A/B Testing ML models in production using Amazon SageMaker
Lab Introduction
- AWS experience: Intermediate
- Time to complete: 35 minutes
- AWS Region: US East (N. Virginia) us-east-1
- Cost to complete: 2-3$
- Services used: Amazon Sagemaker Endpoint, Notebook
Use case: Amazon Alexa

Amazon Alexa sử dụng Amazon SageMaker để quản lý các khối lượng công việc ML đa dạng. Các nhóm Alexa thường xuyên cập nhật các mô hình ML để đối phó với các mối đe dọa bảo mật mới nổi. Trước khi phát hành phiên bản mô hình mới vào môi trường prod, các nhóm cần:
- Kiểm tra và so sánh các phiên bản
- Xác định phiên bản nào đáp ứng tốt nhất các yêu cầu về bảo mật, quyền riêng tư và nghiệp vụ
Các nhóm sử dụng khả năng kiểm thử mô hình trong SageMaker để thực hiện nghiên cứu nhằm bảo vệ quyền riêng tư và bảo mật của khách hàng.
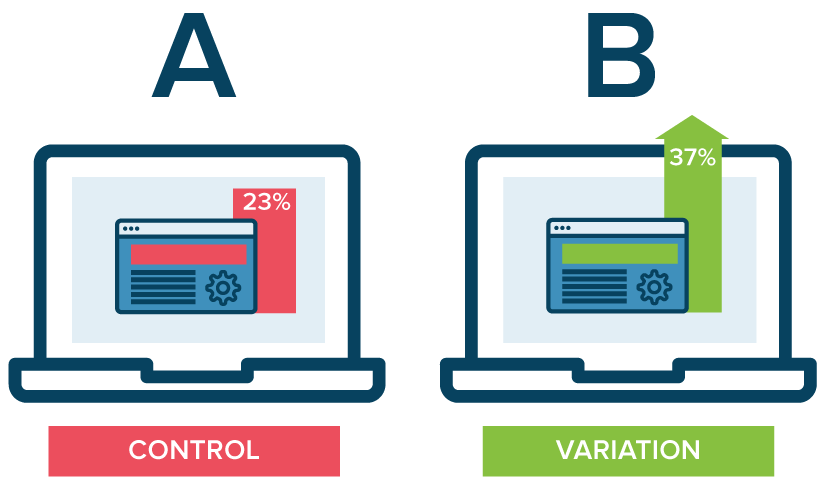
A/B testing with Amazon SageMaker
Trong quy trình MLOPs cho Production, các kỹ sư và nhà khoa học dữ liệu thường cải thiện mô hình bằng cách:
- Điều chỉnh siêu tham số (hyperparameter tuning)
- Huấn luyện với dữ liệu bổ sung hoặc mới hơn
- Cải thiện feature selection
A/B testing giúp kiểm tra mô hình mới với mô hình cũ trong môi trường thực tế và so sánh hiệu suất. Nếu phiên bản mới hoạt động tốt hơn hoặc bằng phiên bản cũ, bạn sẽ thay thế mô hình cũ.
1. Testing models by distributing traffic to variants (Kiểm thử bằng cách phân phối lưu lượng)
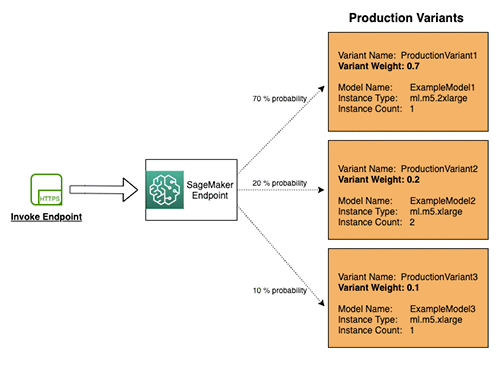
Cách hoạt động:
- Chỉ định tỷ lệ phần trăm lưu lượng được định tuyến đến từng mô hình
- Thiết lập trọng số (weight) cho mỗi production variant trong cấu hình endpoint
- SageMaker tự động phân phối lưu lượng dựa trên trọng số đã cung cấp
Ví dụ trong sơ đồ:
- ProductionVariant1: Trọng số 0.7 → nhận 70% lưu lượng
- ProductionVariant2: Trọng số 0.2 → nhận 20% lưu lượng
- ProductionVariant3: Trọng số 0.1 → nhận 10% lưu lượng
Kết quả: Mỗi inference response sẽ chứa tên của variant đã xử lý request đó.
2. Testing models by invoking specific variants (Kiểm thử bằng cách gọi variant cụ thể)
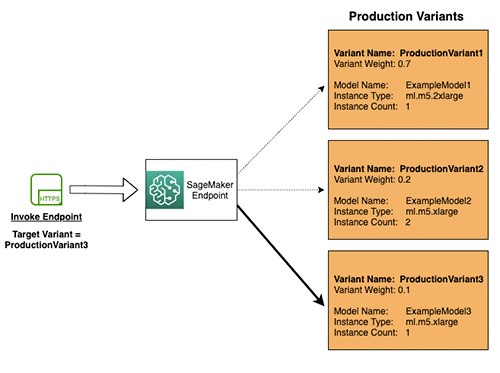
Cách hoạt động:
- Thiết lập header
TargetVarianttrong mỗi request - Cho phép gọi trực tiếp đến một variant cụ thể
- Nếu đã có phân phối lưu lượng theo trọng số, việc chỉ định
TargetVariantsẽ ghi đè phân phối lưu lượng
Ví dụ trong sơ đồ: Request với TargetVariant = ProductionVariant3 sẽ được định tuyến trực tiếp đến ProductionVariant3, bỏ qua phân phối lưu lượng mặc định.
Ưu điểm: Có thể gọi đồng thời các variant khác nhau cho từng request riêng biệt, cho phép kiểm soát chính xác hơn trong quá trình testing.
Overview lab
Sử dụng tính năng A/B testing thông qua một ví dụ thực tế với Jupyter notebook trong Amazon SageMaker.
Mô hình sử dụng:
- Tạo endpoint chứa 2 mô hình sử dụng
ProductionVariant - Cả hai mô hình được huấn luyện bằng thuật toán XGBoost tích hợp sẵn trong SageMaker
- Dataset: Dự đoán customer churn của nhà mạng di động (xem thêm tại "Customer Churn Prediction with XGBoost")
Điểm khác biệt:
- Mỗi mô hình được huấn luyện trên tập con khác nhau của cùng một dataset
- Sử dụng các phiên bản khác nhau của thuật toán XGBoost
1. Creating and deploying the models
1. Create environment notebook
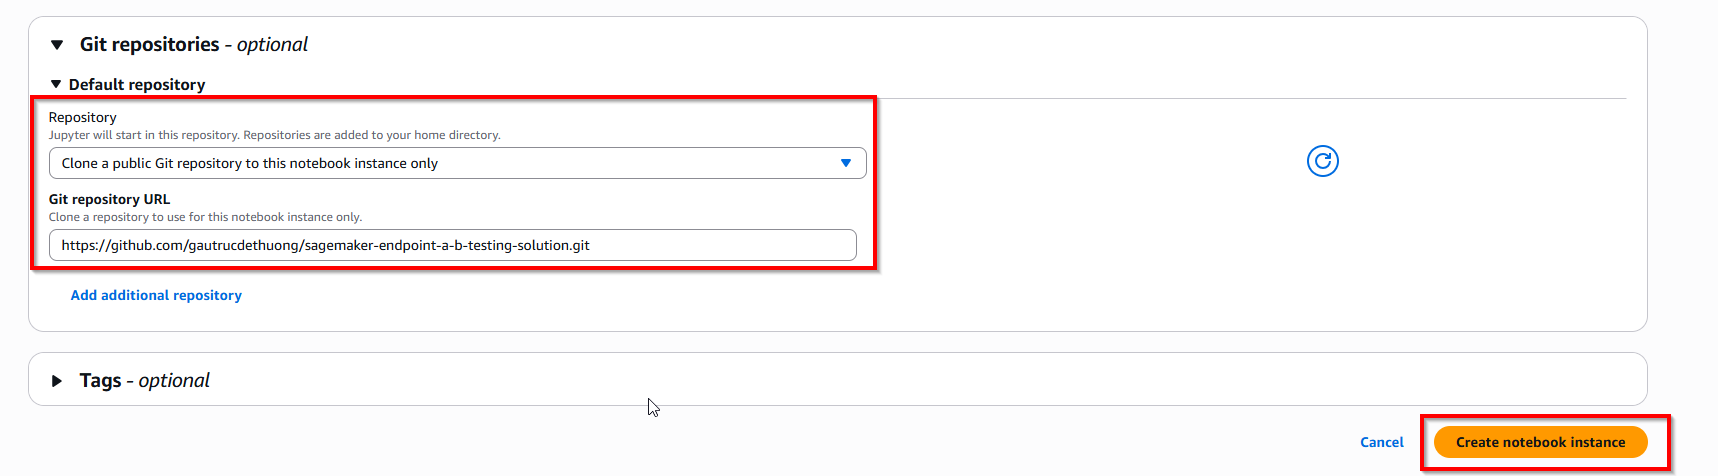
Access sagemaker notebook -> Create notebook instance with ml.t3.medium
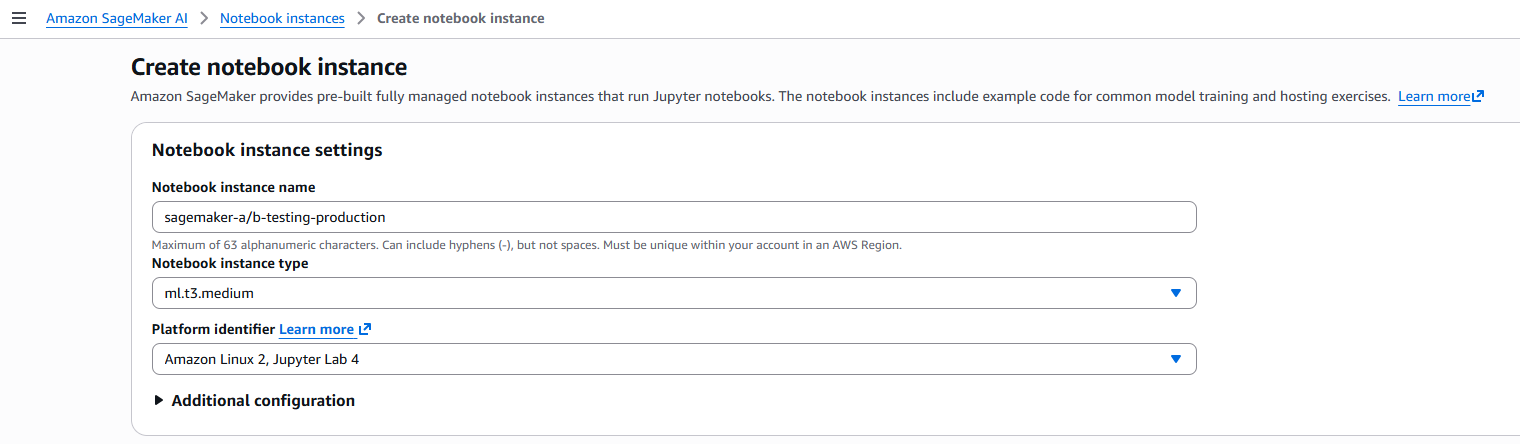
In Git repo, enter: https://github.com/gautrucdethuong/sagemaker-endpoint-a-b-testing-solution.git. Next, create button Create notebook instance.
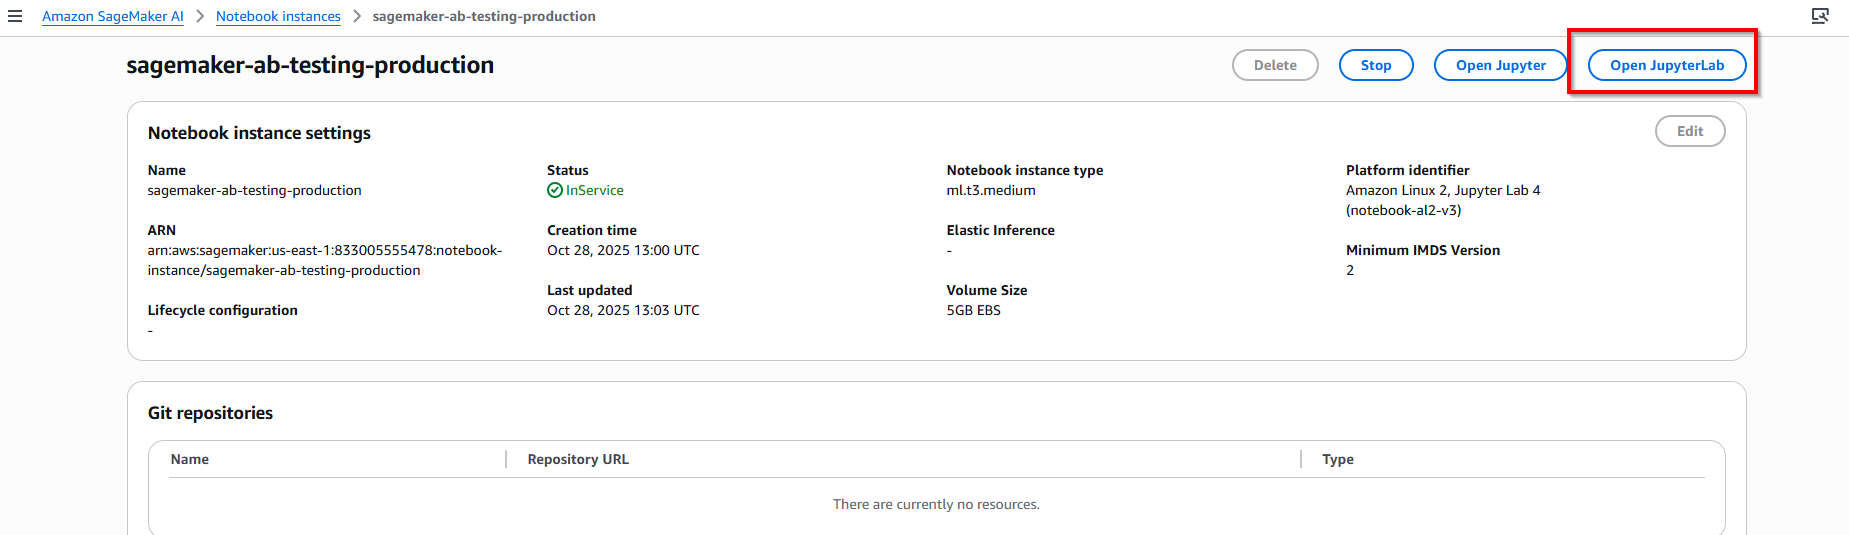
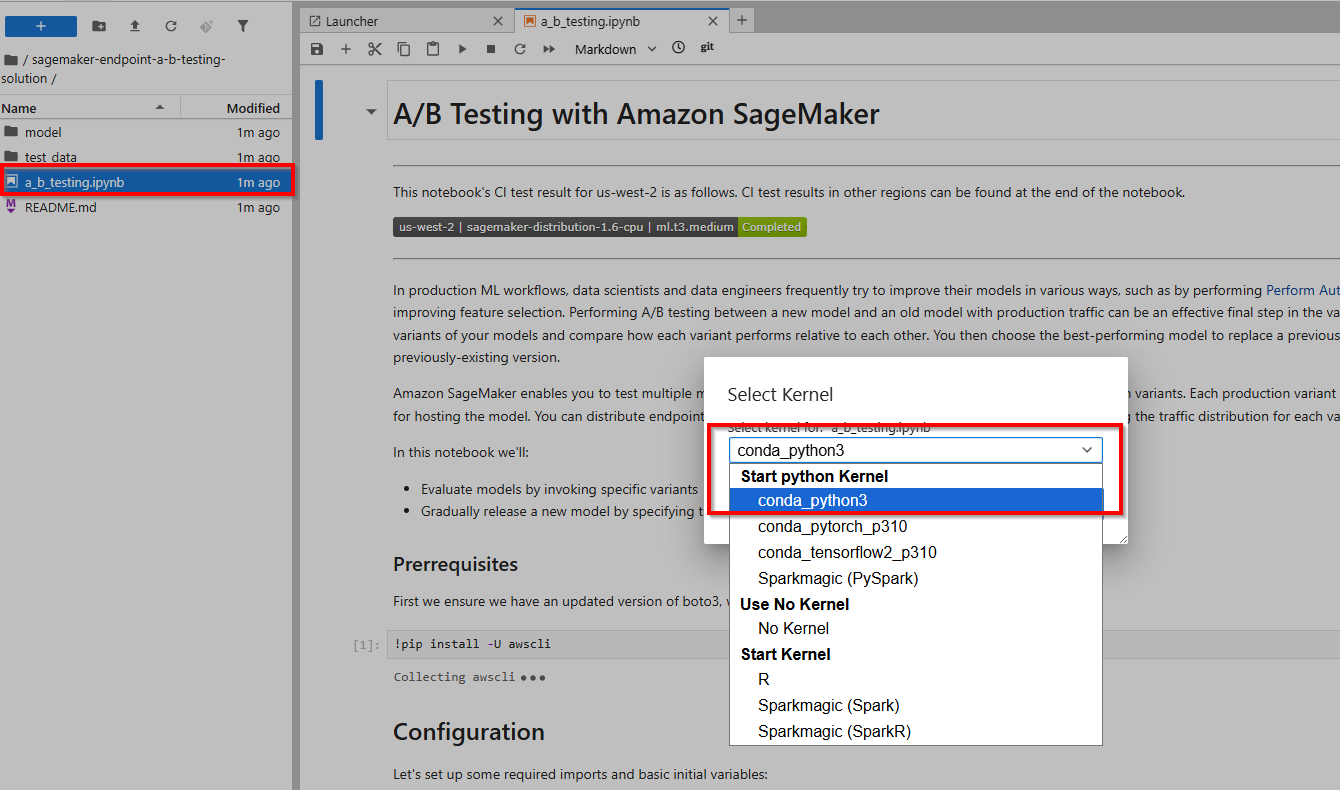
When instance created, click button Open JupyterLab, and double click file a_b_testing.ipynb.
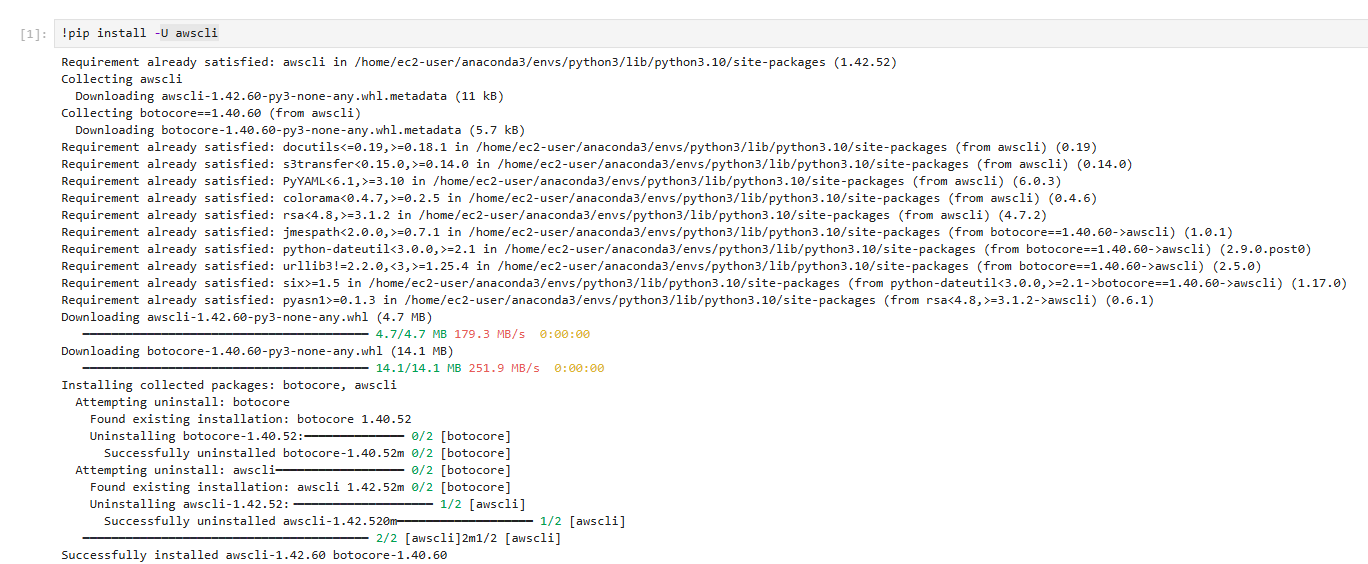
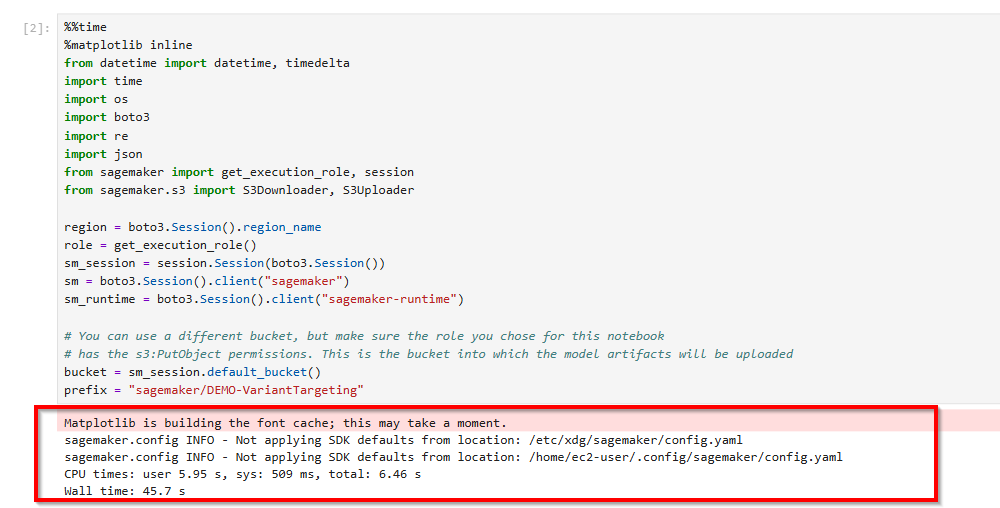
2. Install library and init variable
Run notebook Cell 1 and Cell 2, execute install library.
3. First, we upload our pre-trained models to Amazon S3
- This code uploads two pre-trained XGBoost models that are ready for you to deploy. These models were trained using the XGB Churn Prediction Notebook in SageMaker.
- First, define where the models are located in Amazon S3. You use these locations when deploying the models in subsequent steps. See the following code:

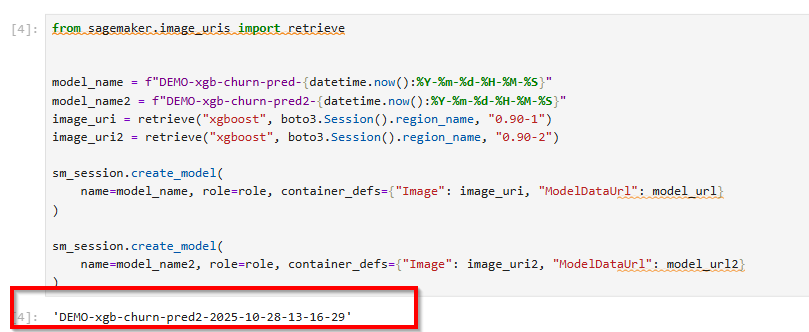
4. Next, we create our model definitions
- Next, create the model objects with the container image and model data. You use these model objects to deploy on production variants on an endpoint.
- You can develop the models by training ML models on different datasets, different algorithms, different ML frameworks, and different hyperparameters. See the following code:
from sagemaker.amazon.amazon_estimator import get_image_uri

model_name = f"DEMO-xgb-churn-pred-{datetime.now():%Y-%m-%d-%H-%M-%S}"
model_name2 = f"DEMO-xgb-churn-pred2-{datetime.now():%Y-%m-%d-%H-%M-%S}"
image_uri = get_image_uri(boto3.Session().region_name, 'xgboost', '0.90-1')
image_uri2 = get_image_uri(boto3.Session().region_name, 'xgboost', '0.90-2')

sm_session.create_model(name=model_name, role=role, container_defs={
    'Image': image_uri,
    'ModelDataUrl': model_url
})

sm_session.create_model(name=model_name2, role=role, container_defs={
    'Image': image_uri2,
    'ModelDataUrl': model_url2
})
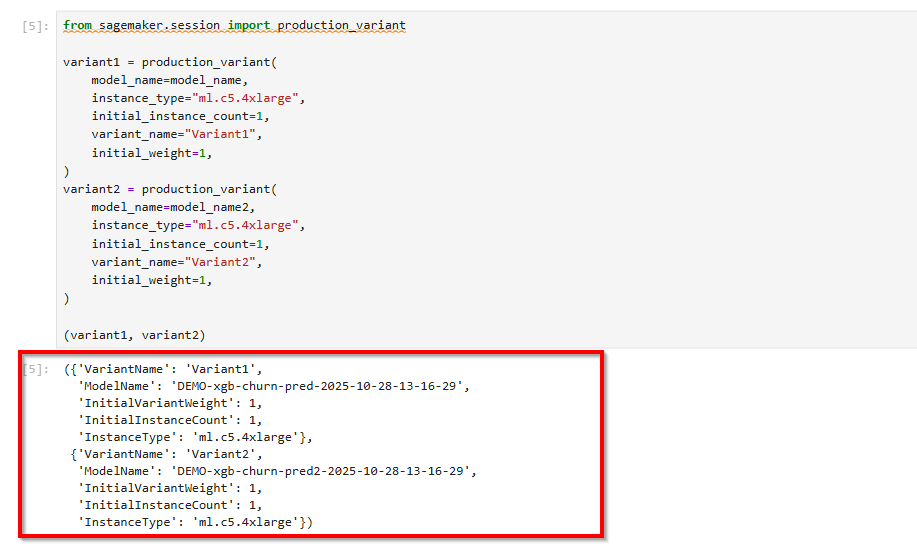
5. Create variants
Create two production variants, each with its own model and resource requirements (instance type and counts). To split the sent requests evenly between variants, set an initial_weight of 0.5 for both variants. See the following code:
from sagemaker.session import production_variant

variant1 = production_variant(model_name=model_name,
                              instance_type="ml.c5.4xlarge",
                              initial_instance_count=1,
                              variant_name='Variant1',
                              initial_weight=0.5)

variant2 = production_variant(model_name=model_name2,
                              instance_type="ml.c5.4xlarge",
                              initial_instance_count=1,
                              variant_name='Variant2',
                              initial_weight=0.5)
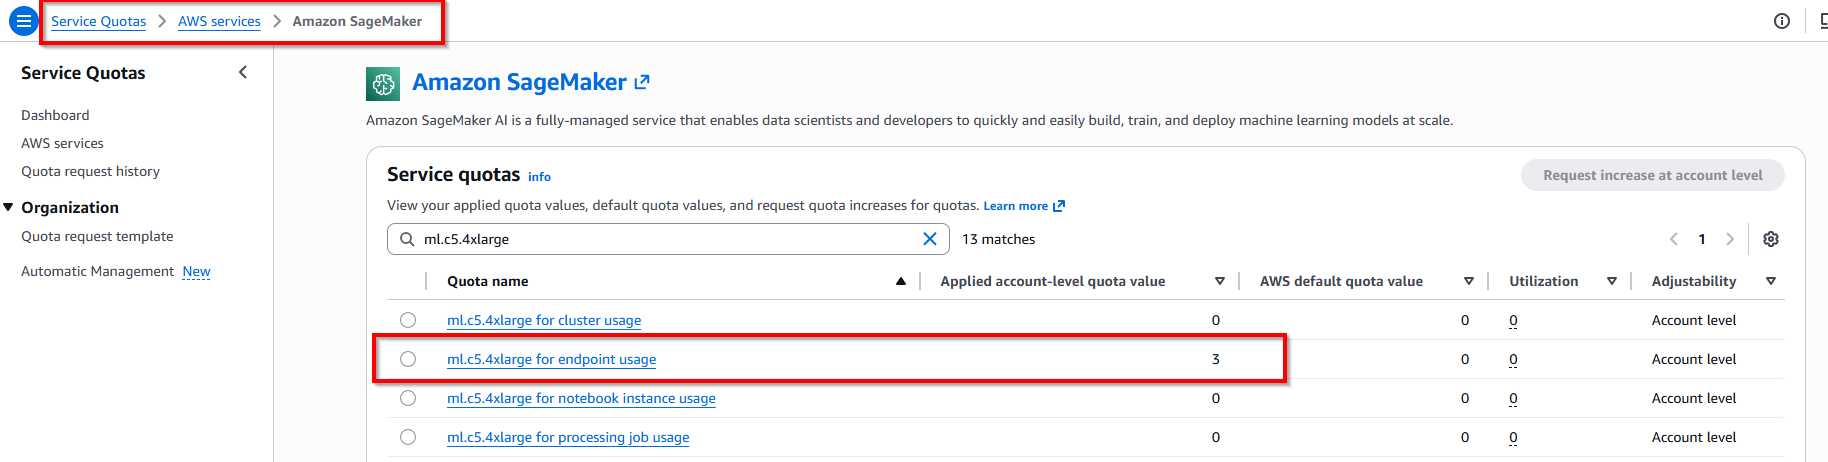
Note: Verify instance ml.m5.xlarge or ml.c5.4x.large available in account.
6. Deploy
Deploy these production variants on an Amazon SageMaker endpoint with the following code:
endpoint_name = f"DEMO-xgb-churn-pred-{datetime.now():%Y-%m-%d-%H-%M-%S}"
print(f"EndpointName={endpoint_name}")

sm_session.endpoint_from_production_variants(
    name=endpoint_name,
    production_variants=[variant1, variant2]
)

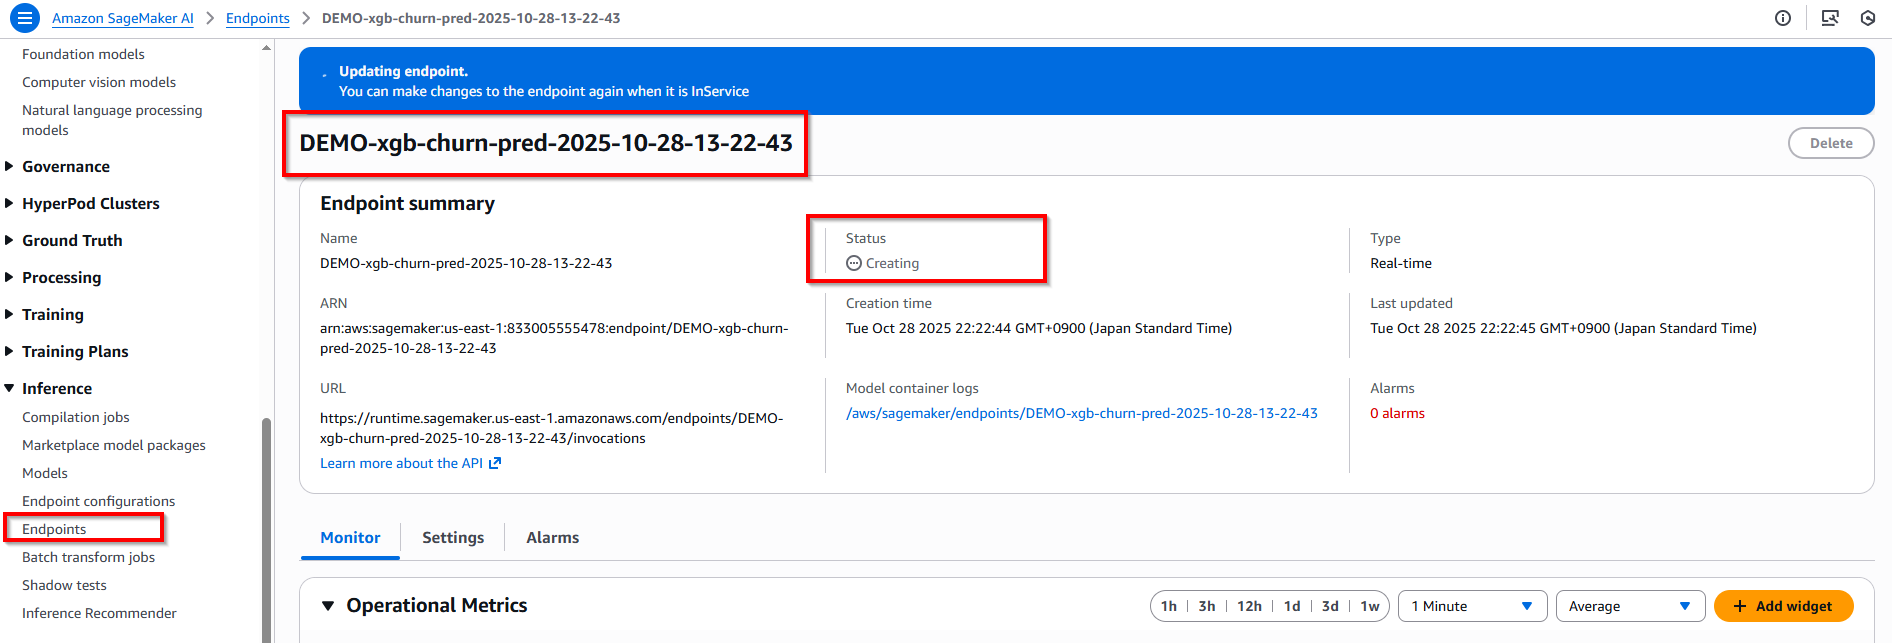
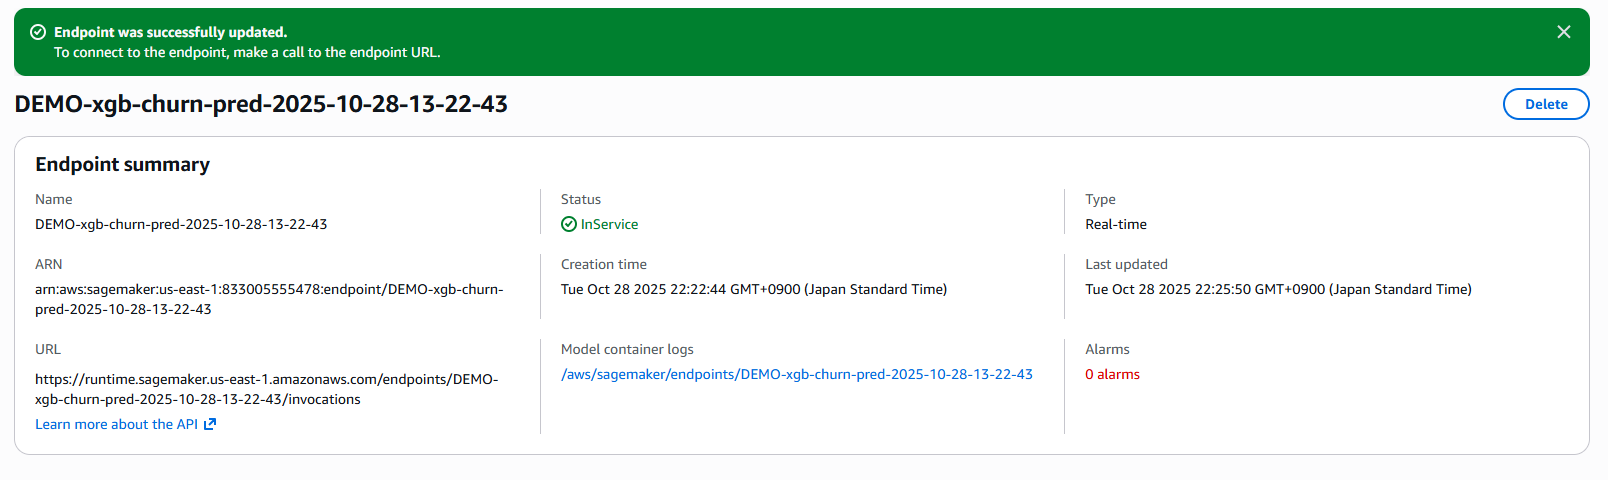
Back to Amazon Sagemaker service -> Verify endpoint is creating...
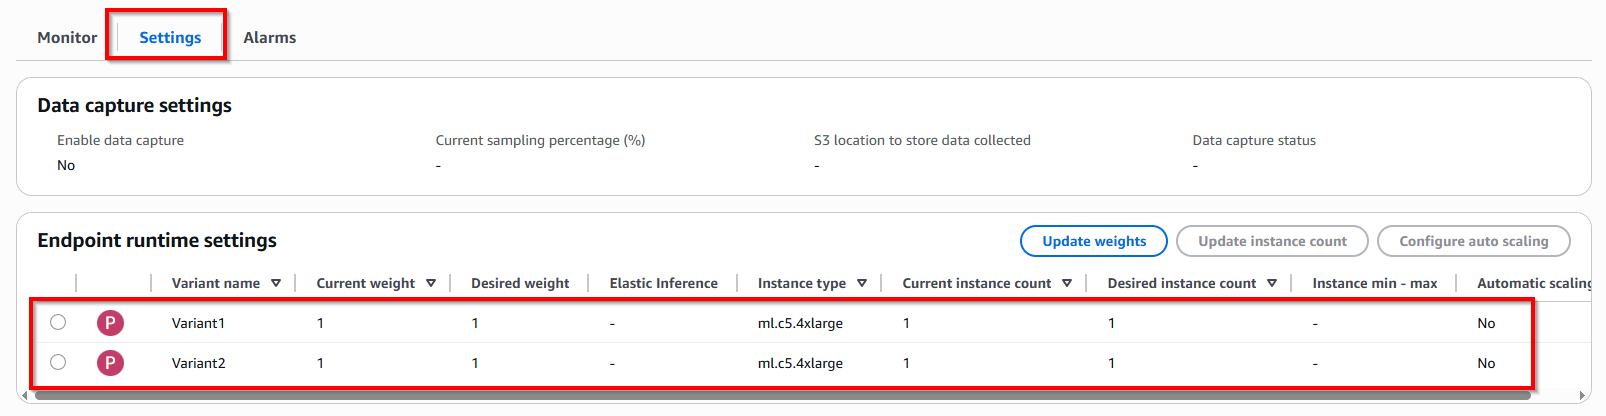
Click tab Settings -> In Endpoint runtime settings have two Variant 1 & Variant 2
2. Invoking the deployed models
You can now send data to this endpoint and get inferences in real time. Testing models with: distributing traffic to variants and invoking specific variants.
1. Distributing traffic to variants
Amazon SageMaker distributes the traffic between production variants on an endpoint based on the respective weights that you configured in the preceding variant definitions. See the following code where we invoke the endpoint:
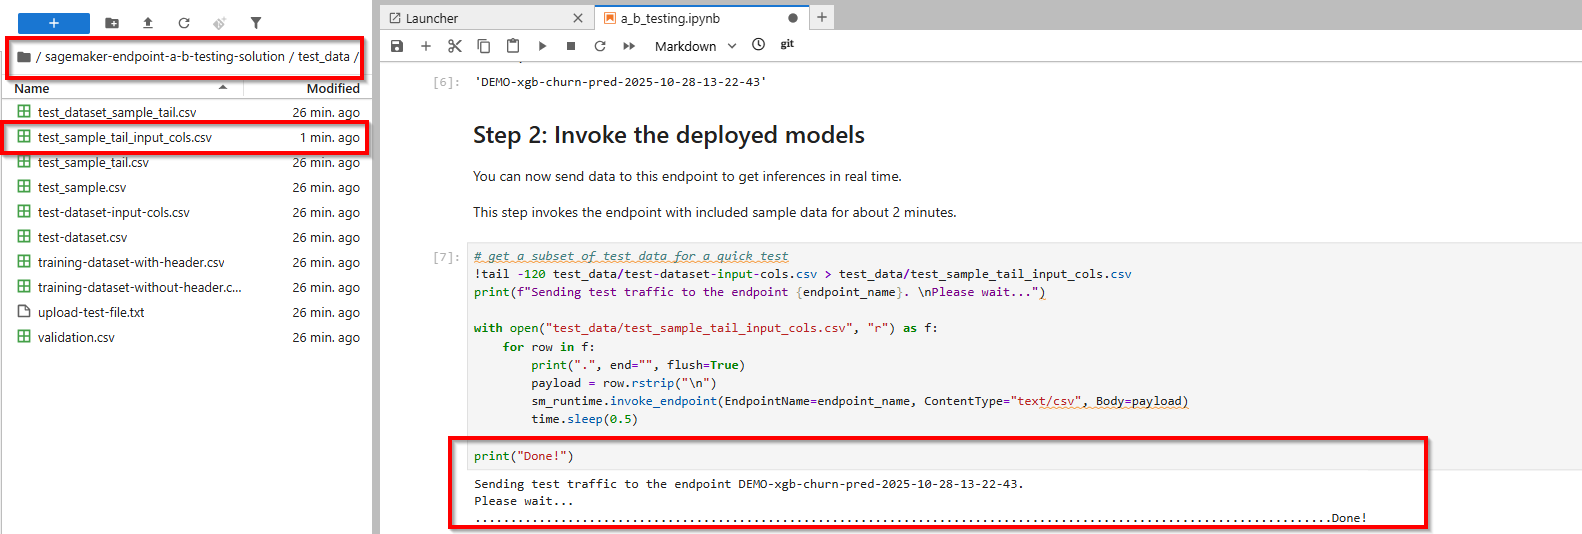
# get a subset of test data for a quick test
!tail -120 test_data/test-dataset-input-cols.csv > test_data/test_sample_tail_input_cols.csv
print(f"Sending test traffic to the endpoint {endpoint_name}. \nPlease wait...")

with open('test_data/test_sample_tail_input_cols.csv', 'r') as f:
    for row in f:
        print(".", end="", flush=True)
        payload = row.rstrip('\n')
        sm_runtime.invoke_endpoint(EndpointName=endpoint_name,
                                   ContentType="text/csv",
                                   Body=payload)
        time.sleep(0.5)

print("Done!")
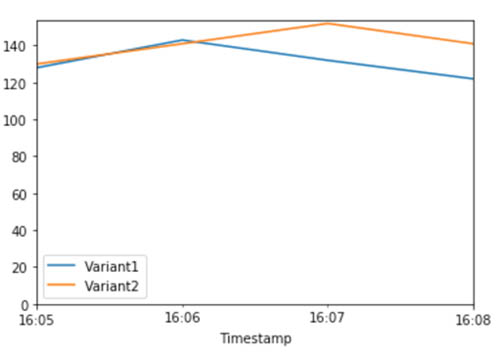
Amazon SageMaker emits metrics such as latency and invocations for each variant in Amazon CloudWatch.
Choose tab Monitor -> Operational Metrics -> CPU Utilization.
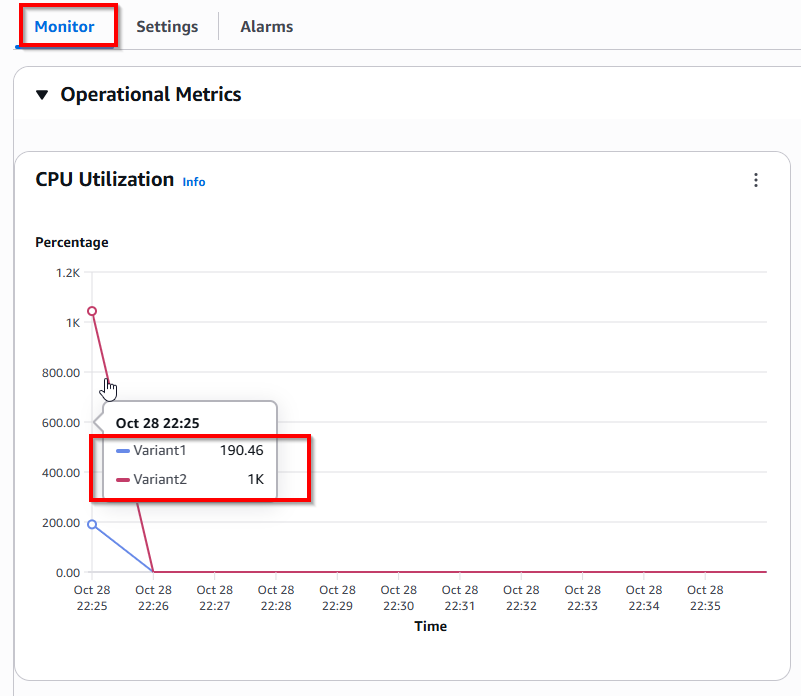
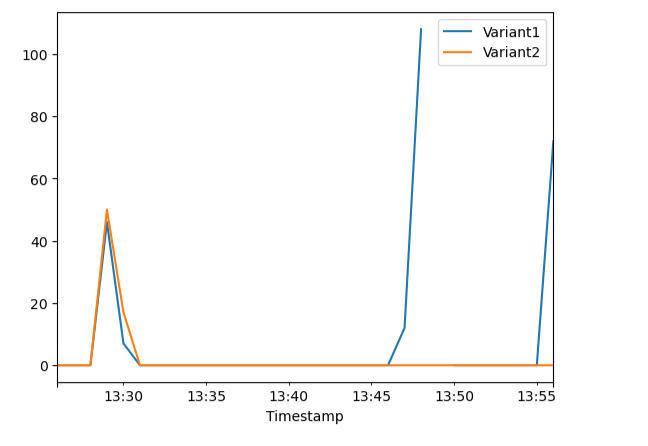
You can query Amazon CloudWatch to get the number of invocations per variant, to see how invocations are split across variants by default. Your findings should resemble the following graph.
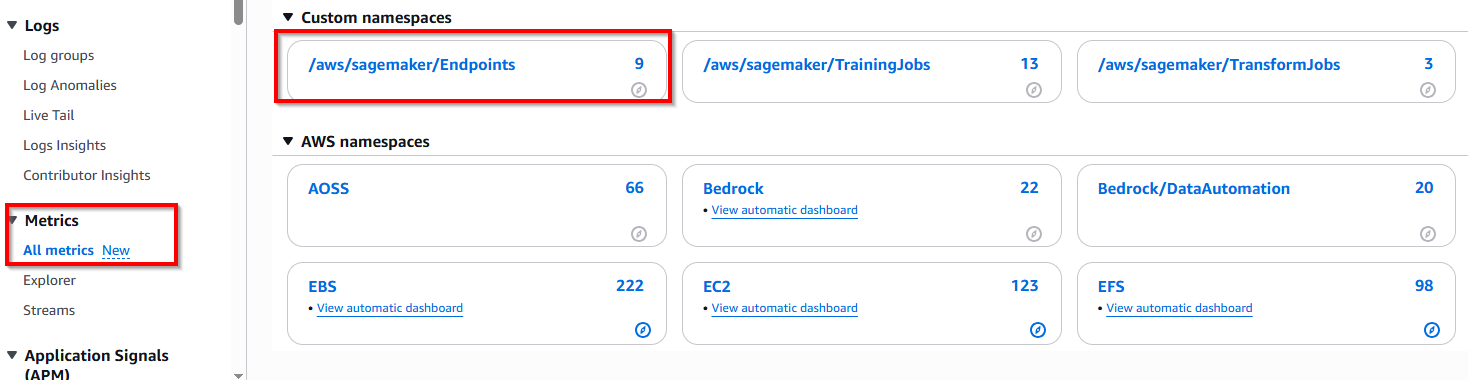
Choose CloudWatch service -> All metrics -> /aws/sagemaker/Endpoints -> EndpointName, VariantName
This Variant1 Percentage 47.13% and Variant2 Percentage 52.87% (mapping with config initial_weight=0.5 in step Create variants)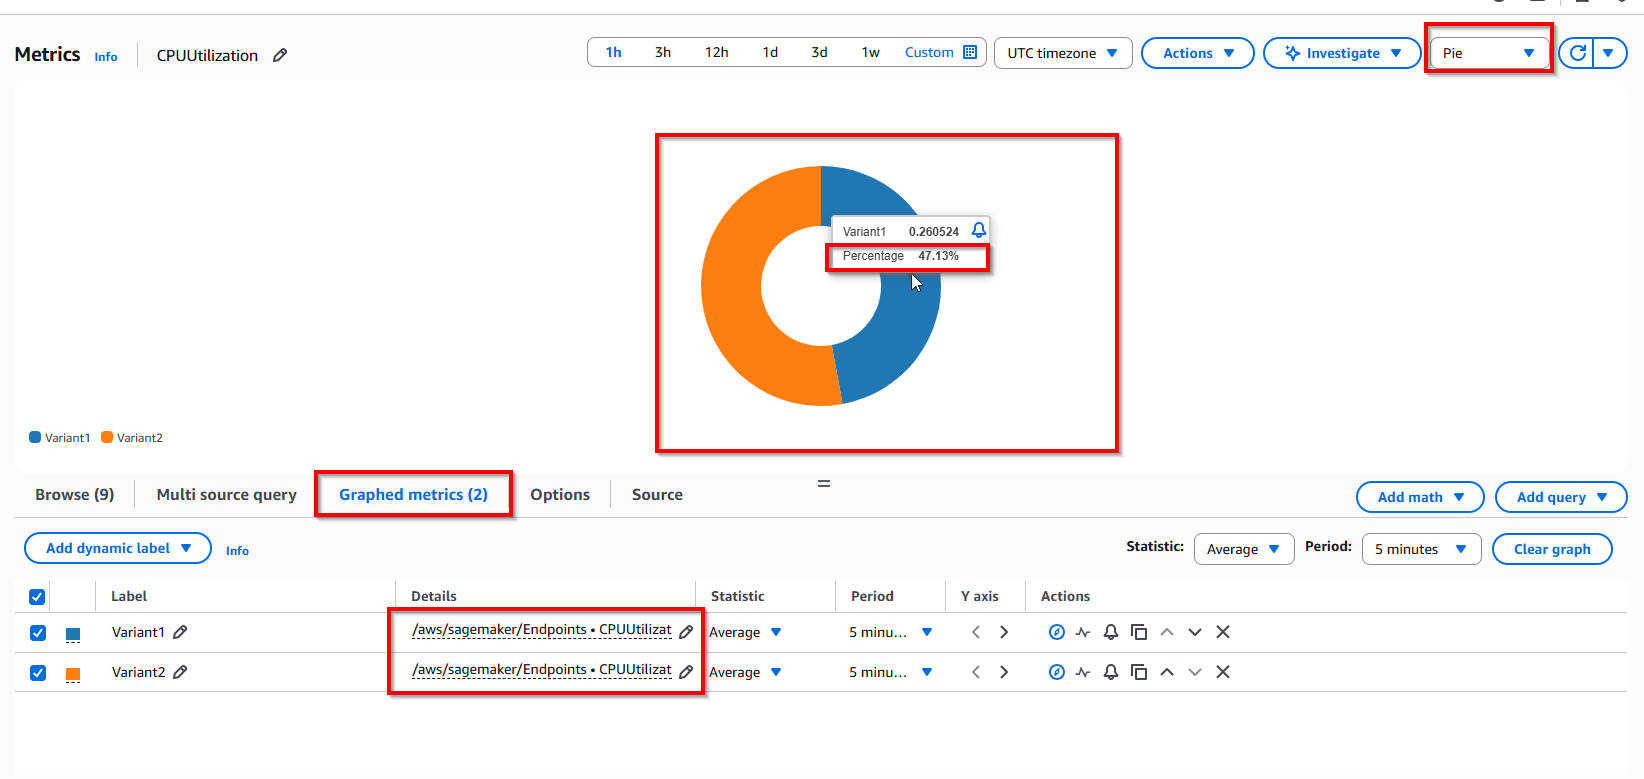
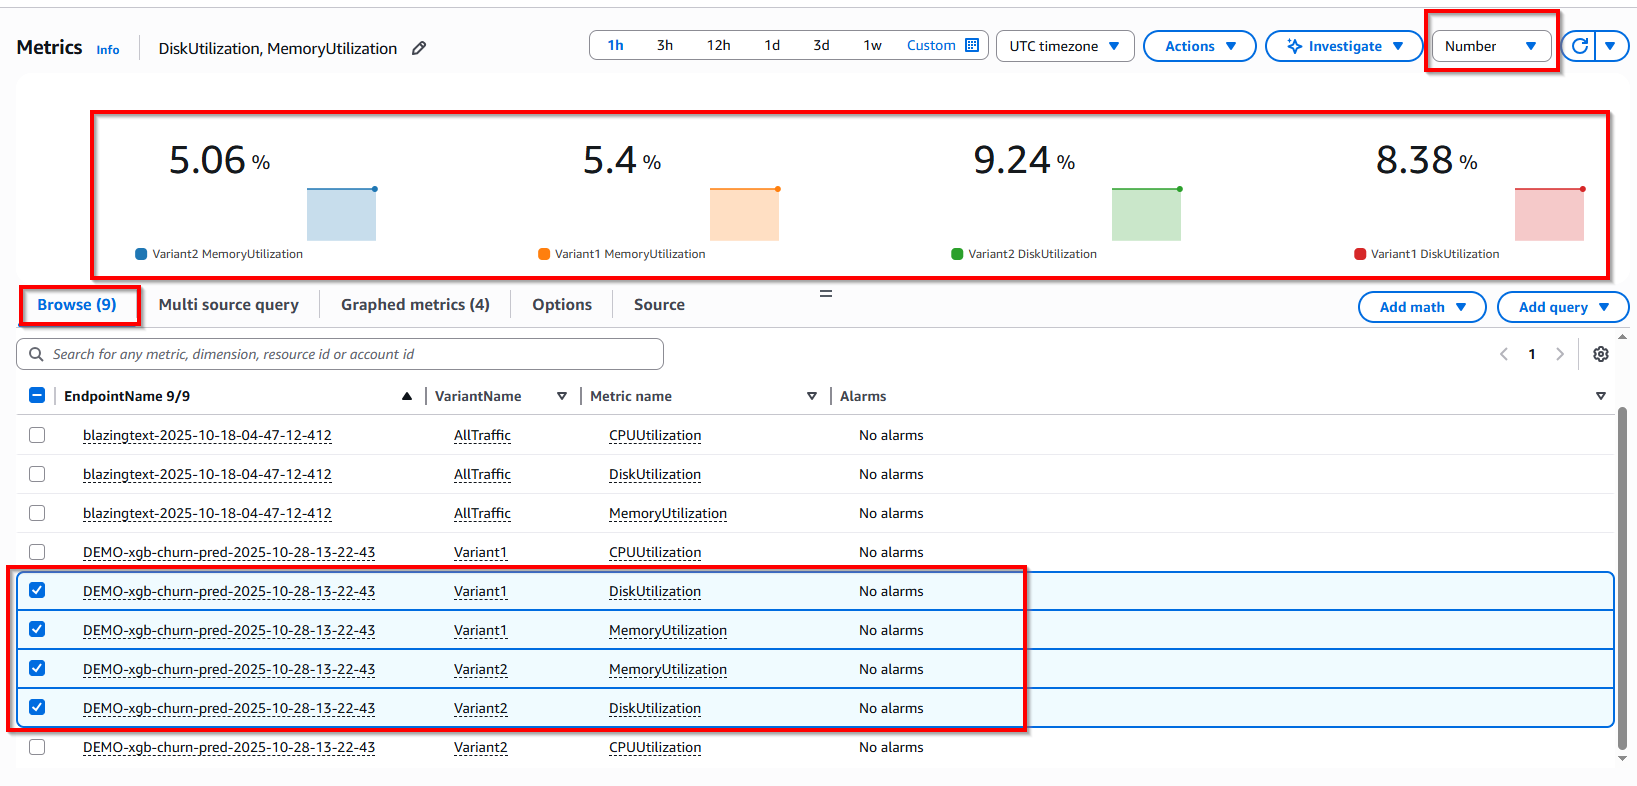
View more metrics with DiskUtilization and MemoryUtilization
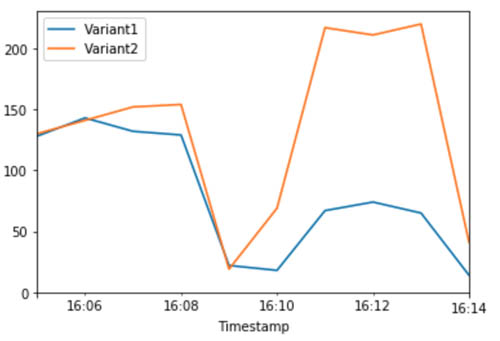
2. Invoke a specific variant
The following use case uses the new Amazon SageMaker variant feature to invoke a specific variant. For this, simply use the new parameter to define which specific ProductionVariant you want to invoke. The following code invokes Variant1 for all requests and the same process can be used to invoke the other variants:
print(f"Sending test traffic to the endpoint {endpoint_name}. \nPlease wait...")
with open('test_data/test_sample_tail_input_cols.csv', 'r') as f:
    for row in f:
        print(".", end="", flush=True)
        payload = row.rstrip('\n')
        sm_runtime.invoke_endpoint(EndpointName=endpoint_name,
                                   ContentType="text/csv",
                                   Body=payload,
                                   TargetVariant="Variant1") # <- Note new parameter
        time.sleep(0.5)
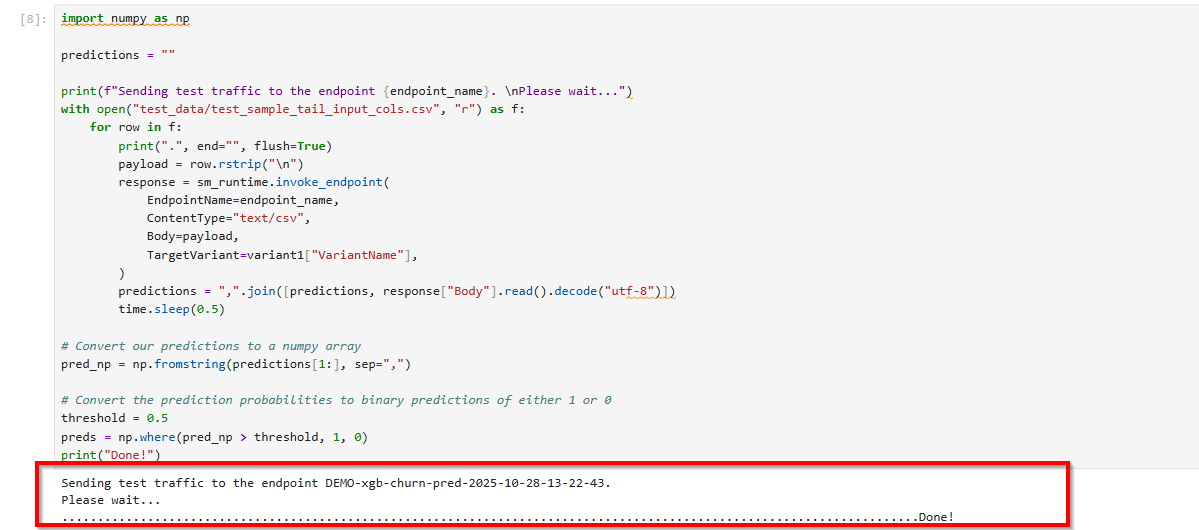
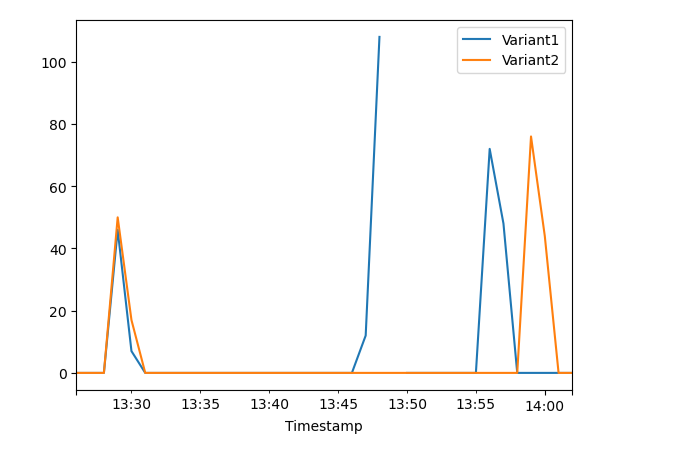
To confirm that Variant1 processed all new invocations, query CloudWatch to get the number of invocations per variant. The following graph shows that for the most recent invocations (latest timestamp), Variant1 processed all requests. There were no invocations made for Variant2.
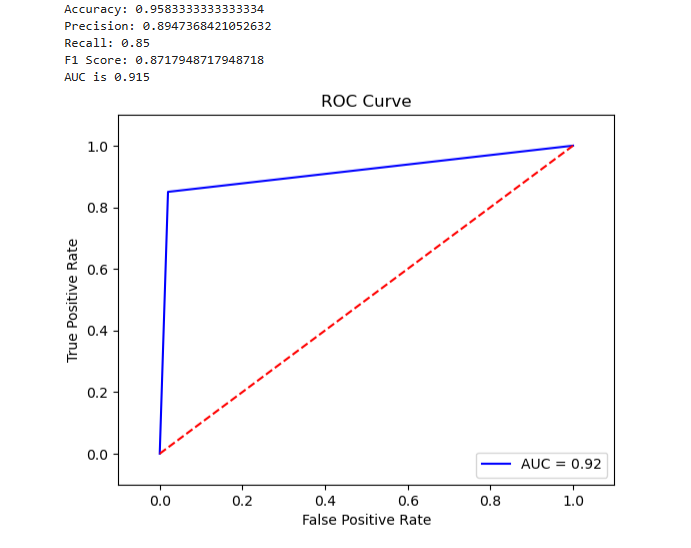
3. Evaluating variant performance
- Calculate accuracy = sum(preds == labels) / len(labels)
- Calculate precision = sum(preds[preds == 1] == labels[preds == 1]) / len(preds[preds == 1])
- Calculate recall = sum(preds[preds == 1] == labels[preds == 1]) / len(labels[labels == 1])
- Calculate F1 score = 2 * (precision * recall) / (precision + recall)
- Calculate AUC = round(roc_auc_score(labels, preds), 4)
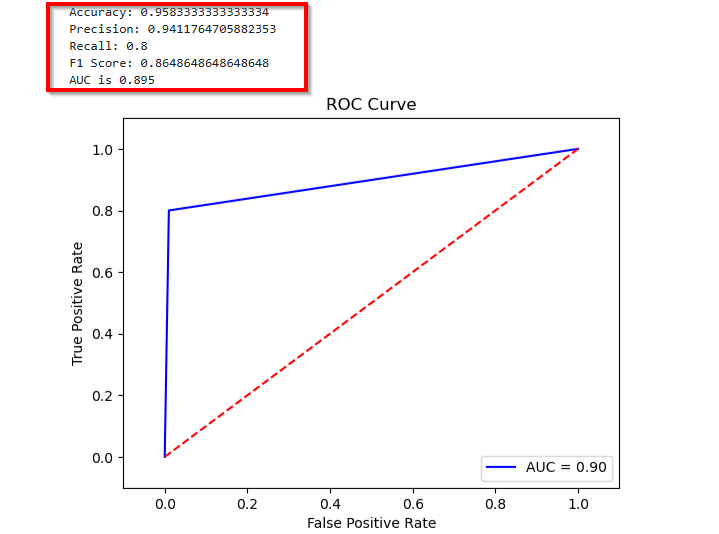
1. Evaluating Variant 1
The following graph evaluates the accuracy, precision, recall, F1 score, and ROC/AUC for Variant1.
2. Next, we collect data for Variant2
The following graph evaluates the same metrics for the predictions Variant2 made.
3. Evaluating Variant2
Variant2 performed better for most of the defined metrics, so this is the one you would likely choose to increasingly service more of your inference traffic in production.
4. Dialing up inference traffic to your chosen variant in production
Now that you have determined Variant2 to be better than Variant1, you can shift more traffic to it.
You can continue to use TargetVariant to invoke a chosen variant. A simpler approach is to update the weights assigned to each variant using UpdateEndpointWeightsAndCapacities. This changes the traffic distribution to your production variants without requiring updates to your endpoint.
Consider the scenario in which you specified variant weights to split traffic 50/50 when you created your models and endpoint configuration. The following CloudWatch metrics for the total invocations for each variant show the invocation patterns for each variant.
To shift 75% of the traffic to Variant2, assign new weights to each variant using UpdateEndpointWeightsAndCapacities. See the following code:
sm.update_endpoint_weights_and_capacities(
    EndpointName=endpoint_name,
    DesiredWeightsAndCapacities=[
        {
            "DesiredWeight": 0.25,
            "VariantName": variant1["VariantName"]
        },
        {
            "DesiredWeight": 0.75,
            "VariantName": variant2["VariantName"]
        }
    ]
)
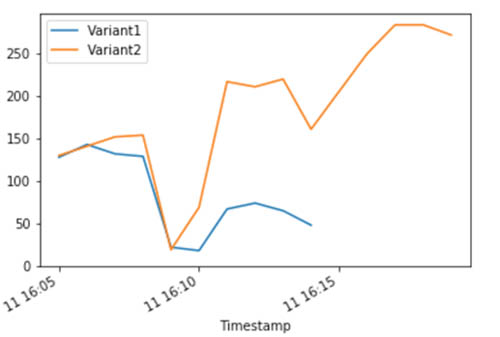
Amazon SageMaker now sends 75% of the inference requests to Variant2 and the remaining 25% of requests to Variant1.
The following CloudWatch metrics for the total invocations for each variant show higher invocations for Variant2 compared to Variant1.
You can continue to monitor your metrics and, when you’re satisfied with a variant’s performance, you can route 100% of the traffic to it. For this use case, we used UpdateEndpointWeightsAndCapacities to update the traffic assignments for the variants. The weight for Variant1 is set to 0.0 and the weight for Variant2 is set to 1.0. Therefore, Amazon SageMaker sends 100% of all inference requests to Variant2. See the following code:
sm.update_endpoint_weights_and_capacities(
    EndpointName=endpoint_name,
    DesiredWeightsAndCapacities=[
        {
            "DesiredWeight": 0.0,
            "VariantName": variant1["VariantName"]
        },
        {
            "DesiredWeight": 1.0,
            "VariantName": variant2["VariantName"]
        }
    ]
)
The following CloudWatch metrics for the total invocations for each variant show that Variant2 processed all inference requests, and there are no inference requests processed by Variant1.
Amazon SageMaker enables you to easily A/B test ML models in production by running multiple production variants on an endpoint.
You can use SageMaker’s capabilities to test models that have been trained using different training datasets, hyperparameters, algorithms, or ML frameworks; test how they perform on different instance types; or a combination of all of the above.
5. Delete the endpoint
- Clean endpoint
- Clean notebook