How to Run a Application on AWS ECS Fargate
 trungtin tran
Lab Details
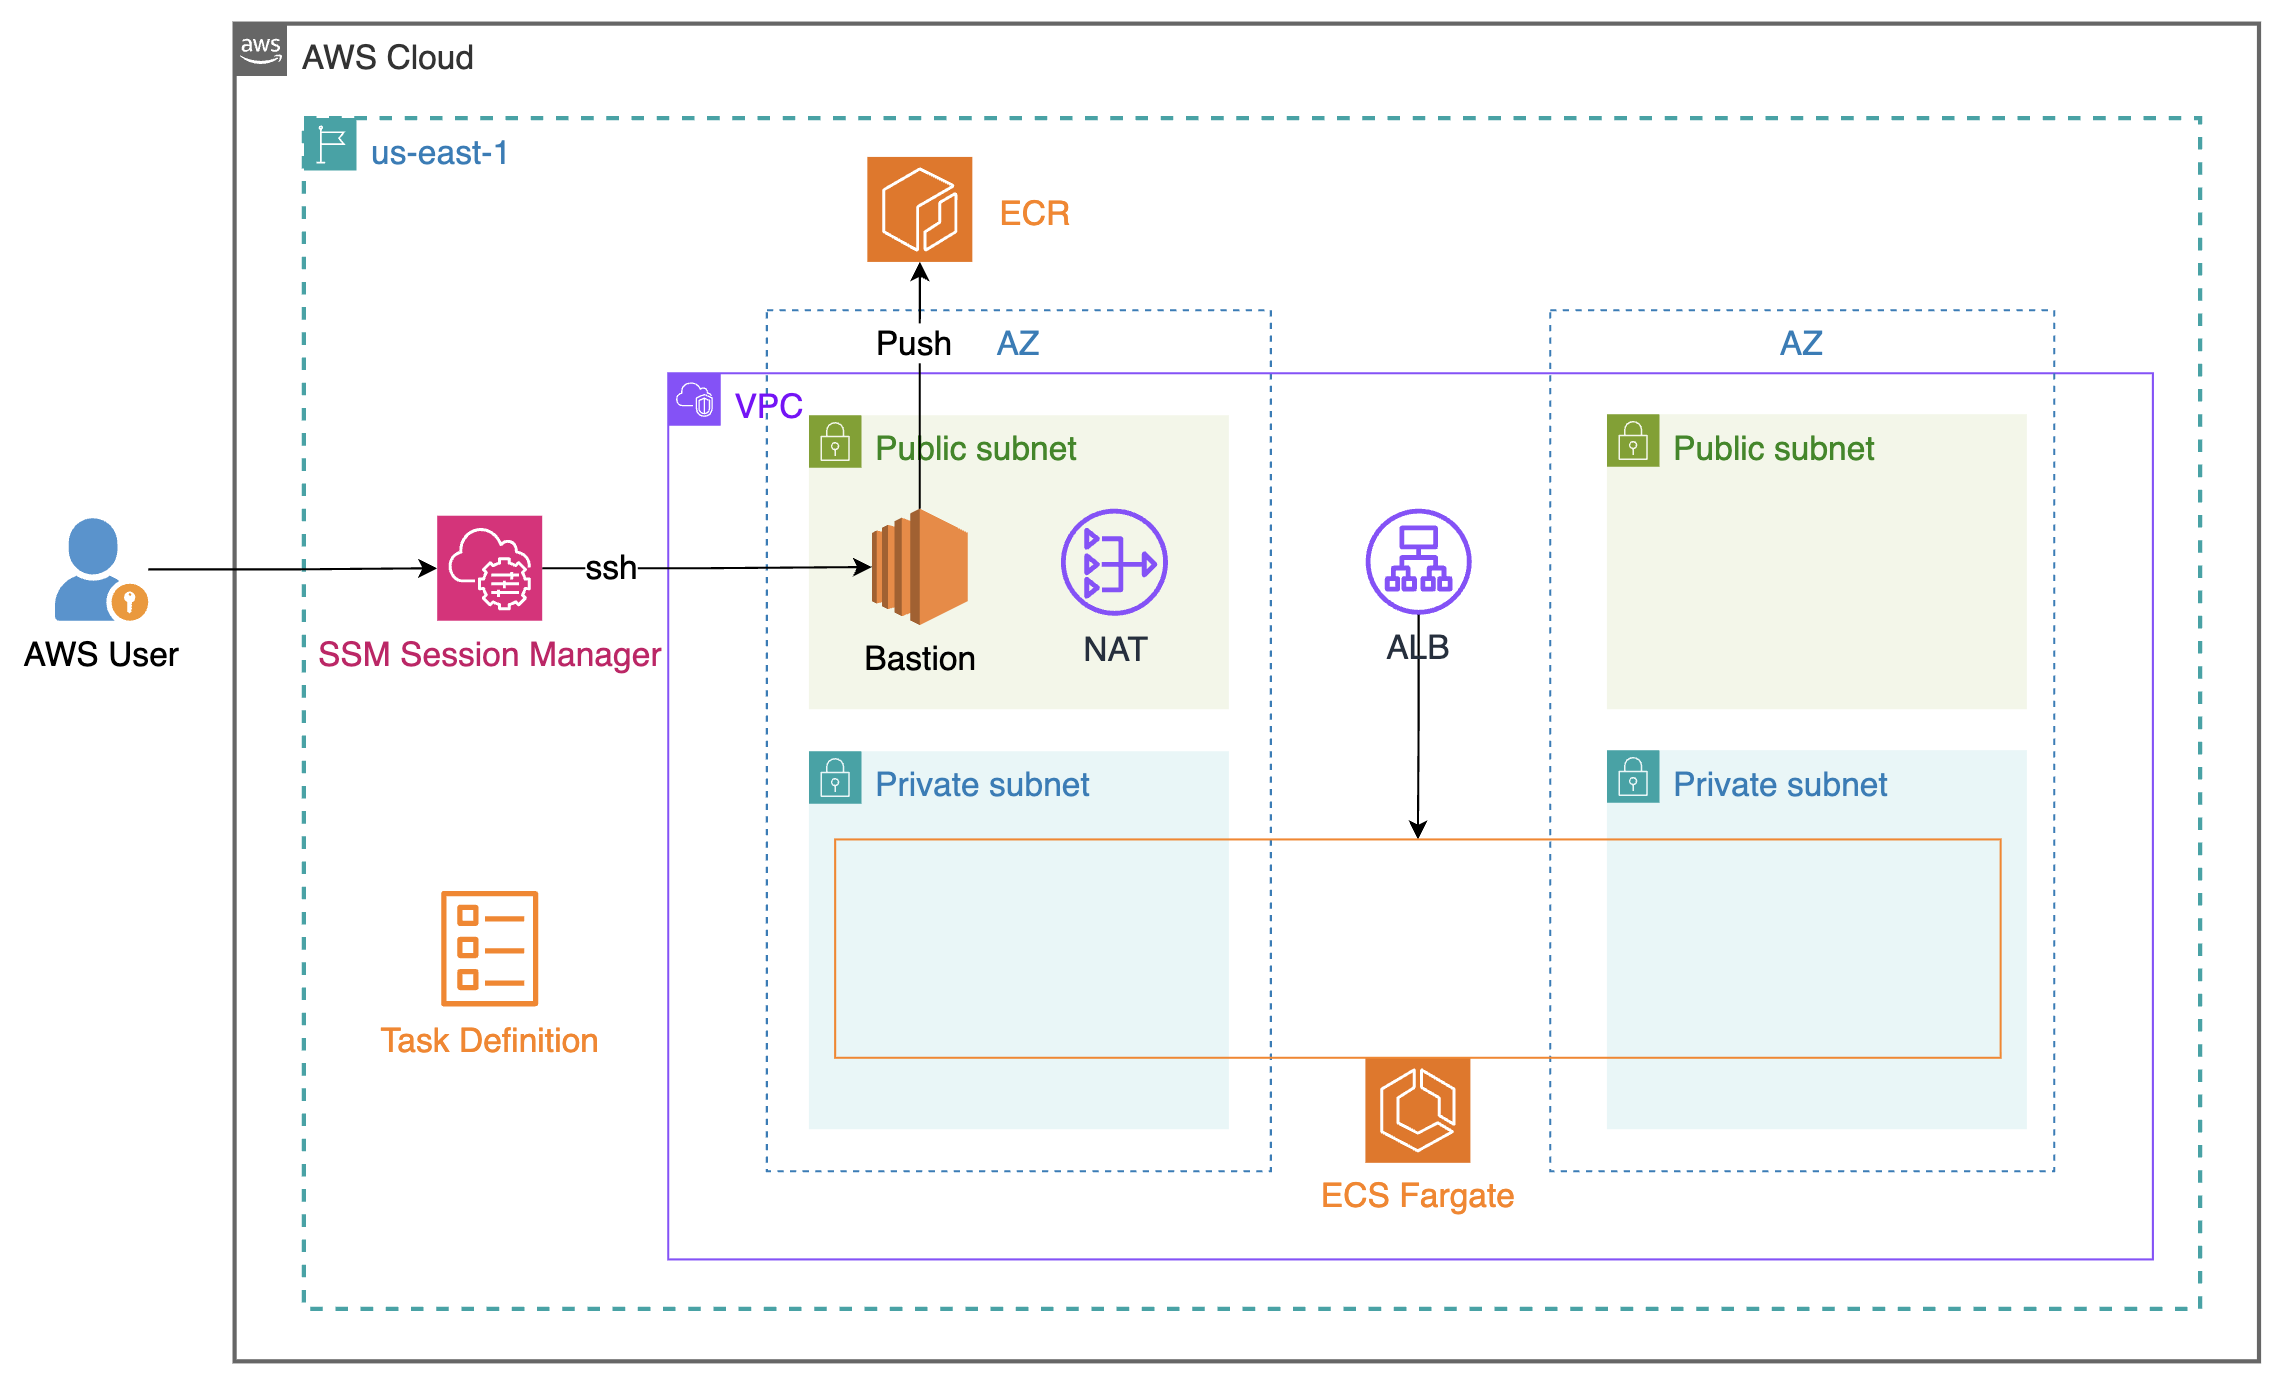
- Bài Lab này sẽ hướng dẫn bạn các bước để khởi chạy và configure custom container trên ECS Fargate.
- Duration: 30 minutes
- AWS Region: US East (N. Virginia) us-east-1
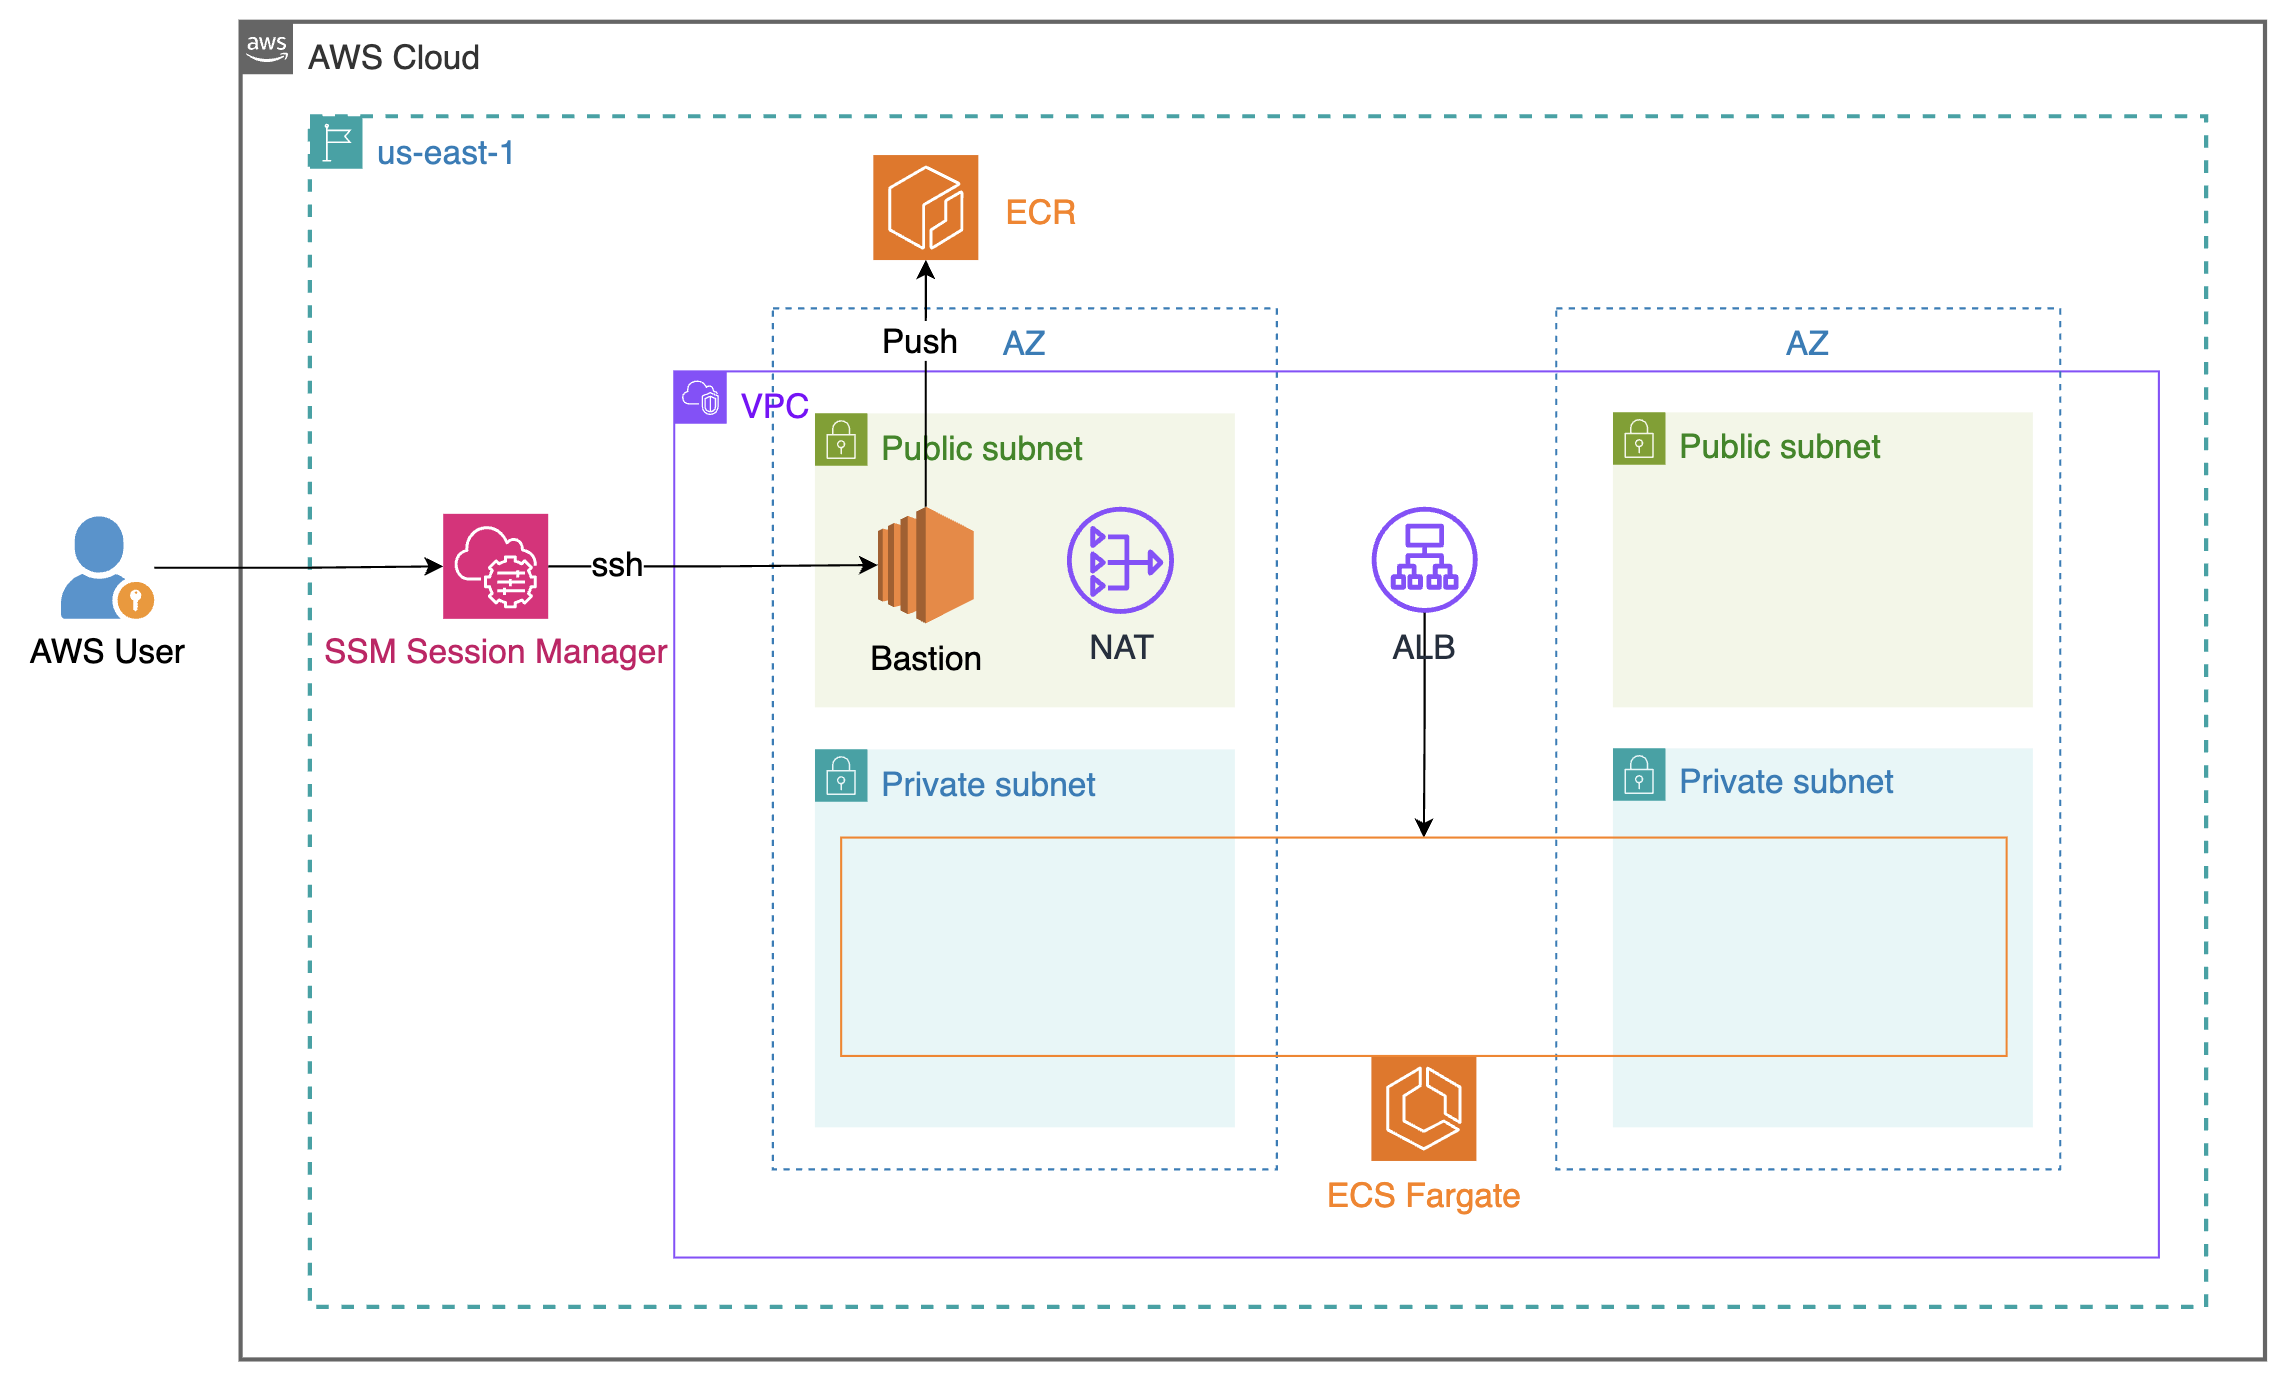
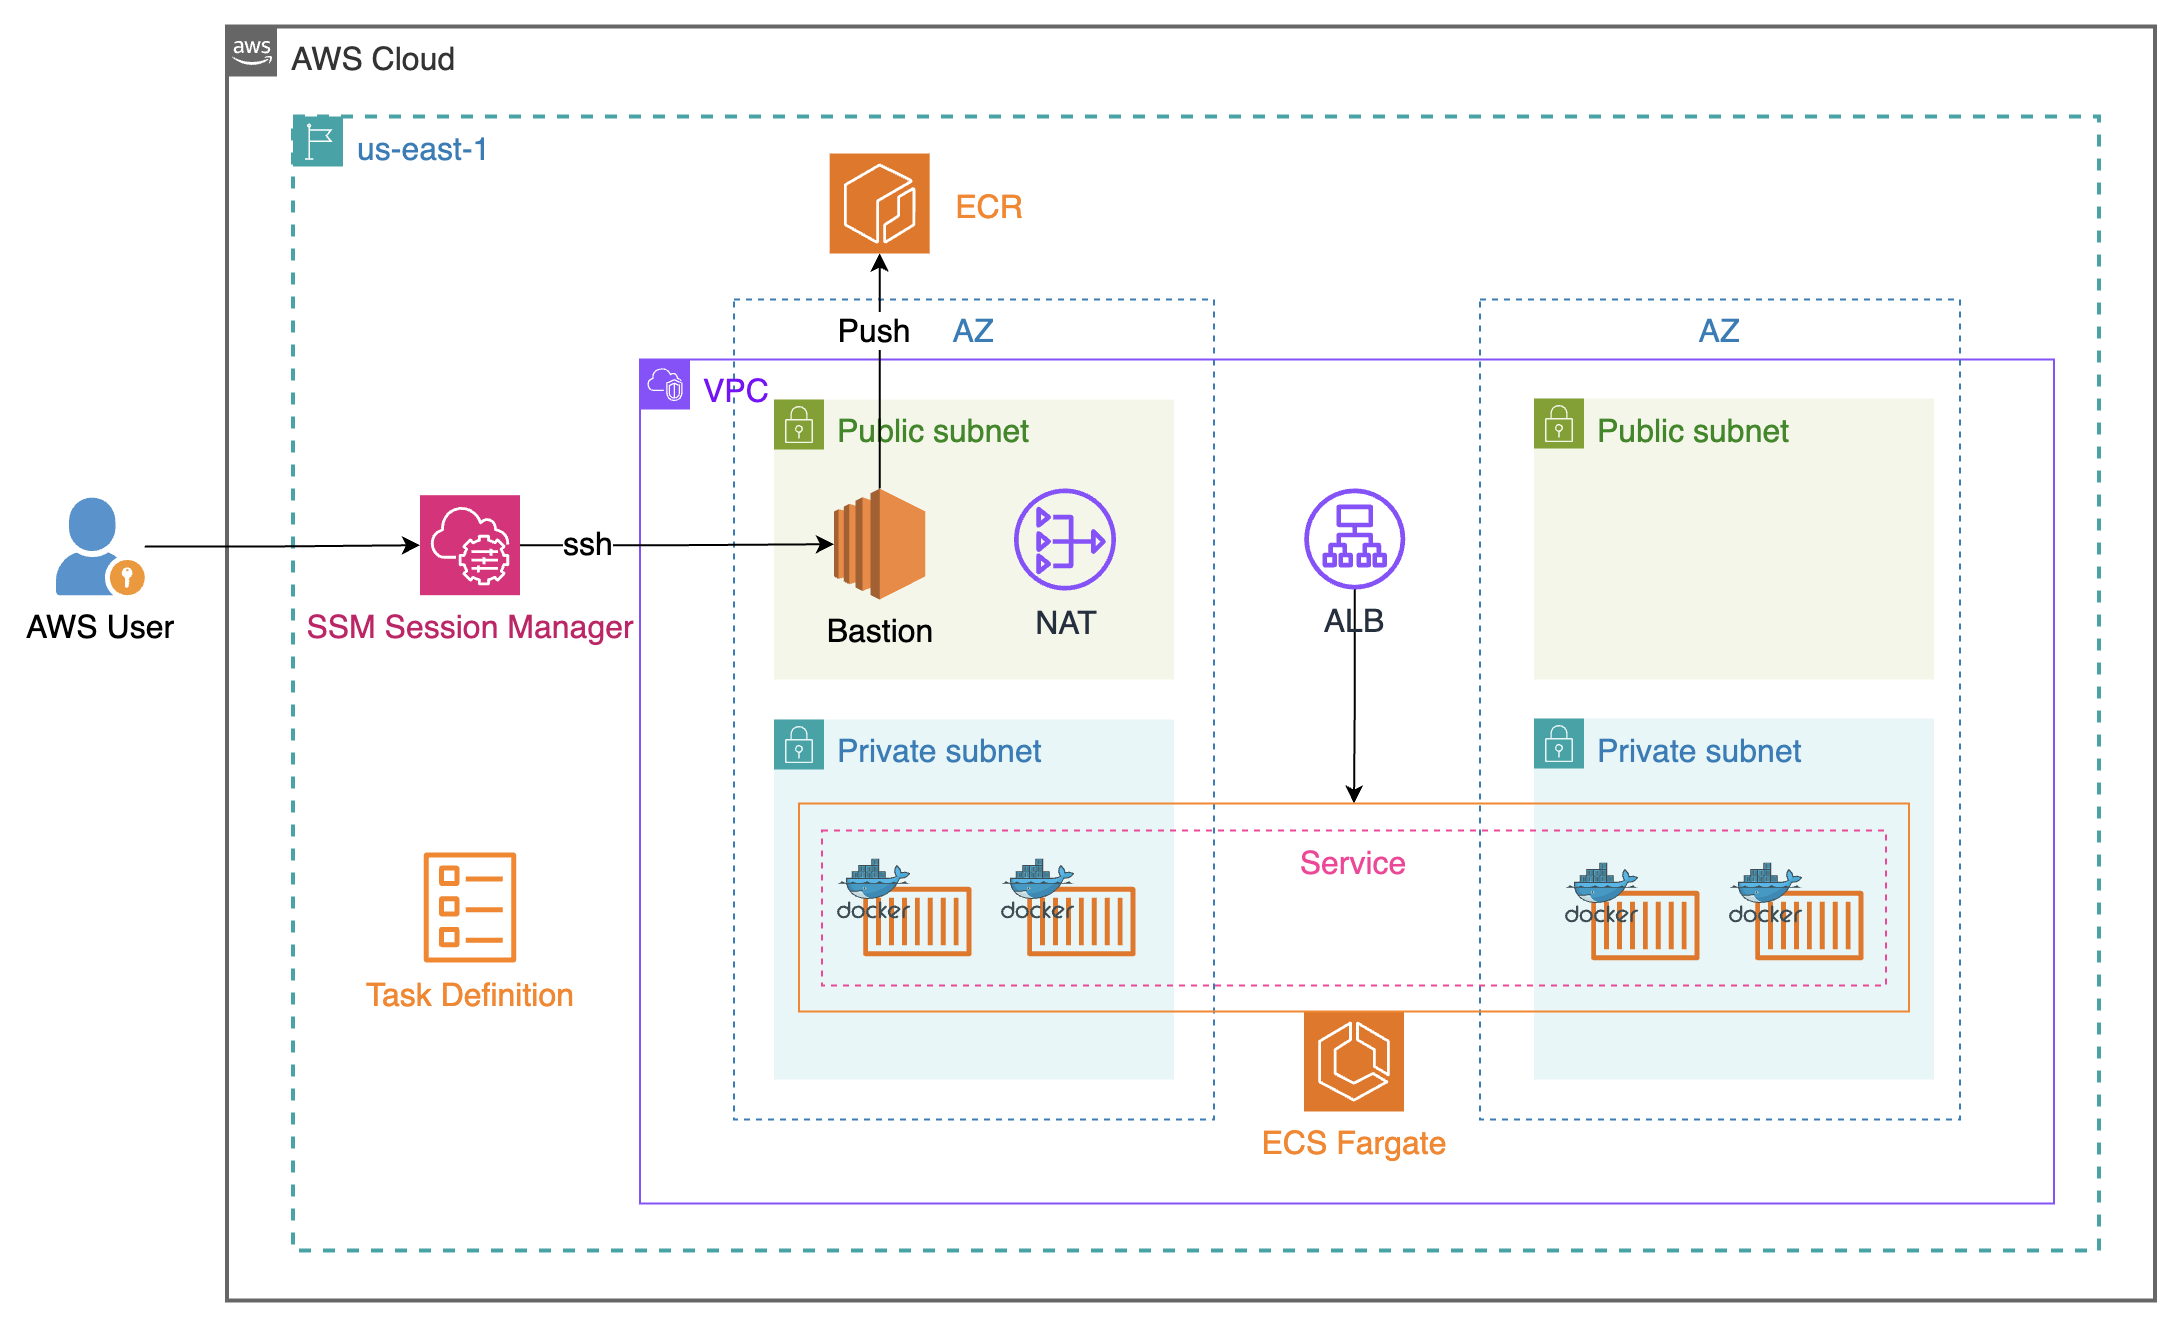
Architecture Diagram
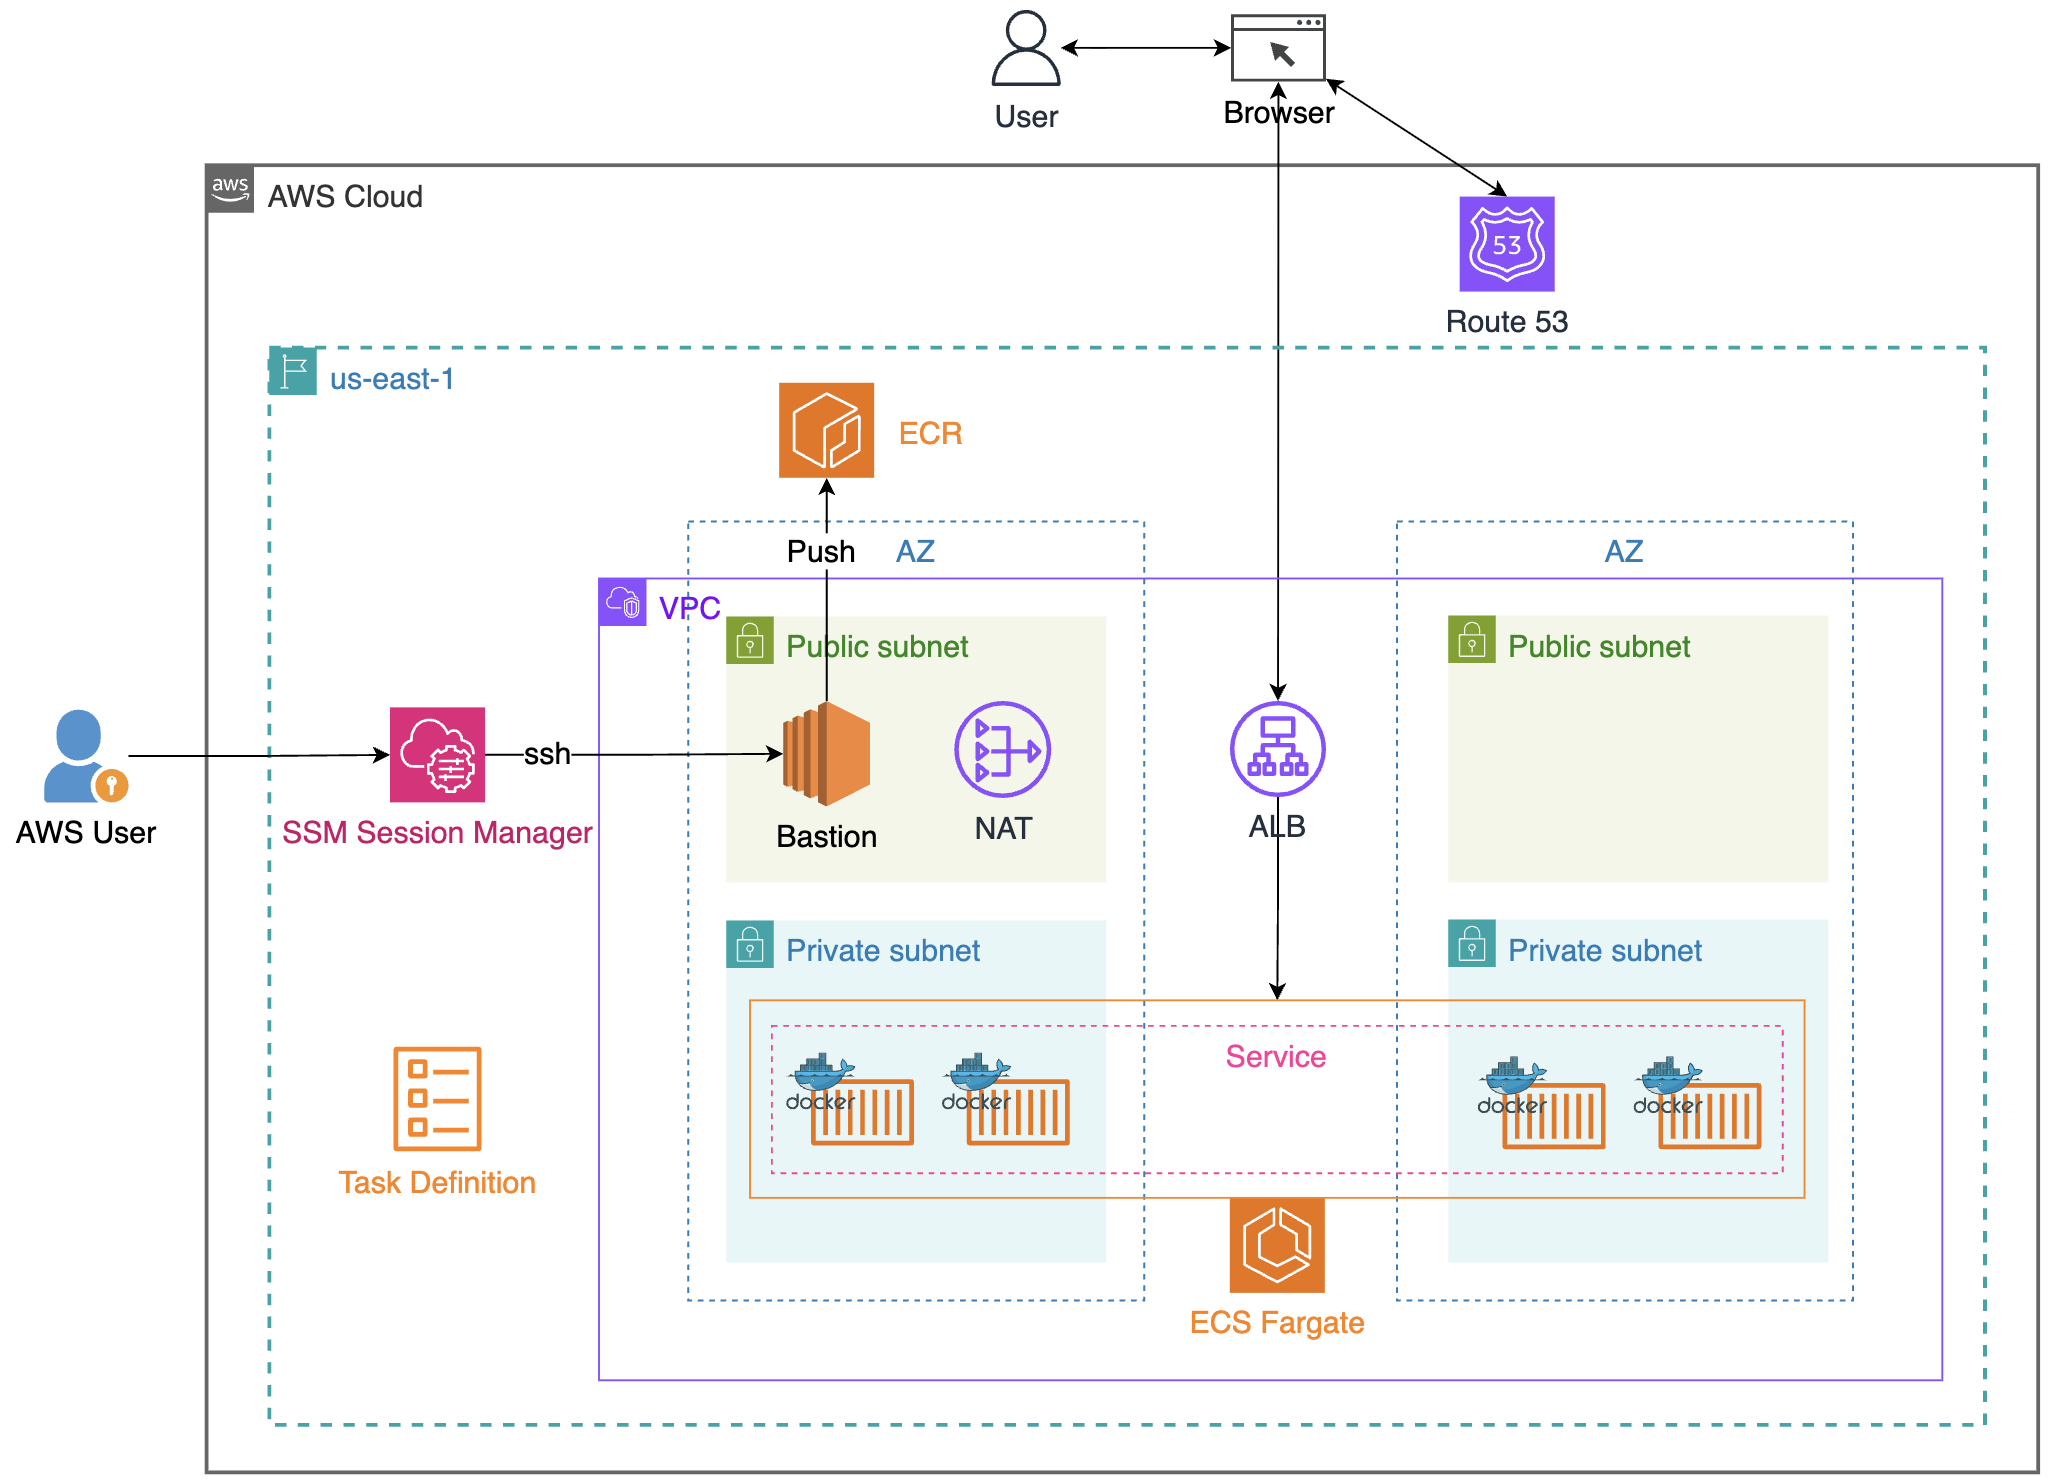
Task Details
- Create VPC, ALB, ECR repository, Bastion Host
- Build Docker image
- Create ECS Cluster
- Create Task definition
- Create ECS Service
- Test hoạt động
- Setting Route53 and access website (optional)
1. Create VPC, ALB, ECR repository, Bastion Host
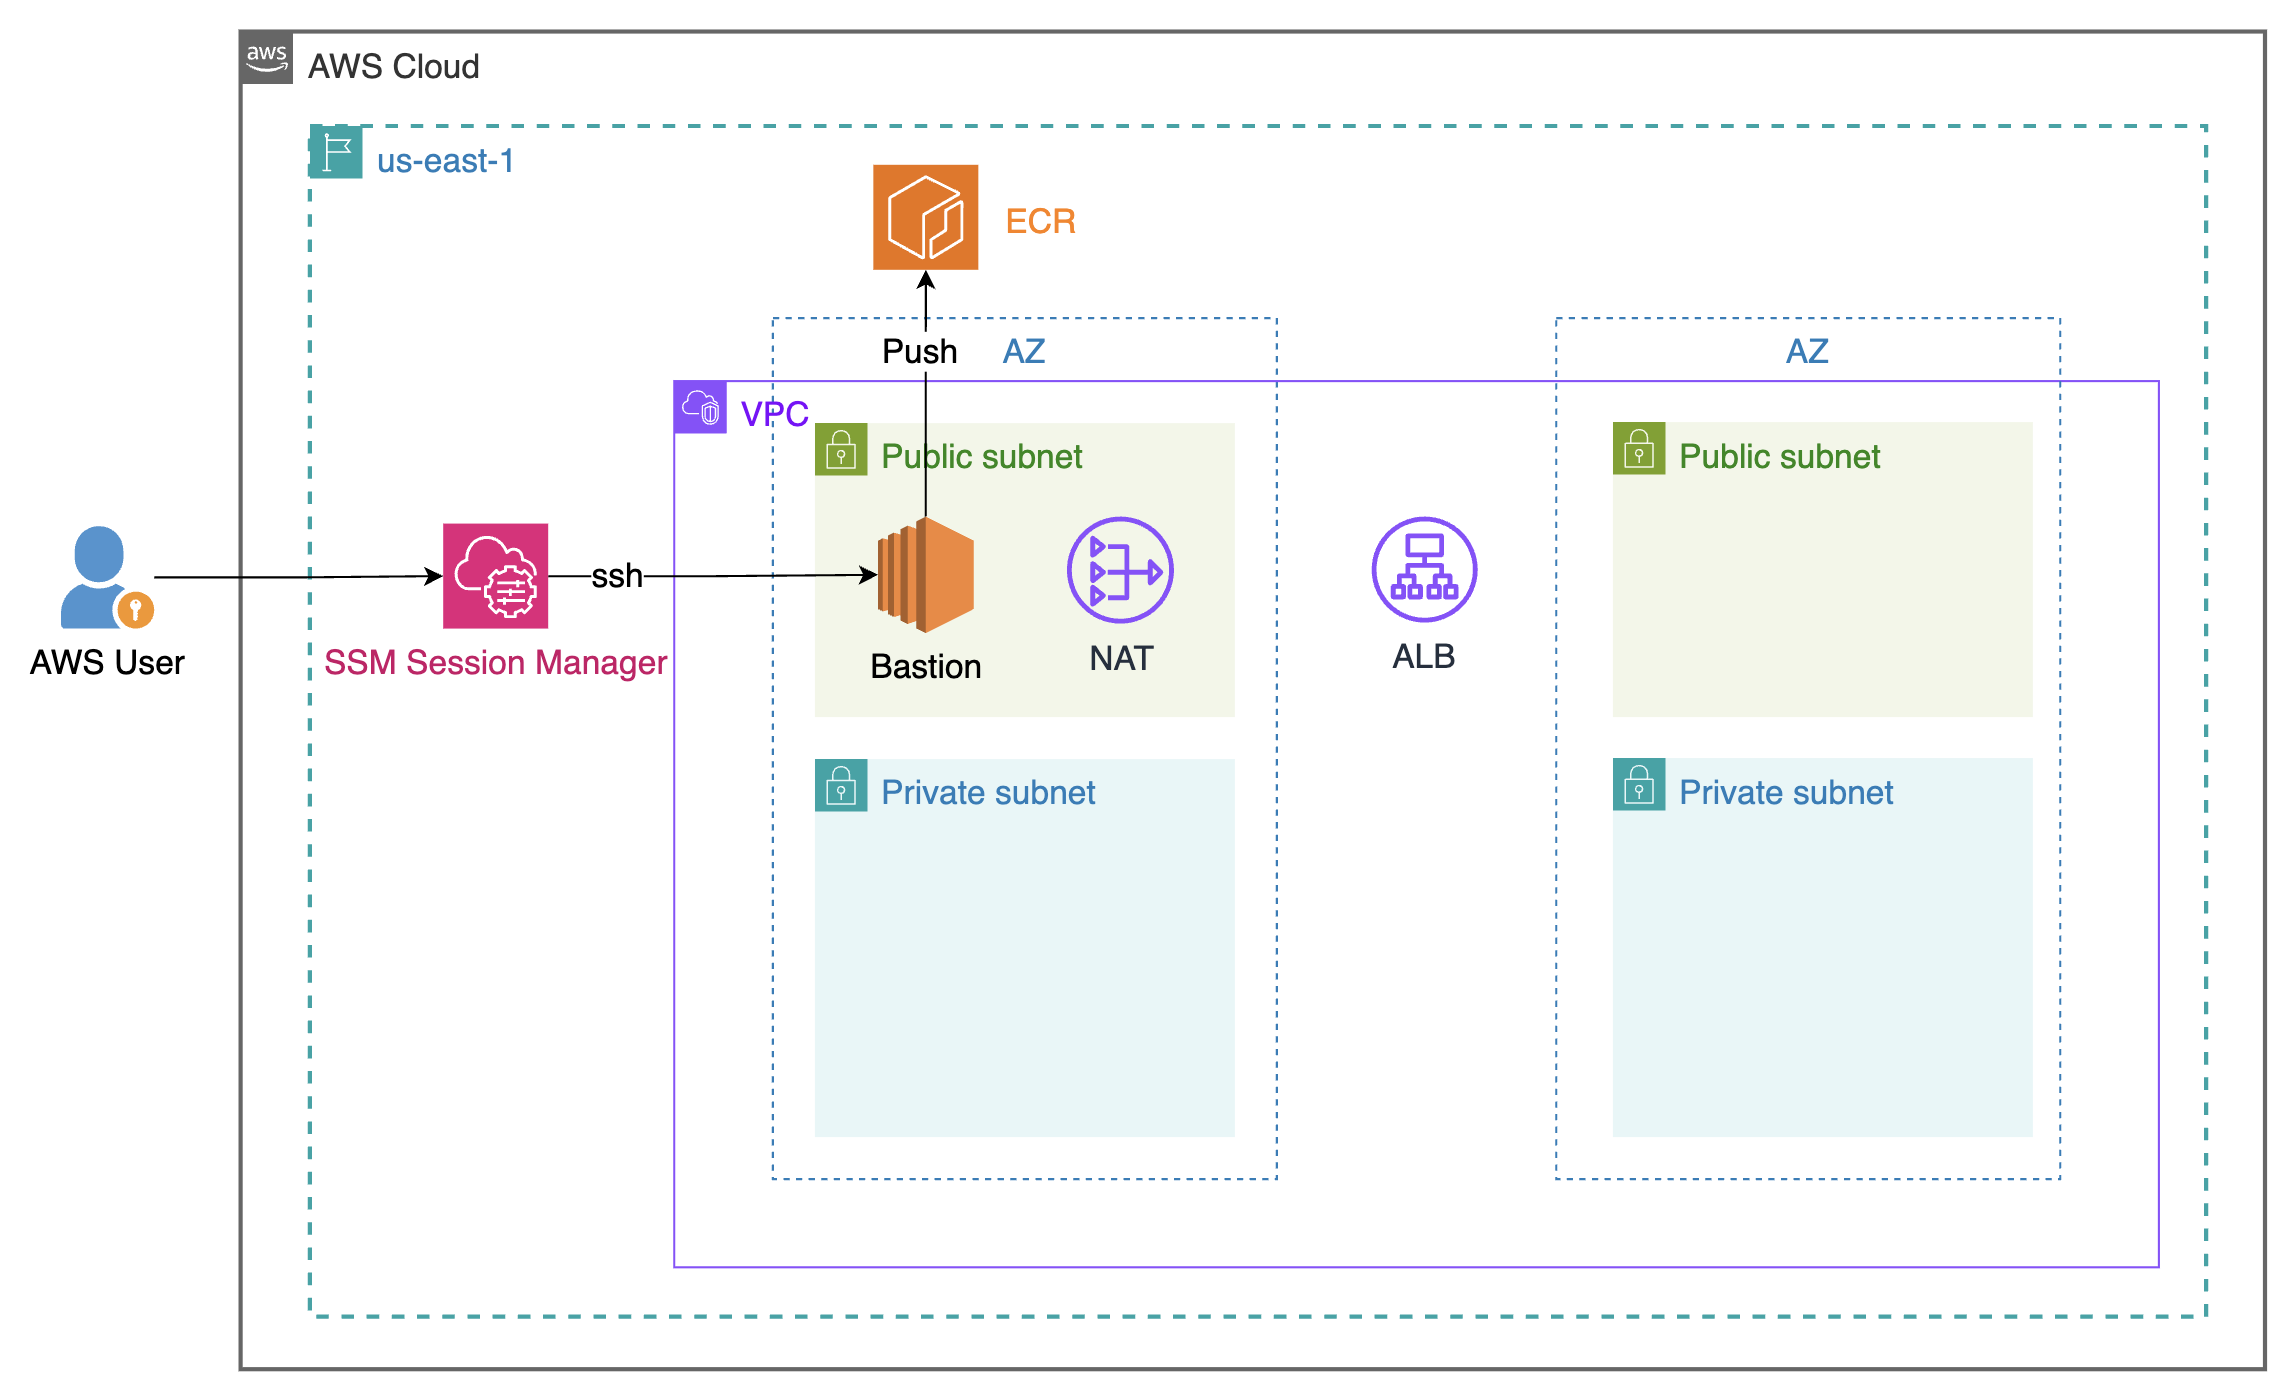
ecs-network-stack.yaml
AWSTemplateFormatVersion: '2010-09-09'

Description: >
  Networking + ALB + Bastion + ECR stack for ECS Fargate. VPC with public/
  private subnets across 2 AZs, 1 NAT Gateway, Security Groups, Target
  Group, ALB, SSM-managed Bastion host, and ECR repository. Only ECS
  Cluster/Task Definition/Service are created manually on the console.

Parameters:
  EnvironmentName:
    Type: String
    Default: dev
    AllowedValues: [dev, test, stg, prod]
    Description: Environment prefix for resource names/tags.

  VpcCIDR:
    Type: String
    Default: 10.1.0.0/16
    Description: VPC CIDR block

  PublicSubnet1CIDR:
    Type: String
    Default: 10.1.0.0/24
    Description: Public subnet CIDR (AZ1)

  PublicSubnet2CIDR:
    Type: String
    Default: 10.1.1.0/24
    Description: Public subnet CIDR (AZ2)

  PrivateSubnet1CIDR:
    Type: String
    Default: 10.1.2.0/24
    Description: Private subnet CIDR (AZ1)

  PrivateSubnet2CIDR:
    Type: String
    Default: 10.1.3.0/24
    Description: Private subnet CIDR (AZ2)

  ContainerPort:
    Type: Number
    Default: 80
    Description: Port the container listens on (nginx = 80)

Resources:

  ##########################################################################
  # VPC + INTERNET GATEWAY
  ##########################################################################
  VPC:
    Type: AWS::EC2::VPC
    Properties:
      CidrBlock: !Ref VpcCIDR
      EnableDnsSupport: true
      EnableDnsHostnames: true
      Tags:
        - Key: Name
          Value: !Sub '${EnvironmentName}-${AWS::StackName}-vpc'

  InternetGateway:
    Type: AWS::EC2::InternetGateway
    Properties:
      Tags:
        - Key: Name
          Value: !Sub '${EnvironmentName}-${AWS::StackName}-igw'

  InternetGatewayAttachment:
    Type: AWS::EC2::VPCGatewayAttachment
    Properties:
      InternetGatewayId: !Ref InternetGateway
      VpcId: !Ref VPC

  ##########################################################################
  # SUBNETS
  # - Public: ALB, NAT Gateway
  # - Private: ECS Fargate tasks
  ##########################################################################
  PublicSubnet1:
    Type: AWS::EC2::Subnet
    Properties:
      VpcId: !Ref VPC
      AvailabilityZone: !Select [0, !GetAZs '']
      CidrBlock: !Ref PublicSubnet1CIDR
      MapPublicIpOnLaunch: true
      Tags:
        - Key: Name
          Value: !Sub
            - '${EnvironmentName}-${AWS::StackName}-subnet-public1-${AZ}'
            - AZ: !Select [0, !GetAZs '']

  PublicSubnet2:
    Type: AWS::EC2::Subnet
    Properties:
      VpcId: !Ref VPC
      AvailabilityZone: !Select [1, !GetAZs '']
      CidrBlock: !Ref PublicSubnet2CIDR
      MapPublicIpOnLaunch: true
      Tags:
        - Key: Name
          Value: !Sub
            - '${EnvironmentName}-${AWS::StackName}-subnet-public2-${AZ}'
            - AZ: !Select [1, !GetAZs '']

  PrivateSubnet1:
    Type: AWS::EC2::Subnet
    Properties:
      VpcId: !Ref VPC
      AvailabilityZone: !Select [0, !GetAZs '']
      CidrBlock: !Ref PrivateSubnet1CIDR
      MapPublicIpOnLaunch: false
      Tags:
        - Key: Name
          Value: !Sub
            - '${EnvironmentName}-${AWS::StackName}-subnet-private1-${AZ}'
            - AZ: !Select [0, !GetAZs '']

  PrivateSubnet2:
    Type: AWS::EC2::Subnet
    Properties:
      VpcId: !Ref VPC
      AvailabilityZone: !Select [1, !GetAZs '']
      CidrBlock: !Ref PrivateSubnet2CIDR
      MapPublicIpOnLaunch: false
      Tags:
        - Key: Name
          Value: !Sub
            - '${EnvironmentName}-${AWS::StackName}-subnet-private2-${AZ}'
            - AZ: !Select [1, !GetAZs '']

  ##########################################################################
  # NAT GATEWAY (single, AZ1 only)
  ##########################################################################
  NatGatewayEIP:
    Type: AWS::EC2::EIP
    DependsOn: InternetGatewayAttachment
    Properties:
      Domain: vpc
      Tags:
        - Key: Name
          Value: !Sub '${EnvironmentName}-${AWS::StackName}-nat-eip'

  NatGateway:
    Type: AWS::EC2::NatGateway
    Properties:
      AllocationId: !GetAtt NatGatewayEIP.AllocationId
      SubnetId: !Ref PublicSubnet1
      Tags:
        - Key: Name
          Value: !Sub
            - '${EnvironmentName}-${AWS::StackName}-nat-public1-${AZ}'
            - AZ: !GetAtt PublicSubnet1.AvailabilityZone

  ##########################################################################
  # ROUTE TABLES
  # - 1 shared public route table
  # - 2 private route tables (1 per AZ), both -> same NAT Gateway
  ##########################################################################
  PublicRouteTable:
    Type: AWS::EC2::RouteTable
    Properties:
      VpcId: !Ref VPC
      Tags:
        - Key: Name
          Value: !Sub '${EnvironmentName}-${AWS::StackName}-rtb-public'

  DefaultPublicRoute:
    Type: AWS::EC2::Route
    DependsOn: InternetGatewayAttachment
    Properties:
      RouteTableId: !Ref PublicRouteTable
      DestinationCidrBlock: 0.0.0.0/0
      GatewayId: !Ref InternetGateway

  PublicSubnet1RouteTableAssociation:
    Type: AWS::EC2::SubnetRouteTableAssociation
    Properties:
      RouteTableId: !Ref PublicRouteTable
      SubnetId: !Ref PublicSubnet1

  PublicSubnet2RouteTableAssociation:
    Type: AWS::EC2::SubnetRouteTableAssociation
    Properties:
      RouteTableId: !Ref PublicRouteTable
      SubnetId: !Ref PublicSubnet2

  PrivateRouteTable1:
    Type: AWS::EC2::RouteTable
    Properties:
      VpcId: !Ref VPC
      Tags:
        - Key: Name
          Value: !Sub
            - '${EnvironmentName}-${AWS::StackName}-rtb-private1-${AZ}'
            - AZ: !GetAtt PrivateSubnet1.AvailabilityZone

  DefaultPrivateRoute1:
    Type: AWS::EC2::Route
    Properties:
      RouteTableId: !Ref PrivateRouteTable1
      DestinationCidrBlock: 0.0.0.0/0
      NatGatewayId: !Ref NatGateway

  PrivateSubnet1RouteTableAssociation:
    Type: AWS::EC2::SubnetRouteTableAssociation
    Properties:
      RouteTableId: !Ref PrivateRouteTable1
      SubnetId: !Ref PrivateSubnet1

  PrivateRouteTable2:
    Type: AWS::EC2::RouteTable
    Properties:
      VpcId: !Ref VPC
      Tags:
        - Key: Name
          Value: !Sub
            - '${EnvironmentName}-${AWS::StackName}-rtb-private2-${AZ}'
            - AZ: !GetAtt PrivateSubnet2.AvailabilityZone

  DefaultPrivateRoute2:
    Type: AWS::EC2::Route
    Properties:
      RouteTableId: !Ref PrivateRouteTable2
      DestinationCidrBlock: 0.0.0.0/0
      NatGatewayId: !Ref NatGateway

  PrivateSubnet2RouteTableAssociation:
    Type: AWS::EC2::SubnetRouteTableAssociation
    Properties:
      RouteTableId: !Ref PrivateRouteTable2
      SubnetId: !Ref PrivateSubnet2

  ##########################################################################
  # SECURITY GROUPS
  ##########################################################################
  ALBSecurityGroup:
    Type: AWS::EC2::SecurityGroup
    Properties:
      GroupDescription: Allow HTTP from internet to ALB
      VpcId: !Ref VPC
      SecurityGroupIngress:
        - IpProtocol: tcp
          FromPort: 80
          ToPort: 80
          CidrIp: 0.0.0.0/0
          Description: Allow HTTP from internet
      SecurityGroupEgress:
        - IpProtocol: '-1'
          CidrIp: 0.0.0.0/0
          Description: Allow all outbound
      Tags:
        - Key: Name
          Value: !Sub '${EnvironmentName}-${AWS::StackName}-alb-sg'

  ECSTasksSecurityGroup:
    Type: AWS::EC2::SecurityGroup
    Properties:
      GroupDescription: Allow traffic from ALB to ECS Fargate tasks
      VpcId: !Ref VPC
      SecurityGroupIngress:
        - IpProtocol: tcp
          FromPort: !Ref ContainerPort
          ToPort: !Ref ContainerPort
          SourceSecurityGroupId: !Ref ALBSecurityGroup
          Description: Allow container port from ALB only
      SecurityGroupEgress:
        - IpProtocol: '-1'
          CidrIp: 0.0.0.0/0
          Description: Allow all outbound
      Tags:
        - Key: Name
          Value: !Sub '${EnvironmentName}-${AWS::StackName}-ecs-tasks-sg'

  BastionSecurityGroup:
    Type: AWS::EC2::SecurityGroup
    Properties:
      GroupDescription: Bastion host - no inbound (SSM only, no SSH)
      VpcId: !Ref VPC
      SecurityGroupEgress:
        - IpProtocol: '-1'
          CidrIp: 0.0.0.0/0
          Description: Allow all outbound
      Tags:
        - Key: Name
          Value: !Sub '${EnvironmentName}-${AWS::StackName}-bastion-sg'

  ##########################################################################
  # BASTION HOST (optional - build/push Docker image)
  ##########################################################################
  BastionRole:
    Type: AWS::IAM::Role
    Properties:
      RoleName: !Sub '${EnvironmentName}-${AWS::StackName}-bastion-role'
      AssumeRolePolicyDocument:
        Version: '2012-10-17'
        Statement:
          - Effect: Allow
            Principal:
              Service: ec2.amazonaws.com
            Action: sts:AssumeRole
      ManagedPolicyArns:
        - arn:aws:iam::aws:policy/AmazonSSMManagedInstanceCore
        - arn:aws:iam::aws:policy/EC2InstanceProfileForImageBuilderECRContainerBuilds
      Tags:
        - Key: Name
          Value: !Sub '${EnvironmentName}-${AWS::StackName}-bastion-role'

  BastionInstanceProfile:
    Type: AWS::IAM::InstanceProfile
    Properties:
      InstanceProfileName: !Sub '${EnvironmentName}-${AWS::StackName}-bastion-profile'
      Roles:
        - !Ref BastionRole

  BastionHost:
    Type: AWS::EC2::Instance
    Properties:
      InstanceType: t3.micro
      ImageId: '{{resolve:ssm:/aws/service/ami-amazon-linux-latest/al2023-ami-kernel-default-x86_64}}'
      SubnetId: !Ref PublicSubnet1
      IamInstanceProfile: !Ref BastionInstanceProfile
      SecurityGroupIds:
        - !Ref BastionSecurityGroup
      Tags:
        - Key: Name
          Value: !Sub '${EnvironmentName}-${AWS::StackName}-bastion-host'

  ##########################################################################
  # ECR REPOSITORY
  ##########################################################################
  ECRRepository:
    Type: AWS::ECR::Repository
    Properties:
      RepositoryName: !Sub '${EnvironmentName}-${AWS::StackName}-nginx-custom'
      EmptyOnDelete: true
      ImageScanningConfiguration:
        ScanOnPush: true
      Tags:
        - Key: Name
          Value: !Sub '${EnvironmentName}-${AWS::StackName}-ecr'

  ##########################################################################
  # TARGET GROUP
  ##########################################################################
  TargetGroup:
    Type: AWS::ElasticLoadBalancingV2::TargetGroup
    Properties:
      Name: !Sub '${EnvironmentName}-${AWS::StackName}-tg'
      VpcId: !Ref VPC
      Port: !Ref ContainerPort
      Protocol: HTTP
      TargetType: ip
      HealthCheckPath: /
      HealthCheckProtocol: HTTP
      HealthCheckIntervalSeconds: 30
      HealthCheckTimeoutSeconds: 5
      HealthyThresholdCount: 2
      UnhealthyThresholdCount: 3
      Matcher:
        HttpCode: '200-299'
      TargetGroupAttributes:
        - Key: deregistration_delay.timeout_seconds
          Value: '30'
      Tags:
        - Key: Name
          Value: !Sub '${EnvironmentName}-${AWS::StackName}-tg'

  ##########################################################################
  # APPLICATION LOAD BALANCER
  ##########################################################################
  ApplicationLoadBalancer:
    Type: AWS::ElasticLoadBalancingV2::LoadBalancer
    Properties:
      Name: !Sub '${EnvironmentName}-${AWS::StackName}-alb'
      Scheme: internet-facing
      Type: application
      IpAddressType: ipv4
      SecurityGroups:
        - !Ref ALBSecurityGroup
      Subnets:
        - !Ref PublicSubnet1
        - !Ref PublicSubnet2
      Tags:
        - Key: Name
          Value: !Sub '${EnvironmentName}-${AWS::StackName}-alb'

  ALBListener:
    Type: AWS::ElasticLoadBalancingV2::Listener
    Properties:
      LoadBalancerArn: !Ref ApplicationLoadBalancer
      Port: 80
      Protocol: HTTP
      DefaultActions:
        - Type: forward
          TargetGroupArn: !Ref TargetGroup

Outputs:
  VPC:
    Description: VPC ID
    Value: !Ref VPC
    Export:
      Name: !Sub '${EnvironmentName}-${AWS::StackName}-VPC'

  PublicSubnets:
    Description: Public subnet IDs
    Value: !Join [',', [!Ref PublicSubnet1, !Ref PublicSubnet2]]
    Export:
      Name: !Sub '${EnvironmentName}-${AWS::StackName}-PublicSubnets'

  PrivateSubnets:
    Description: Private subnet IDs
    Value: !Join [',', [!Ref PrivateSubnet1, !Ref PrivateSubnet2]]
    Export:
      Name: !Sub '${EnvironmentName}-${AWS::StackName}-PrivateSubnets'

  ECSTasksSecurityGroupId:
    Description: Security Group ID for ECS Fargate tasks
    Value: !Ref ECSTasksSecurityGroup
    Export:
      Name: !Sub '${EnvironmentName}-${AWS::StackName}-ECSTasksSG'

  ALBSecurityGroupId:
    Description: Security Group ID attached to the ALB
    Value: !Ref ALBSecurityGroup
    Export:
      Name: !Sub '${EnvironmentName}-${AWS::StackName}-ALBSG'

  TargetGroupArn:
    Description: Target Group ARN
    Value: !Ref TargetGroup
    Export:
      Name: !Sub '${EnvironmentName}-${AWS::StackName}-TargetGroupArn'

  ALBListenerArn:
    Description: ALB Listener ARN
    Value: !Ref ALBListener
    Export:
      Name: !Sub '${EnvironmentName}-${AWS::StackName}-ALBListenerArn'

  ALBDNSName:
    Description: ALB public DNS name
    Value: !GetAtt ApplicationLoadBalancer.DNSName
    Export:
      Name: !Sub '${EnvironmentName}-${AWS::StackName}-ALBDNSName'

  BastionInstanceId:
    Description: Bastion host instance ID - connect via SSM Session Manager
    Value: !Ref BastionHost

  ECRRepositoryUri:
    Description: ECR repository URI
    Value: !GetAtt ECRRepository.RepositoryUri
    Export:
      Name: !Sub '${EnvironmentName}-${AWS::StackName}-ECRRepositoryUri'
- Copy Template phía trên và lưu lại với tên
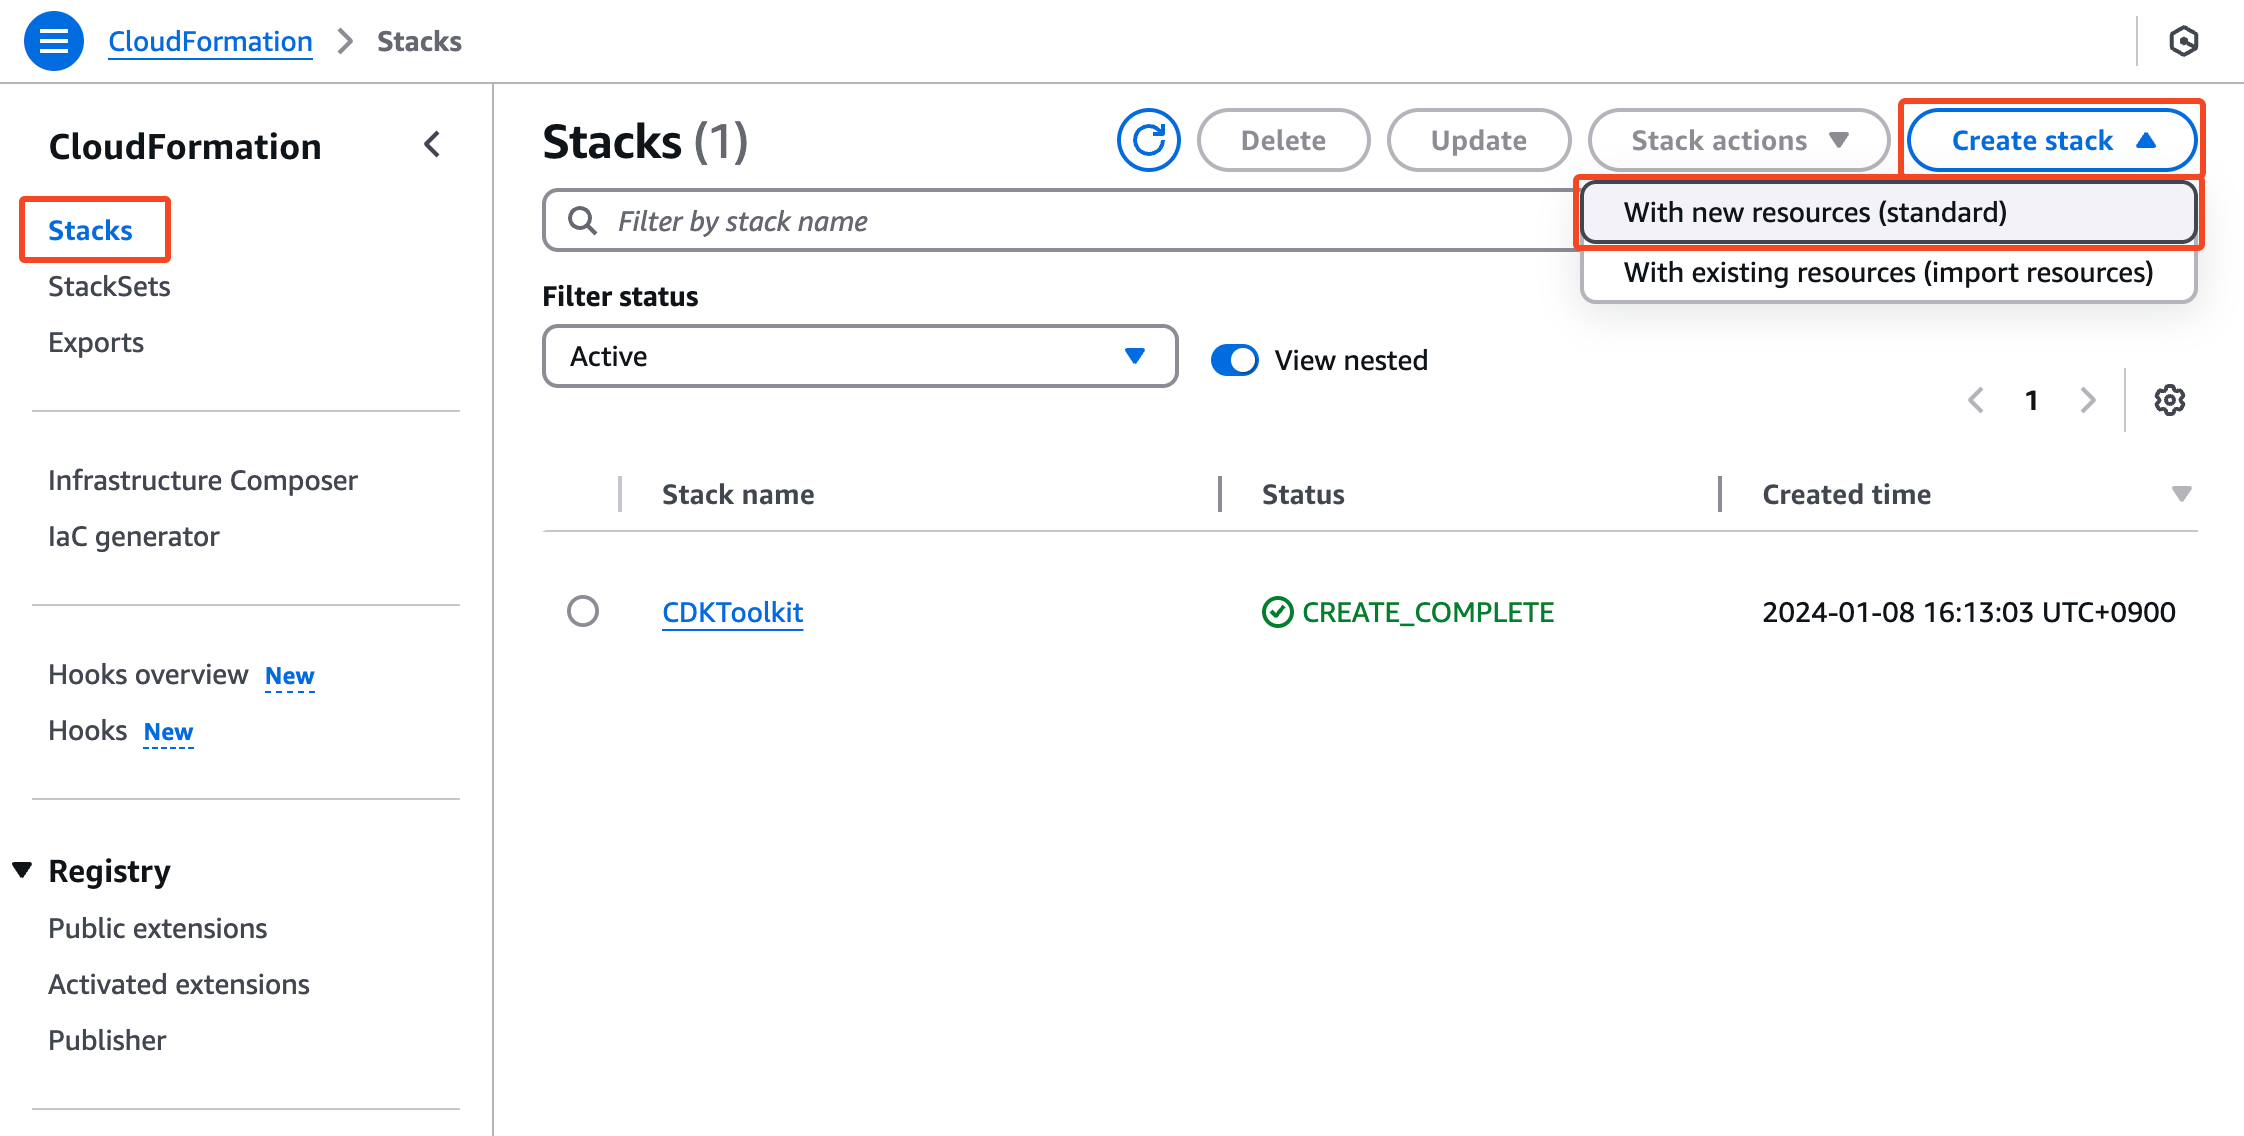
ecs-network-stack.yaml - Tại CloudFormation Console -> Chọn Menu Stack -> Create stack
- Upload file
ecs-network-stack.yamlvà nhấn Next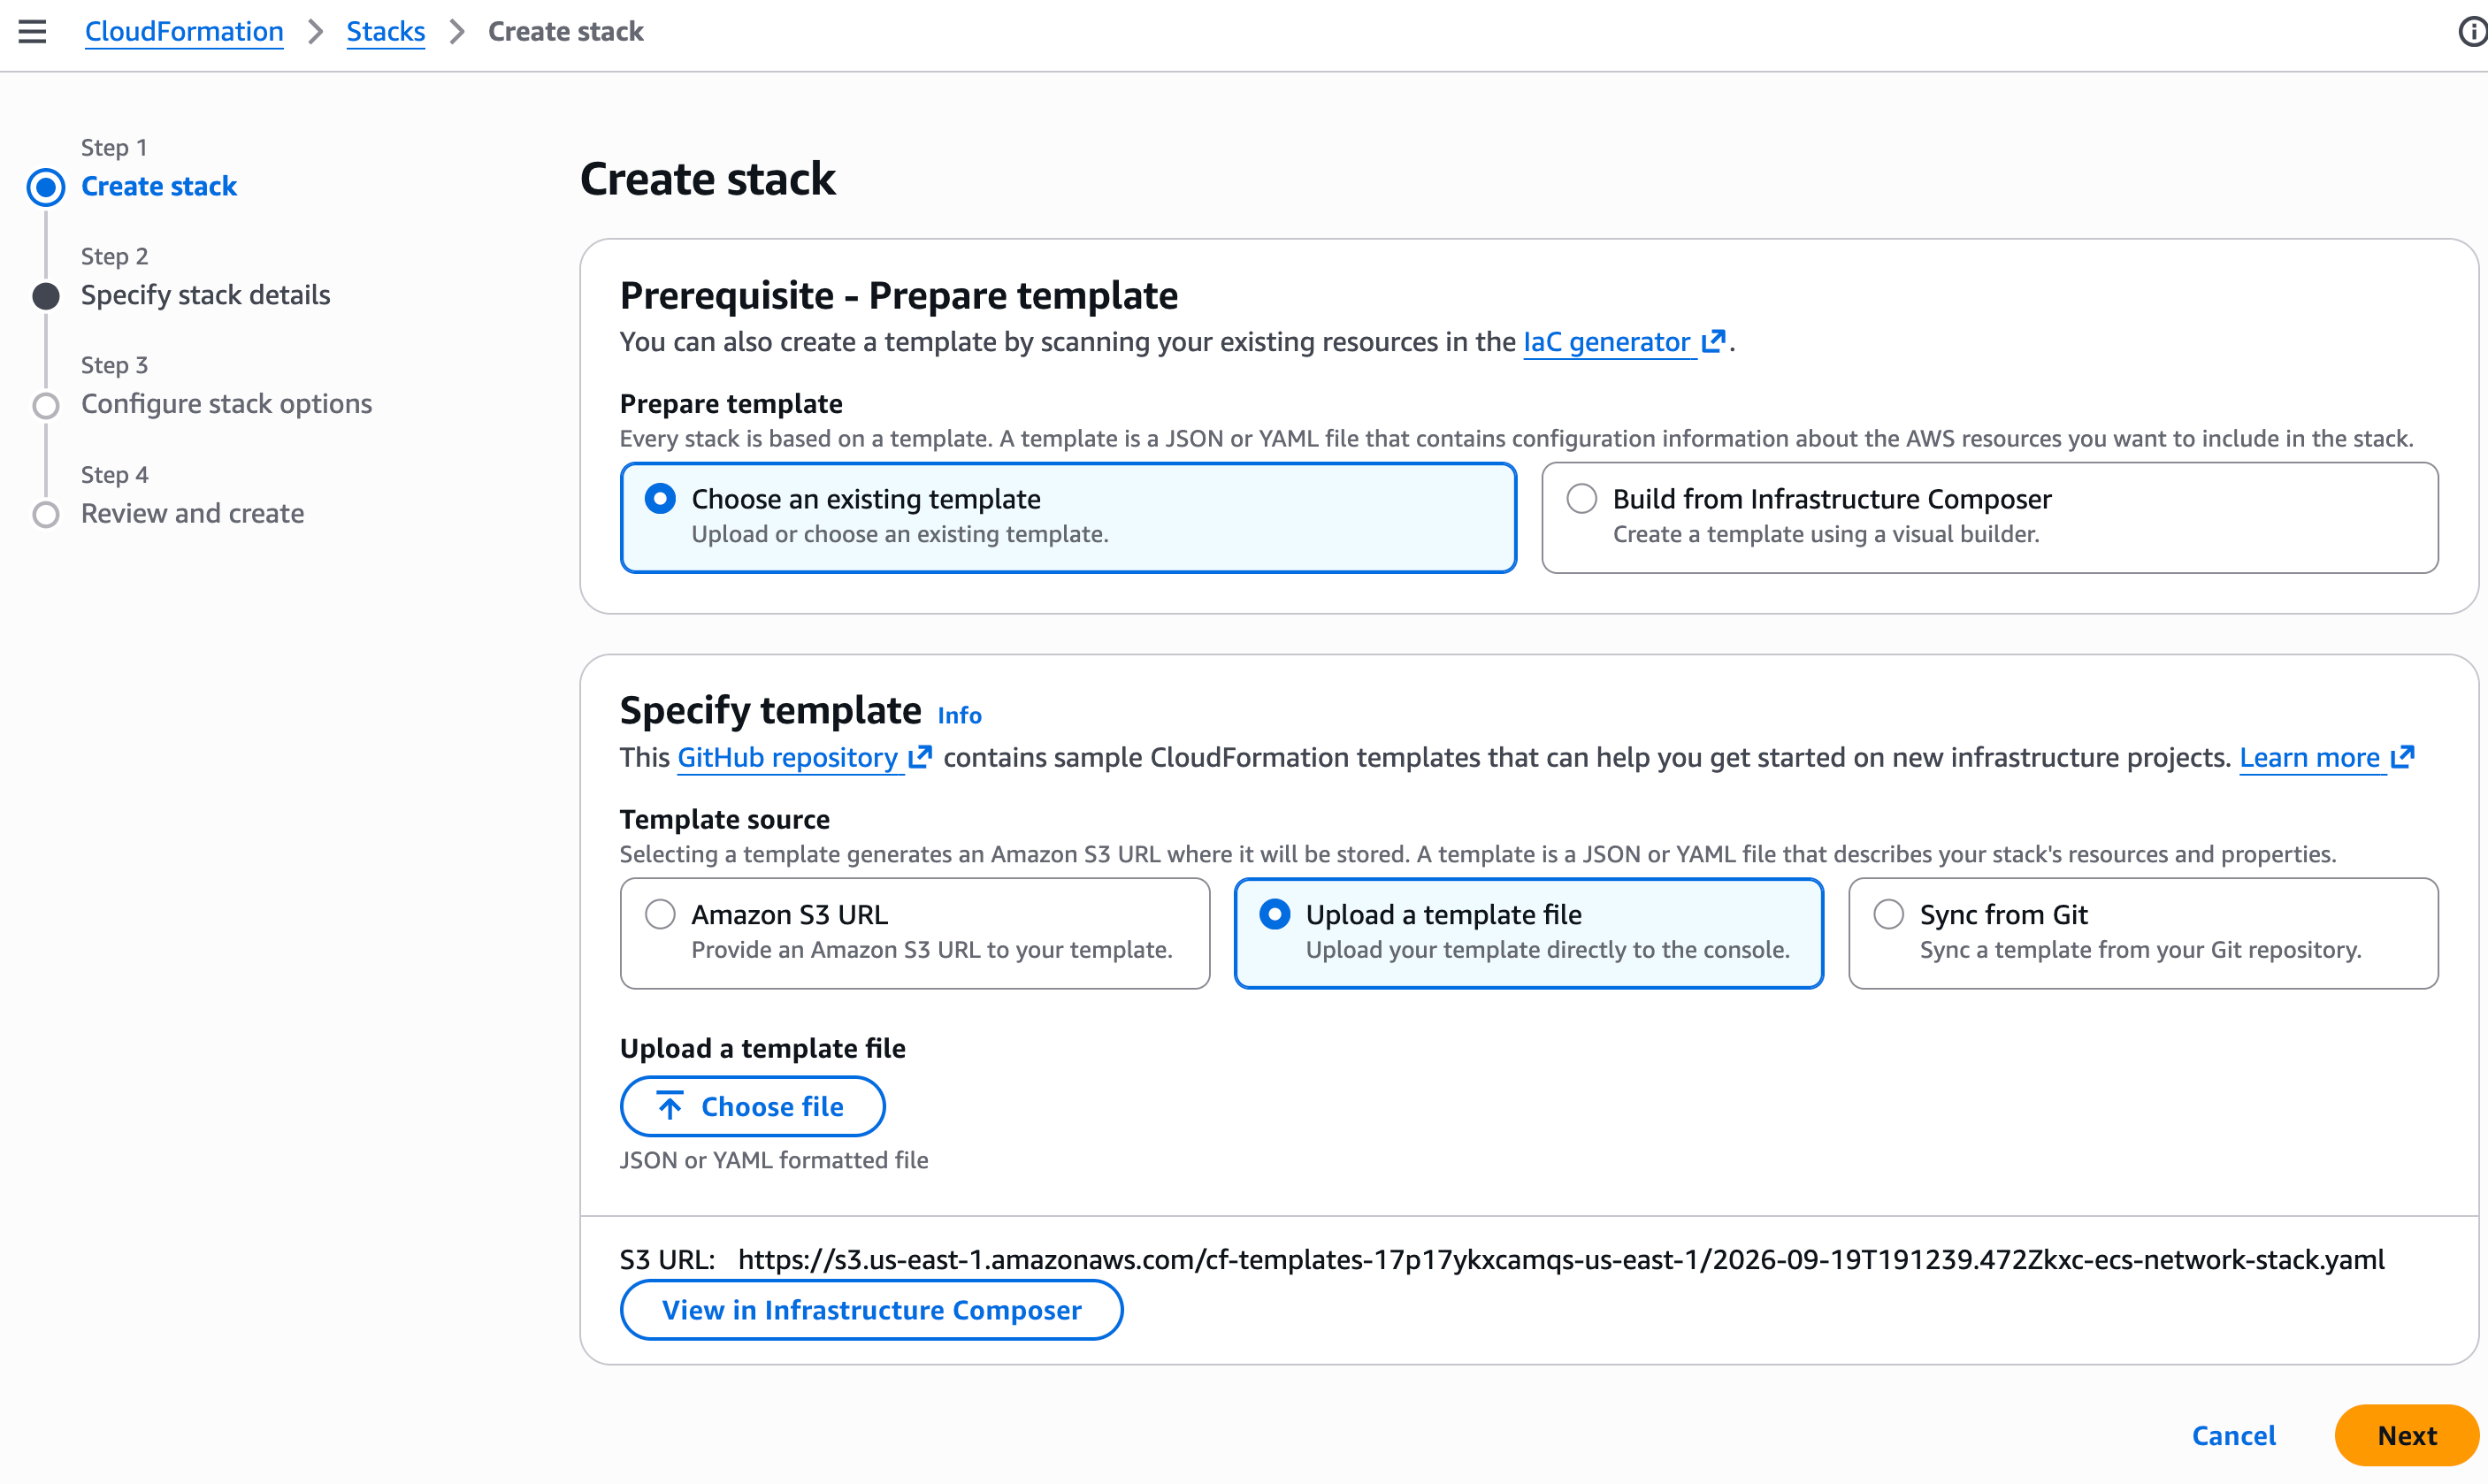
- Nhập tên Stack:
ecs-network-stack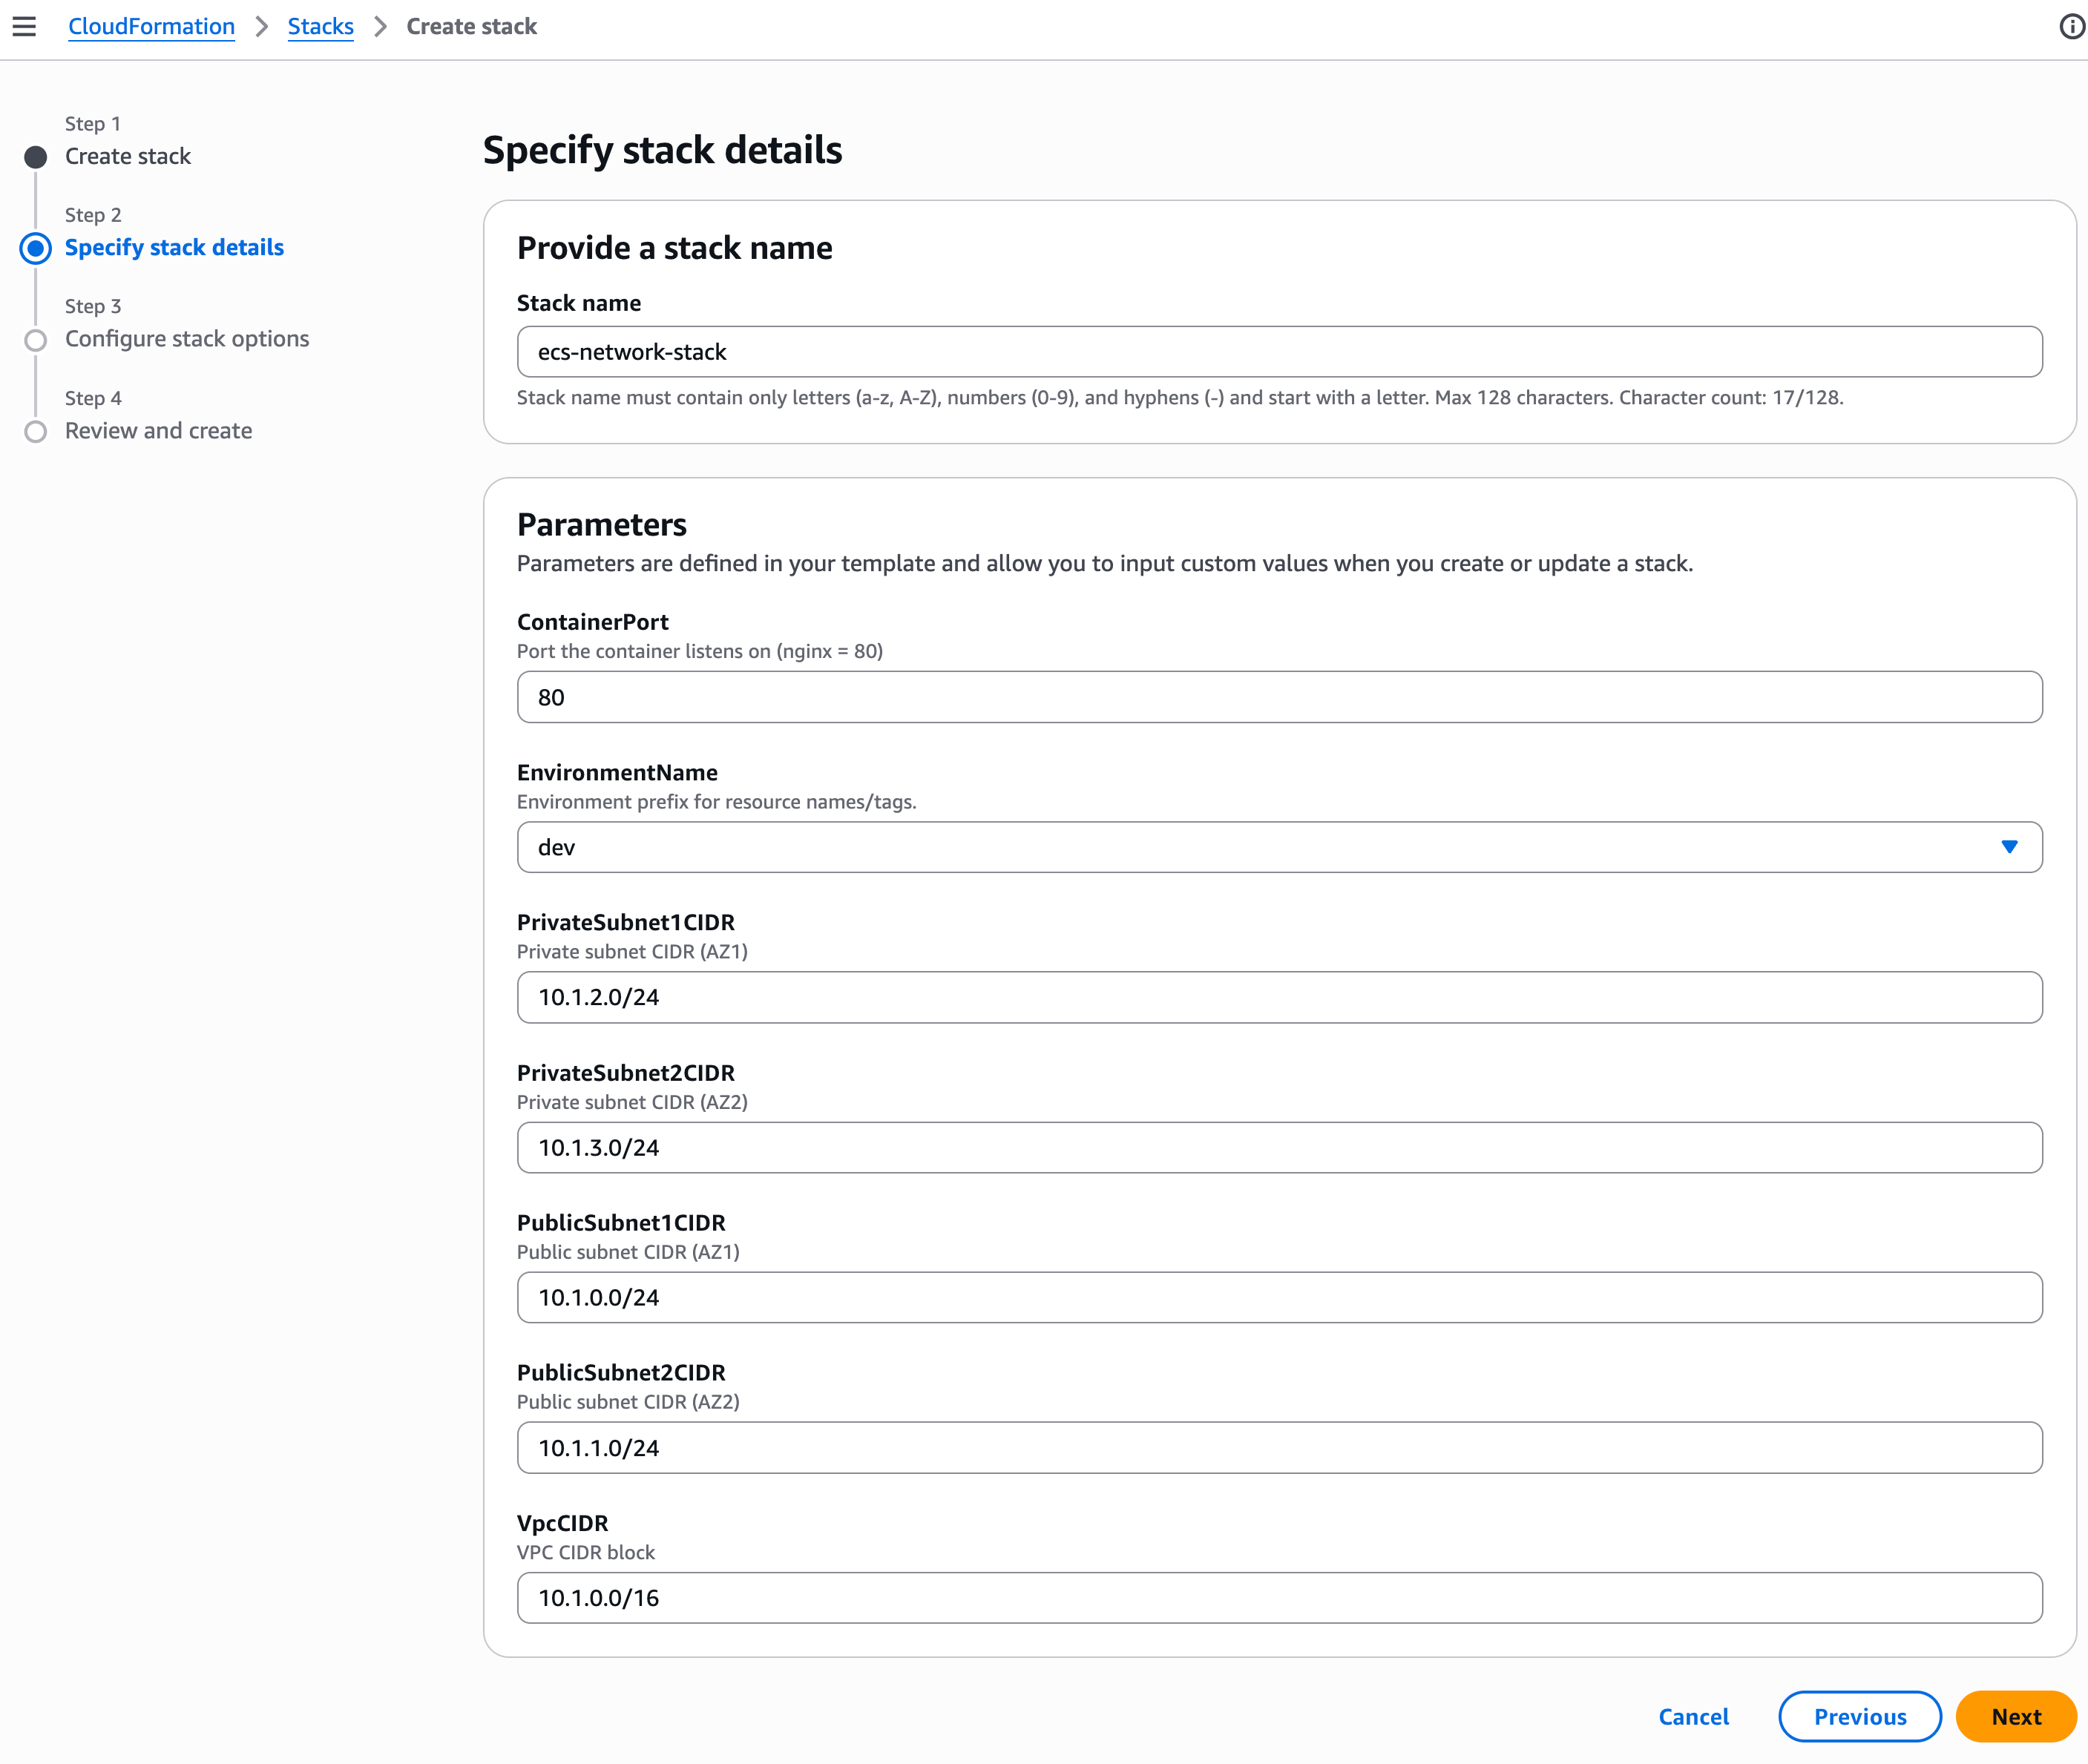
- Tại Capabilities: chọn
✅I acknowledge that AWS CloudFormation might create IAM resources with custom names.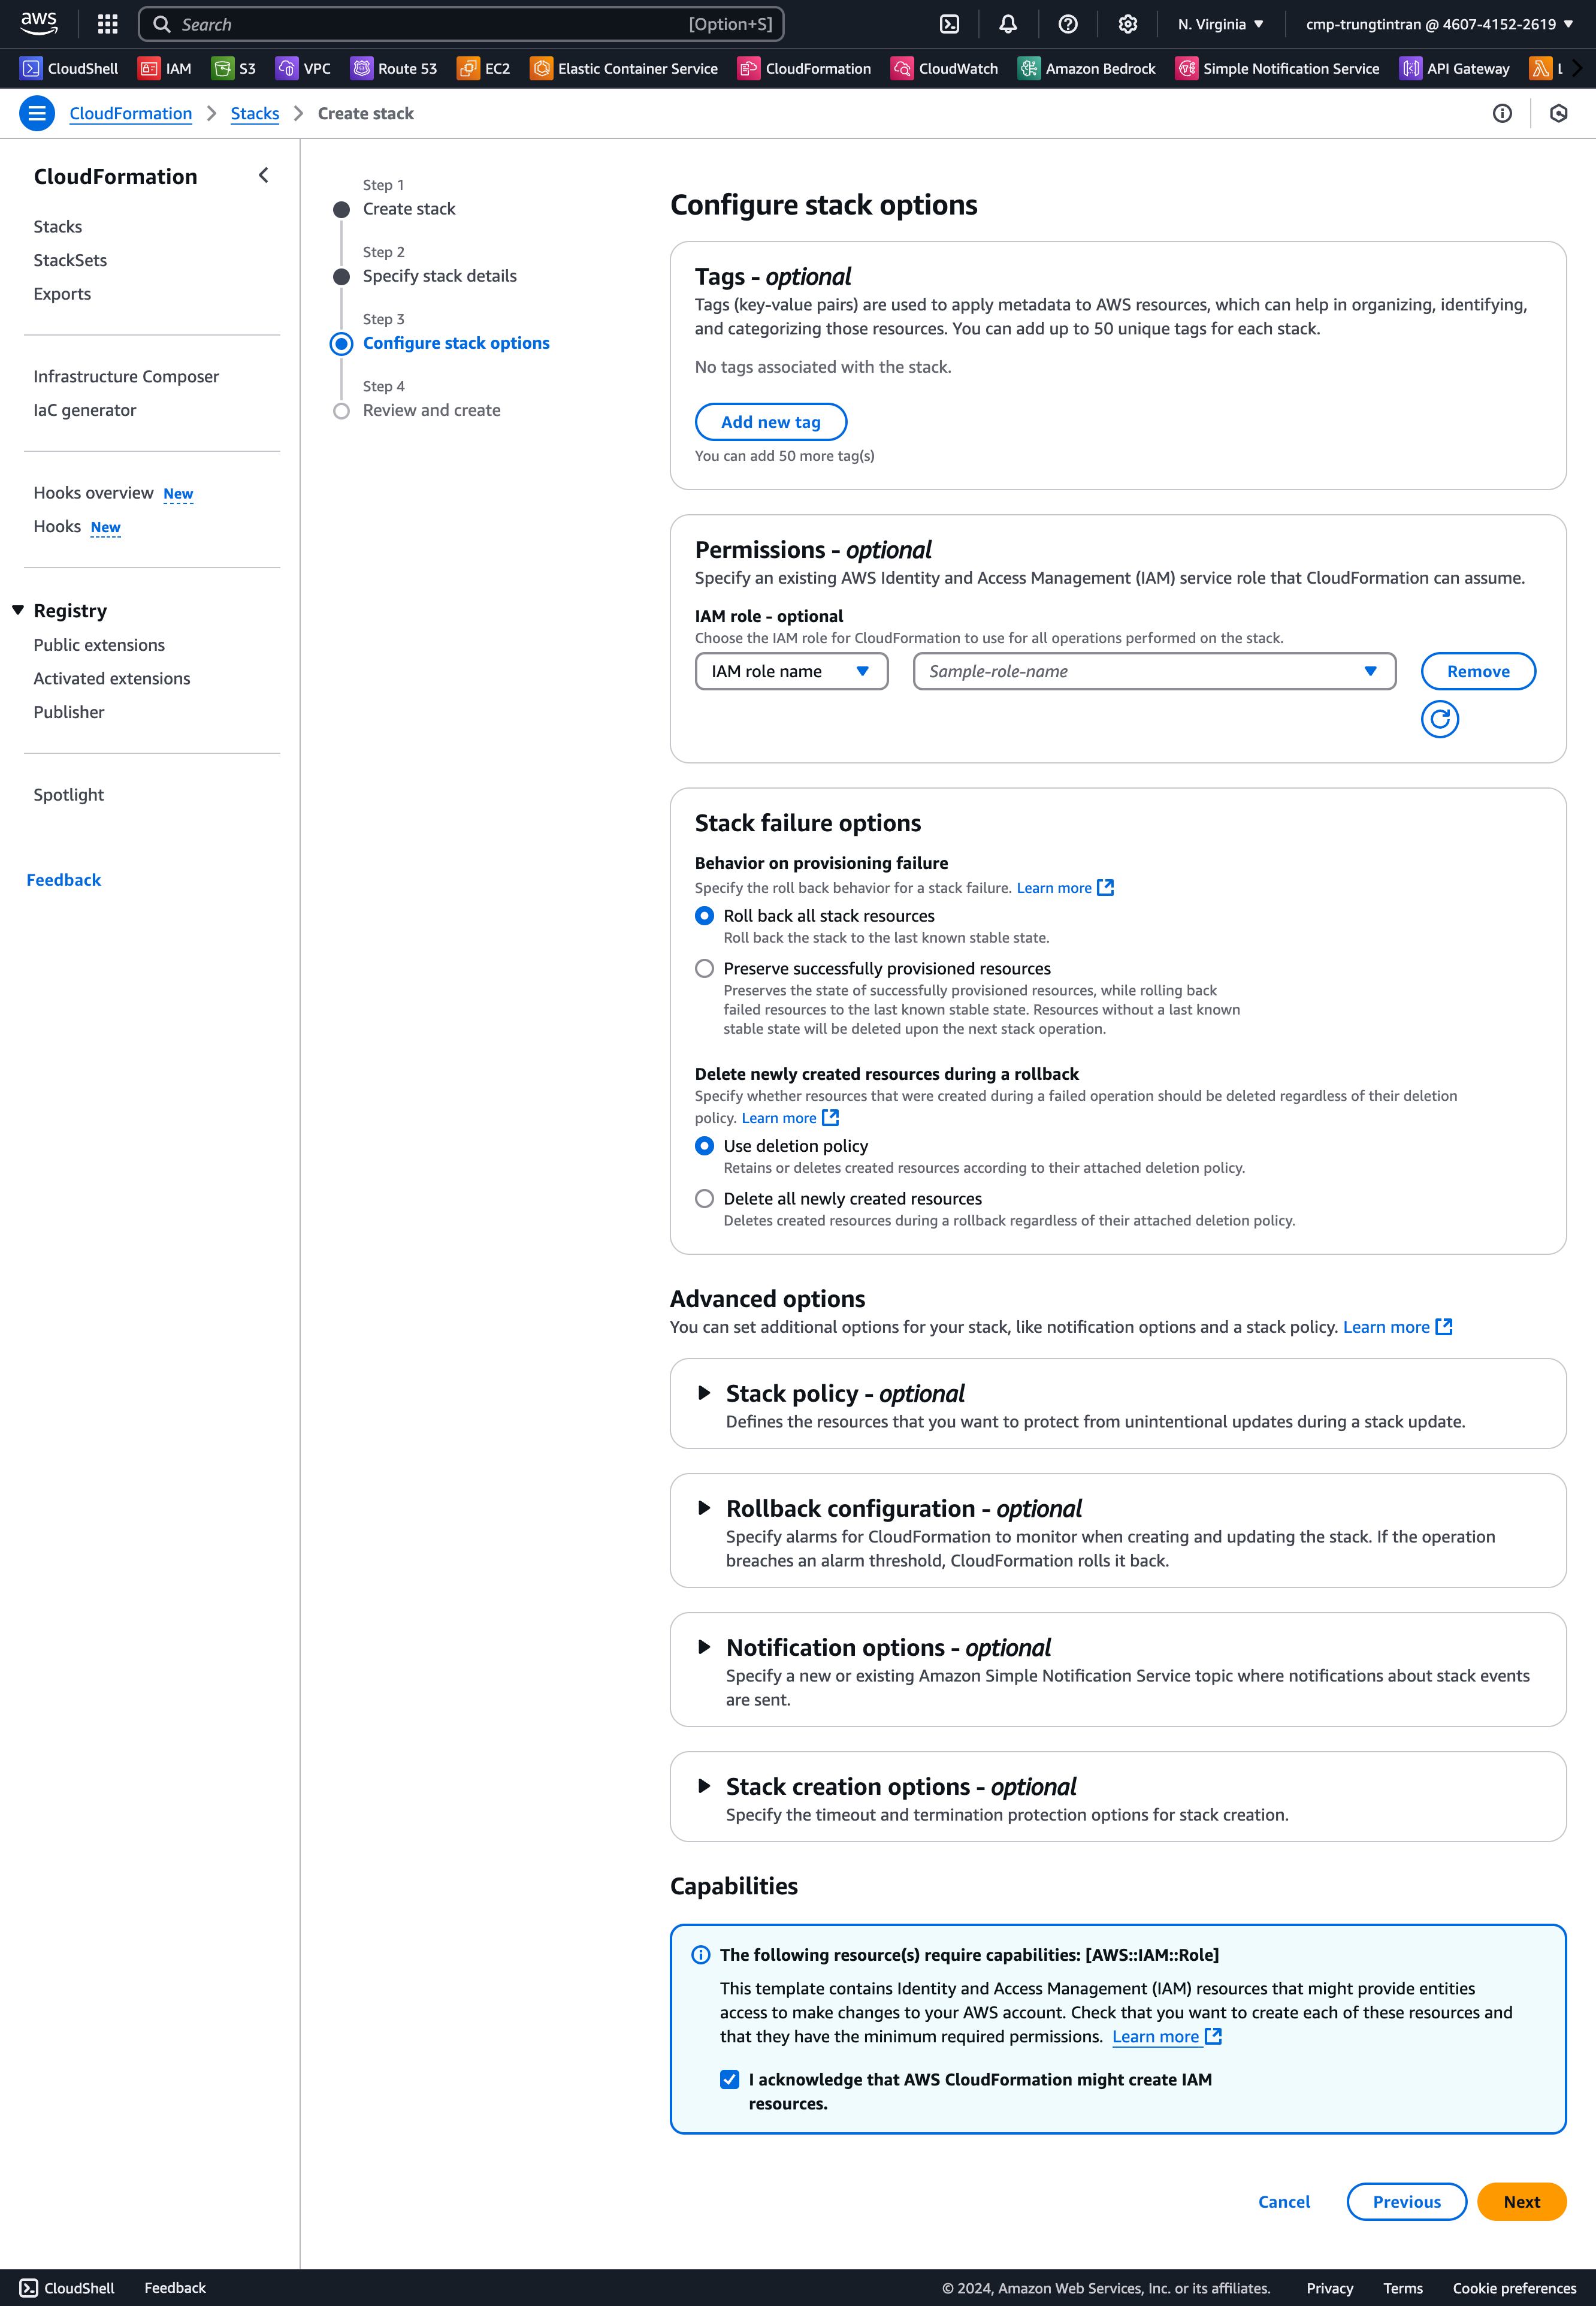
- Review và Submit
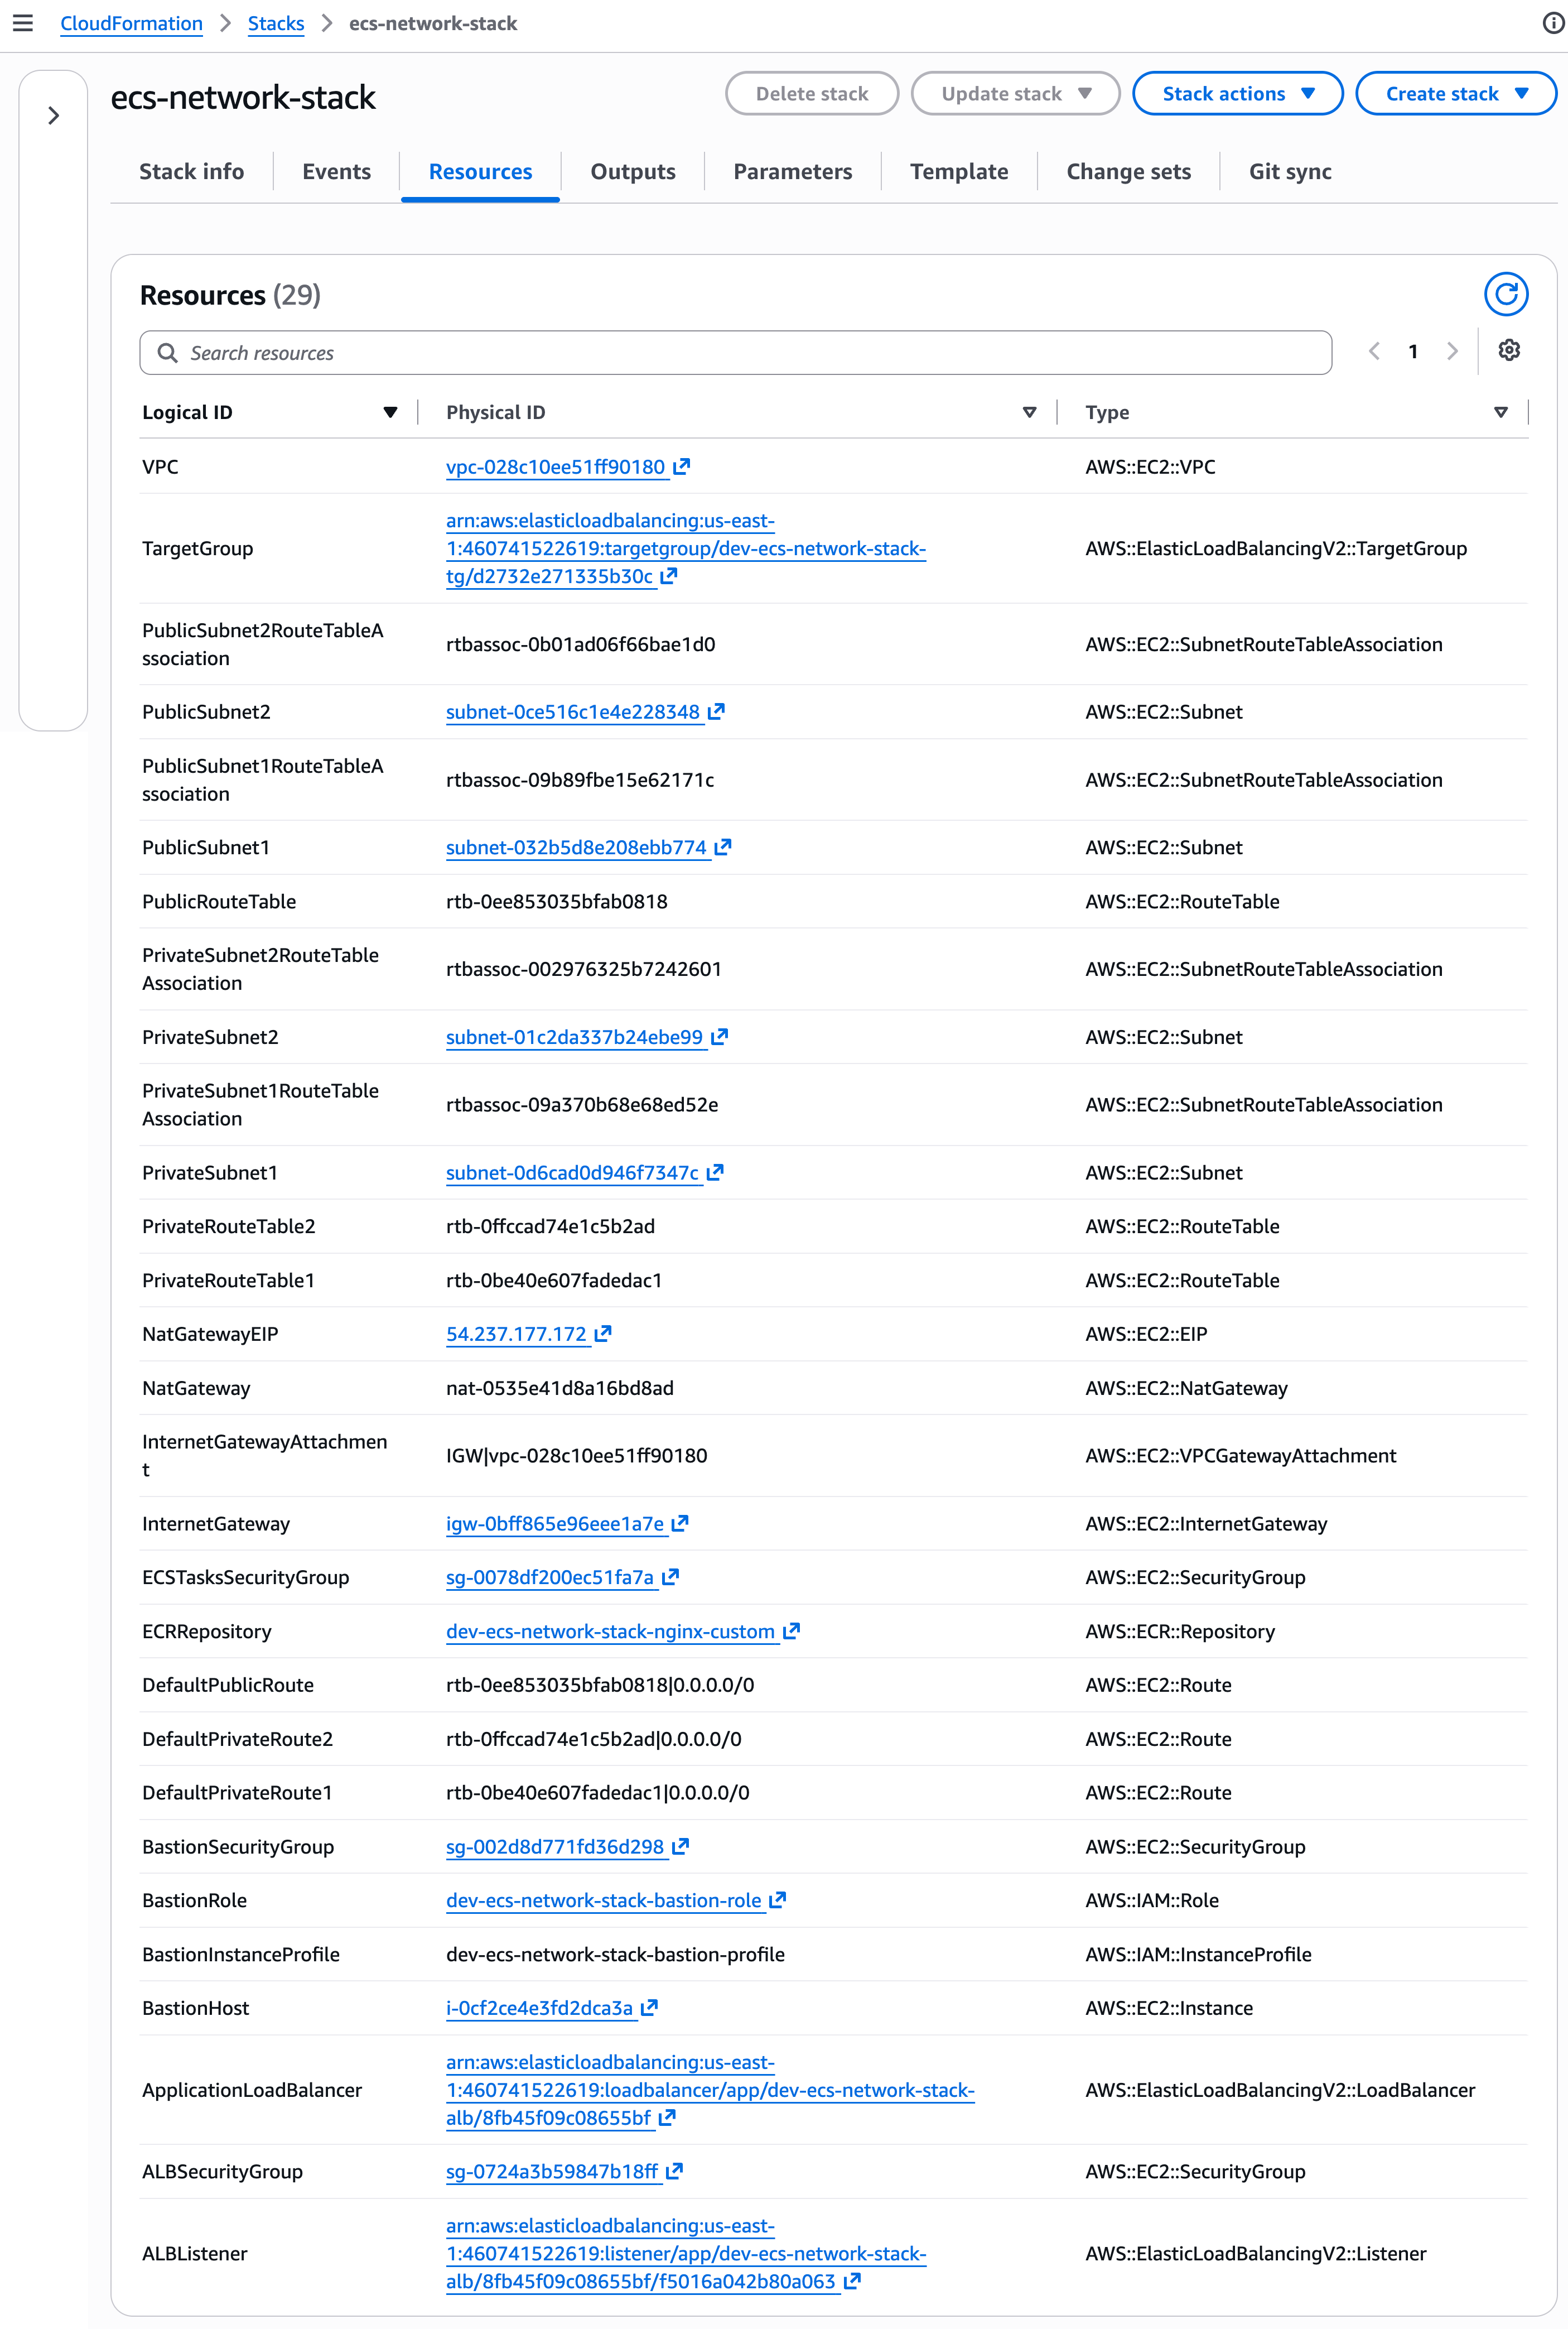
Sau khi đợi vài phút thì Stack đã tạo thành công!
2. Build Docker image
2.1 Connect to EC2 and Install Docker
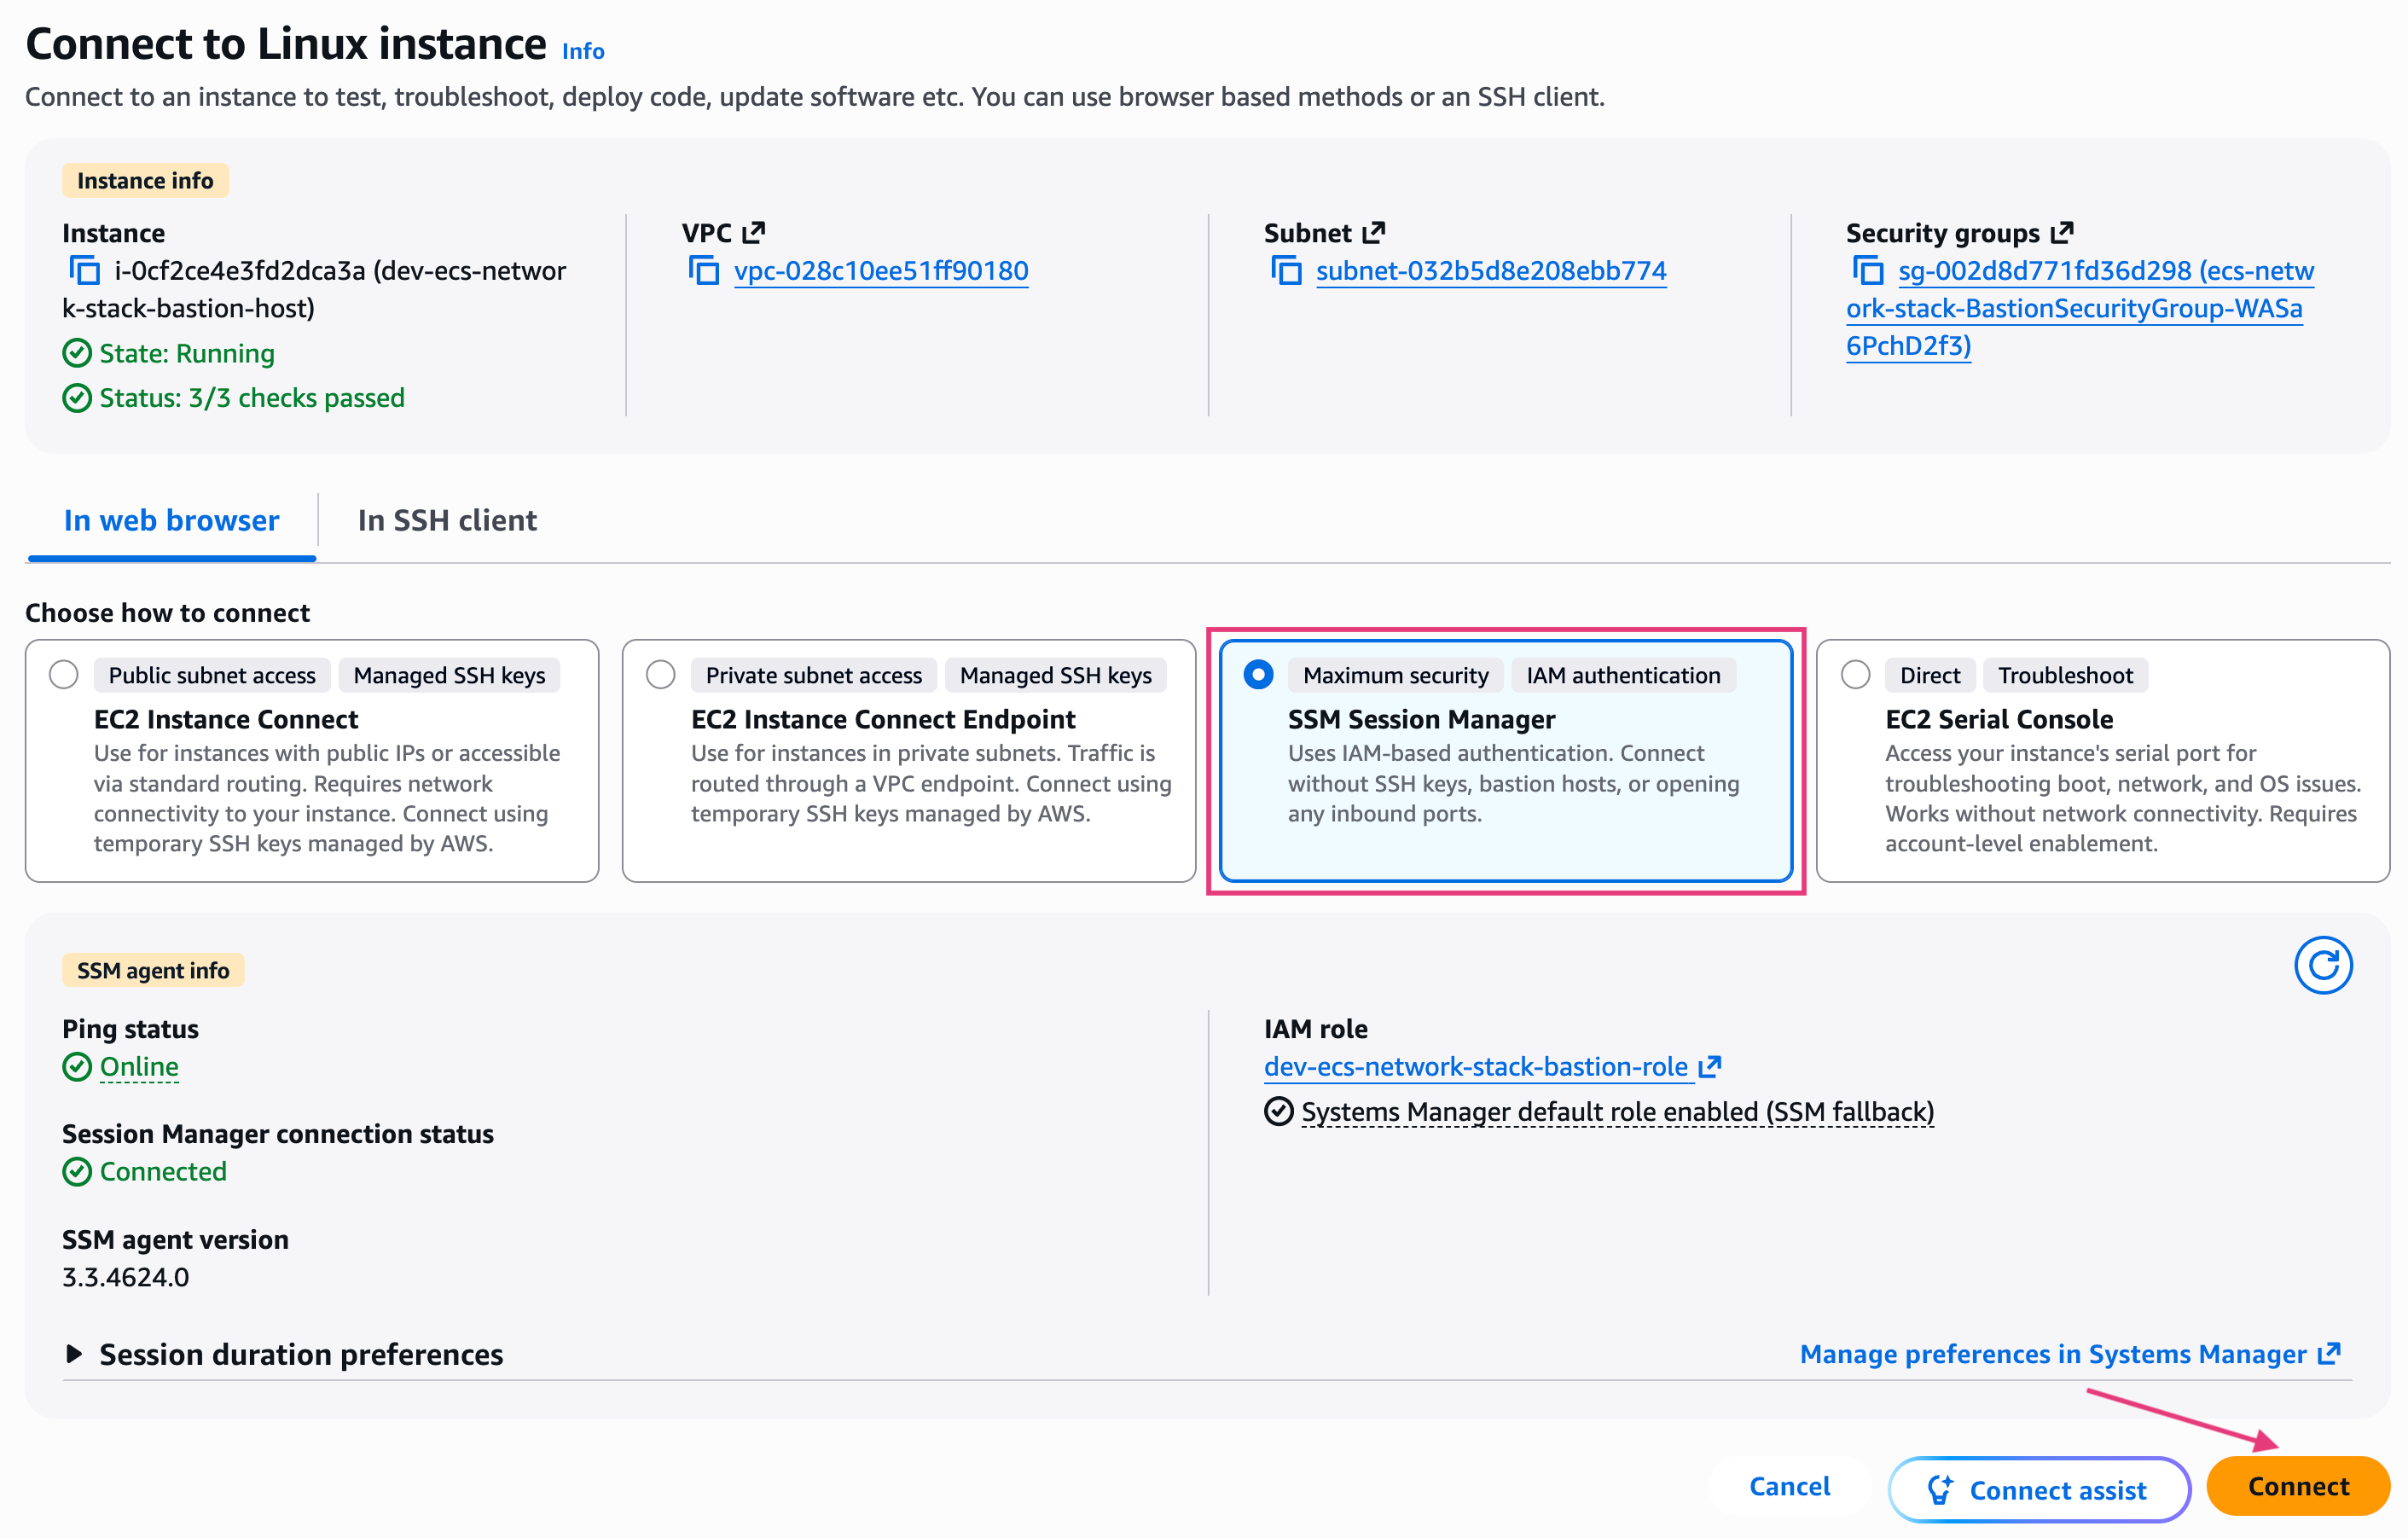
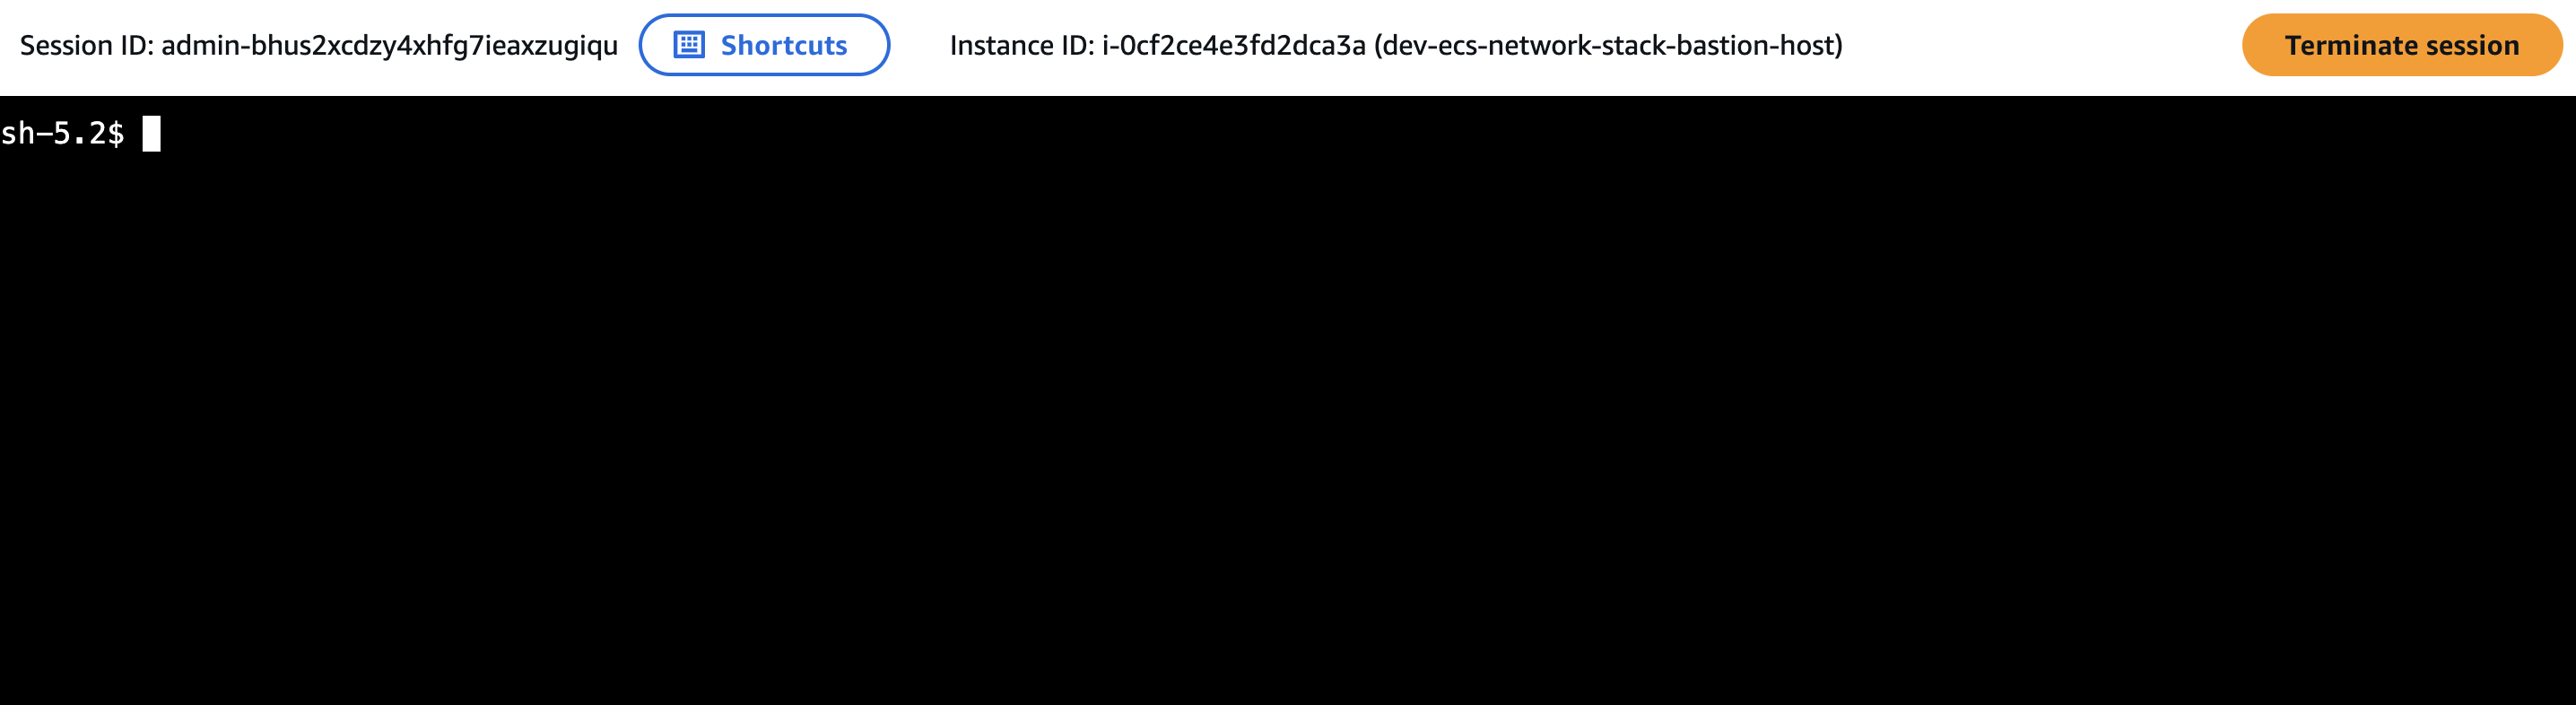
- Connect to EC2 via SSM Session Manager
- Install Docker
sudo yum update -y sudo yum -y install docker - Start Docker
sudo service docker start - Access Docker commands in ssm-user user
sudo usermod -a -G docker ssm-user sudo chmod 666 /var/run/docker.sock - Docker version
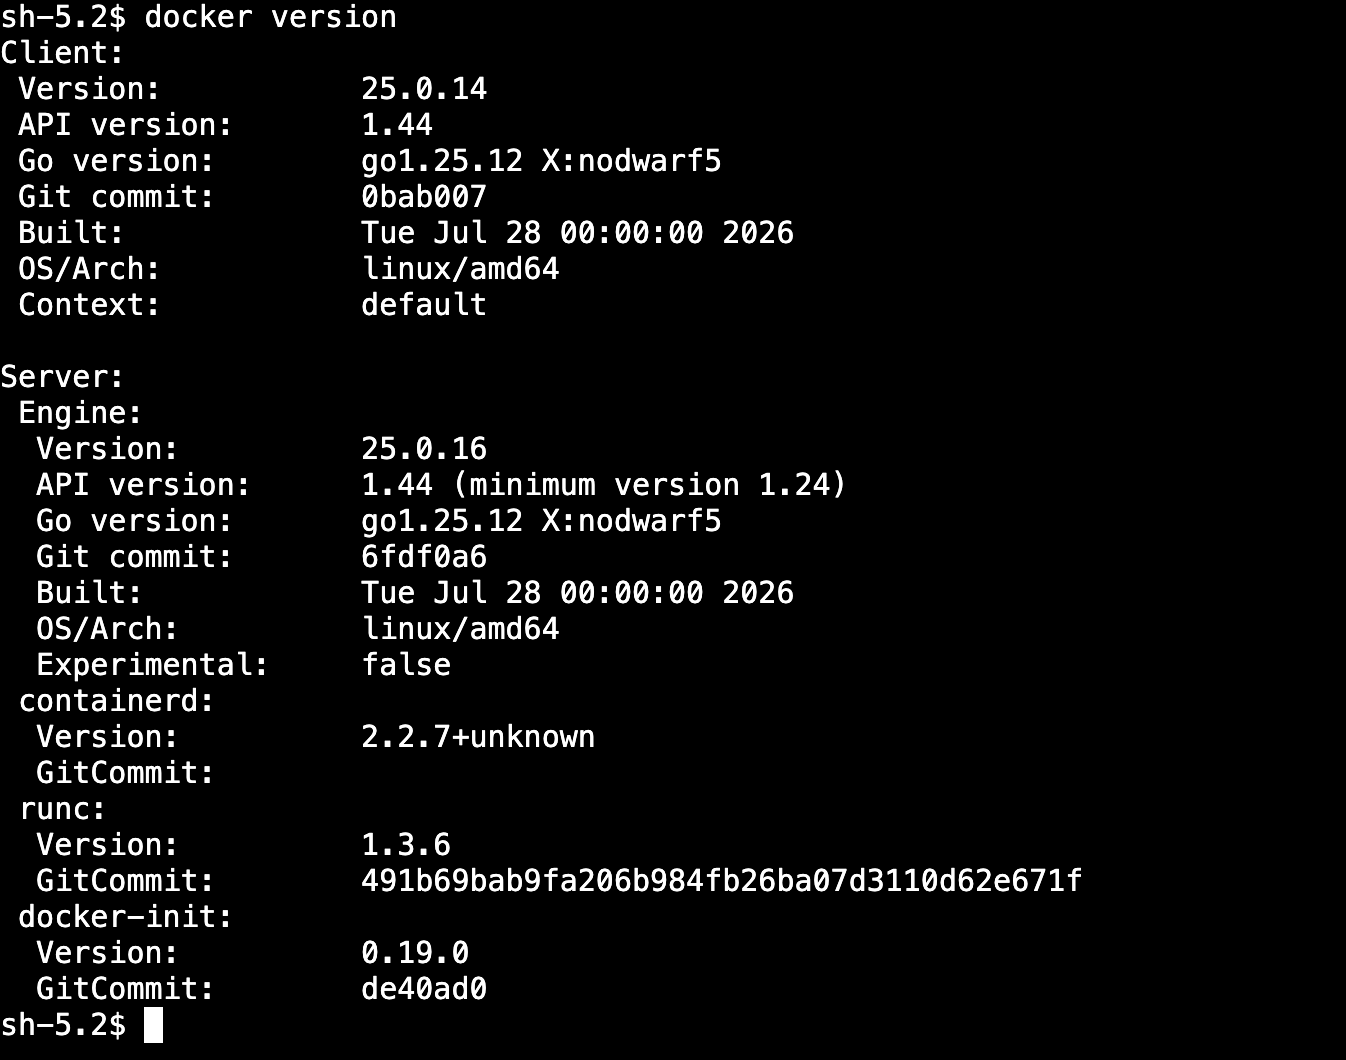
docker version
2.2 Build Docker image
- Create Custom nginx container
cd ~ mkdir nginx-app cd nginx-app/ - Create file
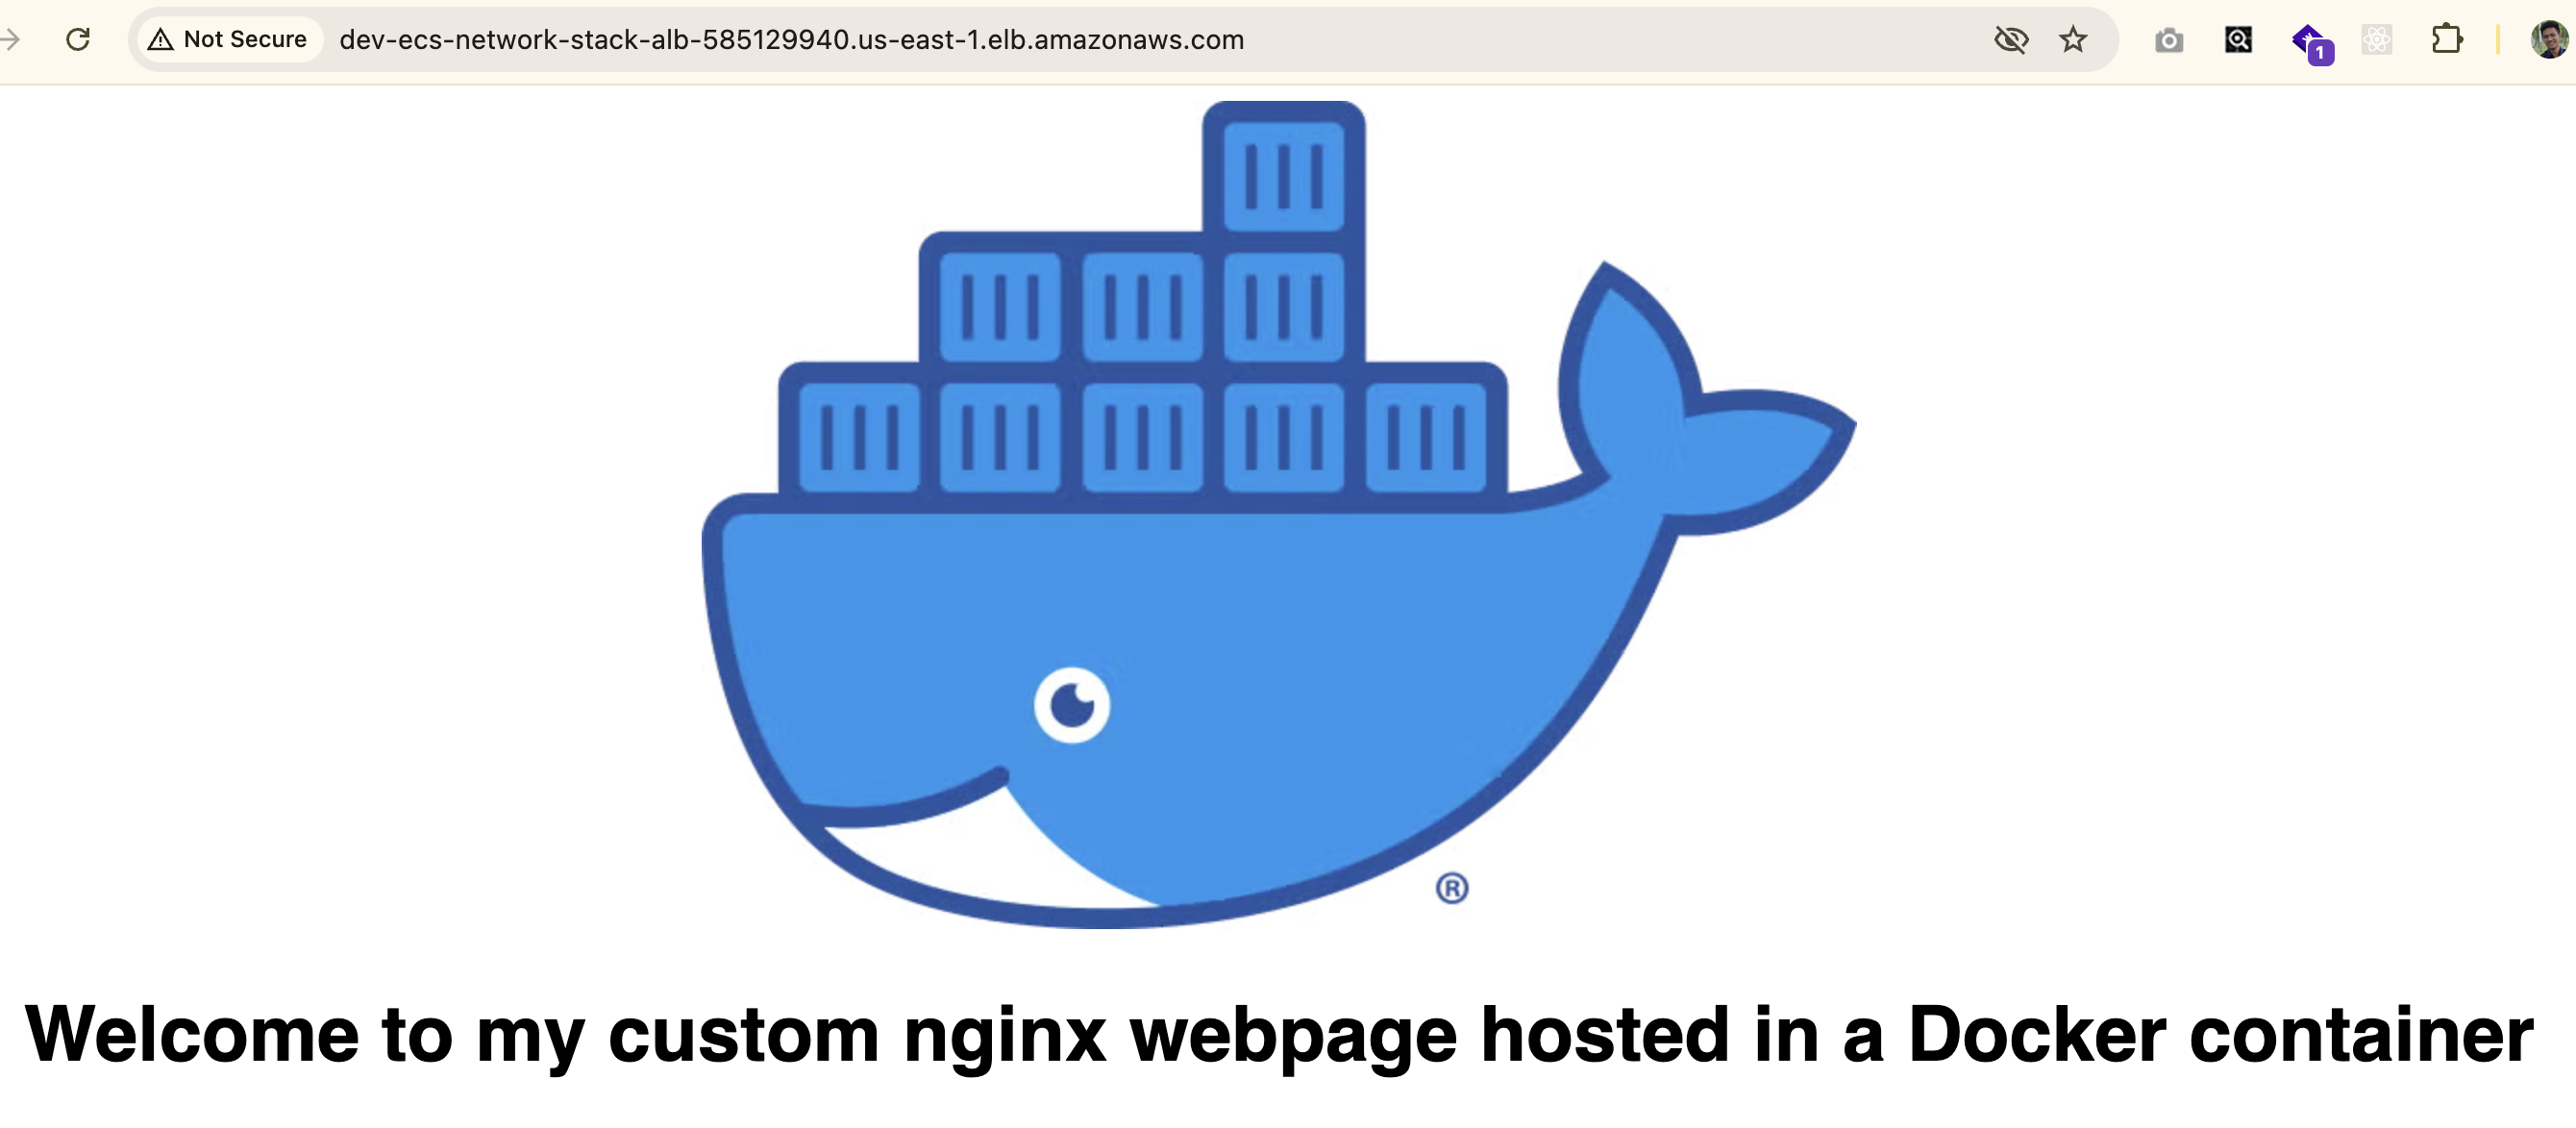
index.html<!DOCTYPE html> <html> <head> <title> ECS | CloudmentorPro Blog </title> </head> <body style=text-align:center;background-color:white;font-weight:900;font-size:20px;font-family:Helvetica,Arial,sans-serif> <img src="https://www.docker.com/wp-content/uploads/2022/03/Moby-logo.png"> <h1> Welcome to my custom nginx webpage hosted in a Docker container </h1> <p> This container was deployed: <div id="date"></div></p> <script> var date = new Date(); document.getElementById("date").innerHTML=date.toLocaleString(); </script> </body> </html> - Create
DockerfileFROM nginx:1.25.3 COPY index.html /usr/share/nginx/html EXPOSE 80 CMD ["nginx", "-g", "daemon off;"] - Build image: nginx-custom
docker build -t nginx-custom . - Docker run
docker run -d --name nginx -p 8080:80 nginx-custom - Confirm
docker ps
curl localhost:8080
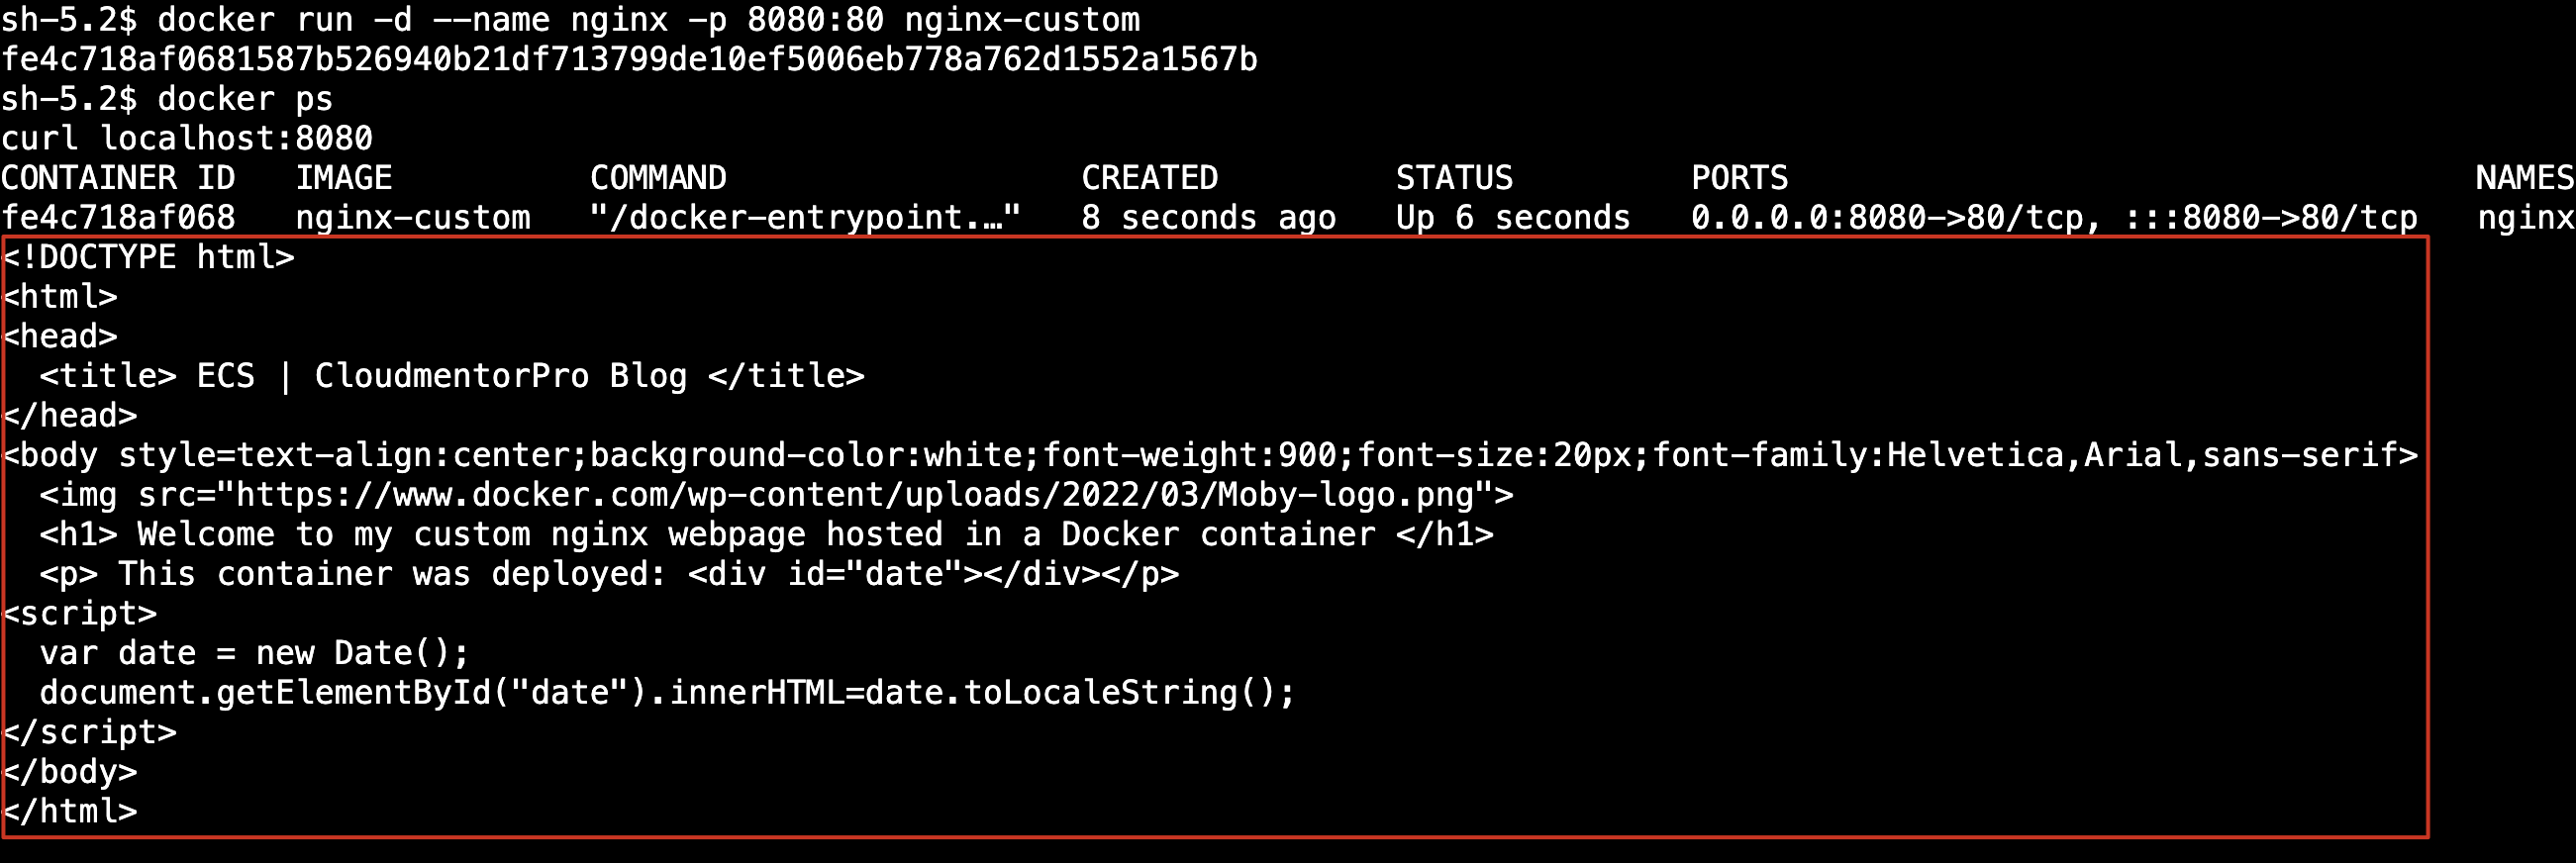
Vậy là chúng ta đã build và test docker image xong. Tiếp theo chúng ta sẽ build và push docker image lên ECR repository
2.3 Connect to Repository
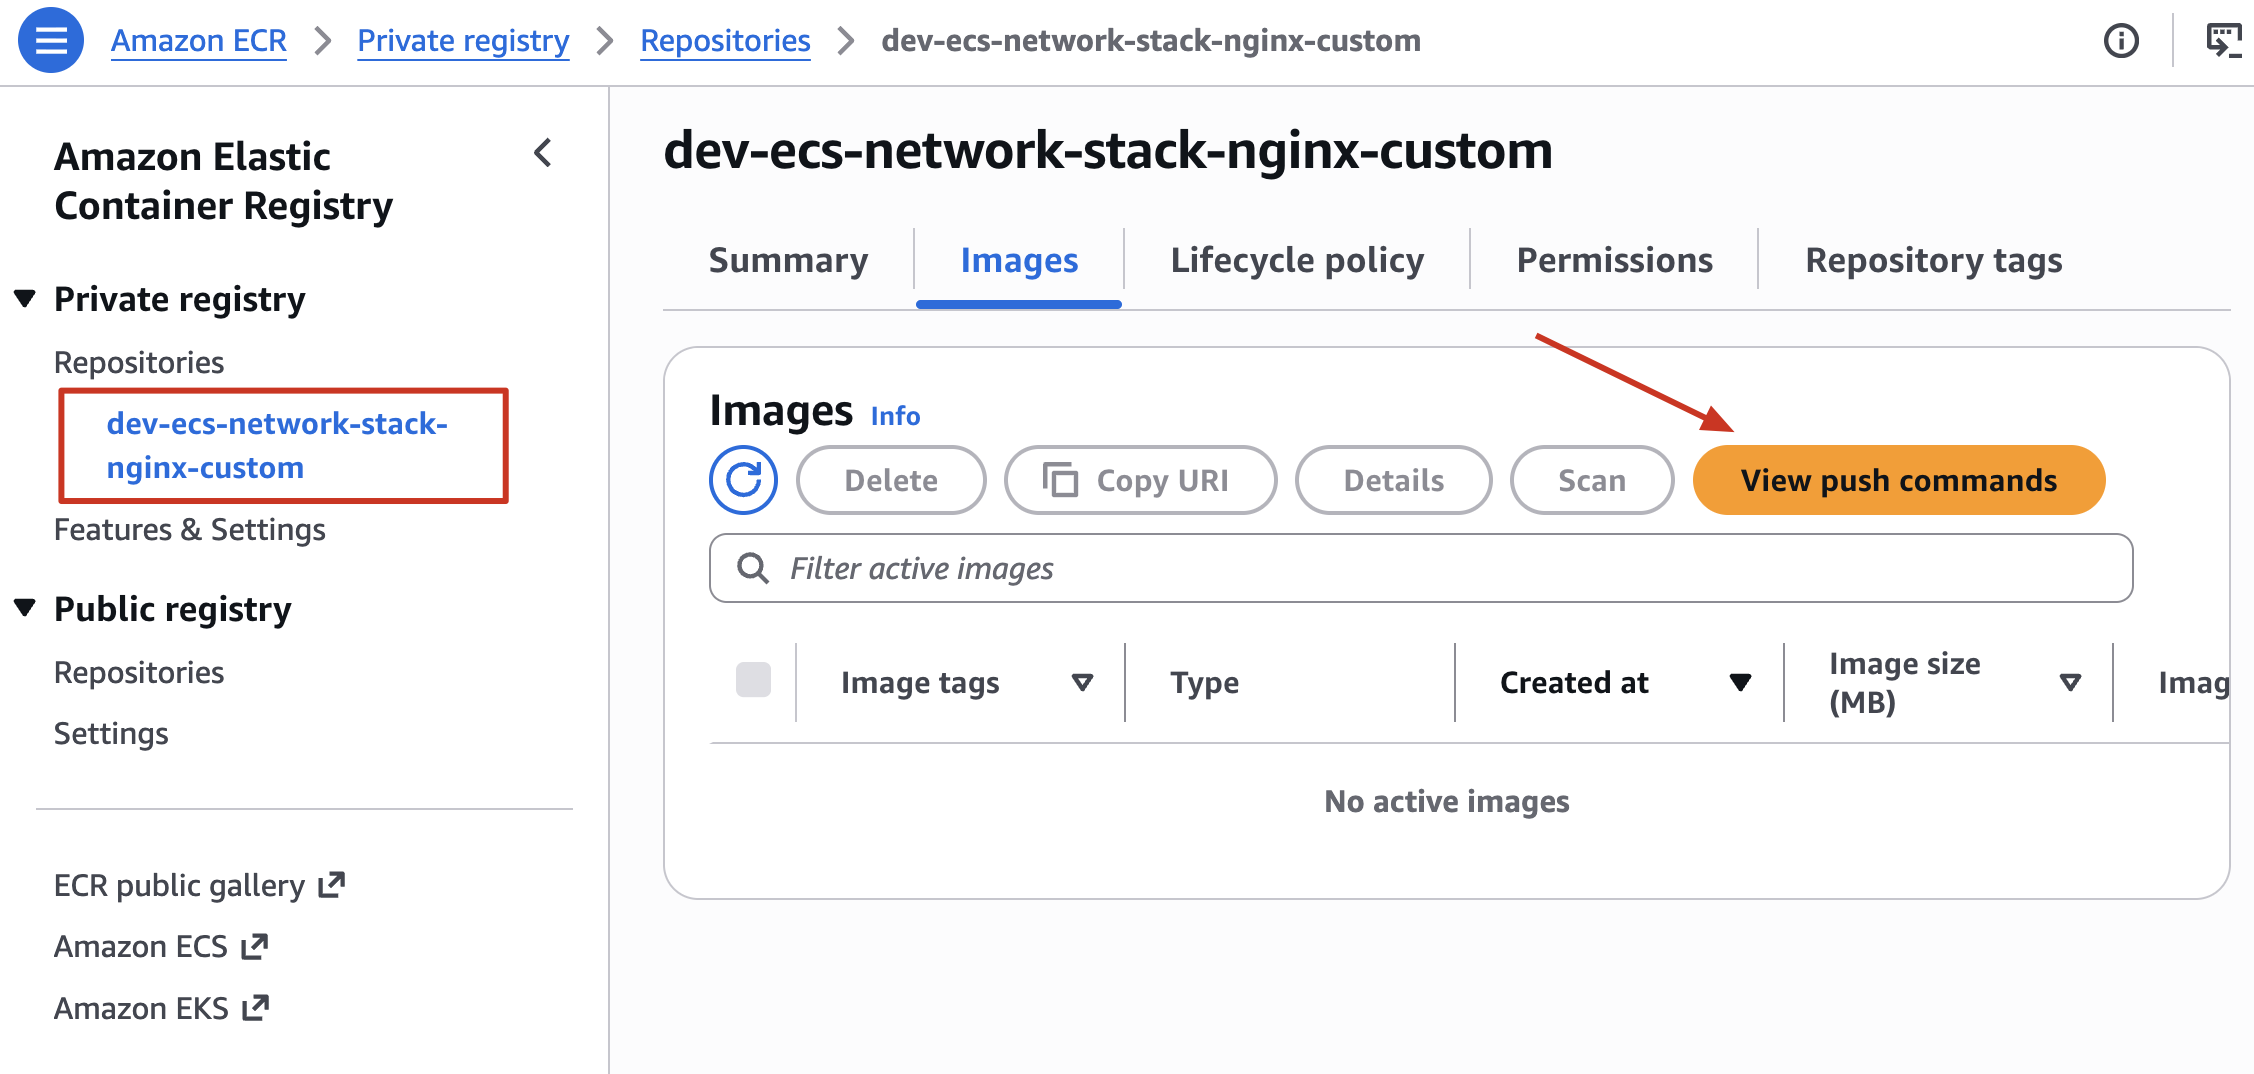
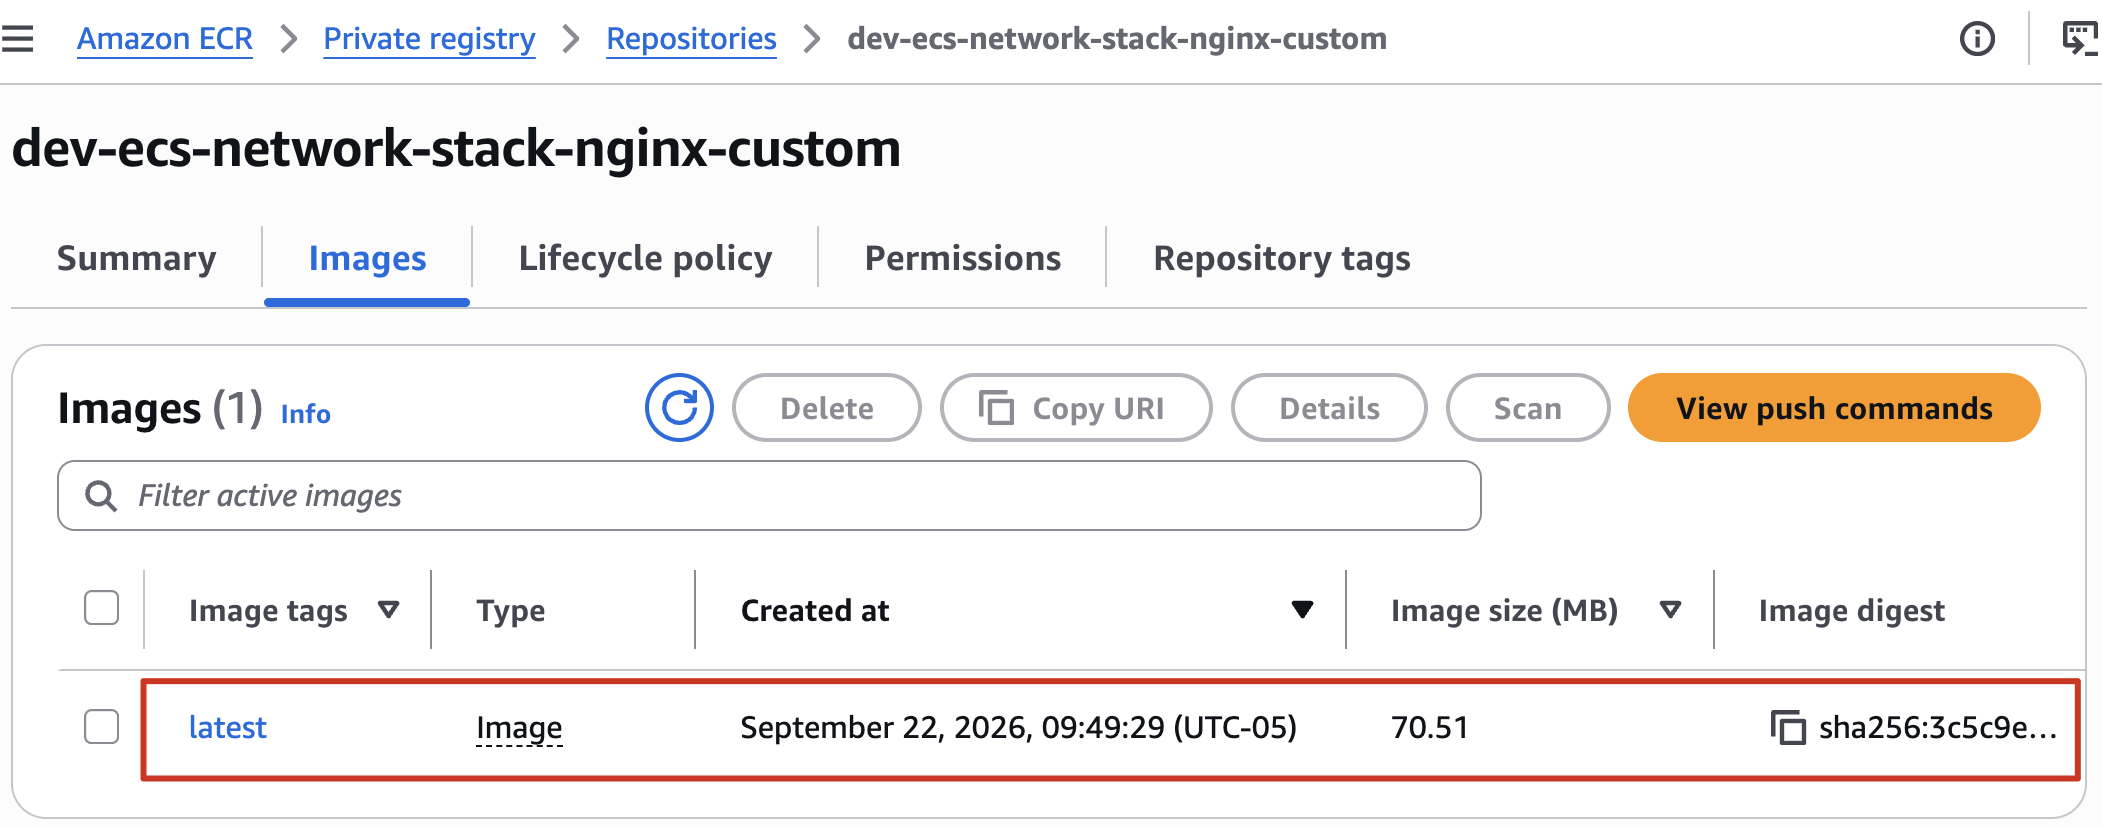
- Tại Console ECR → Repositories → dev-ecs-network-stack-nginx-custom → View push commands
- Copy và chạy lần lượt các command
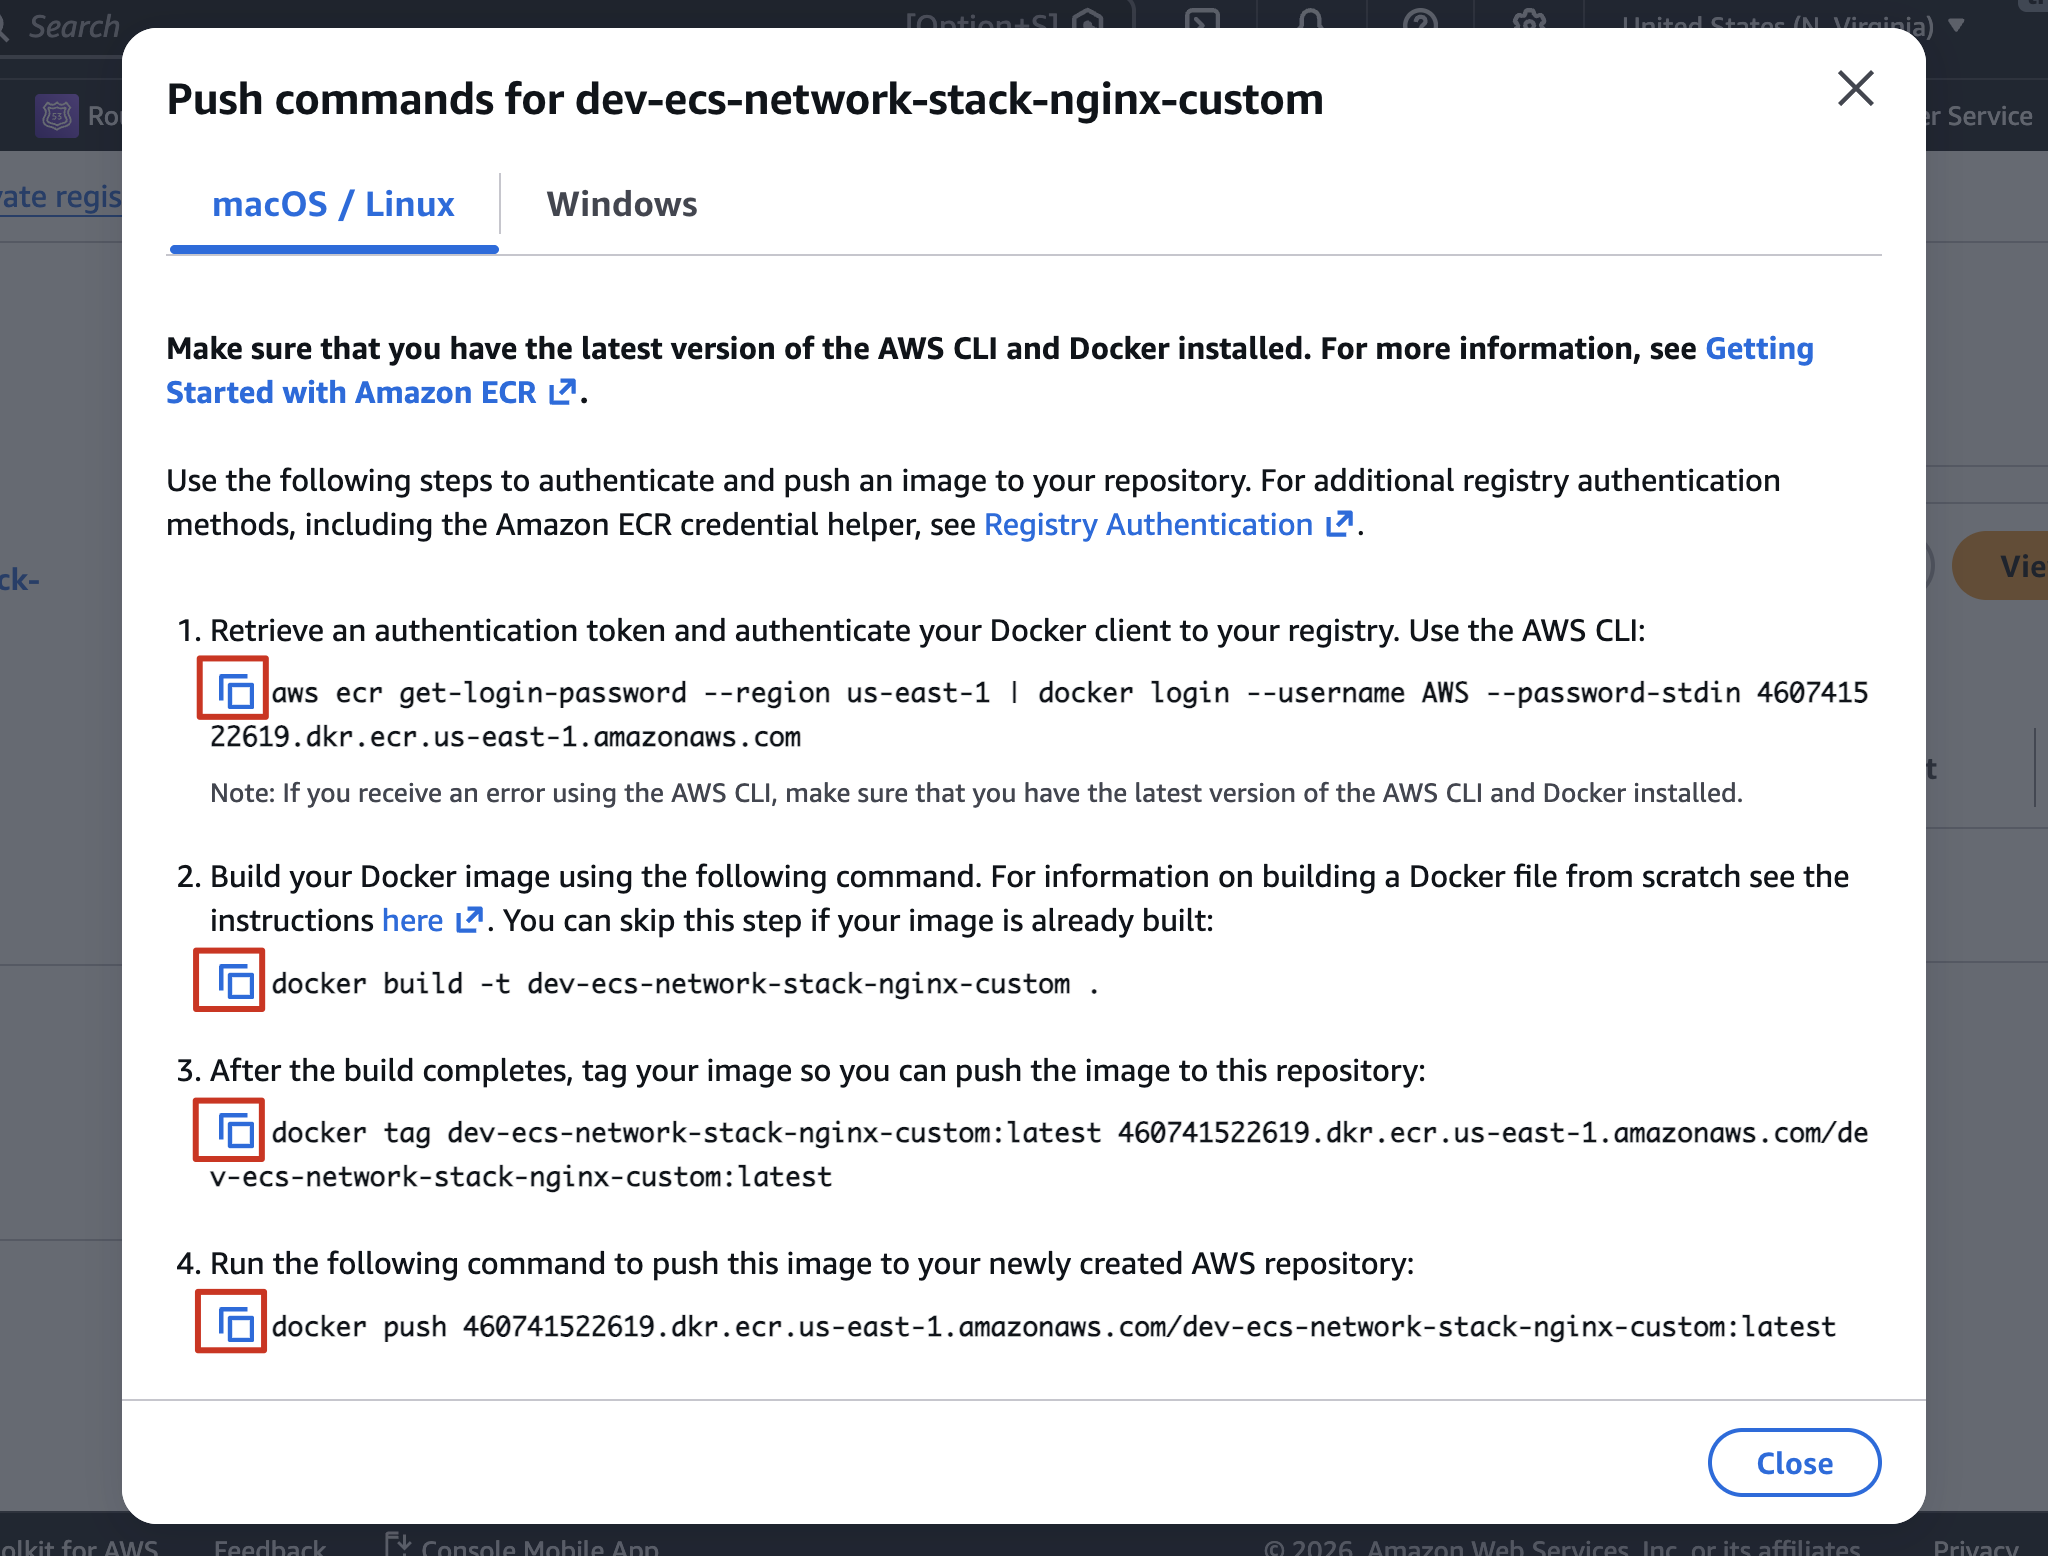
cd nginx-app- Copy command ① and run to login
- Copy command ② and run to build image
- Copy command ③ and run to tag image (có thể thay latest ở cuối command bằng một tag khác như: 20231225_1)
- Copy command ④ and run to push image to ECR (chú ý nếu thay latest ở ③ thì cũng thay tương tự ở command này: 20231225_1)
Note: mỗi lần update application chúng ta sẽ tạo ra 1 docker image với tag khác nhau, và để có thể nhanh chóng roll back về image trước đó, nên việc đặt tag riêng lẻ cho các phiên bản application được recommend.
- Confirm image had pushed to ECR
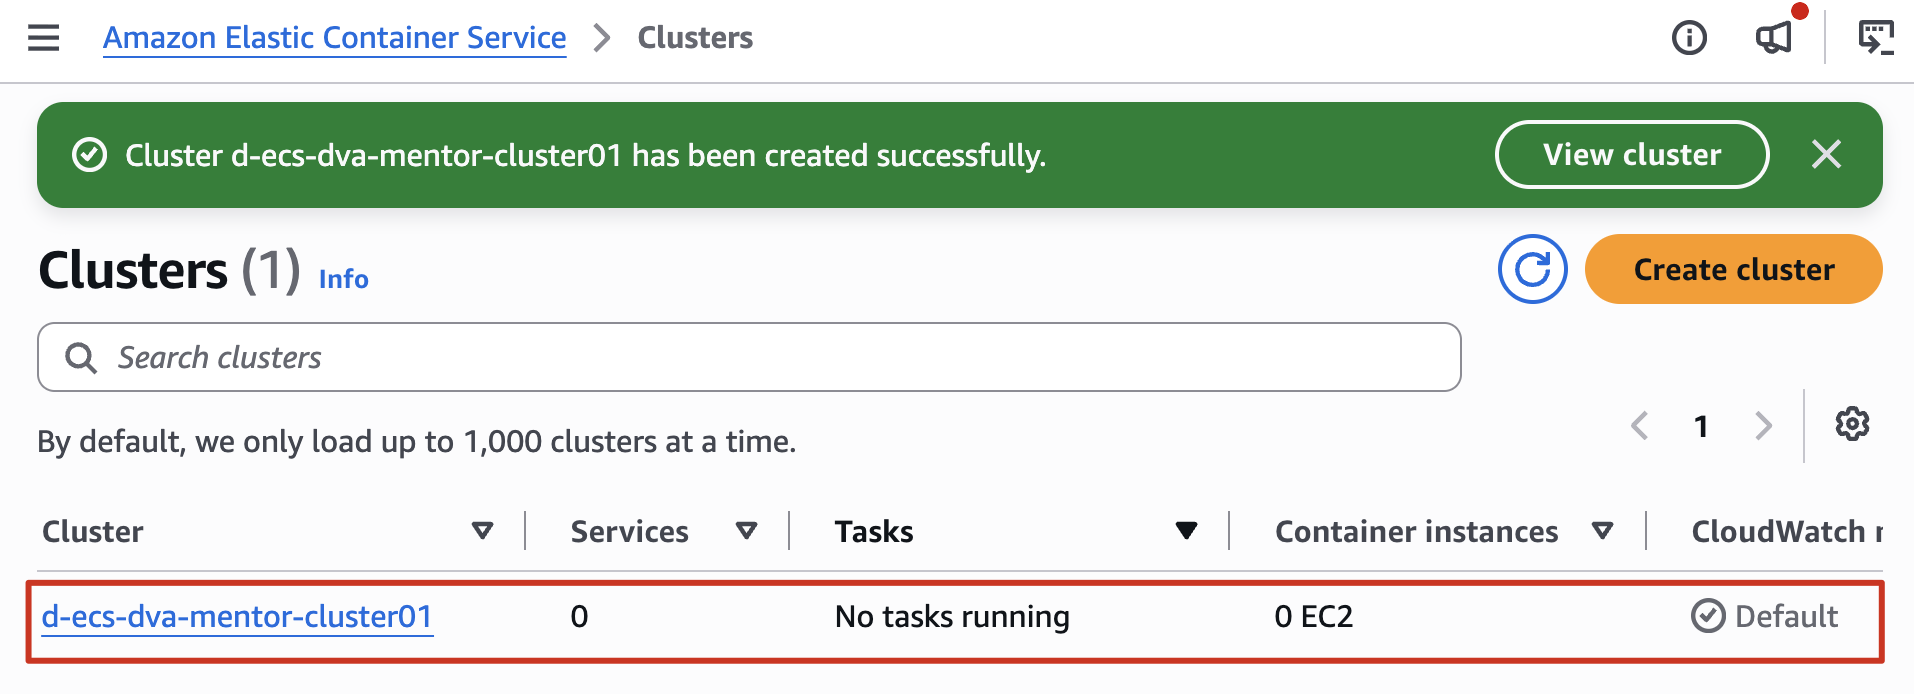
3. Create ECS Cluster
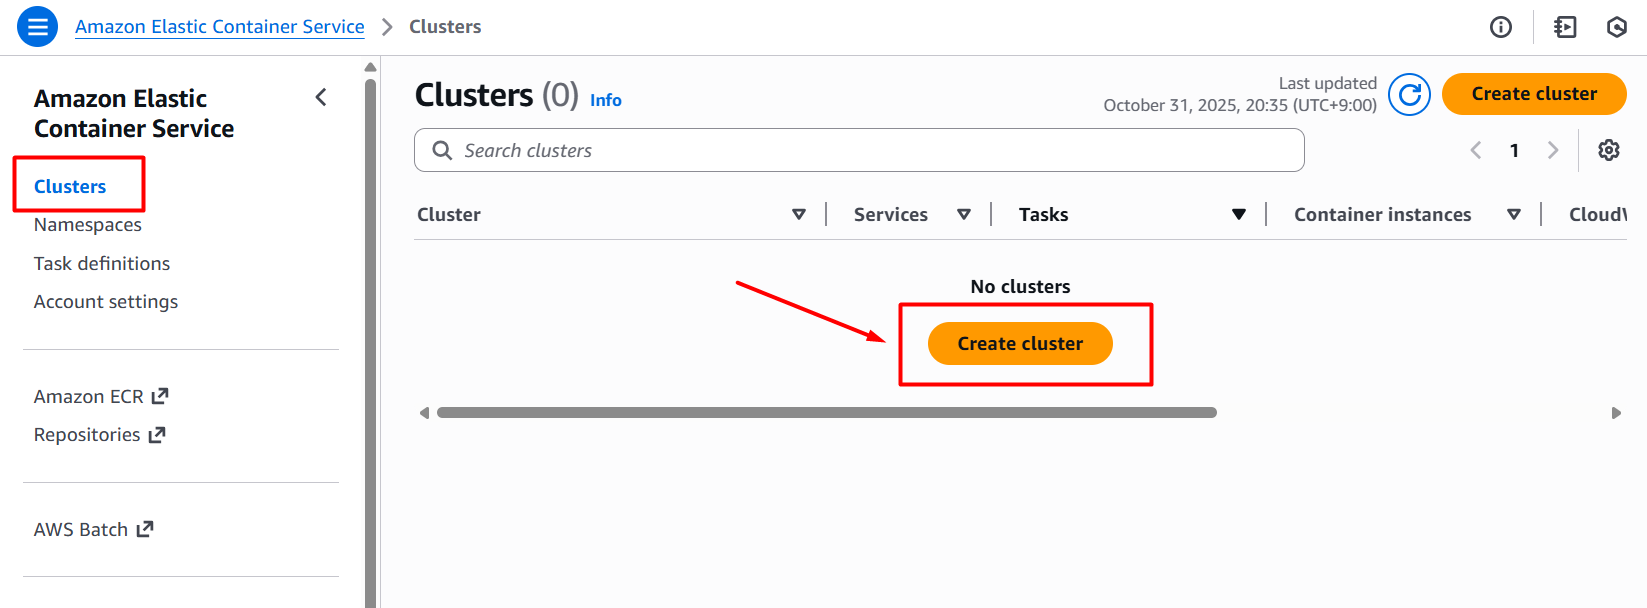
Vào Console Elastic Container Service → Clusters → Create cluster
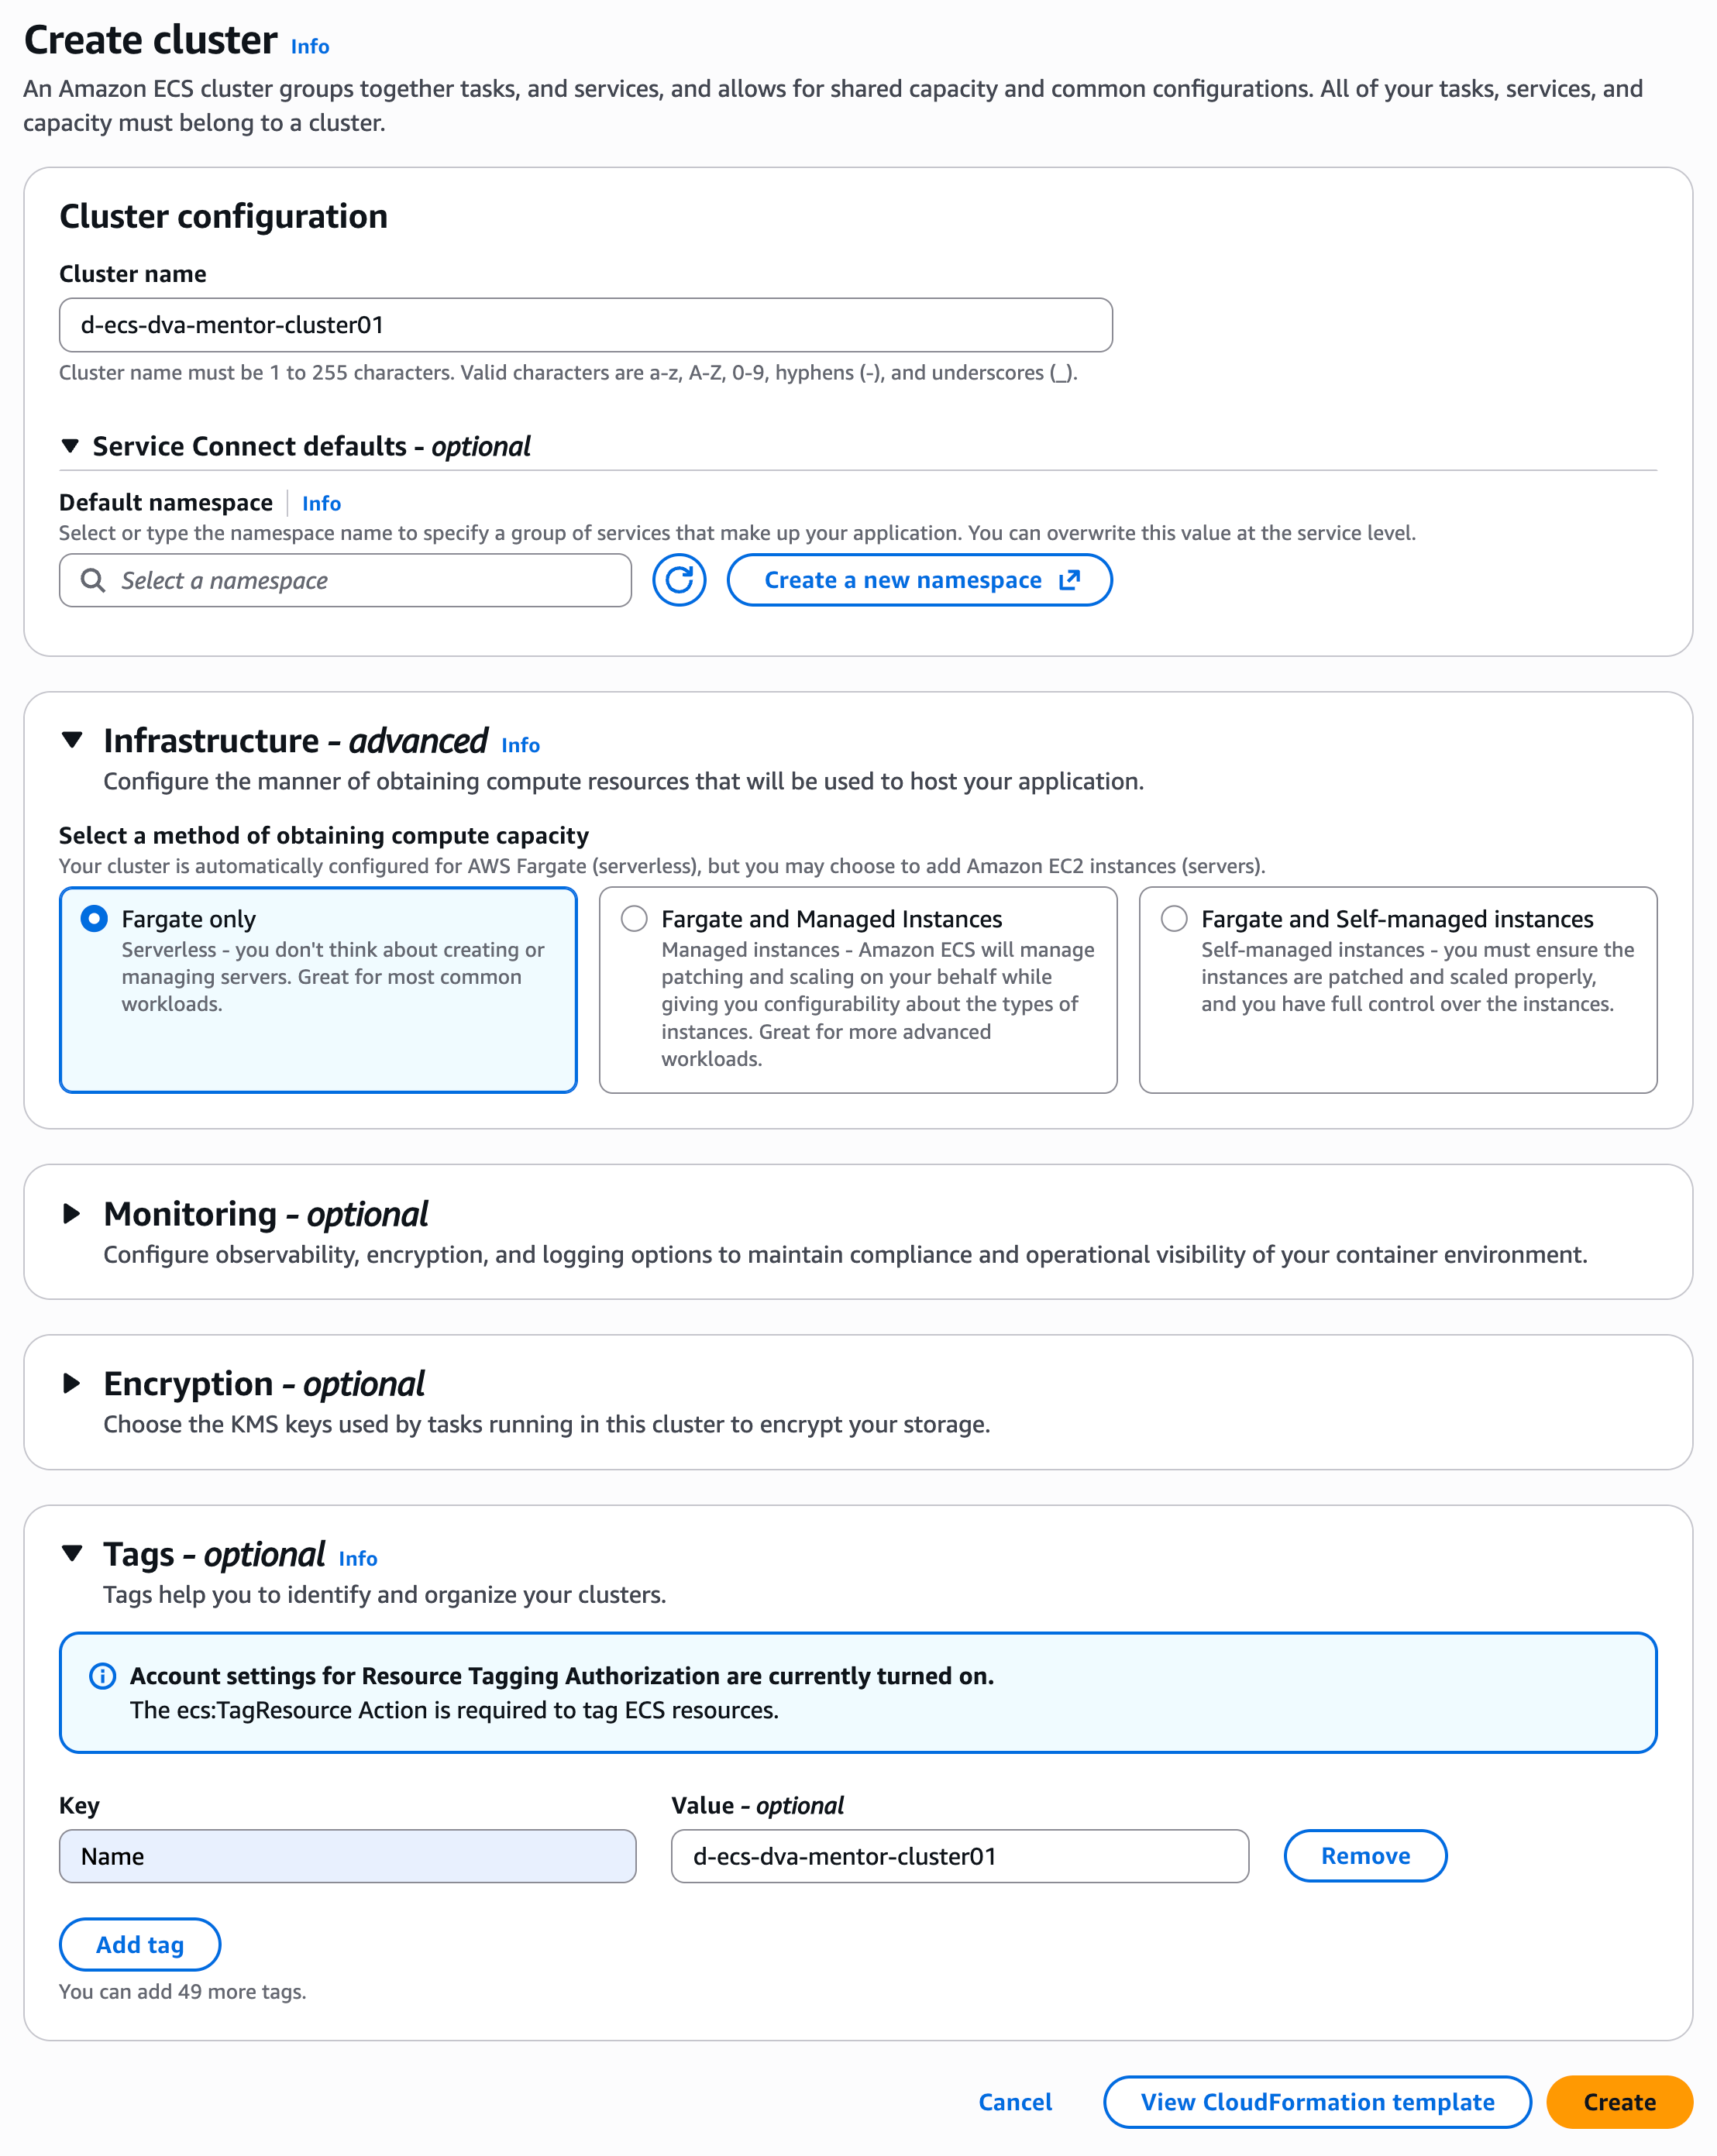
- Cluster configuration
- Cluster name:
d-ecs-dva-{yourname}-cluster01 - Chú ý: Thay
{yourname}bằng tên của bạn.
- Cluster name:
- Infrastructure - advanced
- Select a method of obtaining compute capacity:
Fargate only
- Select a method of obtaining compute capacity:
- Tags
- Key:
Name - Value:
d-ecs-dva-{yourname}-cluster01
- Key:
Hình ảnh minh họa
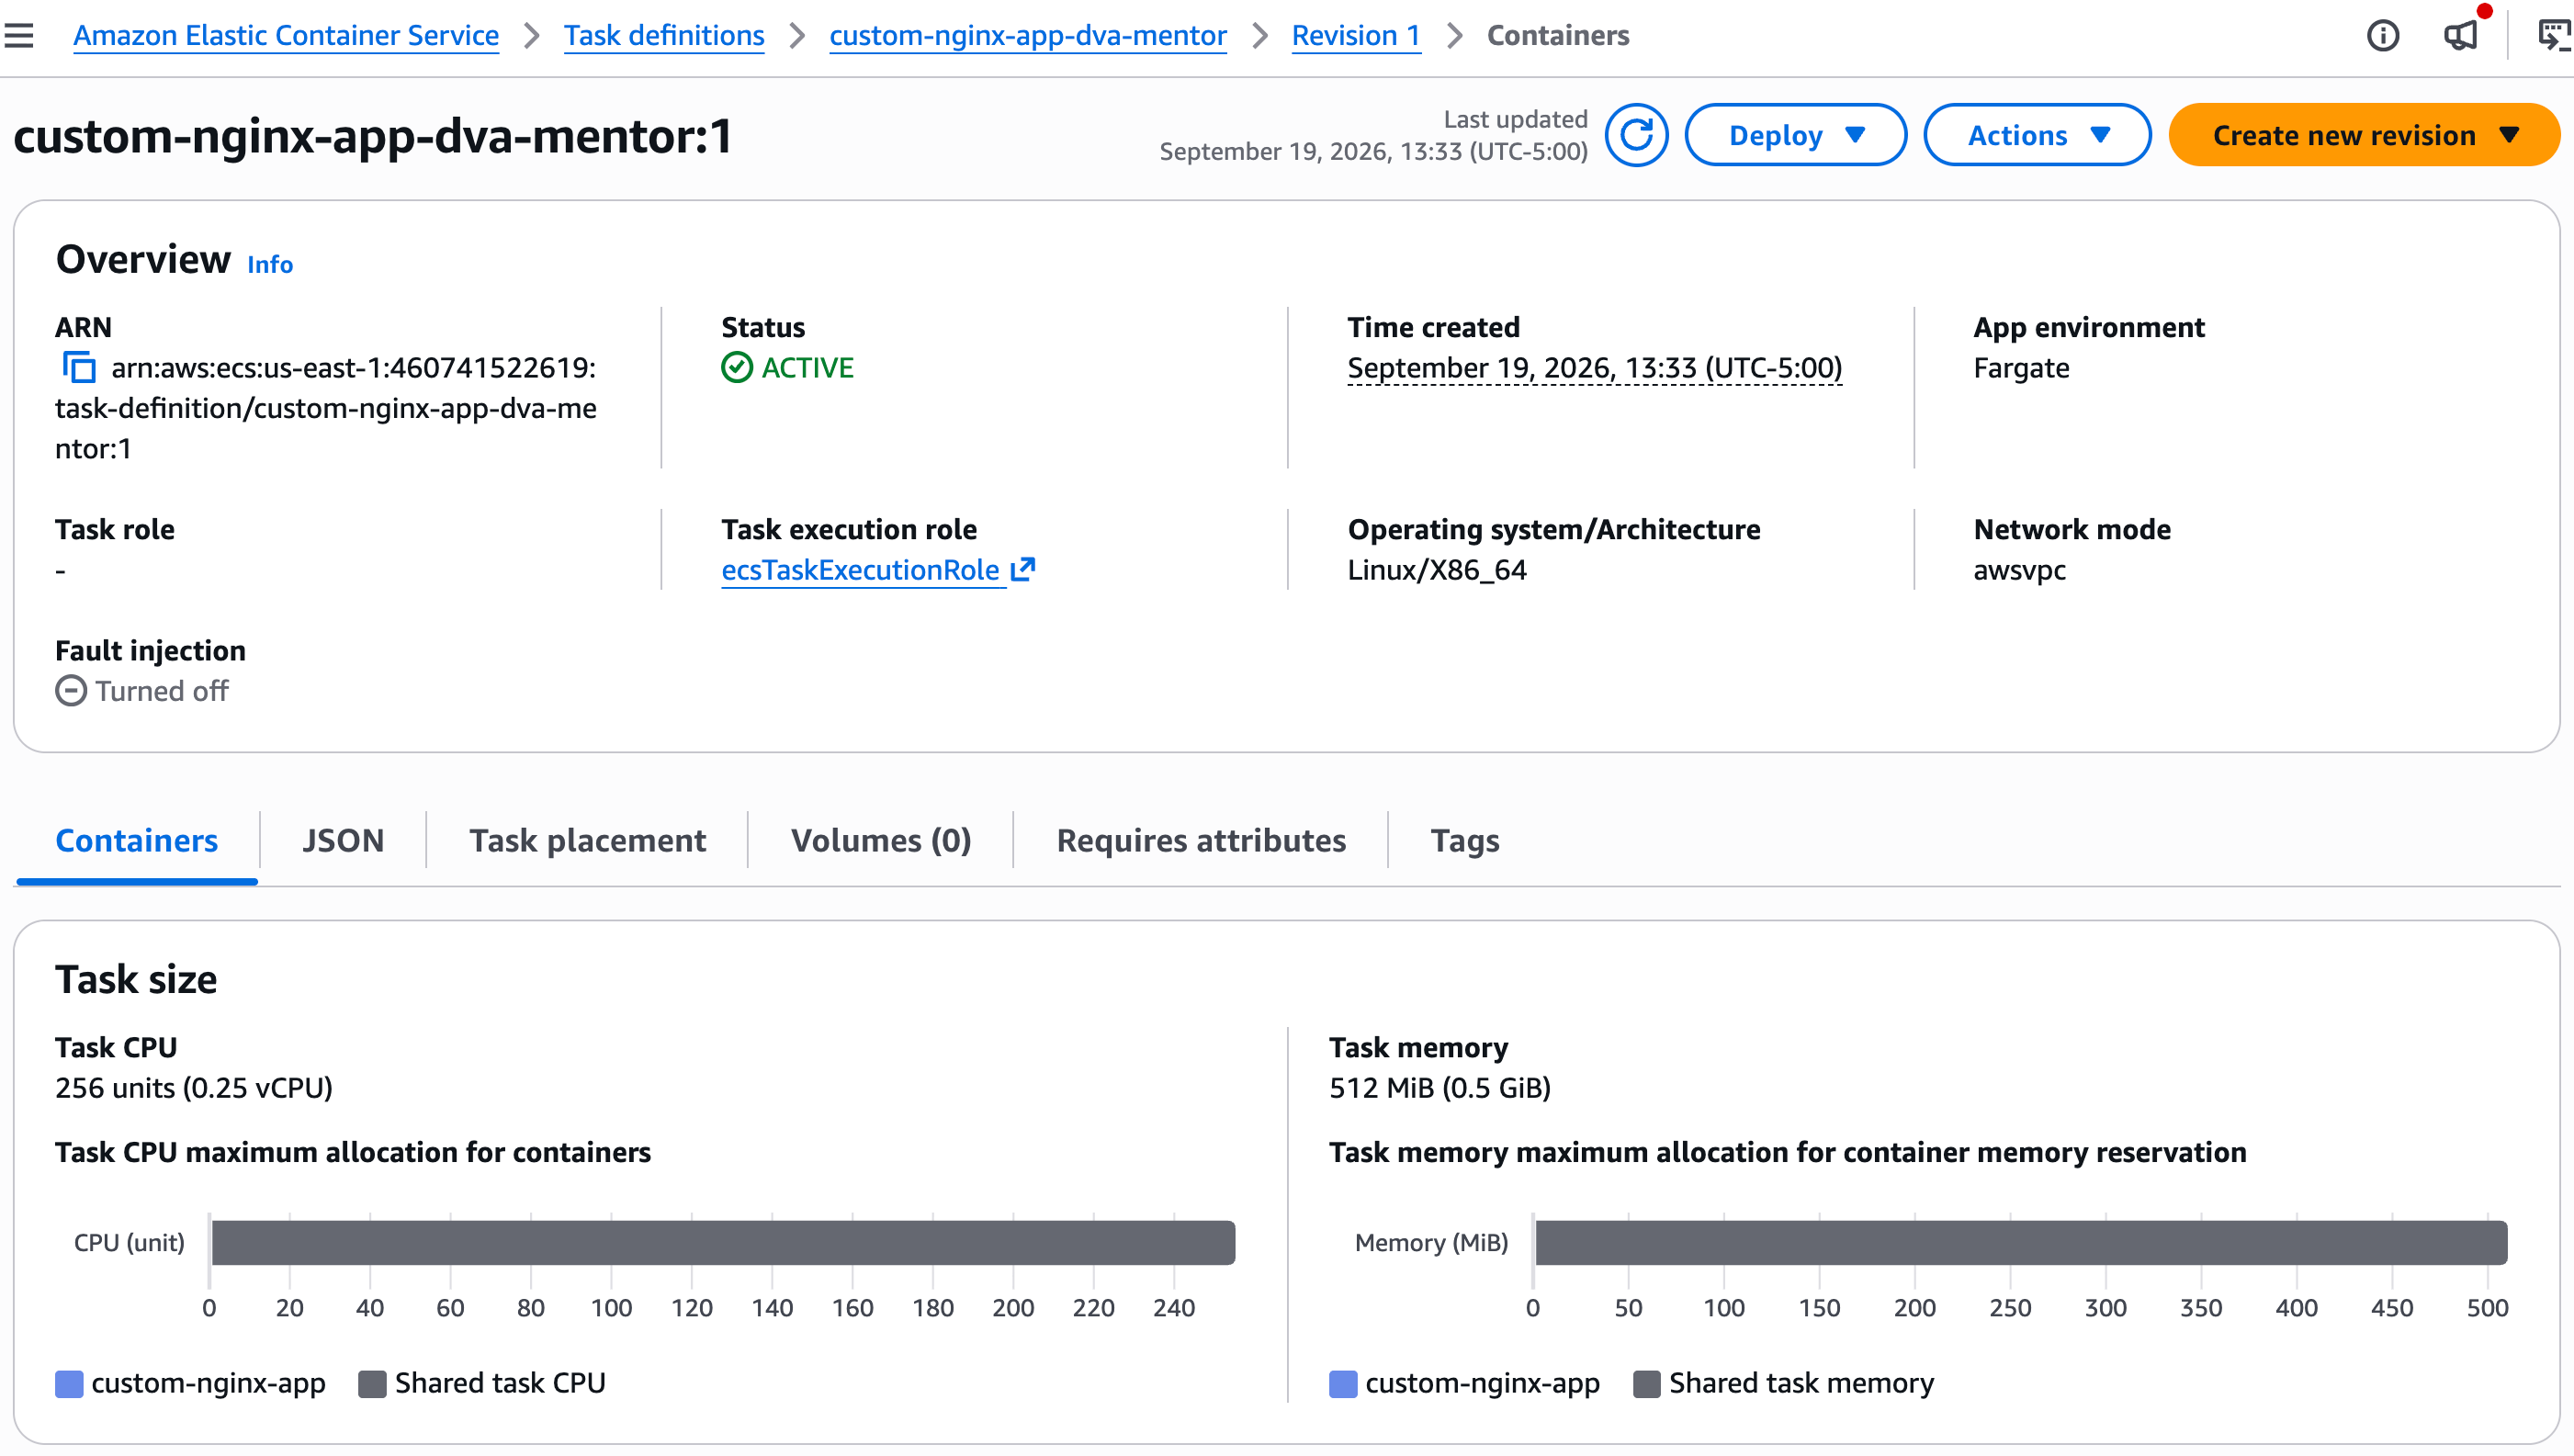
4. Create Task definition
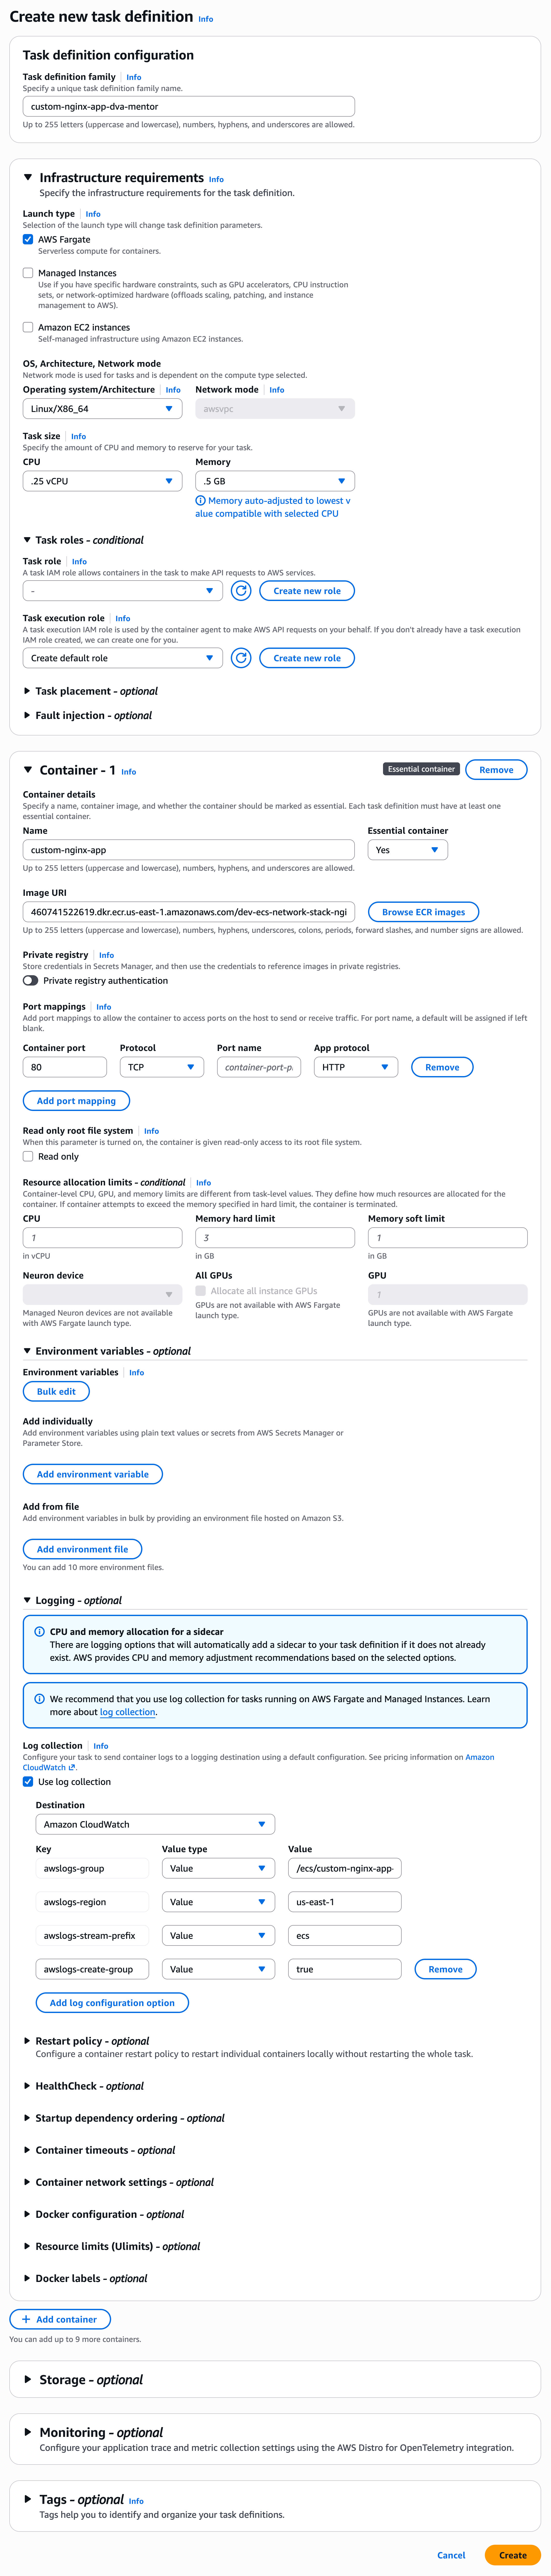
Vào Console Elastic Container Service → Task definitions → Create new task definition
- Task definition configuration
- Task definition family:
custom-nginx-app-{yourname} - Chú ý: Thay
{yourname}bằng tên của bạn.
- Task definition family:
- Infrastructure requirements
- Launch type:
AWS Fargate - Operating system/Architecture:
Linux/X86_64 - Network mode: awsvpc
- Task size
- CPU:
.25 vCPU - Memory:
.5 GB
- CPU:
- Task role:
- - Task execution role:
Create default role( giúp ECS task có quyền Pull image từ ECR + ghi log CloudWatch )
- Launch type:
- Container - 1
- Container details
- Name:
custom-nginx-app - Image URI:
Copy URI từ ECR repository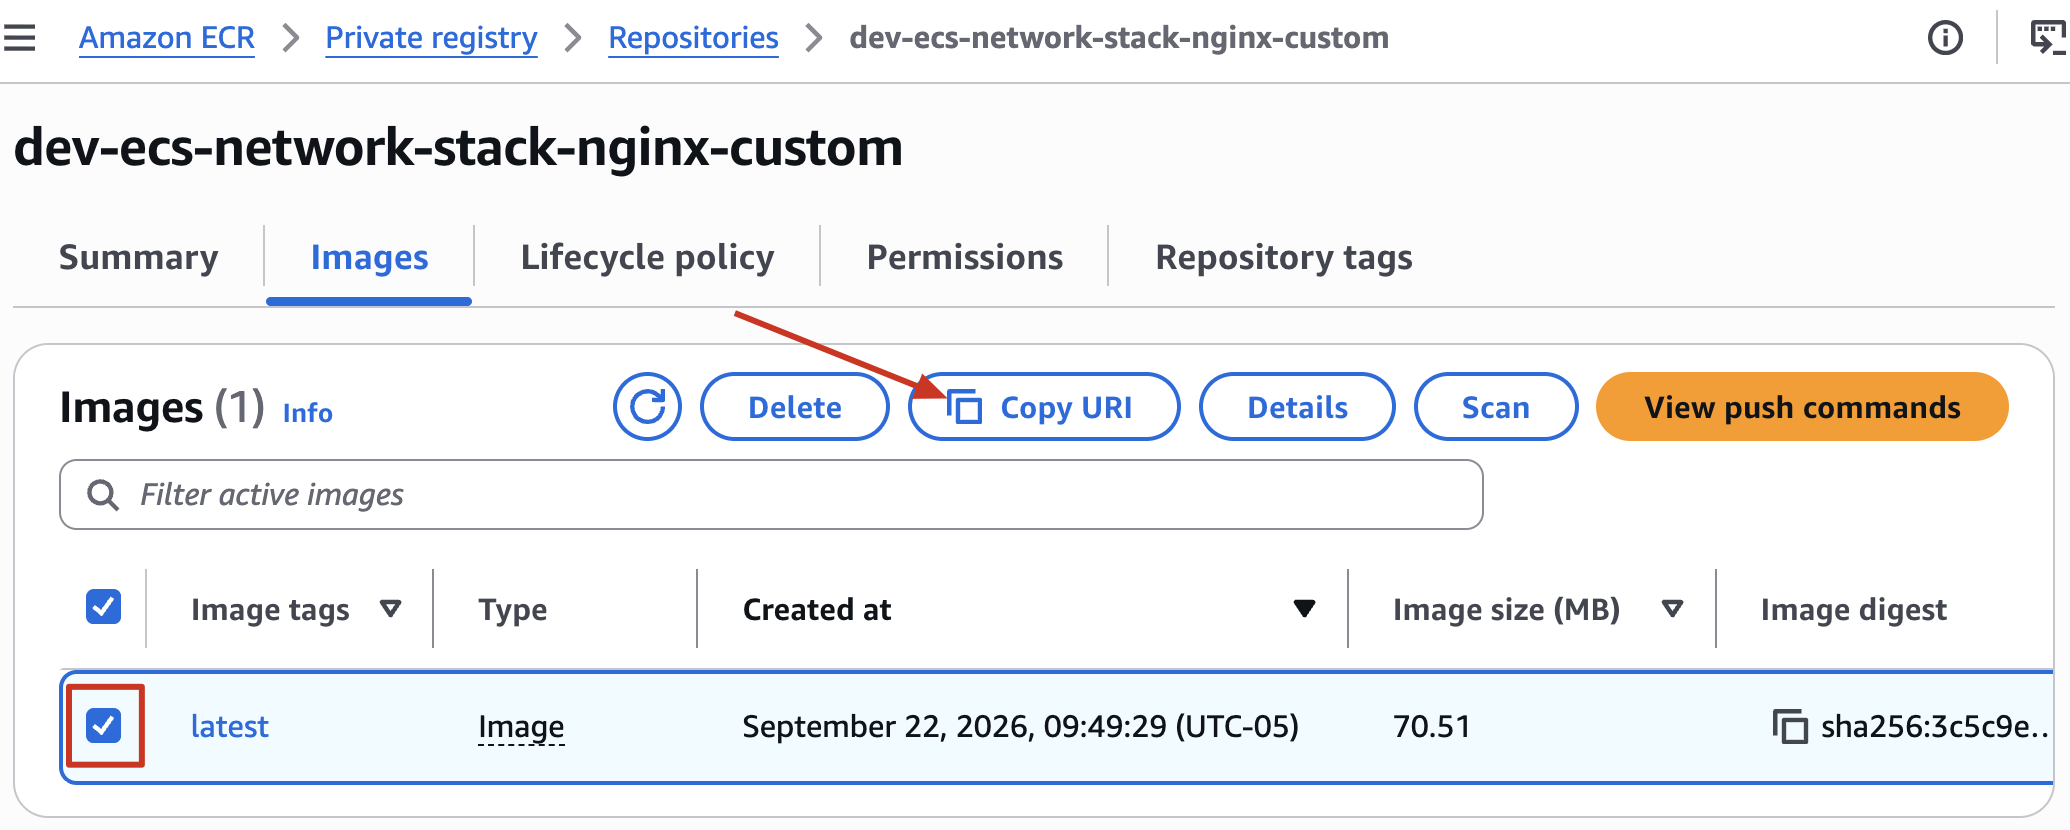
- Name:
- Container details
- Các Setting khác để default
Hình ảnh minh họa
5. Create ECS Service
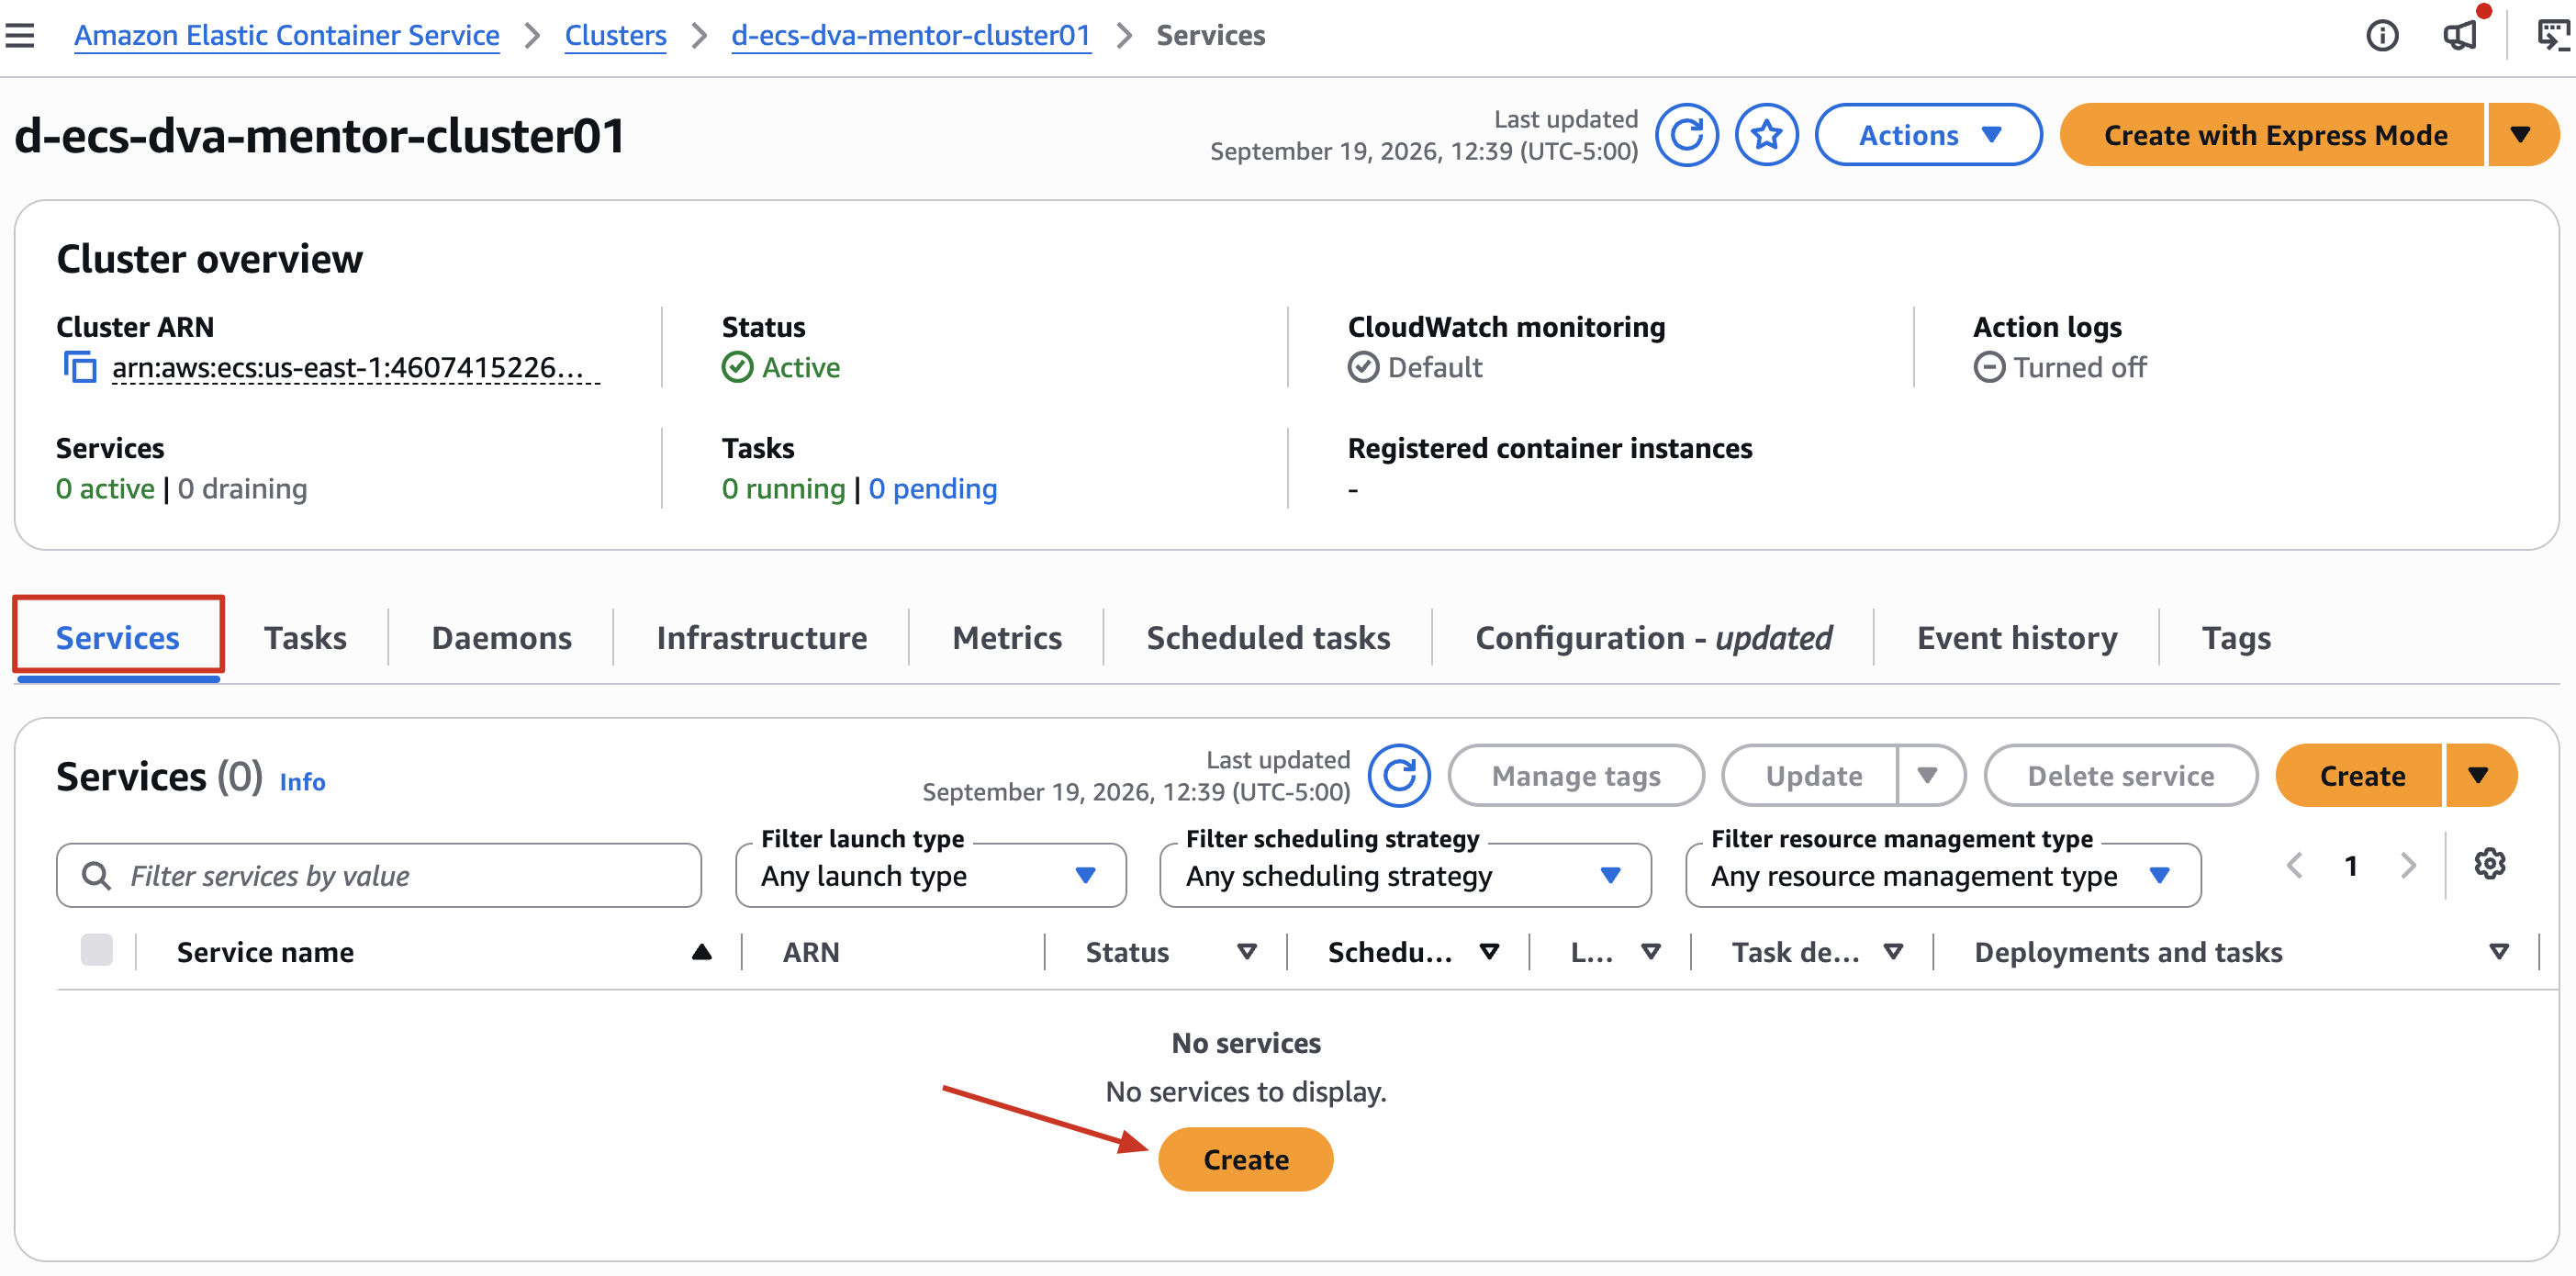
- Vào Console Elastic Container Service → Clusters → Chọn
d-ecs-dva-{yourname}-cluster01 - Tại tab Services → Create
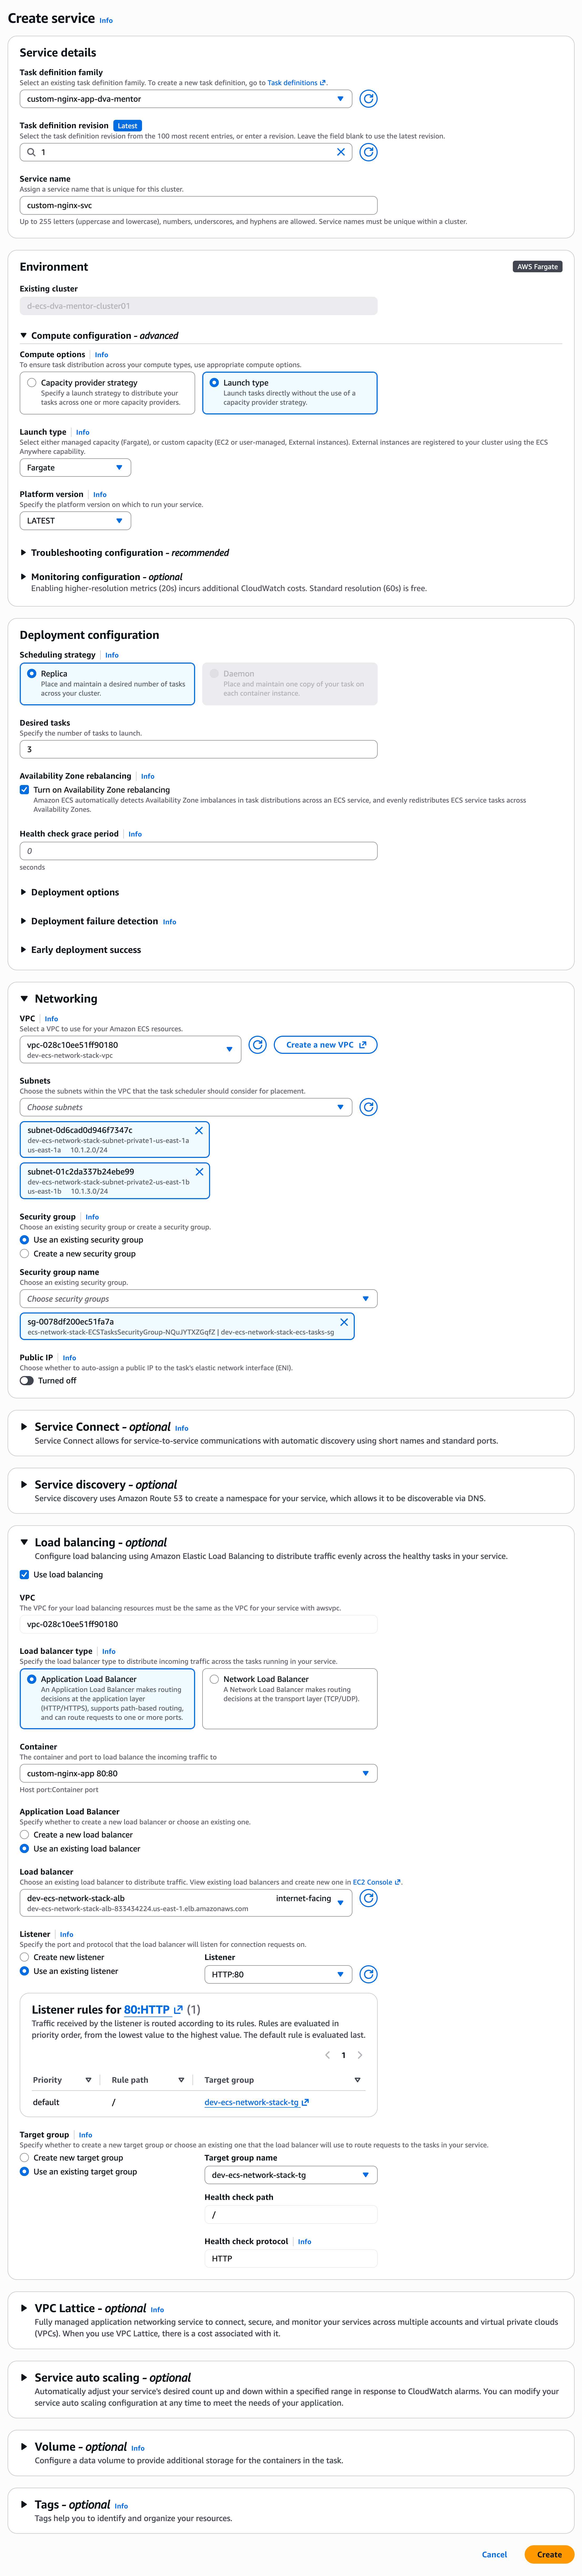
- Service details
- Task definition family:
custom-nginx-app-{yourname} - Task definition revision:
(LATEST)(Chọn version LATEST) - Service name:
custom-nginx-svc
- Task definition family:
- Environment
- Compute options:
Launch type - Launch type:
Fargate
- Compute options:
- Deployment configuration
- Scheduling strategy:
Replica - Desired tasks:
3 - Các setting khác để default
- Scheduling strategy:
- Networking
- VPC:
dev-ecs-network-stack-vpc - Subnets:
dev-ecs-network-stack-subnet-private1-us-east-1adev-ecs-network-stack-subnet-private2-us-east-1b
- Security group:
dev-ecs-network-stack-ecs-tasks-sg - Public IP:
Turned off
- VPC:
- Load balancing - optional
- Use load balancing:
✅ - VPC:
dev-ecs-network-stack-vpc - Load balancer type:
Application Load Balancer - Container:
custom-nginx-app 80:80 - Load balancer:
dev-ecs-network-stack-alb - Listener:
Use an existing listener- Listener:
80:HTTP
- Listener:
- Target group:
Use an existing target group- Target group name:
dev-ecs-network-stack-tg
- Target group name:
- Use load balancing:
- Các setting khác để default
Hình ảnh minh họa
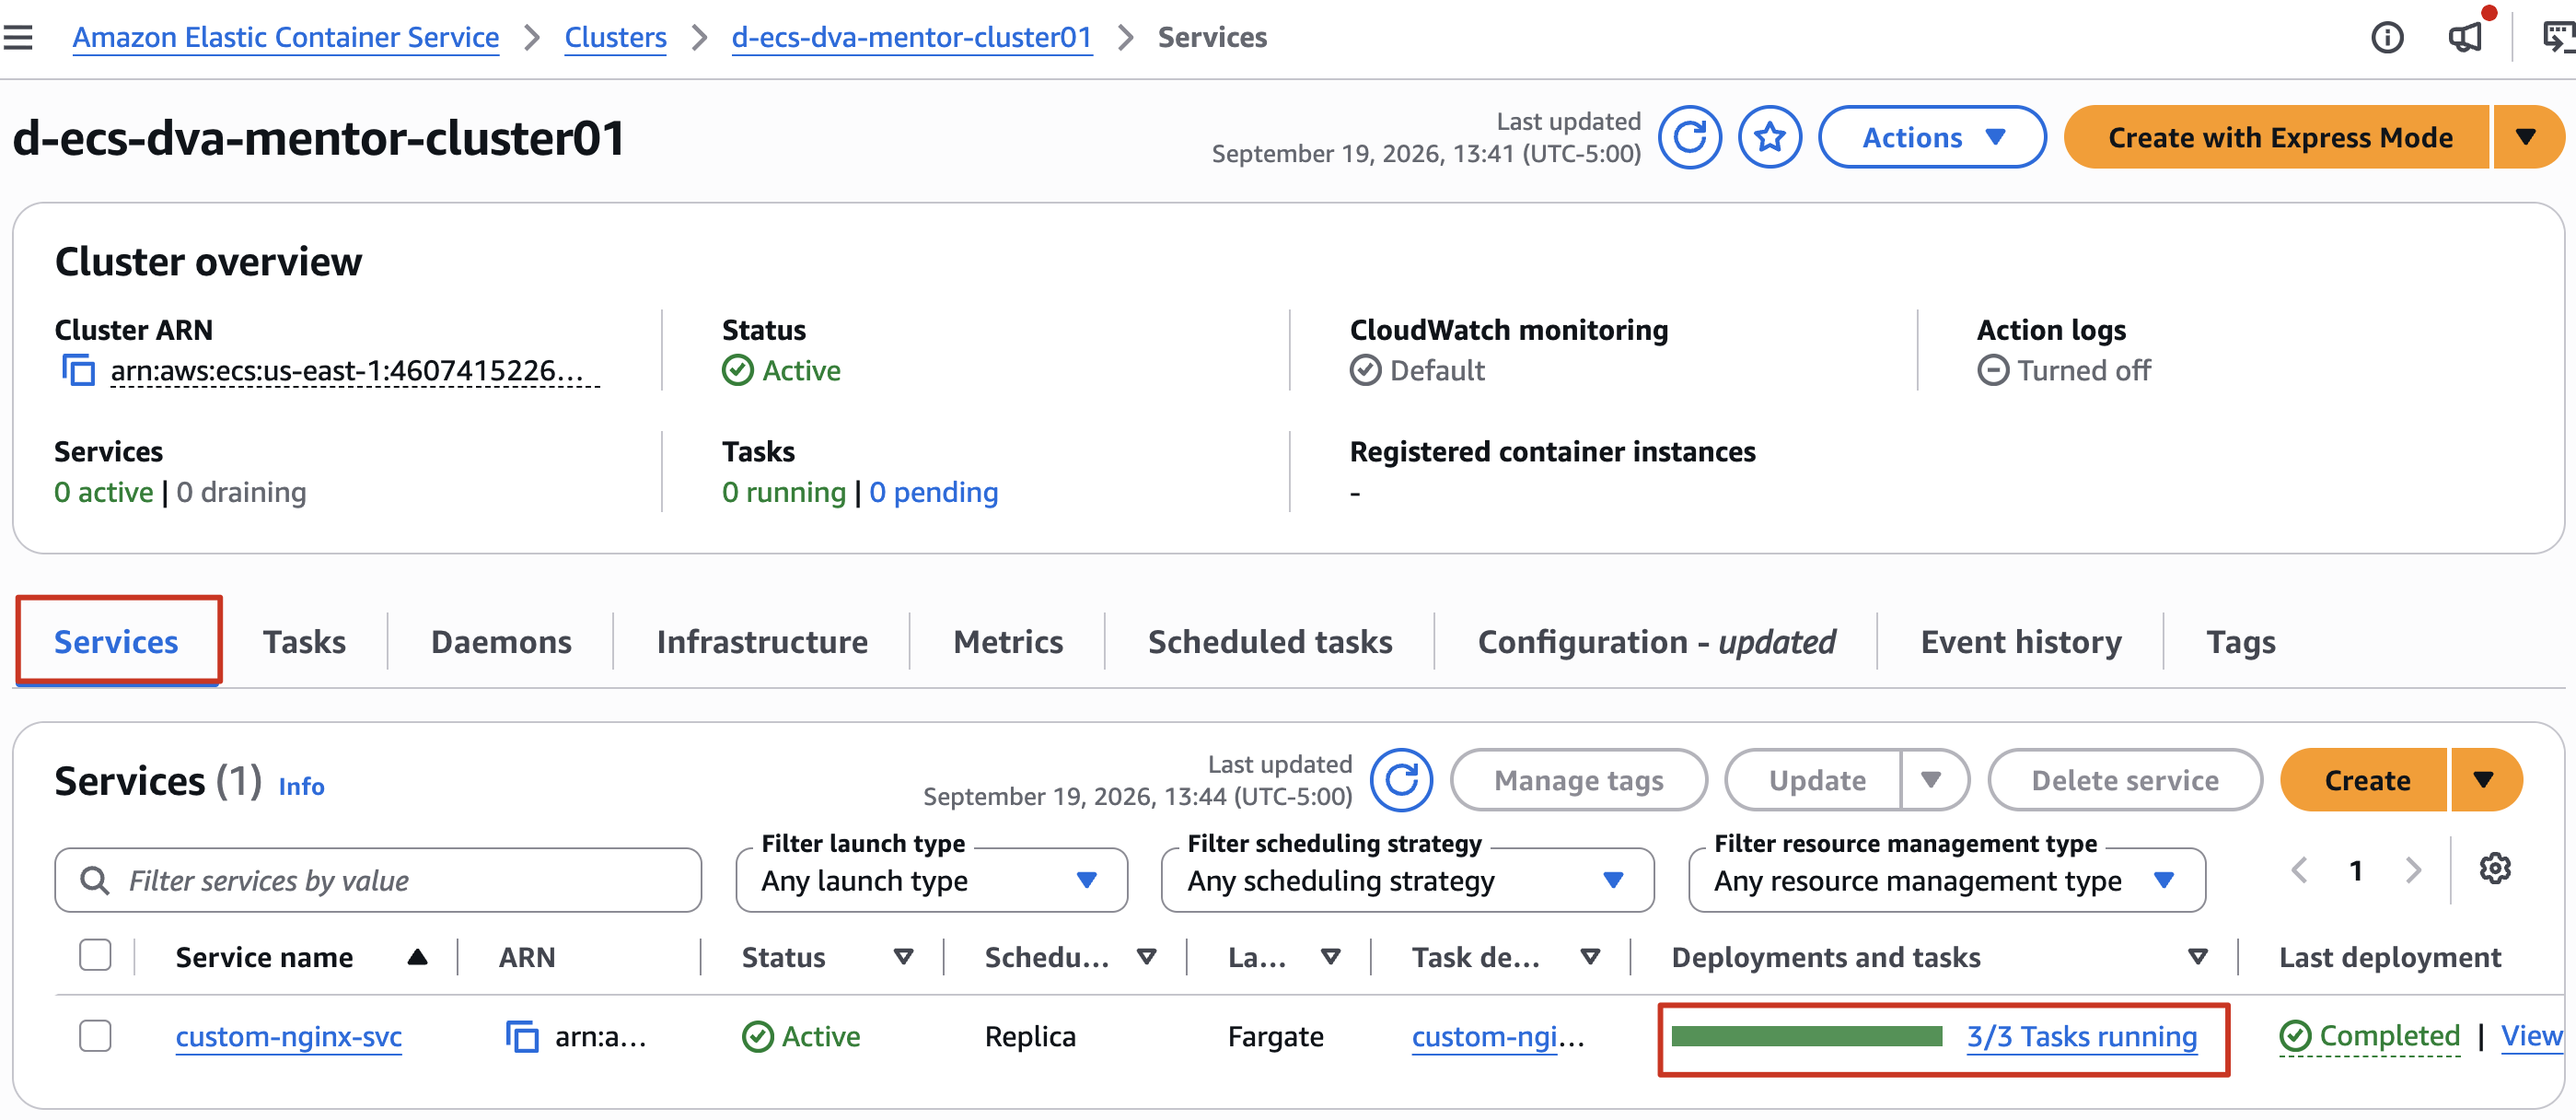
- Confirm 3 tasks đã run thành công
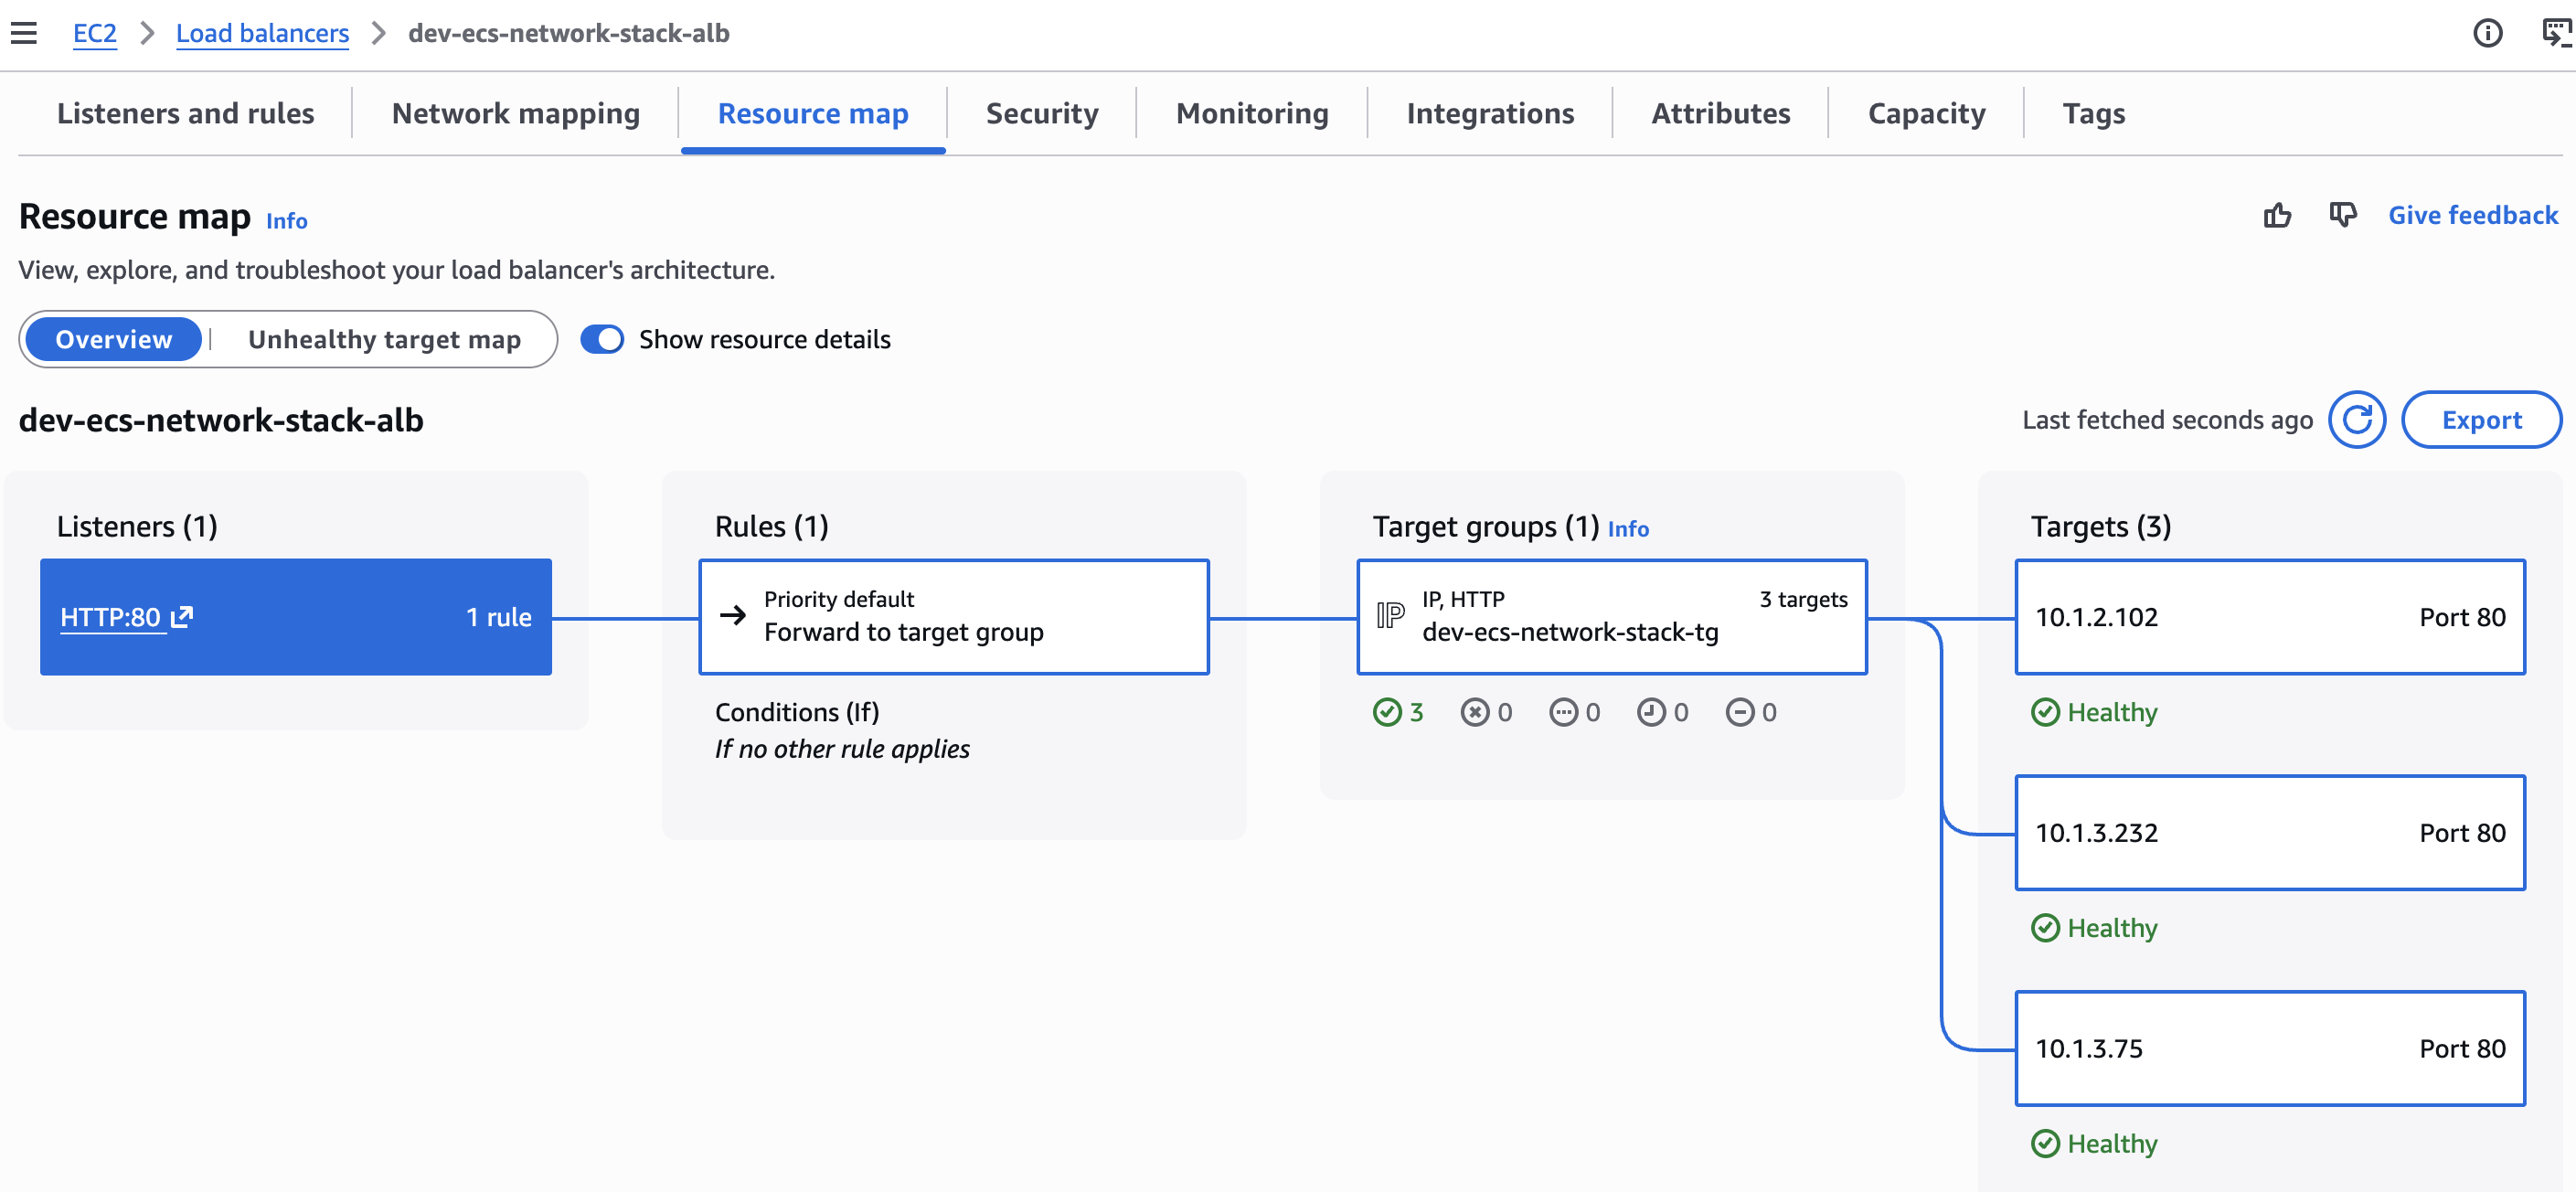
- Kiểm tra
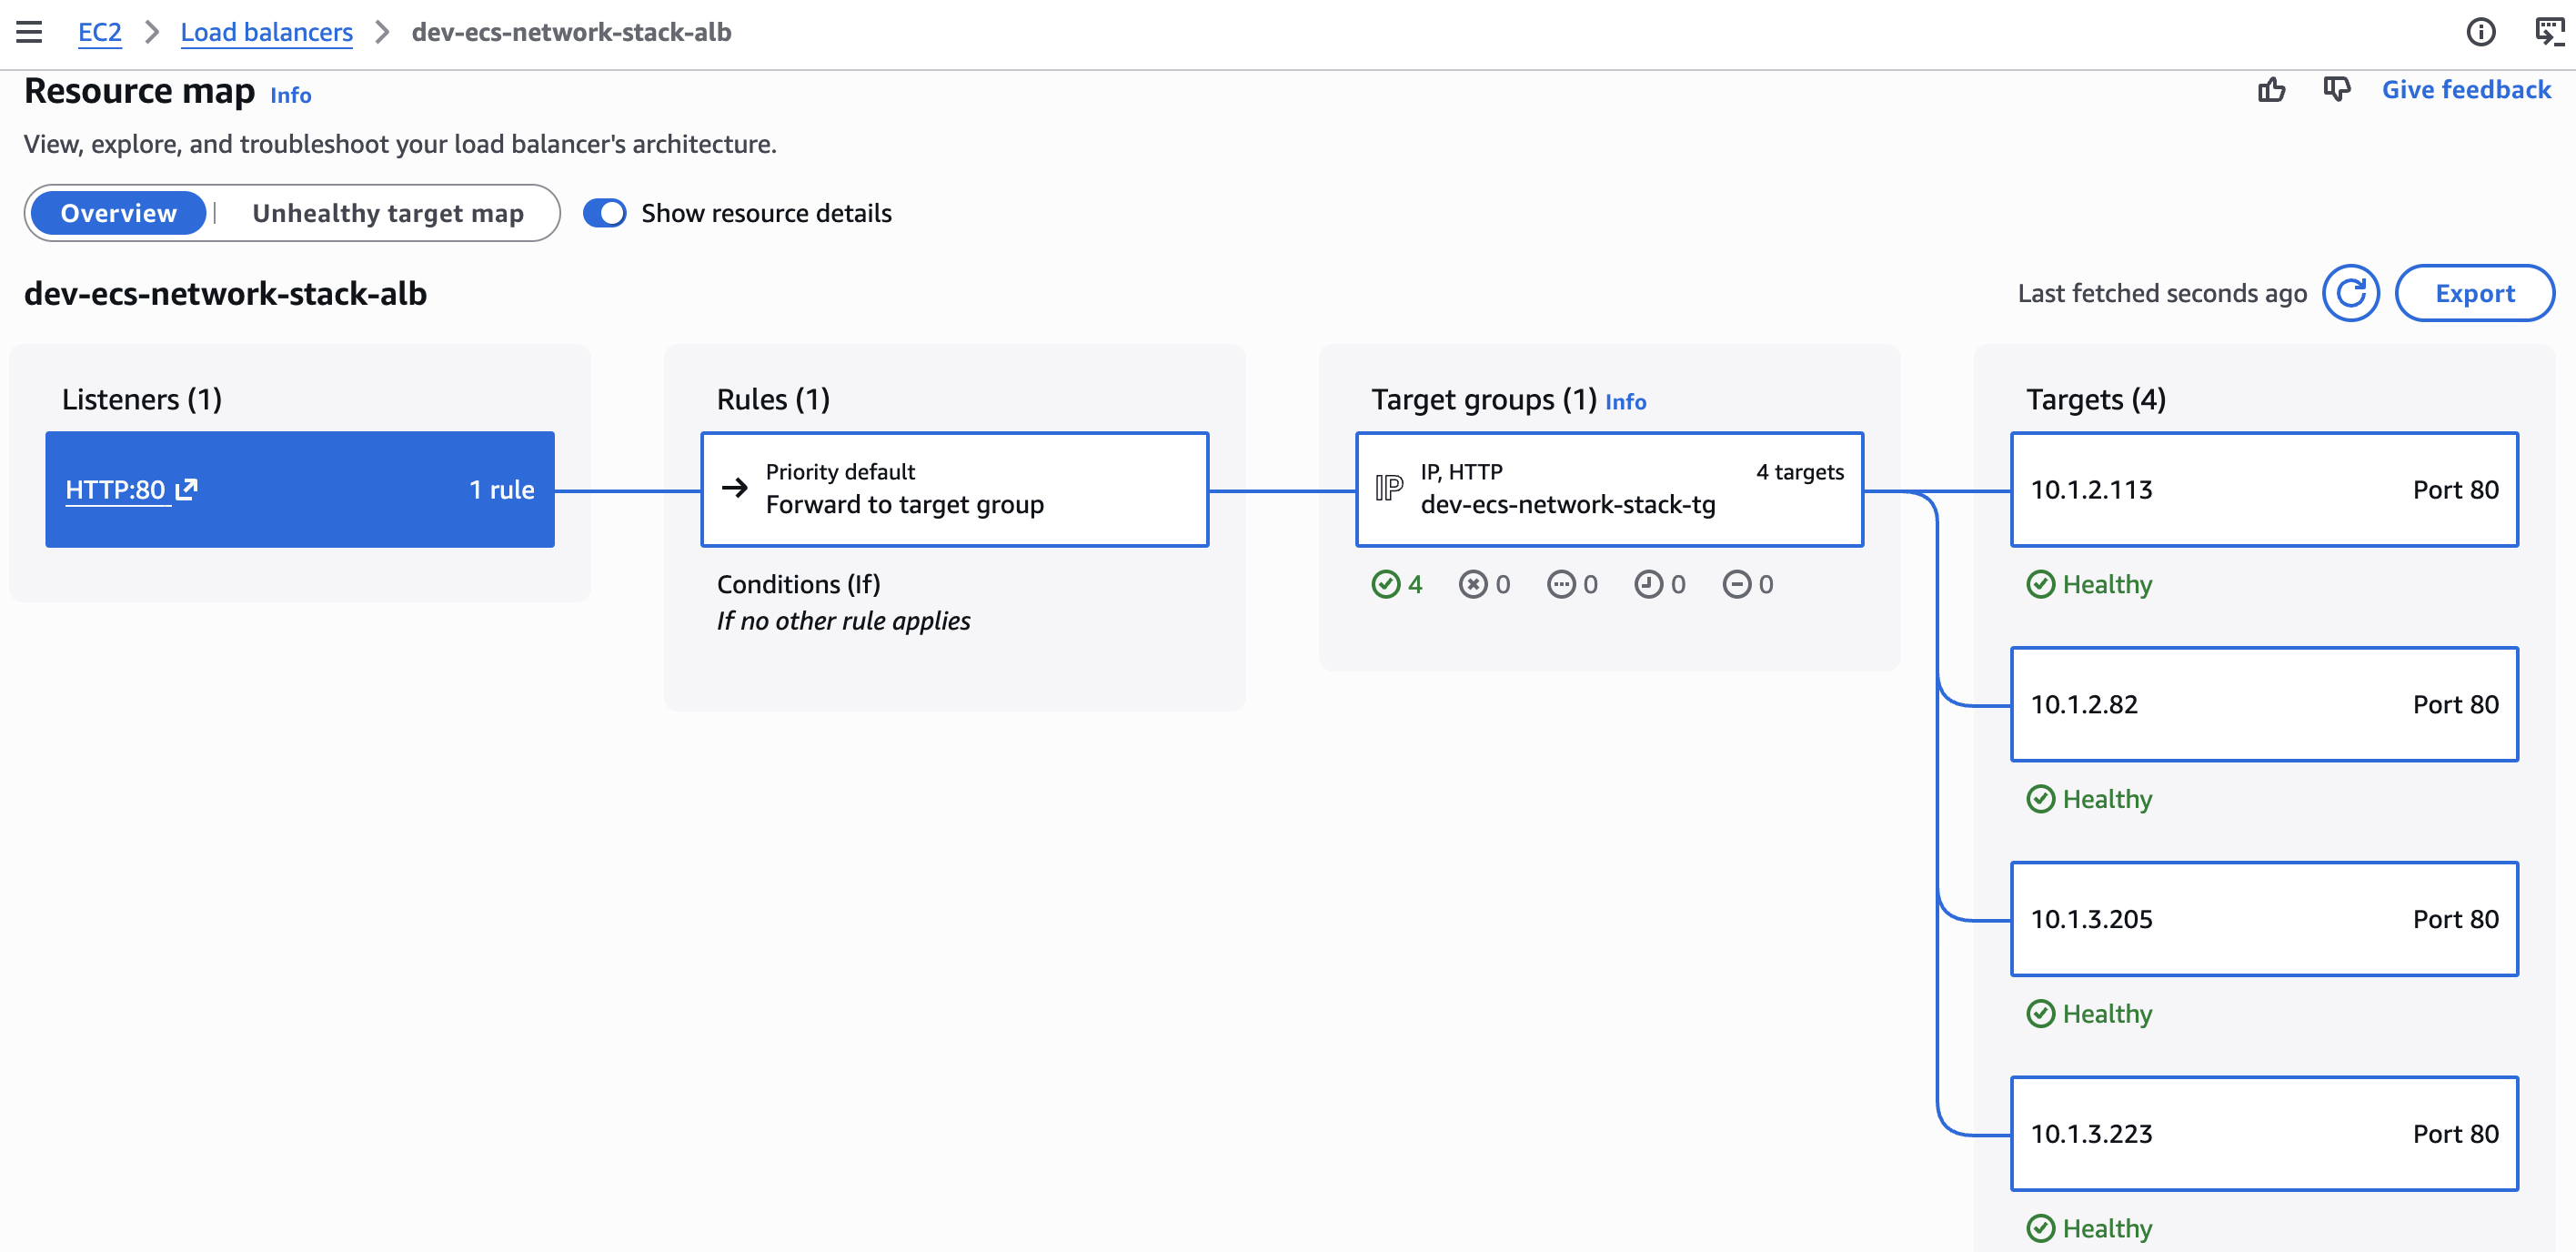
Resource mapcủa các Task ở Load balancer
6. Test hoạt động
- Access đến DNS của Application Load Balancer
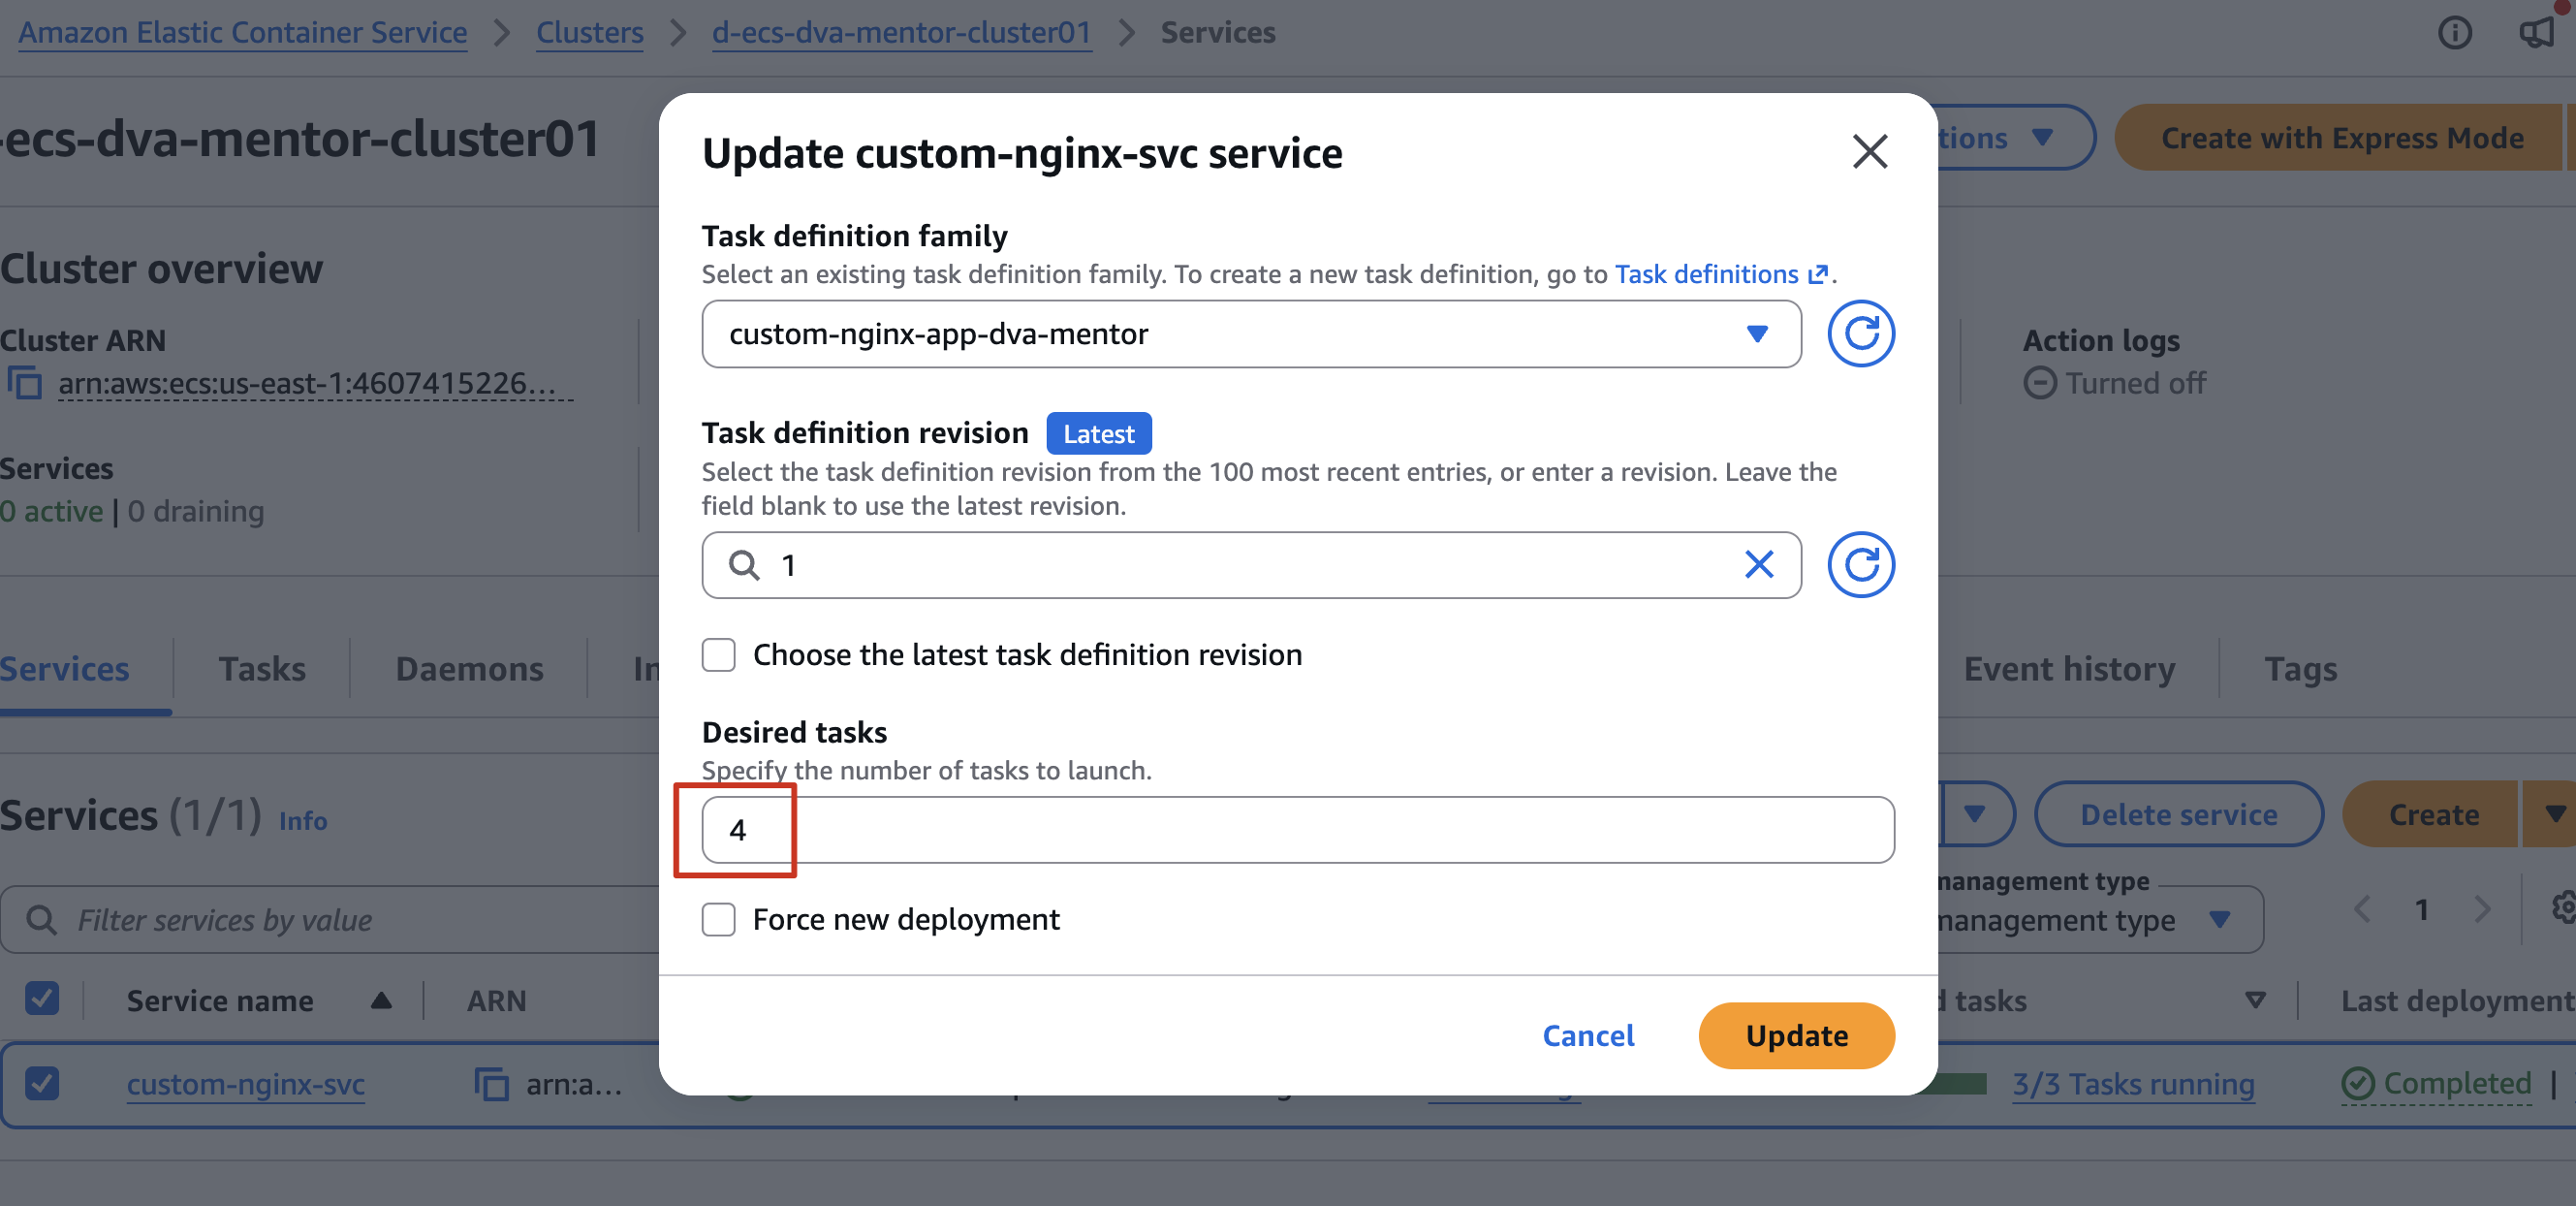
- Update ECS Service
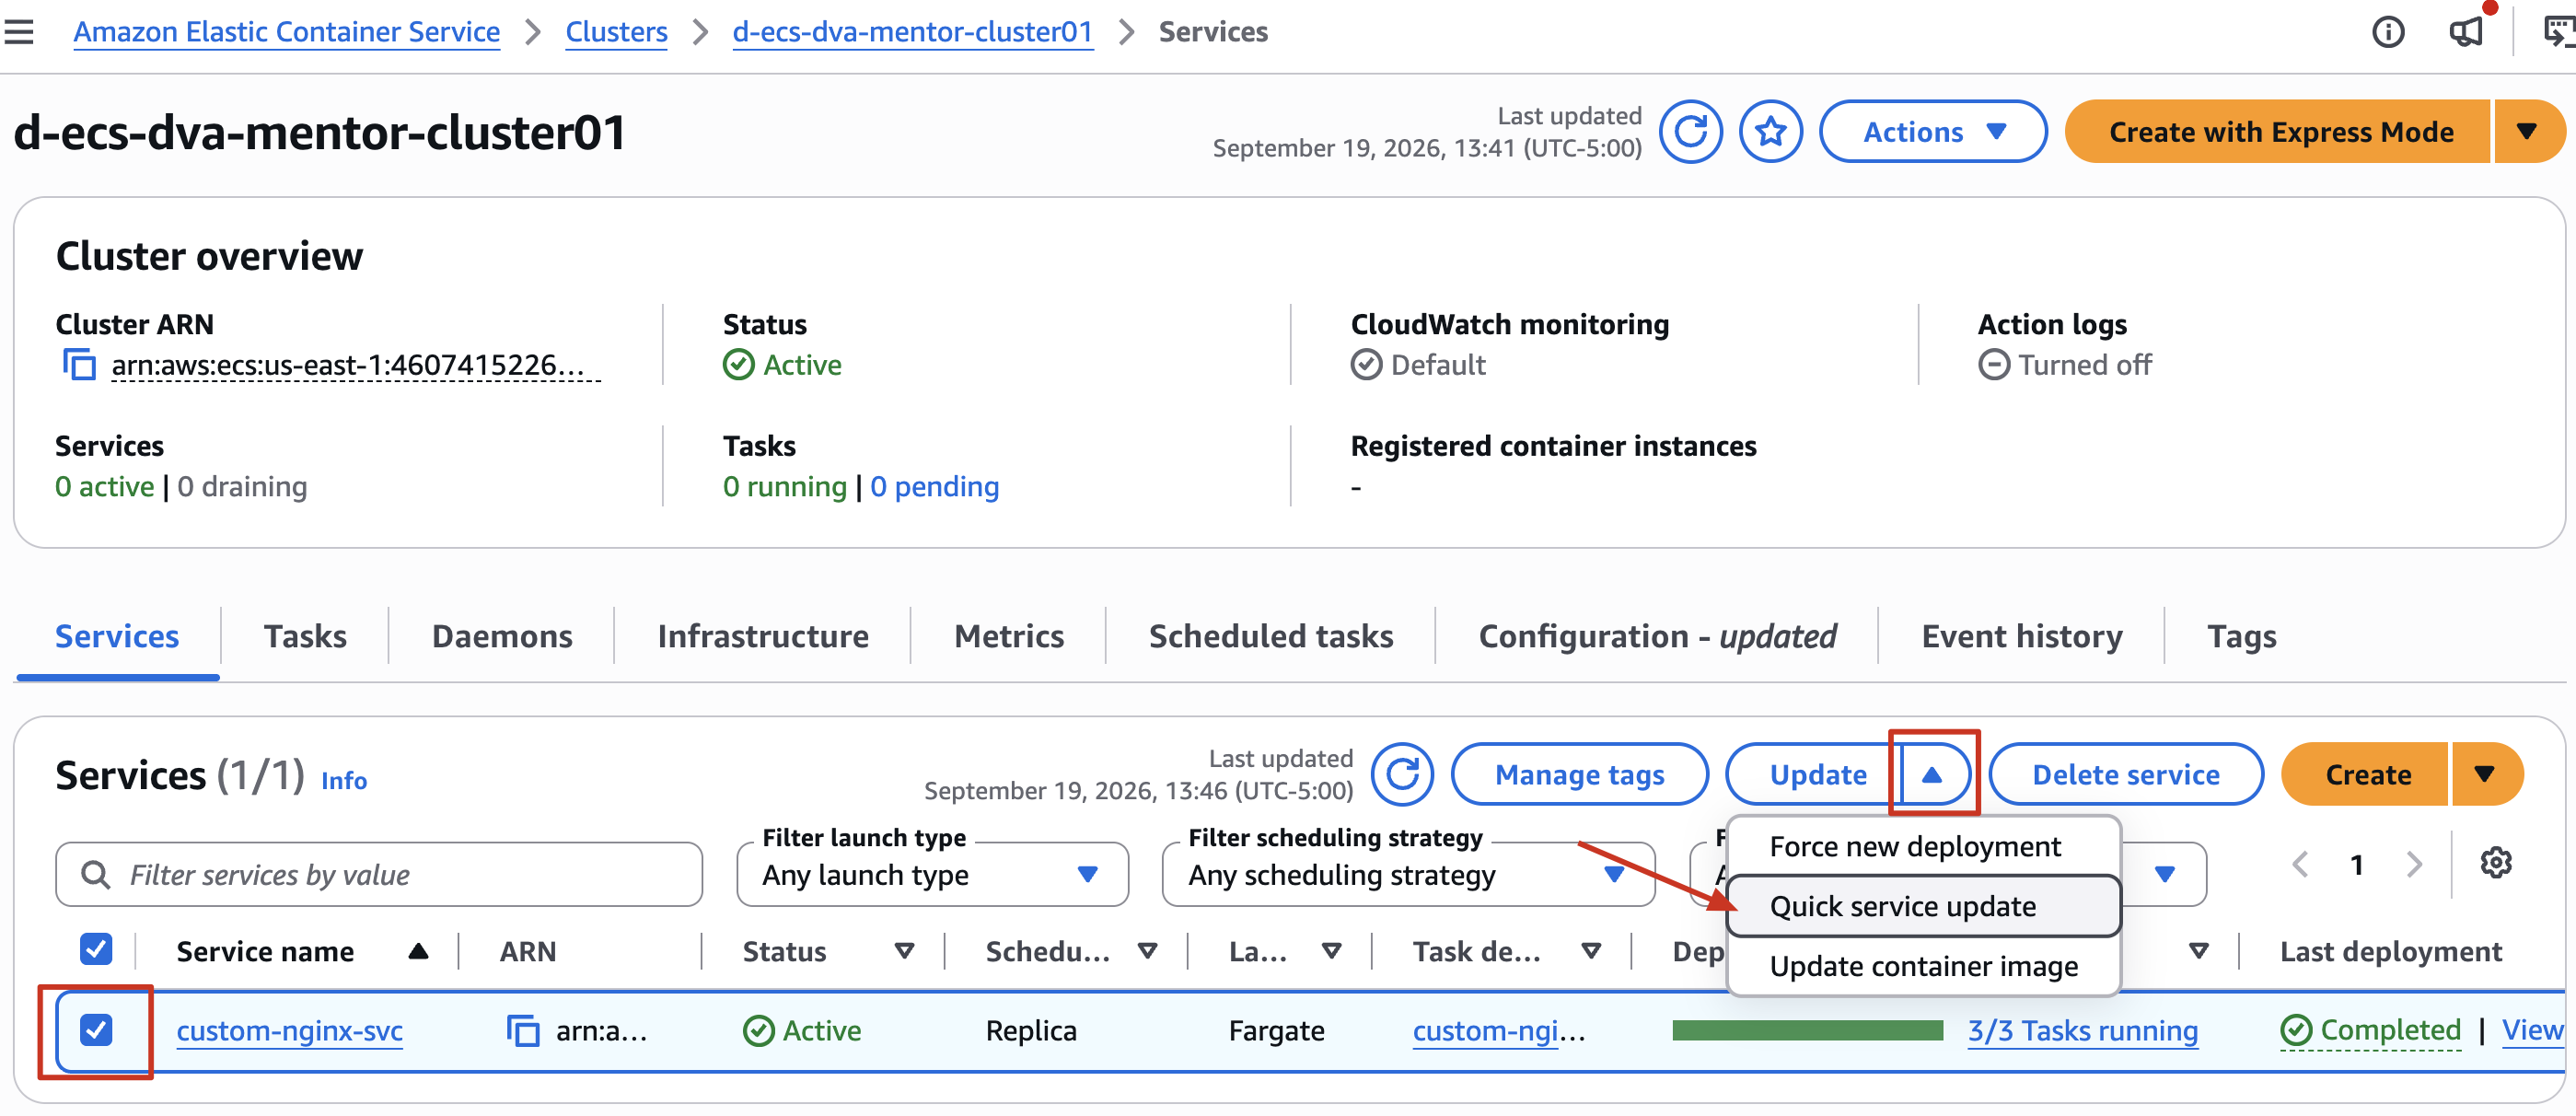
- Tăng số lượng Task lên 4
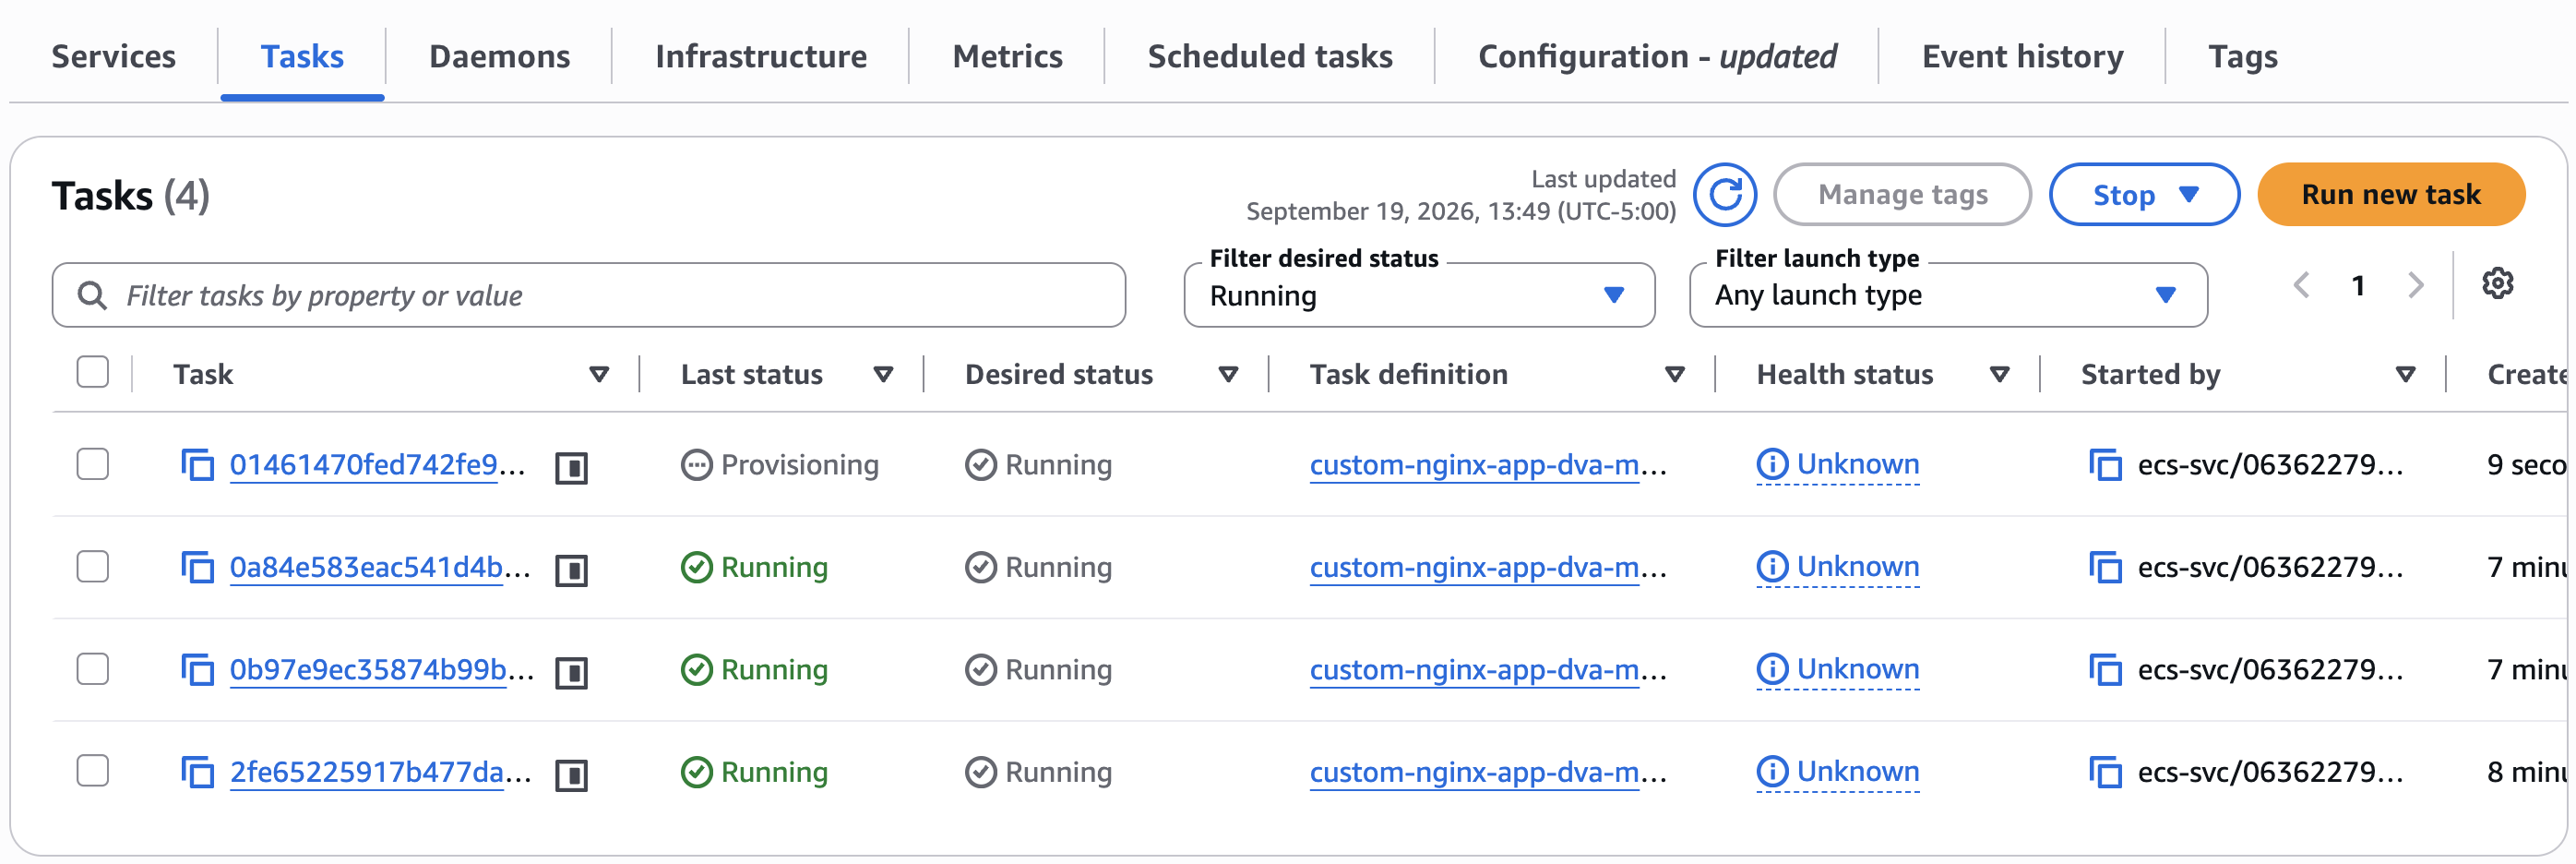
- Quá trình scale out sẽ diễn ra nhanh chóng
7. Setting Route53 and access website (optional)
Để Setting Route53 trỏ domain đến Application load balancer các bạn tham khảo bài viết Configuring ALIAS record on Route 53 of AWS
Challenge
Các bạn sẽ đặt câu hỏi "Vậy làm thế nào để triển khai version mới của ứng dụng?". Mình sẽ hướng dẫn cách làm ngay bây giờ.
- Update file
index.html - Dùng command ở ECR repository → View push commands để build và push docker image
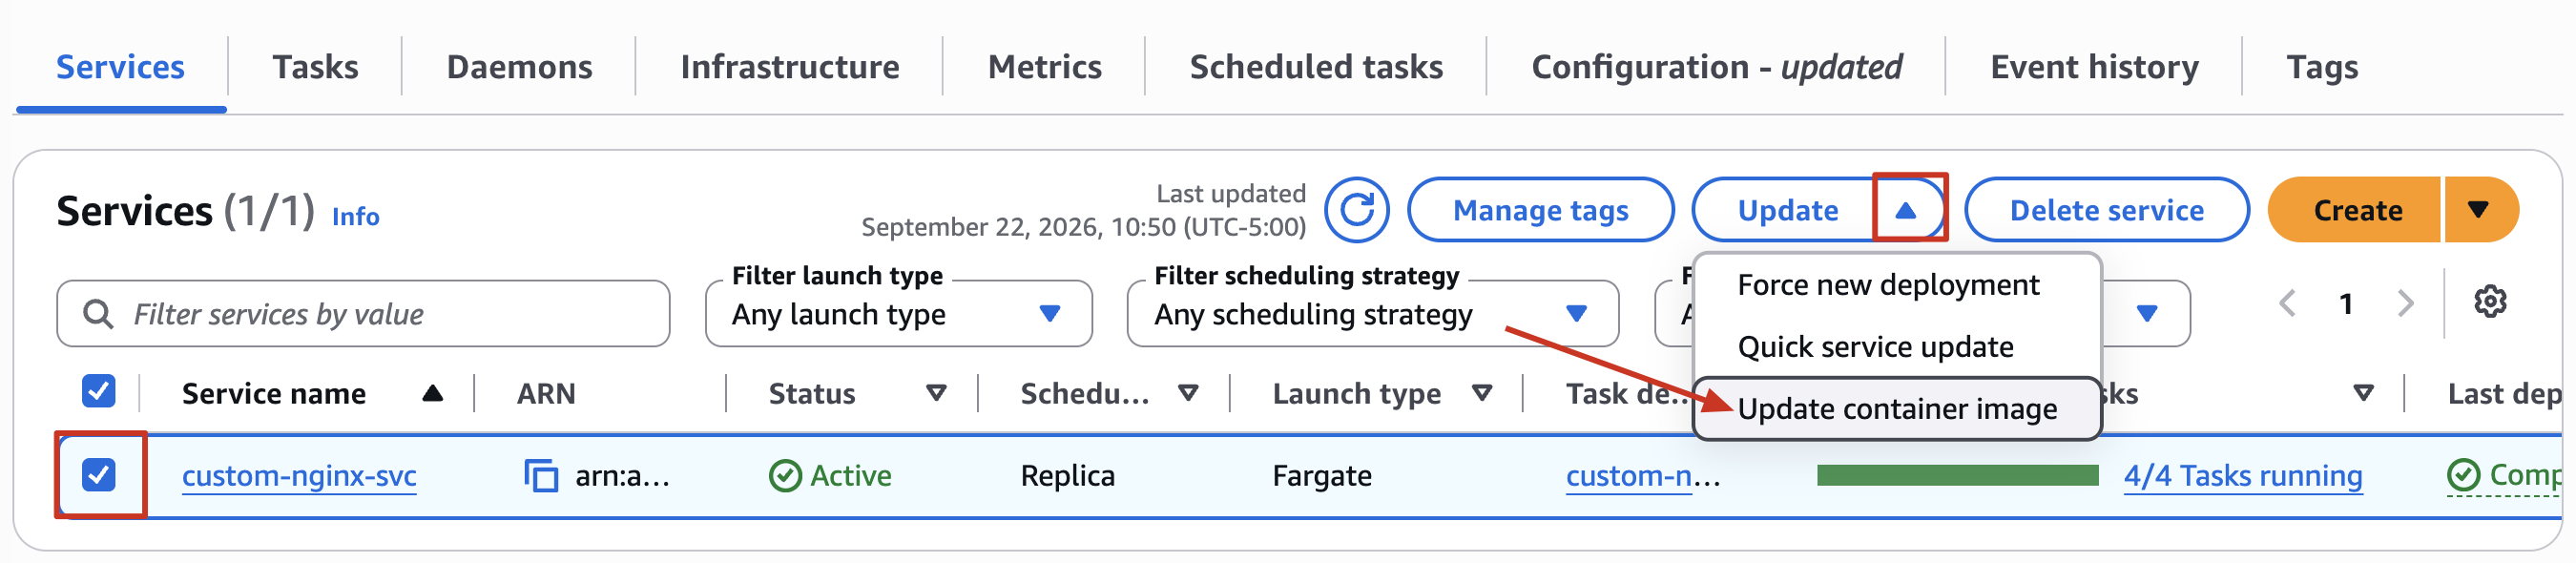
- Update ECS Service
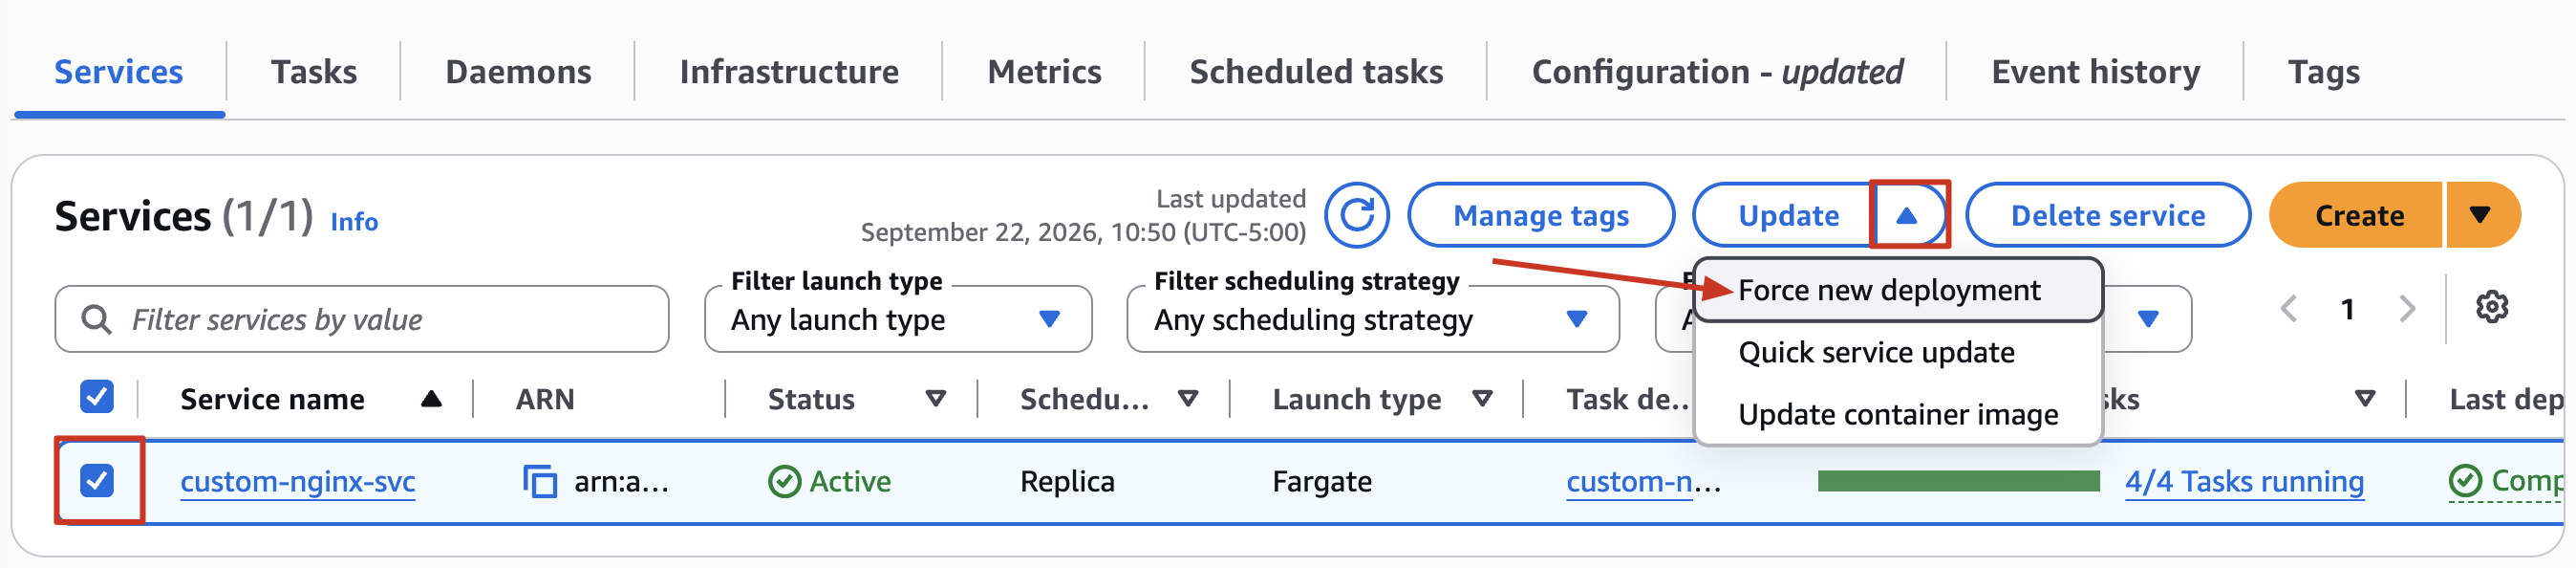
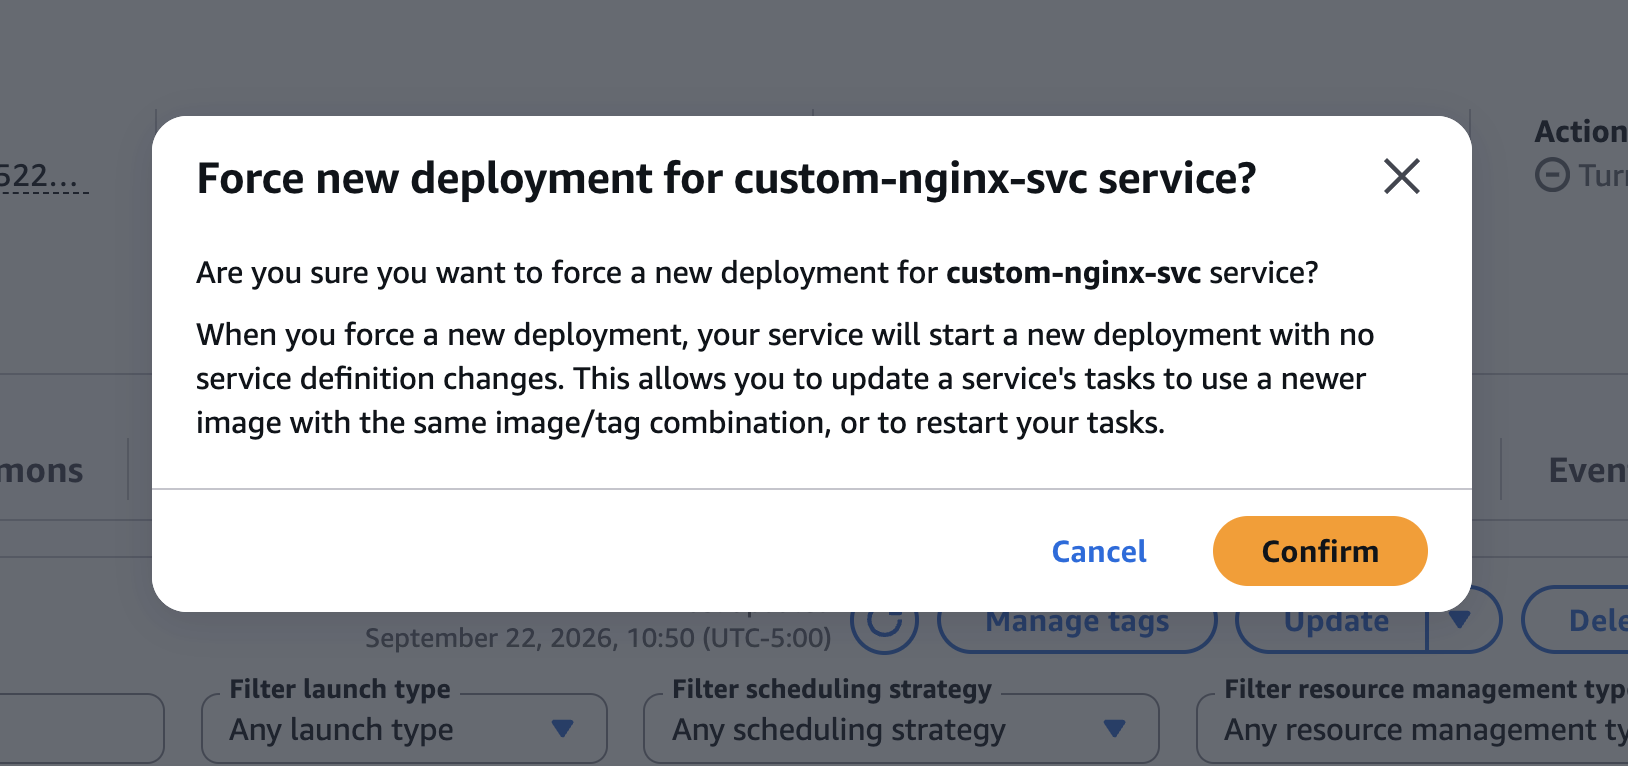
- Quá trình Deployment rolling update sẽ diễn ra bằng cách tạo ra task mới và stop task cũ.
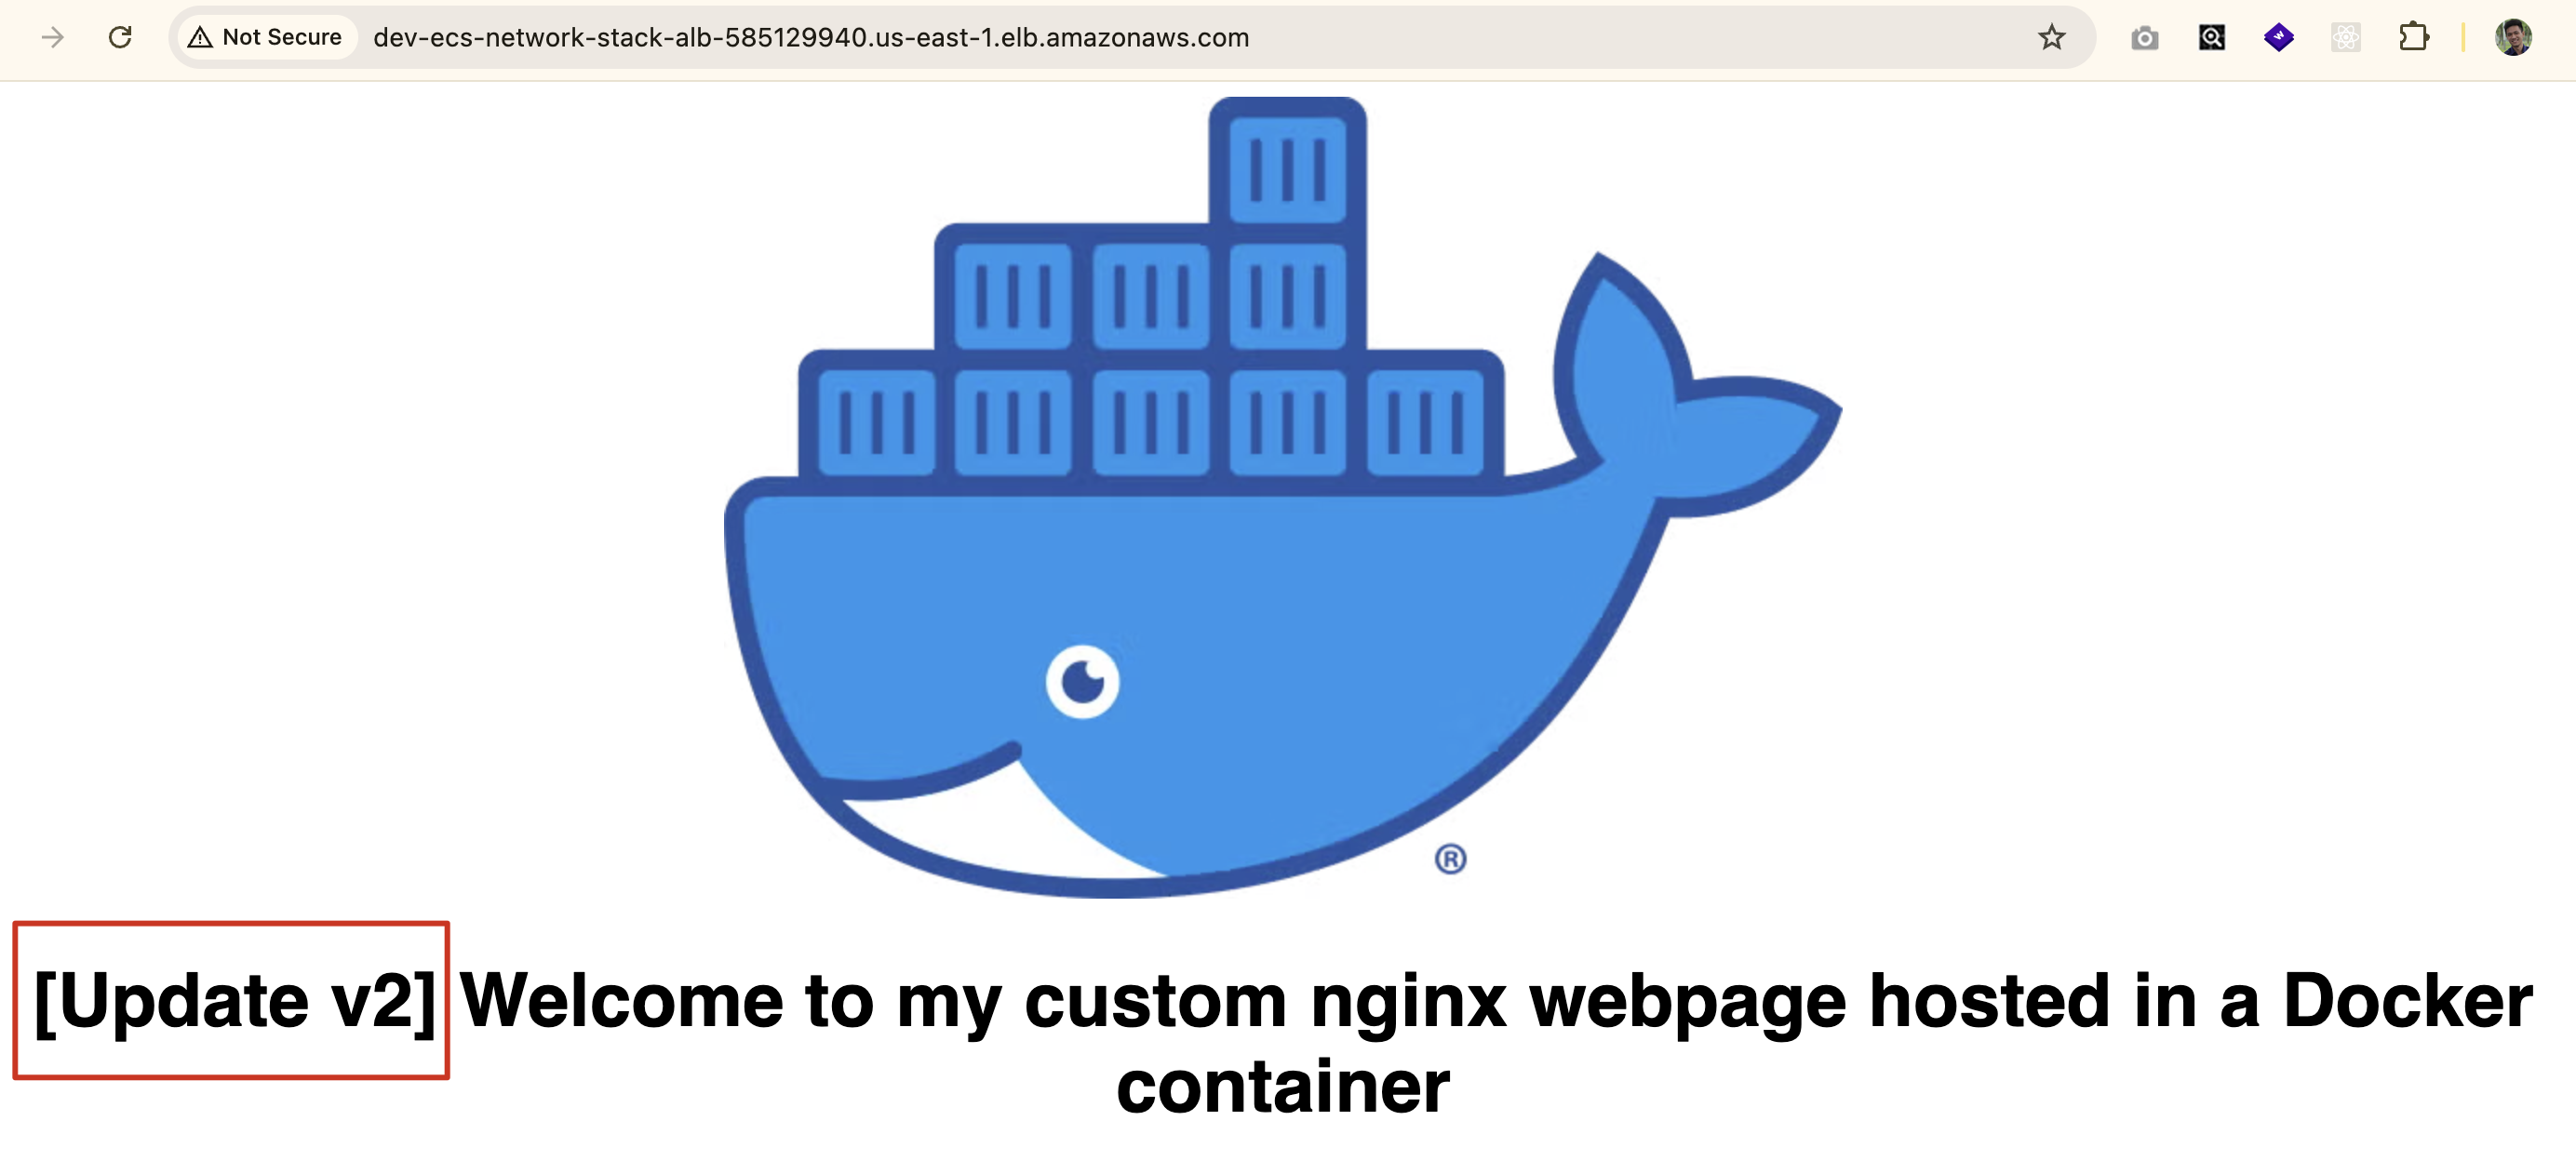
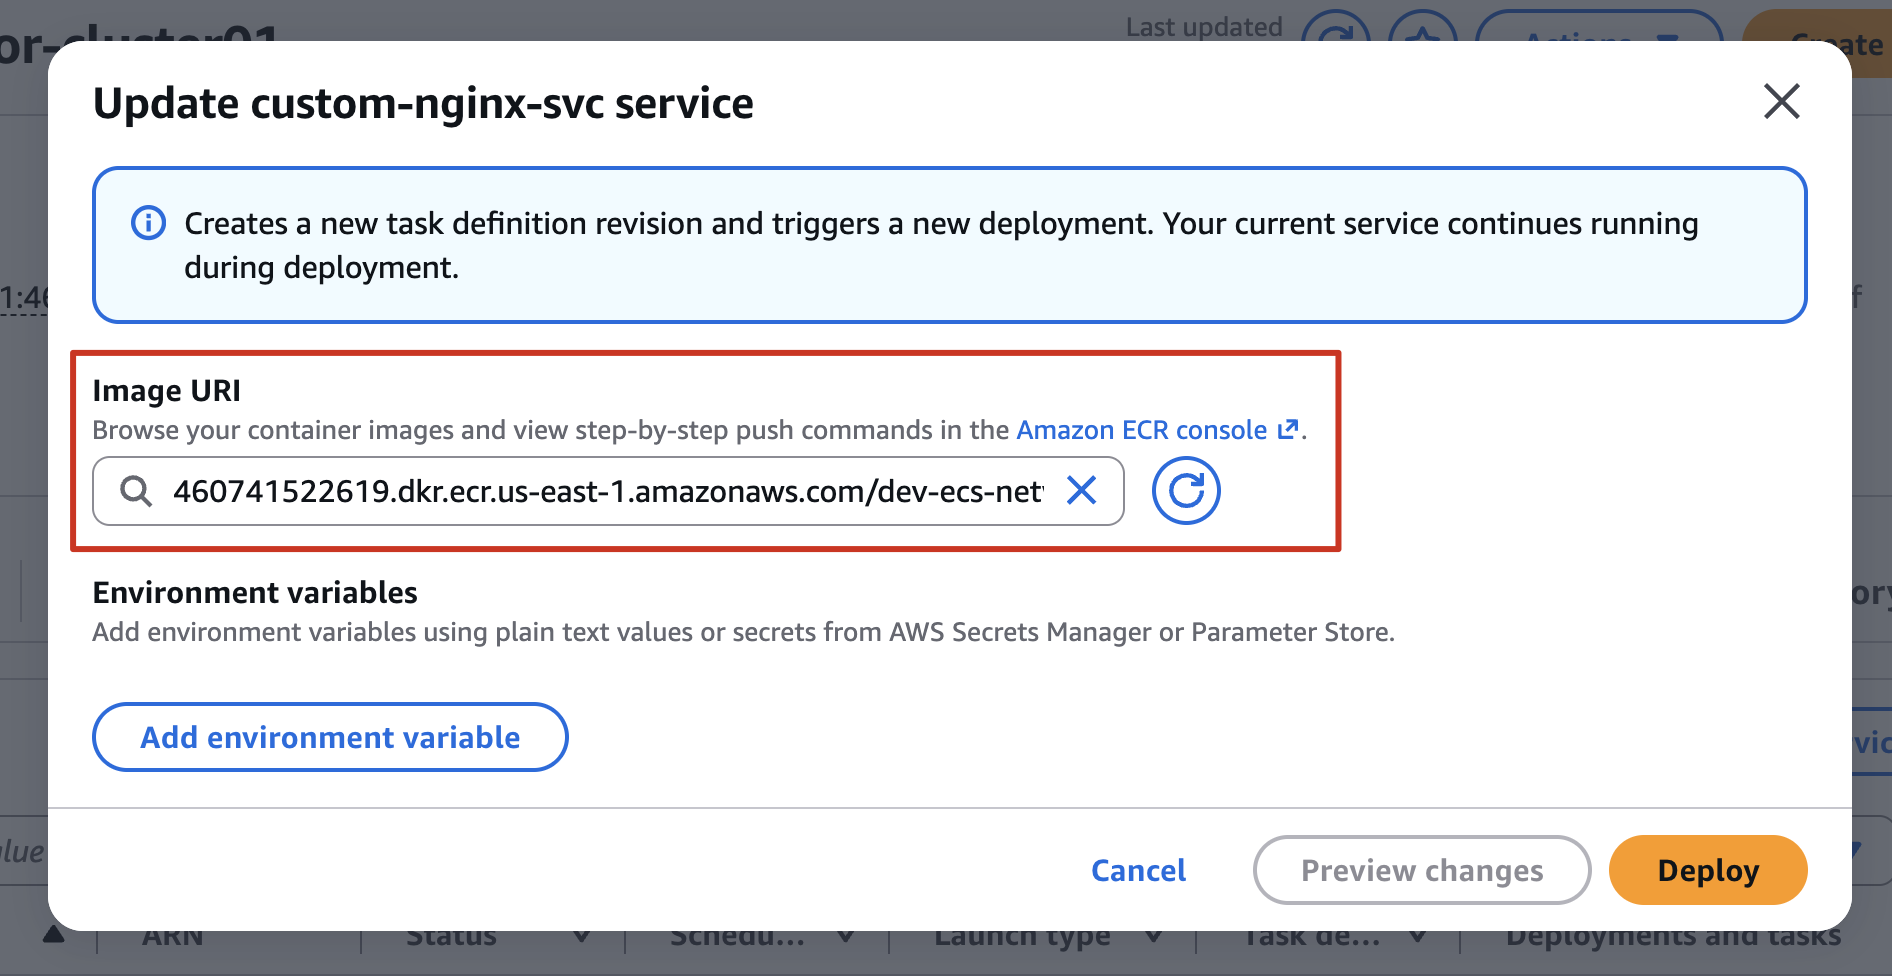
Nếu tag lúc đầu là 20231225_1, thì lần build này sẽ update thành 20231225_2), sau đó Update ECS Service dùng Update container image để update lại Image URI mới
Clean up
- Delete ECS service
- Delete ECS Cluster
- Delete Stack
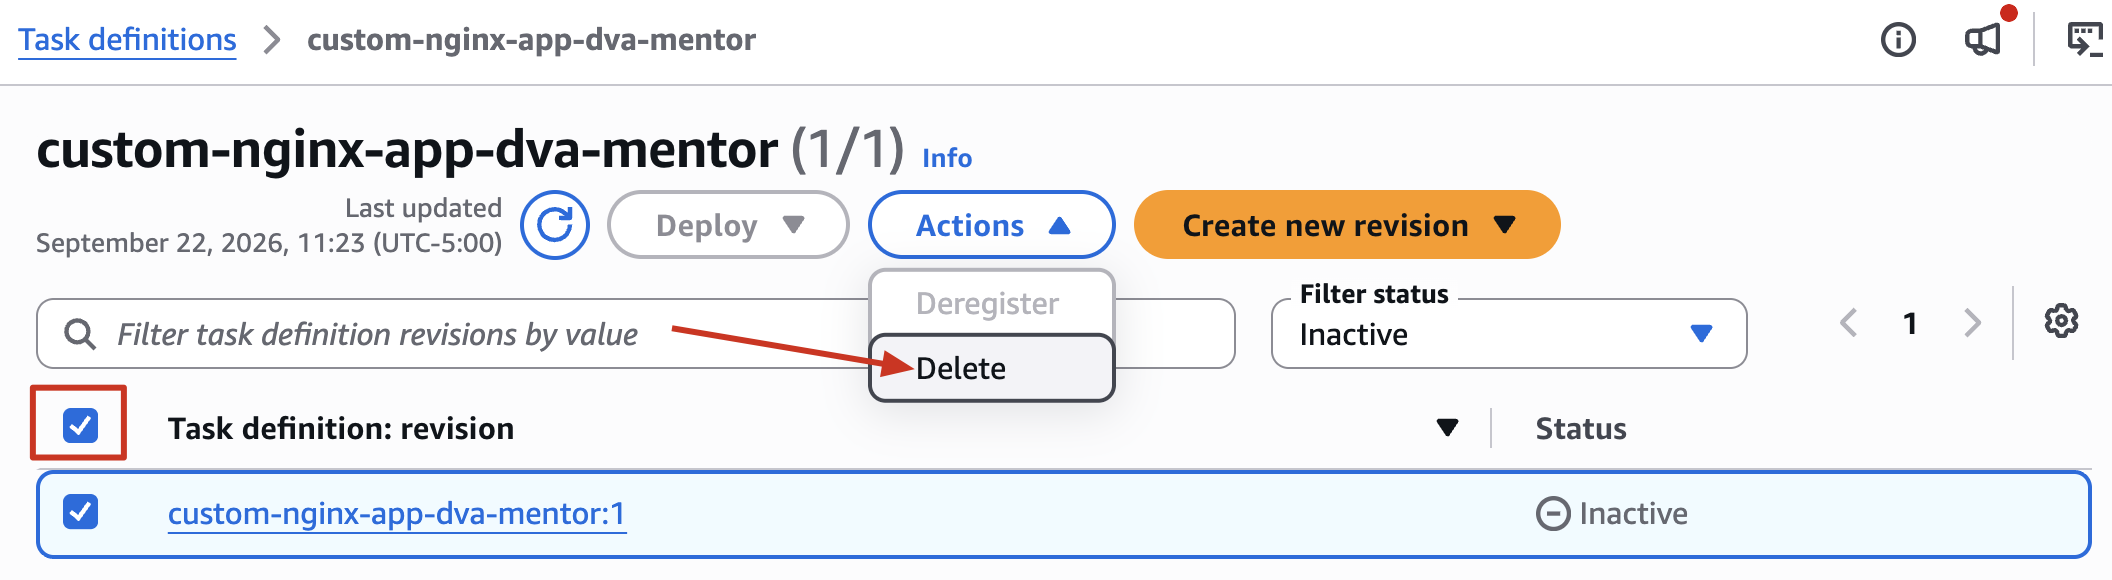
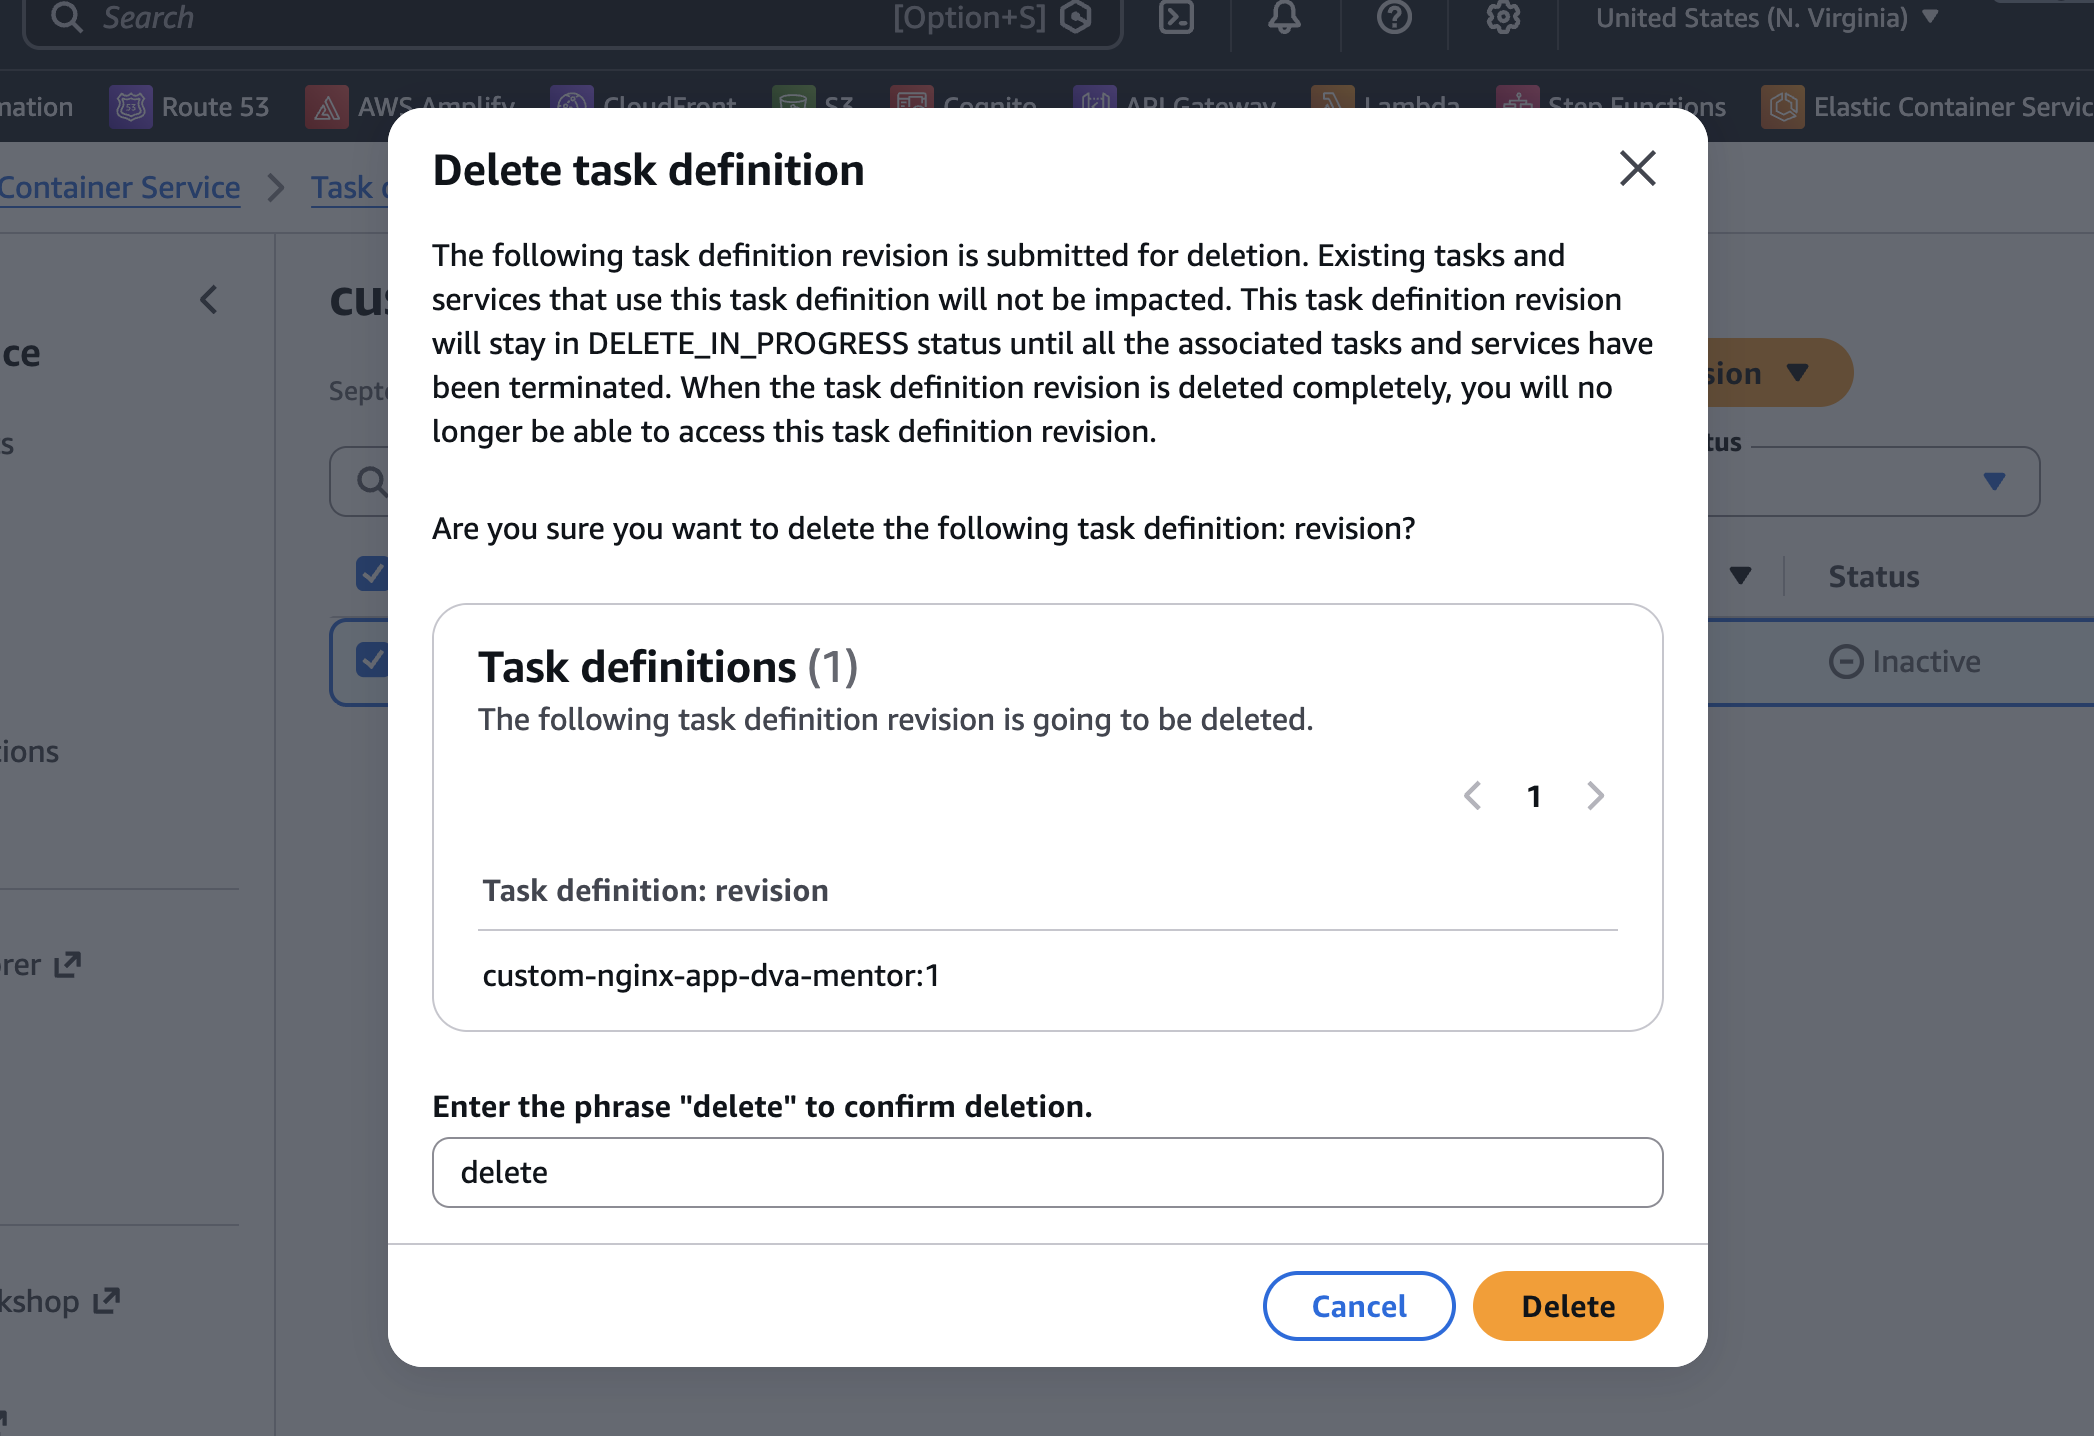
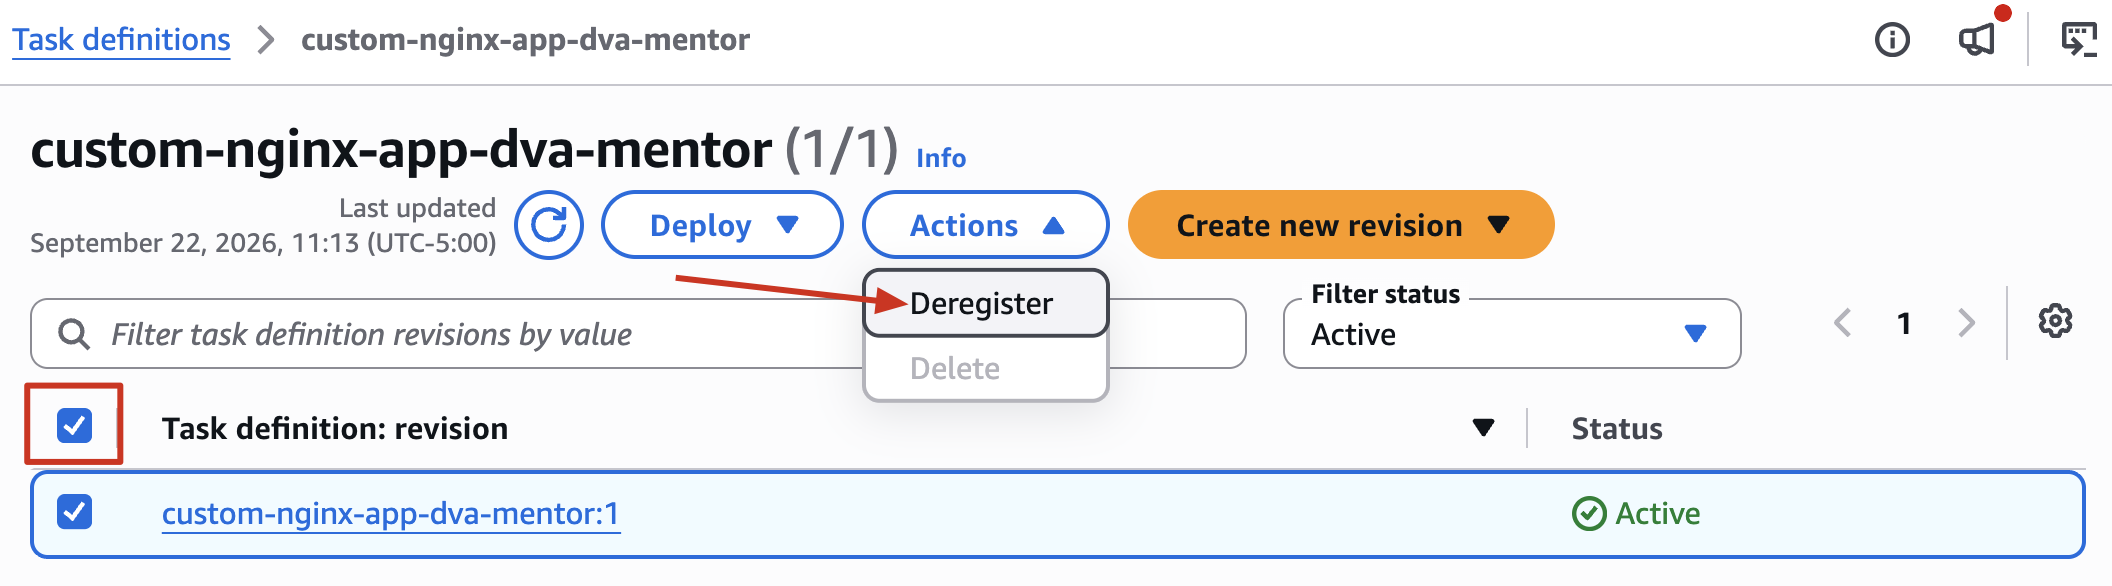
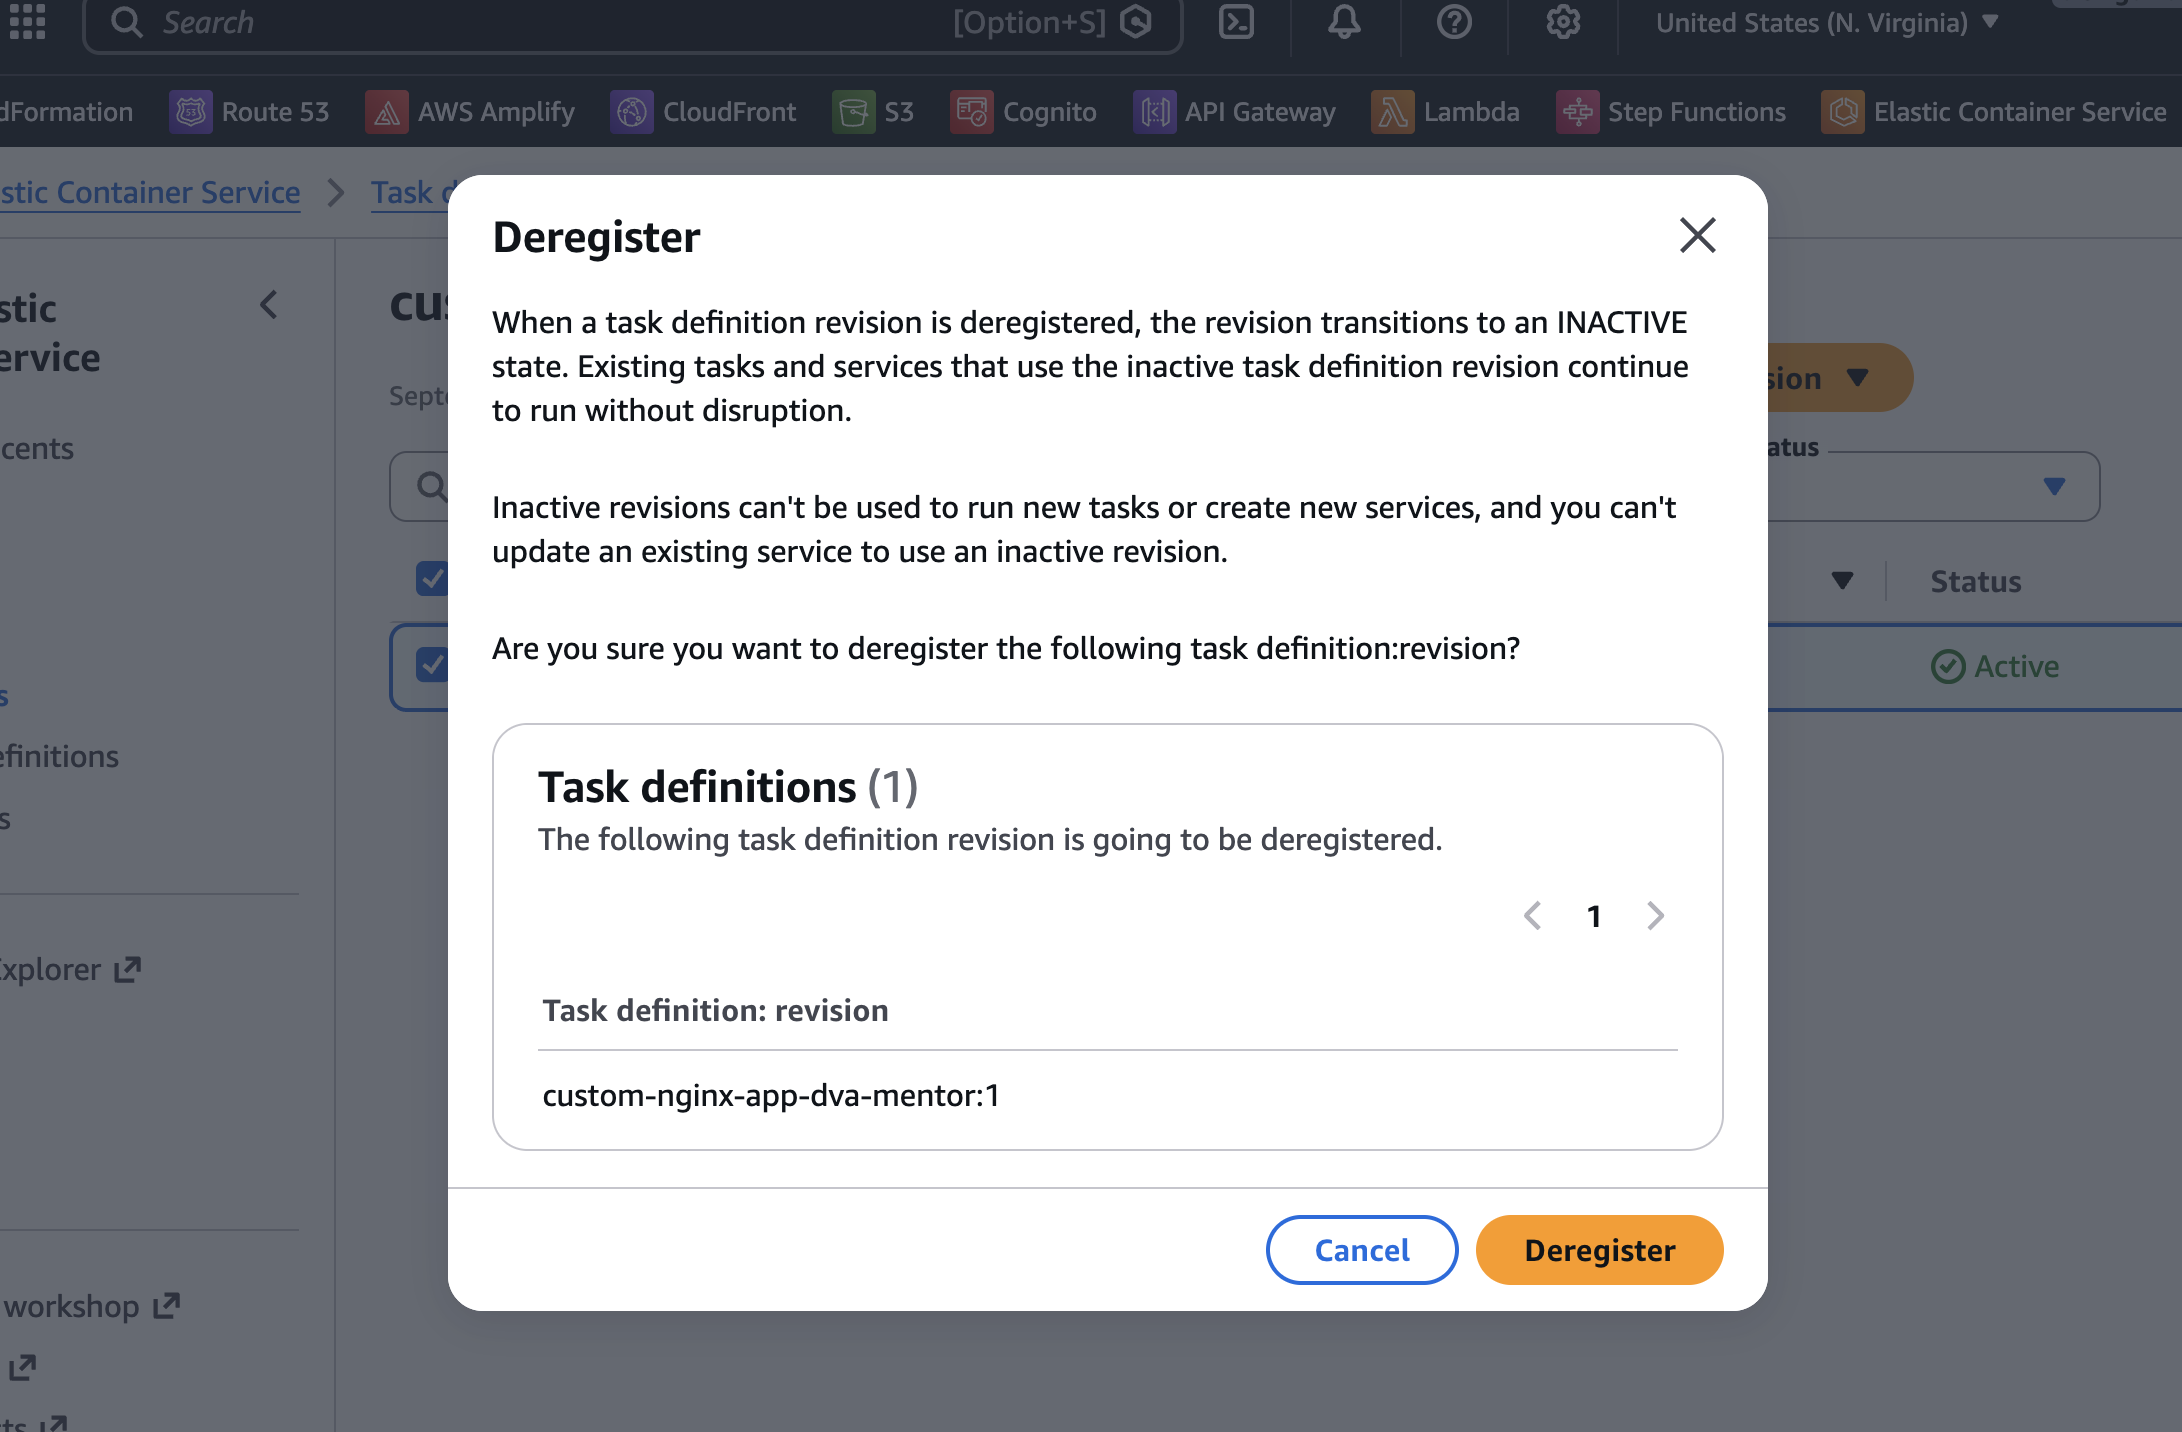
- Delete Task definition
- Trước tiên cần Deregister tất cả các revision
- Tiếp tục chọn các revision đã bị Inactive và delete