
Hướng Dẫn Triển Khai và Tối Ưu Hóa Ứng Dụng Web với AWS CloudFront
Tổng quan
Bạn có một website đặt trên S3 ở US. Người dùng ở Việt Nam truy cập mất 1.7 giây mỗi lần tải trang. Sau khi thêm CloudFront, thời gian giảm xuống 0.2 giây — nhanh gấp 8 lần. Đây chính xác là những gì Netflix, Shopee, và YouTube đang làm với CDN.
Trong bài lab này, bạn sẽ tự tay triển khai một ứng dụng web với S3 + CloudFront, cấu hình nhiều Origins (API Gateway, MediaPackage), và đo lường sự khác biệt hiệu suất giữa S3 trực tiếp và CloudFront.
Giới thiệu Amazon CloudFront
Amazon CloudFront là dịch vụ CDN (Content Delivery Network) của AWS, giúp phân phối nội dung web nhanh hơn đến người dùng toàn cầu.
Tại sao CloudFront nhanh hơn truy cập S3 trực tiếp?

CloudFront có 750+ Edge Locations trên toàn cầu. Khi user request nội dung, DNS tự động chọn edge location gần nhất. Nếu nội dung đã được cache, trả về ngay (cache hit). Nếu chưa (cache miss — lần đầu), CloudFront lấy từ origin (S3/API GW), cache lại, rồi các lần sau trả về nhanh.
Các khái niệm quan trọng
Trước khi bắt đầu lab, hãy nắm 4 khái niệm cốt lõi:
| Khái niệm | Giải thích | Ví von |
|---|---|---|
| Origin | Nơi chứa nội dung gốc (S3, API Gateway, EC2, MediaPackage...) | Nhà bếp trong nhà hàng — nơi nấu món ăn |
| Edge Location | Điểm biên gần user, cache nội dung | Quầy phục vụ — mang đồ ăn sẵn ra cho khách, chỉ quay lại bếp khi hết |
| Behavior | Quy tắc định tuyến: URL nào → Origin nào | Lễ tân khách sạn — nhìn thẻ rồi chỉ khách đúng tầng: /api/* → tầng API, /video/* → tầng Video |
| Cache Policy | Quy tắc cache: cache bao lâu, cache gì | Luật lưu trữ — "giữ món phở 24h" (CachingOptimized) vs "luôn nấu mới" (CachingDisabled cho API real-time) |
Lưu ý cho kỳ thi SOA: CloudFront là chủ đề hay xuất hiện. Đặc biệt câu hỏi về Cache Policy (khi nào disable cache cho API, khi nào optimize cho static content) và Origin routing (path pattern behaviors).
Lab Introduction
- AWS Experience: Intermediate
- Time to Complete: 45 minutes
- AWS Region: US East (N. Virginia) us-east-1
- Cost to Complete: Hầu hết Free Tier eligible. Lưu ý: MediaPackage KHÔNG nằm trong Free Tier — có thể phát sinh phí nhỏ (~$0.1-0.5) nếu chạy lab. Hãy cleanup ngay sau khi hoàn thành để tránh chi phí
- Services Used: Amazon S3, AWS CloudFormation, Amazon CloudFront, API Gateway, MediaPackage
Architecture Diagram
Dưới đây là kiến trúc tổng quan của ứng dụng sau khi hoàn thành triển khai:
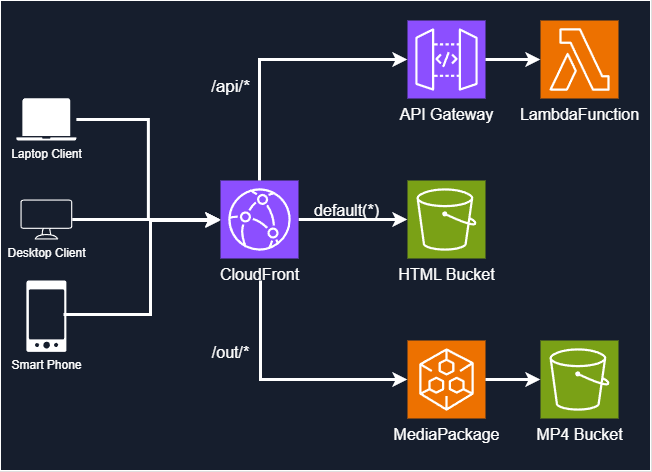
- S3 Bucket: Lưu trữ nội dung tĩnh (HTML, CSS, JS).
- CloudFront Distribution: Phân phối nội dung từ S3, API Gateway, và MediaPackage.
- API Gateway: Cung cấp API cho các chức năng động.
- MediaPackage: Xử lý streaming video.
Prerequisites
Trước khi bắt đầu, bạn cần:
- Một tài khoản AWS.
- Đã cài đặt AWS CLI và cấu hình quyền truy cập (AWS Access Key và Secret Access Key).
- Một trình duyệt web (Chrome, Firefox, v.v.) để kiểm tra ứng dụng.
- Công cụ curl.
Task Details
- Lấy tài nguyên dự án
- Chạy script khởi tạo bucket
- Triển khai Infra & App
- Kiểm tra ứng dụng web
- Tạo CloudFront Distribution
- Kiểm tra CloudFront Distribution
- Thêm API Origin
- Thêm Video Origin
- Định tuyến yêu cầu đến các Origins
- Kiểm tra các Origins
- Chuẩn bị cho So sánh hiệu suất giữa S3 và CloudFront
- Kiểm tra thời gian tải trung bình từ S3
- Kiểm tra thời gian tải trung bình từ CloudFront
1. Lấy tài nguyên dự án
-
Tải file ZIP từ link sau: https://codeload.github.com/cloud-mentor-pro/lab-resource/zip/refs/heads/main
-
Giải nén file ZIP và điều hướng đến thư mục:
cd aws-soa/cloudfront-lab/01.Prepair/
2. Chạy script khởi tạo bucket
-
Đối với Linux, macOS hoặc WSL trên Windows, cấp quyền thực thi cho script:
chmod +x prepare.sh -
Chạy script với một chuỗi ngẫu nhiên (ví dụ:
soa202507):- Window / Powershell
.\prepair.ps1 soa202507- Window / CMD
call .\prepair.bat- Linux / Mac-OS
./prepare.sh soa202507Script này thực hiện 3 việc chính:
Bước Lệnh AWS CLI trong script Kết quả 1. Deploy CloudFormation aws cloudformation deploy --stack-name soa-s3-cloudfront-lab --template-file s3-cloudformation-template.yamlTạo S3 bucket + IAM Role 2. Lấy bucket name aws cloudformation describe-stacks→ đọc OutputBucketNameBiết tên bucket để upload files 3. Upload resources aws s3 cptừng file ZIP (Lambda code, demo site, demo video)Bucket sẵn sàng cho bước tiếp Cấu trúc thư mục resources được upload:
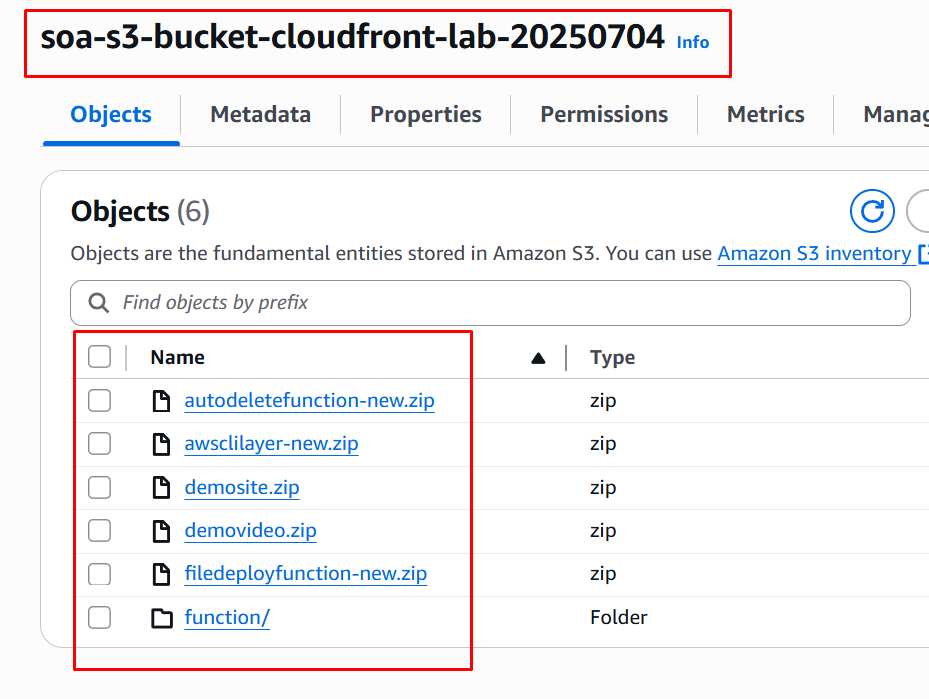
resources/ ├── demosite.zip ← HTML/CSS/JS cho web app ├── demovideo.zip ← Video mẫu cho MediaPackage ├── autodeletefunction-new.zip ← Lambda tự xóa S3 khi cleanup ├── filedeployfunction-new.zip ← Lambda deploy files từ ZIP ├── awsclilayer-new.zip ← AWS CLI Lambda Layer └── function/ ← Lambda functions cho API ├── echo.zip, login.zip, logout.zip ├── getplayurl.zip, getsignedcookie.zip └── sessionvalue.zip, teststaleobject.zip- Lưu ý: Chuỗi ngẫu nhiên (ví dụ
soa202507) dùng để tạo tên bucket unique trên toàn cầu. Nếu lỗi "bucket already exists", chọn chuỗi khác.
-
Sau khi triển khai thành công, xác nhận các tài nguyên sau đã được tạo:
- IAM Role:
soa-iam-role-cloudformation-section7-lab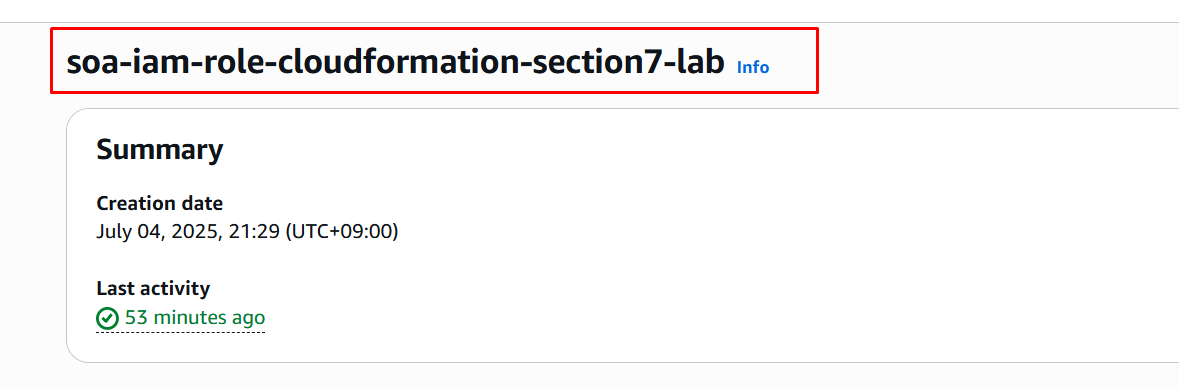
- S3 Bucket:
soa-s3-bucket-cloudfront-lab-soa202507 - Nội dung trong bucket (các file HTML, CSS, JS).
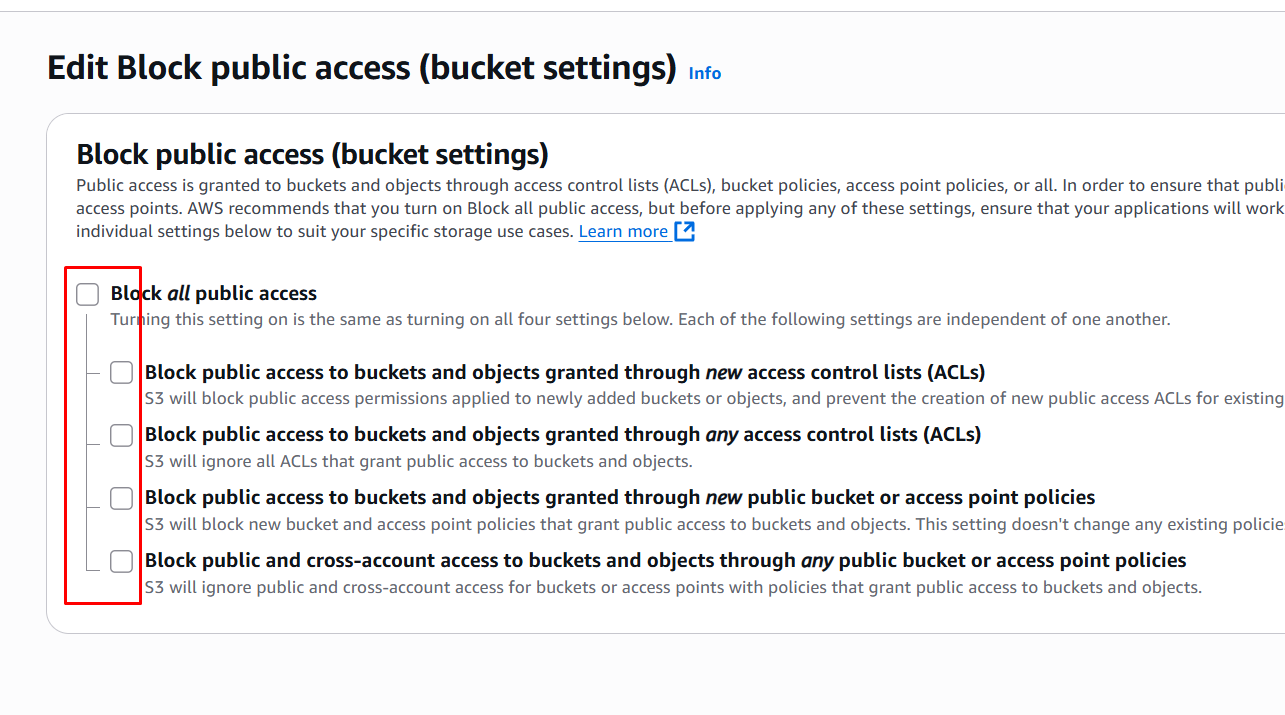
- Bucket đã tắt Block Public Access. (chỉ cần kiểm tra)
- IAM Role:
3. Triển khai Infra & App
Hiểu file infra.yaml trước khi deploy
File infra.yaml là CloudFormation template tạo toàn bộ backend cho ứng dụng web. Trước khi deploy, hãy hiểu nó tạo những gì:
| Nhóm tài nguyên | Số lượng | Chi tiết |
|---|---|---|
| S3 Buckets | 4 | OriginBucket (static web), VideoBucket, LogBucket, FailoverBucket |
| Lambda Functions | 9 | API endpoints: login, logout, echo, getplayurl, getsignedcookie... |
| API Gateway | 1 REST API | 8 endpoints: /echo, /login, /logout, /getplayurl... |
| MediaPackage | 3 resources | Packaging group + config + asset cho video streaming HLS |
| IAM Roles | 9 | 1 role cho mỗi Lambda function |
| Custom Resources | 5 | Auto-deploy demo site + video từ ZIP vào S3 |
Tại sao dùng CloudFormation thay vì tạo thủ công? Với ~40 resources liên kết phức tạp, tạo tay sẽ mất hàng giờ và dễ sai. CloudFormation tạo tất cả trong ~5 phút và cleanup bằng 1 lệnh delete.
Tiến hành deploy
- Triển khai file
infra.yaml:- Truy cập AWS CloudFormation Console
- Tạo stack mới với tên
soa-cloudformatiom-lab-cloudfront - Upload file
infra.yamlvà triển khai - Variable nhập là
soa-s3-bucket-cloudfront-lab-soa202507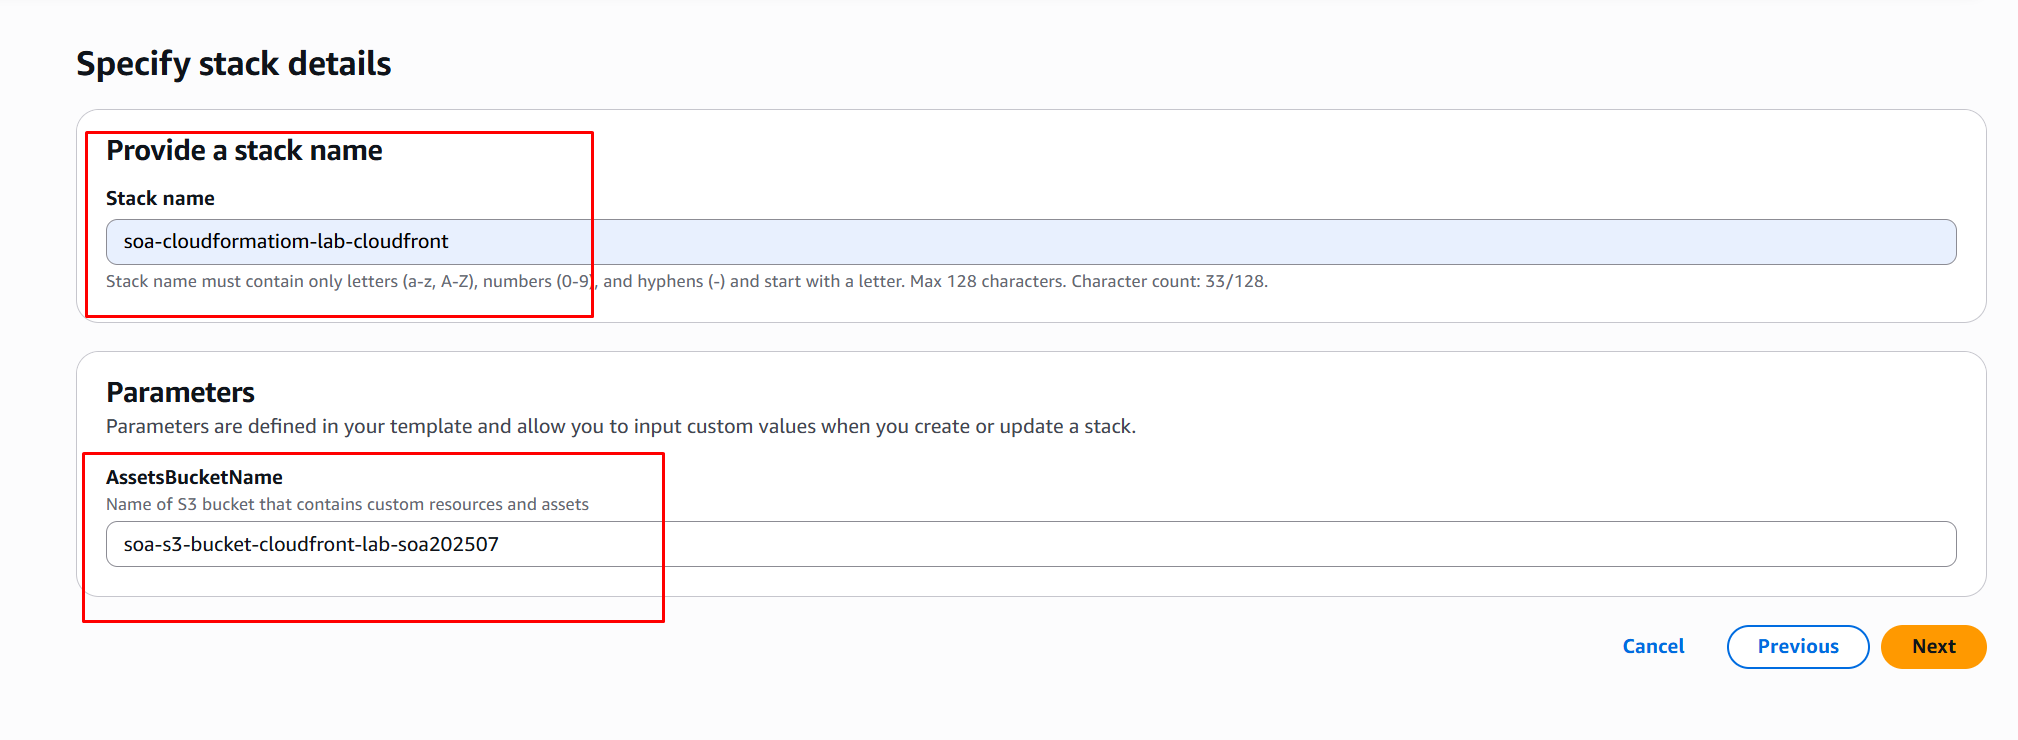
- Role chọn là
soa-iam-role-cloudformation-section7-lab
- Sau khi triển khai thành công, kiến trúc ứng dụng sẽ như hình dưới. Hình này được tạo nhờ tool Infrastructure Composer của AWS — giúp trực quan hóa kiến trúc từ file CloudFormation template:
 Link tham khảo: Infrastructure Composer AWS docs
4. Kiểm tra ứng dụng web
- Truy cập tab Outputs của stack
soa-cloudformatiom-lab-cloudfronttrong CloudFormation Console và ghi lại các giá trị:apiOriginEndpointoriginBuckets3WebsiteDomainvideoOriginDomain
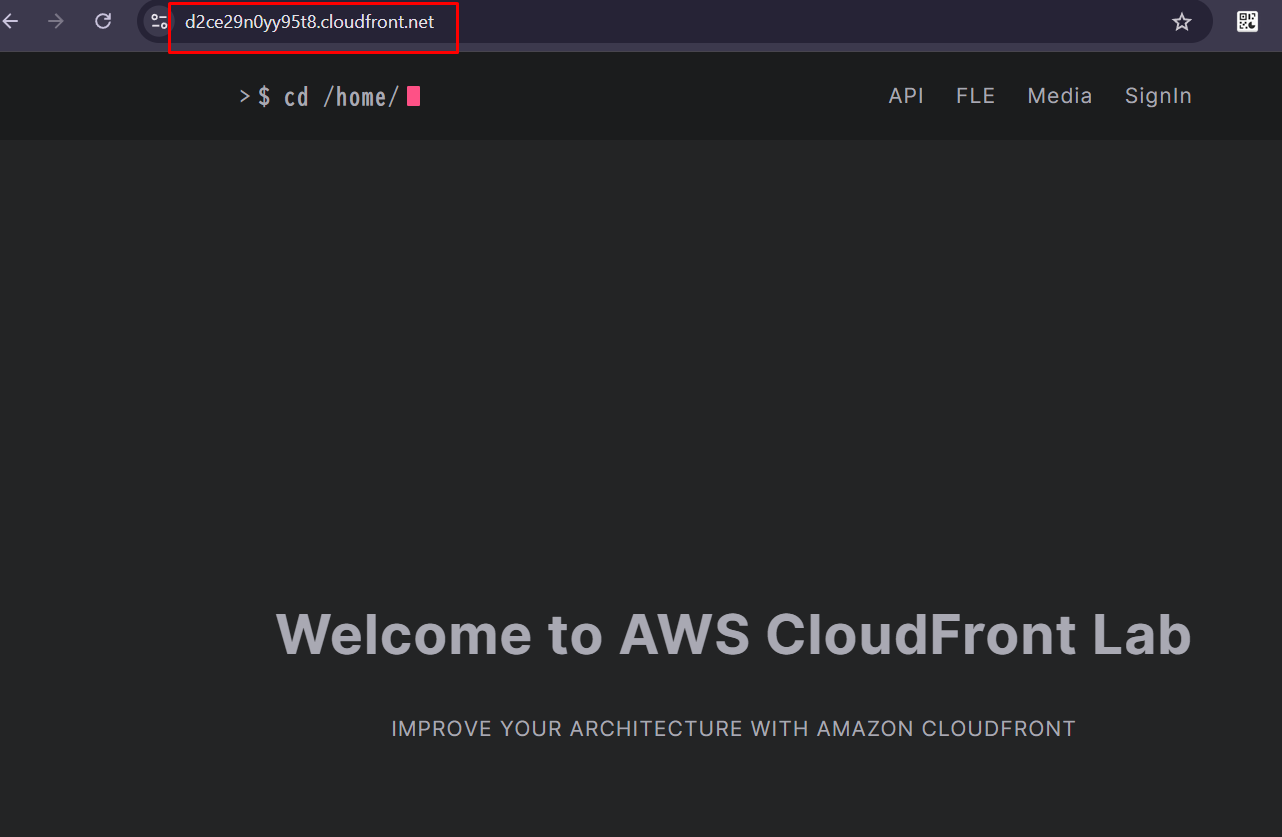
- Mở trình duyệt và truy cập URL của
s3WebsiteDomain. Kết quả mong đợi: Ứng dụng web hiển thị giao diện chính.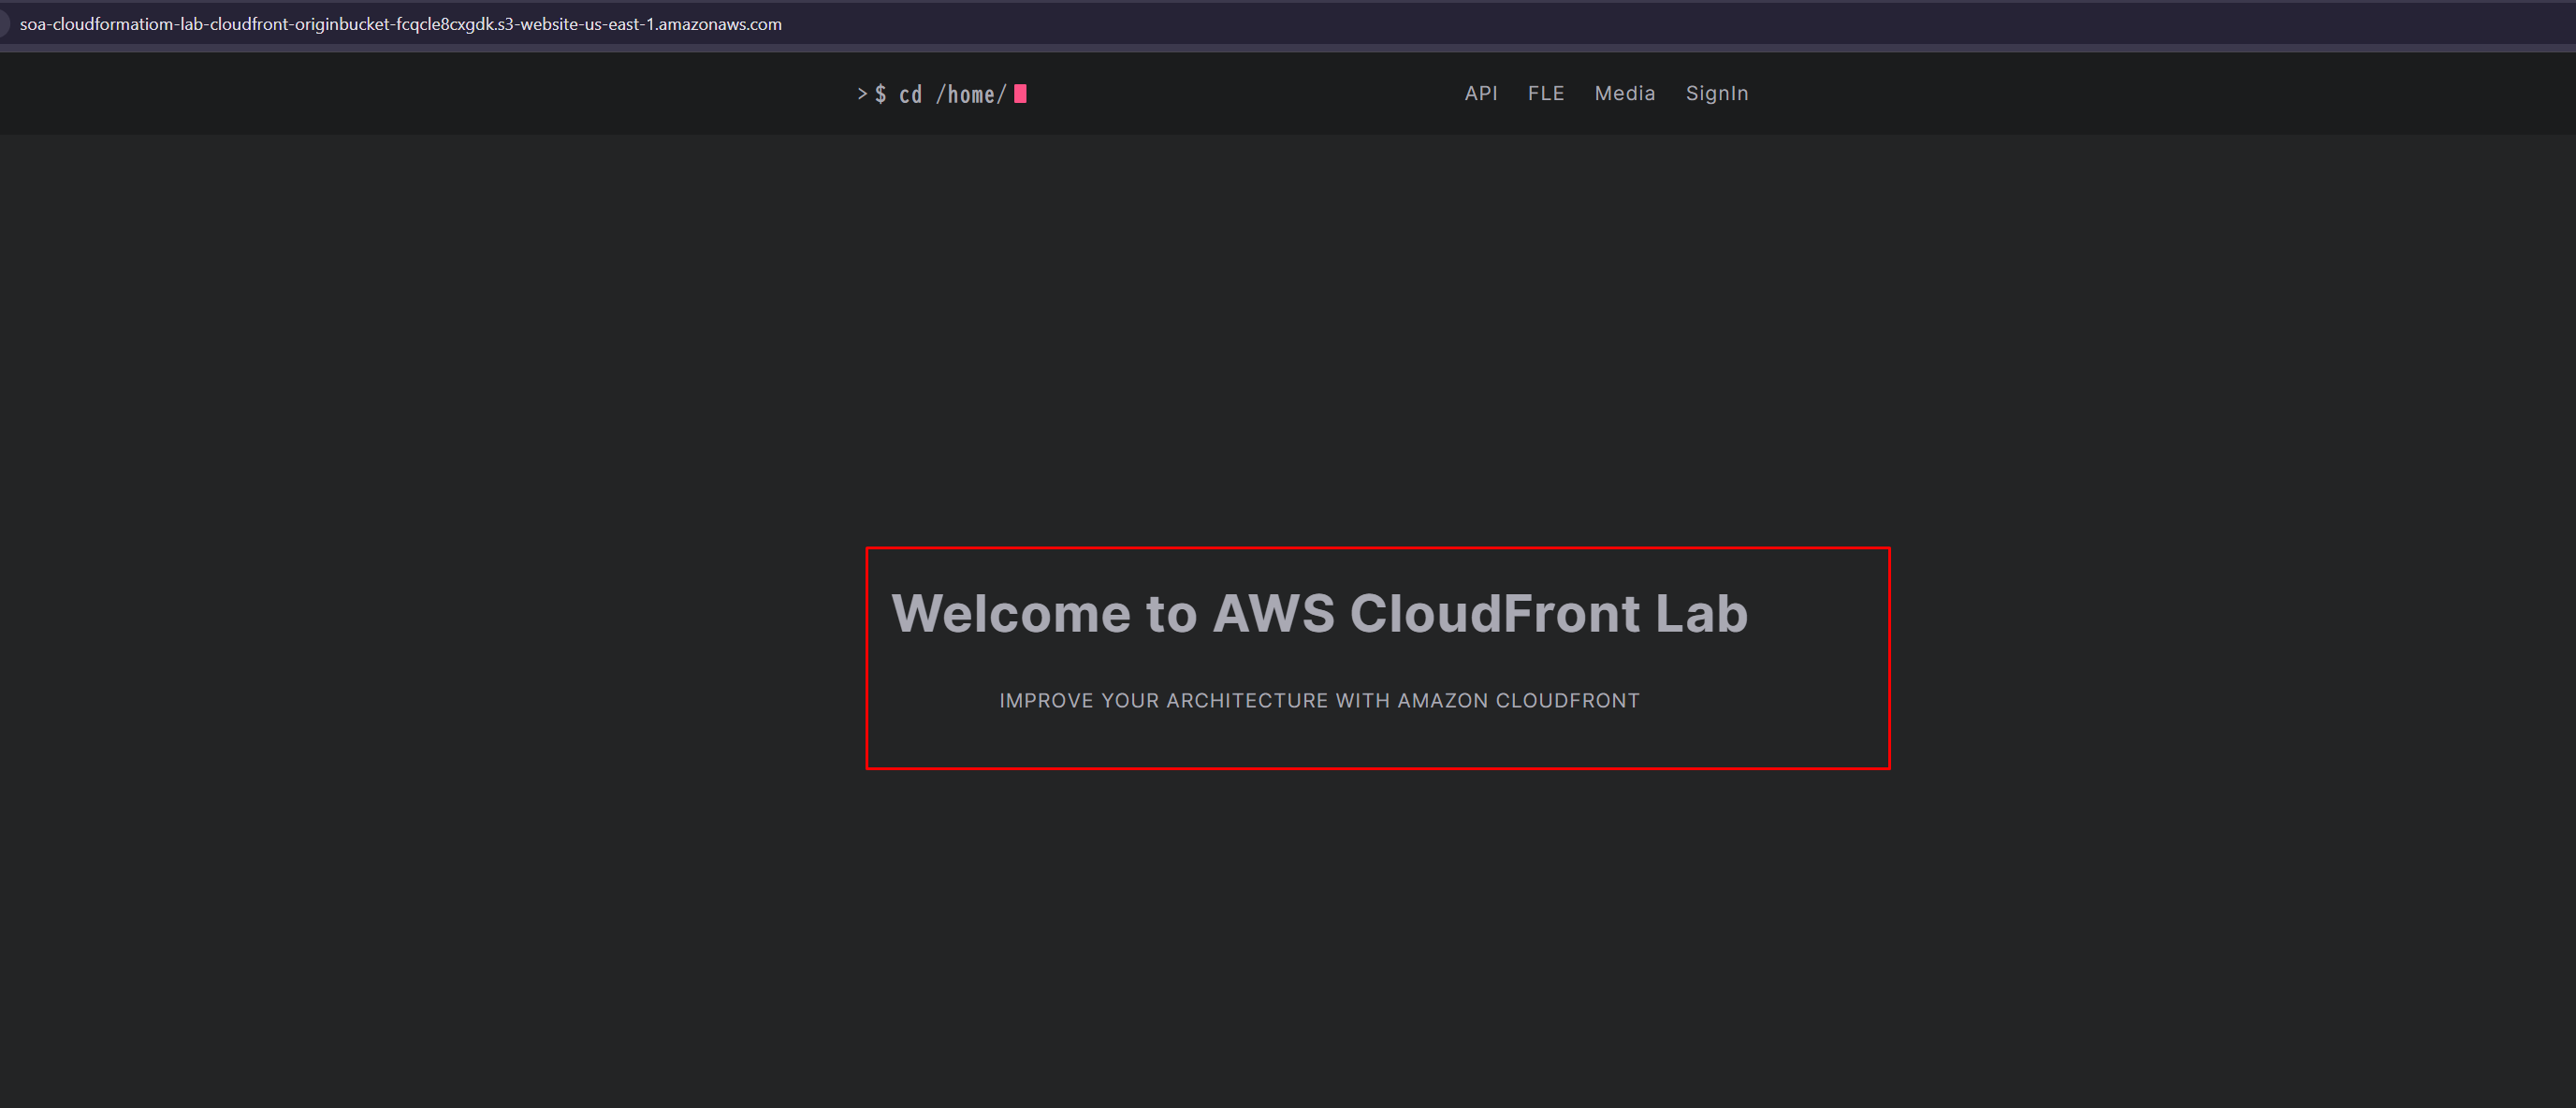
Checkpoint 1: Bạn đã có ứng dụng web chạy trên S3 với API Gateway và MediaPackage. Tuy nhiên, user truy cập trực tiếp S3 — chậm nếu ở xa. Tiếp theo: Thêm CloudFront CDN để tăng tốc.
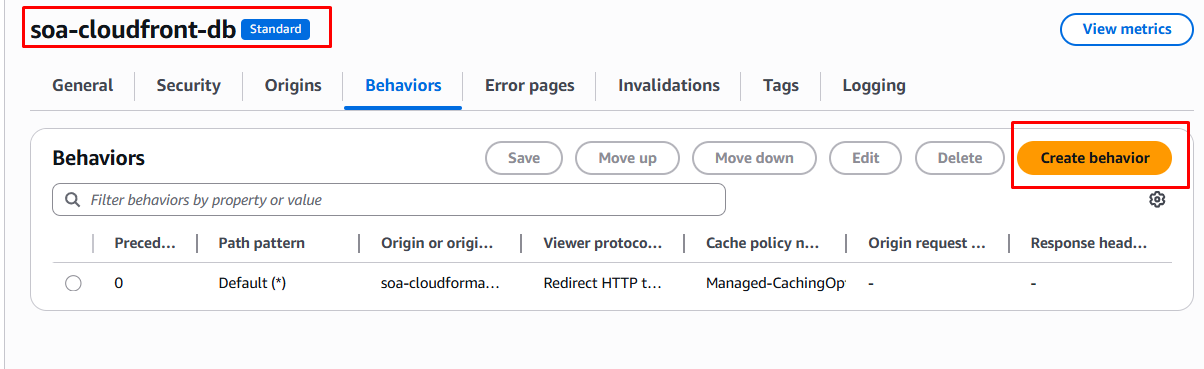
5. Tạo CloudFront Distribution
- Truy cập CloudFront Console và chọn Create distribution.
Distribution name sẽ là
soa-cloudfront-db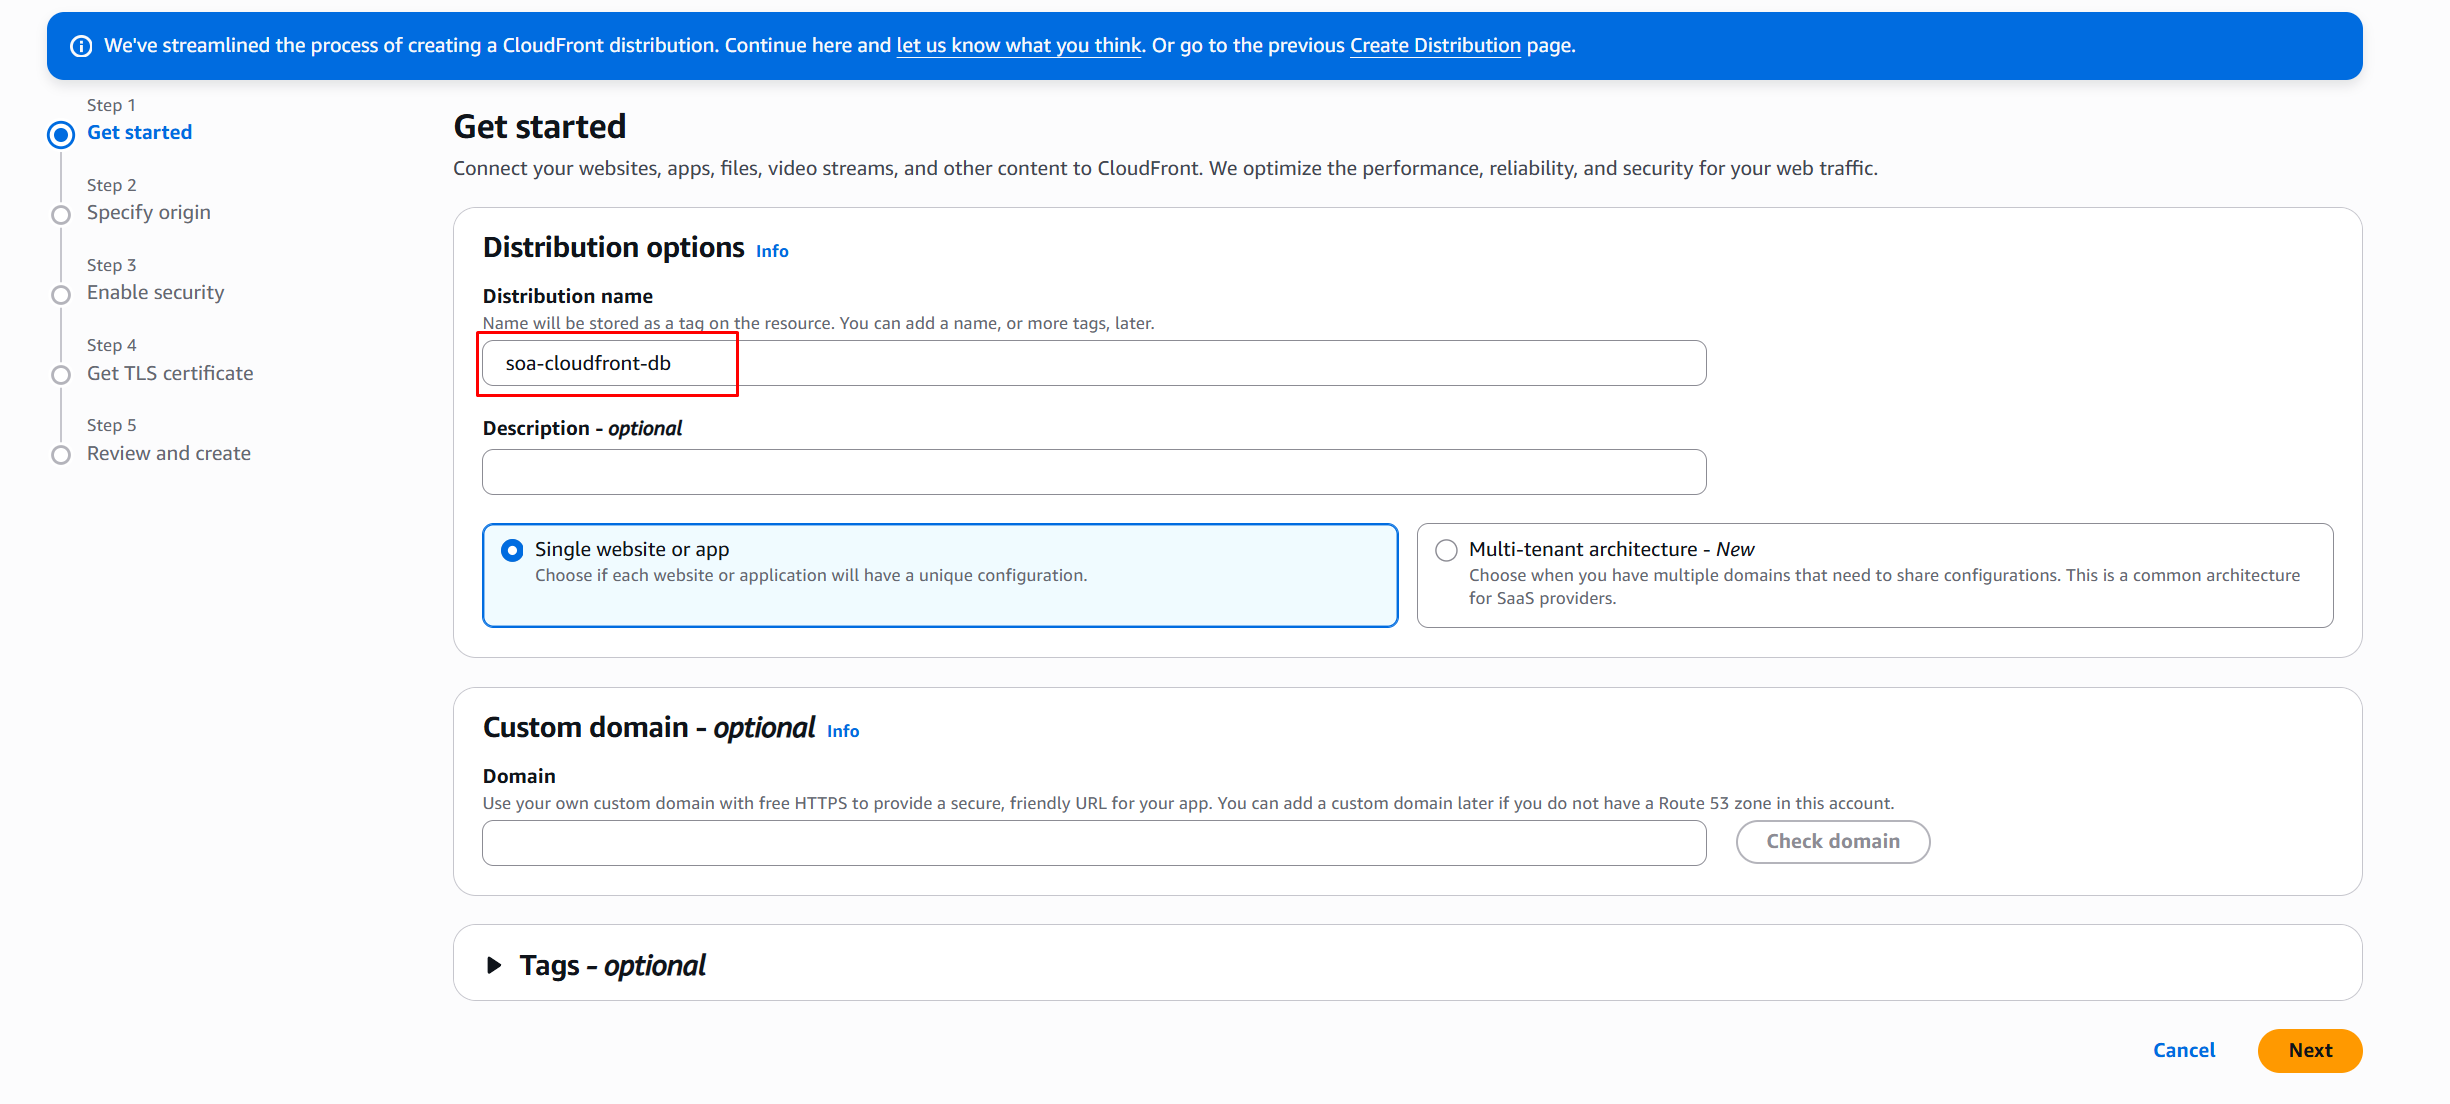
- Trong phần Origin settings:
- Chọn S3 bucket được tạo bởi CloudFormation (tên tương tự:
soa-cloudformatiom-lab-cloudfront-originbucket-<random-string>.s3.us-east-1.amazonaws.com). - Chọn origin là
Amazon S3. - Giữ nguyên các thiết lập mặc định khác.
- Chọn S3 bucket được tạo bởi CloudFormation (tên tương tự:
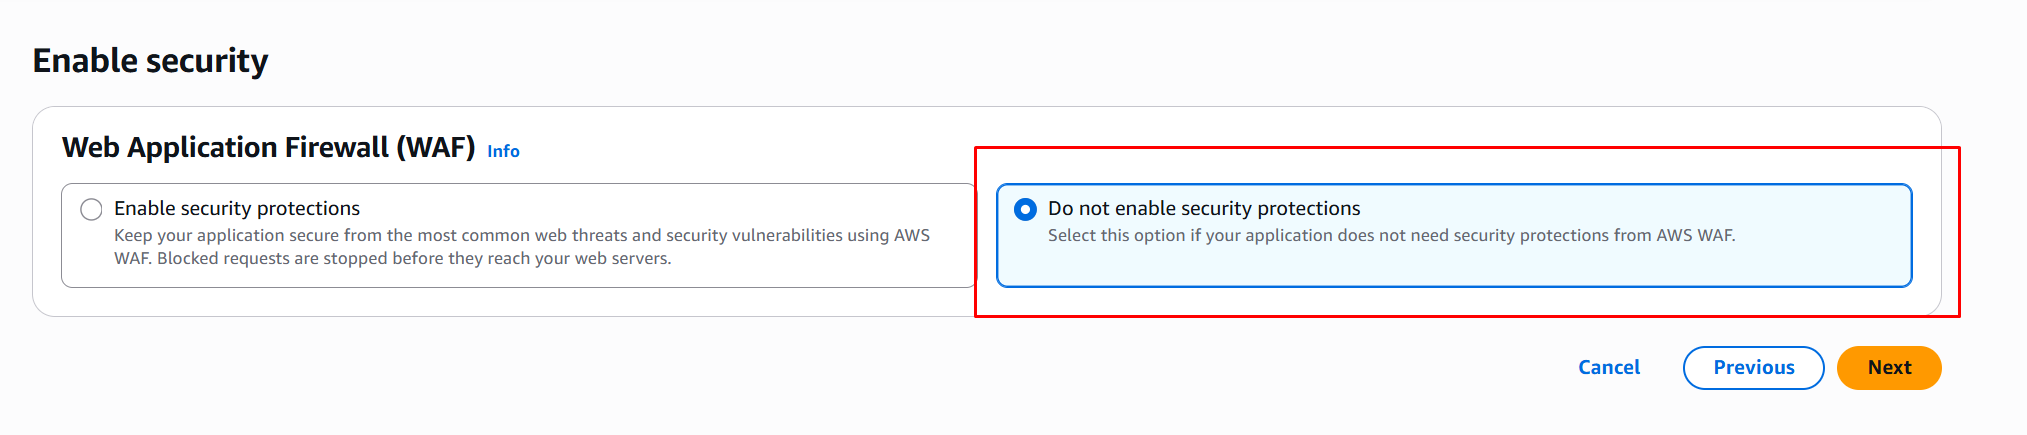
- Trong phần Web Application Firewall (WAF), chọn Do not enable security protections.
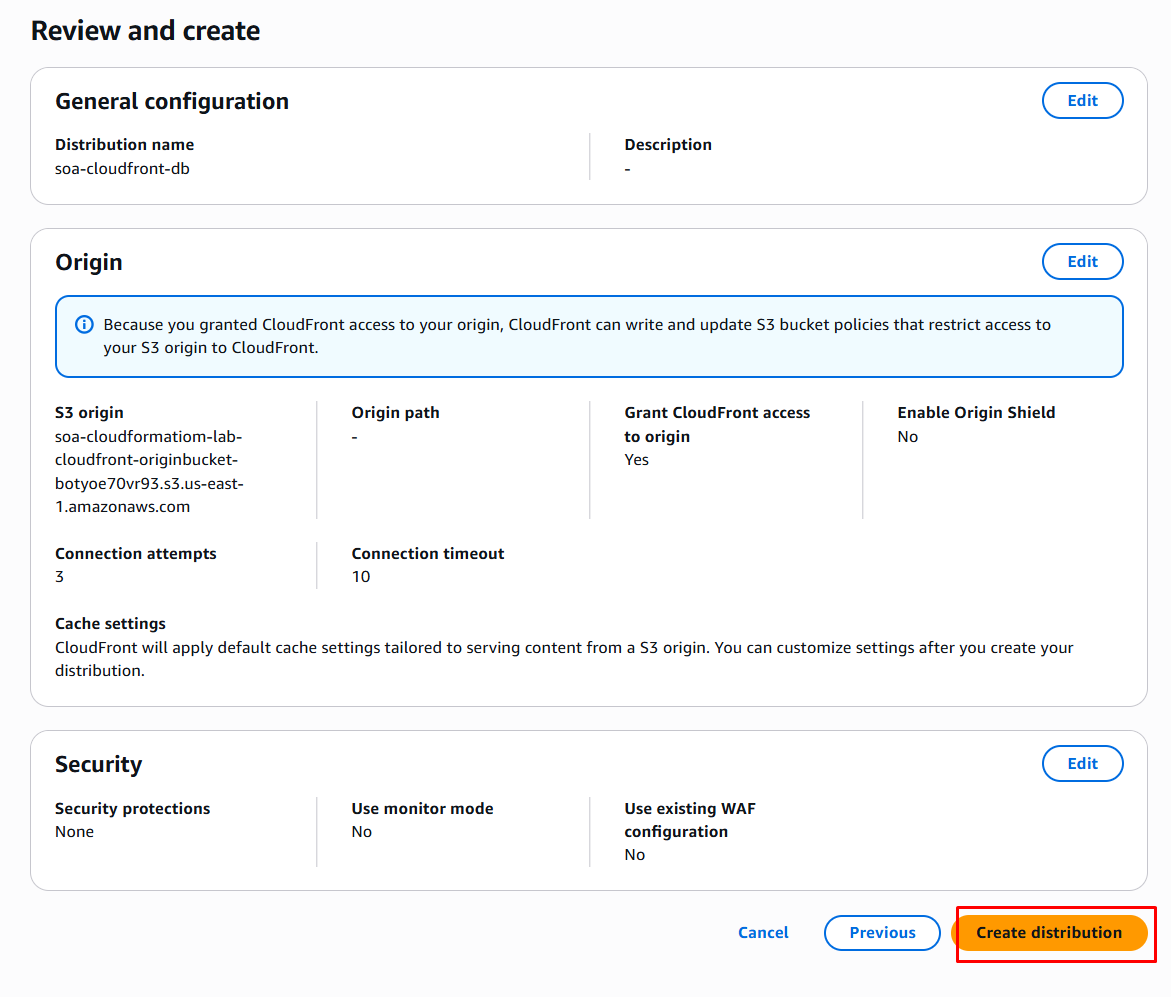
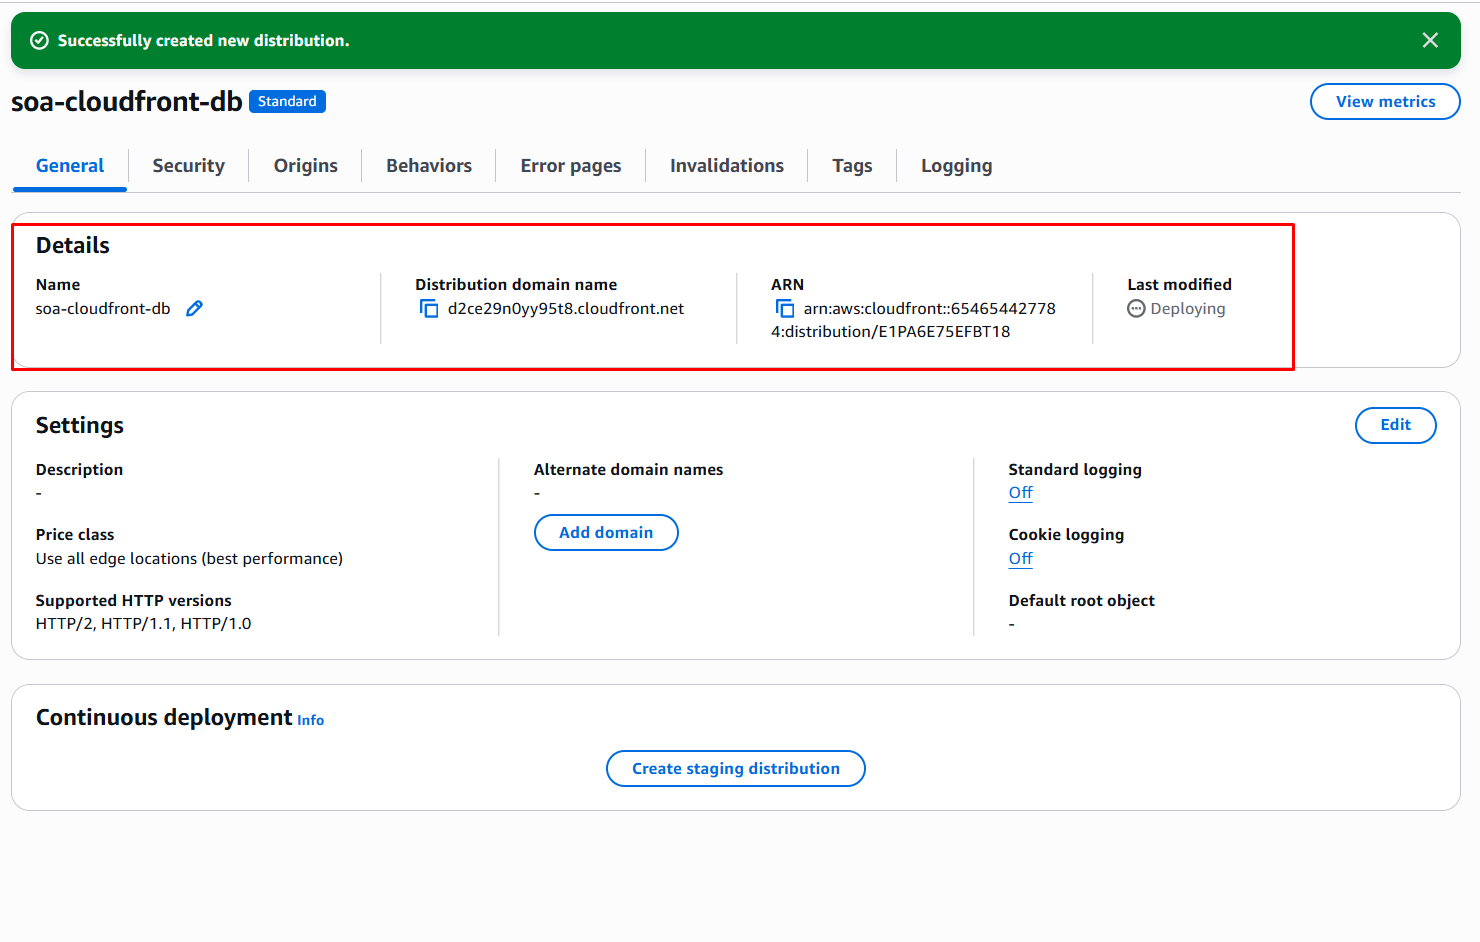
- Nhấn Create distribution. Trang chi tiết của CloudFront Distribution sẽ hiển thị.
6. Kiểm tra CloudFront Distribution
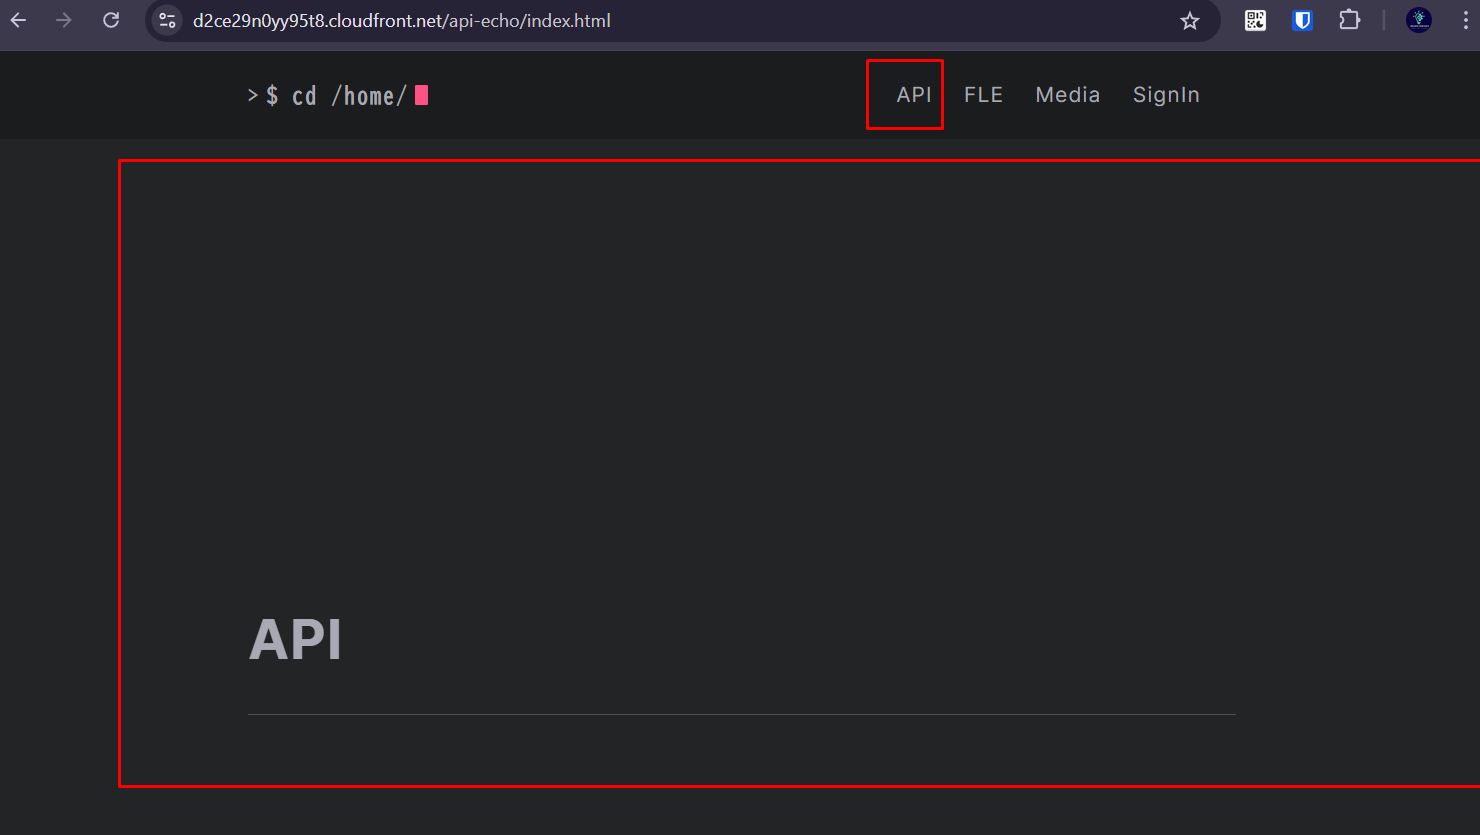
- Sao chép Domain name của CloudFront Distribution (ví dụ:
`https://d2ce29n0yy95t8.cloudfront.net/index.html).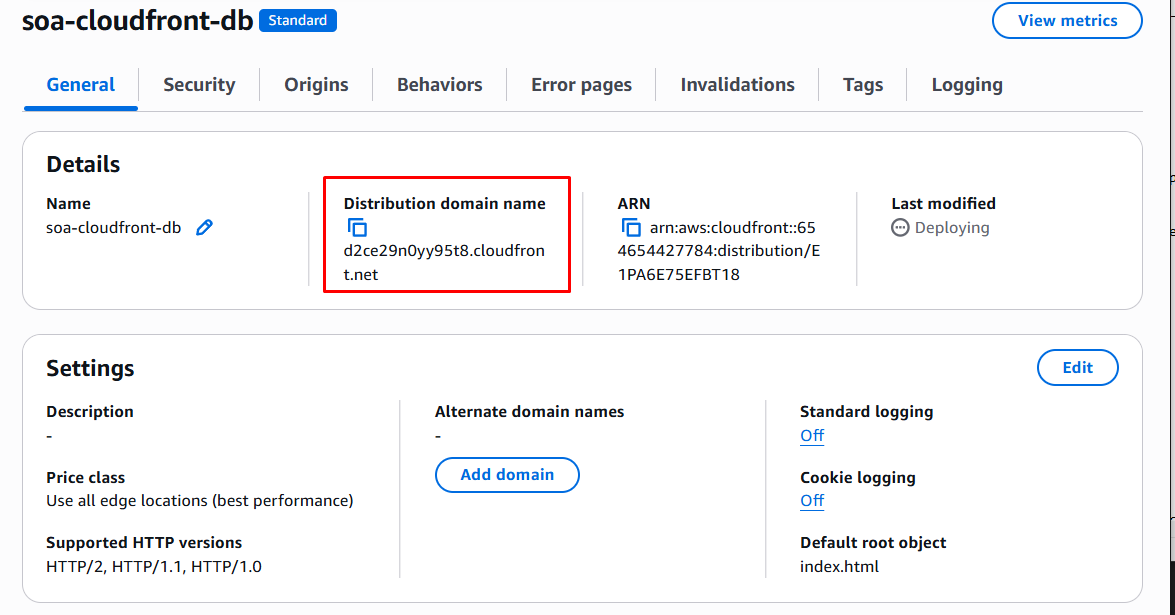
- Mở trình duyệt và truy cập domain name. Trang web mẫu sẽ hiển thị.
- Các trang con như API có thể không hiển thị dữ liệu. Chúng ta sẽ khắc phục ở bước tiếp theo.
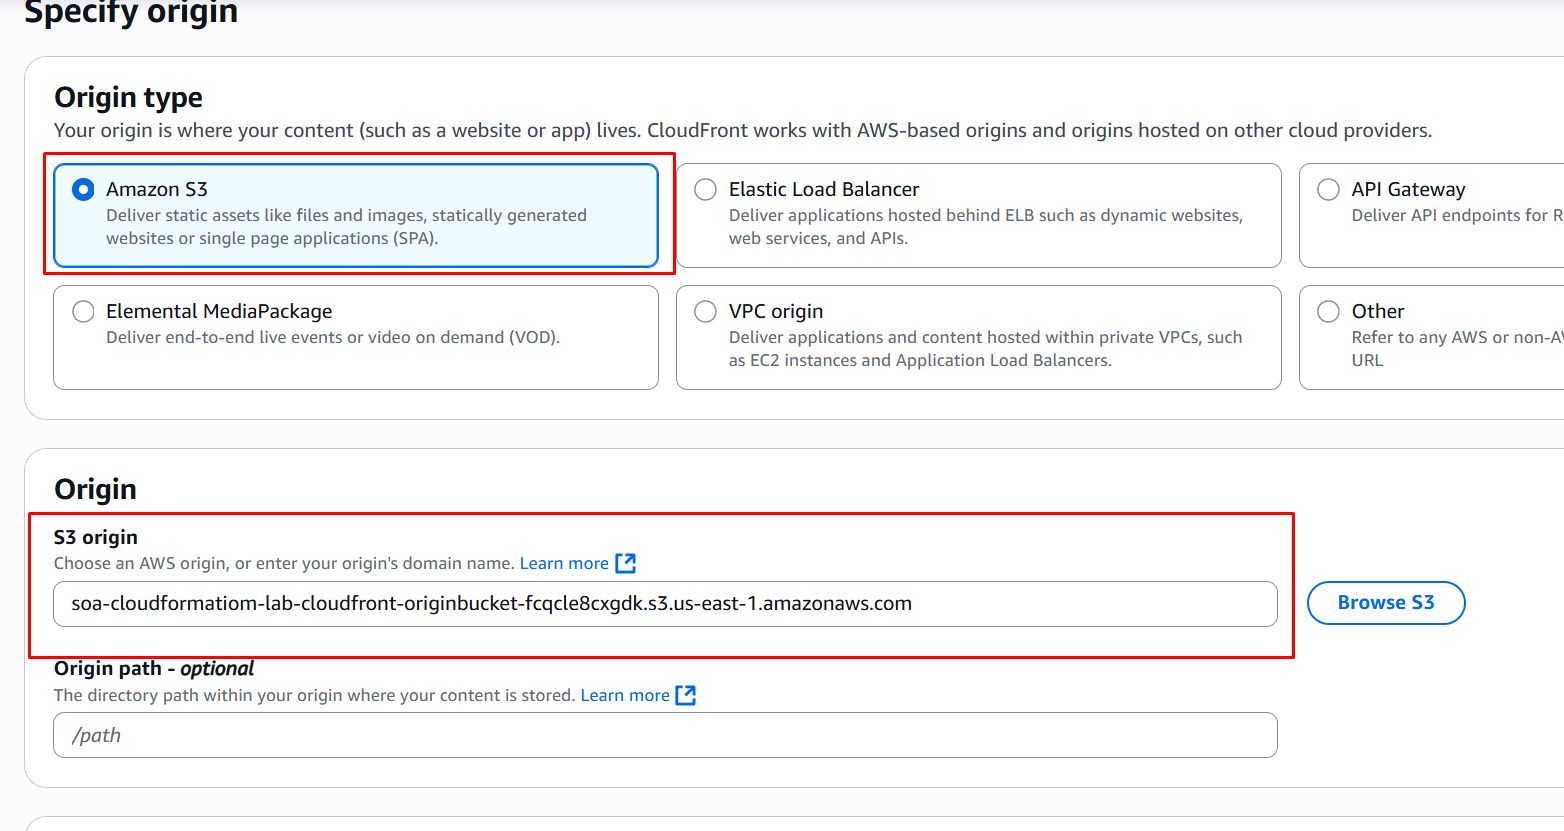
7. Thêm API Origin
- Lấy URL của API Gateway từ Outputs của stack CloudFormation (
apiOriginEndpoint).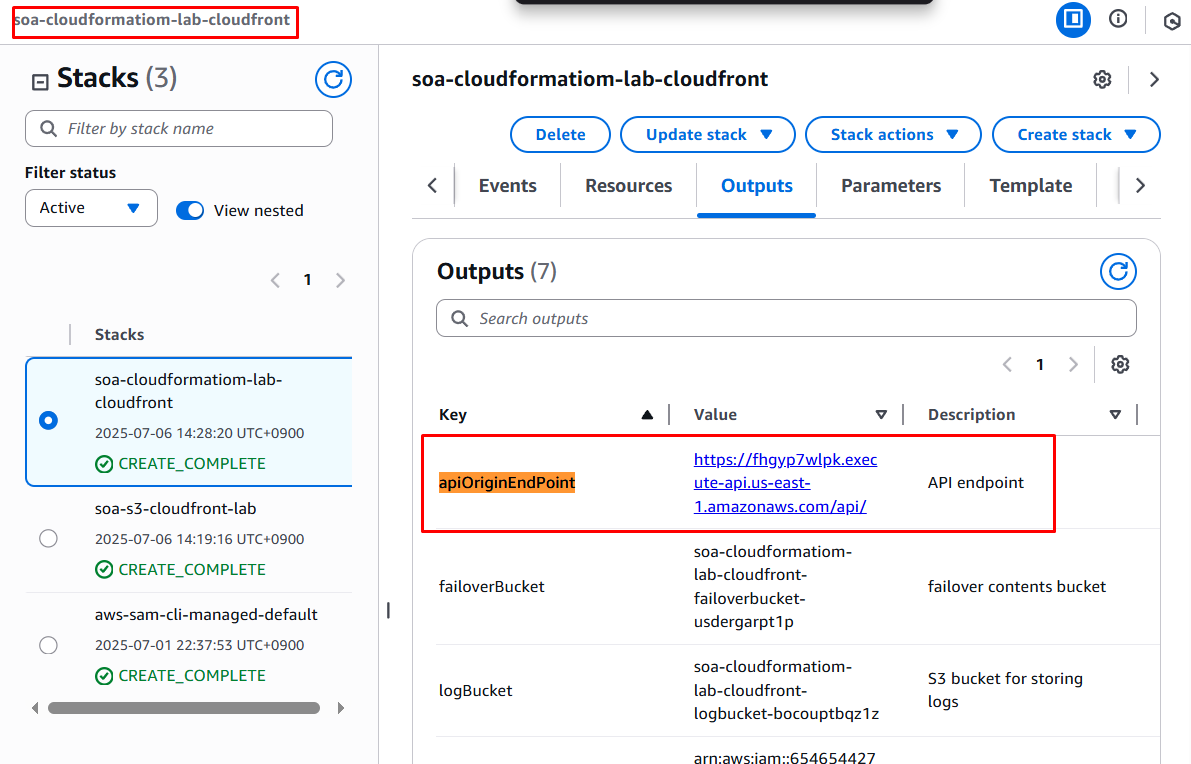
- Trong CloudFront Console, mở Distribution đã tạo, chọn tab Origins.
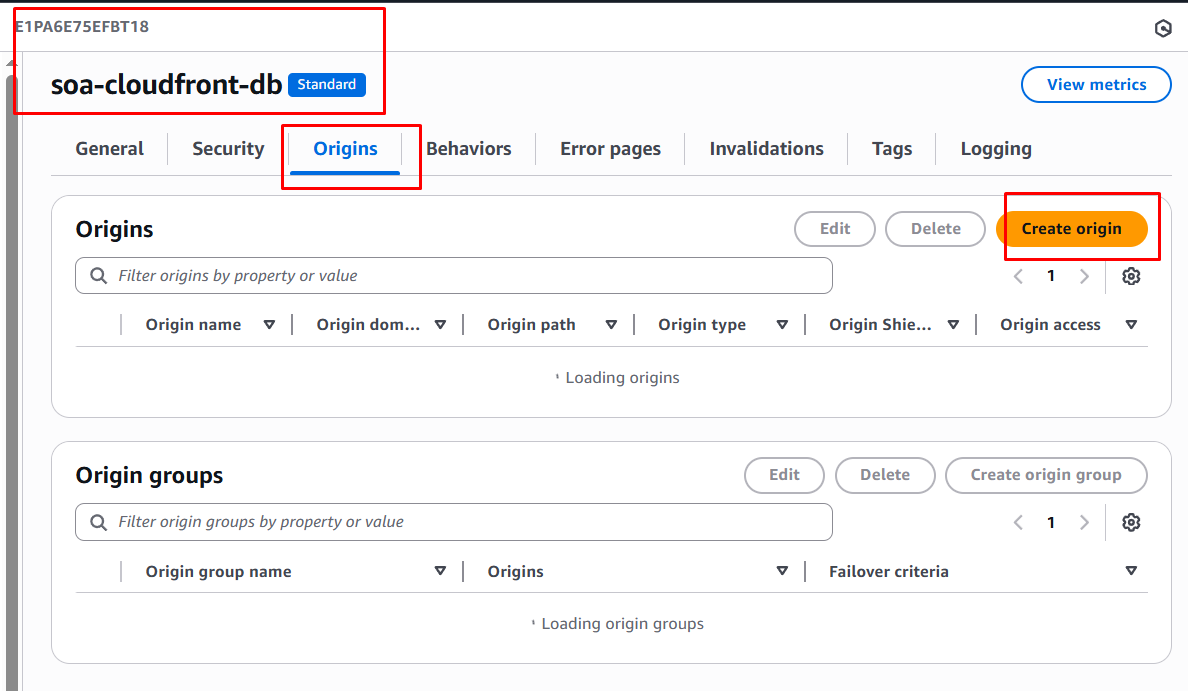
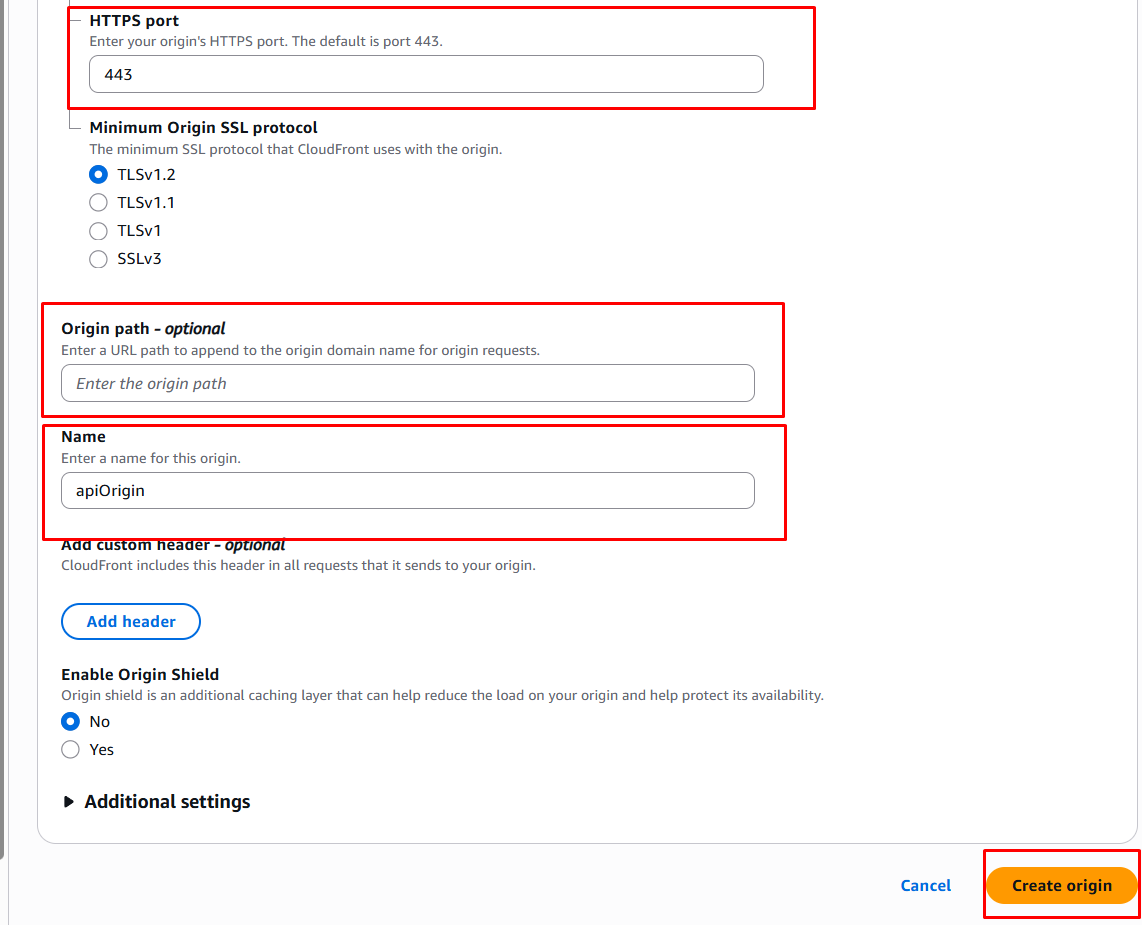
- Nhấn Create origin:
- Nhập domain name của
apiOriginEndpoint(chỉ nhập phần nhưhttps://fhgyp7wlpk.execute-api.us-east-1.amazonaws.com/api/).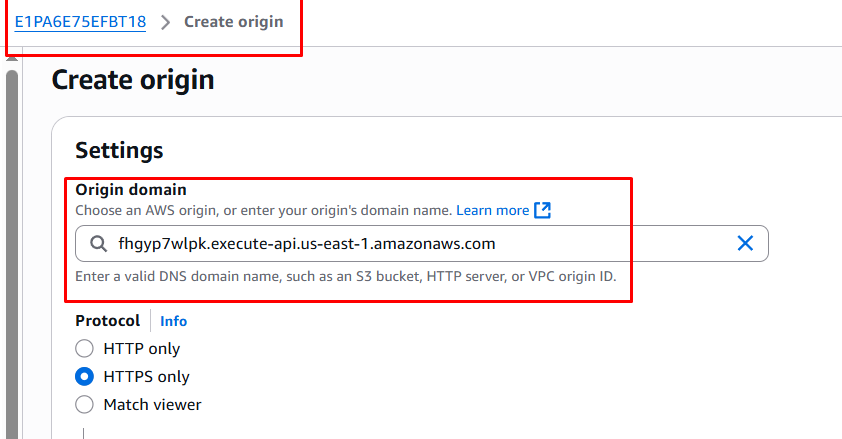
- Chọn Protocol là HTTPS Only.

- Đặt tên origin là
apiOrigin. - Nhấn Create origin.
- Nhập domain name của
8. Thêm Video Origin
- Lấy URL streaming video từ Outputs của stack CloudFormation (
videoOriginDomain).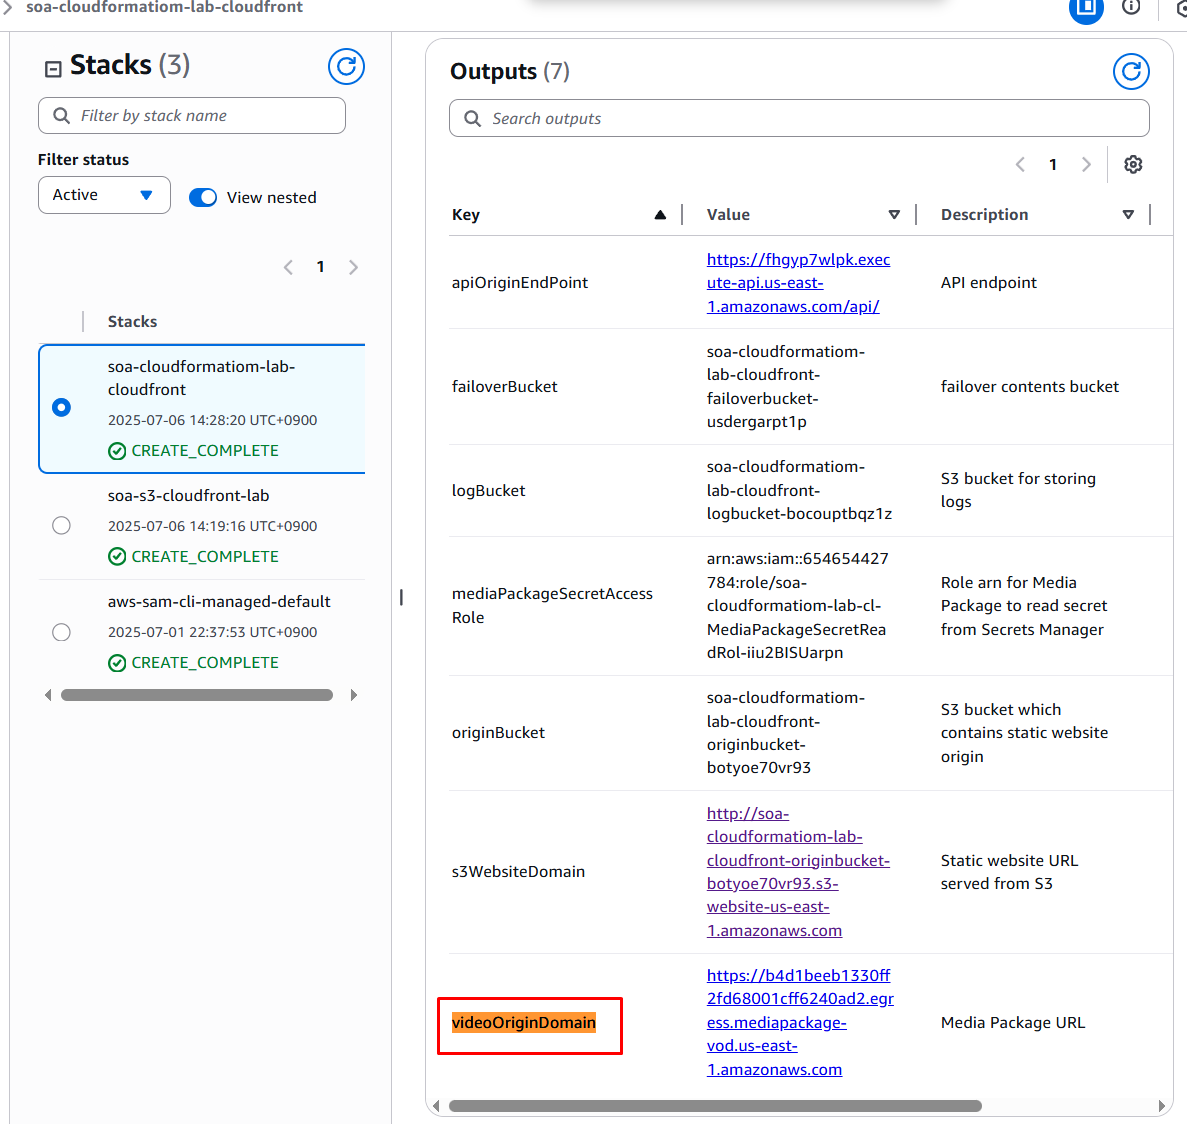
- Trong tab Origins, nhấn Create origin:
- Nhập domain name của
videoOriginDomain(chỉ nhập phần nhưhttps://b4d1beeb1330ff2fd68001cff6240ad2.egress.mediapackage-vod.us-east-1.amazonaws.com)..) - Chọn Protocol là HTTPS Only.
- Đặt tên origin là
videoOrigin. - Nhấn Create origin.
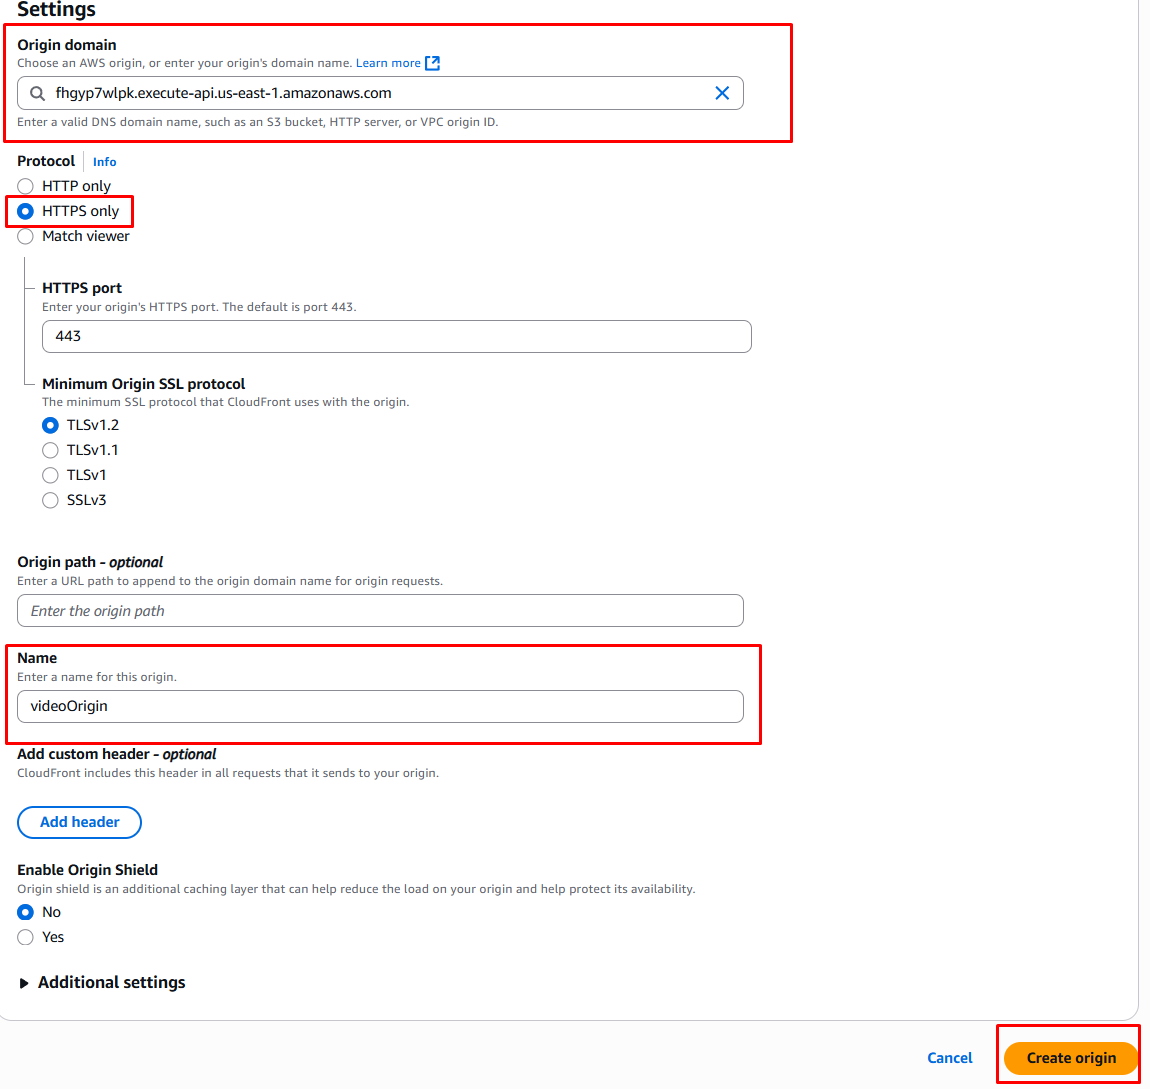
- Nhập domain name của
9. Định tuyến yêu cầu đến các Origins
- Trong tab Behaviors, nhấn Create behavior:
- Đặt Path pattern là
/api/*. - Chọn apiOrigin làm Origin and origin group.
- Chọn Allowed HTTP methods:
GET, HEAD, OPTIONS, PUT, POST, PATCH, DELETE.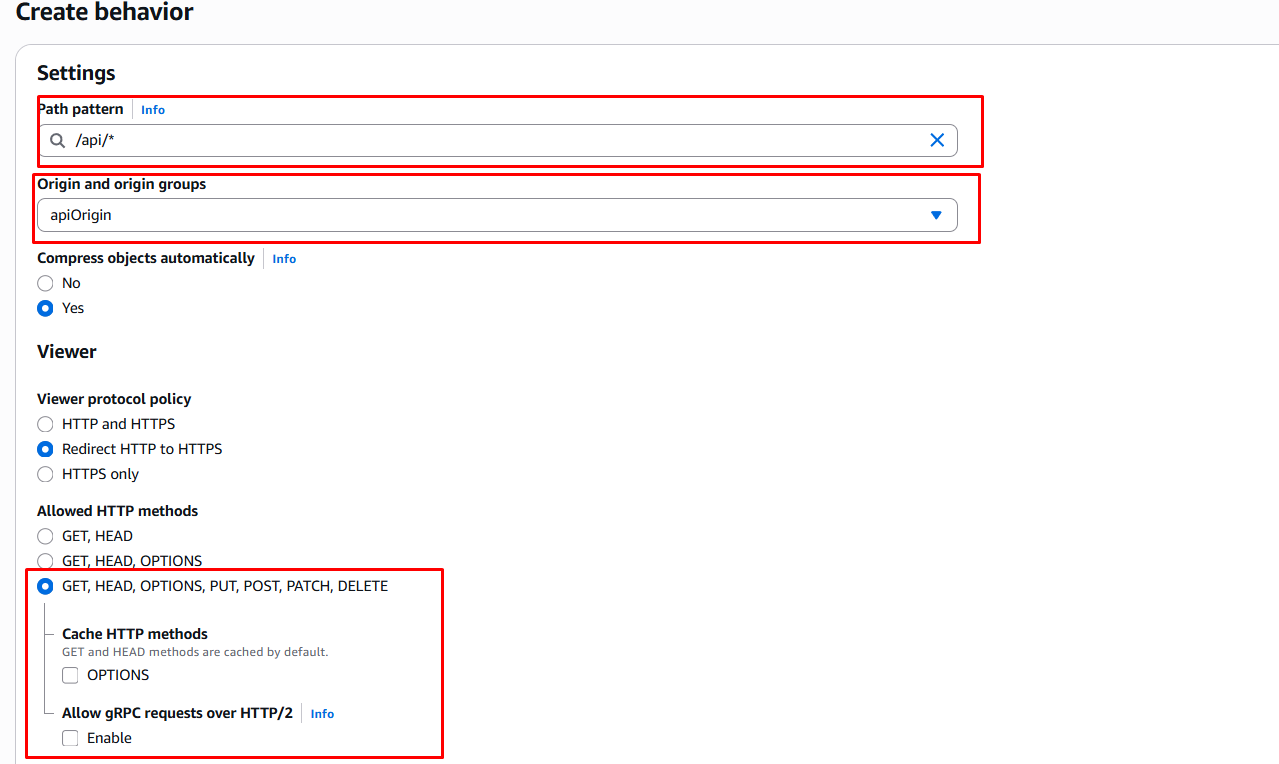
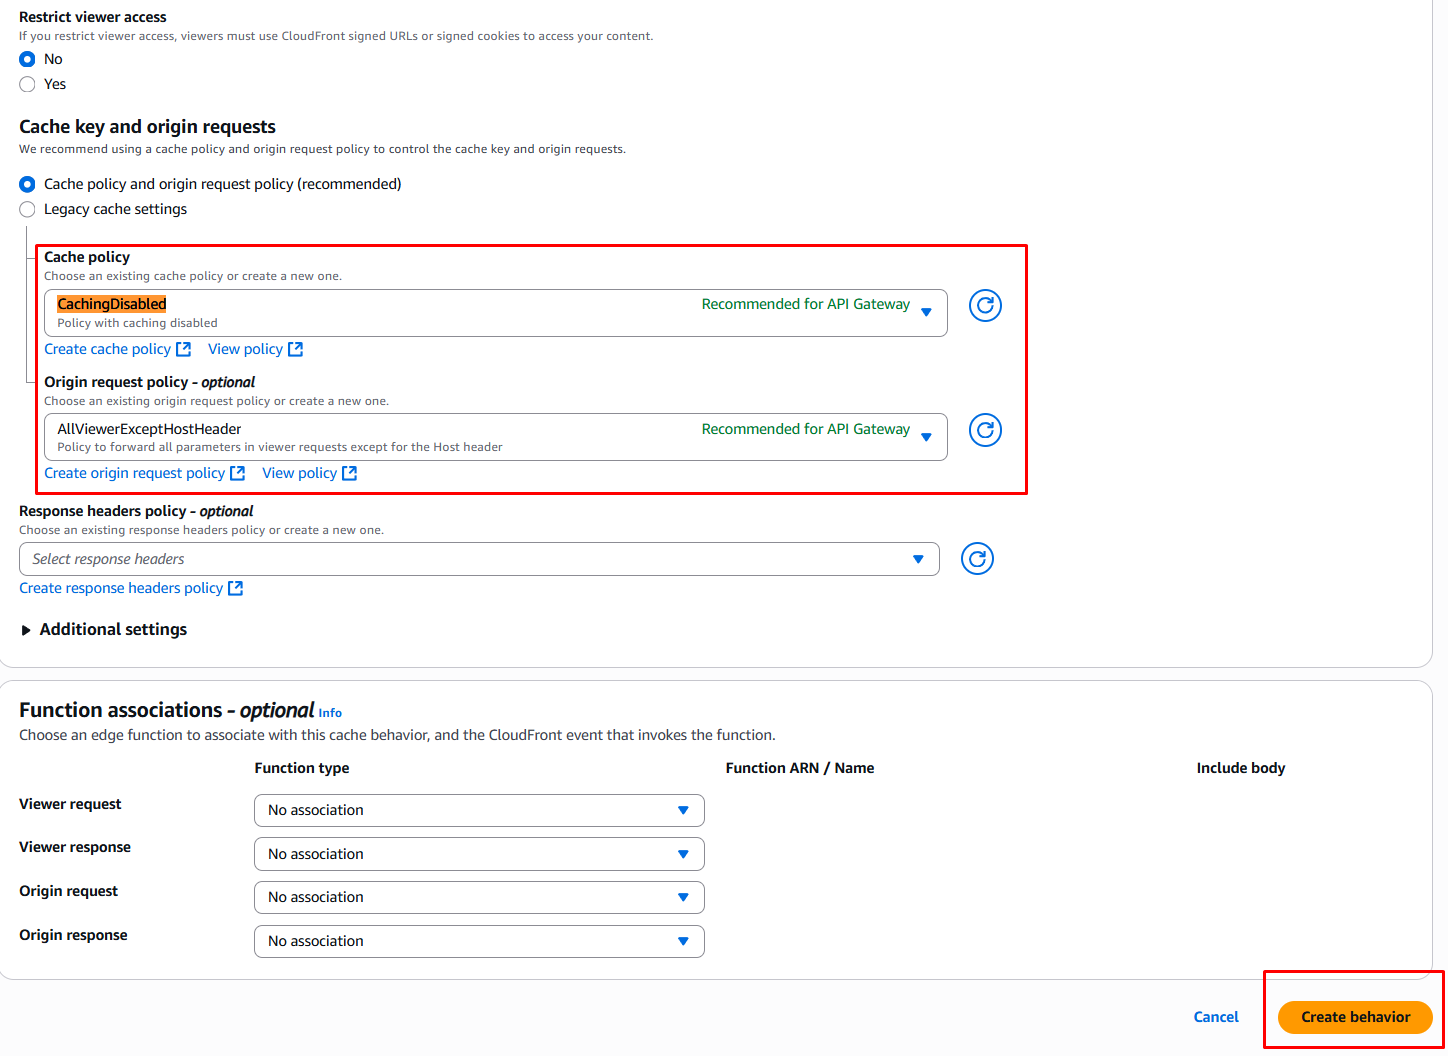
- Chọn Cache policy là
CachingDisabled— vì API trả dữ liệu real-time (danh sách sản phẩm, user info). Nếu cache, user sẽ thấy data cũ. - Chọn Origin request policy là
AllViewerExceptHostHeader— forward tất cả headers/cookies đến API Gateway, trừ Host header. Nếu forward Host header (ví dụd2ce29n0yy95t8.cloudfront.net), API Gateway sẽ không nhận ra và trả lỗi. - Nhấn Create behavior.
- Đặt Path pattern là
- Tạo thêm behavior cho video:
- Nhấn Create behavior.
- Đặt Path pattern là
/out/*. - Chọn videoOrigin làm Origin and origin group.
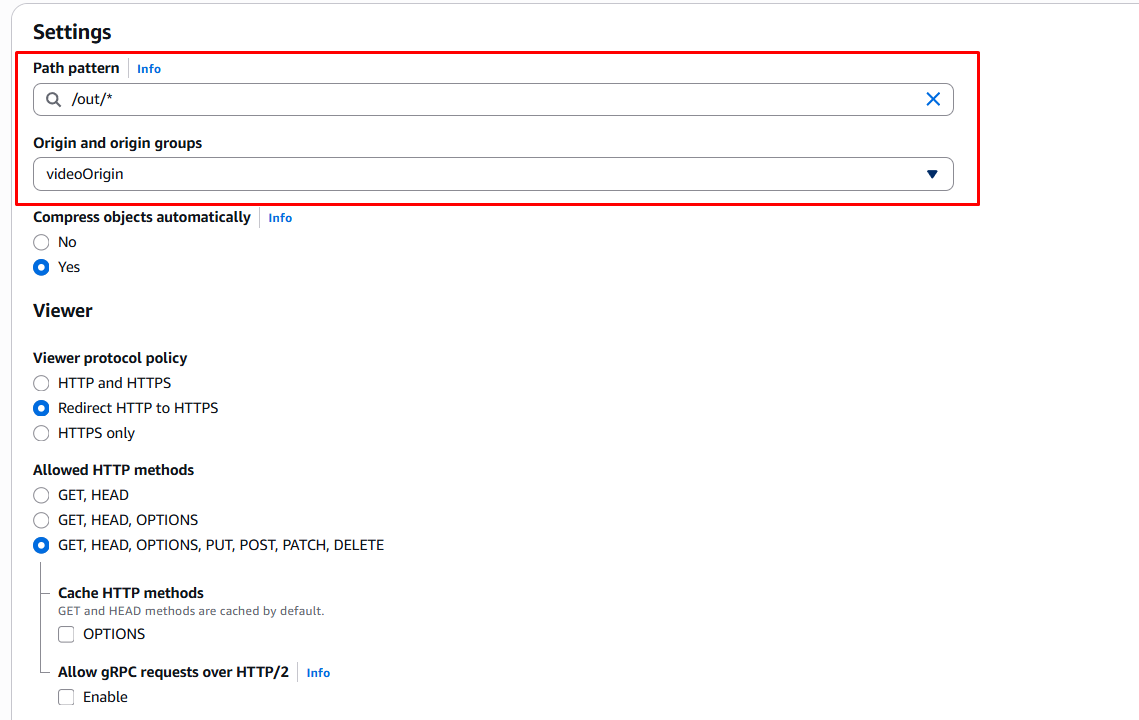
- Chọn Cache policy là
CachingOptimized— video không thay đổi nội dung, nên cache tối đa (mặc định 24h, tối đa 365 ngày). CloudFront cũng tự động nén (Gzip/Brotli) để giảm bandwidth. - Nhấn Create behavior.
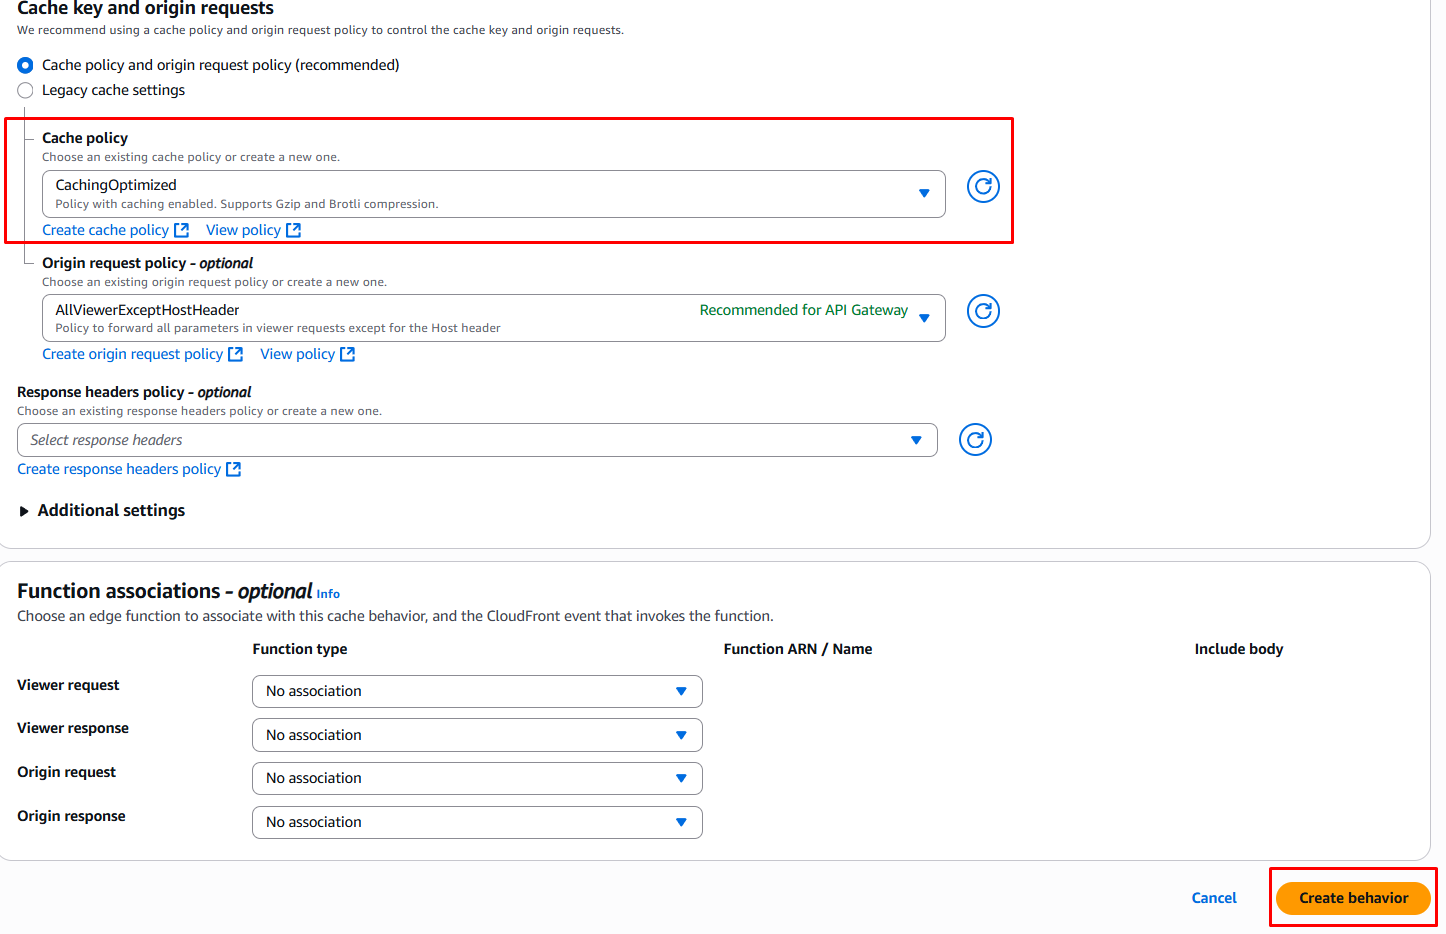
- Đảm bảo các behavior mới nằm trên Default (*) Behavior.

- Trong tab General, kiểm tra trạng thái Last modified là Deploying.

10. Kiểm tra các Origins
- Sau khi Distribution được triển khai, truy cập lại domain CloudFront (
https://d2ce29n0yy95t8.cloudfront.net). - Kiểm tra menu API: Dữ liệu API sẽ hiển thị.
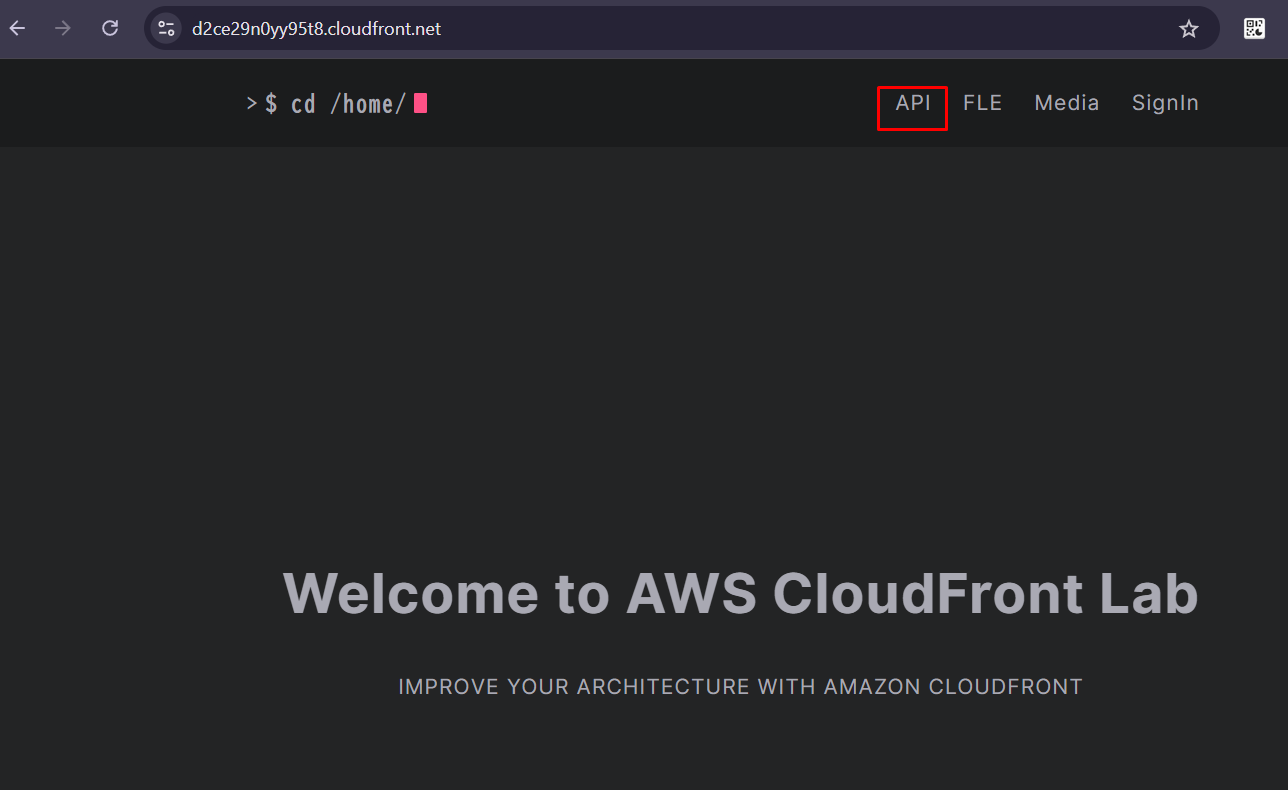
- Kiểm tra menu Media: Video sẽ phát sau khi tải trang.
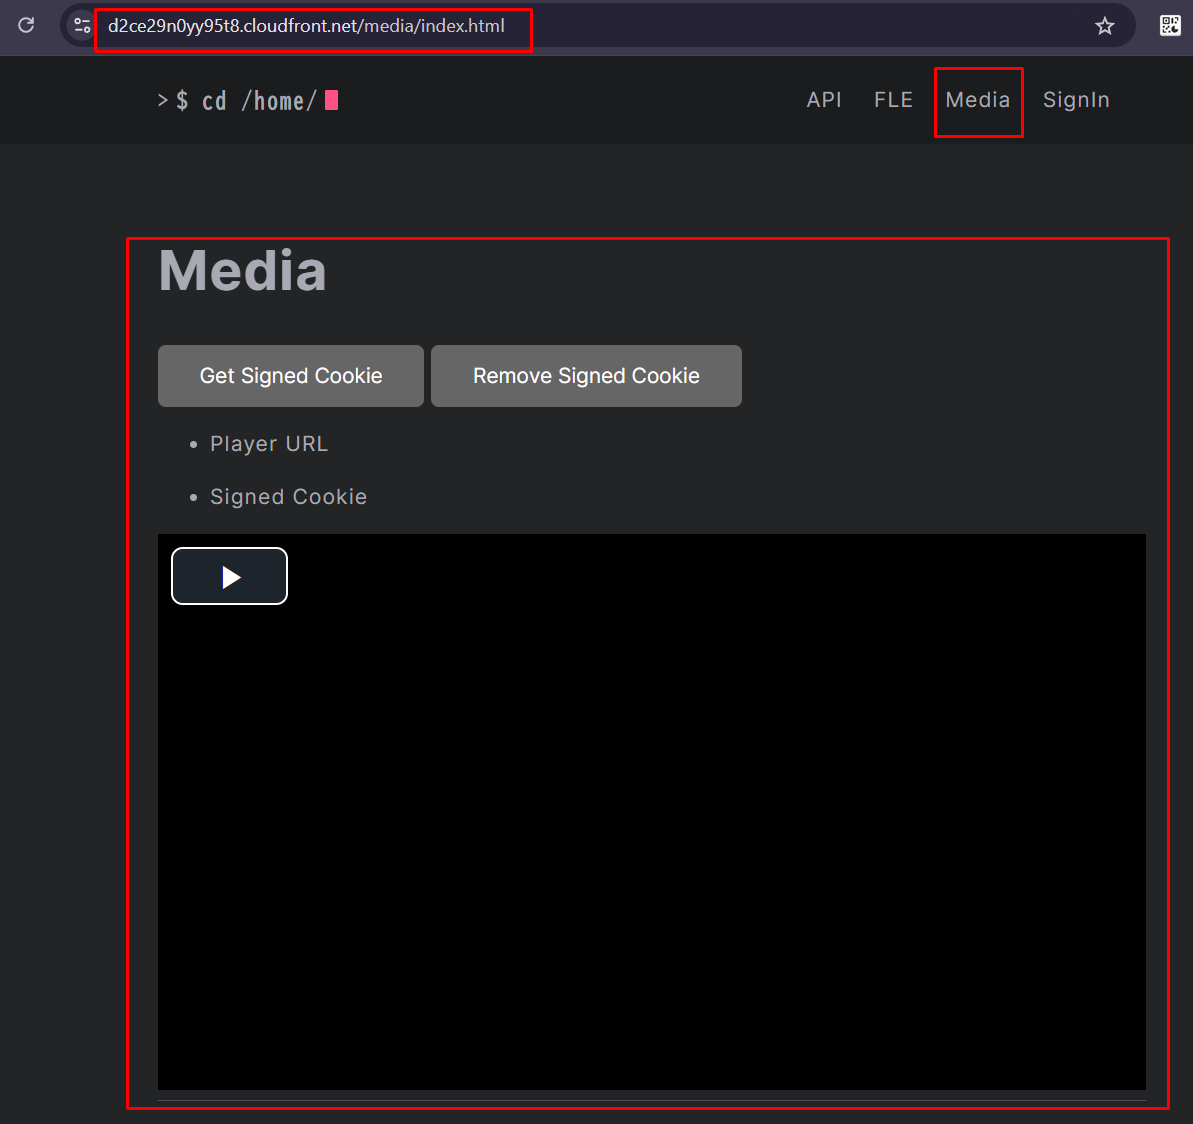
Checkpoint 2: CloudFront Distribution hoạt động hoàn chỉnh với 3 origins: S3 (static), API Gateway (dynamic), MediaPackage (video). Tất cả truy cập qua 1 domain CloudFront duy nhất. Tiếp theo: Đo lường xem CloudFront nhanh hơn S3 bao nhiêu.
11. Chuẩn bị cho So sánh hiệu suất giữa S3 và CloudFront:
- Lấy url s3 domain:
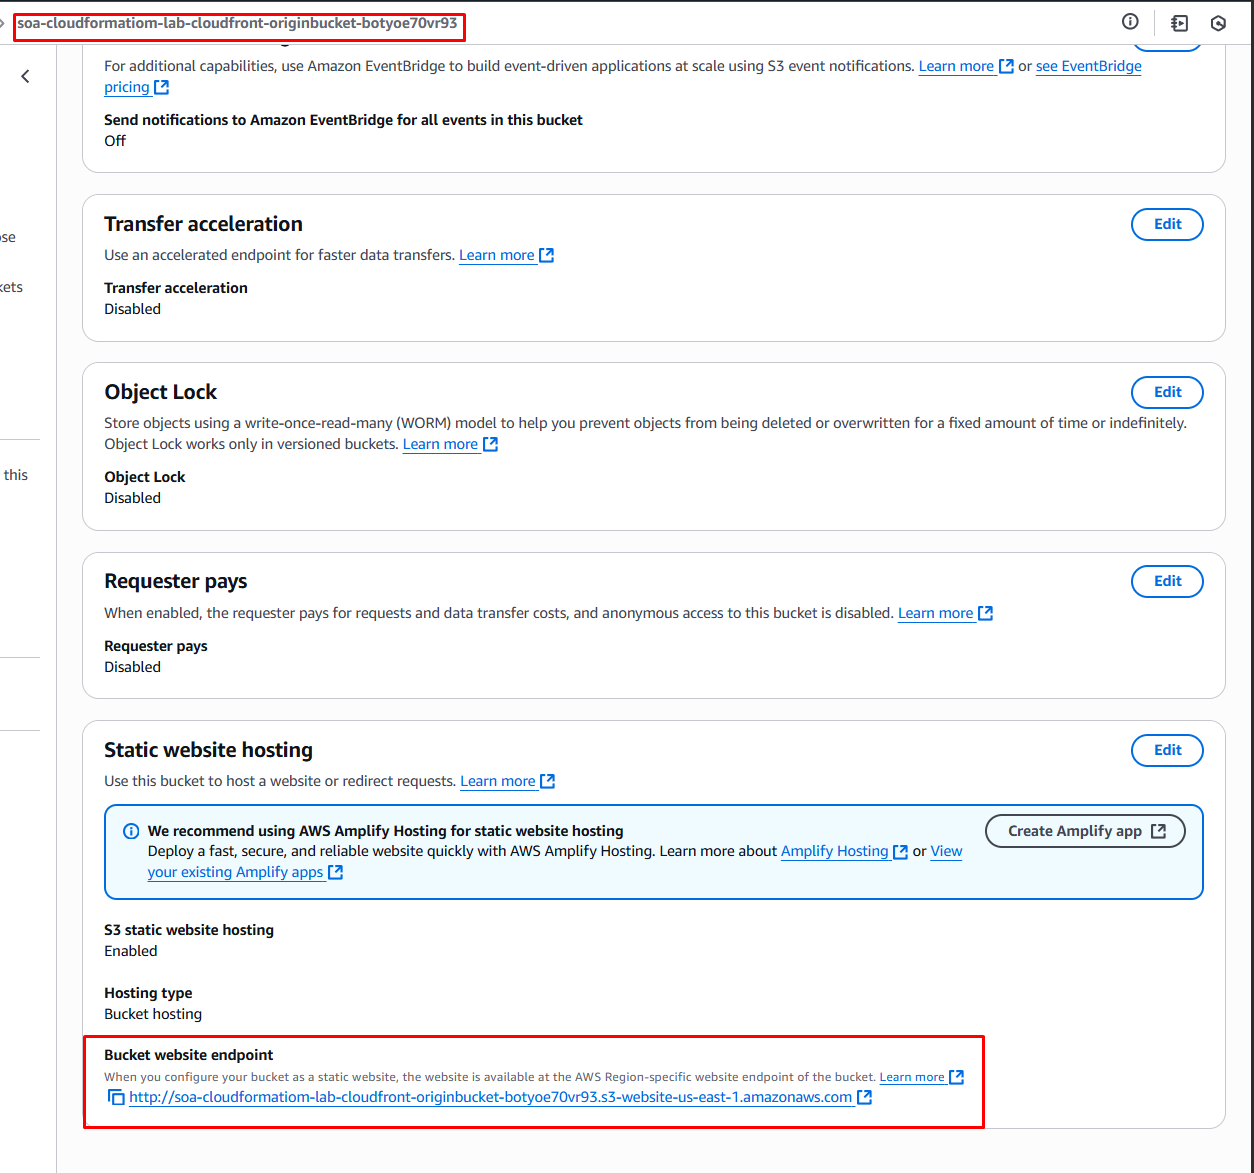
12. Kiểm tra thời gian tải trung bình từ S3 (s3WebsiteDomain):
-
Câu lệnh thực thi:
- macOS/Linux:
for i in $(seq 1 10); do echo $i; curl -s -o /dev/null --write-out "size_download: %{size_download} // time_total: %{time_total} // time_starttransfer: %{time_starttransfer}\n" http://[s3WebsiteDomain]/test/download.test; done;- Windows / CMD:
for /L %i in (1,1,10) do @echo %i && curl -s -o NUL --write-out "size_download: %{size_download} // time_total: %{time_total} // time_starttransfer: %{time_starttransfer}\n" http://[s3WebsiteDomain]/test/download.test- Windows / PowerShell
for ($i = 1; $i -le 10; $i++) { Write-Host $i $startTime = Get-Date try { $webRequest = [System.Net.WebRequest]::Create("http://[s3WebsiteDomain]/test/download.test") $response = $webRequest.GetResponse() $responseStream = $response.GetResponseStream() $firstByteTime = Get-Date $timeToFirstByte = ($firstByteTime - $startTime).TotalSeconds # Read the response $buffer = New-Object byte[] 4096 $totalBytes = 0 do { $bytesRead = $responseStream.Read($buffer, 0, $buffer.Length) $totalBytes += $bytesRead } while ($bytesRead -gt 0) $endTime = Get-Date $totalTime = ($endTime - $startTime).TotalSeconds Write-Host "size_download: $totalBytes // time_total: $totalTime // time_starttransfer: $timeToFirstByte" $responseStream.Close() $response.Close() } catch { Write-Host "Error: $($_.Exception.Message)" } } -
Thay thế [s3WebsiteDomain] bằng domain của bản thân.
-
Trường hợp của mình :
for i in $(seq 1 10); do echo $i; curl -s -o /dev/null --write-out "size_download: %{size_download} // time_total: %{time_total} // time_starttransfer: %{time_starttransfer}\n" [http://soa-cloudformatiom-lab-cloudfront-originbucket-botyoe70vr93.s3-website-us-east-1.amazonaws.com/test/download.test](http://soa-cloudformatiom-lab-cloudfront-originbucket-botyoe70vr93.s3-website-us-east-1.amazonaws.com/test/download.test); done; -
Kết quả:
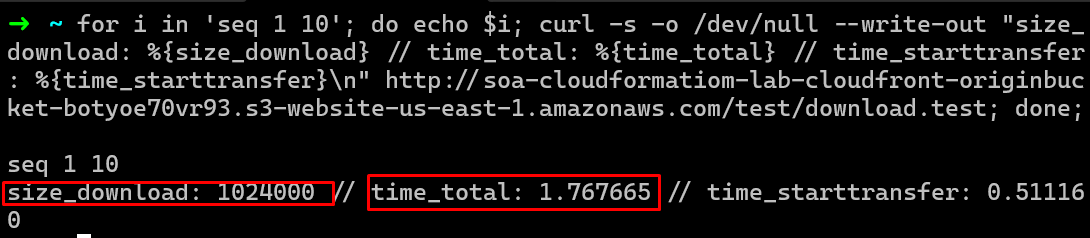
- Tốc độ load khoảng 1.7 giây
13. Kiểm tra thời gian tải trung bình từ CloudFront (CloudFront endpoint):
- Câu lệnh thực thi:
- macOS/Linux:
for i in $(seq 1 10); do echo $i; curl -s -o /dev/null --write-out "size_download: %{size_download} // time_total: %{time_total} // time_starttransfer: %{time_starttransfer}\n" http://[CloudFront endpoint]/test/download.test; done;- Windows / CMD:
for /L %i in (1,1,10) do @echo %i && curl -s -o NUL --write-out "size_download: %{size_download} // time_total: %{time_total} // time_starttransfer: %{time_starttransfer}\n" http://[CloudFront endpoint]/test/download.test- Windows / PowerShell:
1..10 | ForEach-Object { Write-Host $_ $start = Get-Date try { $resp = Invoke-WebRequest "https://[CloudFront endpoint]/test/download.test" -UseBasicParsing $end = Get-Date $time = ($end - $start).TotalSeconds Write-Host "size_download: $($resp.RawContentLength) // time_total: $time // time_starttransfer: $time" } catch { Write-Host "Error: $($_.Exception.Message)" } } - Thay thế [CloudFront endpoint] bằng domain của bản thân
- Trường hợp của mình :
   1..10 | ForEach-Object {
       Write-Host $_
       $start = Get-Date
       try {
           $resp = Invoke-WebRequest "https://duvqxiwl2inn2.cloudfront.net/test/download.test" -UseBasicParsing
           $end = Get-Date
           $time = ($end - $start).TotalSeconds
           Write-Host "size_download: $($resp.RawContentLength) // time_total: $time // time_starttransfer: $time"
       }
       catch {
           Write-Host "Error: $($_.Exception.Message)"
       }
   }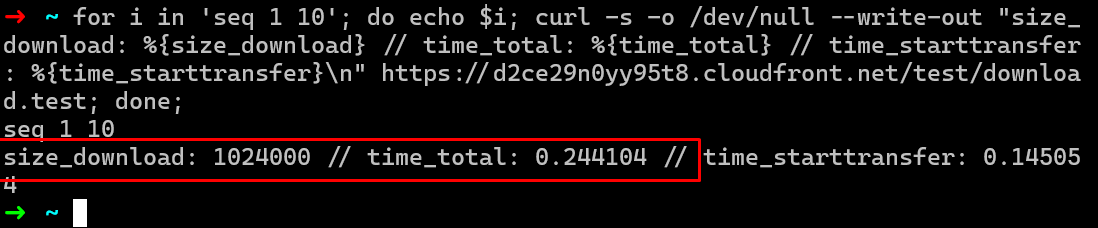
- Kết quả: Thời gian load chỉ khoảng 0.2 giây
-
Kết quả so sánh:
Nguồn Thời gian trung bình Ghi chú S3 trực tiếp ~1.7 giây Request phải đi đến US mỗi lần CloudFront ~0.2 giây Lần đầu chậm (cache miss), từ lần 2 nhanh (cache hit) Tỷ lệ cải thiện ~8 lần nhanh hơn - Origin (S3):
- CloudFront:

Lưu ý: Request đầu tiên tới CloudFront có thể chậm tương đương S3 vì nội dung chưa được cache (cache miss). Từ request thứ 2 trở đi, CloudFront trả về từ edge cache nên nhanh hơn nhiều (cache hit). Hãy để ý sự khác biệt giữa request #1 và #10 trong kết quả.
- Origin (S3):
Clean Up
Quan trọng: Phải xóa theo đúng thứ tự bên dưới. Đặc biệt CloudFront Distribution phải disable trước rồi mới delete được.
Bước 1: Disable và xóa CloudFront Distribution
- CloudFront Console → chọn distribution → Disable → đợi status chuyển thành "Disabled" (~5 phút)
- Sau khi Disabled → chọn distribution → Delete
Bước 2: Xóa nội dung S3 bucket
- S3 Console → chọn bucket
soa-s3-bucket-cloudfront-lab-soa202507→ Empty → xác nhận
Bước 3: Xóa stack soa-cloudformatiom-lab-cloudfront
- CloudFormation Console → chọn stack → Delete
- Stack này sẽ xóa: API Gateway, Lambda, MediaPackage, S3 bucket (origin)
Bước 4: Xóa S3 bucket soa-s3-bucket-cloudfront-lab-soa202507
- S3 Console → chọn bucket → Empty (nếu còn nội dung) → Delete bucket
Bước 5: Xóa stack soa-s3-cloudfront-lab
- CloudFormation Console → chọn stack → Delete
- Stack này sẽ xóa: IAM Role
soa-iam-role-cloudformation-section7-lab
Kết luận
Trong bài lab này, bạn đã:
- Triển khai ứng dụng web với S3 và CloudFront
- Hiểu cách CloudFront sử dụng Edge Locations để cache nội dung gần user
- Cấu hình multiple Origins (S3, API Gateway, MediaPackage) trên cùng 1 distribution
- Sử dụng Behaviors để routing:
/api/*→ API Gateway,/out/*→ MediaPackage - Phân biệt CachingDisabled (API real-time) vs CachingOptimized (static/video)
- Đo lường: CloudFront nhanh hơn S3 trực tiếp ~8 lần
Tiếp theo
Nếu bạn muốn tìm hiểu sâu hơn về CloudFront:
- CloudFront Functions — xử lý request/response ngay tại edge (redirect, rewrite URL, thêm header)
- Origin Access Control (OAC) — bảo vệ S3 origin, chỉ cho phép truy cập qua CloudFront
- Lambda@Edge — chạy logic phức tạp tại edge locations (A/B testing, authentication)
- Cache Invalidation — xóa cache khi nội dung thay đổi