
EC2 Fundamentals
 Phong Nguyễn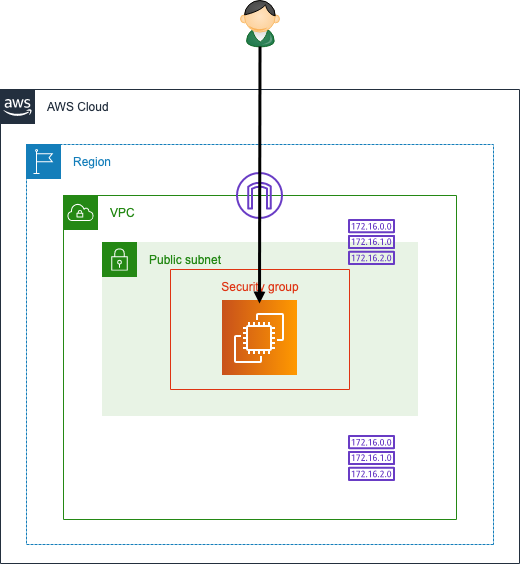
Lưu ý
- Chọn region: us-east-1
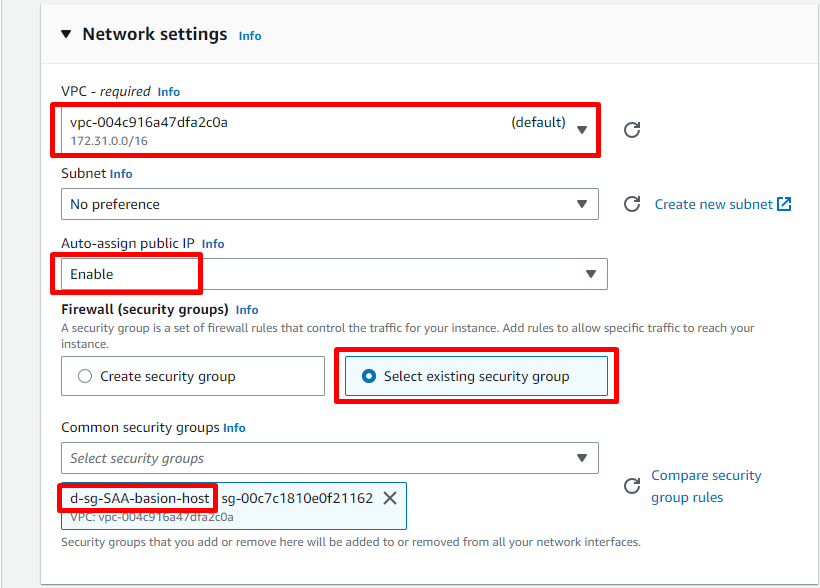
- Khi setting Network: chọn default VPC
Create security group
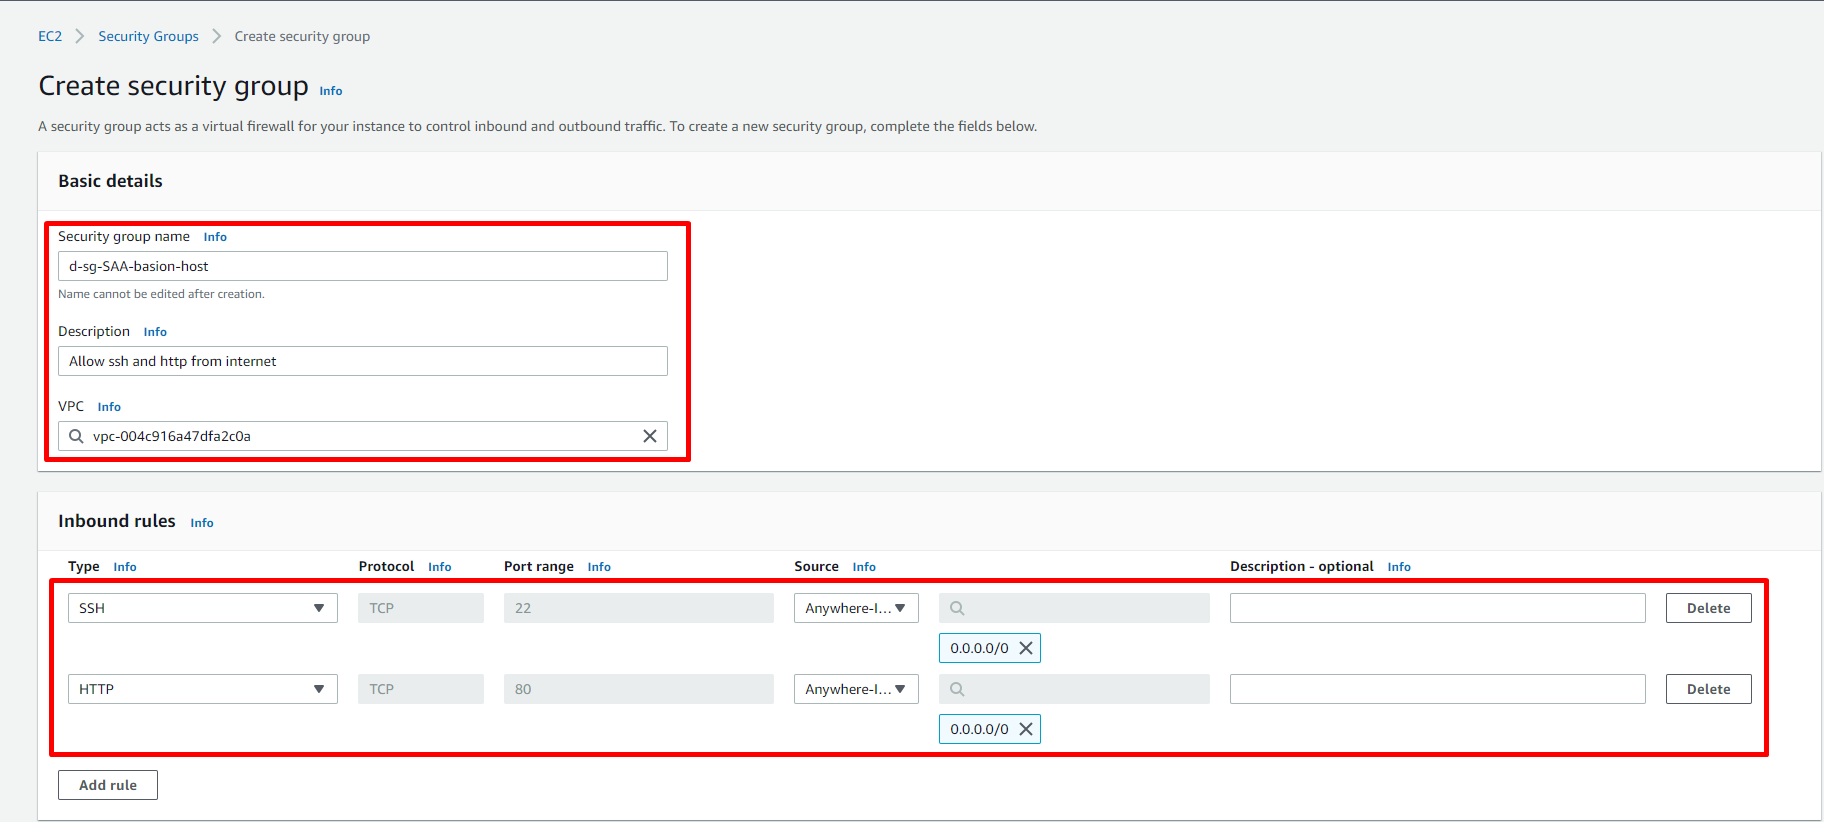
Chúng ta sẽ tạo SG cho phép có thể access đến EC2 thông qua giao thức ssh, đồng thời cũng cho phép có thể access đến EC2 thông qua http
Tại giao diện EC2 console -> chọn Security Groups ở menu phía bên trái
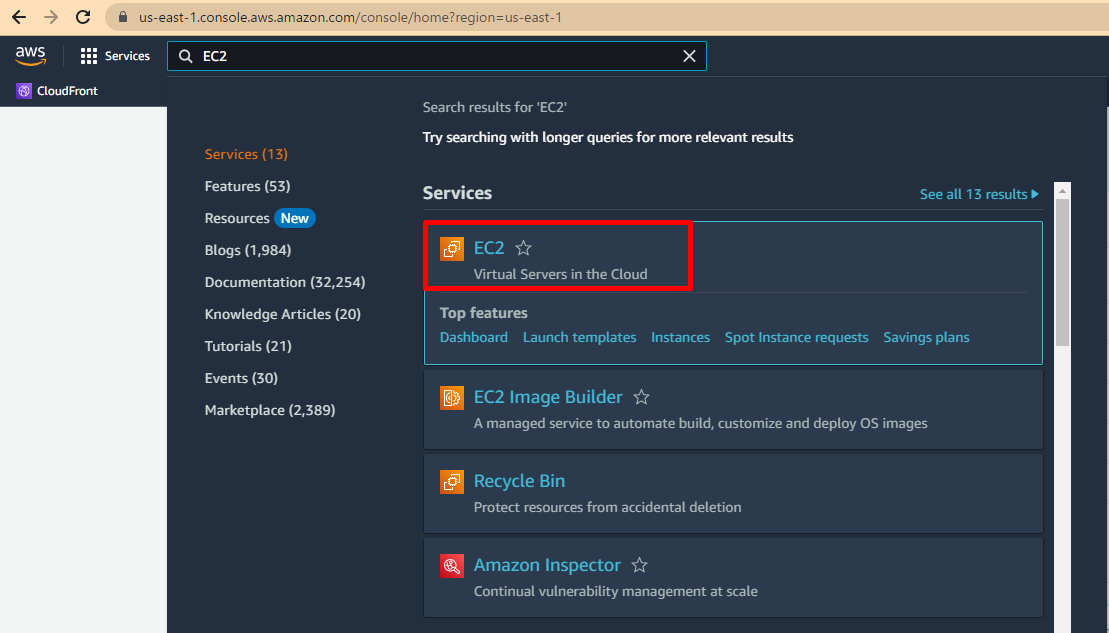
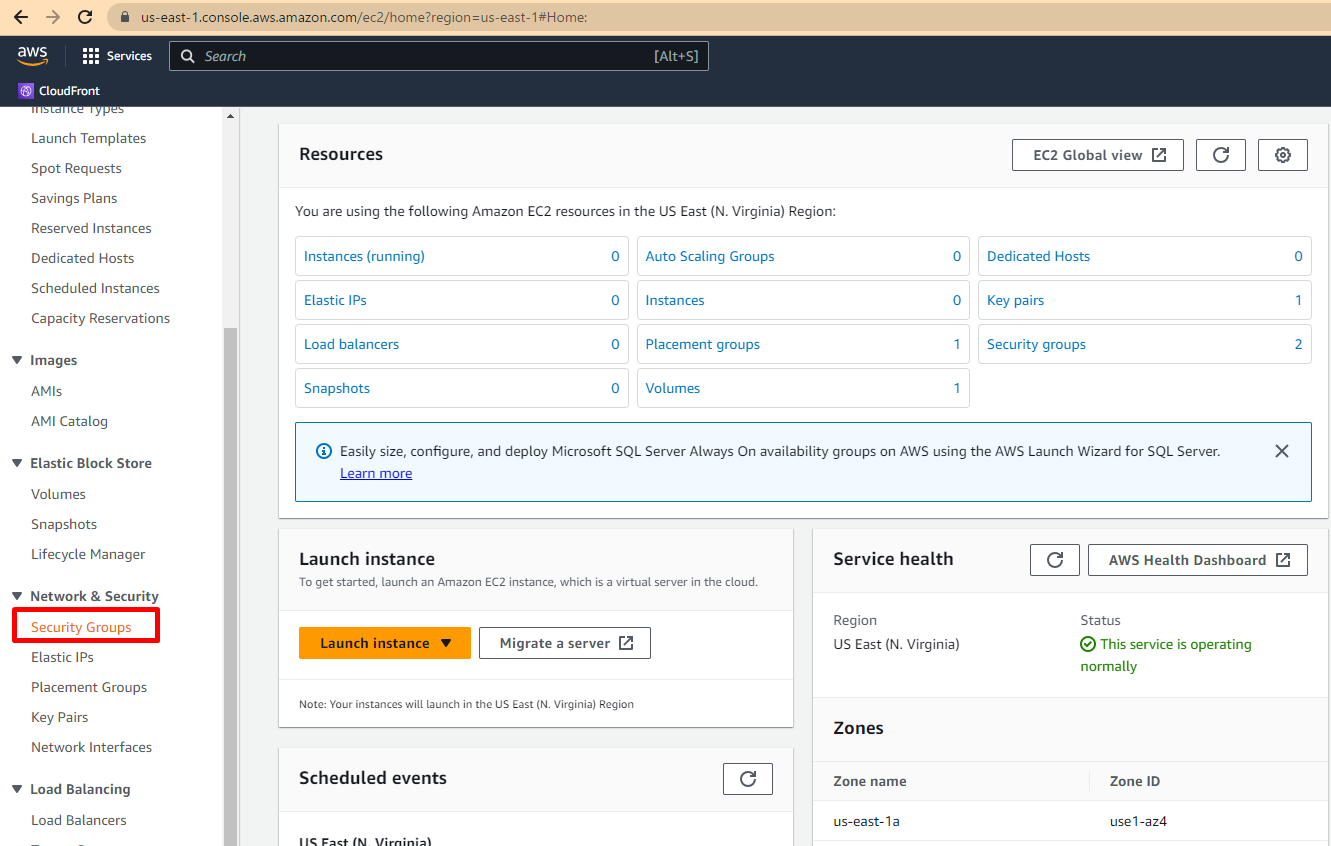
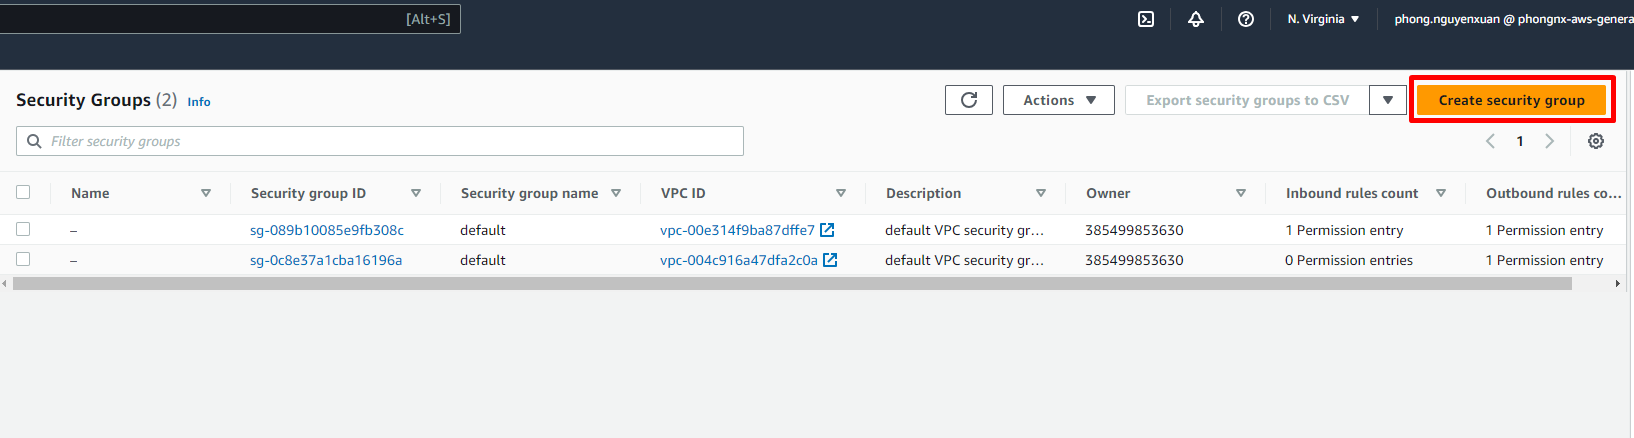
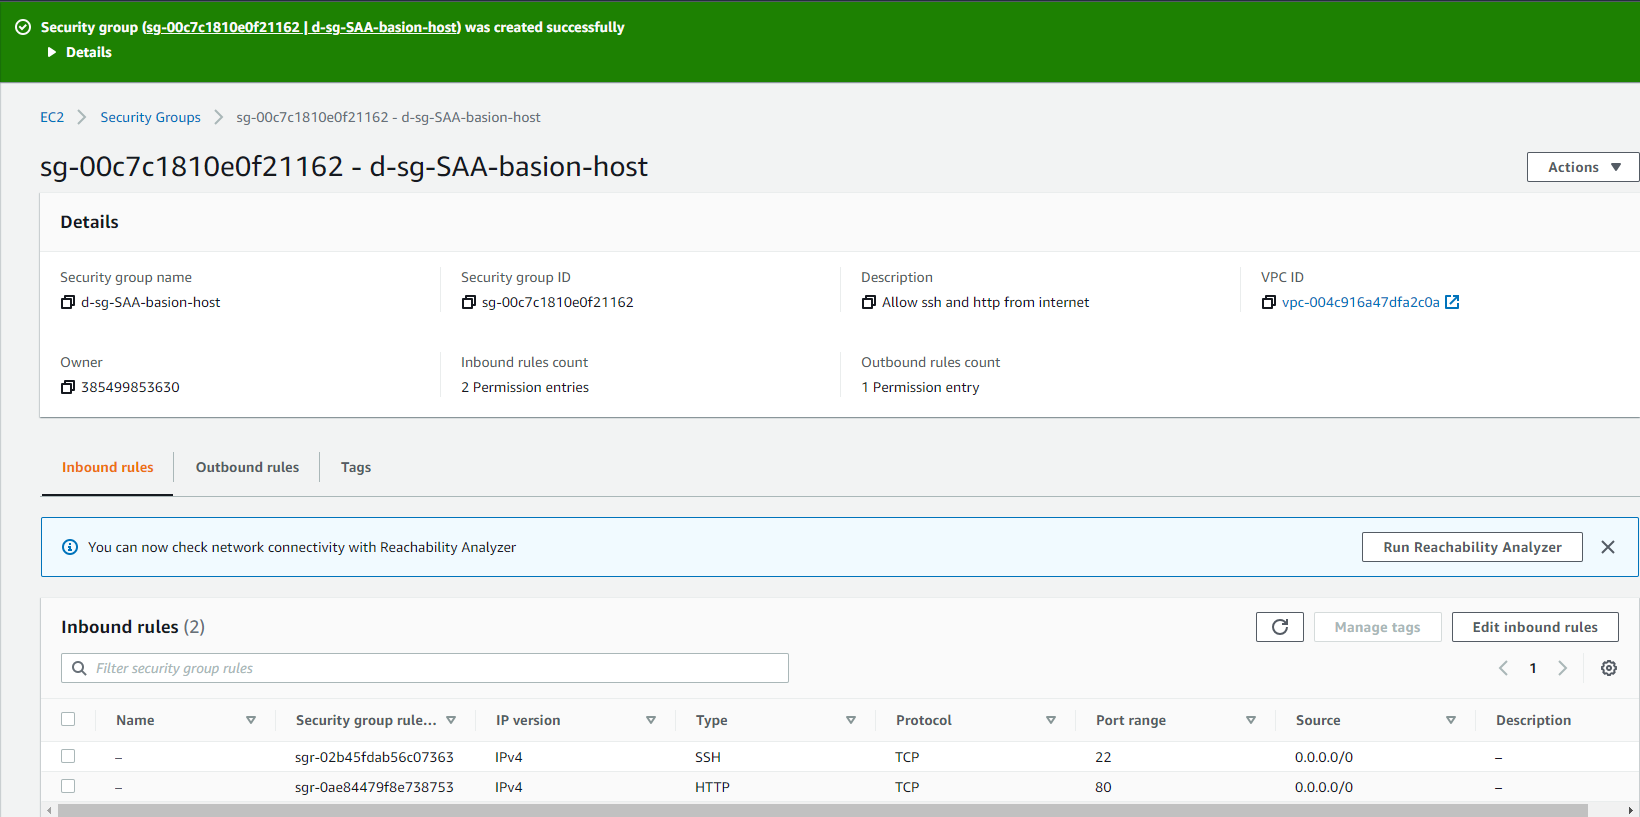
Chọn Create security group
Nhập các thông tin như trong hình
- Security group name:
d-sg-SAA-basion-host - Description:
Allow ssh and http from internet - VPC: chọn Default VPC (nếu như account các bạn có nhiều VPC)
- Inbound rules: Như hình bên dưới
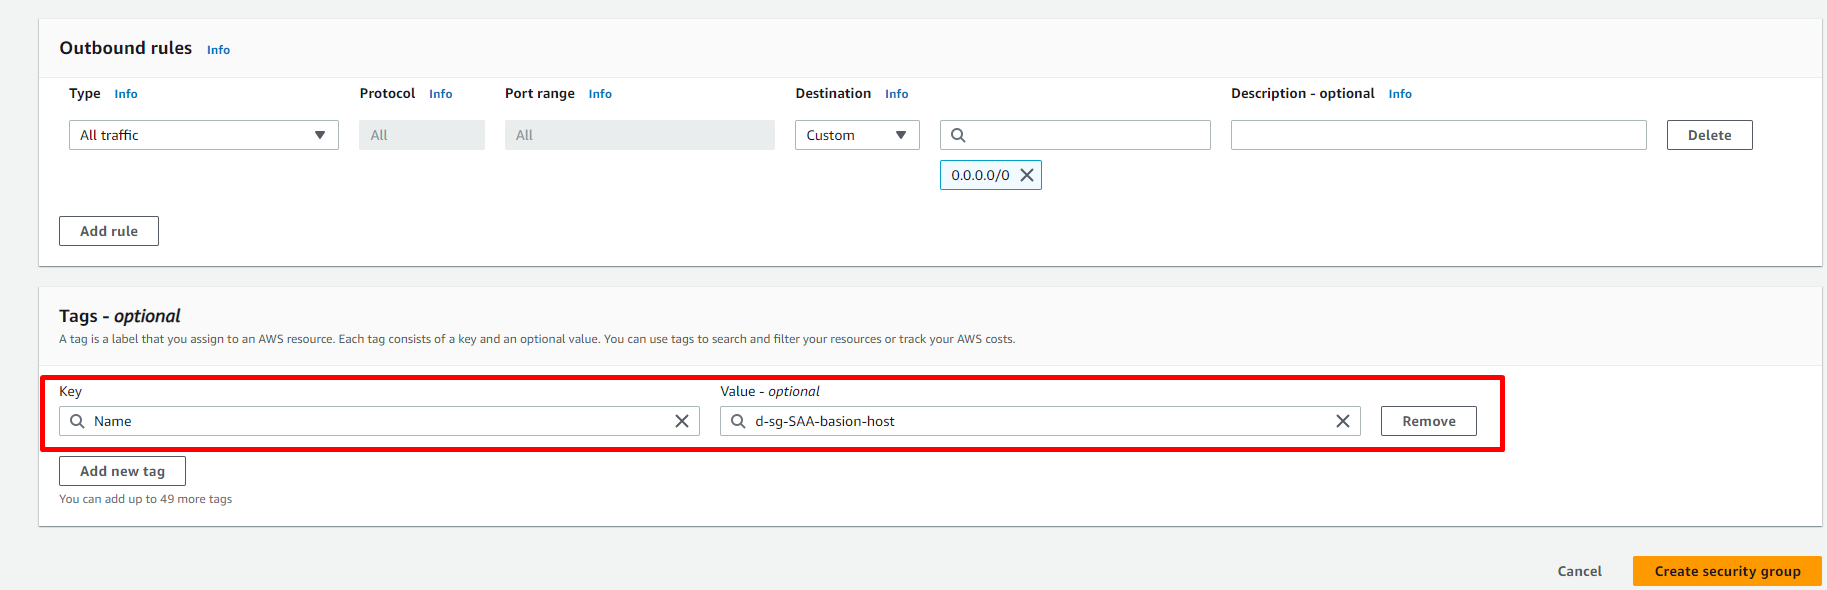
- Outbound rules: Như hình bên dưới
- Tags - optional:
| Key | value |
|---|---|
| Name | d-sg-SAA-basion-host |
Create EC2
Tiếp sau chúng ta sẽ tạo EC2 ở default VPC. Default thì Region nào cũng có default VPC, nếu bạn không xoá thì nó sẽ ở đó - không ảnh hưởng gì đến hệ thống cả. Nếu bạn nào vô tình xoá thì cũng có thể tạo lại được
Trong khi tạo EC2 Instace thì chúng ta cũng tạo key pair - cách để connect đến EC2 thông qua SSH
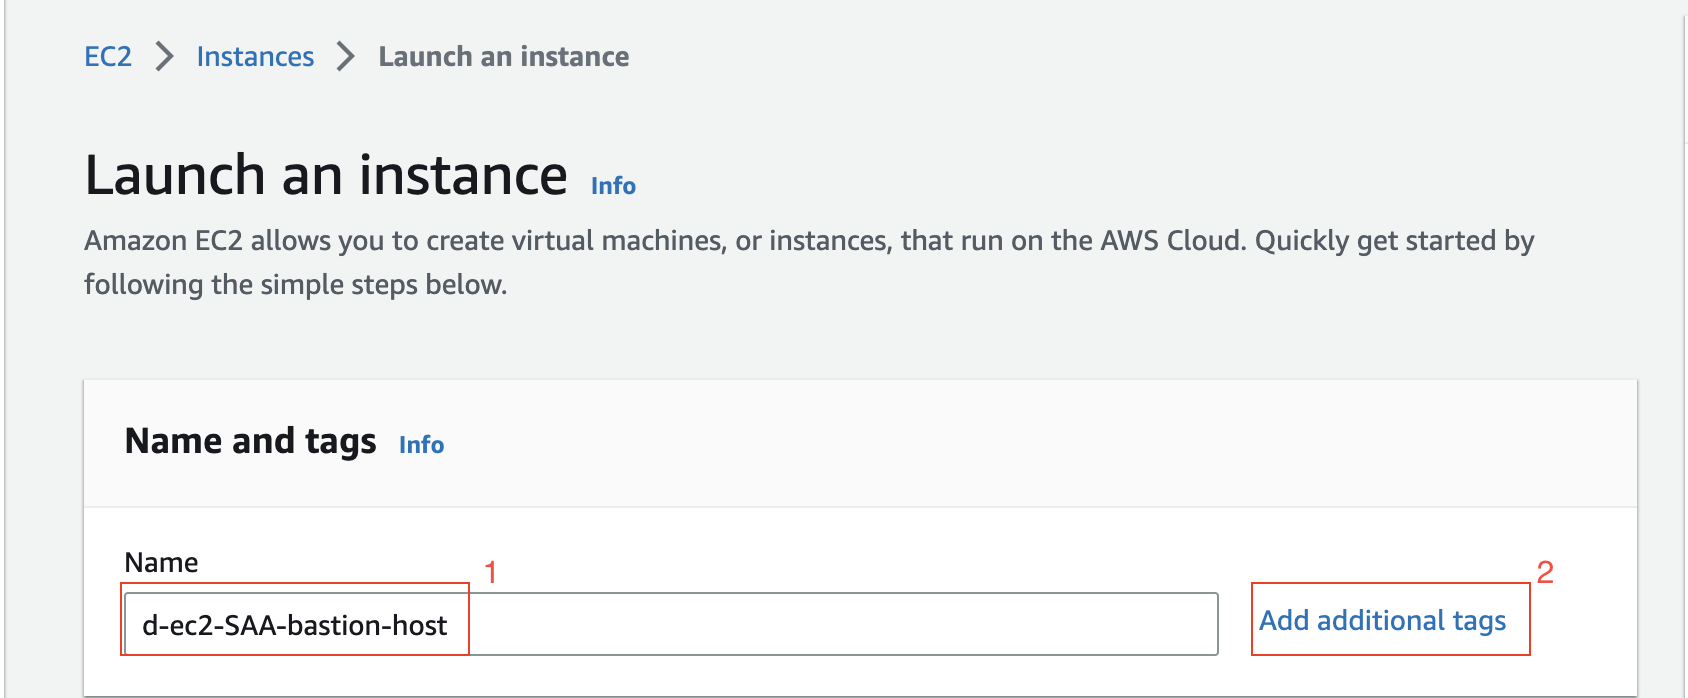
Tại EC2 console, chọn Instance ở menu bên trái, chọn Launch Instances
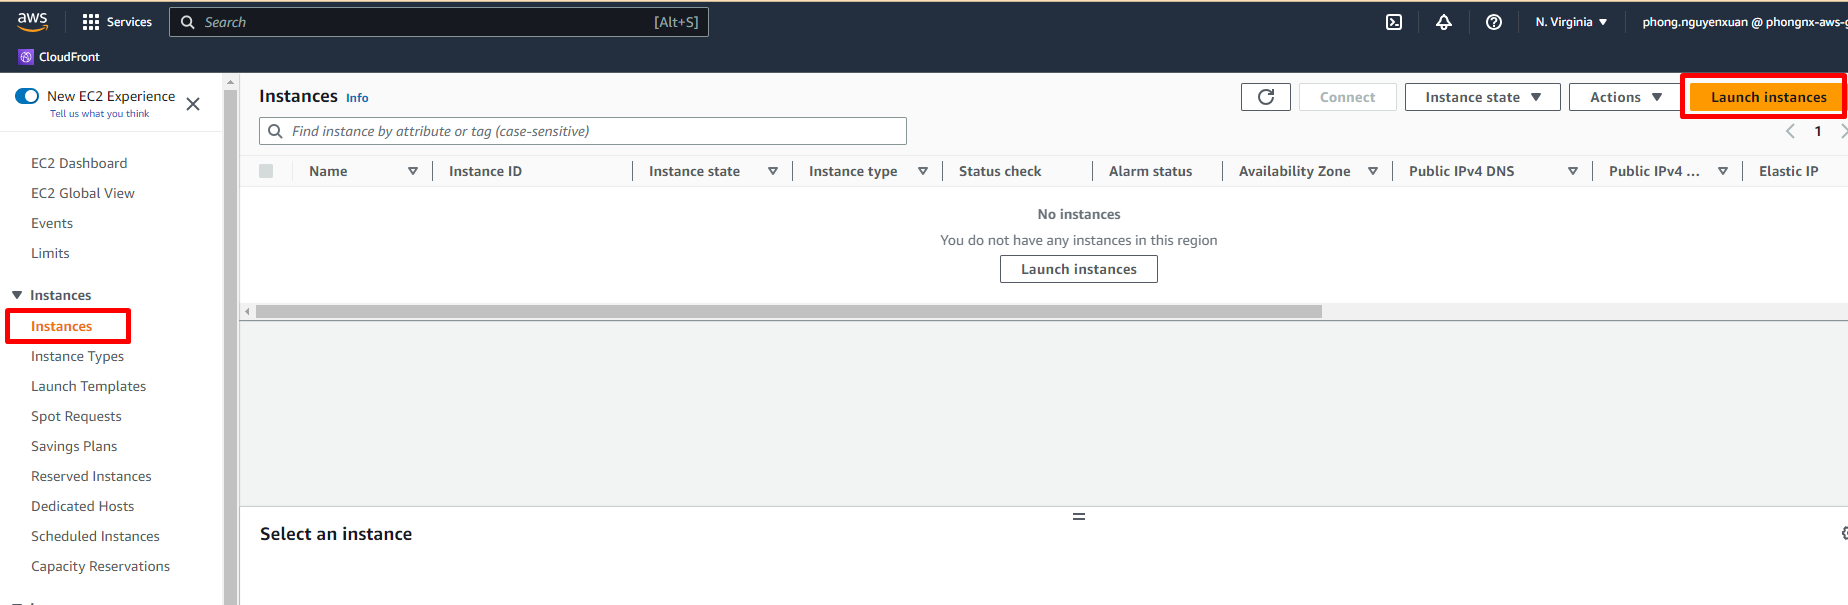
Name: d-ec2-SAA-bastion-host và nhấn "Add additional tags"
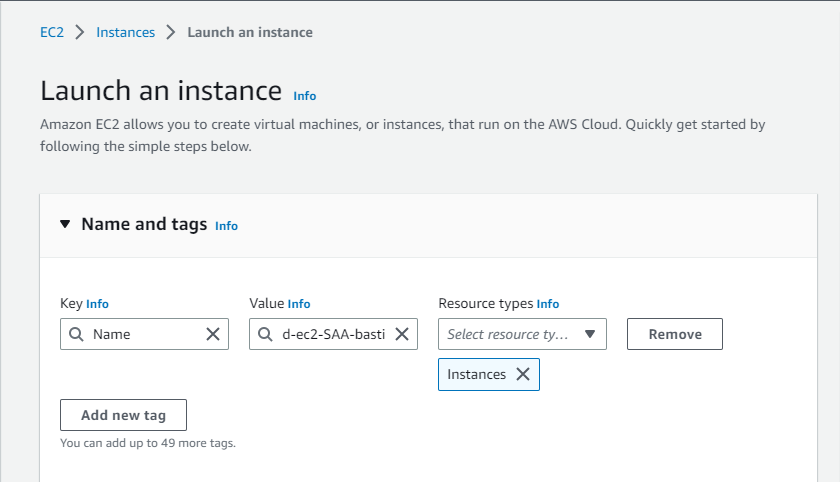
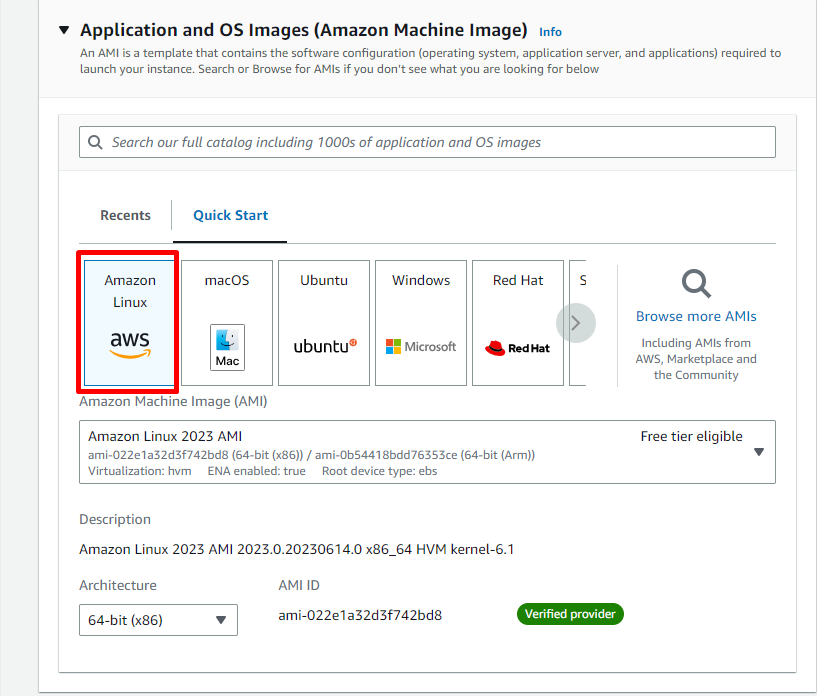
OS Images (AMI): default
Instance type: t3.micro (loại này support free tier)
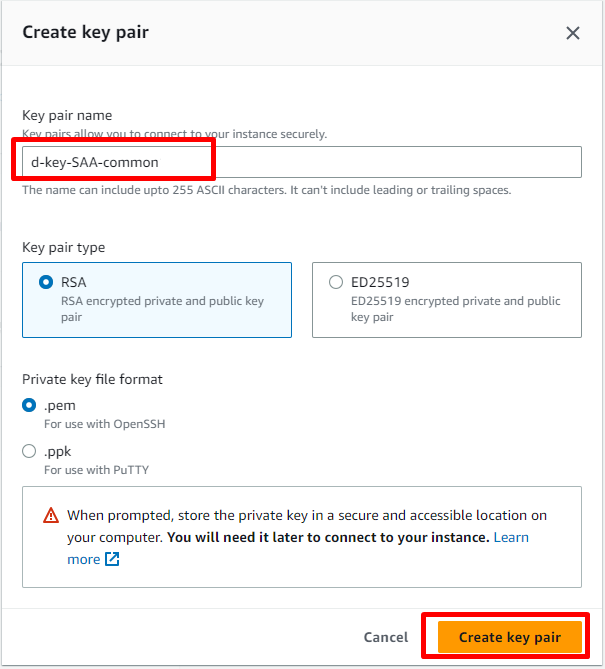
Để tạo new key pair -> nhấn Create new key pair
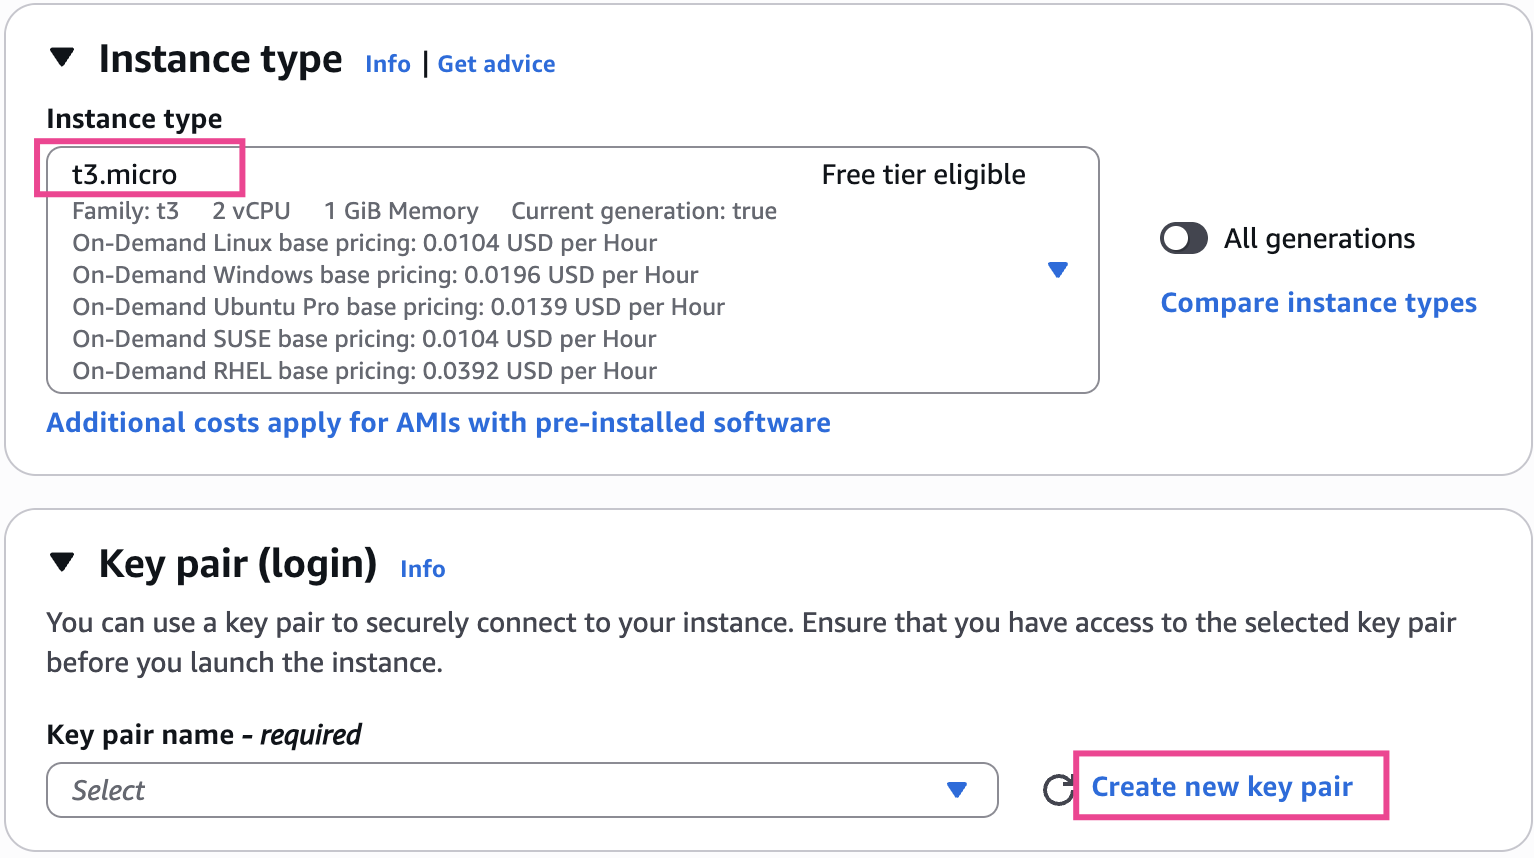
Key pair name: d-key-SAA-common (key này sẽ dùng trong suốt khoá học).
Download key pair và lưu trữ cẩn thận
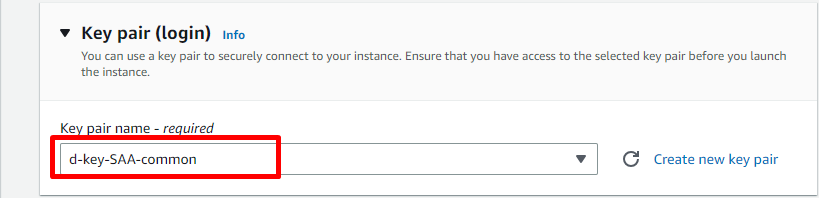
Chọn key pair vừa tạo
Network: Sử dụng default VPC, nhớ Enable public IP, chọn SG vừa tạo step trước
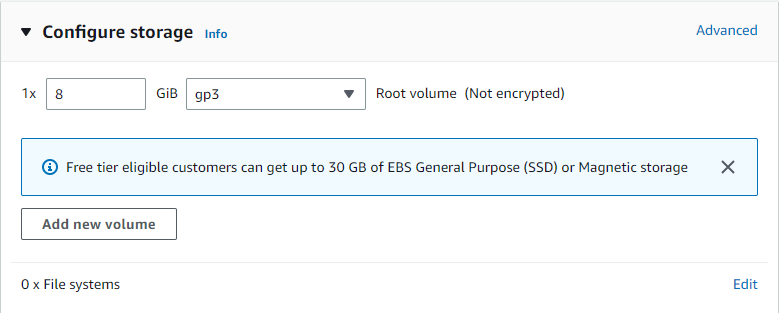
Configue storage: để default
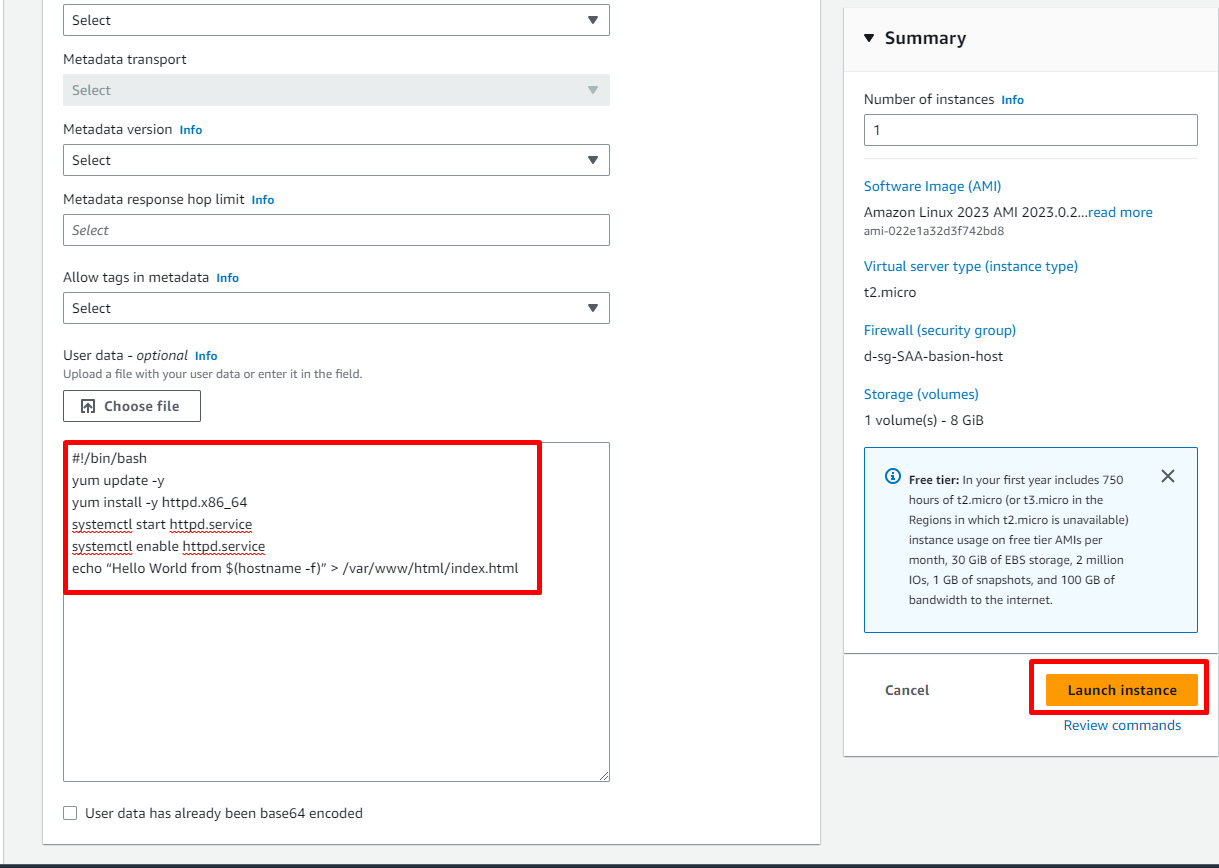
Mở Advanced details và setting user data (lưu ý copy chính xác script bên dưới)
#!/bin/bash
# =========================================================
# User Data - Cloud Mentor Pro
# Cai Apache (httpd) + render trang chao mung kem thong tin EC2
# Tuong thich: Amazon Linux 2023 (dnf) va Amazon Linux 2 (yum)
# =========================================================

# Ghi log ra file de debug (xem: cat /var/log/user-data.log)
exec > /var/log/user-data.log 2>&1
echo ">>> Bat dau chay user-data luc $(date)"

# ---- 1. Cai dat Apache ----
if command -v dnf >/dev/null 2>&1; then
    dnf update -y
    dnf install -y httpd
else
    yum update -y
    yum install -y httpd
fi

systemctl enable httpd
systemctl start httpd

# ---- 2. Lay thong tin instance qua IMDSv2 (bat buoc token) ----
TOKEN=$(curl -s -X PUT "http://169.254.169.254/latest/api/token" \
    -H "X-aws-ec2-metadata-token-ttl-seconds: 21600")

meta() {
    curl -s -H "X-aws-ec2-metadata-token: $TOKEN" \
        "http://169.254.169.254/latest/meta-data/$1"
}

HOSTNAME_VAL=$(meta local-hostname)
LOCAL_IP=$(meta local-ipv4)
PUBLIC_IP=$(meta public-ipv4)
AZ=$(meta placement/availability-zone)
INSTANCE_ID=$(meta instance-id)

# Instance khong co Public IP (chi chay trong private subnet) thi bien nay se rong
if [ -z "$PUBLIC_IP" ]; then
    PUBLIC_IP="(khong co Public IP)"
fi

echo ">>> Hostname: $HOSTNAME_VAL | IP: $LOCAL_IP | AZ: $AZ | Instance: $INSTANCE_ID"

# ---- 3. Ghi de index.html voi thong tin thuc te cua instance ----
cat > /var/www/html/index.html << HTMLPAGE
<!DOCTYPE html>
<html lang="vi">
<head>
<meta charset="UTF-8">
<meta name="viewport" content="width=device-width, initial-scale=1.0">
<title>Cloud Mentor Pro — EC2 Instance</title>
<link rel="preconnect" href="https://fonts.googleapis.com">
<link rel="preconnect" href="https://fonts.gstatic.com" crossorigin>
<link href="https://fonts.googleapis.com/css2?family=Space+Grotesk:wght@500;600;700&family=Inter:wght@400;500;600&family=JetBrains+Mono:wght@400;500&display=swap" rel="stylesheet">
<style>
  :root{
    --bg-dark:#151035;
    --teal:#32EFB9;
    --purple:#5F56D9;
    --bg-light:#F6F5FB;
    --text-dark:#17132E;
    --text-muted:#6C6693;
    --white:#FFFFFF;
  }
  *{margin:0;padding:0;box-sizing:border-box;}
  body{font-family:'Inter',sans-serif;color:var(--text-dark);background:var(--bg-light);line-height:1.5;}
  h1,h2{font-family:'Space Grotesk',sans-serif;}
  a{text-decoration:none;}

  .topbar{display:flex;justify-content:space-between;align-items:center;max-width:1080px;margin:0 auto;padding:28px 24px 0;}
  .logo{display:flex;align-items:center;gap:10px;font-family:'Space Grotesk';font-weight:700;font-size:18px;color:var(--white);}
  .logo-mark{width:34px;height:34px;border-radius:9px;background:linear-gradient(135deg,var(--teal),var(--purple));display:flex;align-items:center;justify-content:center;font-size:16px;}
  .badge-outline{font-size:12px;letter-spacing:.06em;color:var(--teal);border:1px solid rgba(50,239,185,.35);padding:6px 14px;border-radius:99px;font-family:'JetBrains Mono',monospace;}

  .hero{background:var(--bg-dark);padding-bottom:120px;}
  .hero-content{max-width:720px;margin:0 auto;text-align:center;padding:64px 24px 0;}
  .pill{display:inline-flex;align-items:center;gap:8px;background:rgba(50,239,185,.1);border:1px solid rgba(50,239,185,.3);color:var(--teal);font-size:13px;font-family:'JetBrains Mono',monospace;padding:7px 16px;border-radius:99px;margin-bottom:28px;}
  .pill-dot{width:7px;height:7px;border-radius:50%;background:var(--teal);box-shadow:0 0 8px var(--teal);}
  .hero h1{font-size:56px;color:var(--white);font-weight:700;letter-spacing:-.02em;margin-bottom:18px;}
  .hero .subtitle{font-size:18px;color:#B8B3DE;margin-bottom:36px;}
  .cta{display:inline-block;background:var(--teal);color:var(--bg-dark);font-weight:600;font-size:15px;padding:14px 30px;border-radius:10px;transition:transform .15s ease;}
  .cta:hover{transform:translateY(-2px);}
  .cta:focus-visible{outline:3px solid var(--white);outline-offset:3px;}

  .terminal-wrap{max-width:640px;margin:-80px auto 0;padding:0 24px;position:relative;z-index:2;}
  .terminal-card{background:#0F0B2A;border-radius:14px;box-shadow:0 30px 60px -20px rgba(21,16,53,.5);overflow:hidden;border:1px solid rgba(255,255,255,.06);}
  .terminal-titlebar{display:flex;align-items:center;gap:8px;padding:13px 16px;background:#181235;border-bottom:1px solid rgba(255,255,255,.06);}
  .dot{width:10px;height:10px;border-radius:50%;}
  .dot.red{background:#FF5F57;}.dot.yellow{background:#FEBC2E;}.dot.green{background:#28C840;}
  .terminal-filename{margin-left:8px;font-family:'JetBrains Mono';font-size:12px;color:#8B87B3;}
  .terminal-body{padding:22px 24px 26px;font-family:'JetBrains Mono',monospace;font-size:13.5px;}
  .t-line{color:#8B87B3;margin-bottom:4px;}
  .t-line .prompt{color:var(--teal);margin-right:8px;}
  .t-output{color:var(--white);margin:0 0 16px;padding-left:16px;word-break:break-all;}
  .t-output:last-child{margin-bottom:0;}

  .terminal-wrap{margin-bottom:80px;}
  footer{background:var(--bg-dark);padding:36px 24px;text-align:center;}
  footer .logo{justify-content:center;margin-bottom:10px;}
  footer p{font-size:13px;color:#8B87B3;}

  @media (max-width:640px){
    .hero h1{font-size:38px;}
    .feature-grid{grid-template-columns:1fr;}
    .terminal-wrap{margin-top:-56px;}
  }
</style>
</head>
<body>
  <div class="hero">
    <div class="topbar">
      <div class="logo"><span class="logo-mark">☁</span> Cloud Mentor Pro</div>
      <span class="badge-outline">AWS CERTIFIED TRAINING</span>
    </div>
    <div class="hero-content">
      <span class="pill"><span class="pill-dot"></span> EC2 INSTANCE ĐANG HOẠT ĐỘNG</span>
      <h1>Cloud Mentor Pro</h1>
      <p class="subtitle">Welcome bạn đến với khoá học và luyện thi chứng chỉ AWS</p>
      <a class="cta" href="#info">Xem thông tin server →</a>
    </div>
  </div>

  <div class="terminal-wrap" id="info">
    <div class="terminal-card">
      <div class="terminal-titlebar">
        <span class="dot red"></span><span class="dot yellow"></span><span class="dot green"></span>
        <span class="terminal-filename">ec2-instance-metadata</span>
      </div>
      <div class="terminal-body">
        <div class="t-line"><span class="prompt">\$</span>curl metadata/hostname</div>
        <div class="t-output">${HOSTNAME_VAL}</div>
        <div class="t-line"><span class="prompt">\$</span>curl metadata/local-ipv4</div>
        <div class="t-output">${LOCAL_IP}</div>
        <div class="t-line"><span class="prompt">\$</span>curl metadata/placement/availability-zone</div>
        <div class="t-output">${AZ}</div>
        <div class="t-line"><span class="prompt">\$</span>curl metadata/instance-id</div>
        <div class="t-output">${INSTANCE_ID}</div>
      </div>
    </div>
  </div>

  <footer>
    <div class="logo"><span class="logo-mark">☁</span> Cloud Mentor Pro</div>
    <p>Được phục vụ bởi Apache trên Amazon EC2 · ${AZ}</p>
  </footer>
</body>
</html>
HTMLPAGE

# ---- 4. Phan quyen va restart Apache ----
chown apache:apache /var/www/html/index.html 2>/dev/null || chown www-data:www-data /var/www/html/index.html 2>/dev/null
chmod 644 /var/www/html/index.html
systemctl restart httpd

echo ">>> Hoan tat luc $(date)"
Launch instance
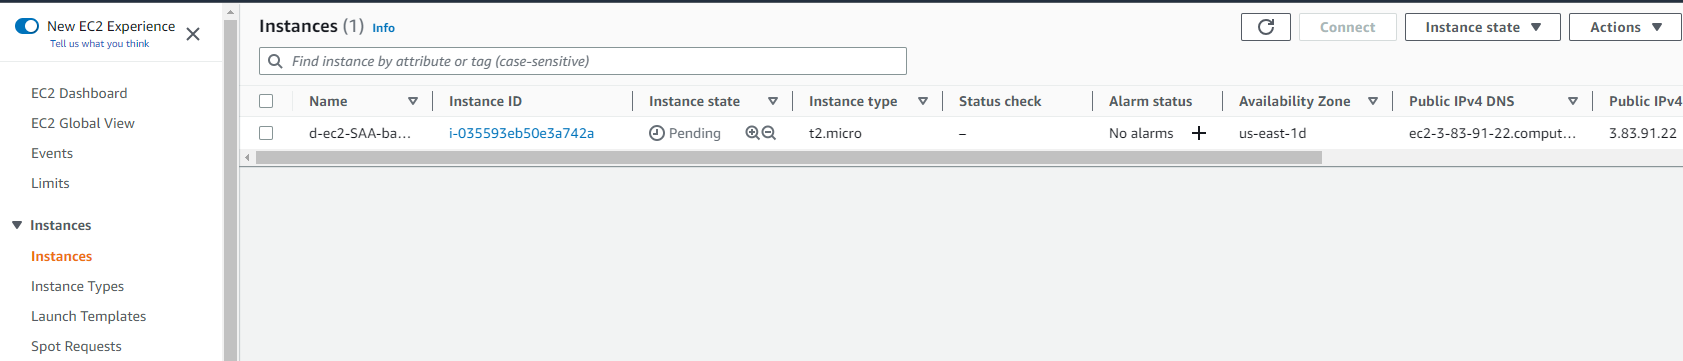
Instance đang starting
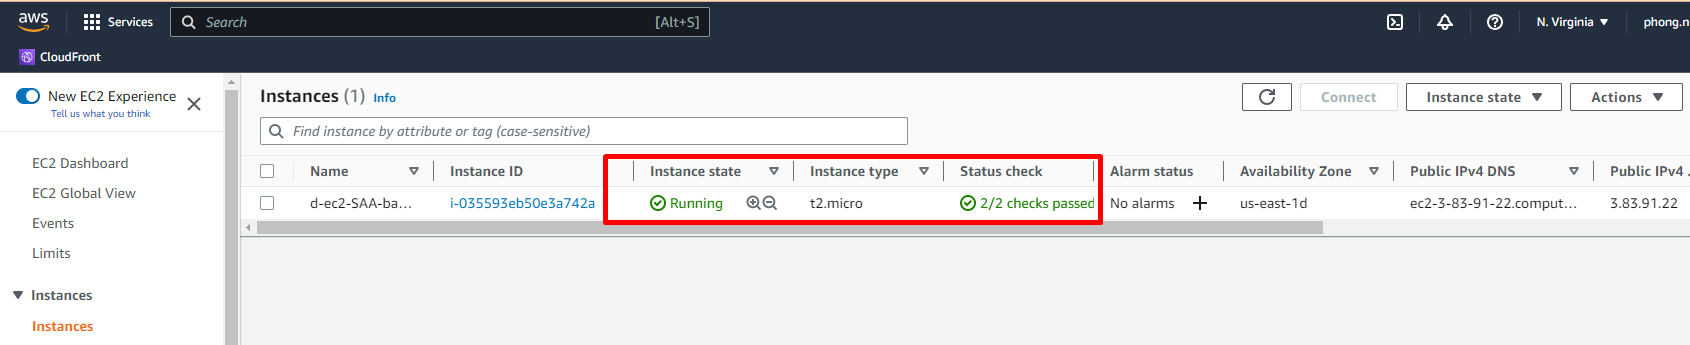
Đợi một chút thì EC2 đã running hoàn toàn
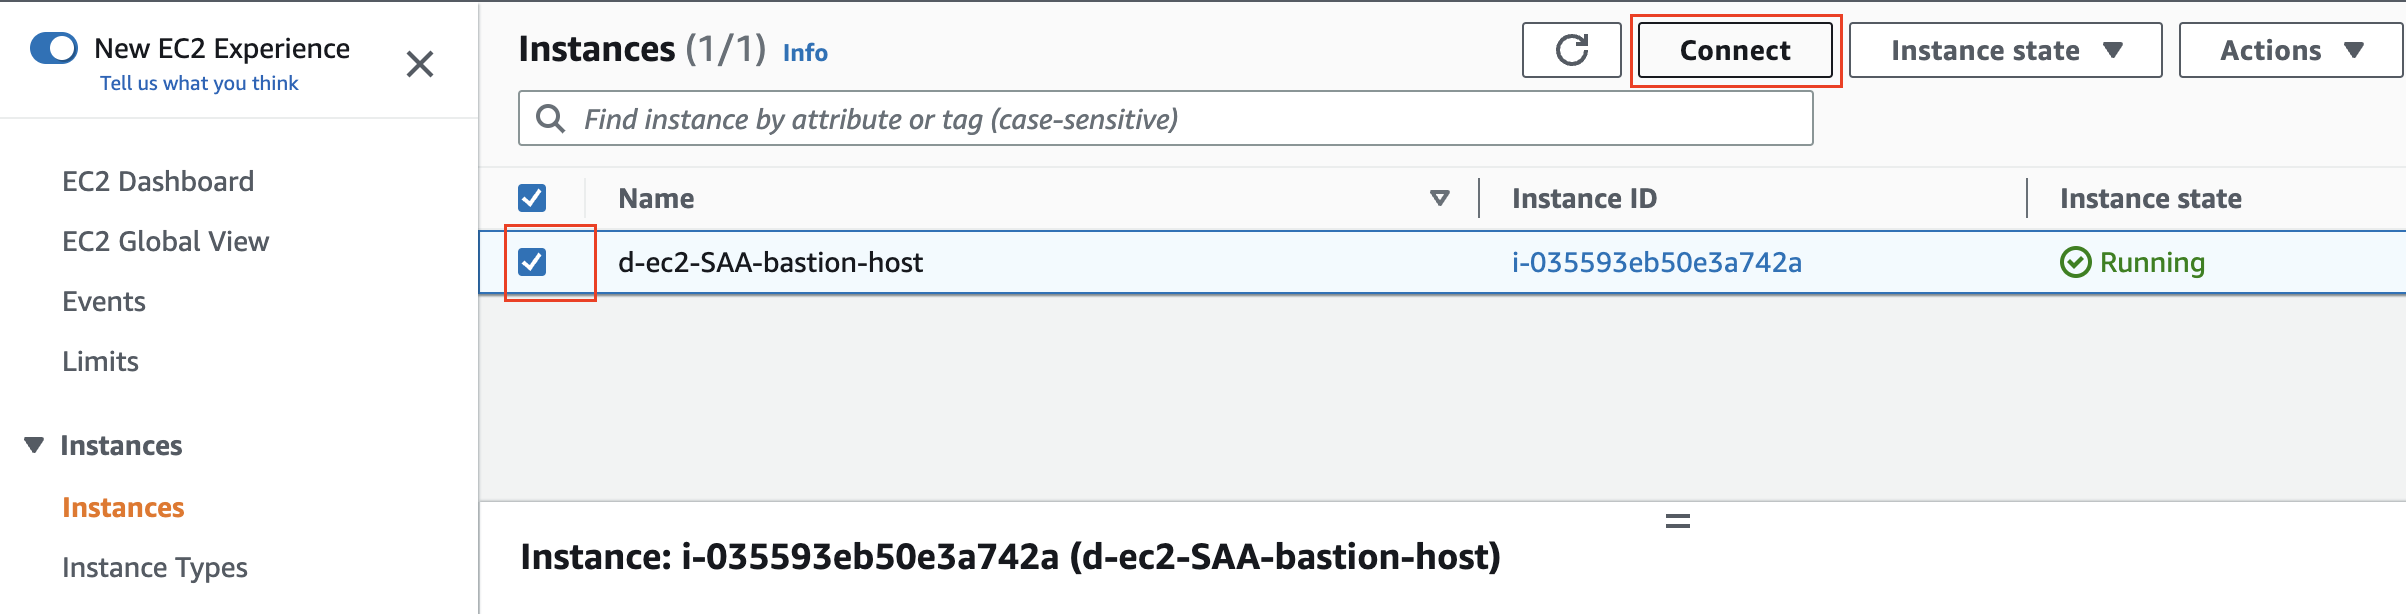
Connect to EC2 via ssh
Sử dụng git bash (đối với Windows), terminal (đối với Mac) tại thư mục có chứa file key pair
- Lấy command để ssh vào EC2
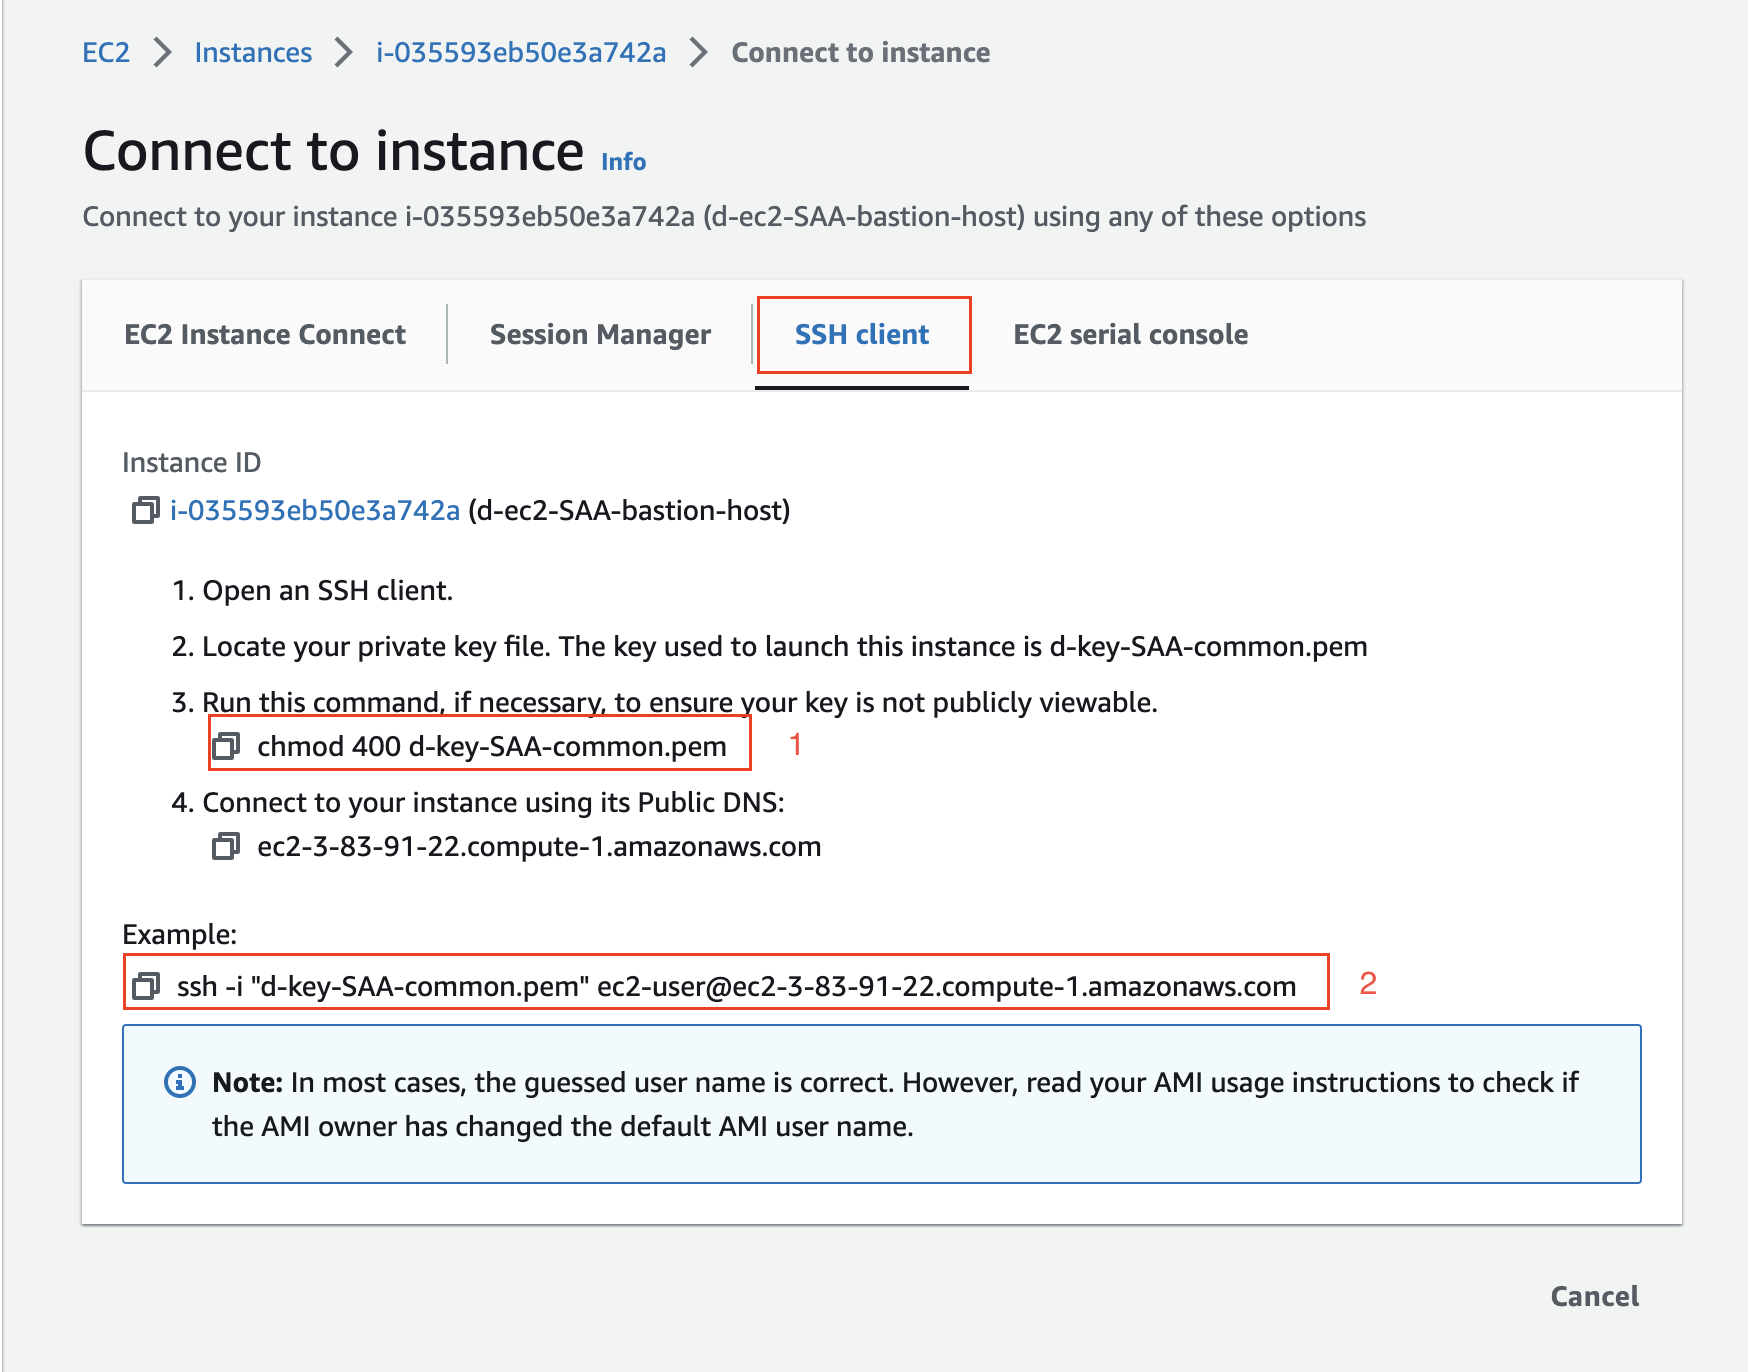
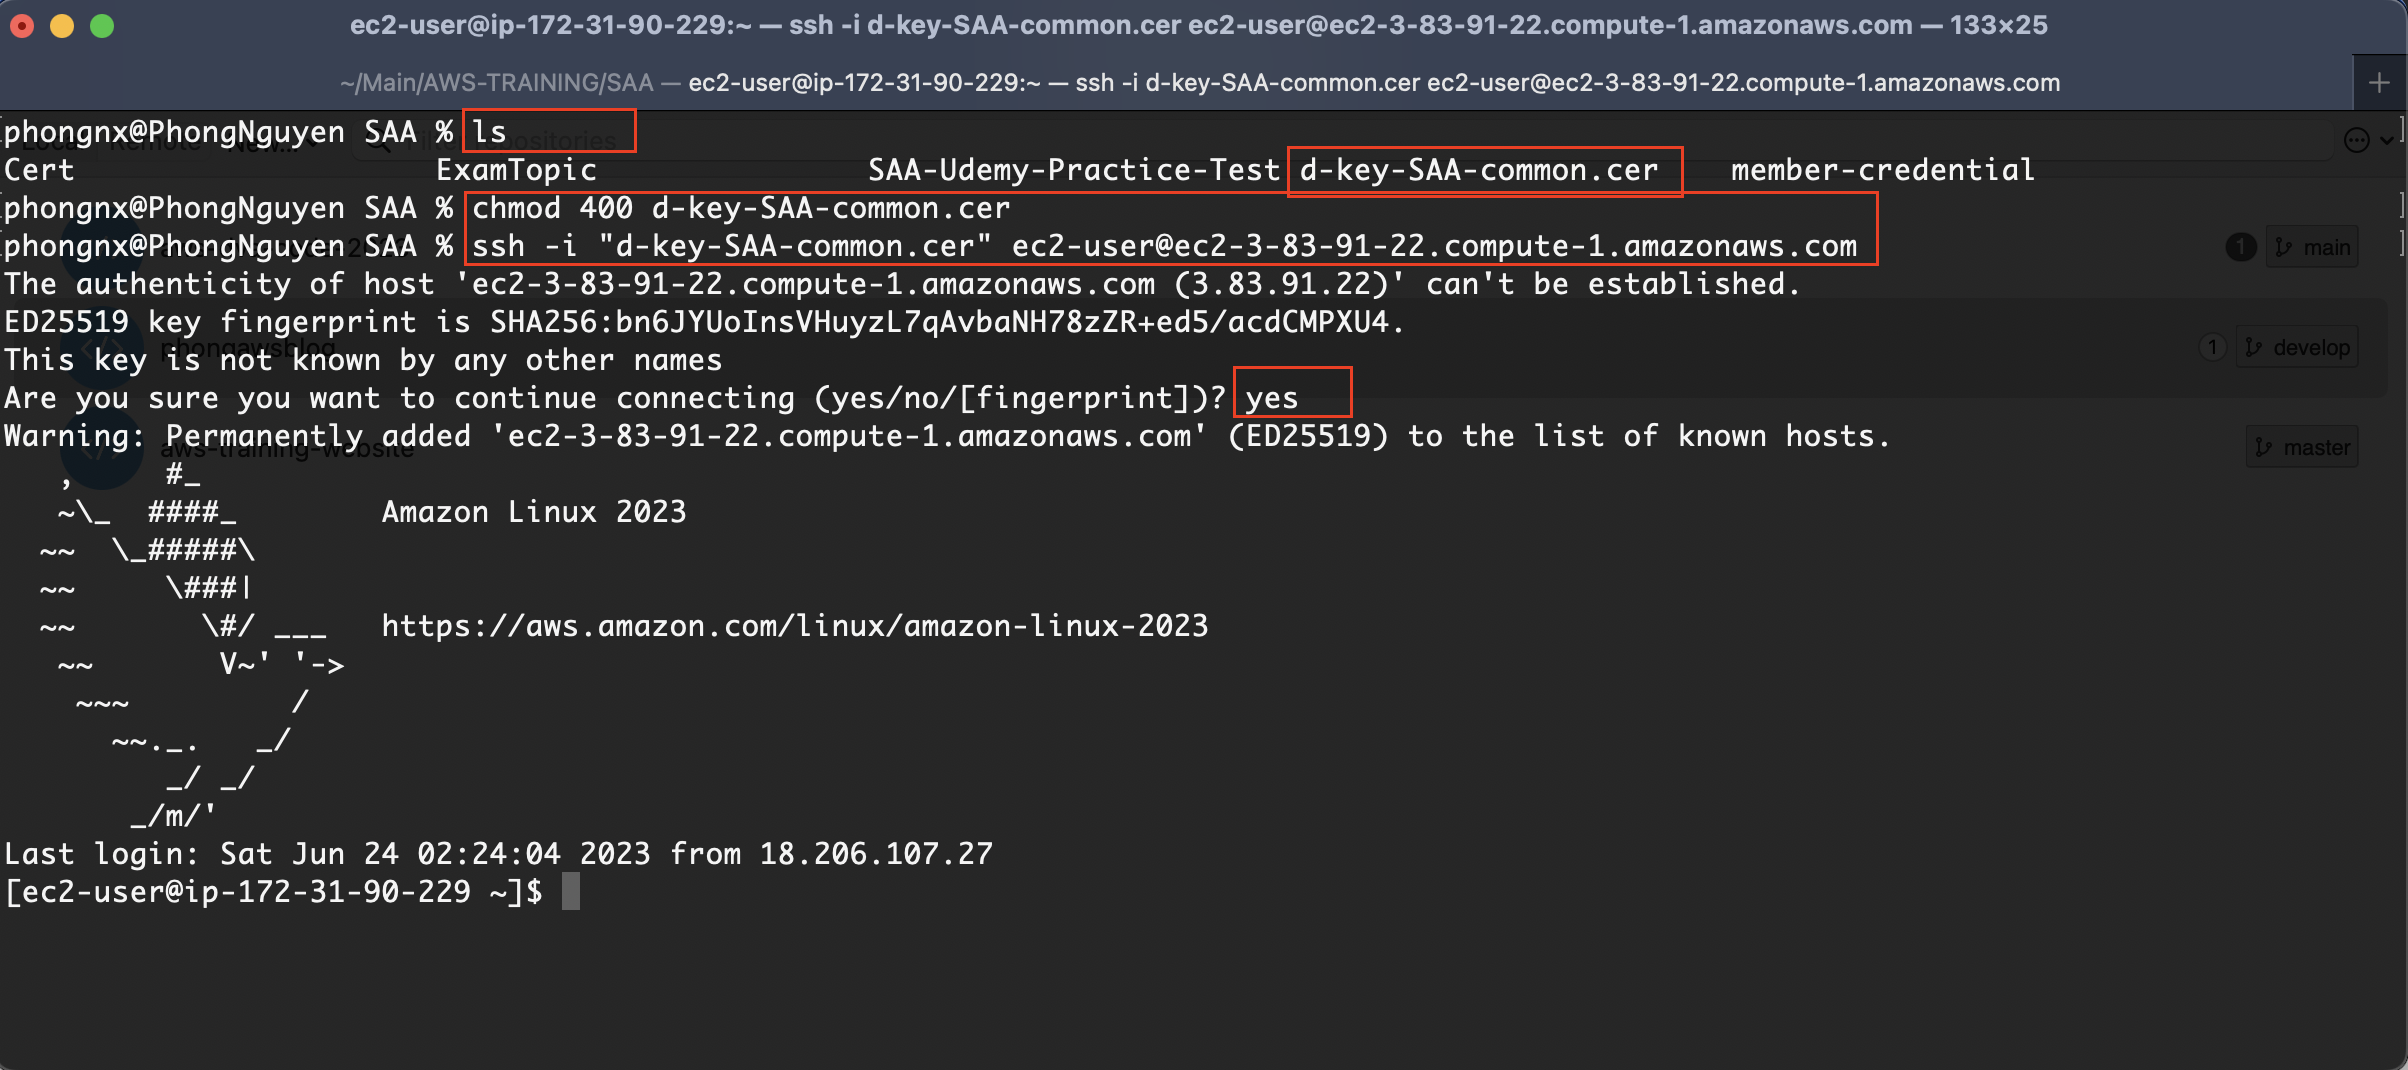
- Chạy lệnh 1 để set quyền thực thi cho file
.pem - Chạy lệnh 2 để ssh vào EC2 (lưu ý đúng tên file key pair nhé)
Connect to EC2 via Console
Chúng ta có thể ssh đến EC2 trên chính Management console - rất tiện lợi
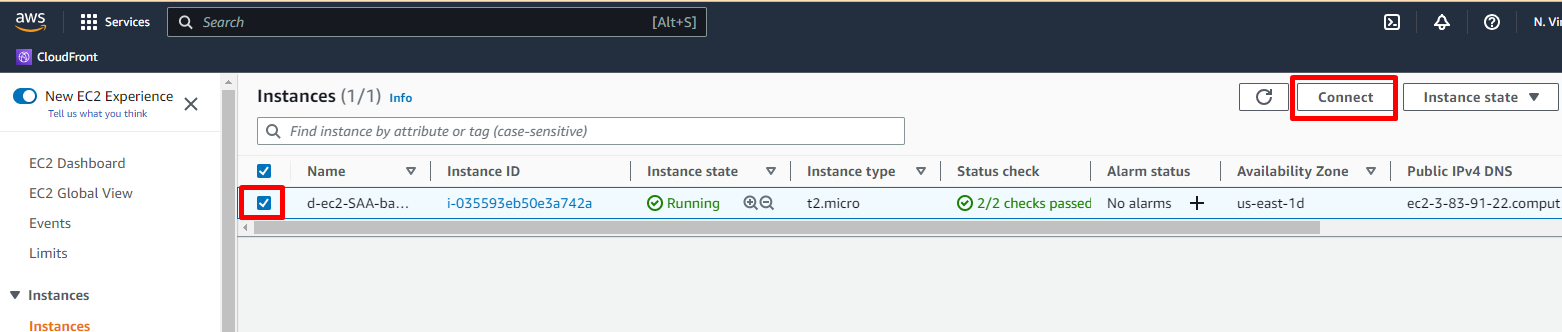
Chọn Instance -> Connect
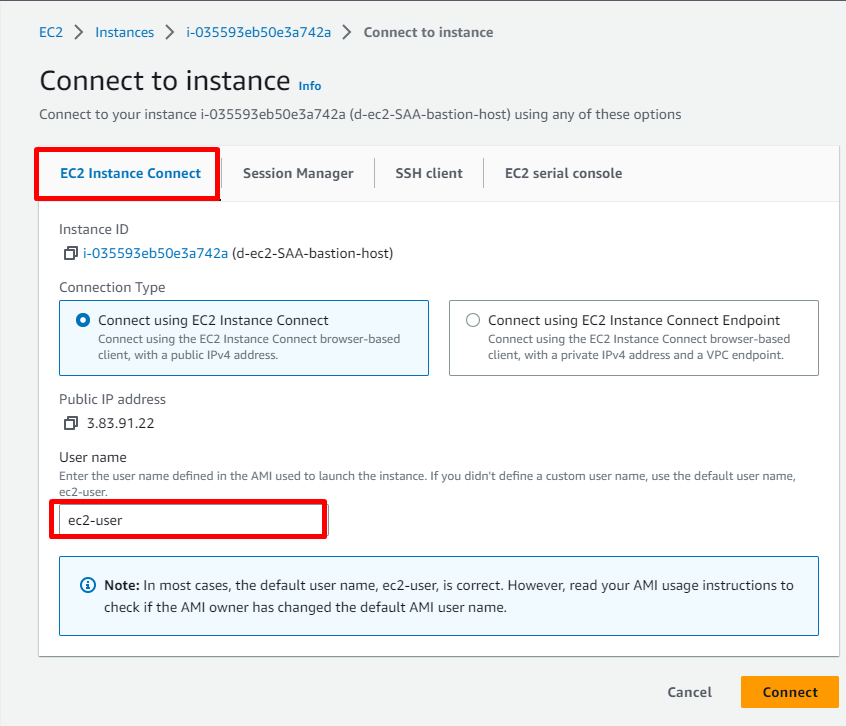
Lưu ý User name, Click connect
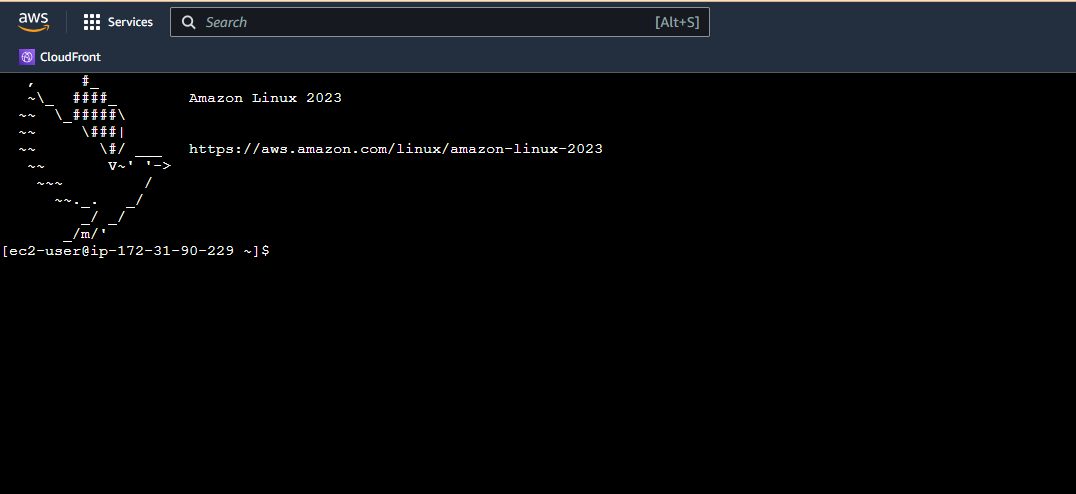
Vậy là chúng ta đã connect dc đến Instance (OS: Amazon linux 2023)
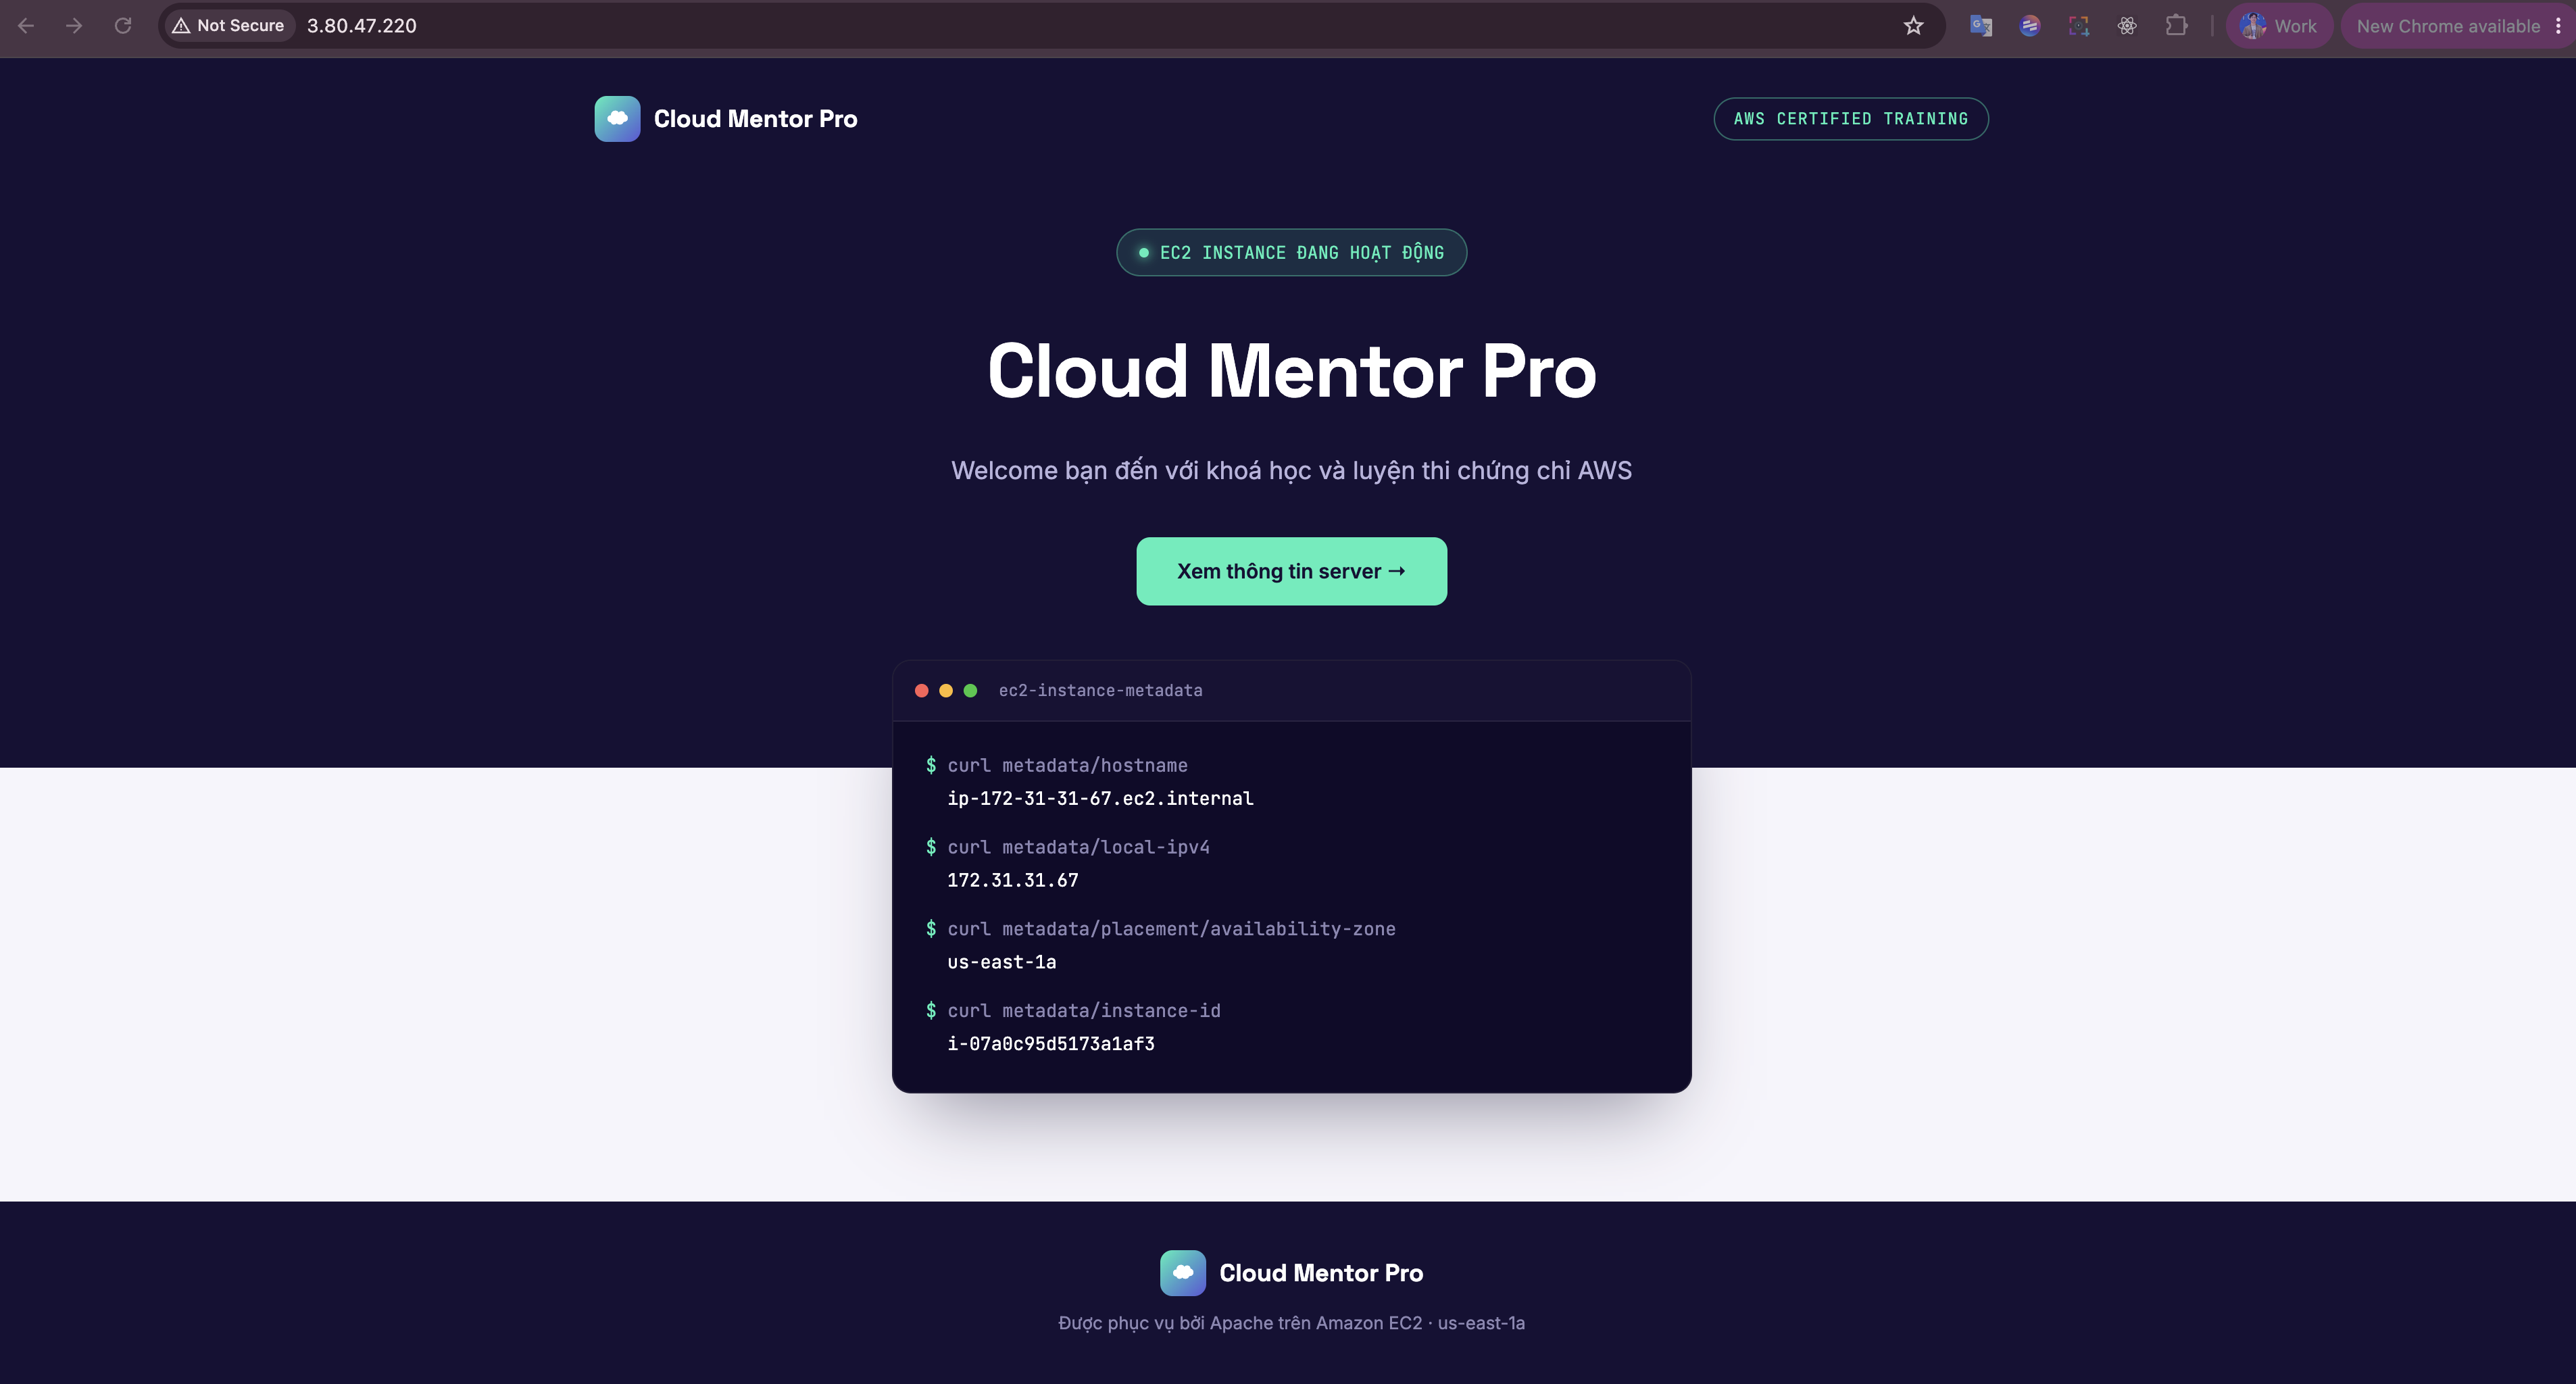
Access to http://{EC2 public IP}
Chúng ta đã sử dụng script để install apache server. Vậy nên bây giờ có thể sử dụng web browser để access đến server thông qua http
Lấy địa chỉ public của EC2
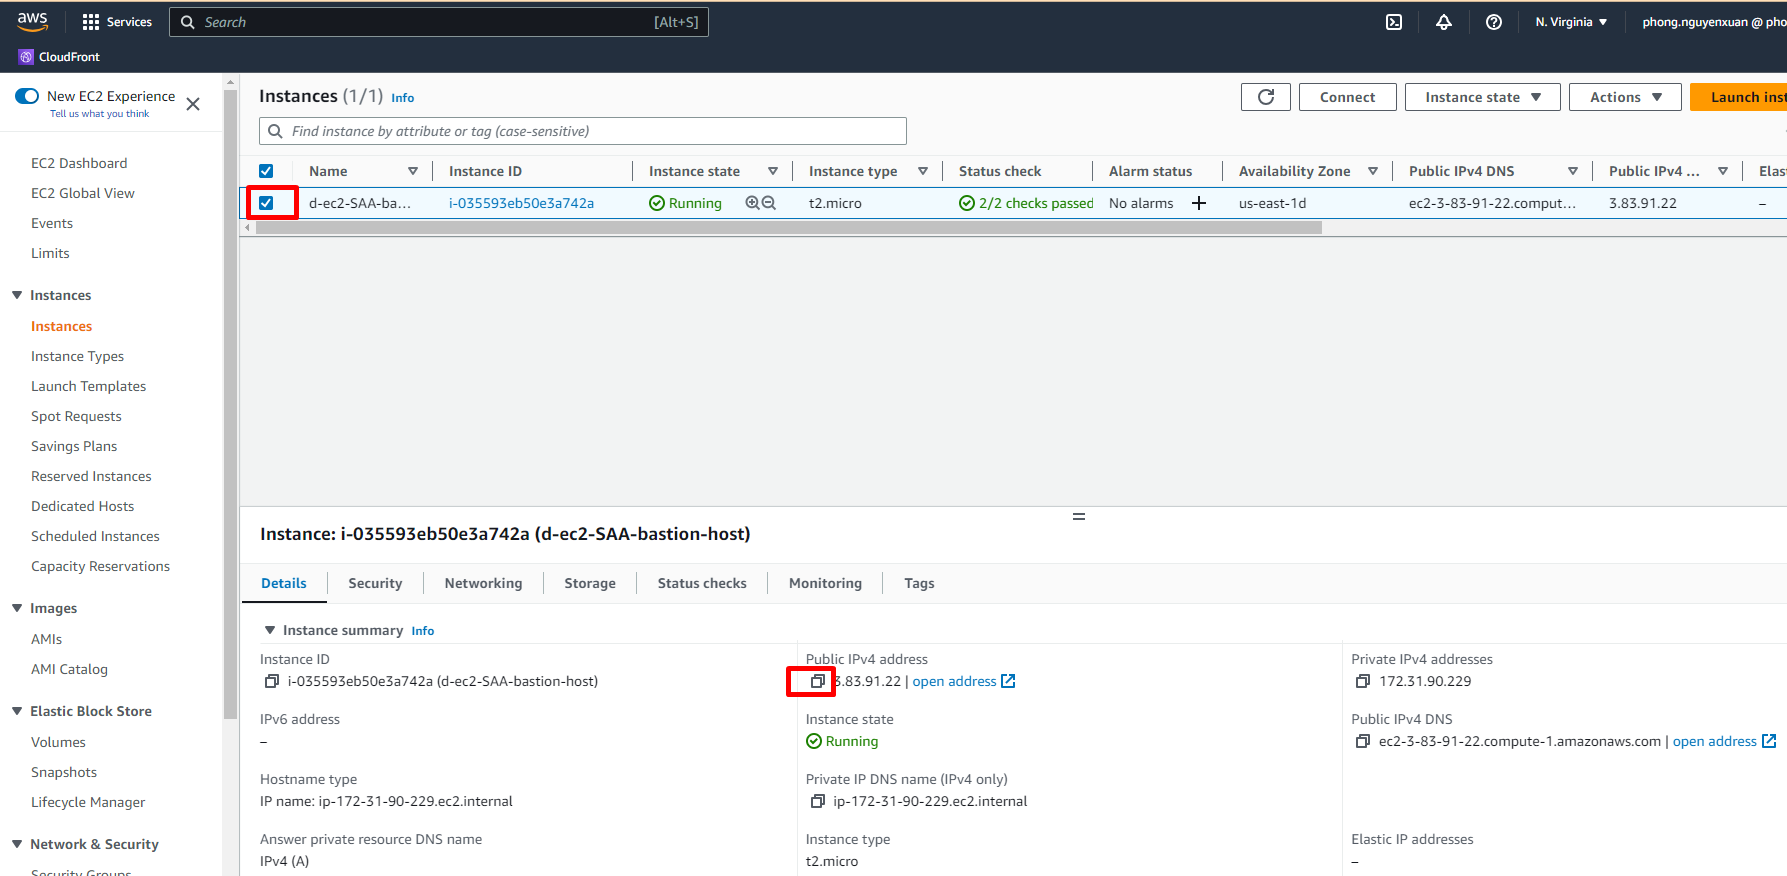
Access http://{public ip} (lưu ý là http chứ không phải https)
Create and Assign IAM role SAAEC2S3FullAccessRole to Instance
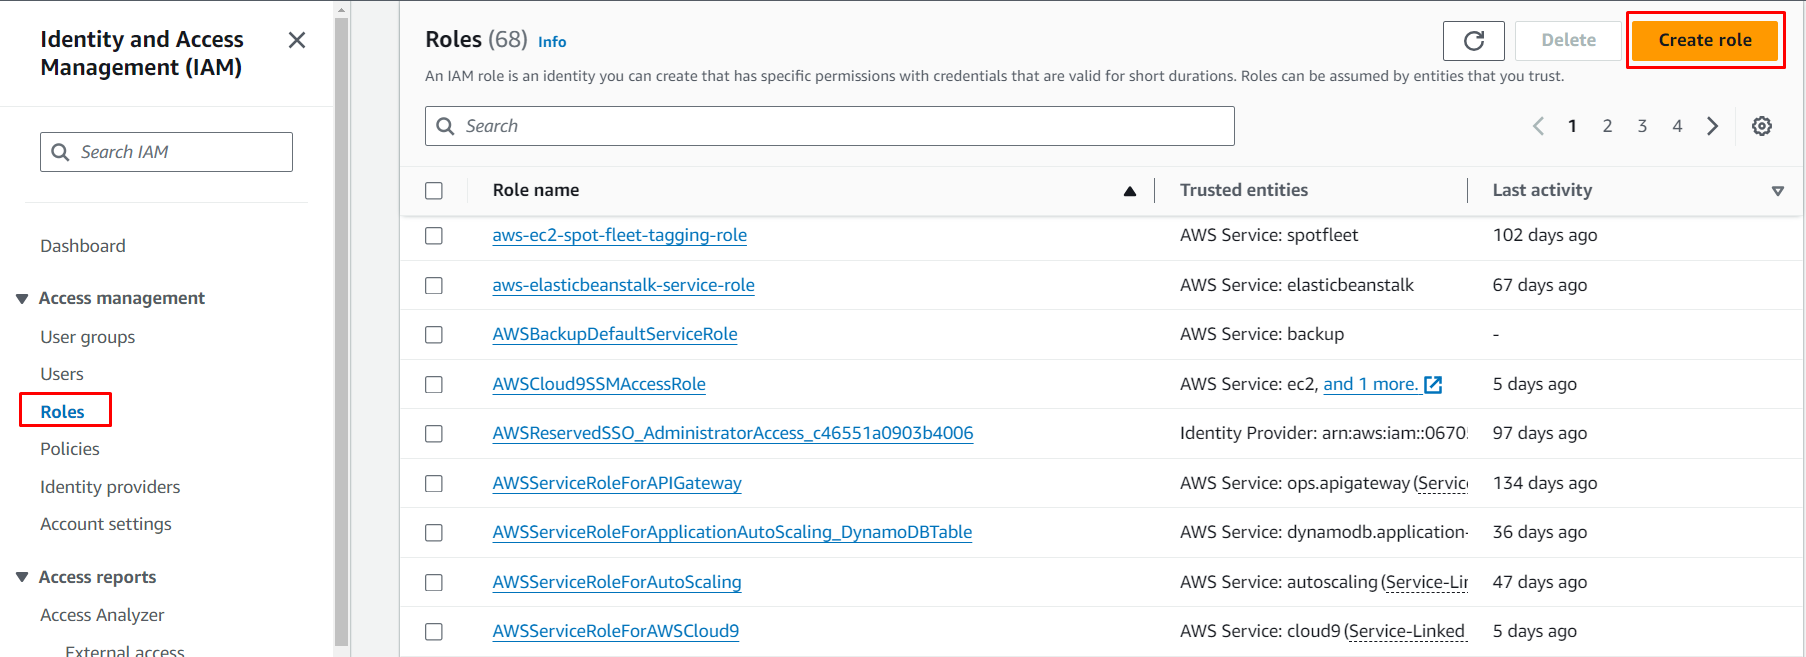
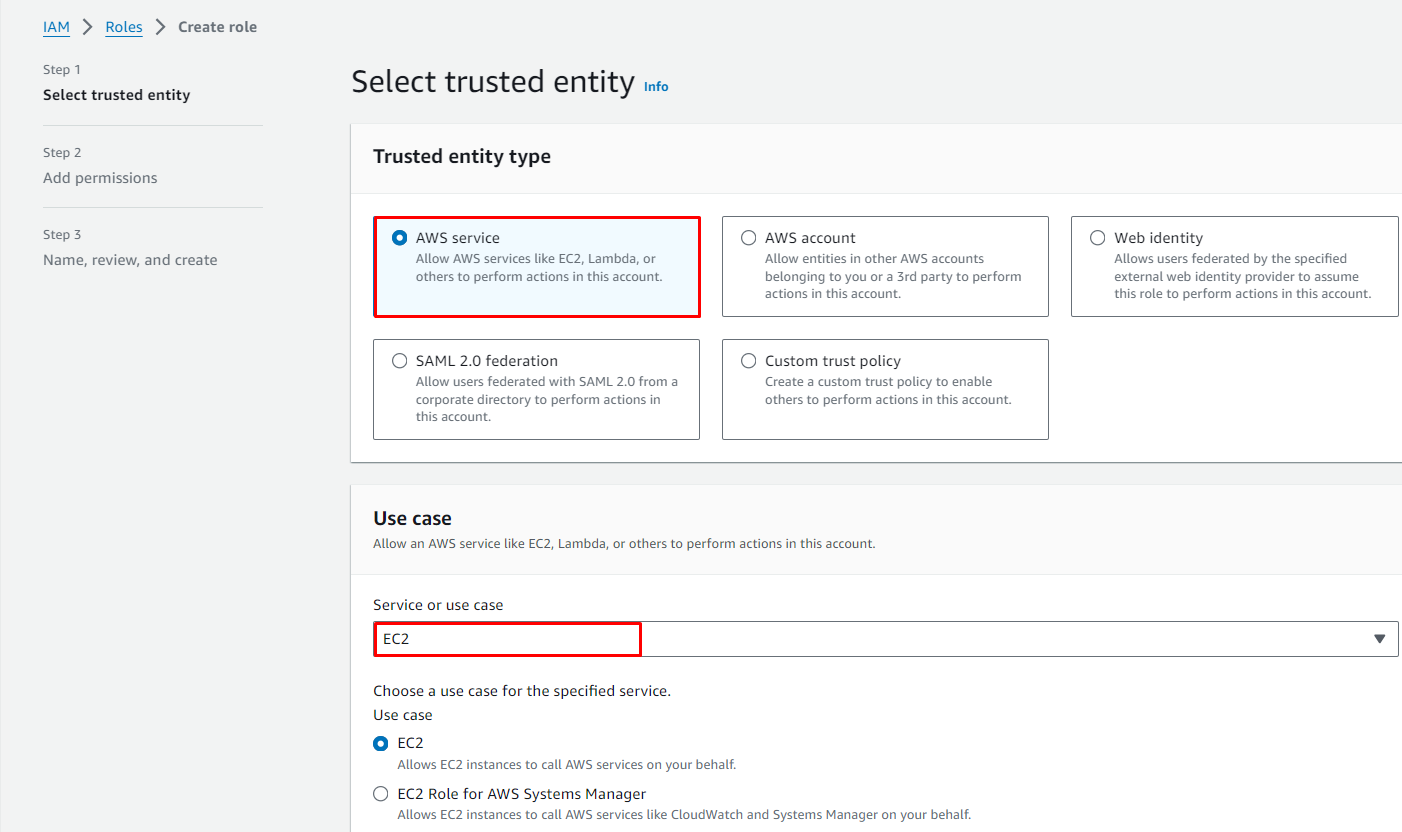
Tại IAM console, Menu Role -> Create role
Chọn EC2 làm trusted entity
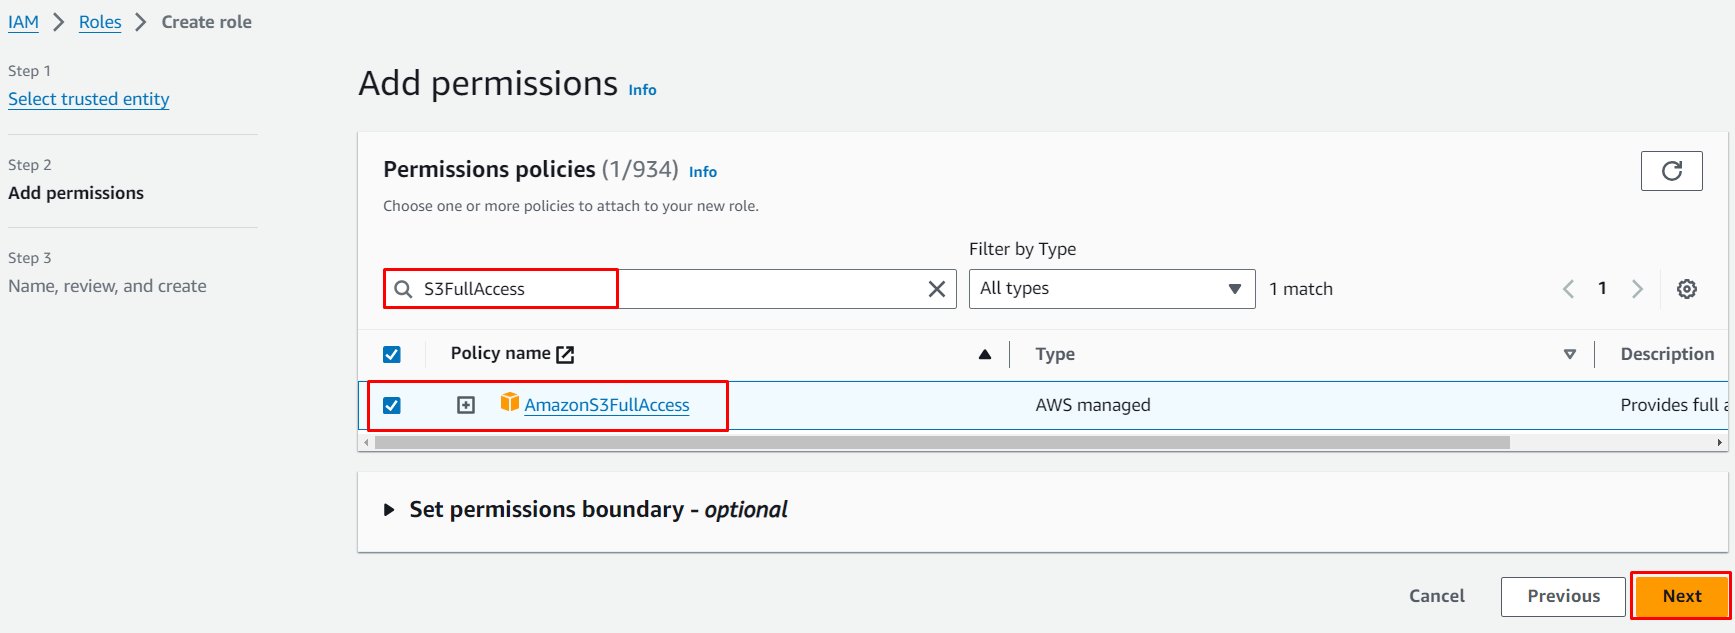
Tìm và chọn AWS Managed policy AmazonS3FullAccess
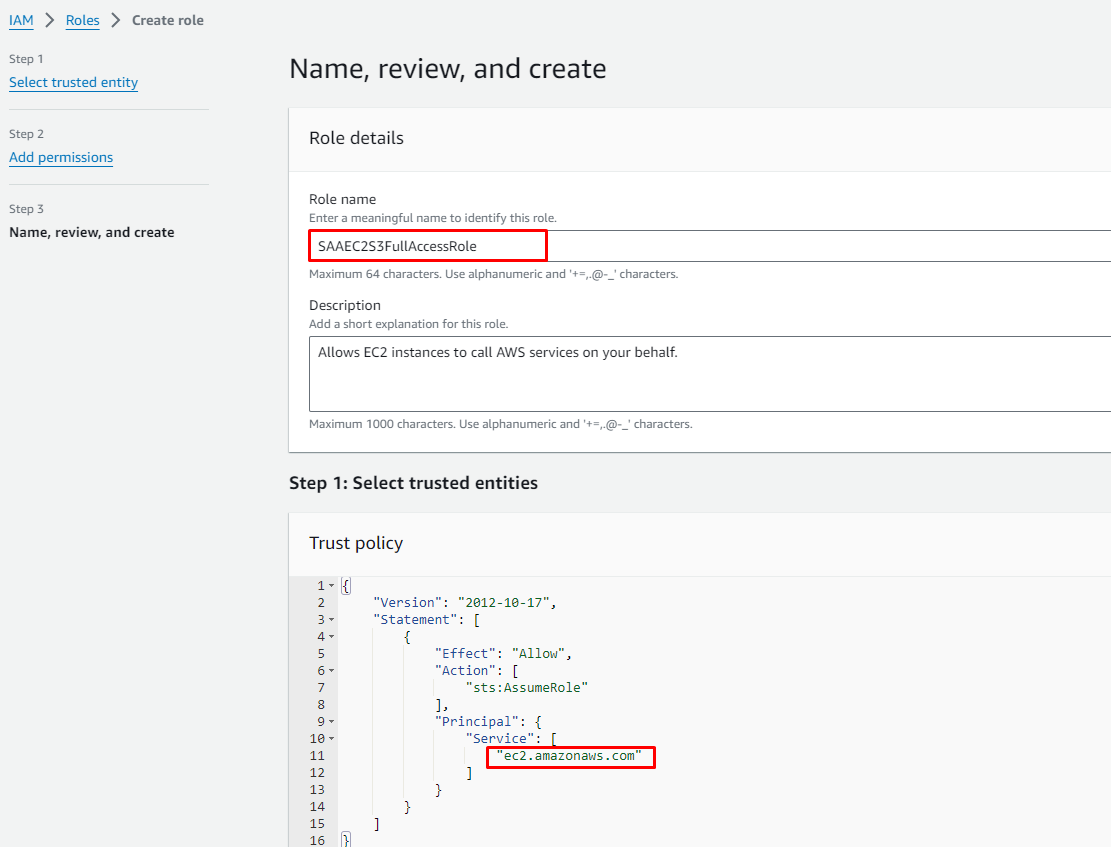
Điền tên Role SAAEC2S3FullAccessRole và nhấn Create role
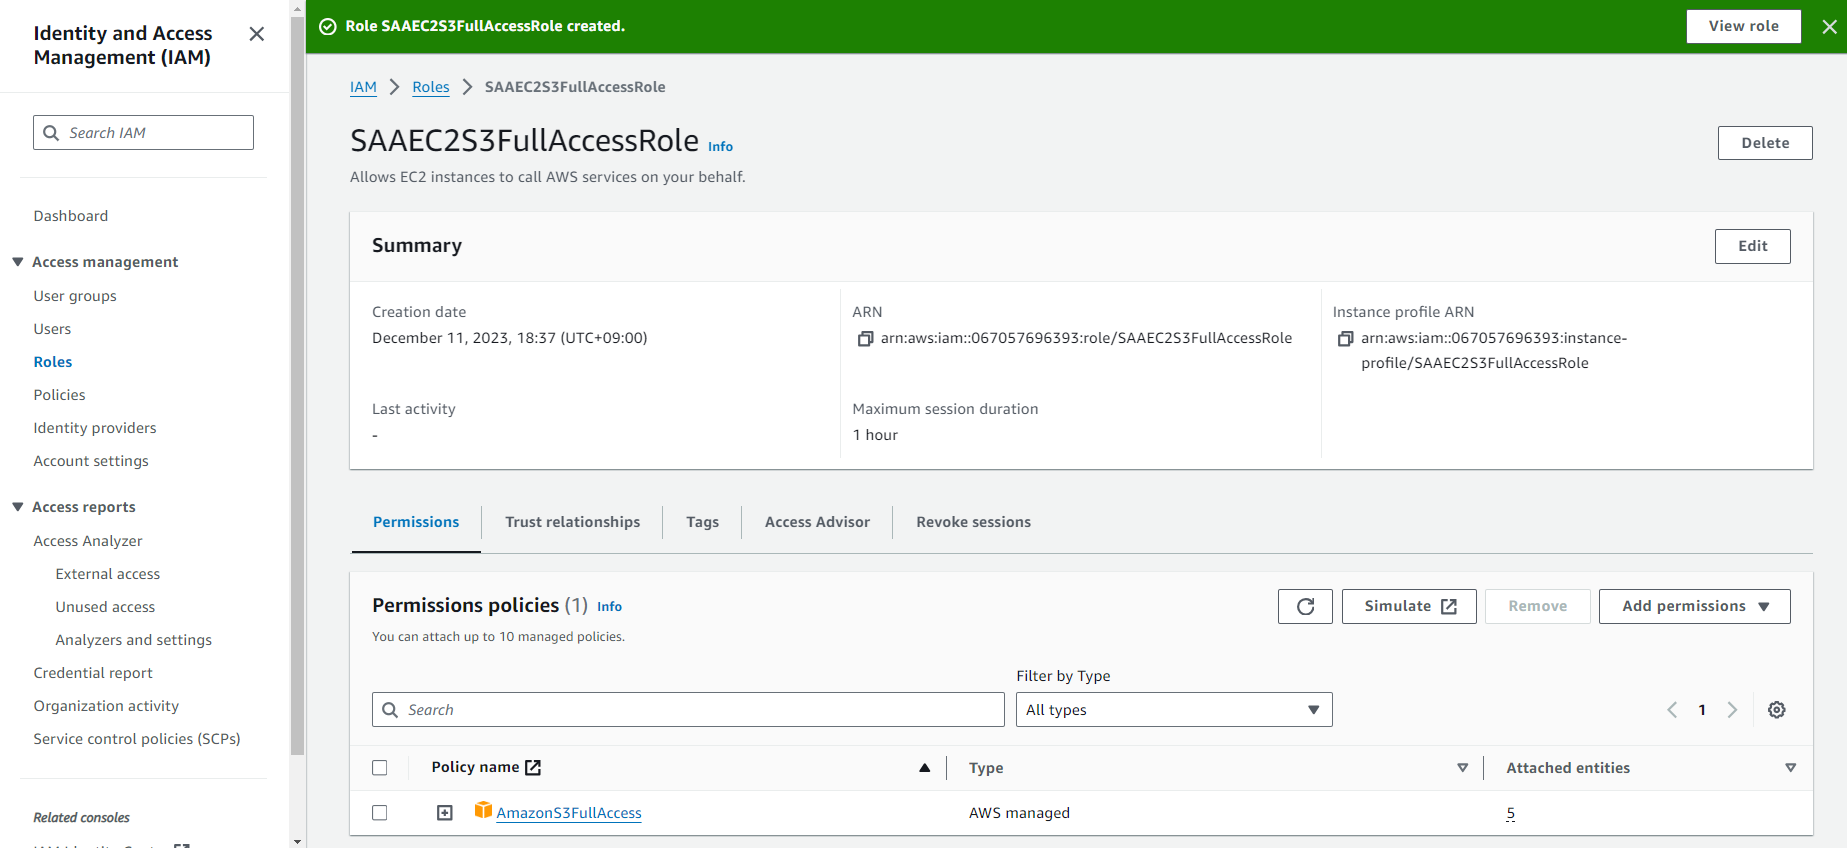
Confirm kết quả
Attach role SAAEC2S3FullAccessRole to EC2
Tại EC2 Console, thực hiện như sau:
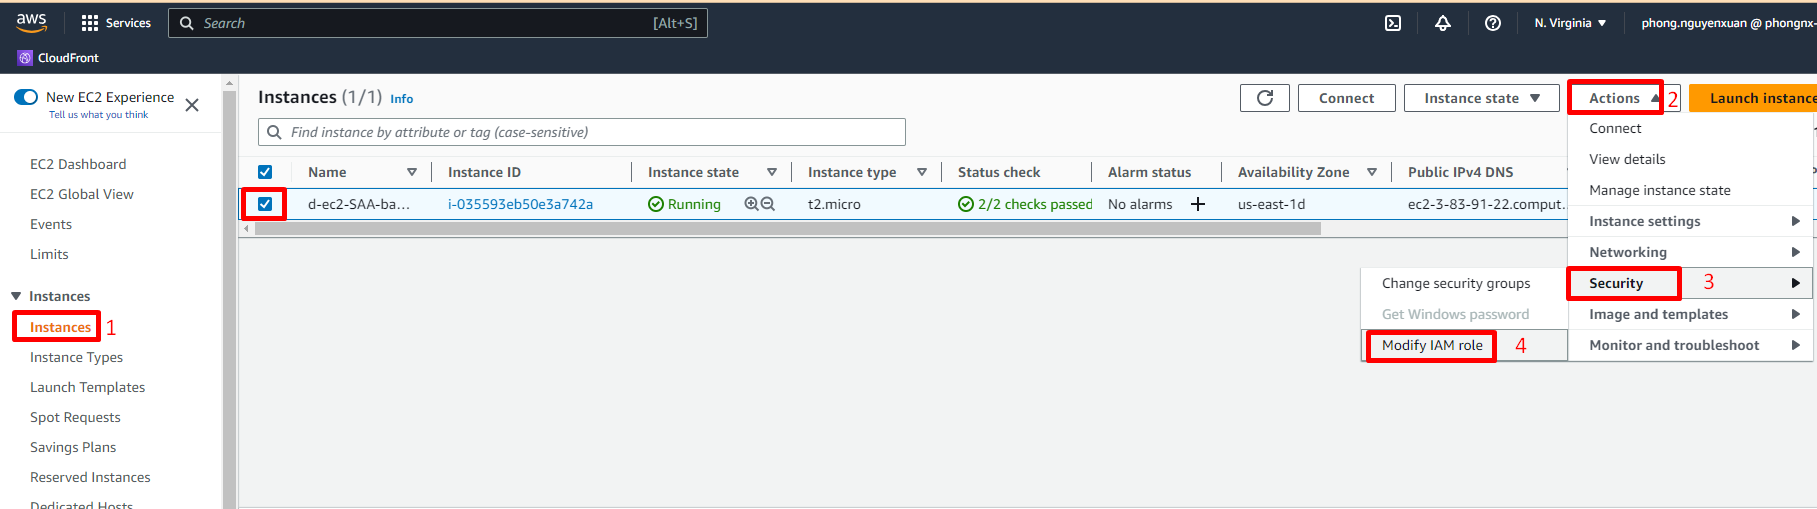
Chọn role SAAEC2S3FullAccessRole và nhấn Update IAM role
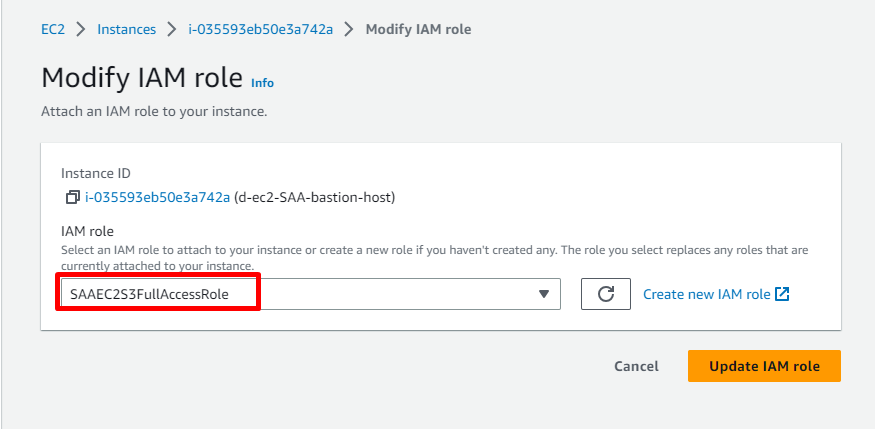
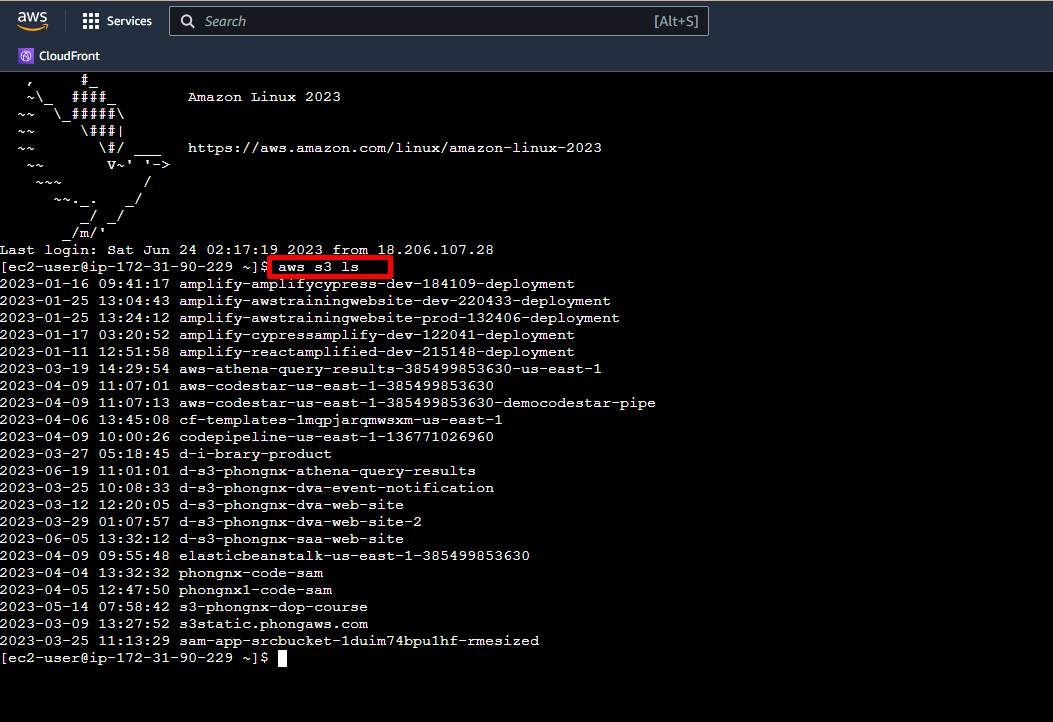
Connect to EC2 and run: aws s3 ls
ssh đến Ec2 và thực hiện command aws s3 ls để test connect đến S3 (account các bạn nếu chưa có bucket nào thì không hiển thị gì cả, nhưng không báo lỗi gì thì là thành công)
Cleanup
Vậy là các bạn đã tạo thành thông EC2 Instance và ssh đến EC2 ok. Để tiết kiệm chúng ta sẽ Terminated EC2 khi không còn dùng nữa.
- Terminated EC2
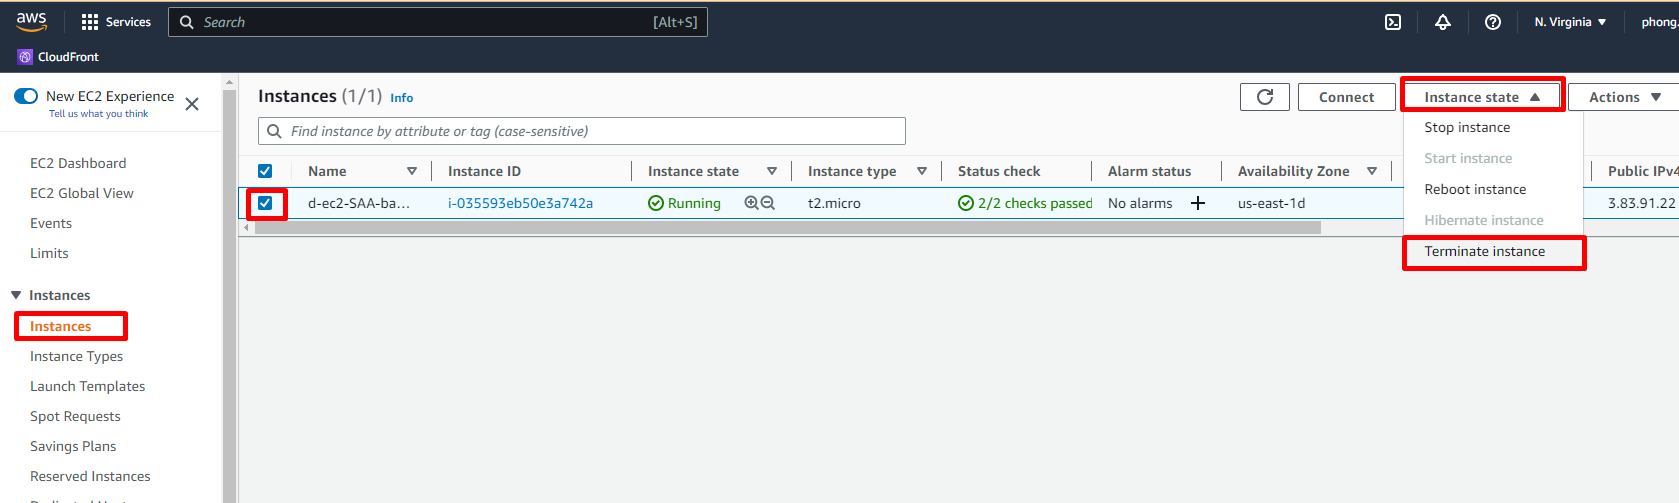
- Sau khi EC2 ở trạng thái Terminated, delete security group:
d-sg-SAA-basion-host