How to Run a Application on AWS ECS: A Step-by-Step Guide
Lab Details
- Bài Lab này sẽ hướng dẫn bạn các bước để khởi chạy và configure custom nginx container trên ECS Cluster.
- Duration: 60 minutes
- AWS Region: US East (N. Virginia) us-east-1
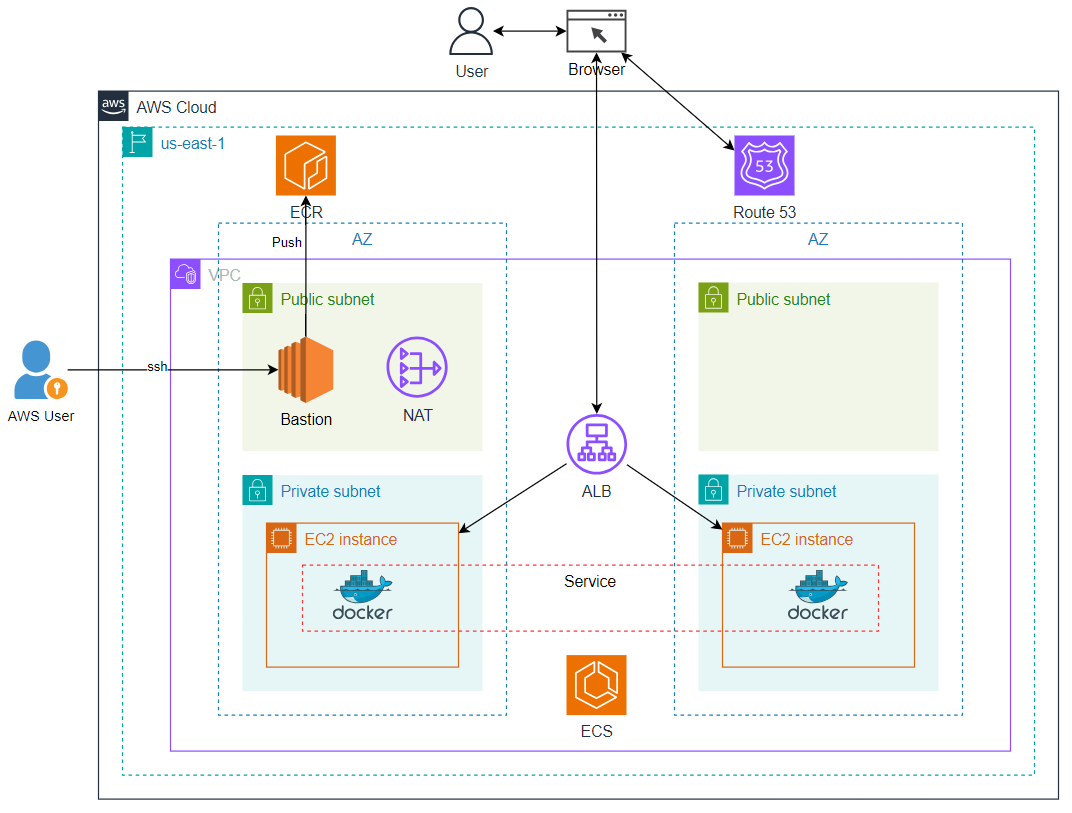
Architecture Diagram
Task Details
- Create VPC
- Create EC2 đặt ở Public Subnet (Đóng vai trò như là bastion host)
- Create ECR repository and build Docker image
- Create ECS Cluster
- Create Task definition
- Create TG
- Create ALB
- Create ECS Service
- Test hoạt động
- Setting Route53 and access website (optional)
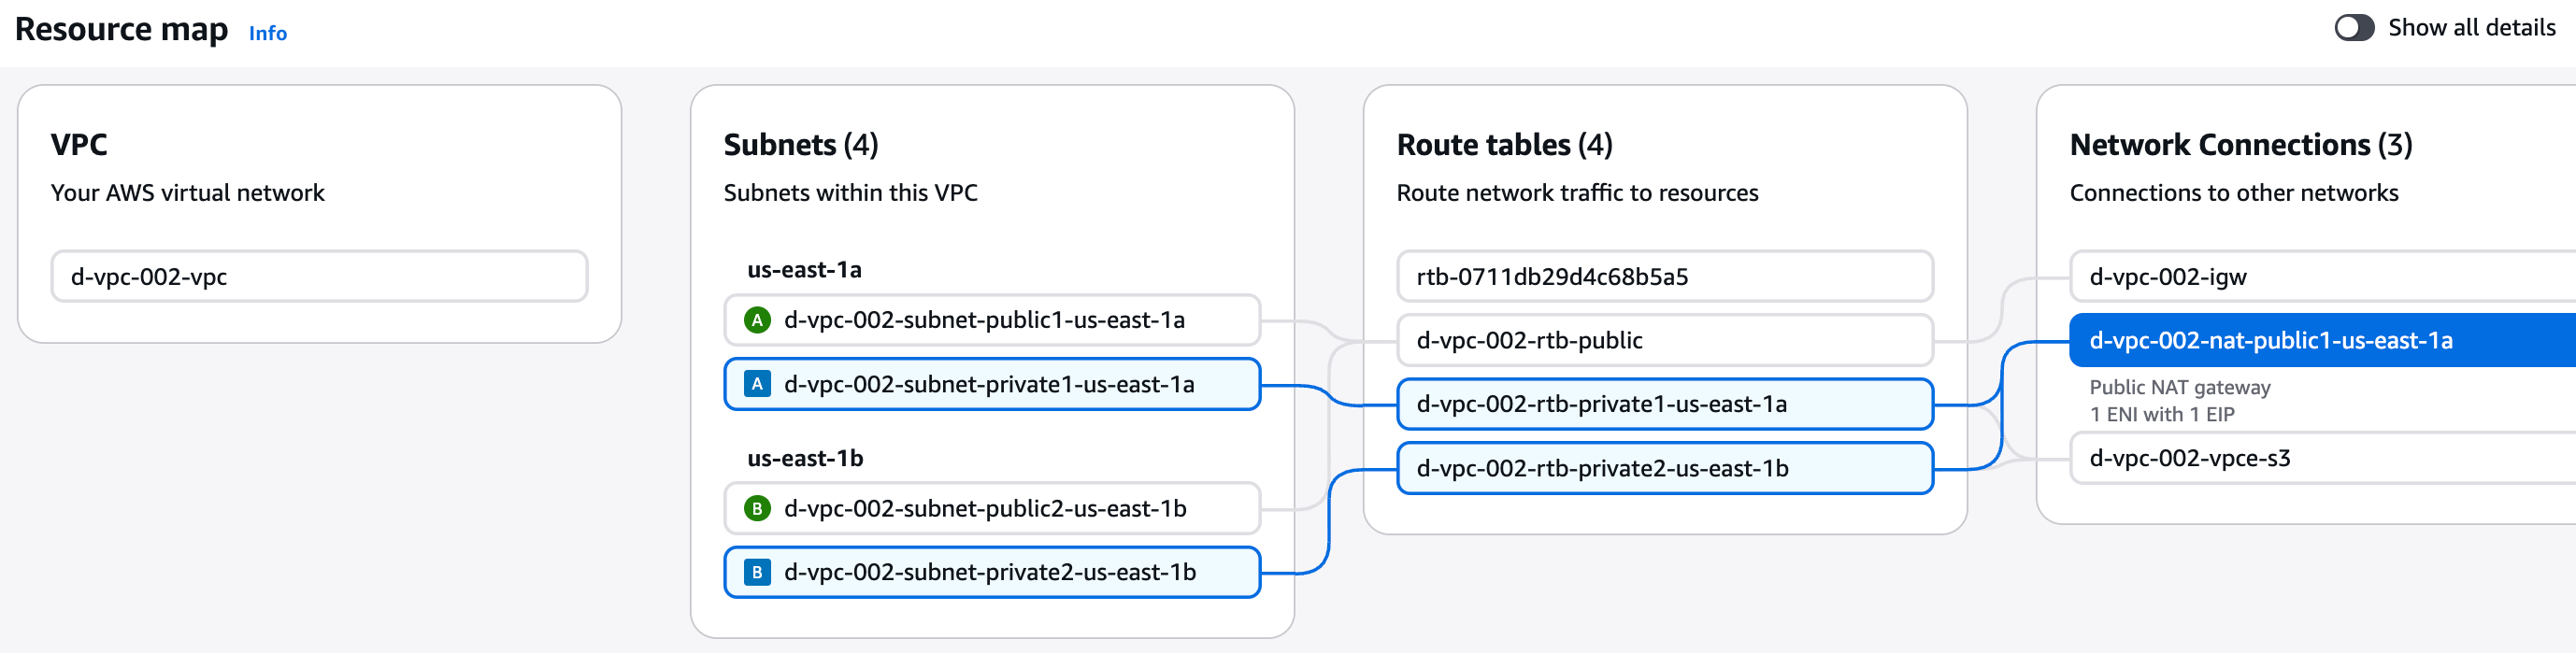
1. Create VPC (VPC + IGW + Subnet + Route Table + NAT)
VPC settings
- Resources to create:
VPC and more - Auto-generate:
check - Name:
d-vpc-002 - IPv4 CIDR block:
10.1.0.0/16 - Number of Availability Zones (AZs) :
2 - Number of public subnets:
2 - Number of private subnets:
2 - NAT gateways ($):
In 1 AZ - VPC endpoints:
S3 Gateway - Còn lại để default
2. Create EC2 đặt ở Public Subnet (Đóng vai trò như là bastion host)
Chúng ta cần tạo 1 EC2 cho mục đích build docker image và push lên ECR, việc này có thể thực hiện ở local (Nếu như môi trường local của bạn đã được cài đặt docker)
Bastion host cũng có thể access đến private instance khi cần troubleshooting.
Note: Nếu local đã chạy được docker, có thể bỏ qua step này
2.1 Create Security Group cho Bastion host
- Name:
d-sg-SAA-basion-host - Description:
Allow ssh from internet - VPC:
d-vpc-002-vpc - Inbound rules
Type Protocol Port range Source SSH TCP 22 0.0.0.0/0 - Outbound rules
Type Protocol Port range Source All traffic All All 0.0.0.0/0 - Tags
Key value Name d-sg-SAA-basion-host
2.2 Create EC2
- Name:
d-ec2-SAA-bastion-host - Application and OS Images:
Default (Amazon Linux 2023) - Instance type:
Default (t3.micro) - Key pair:
d-key-SAA-common(Nếu chưa có thì tạo mới) - Network Setting:
- VPC:
d-vpc-002-vpc - Subnet:
d-vpc-002-subnet-public1-us-east-1a - Auto-assign public IP:
Enable - Select existing security group:
d-sg-SAA-basion-host
- VPC:
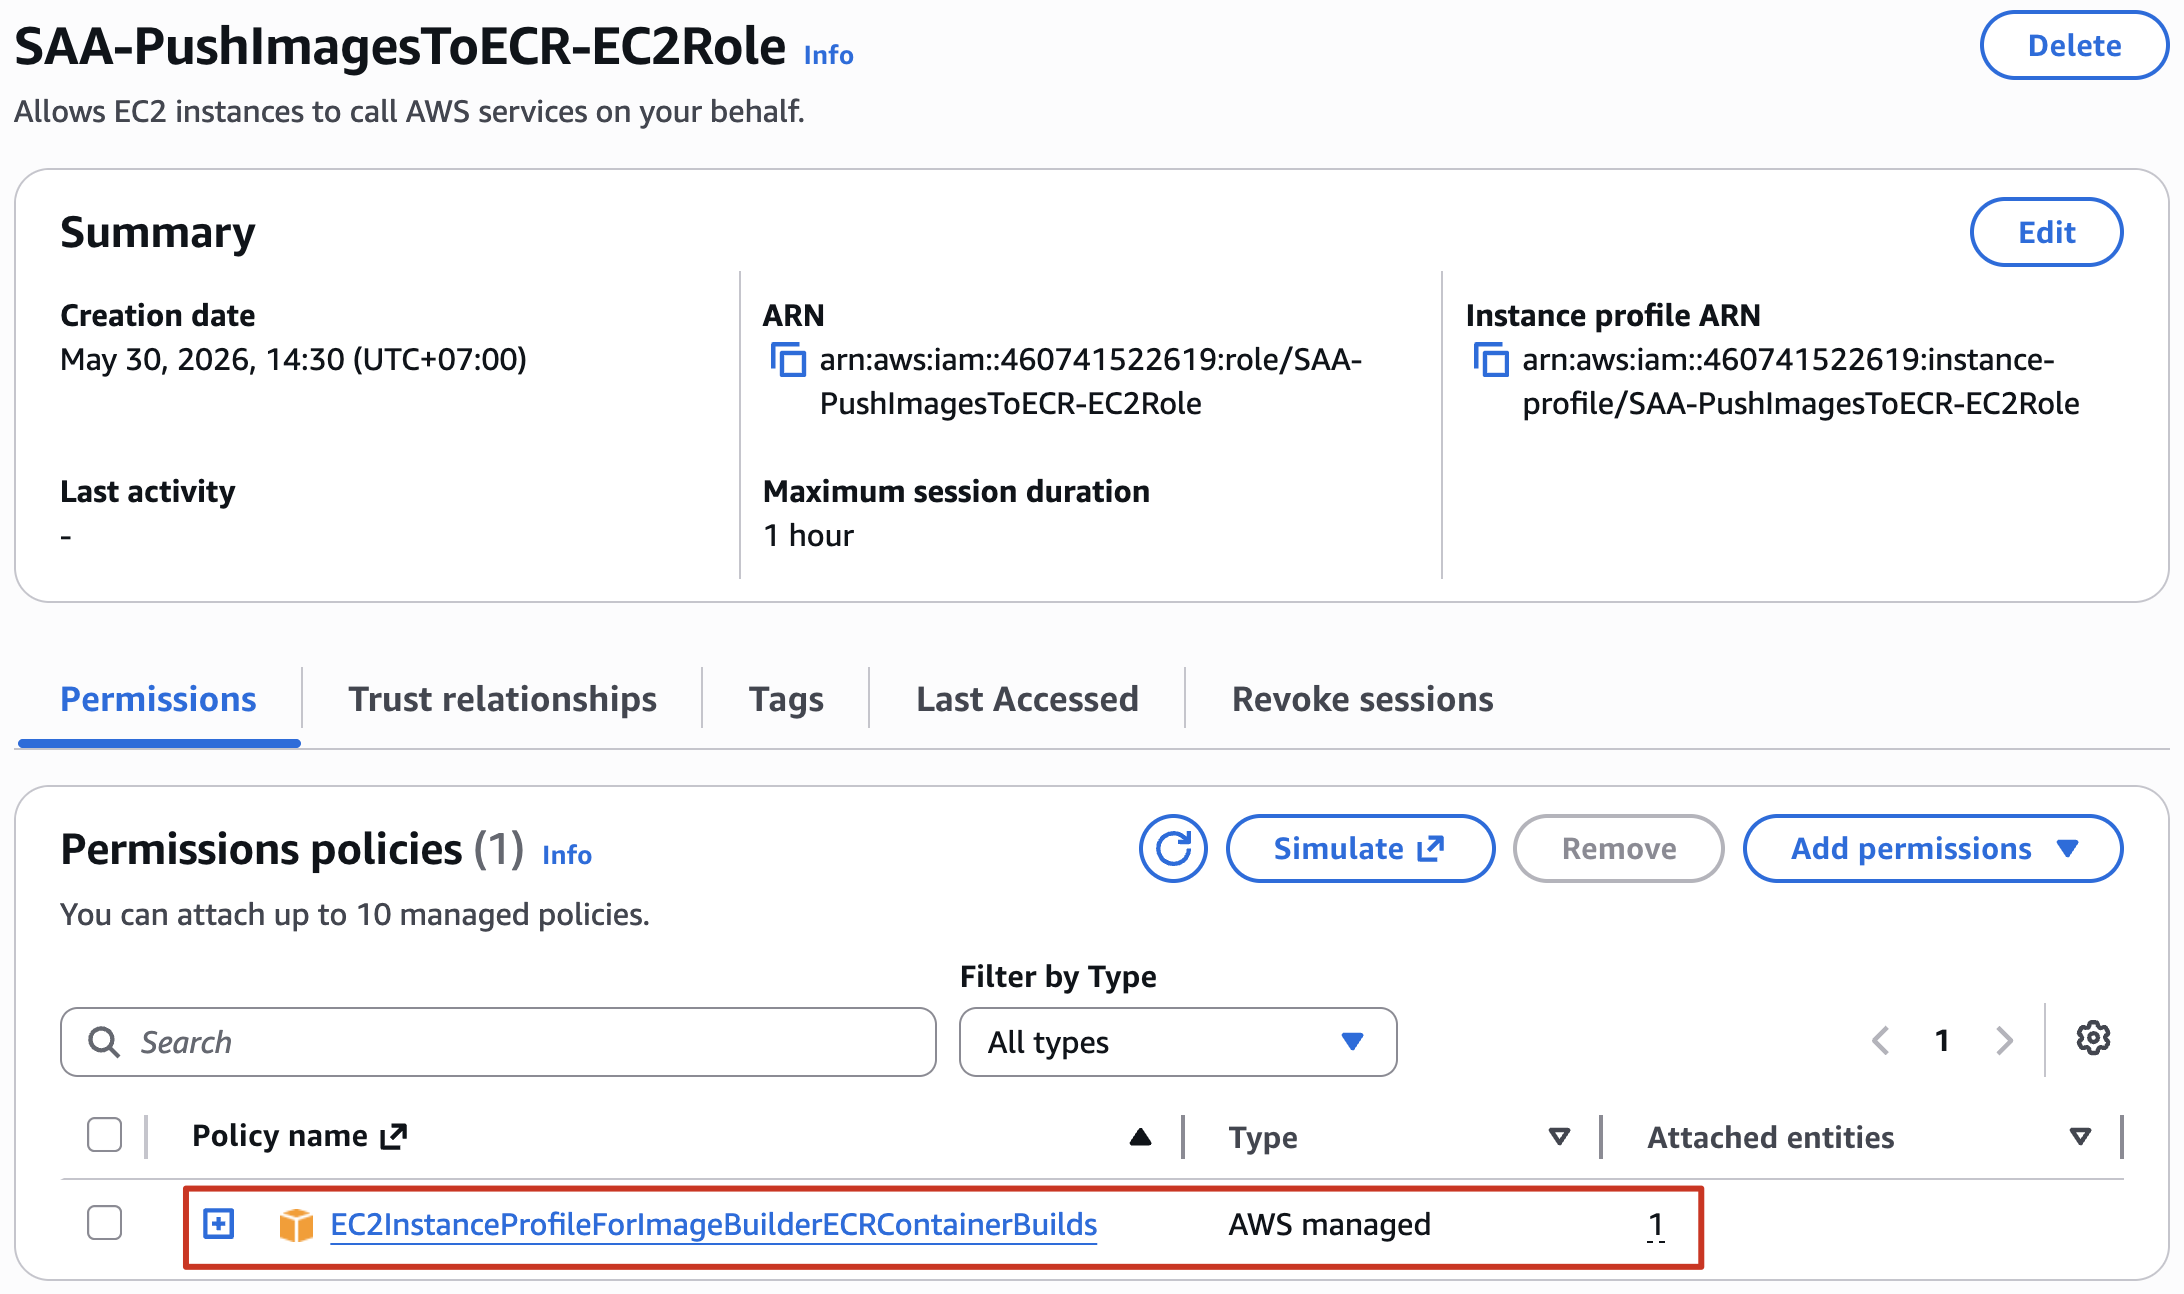
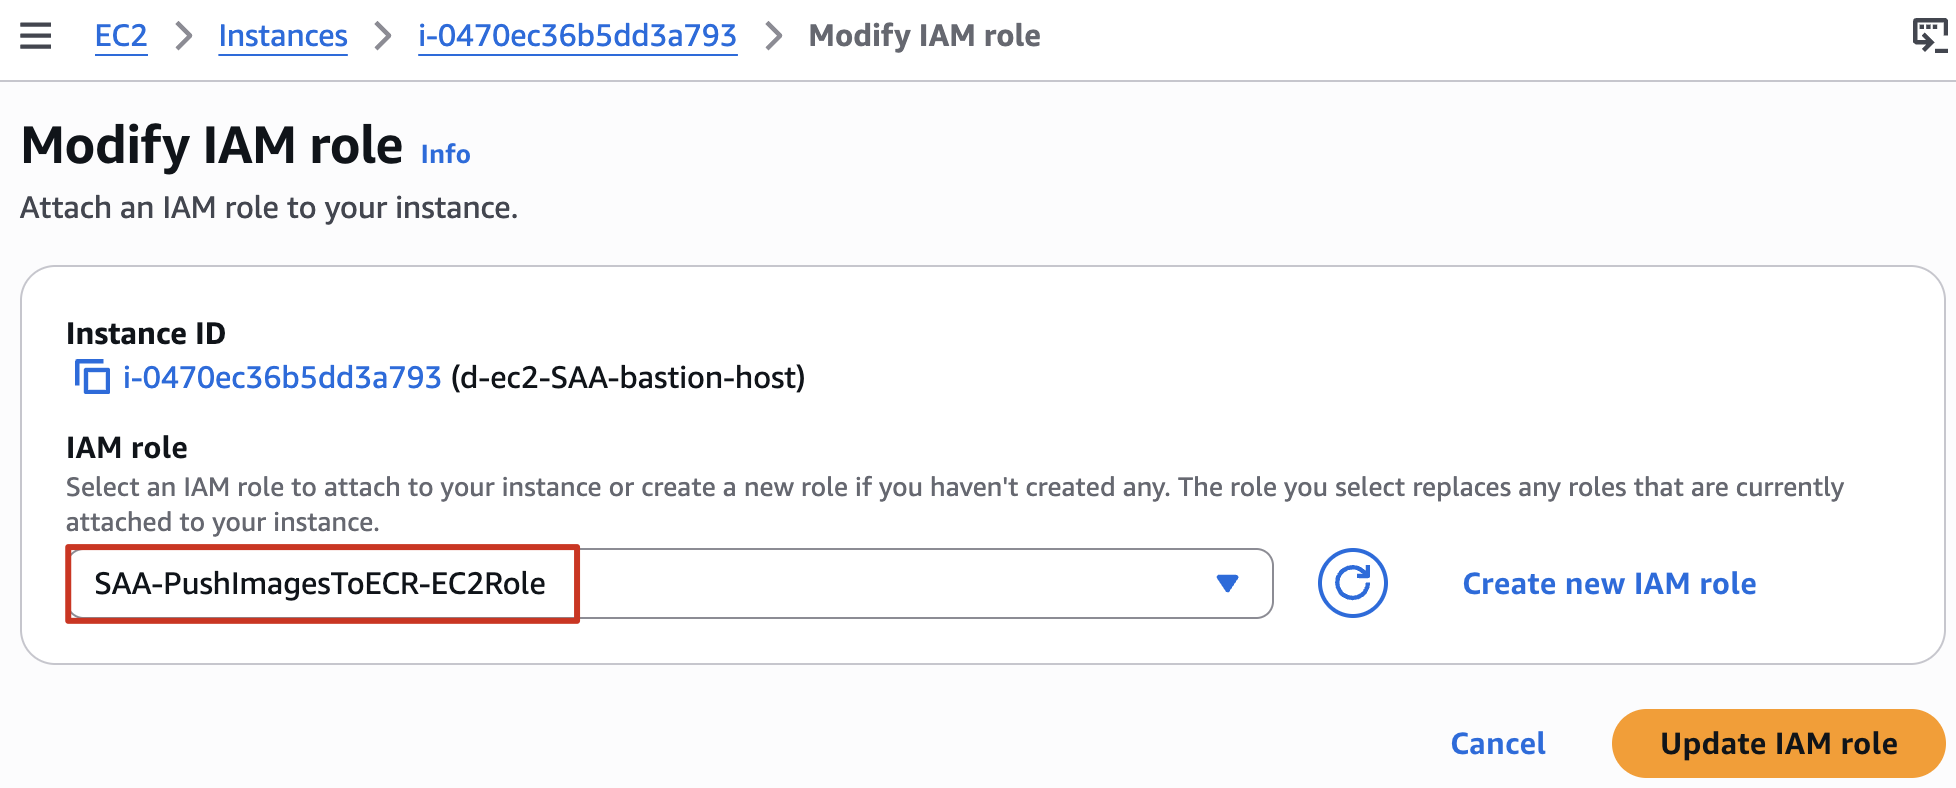
2.3 Ceate Role SAA-PushImagesToECR-EC2Role for EC2
Để có thể push Docker image đến ECR, chúng ta cần tạo Role và gắn cho EC2
Create Role
- Trusted entity type:
AWS service - Use case:
EC2 - Permissions policies:
EC2InstanceProfileForImageBuilderECRContainerBuilds - Role name:
SAA-PushImagesToECR-EC2Role
Attach to Bastion host
2.4 Connect to EC2 and Install Docker
- Connect to EC2

- Install Docker
sudo yum update -y sudo yum -y install docker - Start Docker
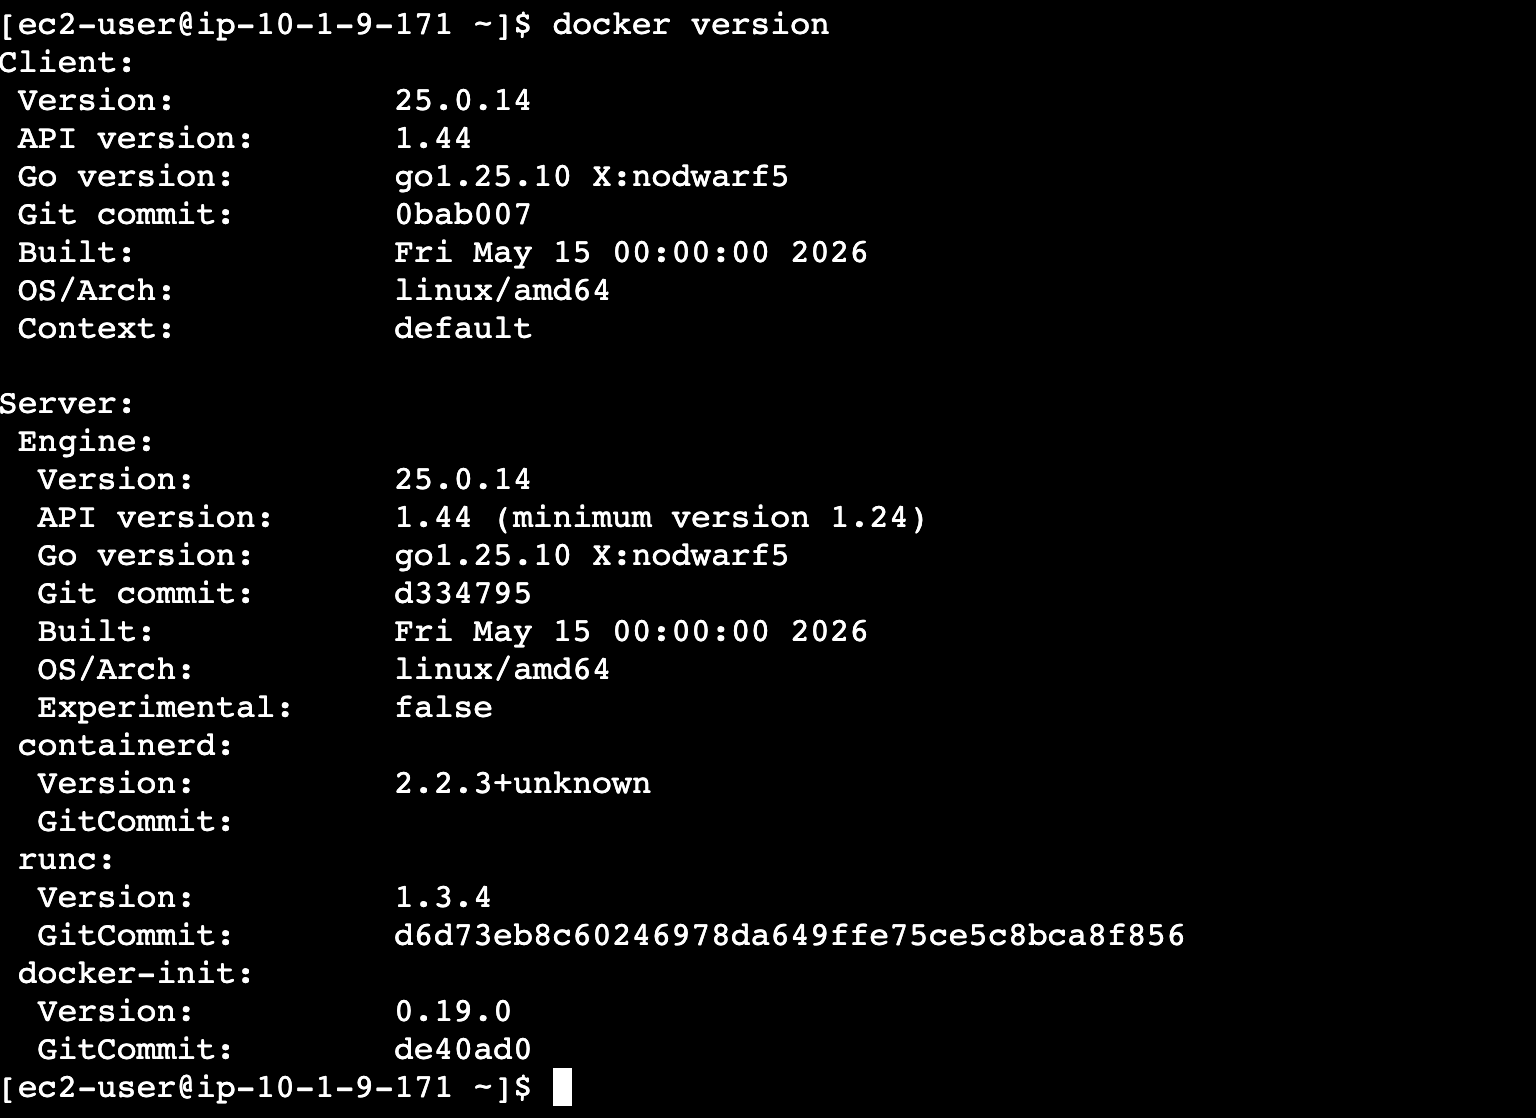
sudo service docker start - Access Docker commands in ec2-user user
sudo usermod -a -G docker ec2-user sudo chmod 666 /var/run/docker.sock - docker version
3. Create ECR repository and build Docker image
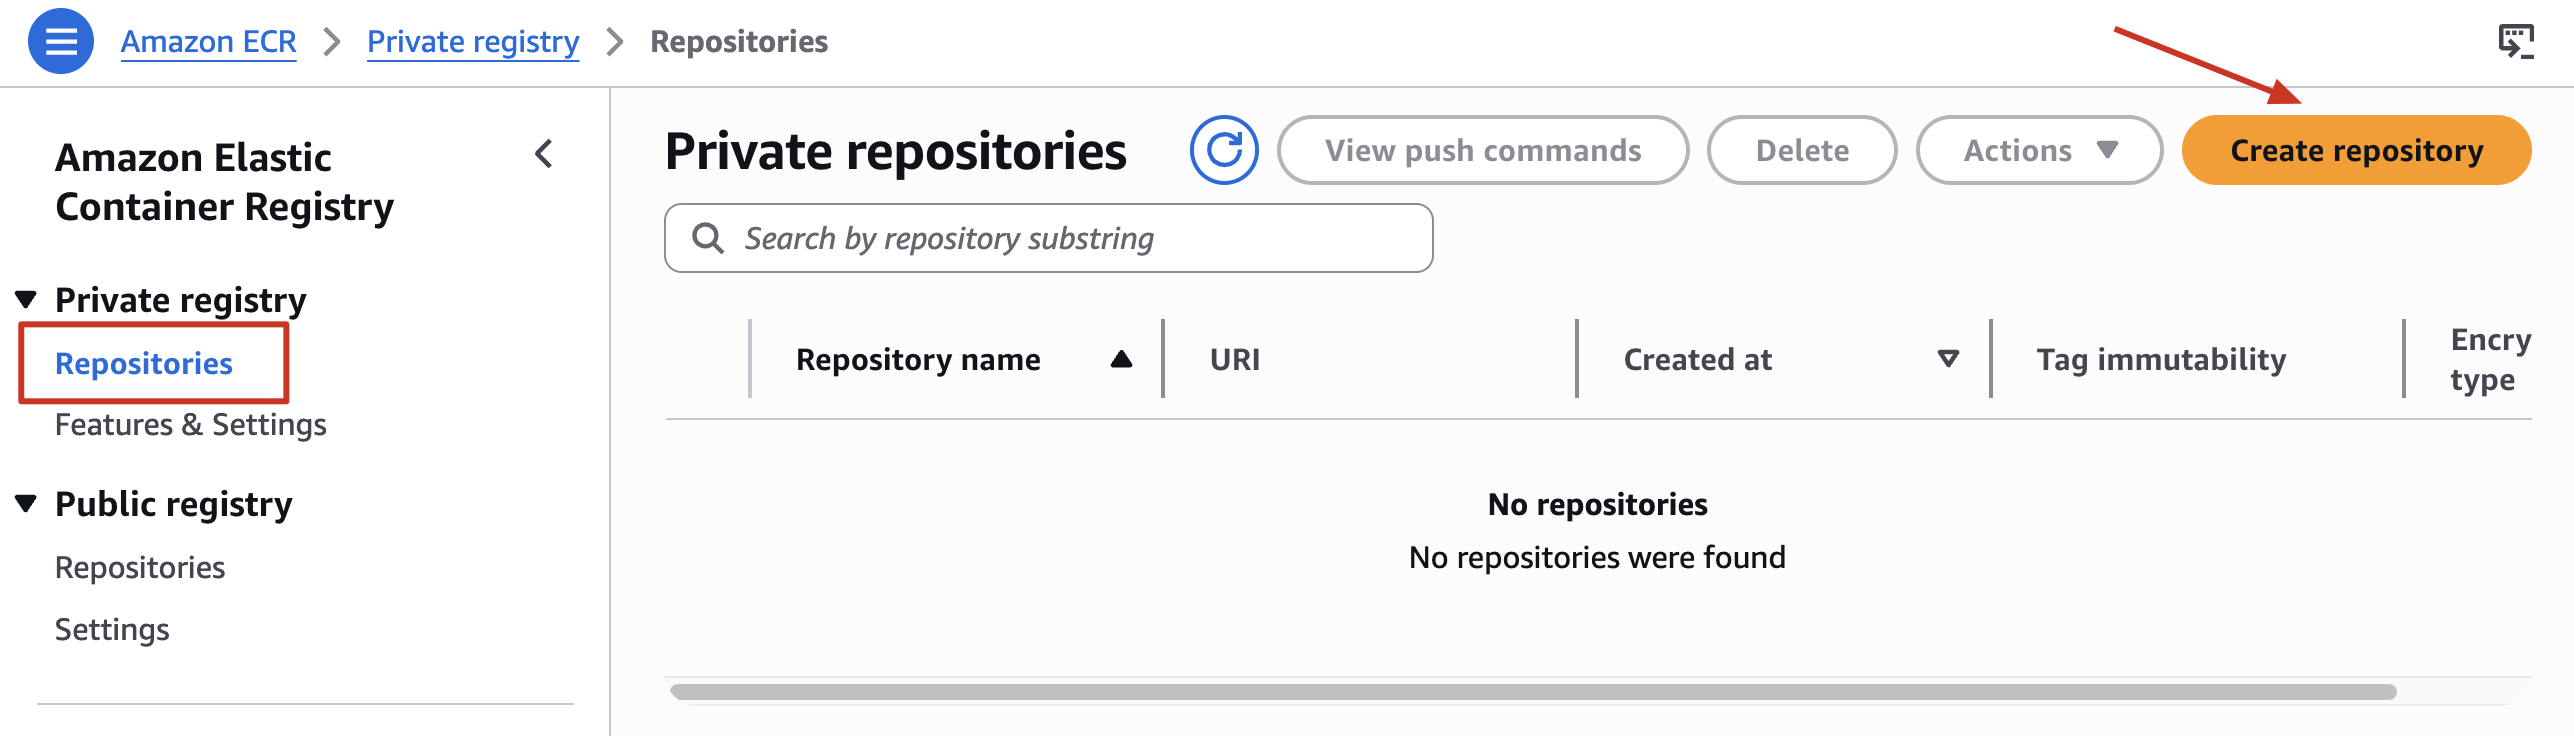
3.1 Create ECR Repository
Tại Console của Elastic Container Registry -> Chọn Repositories -> Create repository
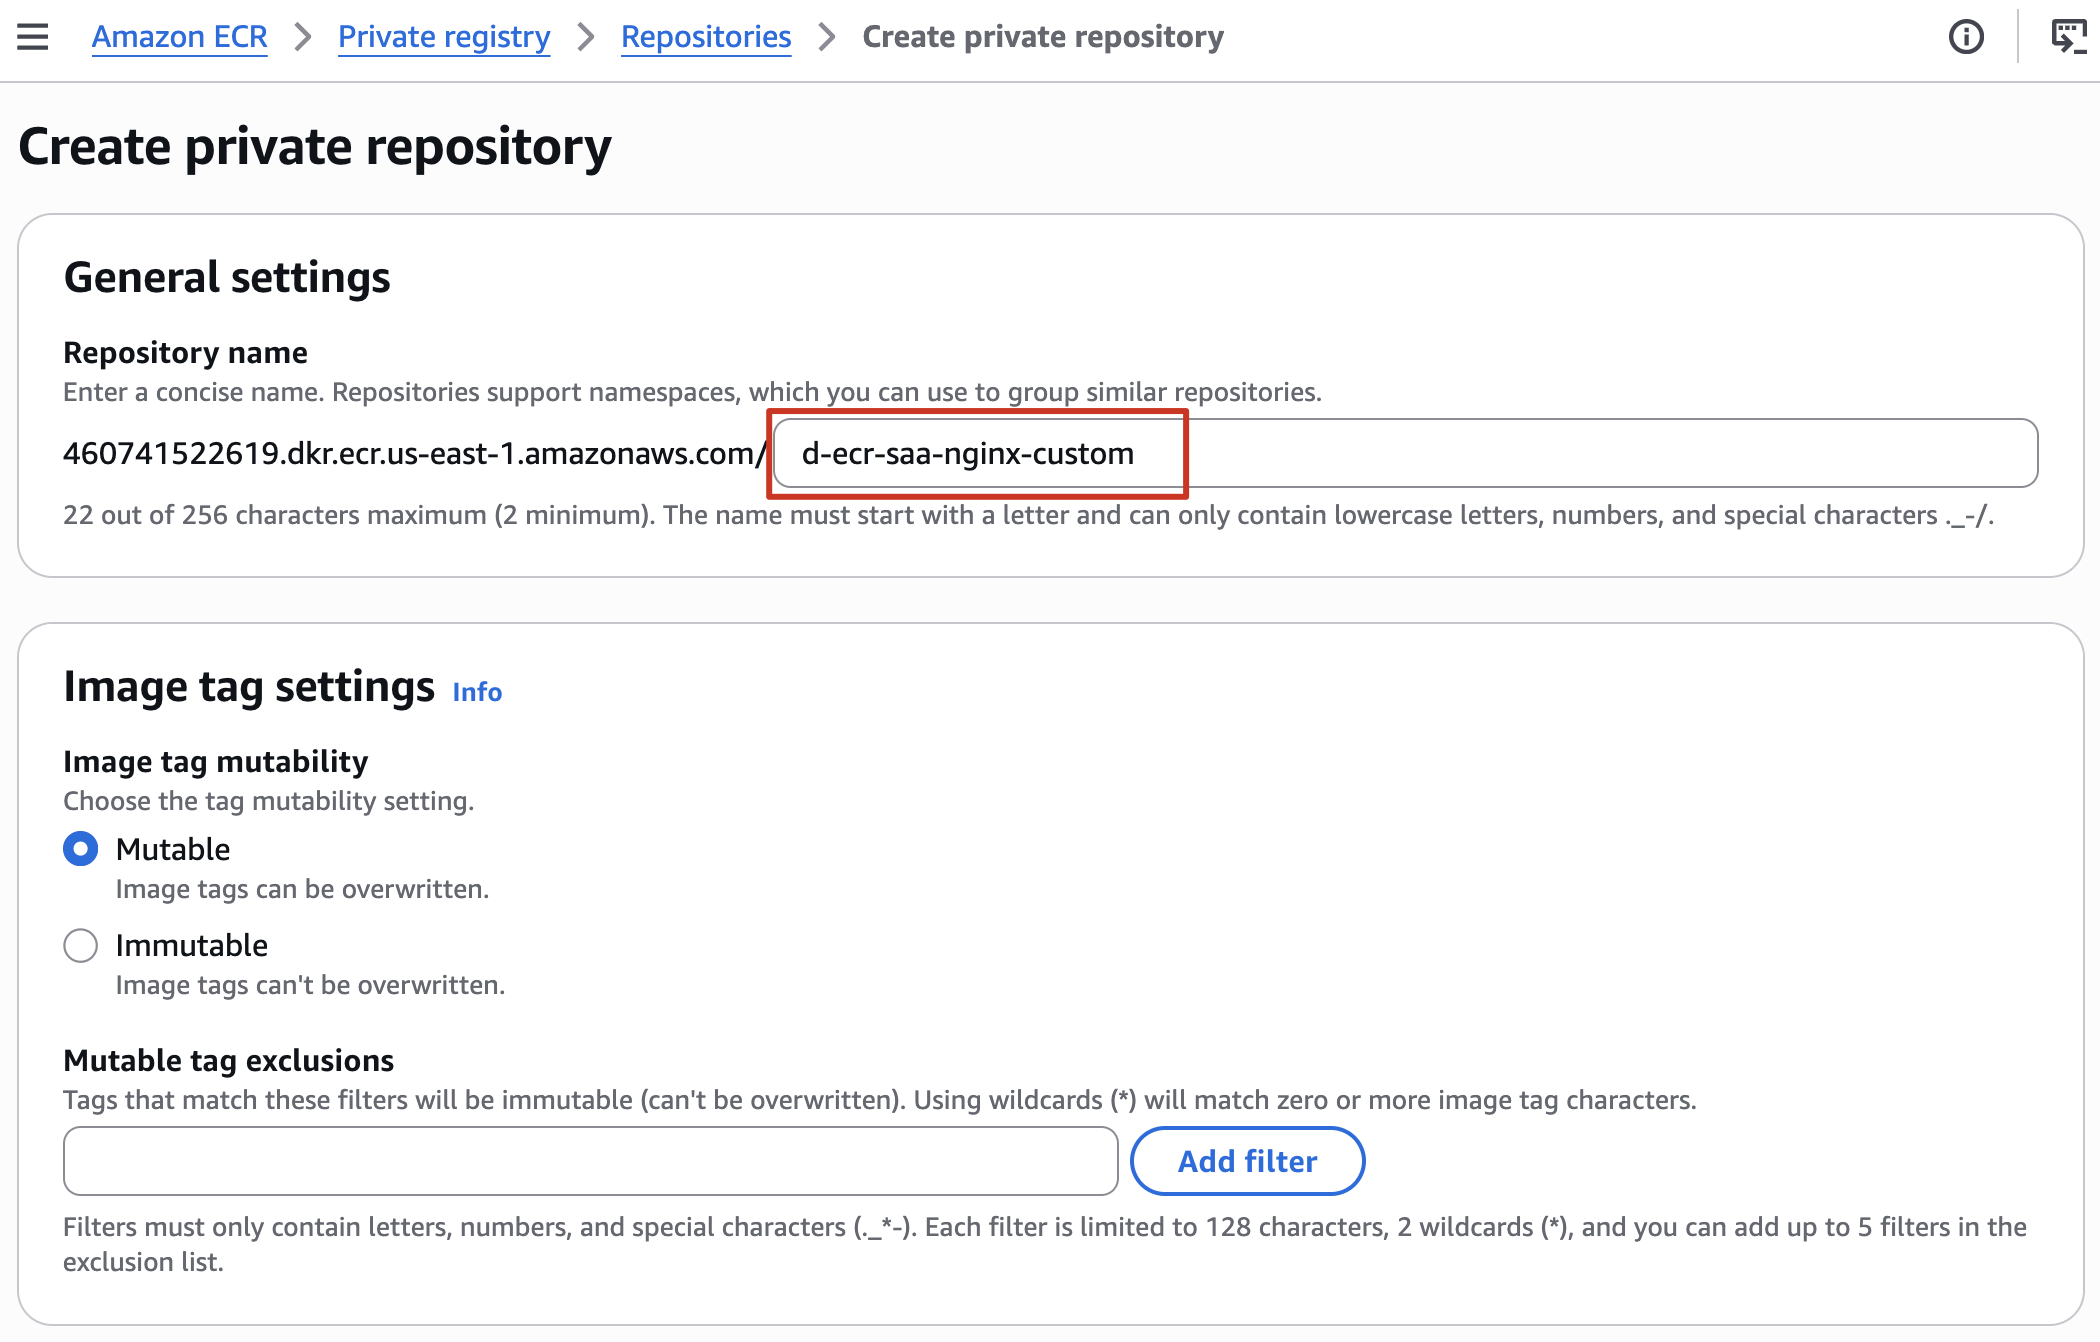
General settings
- Repository name:
d-ecr-saa-nginx-custom - Còn lại để default
3.2 Build Docker image
- Connect to Bastion host (hoặc chạy ở local)
- Create Custom nginx container
mkdir nginx-app cd nginx-app/ - Create file
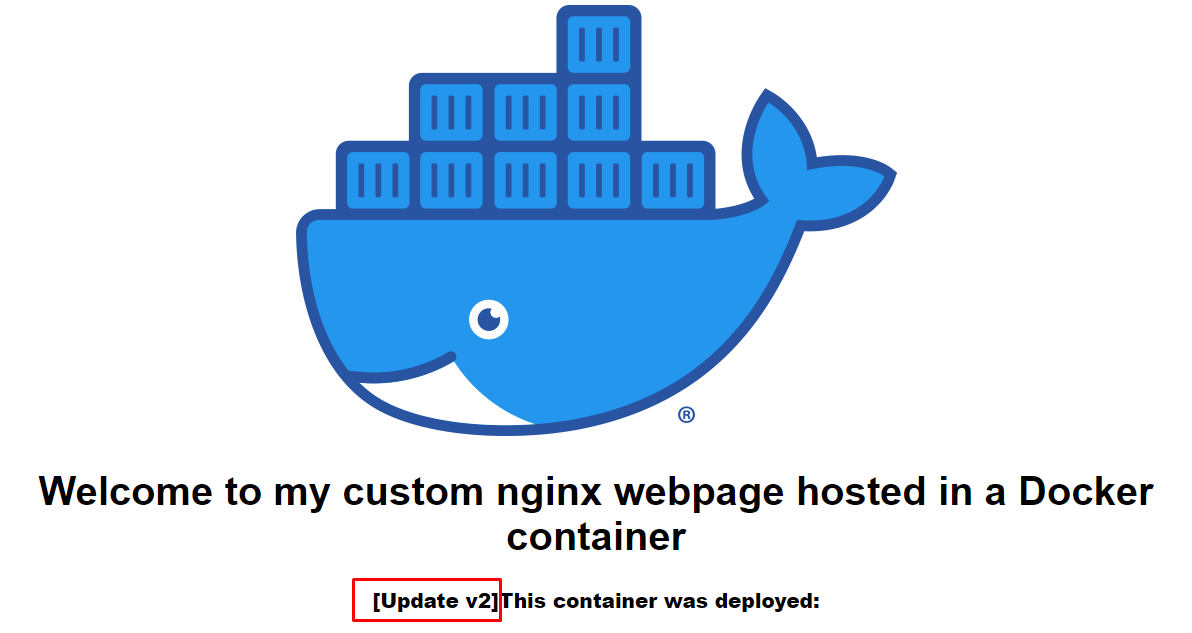
index.html<!DOCTYPE html> <html> <head> <title> ECS | CloudmentorPro Blog </title> </head> <body style=text-align:center;background-color:white;font-weight:900;font-size:20px;font-family:Helvetica,Arial,sans-serif> <img src="https://www.docker.com/wp-content/uploads/2022/03/Moby-logo.png"> <h1> Welcome to my custom nginx webpage hosted in a Docker container </h1> <p> This container was deployed: <div id="date"></div></p> <script> var date = new Date(); document.getElementById("date").innerHTML=date.toLocaleString(); </script> </body> </html> - Create
DockerfileFROM nginx:1.25.3 COPY index.html /usr/share/nginx/html EXPOSE 80 CMD ["nginx", "-g", "daemon off;"] - Build image: nginx-custom
docker build -t nginx-custom . - Docker run
docker run -d --name nginx -p 8080:80 nginx-custom - Confirm
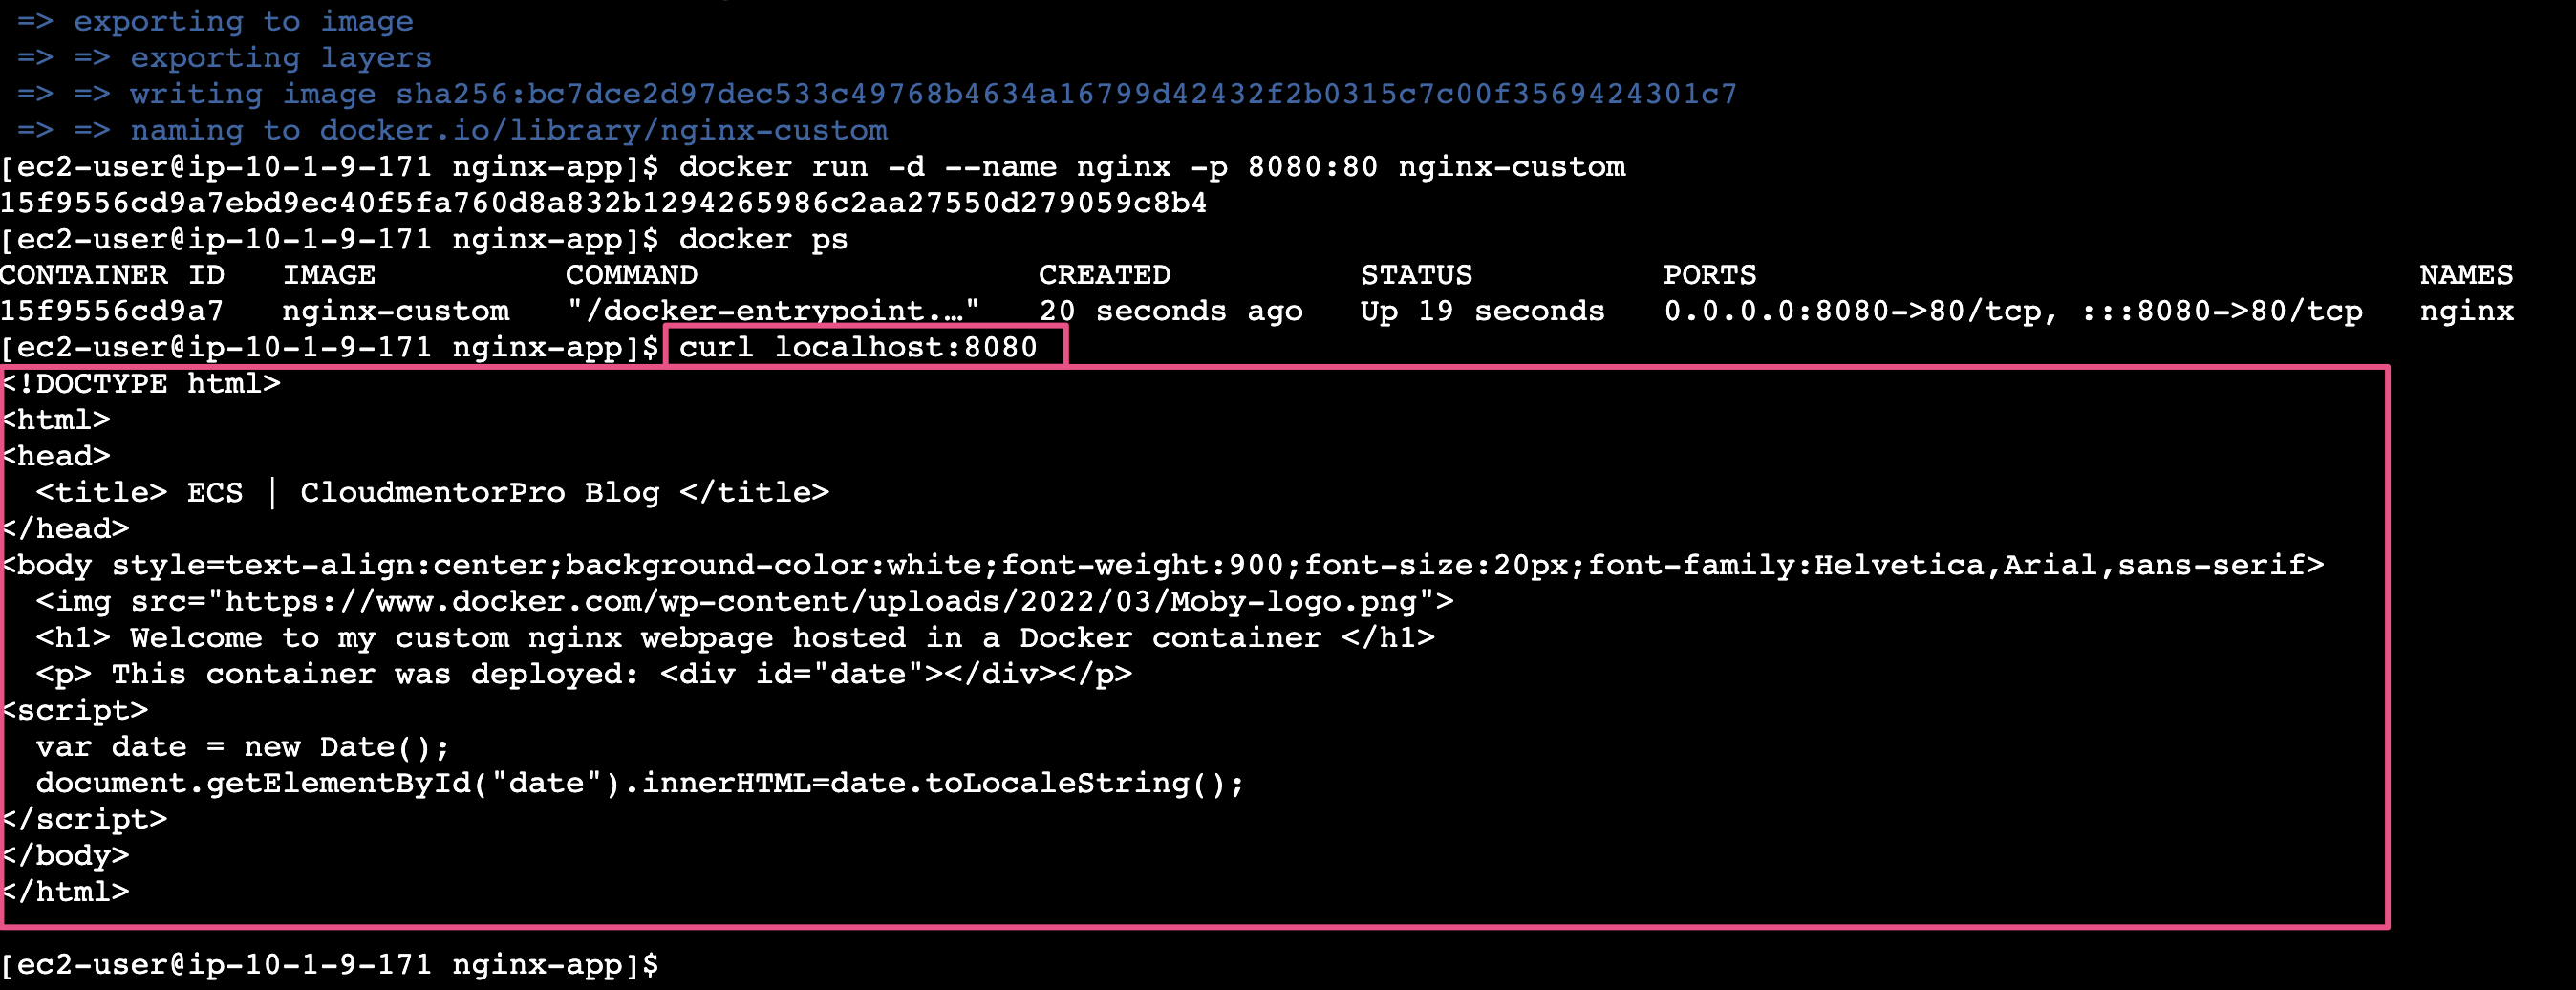
Vậy là chúng ta đã build và test docker image xong. Tiếp theo chúng ta sẽ build và push docker image lên ECR repository
3.3 Connect to Repository
- Tại Console ECR -> Repositories -> Click chọn d-ecr-saa-nginx-custom -> View push commands
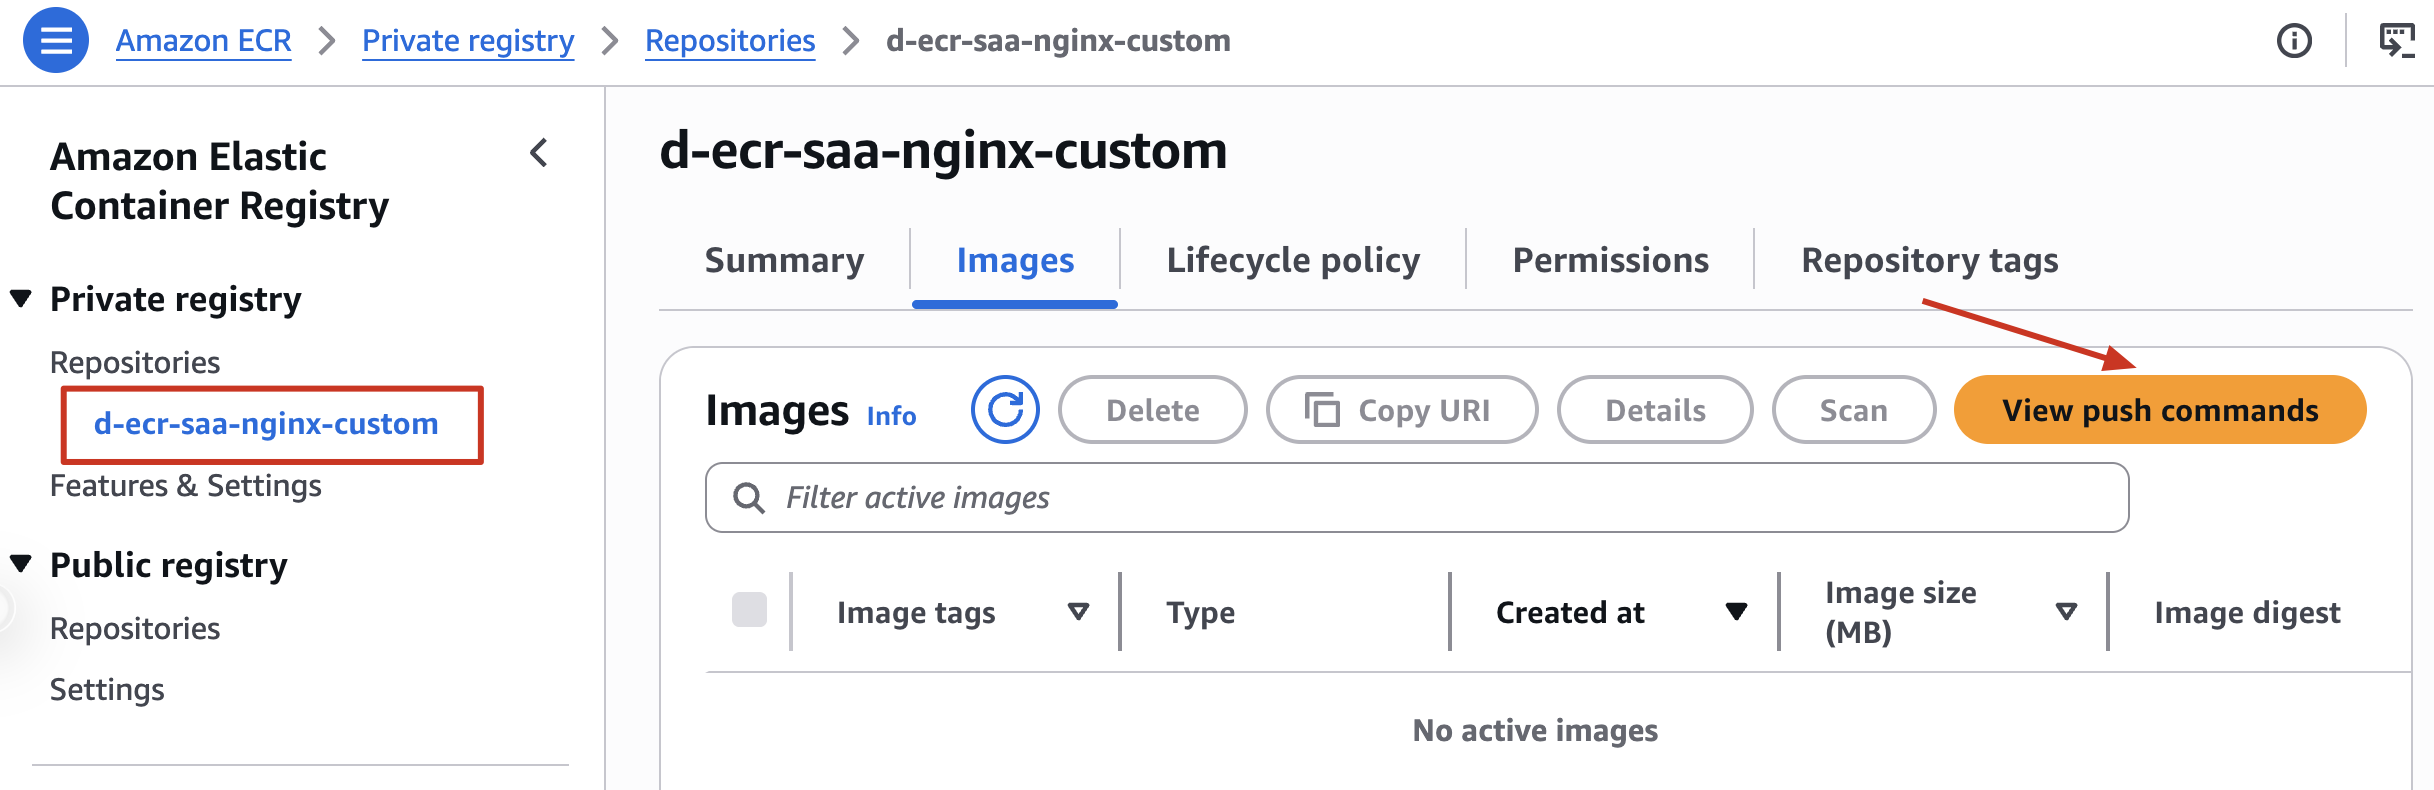
- Copy và chạy lần lượt các command
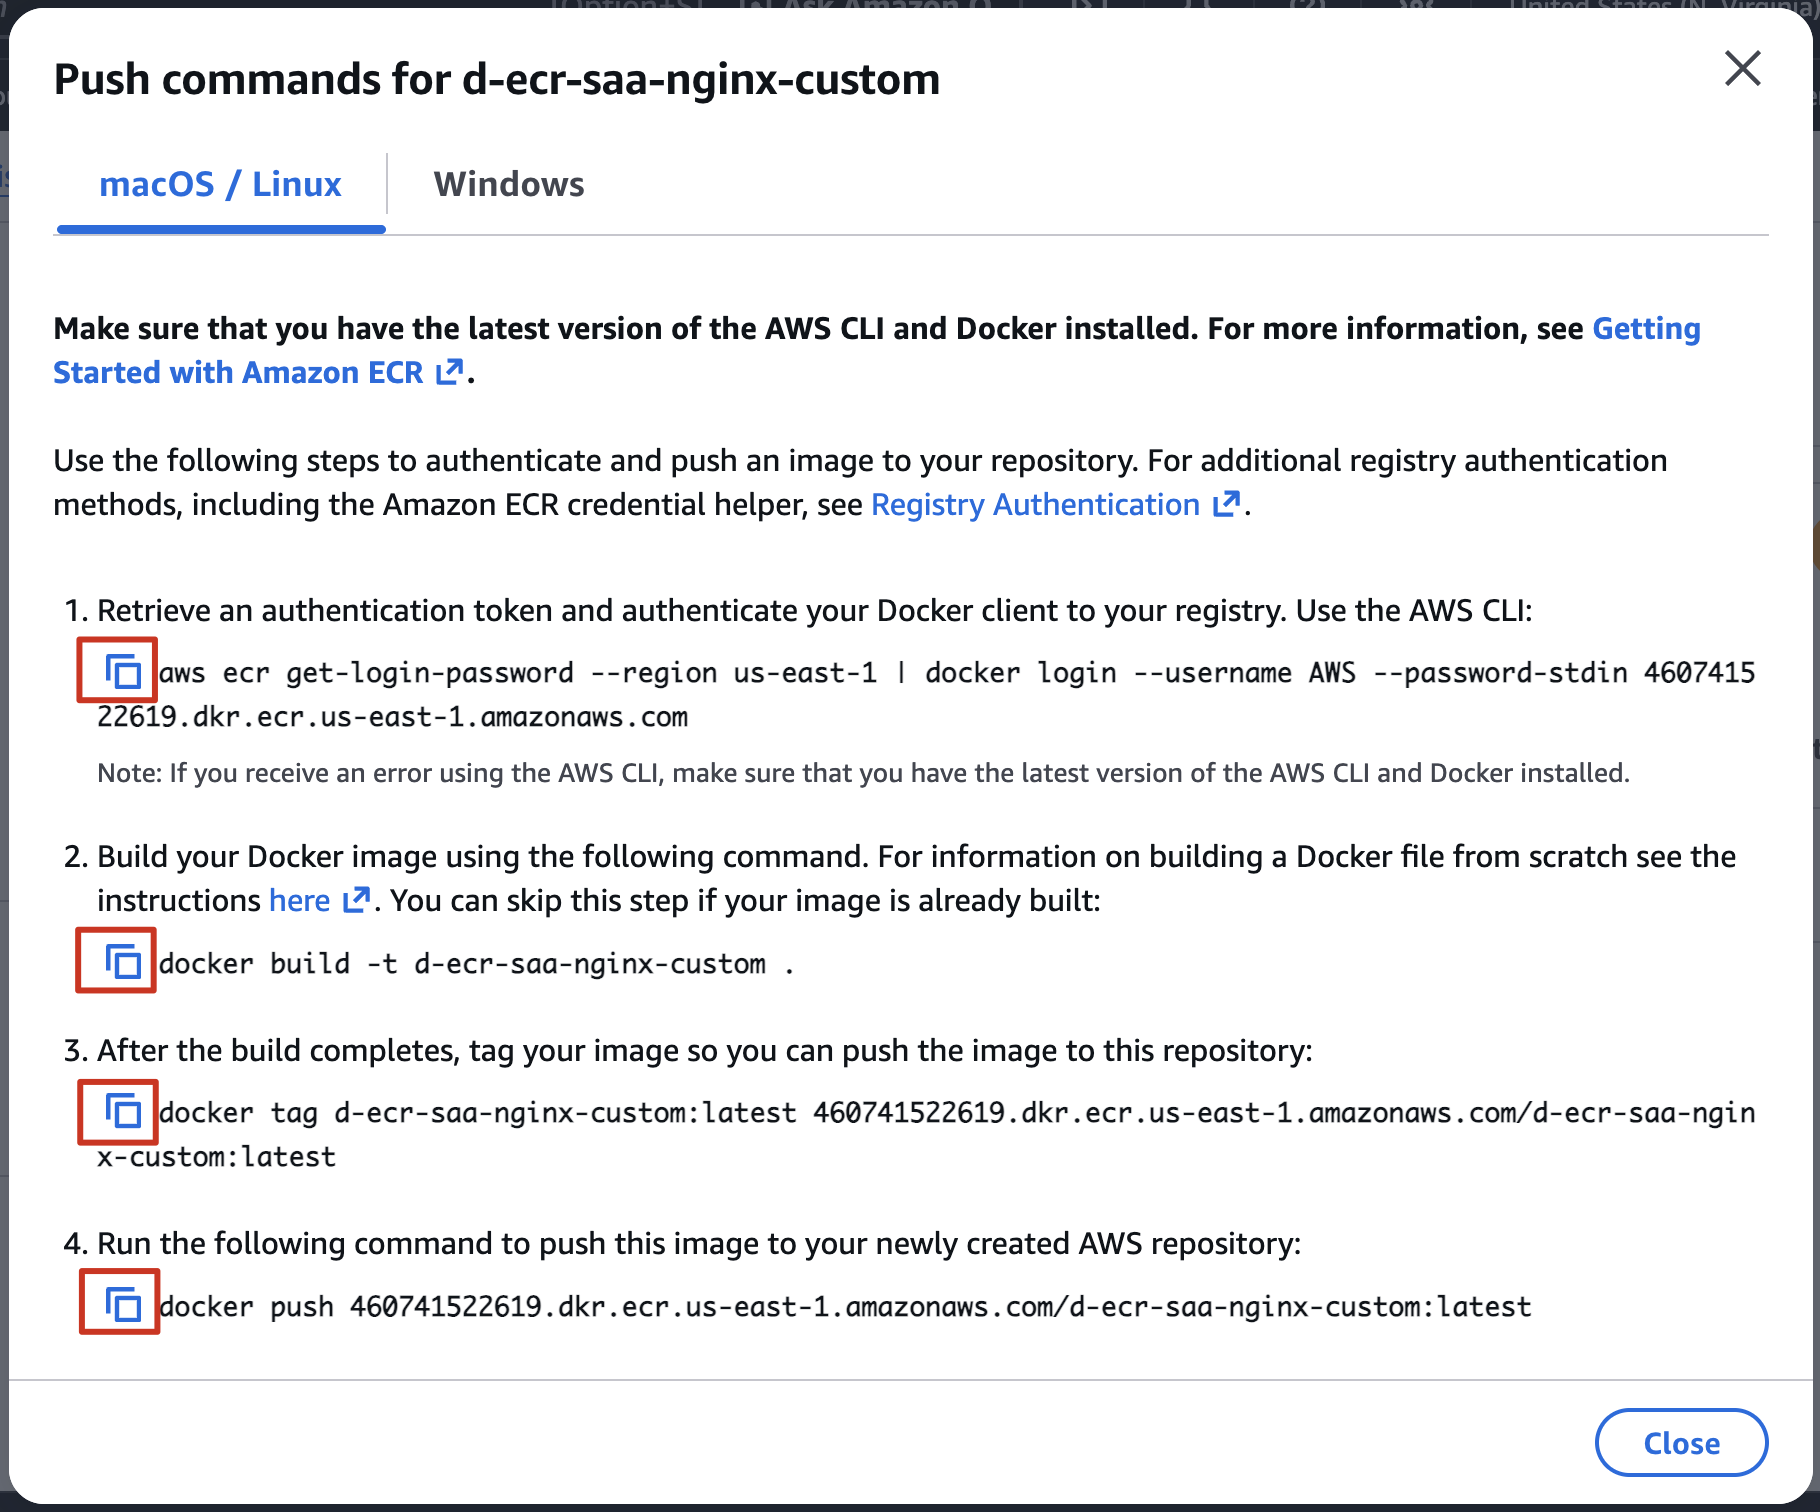
cd nginx-app- Copy command ① and run to login
- Copy command ② and run to build image
- Copy command ③ and run to tag image (có thể thay latest ở cuối command bằng một tag khác như: 20231225_1)
- Copy command ④ and run to push image to ECR (chú ý nếu thay latest ở ③ thì cũng thay tương tự ở command này: 20231225_1)
Note: mỗi lần update application chúng ta sẽ tạo ra 1 docker image với tag khác nhau, và để có thể nhanh chóng roll back về image trước đó, nên việc đặt tag riêng lẻ cho các phiên bản application được recommend.
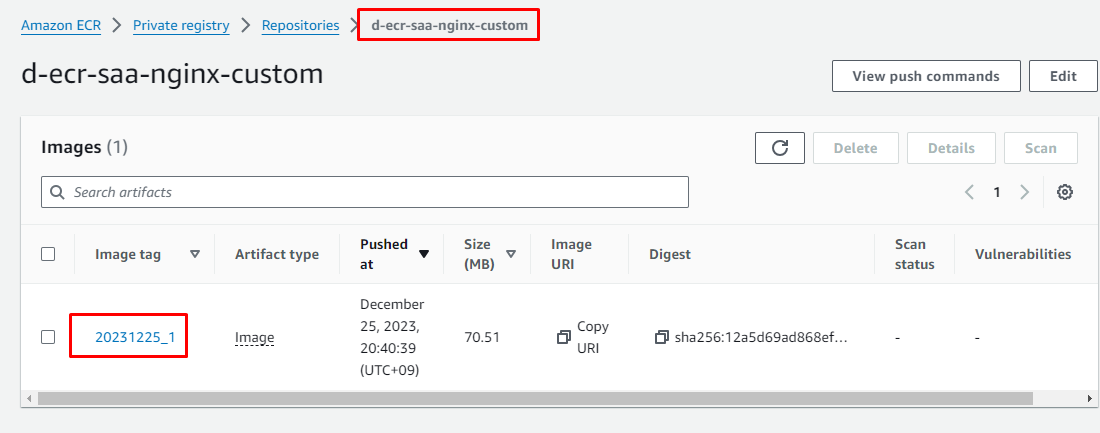
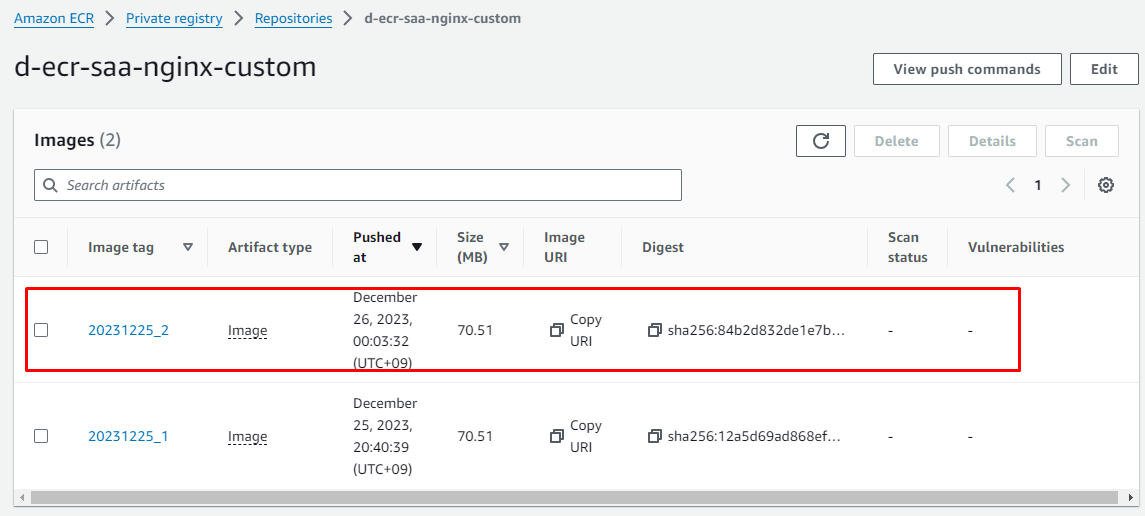
Confirm image had pushed to ECR
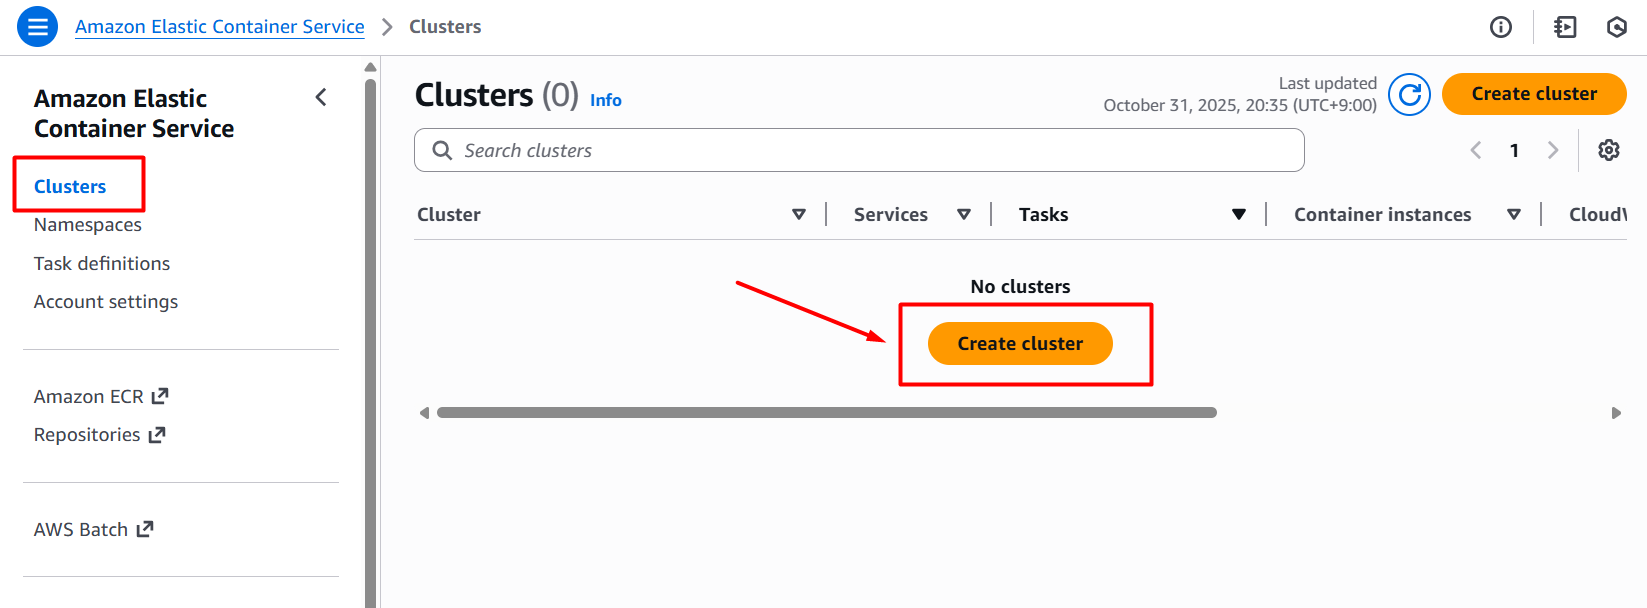
4. Create ECS Cluster
Vào Console Elastic Container Service -> Chọn Clusters -> Create cluster
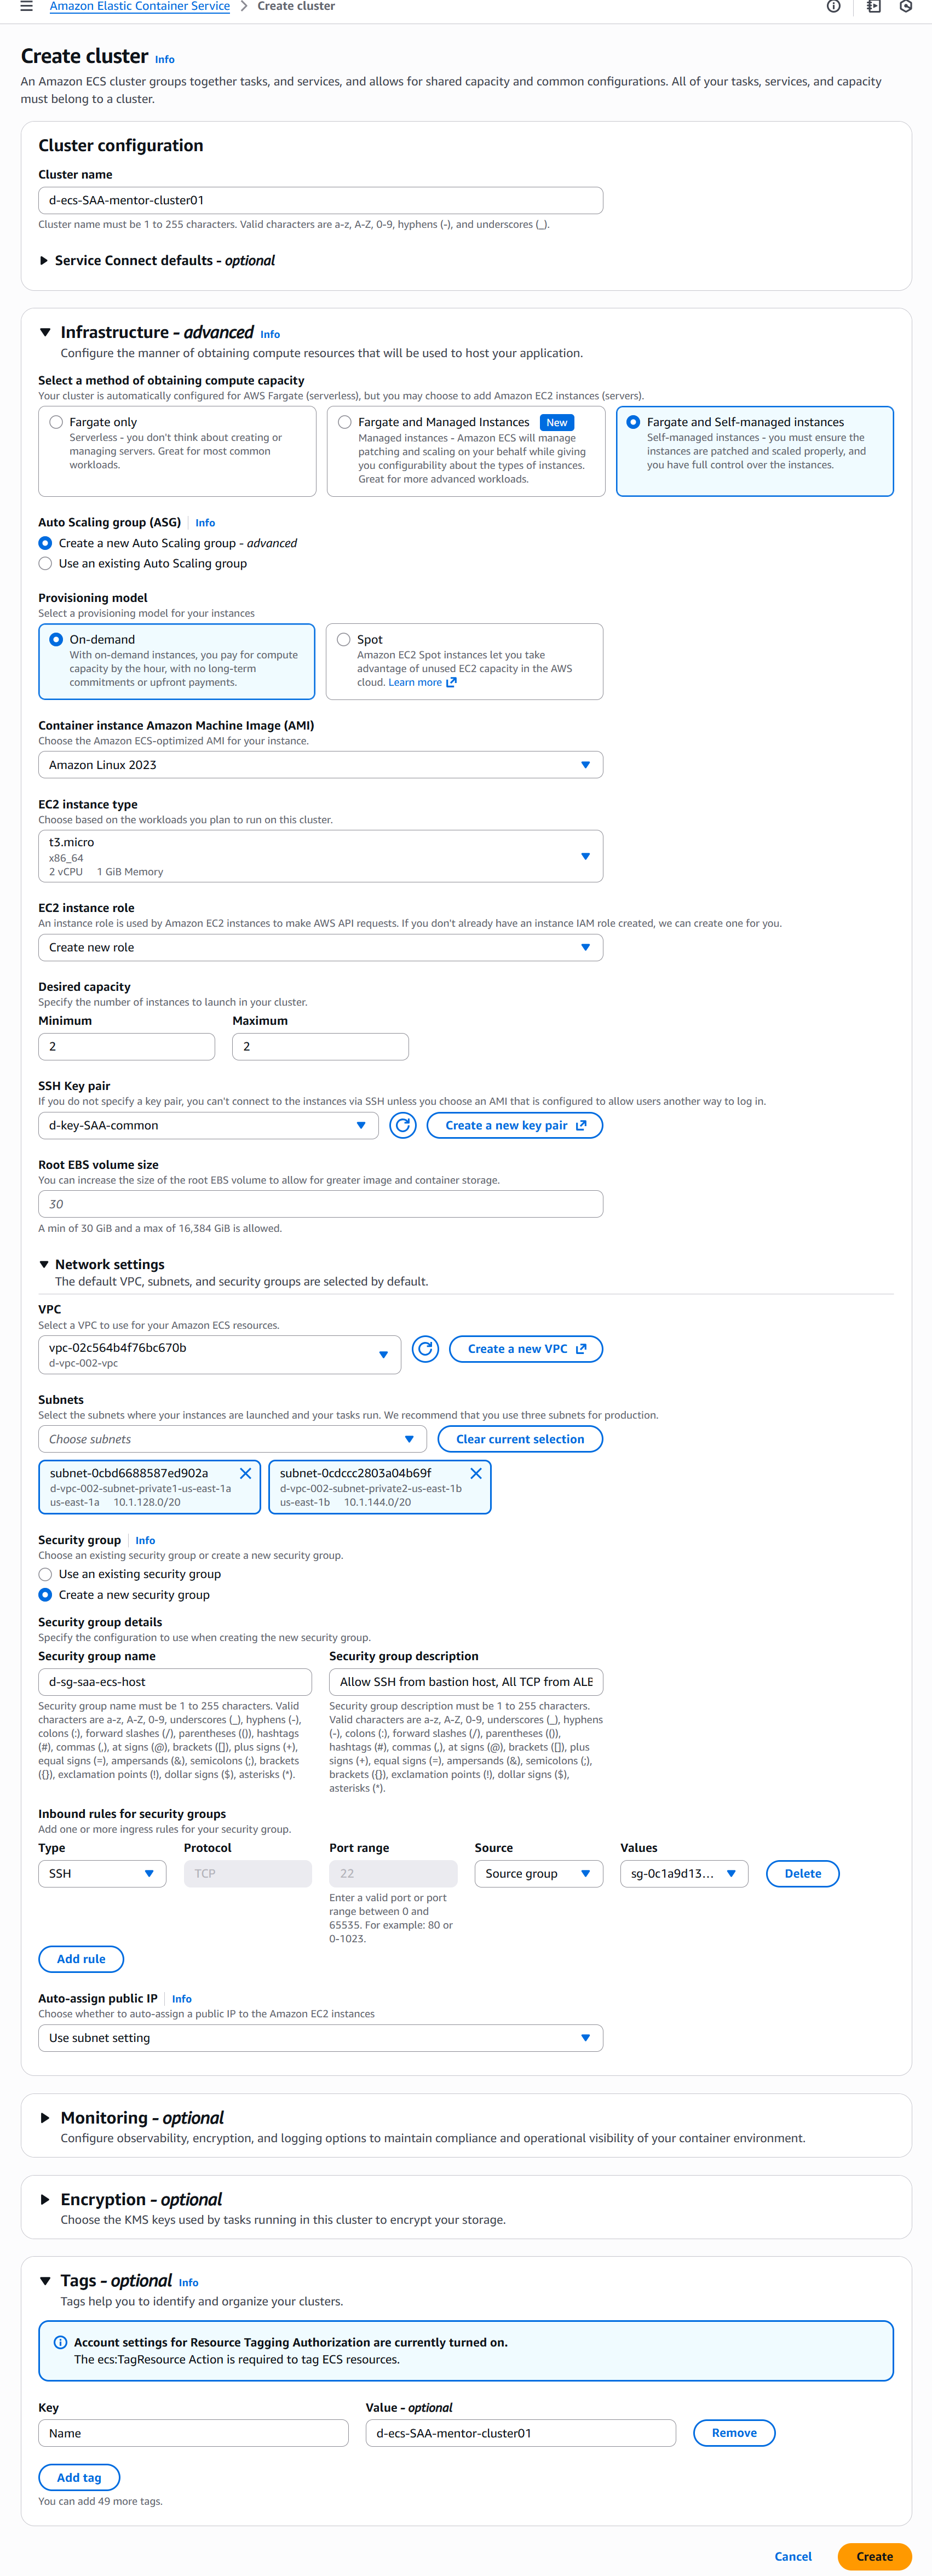
- Cluster configuration
- Cluster name:
d-ecs-SAA-{yourname}-cluster01 - Chú ý: thay tên của mình vào
{yourname}vì Cluster name không được trùng nhau trong cùng Region
- Cluster name:
- Infrastructure - advanced
- Select a method of obtaining compute capacity:
Fargate and Self-managed instances - Auto Scaling group (ASG):
Create a new Auto Scaling group - advanced - Container instance Amazon Machine Image (AMI):
Amazon Linux 2023 - EC2 instance type:
t3.micro - Desired capacity
- Minimum:
2 - Maximum:
2
- Minimum:
- SSH Key pair:
d-key-SAA-common
- Select a method of obtaining compute capacity:
- Network settings
- VPC:
d-vpc-002-vpc - Subnets
d-vpc-002-subnet-private1-us-east-1ad-vpc-002-subnet-private2-us-east-1b
- Security group:
Create a new security group- Security group name:
d-sg-saa-ecs-host - Security group description:
Allow SSH from bastion host, All TCP from ALB - Inbound rule:
Cho phép SSH từ Security group của bastion host
- Security group name:
- VPC:
- Tags: Key:
Name, Value:d-ecs-SAA-{cloudmentor}-cluster01
Hình ảnh minh họa
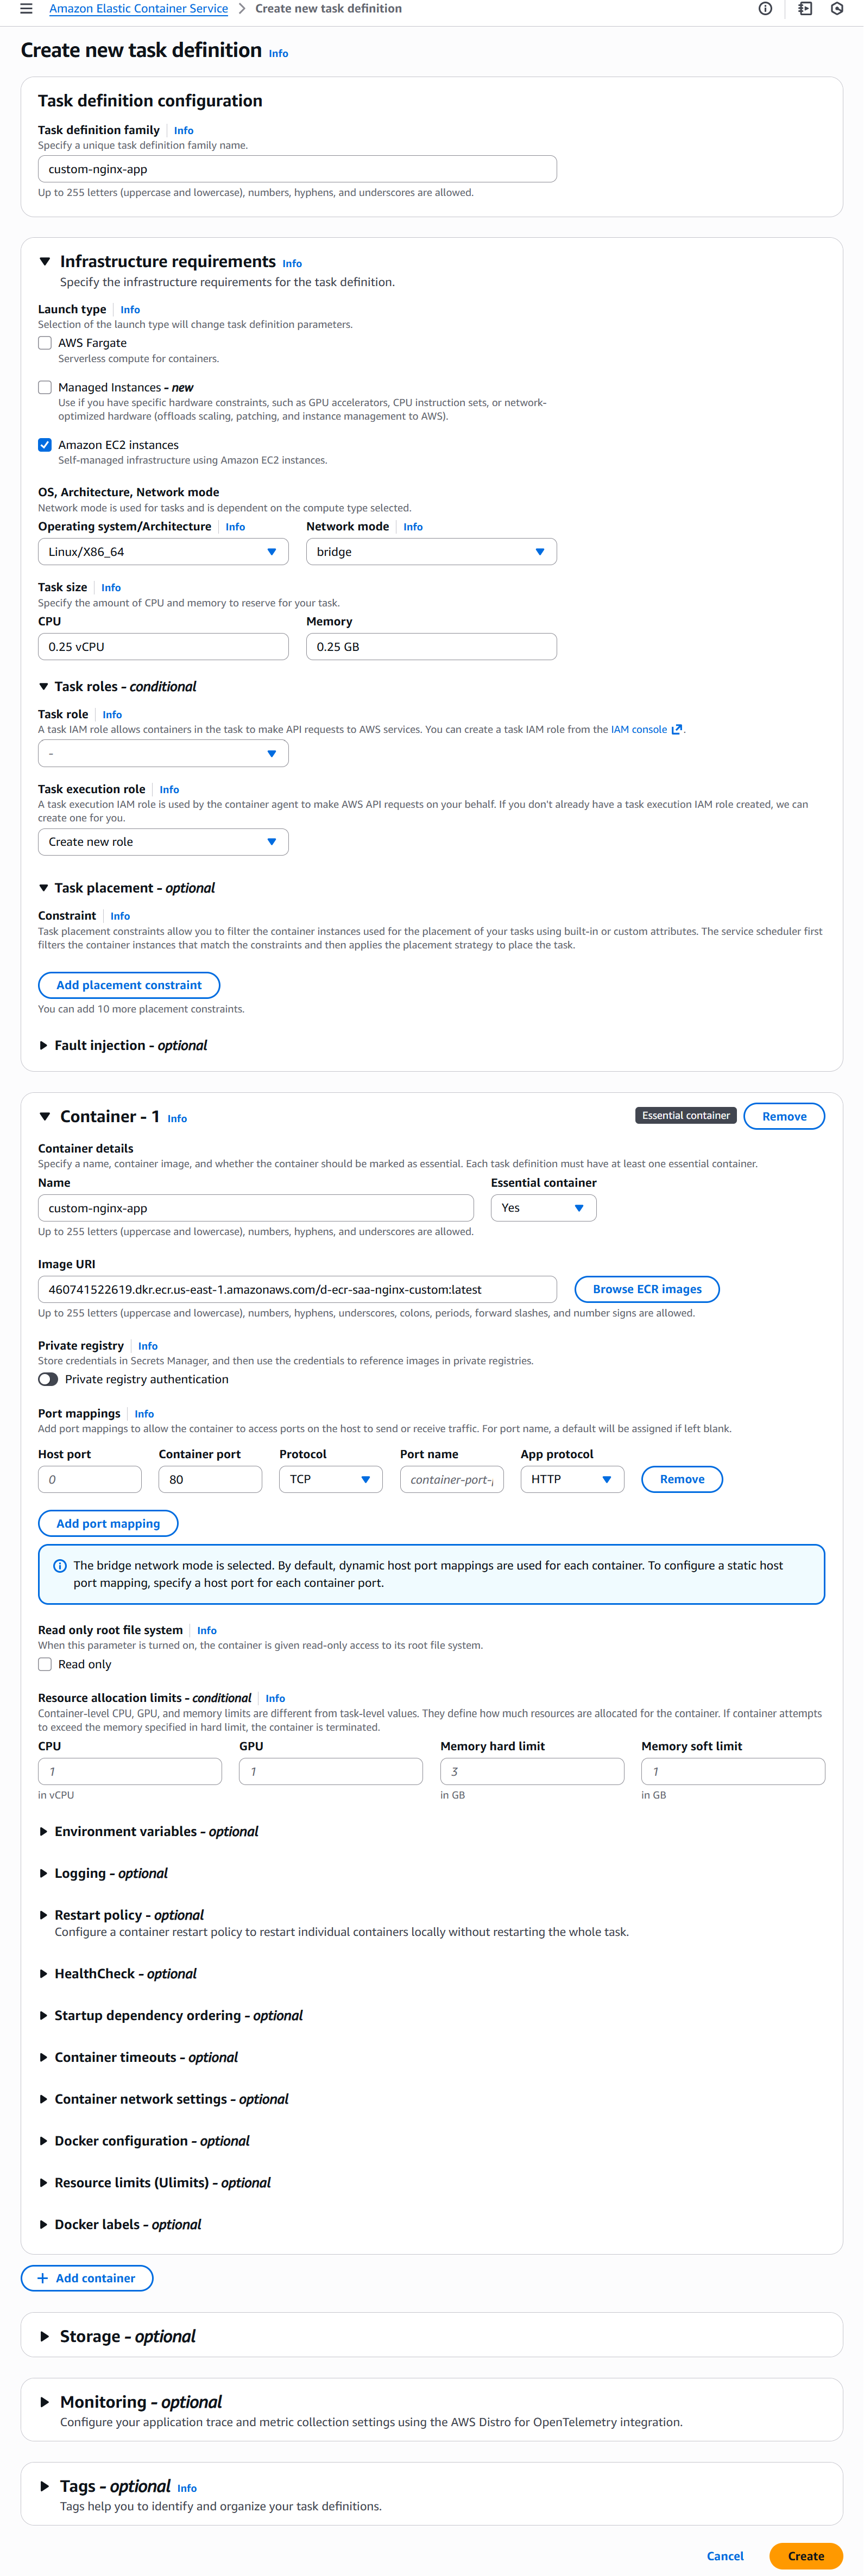
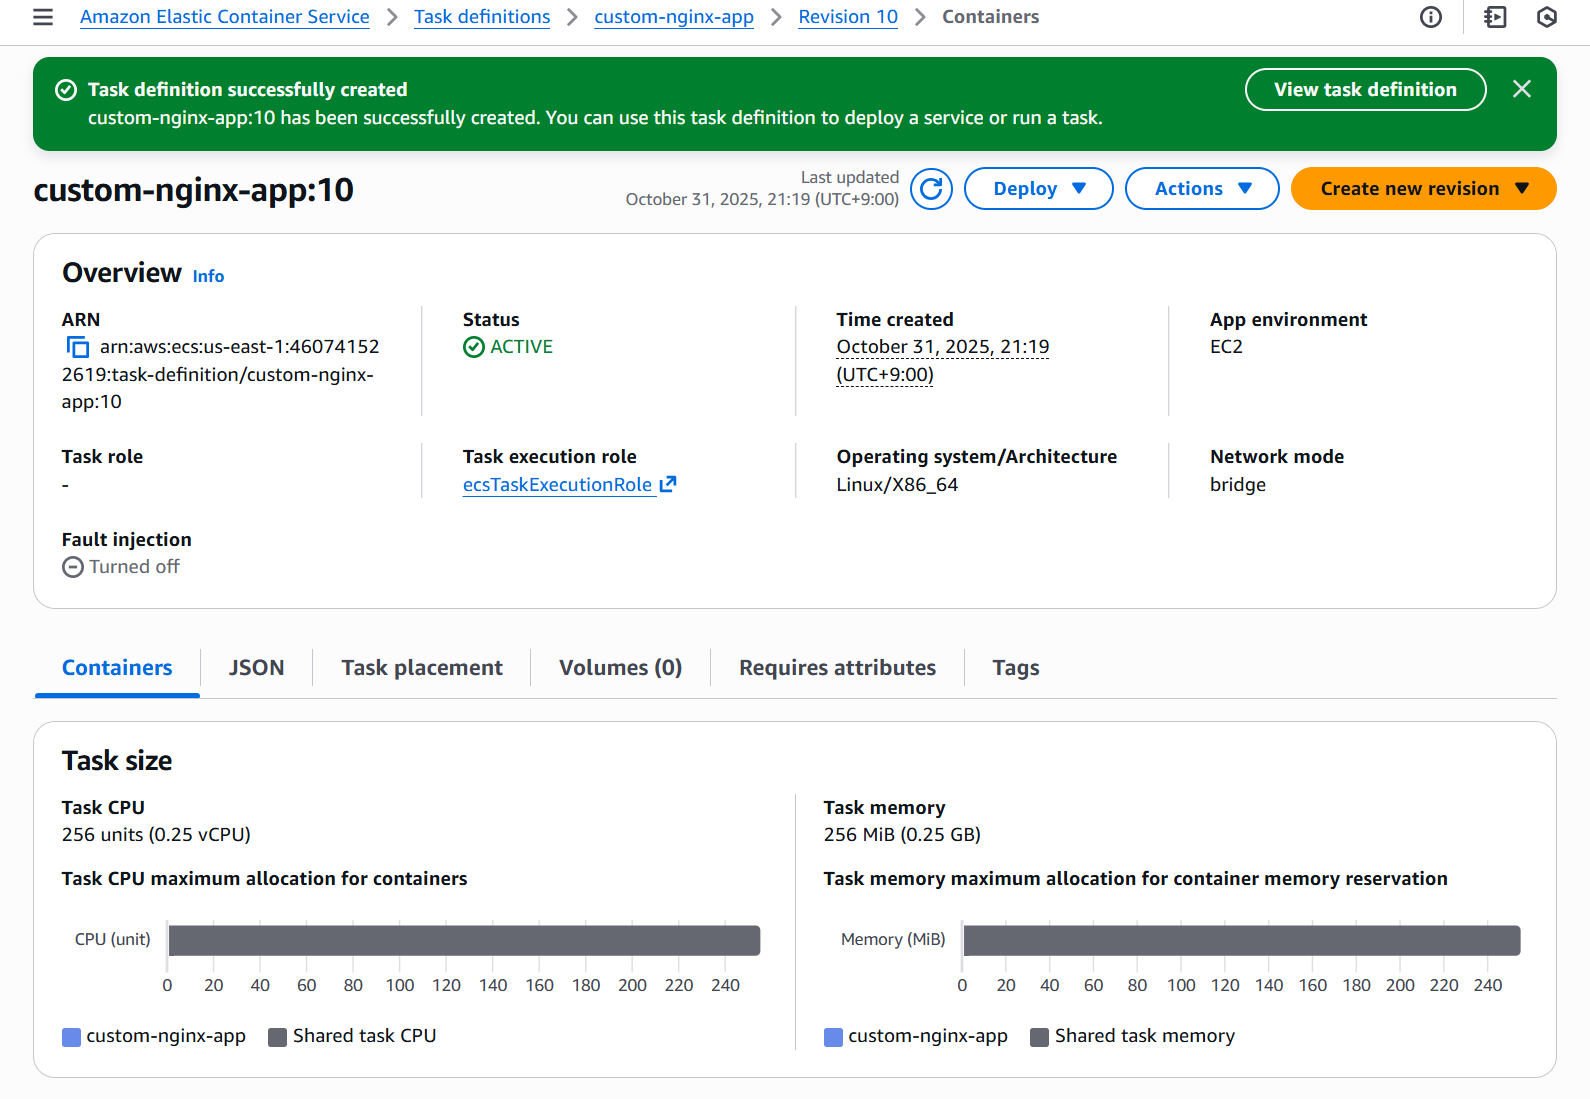
5. Create Task definition
Vào Console Elastic Container Service -> Task definitions -> Create new task definition
- Task definition configuration
- Task definition family:
custom-nginx-app
- Task definition family:
- Infrastructure requirements
- Launch type:
Amazon EC2 instances - Operating system/Architecture:
Linux/X86_64 - Network mode:
bridge - Task size
- CPU:
0.25 vCPU - Memory:
0.25 GB
- CPU:
- Task role:
- - Task execution role:
Create new role
- Launch type:
- Container - 1
- Container details
- Name:
custom-nginx-app - Image URI:
Copy URI từ ECR repository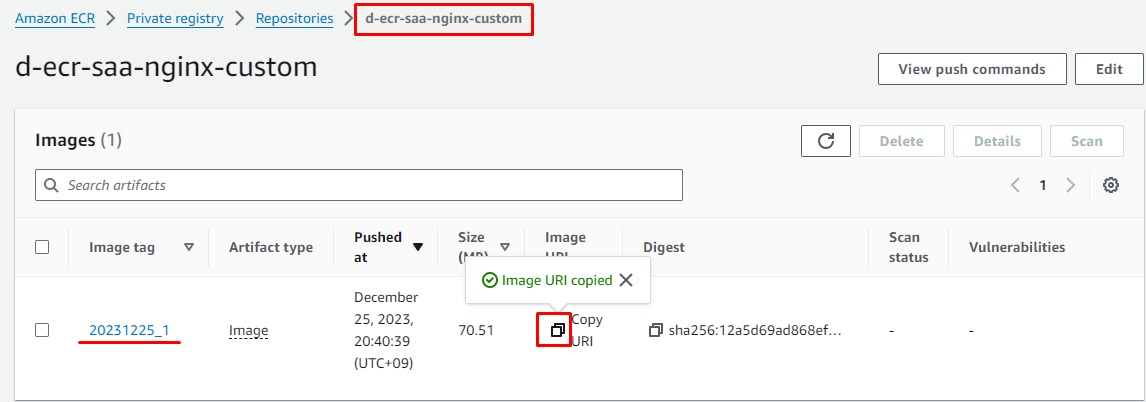
- Name:
- Container details
- Các Setting khác để default
Hình ảnh minh họa
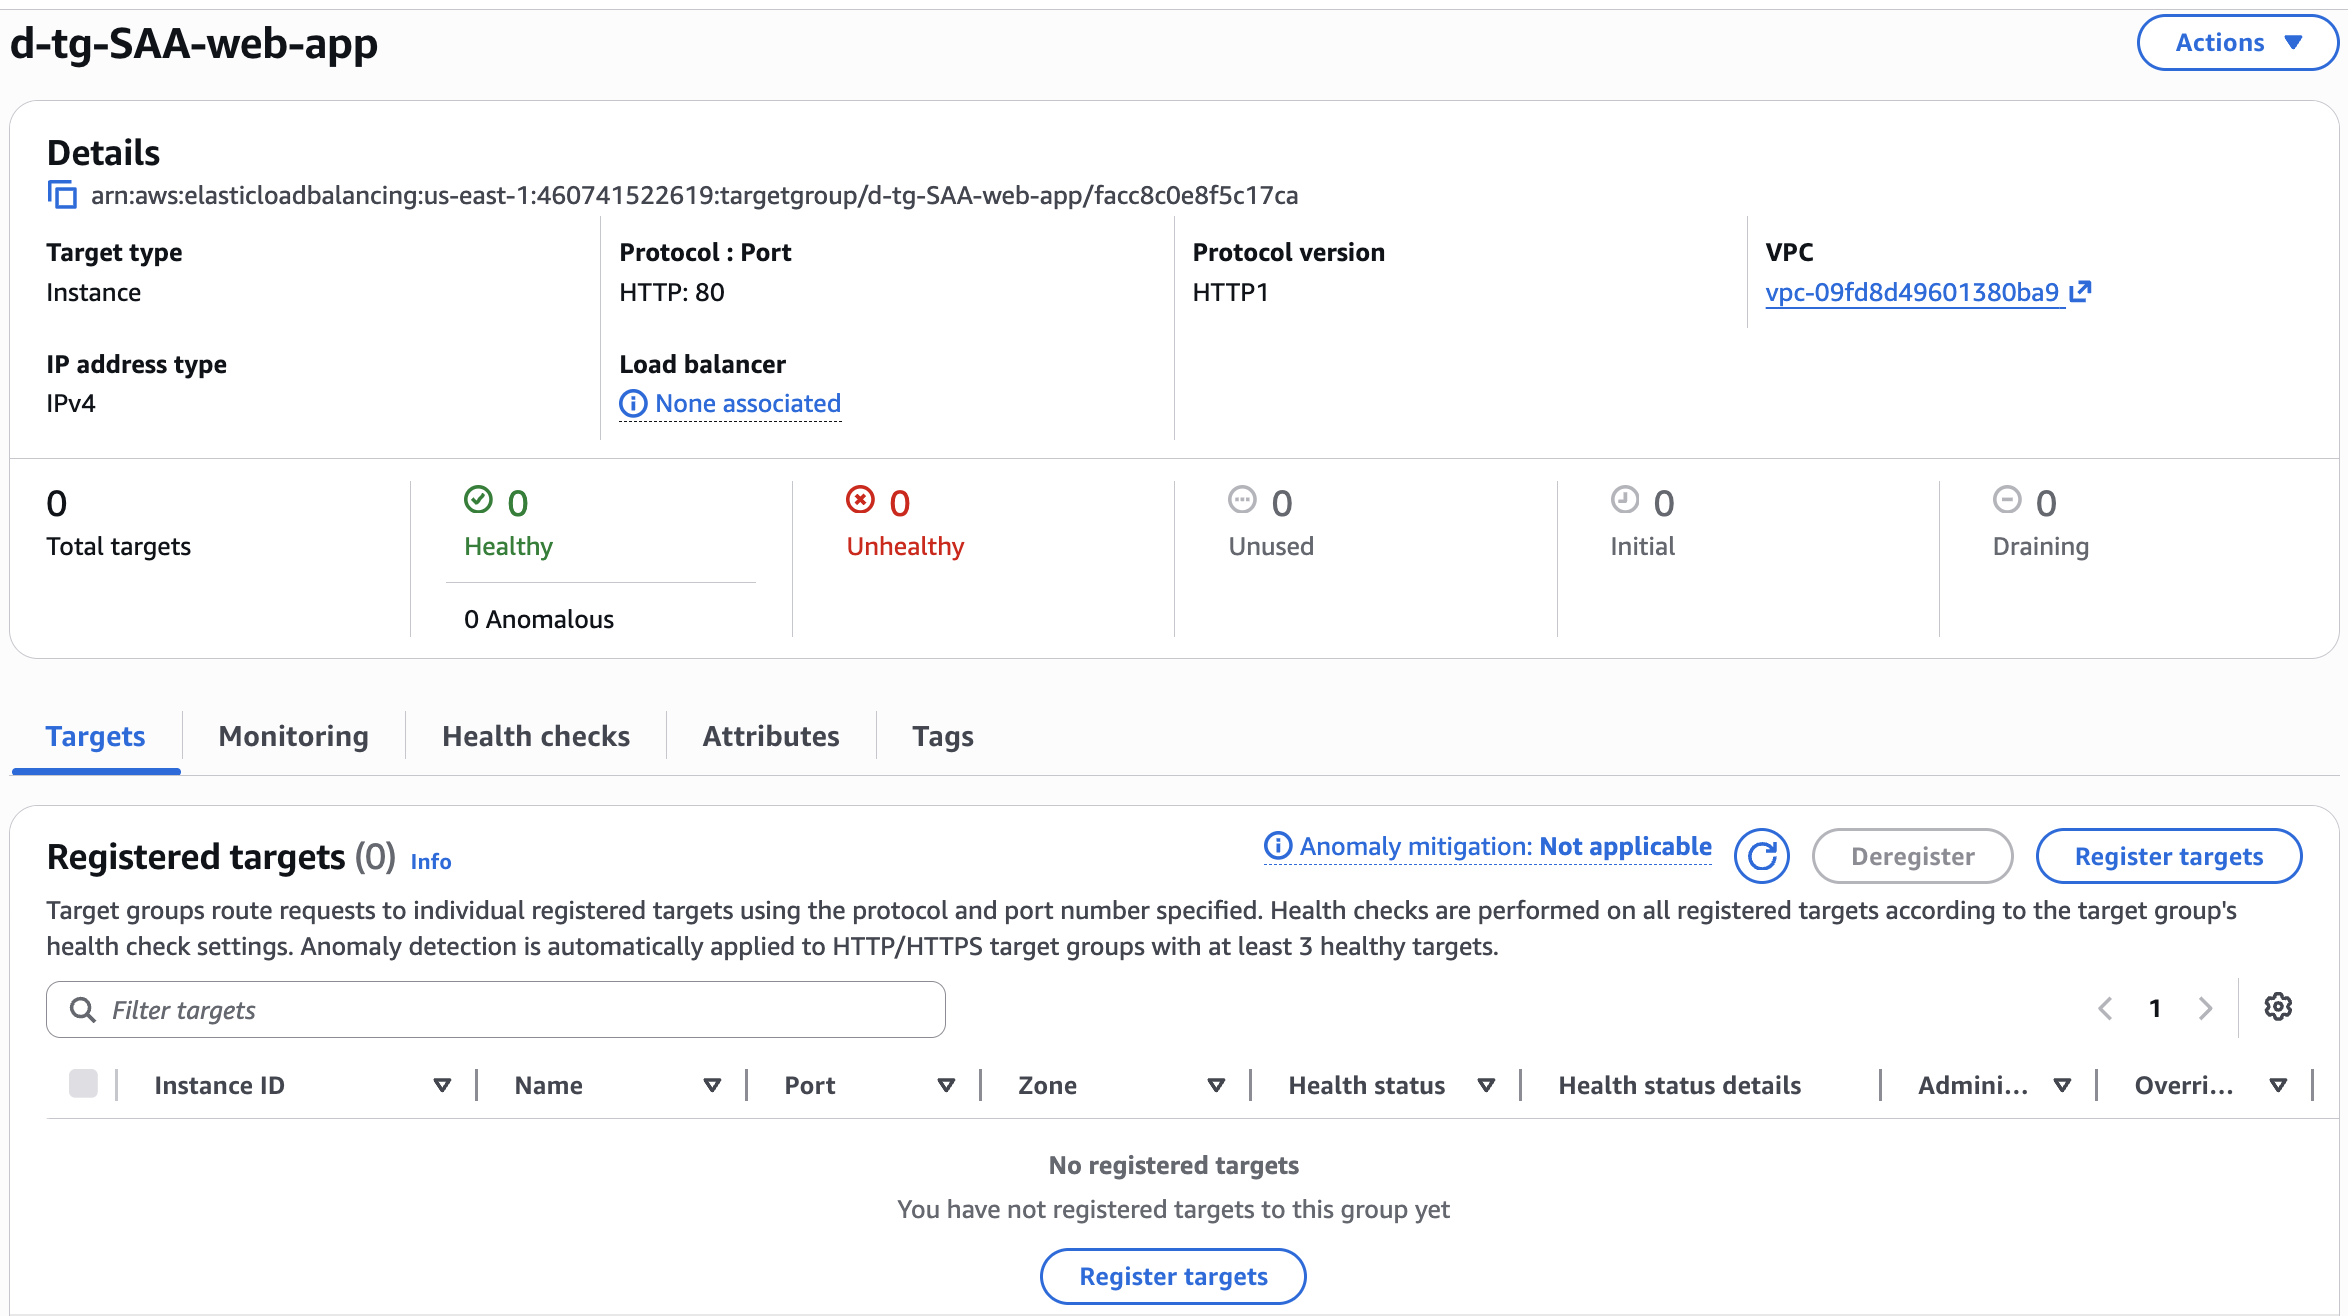
6. Create Target Group
Vào EC2 Console -> Taget Group -> Nhấn Create taget group
- Specify group details
- Choose a target type:
Instances - Target group name:
d-tg-SAA-web-app - Protocol:
HTTP - Port:
80 - VPC:
d-vpc-002-vpc - Tag: Key:
NameValue:d-tg-SAA-web-app - Các setting khác để như default
- Next
- Choose a target type:
- Register targets:
- NOT assign instance
- Create target group
7. Create ALB
7.1 Create SG for ALB
- Name:
d-sg-SAA-ecs-alb - Description:
Allow http from internet - VPC:
d-vpc-002-vpc - Inbound rules
Type Protocol Port range Source HTTP TCP 80 0.0.0.0/0 - Outbound rules
Type Protocol Port range Source All traffic All All 0.0.0.0/0 - Tags
Key value Name d-sg-SAA-ecs-alb
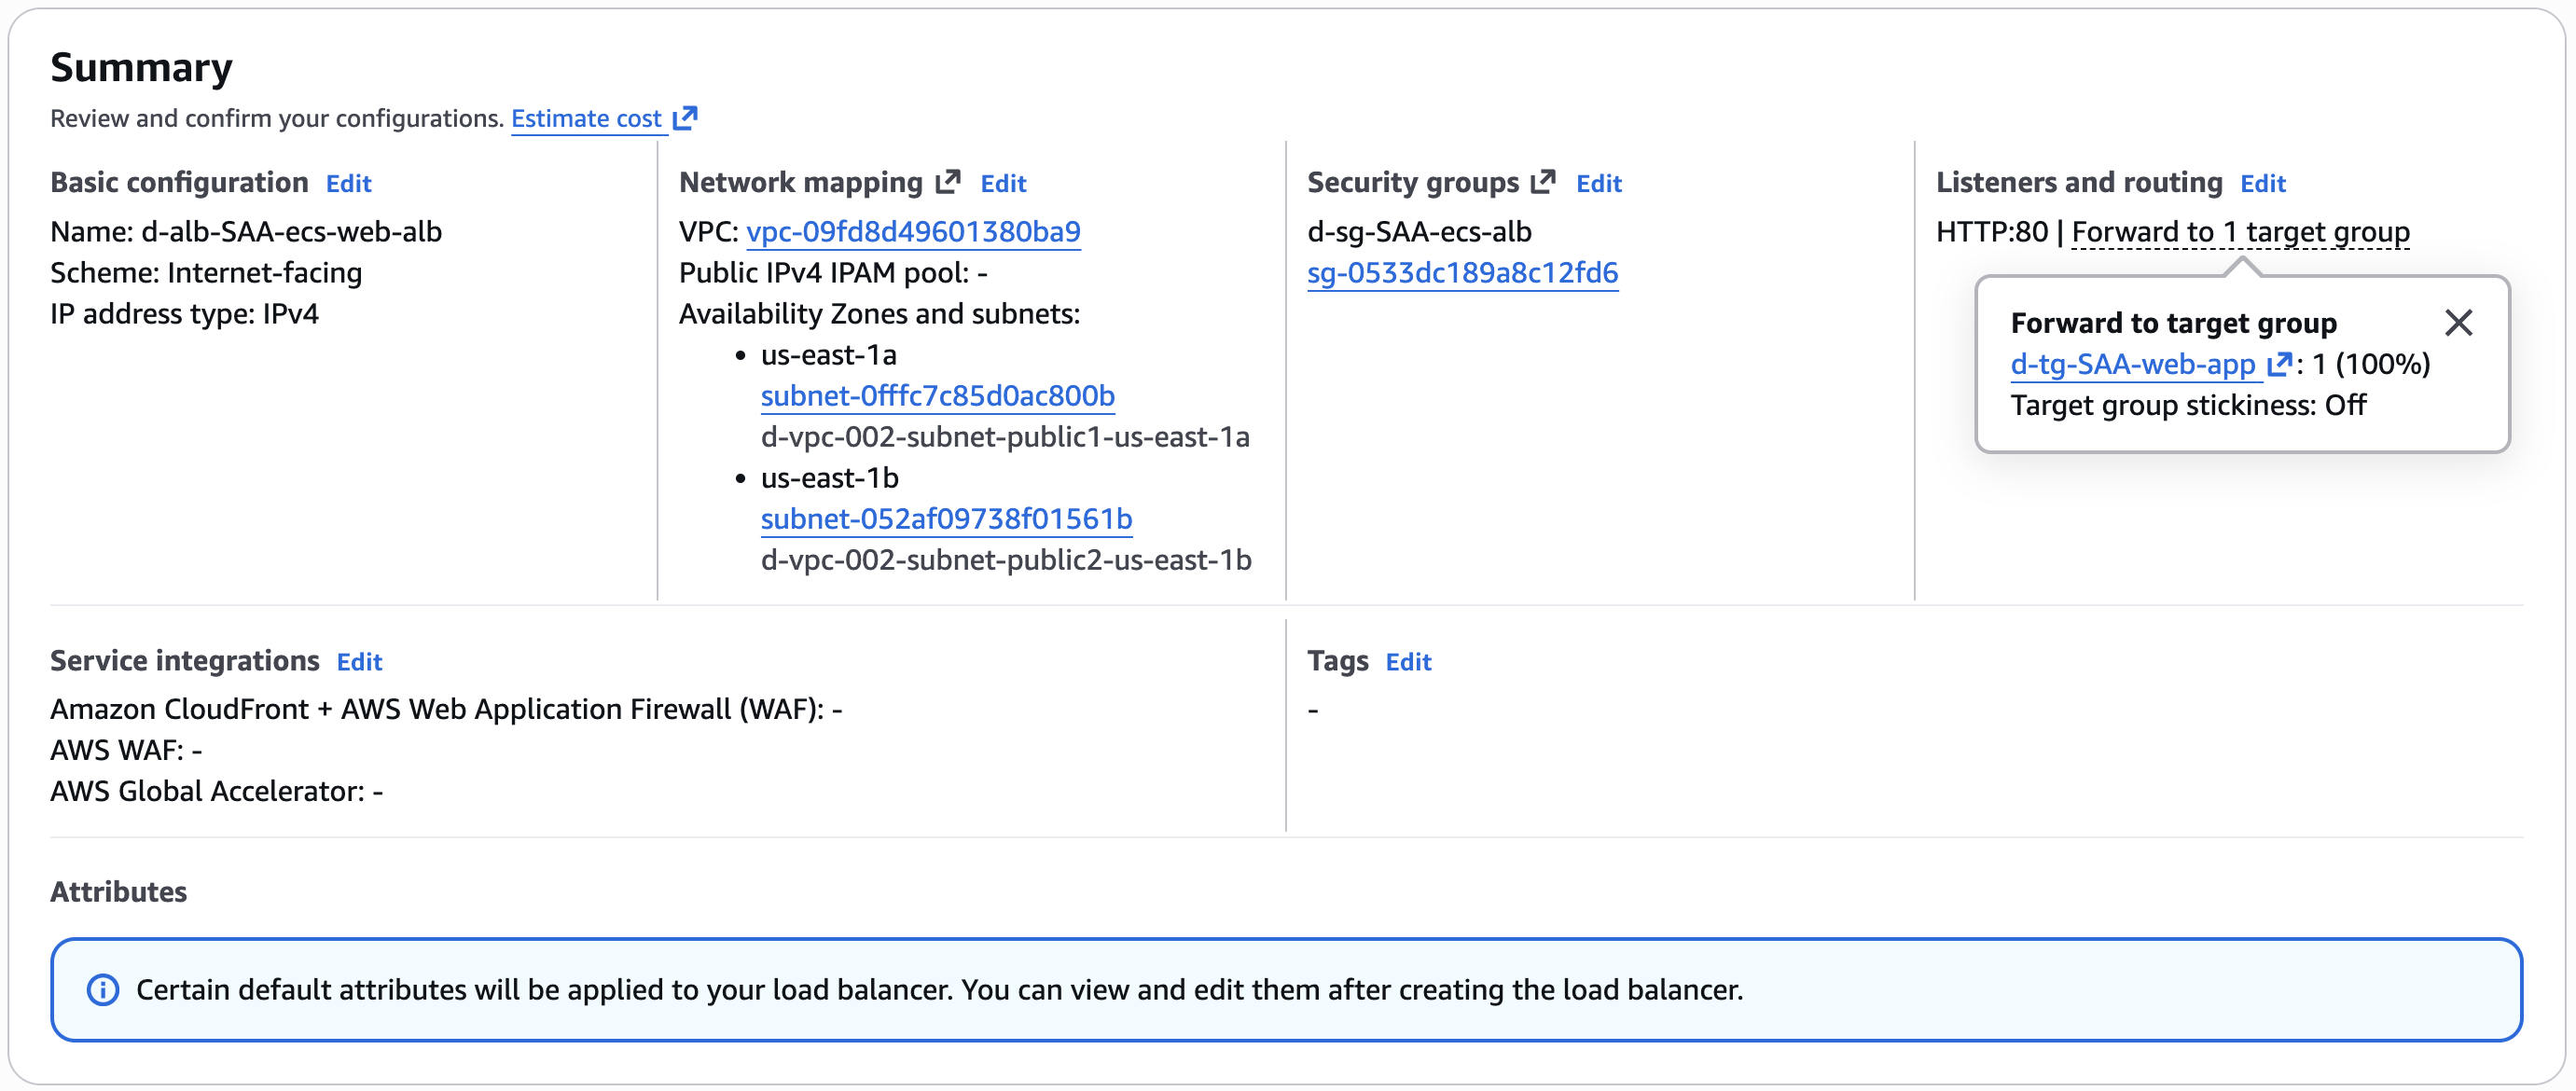
7.2 Create Application Load Balancer
Vào EC2 Console -> Load Balancers
- Chọn create Application Load Balancer
- Basic configuration
- Load balancer name:
d-alb-SAA-ecs-web-alb - Scheme:
Internet-facing - IP address type:
IPv4
- Load balancer name:
- Network mapping
- VPC: Chọn
d-vpc-002-vpc - Mappings:
- Check
us-east-1a-> Check...public1... - Check
us-east-1b-> Check...public2...
- Check
- VPC: Chọn
- Security groups:
d-sg-SAA-ecs-alb - Listeners and routing
- Protocol:
HTTP - Port:
80 - Default action: Chọn Taget group
d-tg-SAA-web-server
- Protocol:
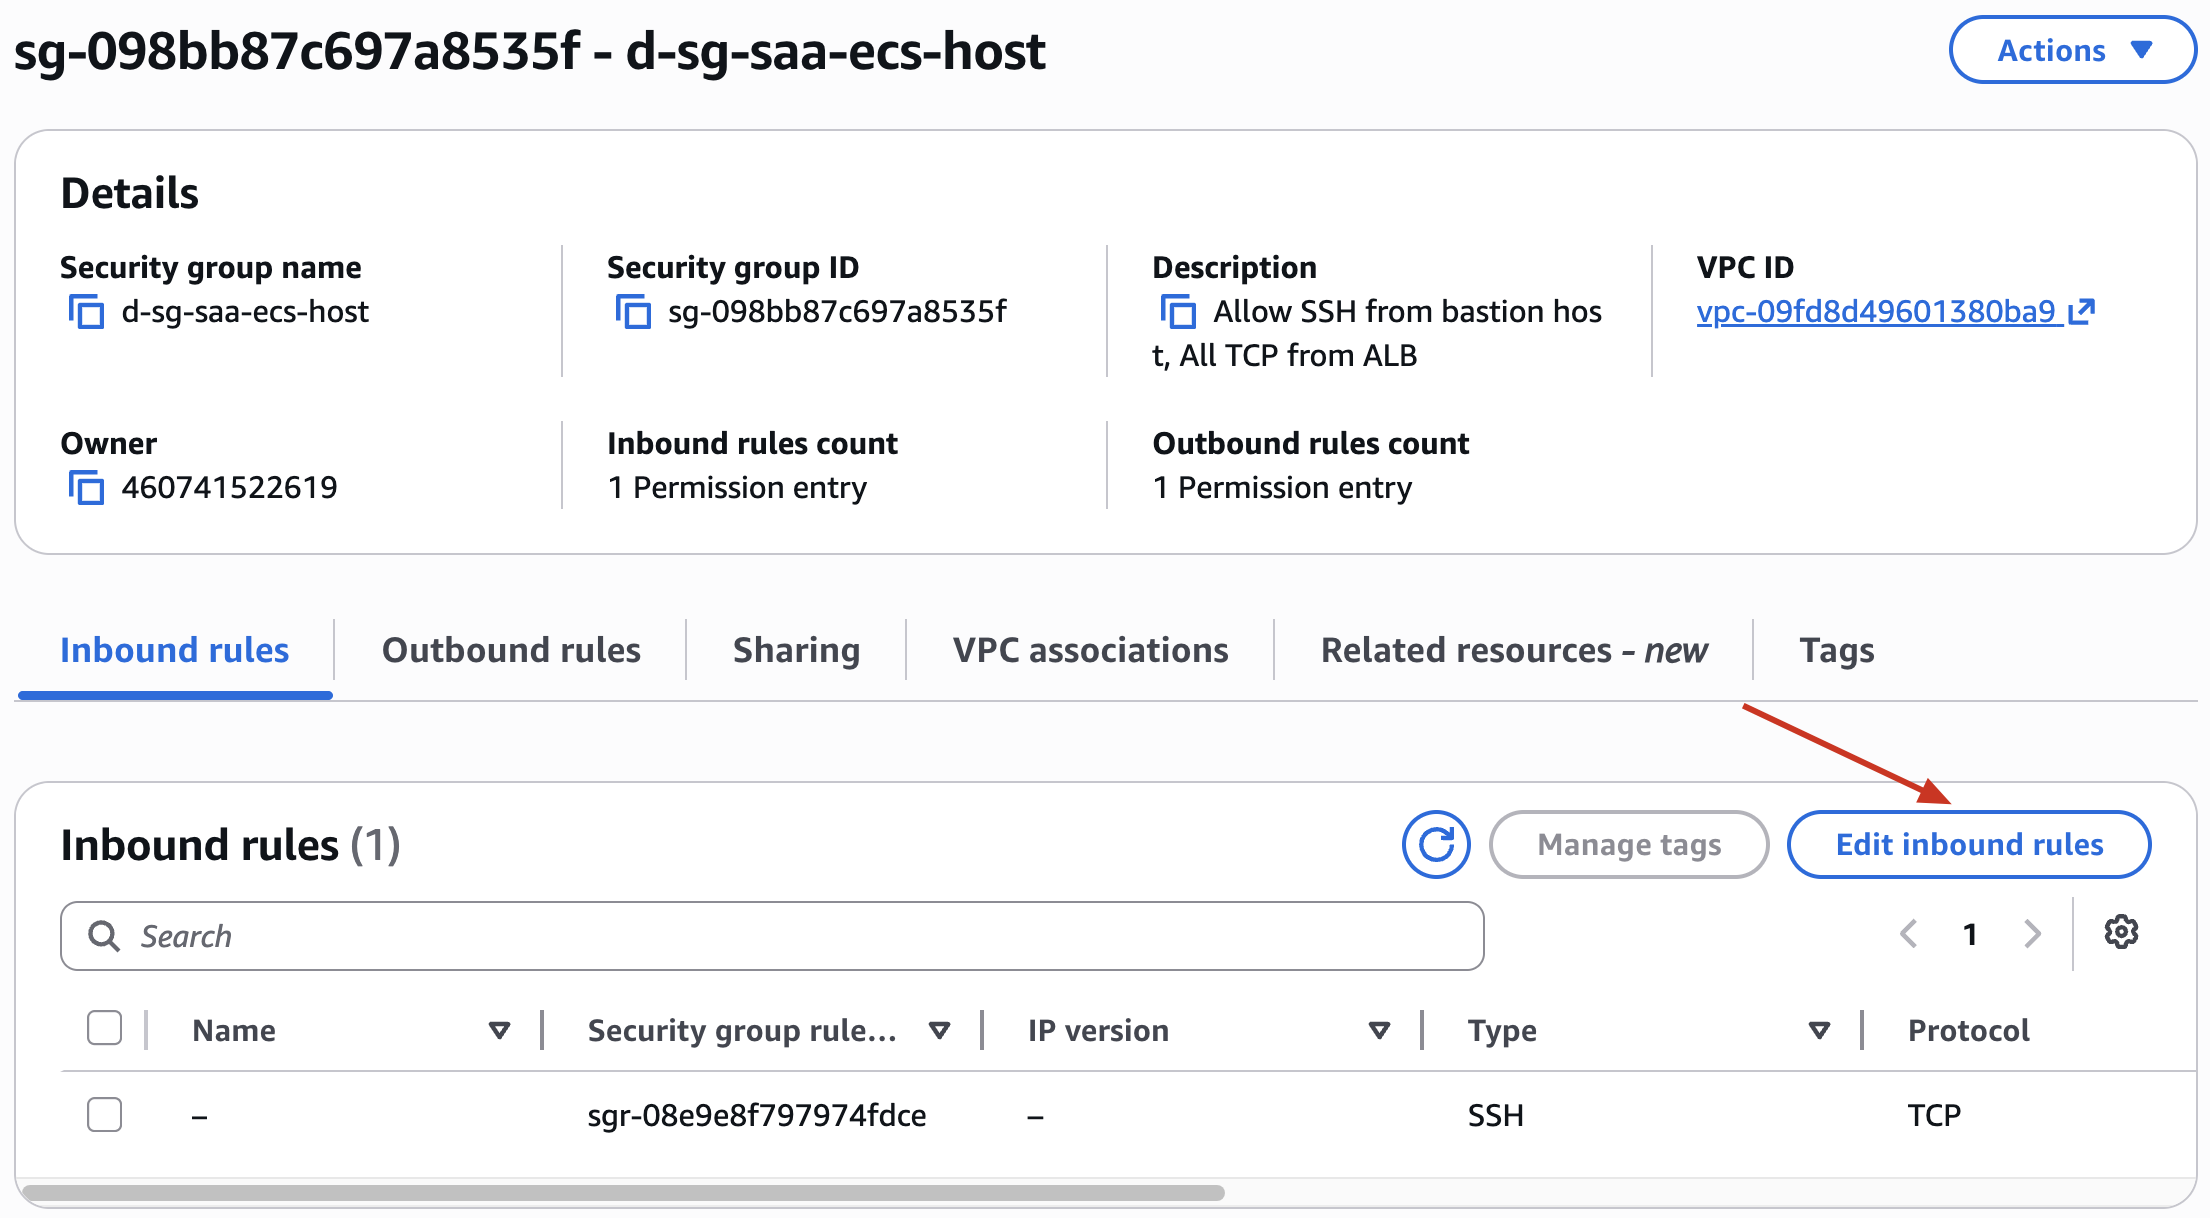
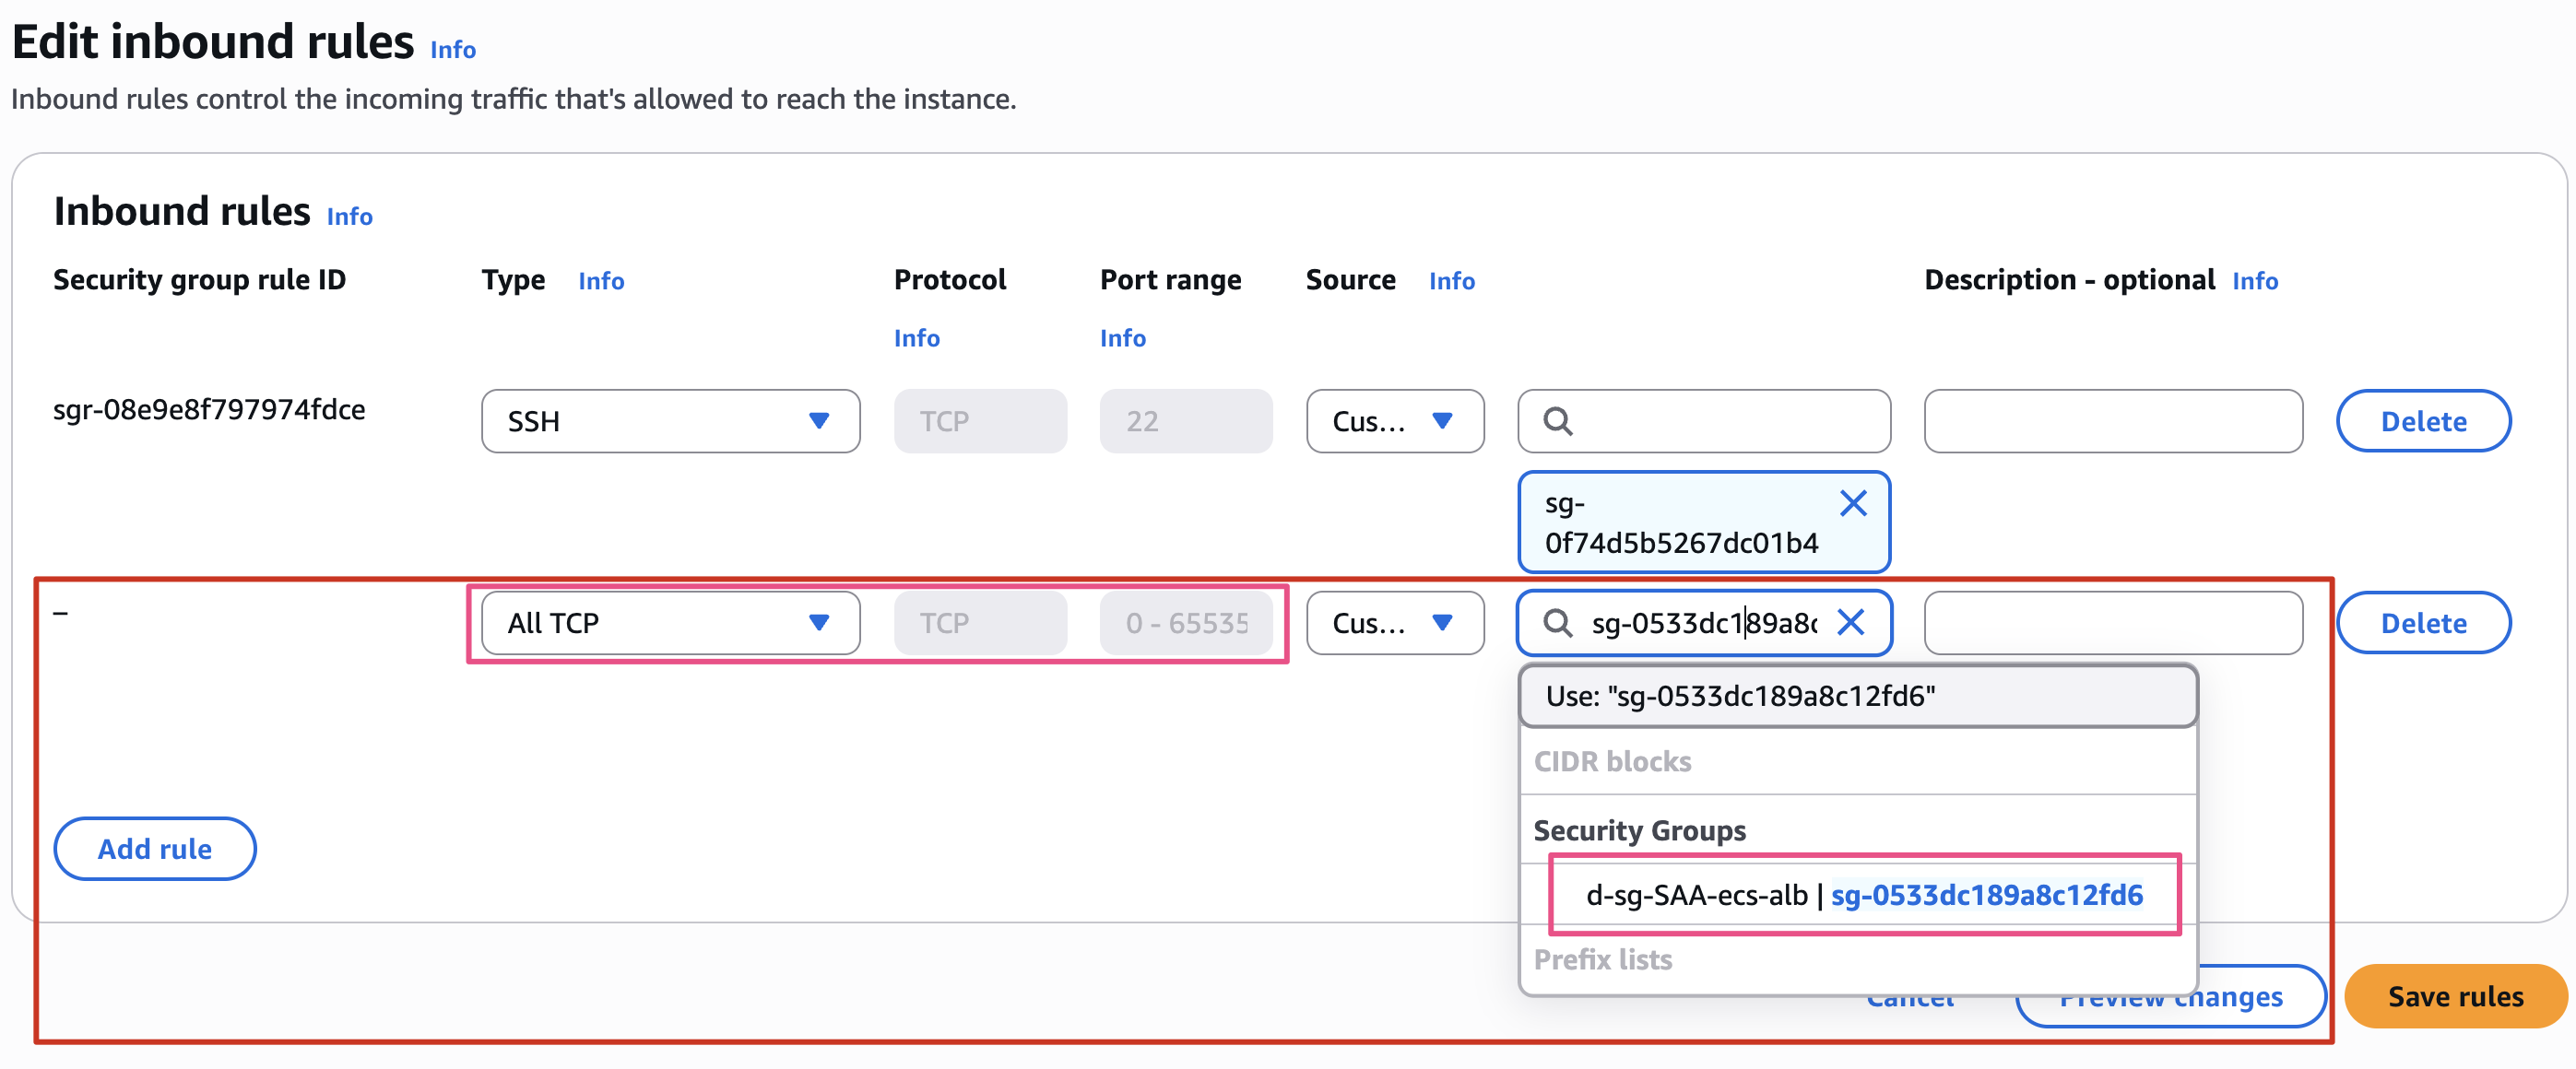
7.3 Modify SG of EC2 (Docker host)
Theo cơ chế dynamic port mapping khi chúng ta chạy nhiều task port 80 trên 2 EC2 (Docker host).
Trước khi đi vào port 80 thì ALB sẽ access đến EC2 1 port được sinh ra tự động, vì chúng ta không thể biết ALB acces đến EC2 port nào nên phải Allow All TCP.
- Edit Inbound Rule của SG
d-sg-saa-ecs-host
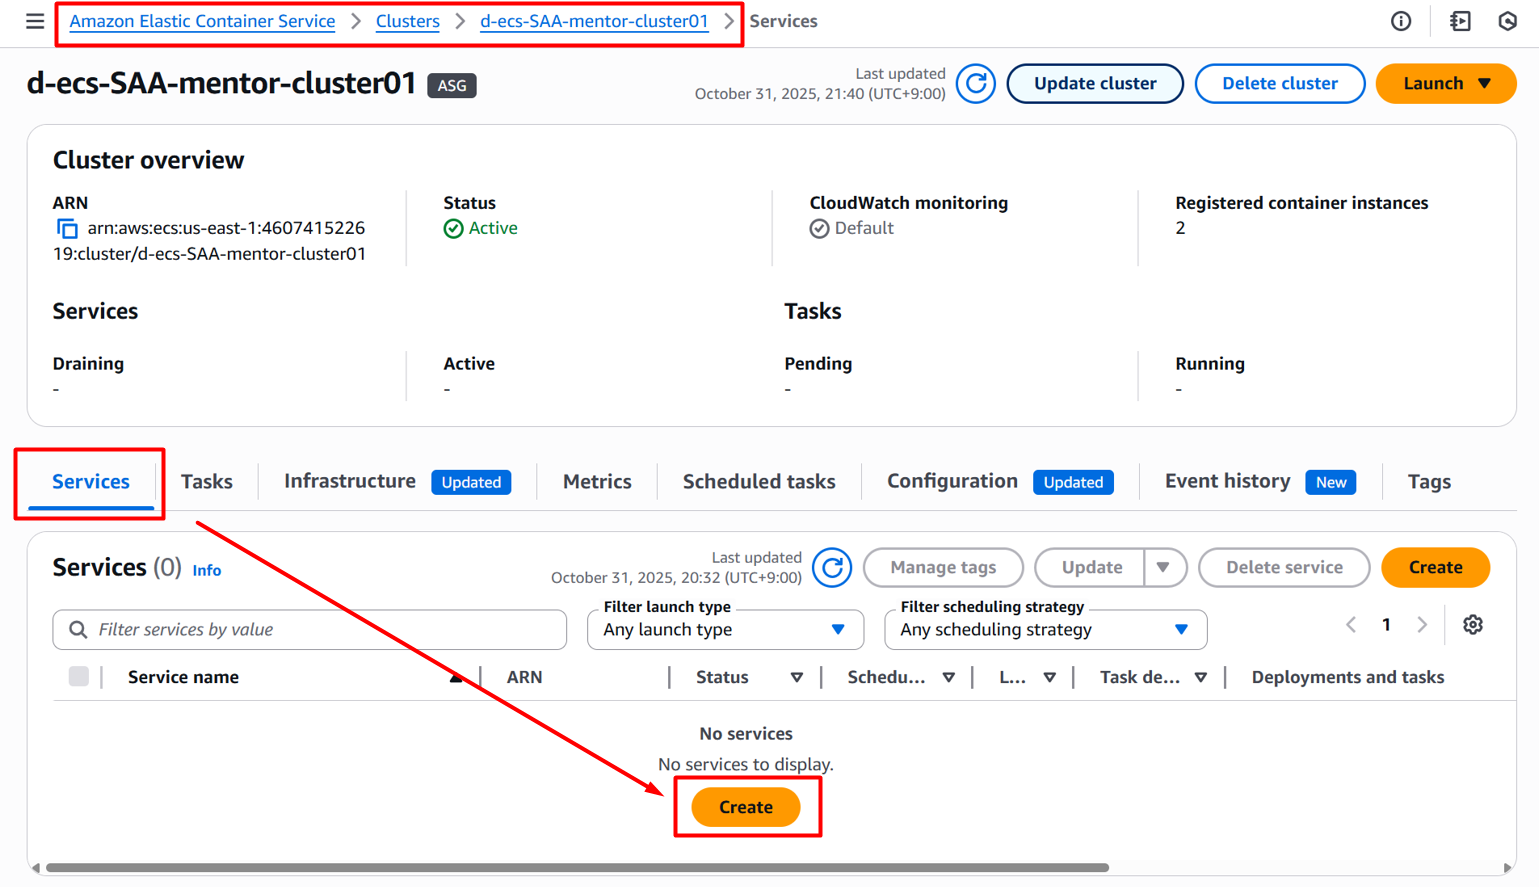
8. Create ECS Service
- Vào Console Elastic Container Service -> Clusters -> Chọn
d-ecs-SAA-{yourname}-cluster01 - Tại tab Services -> Create
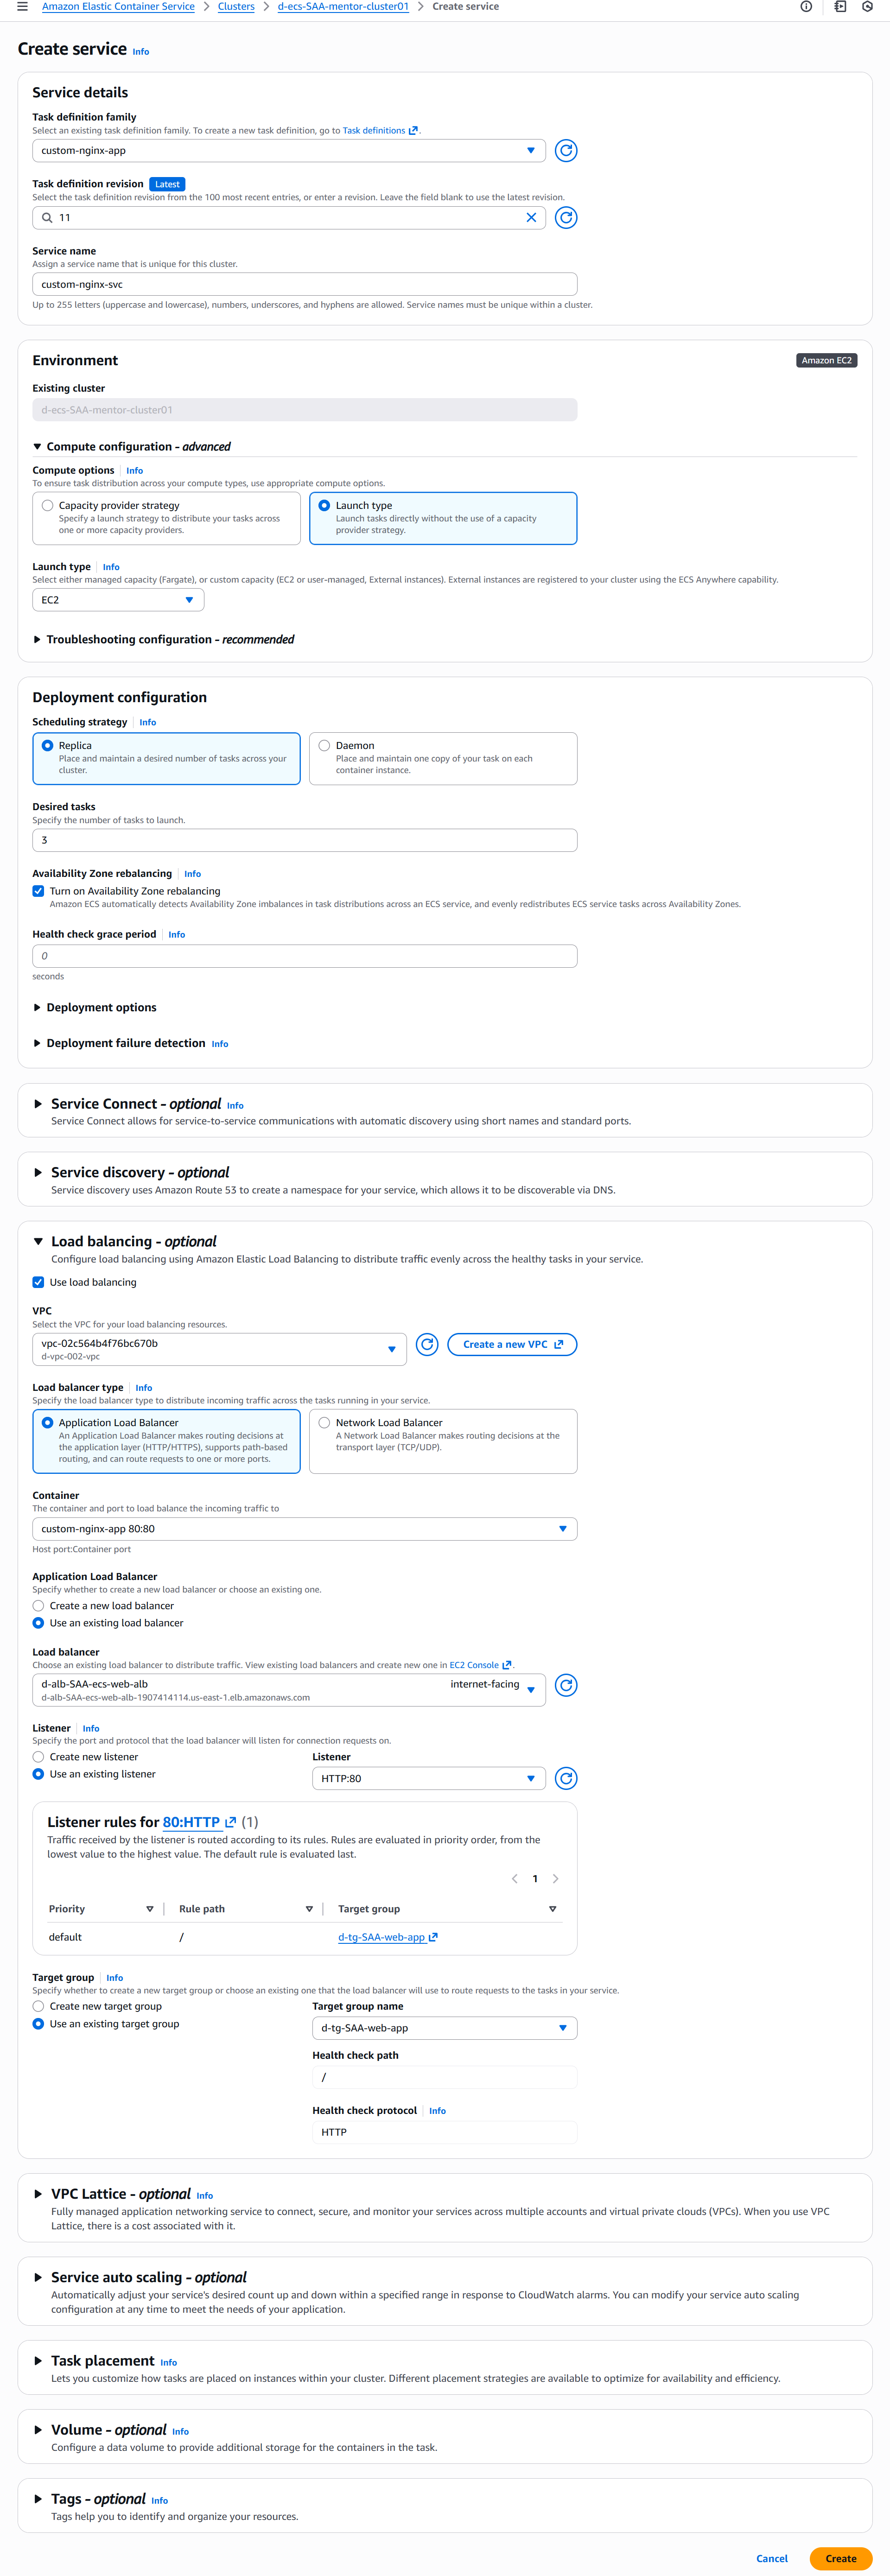
- Service details
- Task definition family:
custom-nginx-app - Task definition revision:
{No}(LATEST)(Chọn version LATEST) - Service name:
custom-nginx-svc
- Task definition family:
- Environment
- Compute options:
Launch type - Launch type:
EC2
- Compute options:
- Deployment configuration
- Scheduling strategy:
Replica - Service type:
Replica - Desired tasks:
3 - Các setting khác để default
- Scheduling strategy:
- Load balancing - optional
- Use load balancing: ✅
- VPC:
d-vpc-002-vpc - Load balancer type:
Application Load Balancer - Container:
custom-nginx-app 80:80 - Load balancer:
d-alb-SAA-ecs-web-alb - Listener:
Use an existing listener- Listener:
80:HTTP
- Listener:
- Target group:
Use an existing target group- Target group name:
d-tg-SAA-web-app
- Target group name:
- Các setting khác để default
Hình ảnh minh họa
Confirm 3 tasks đã run thành công
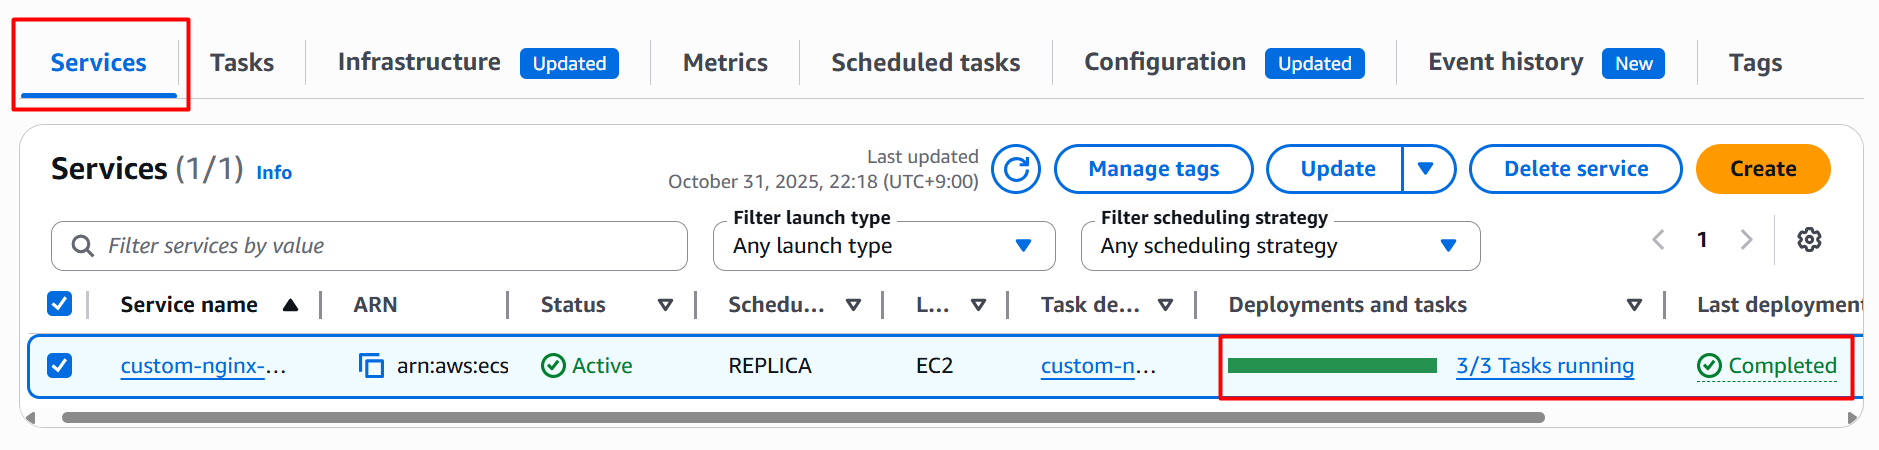
Kiểm tra Health check của các Task ở Target group
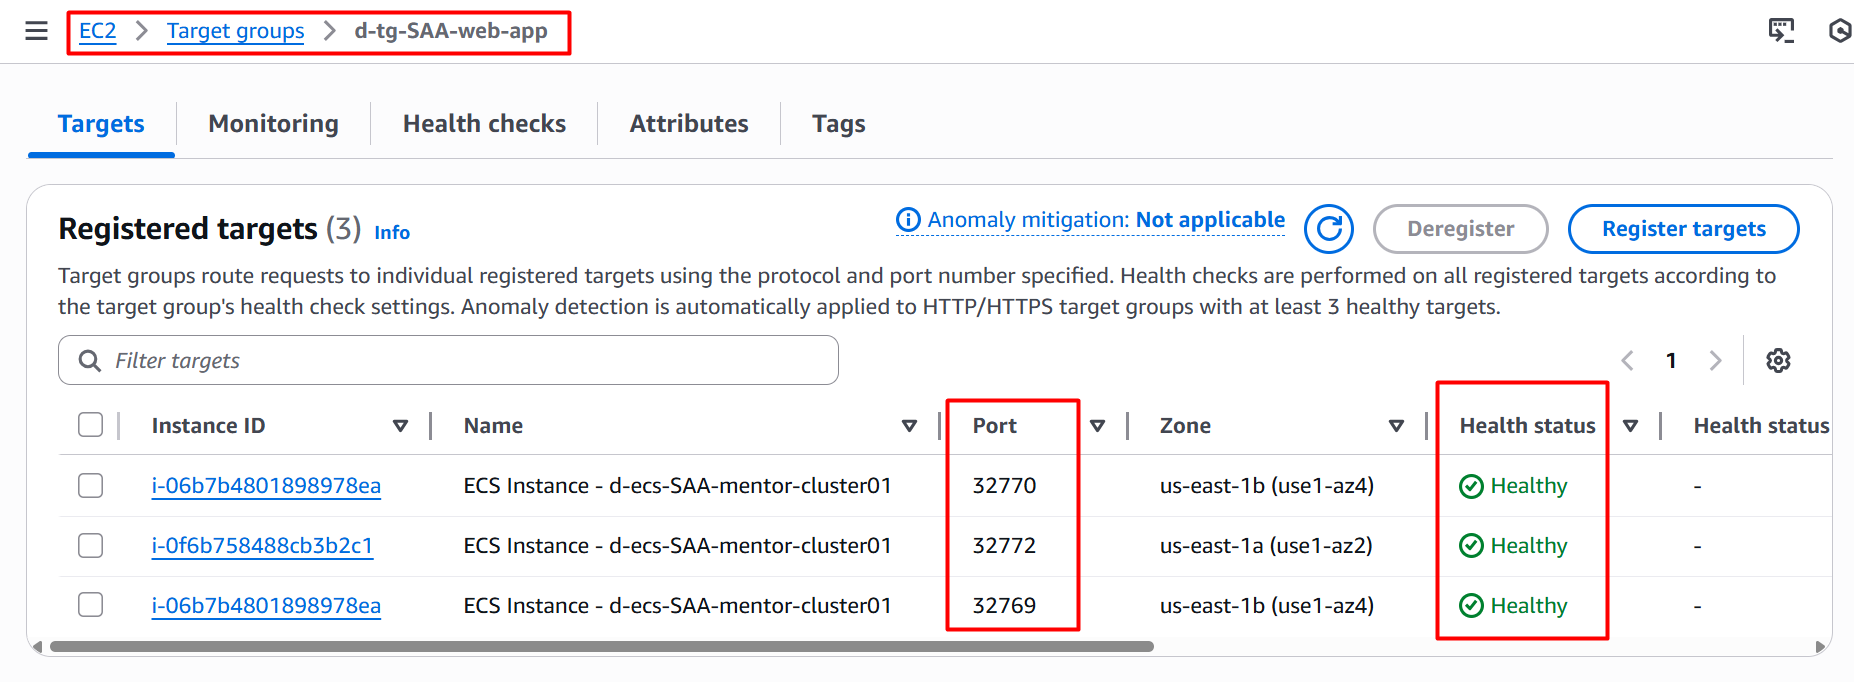
Port cũng được sinh ra tự động (đó là lý do mình phải Edit SG của EC2 Allow All TCP từ ALB)
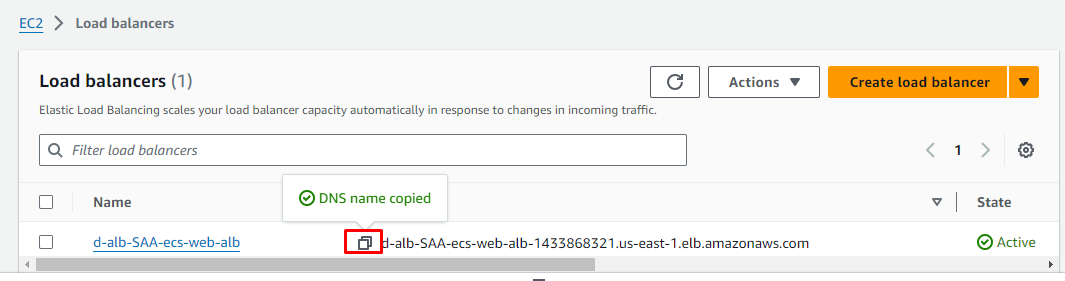
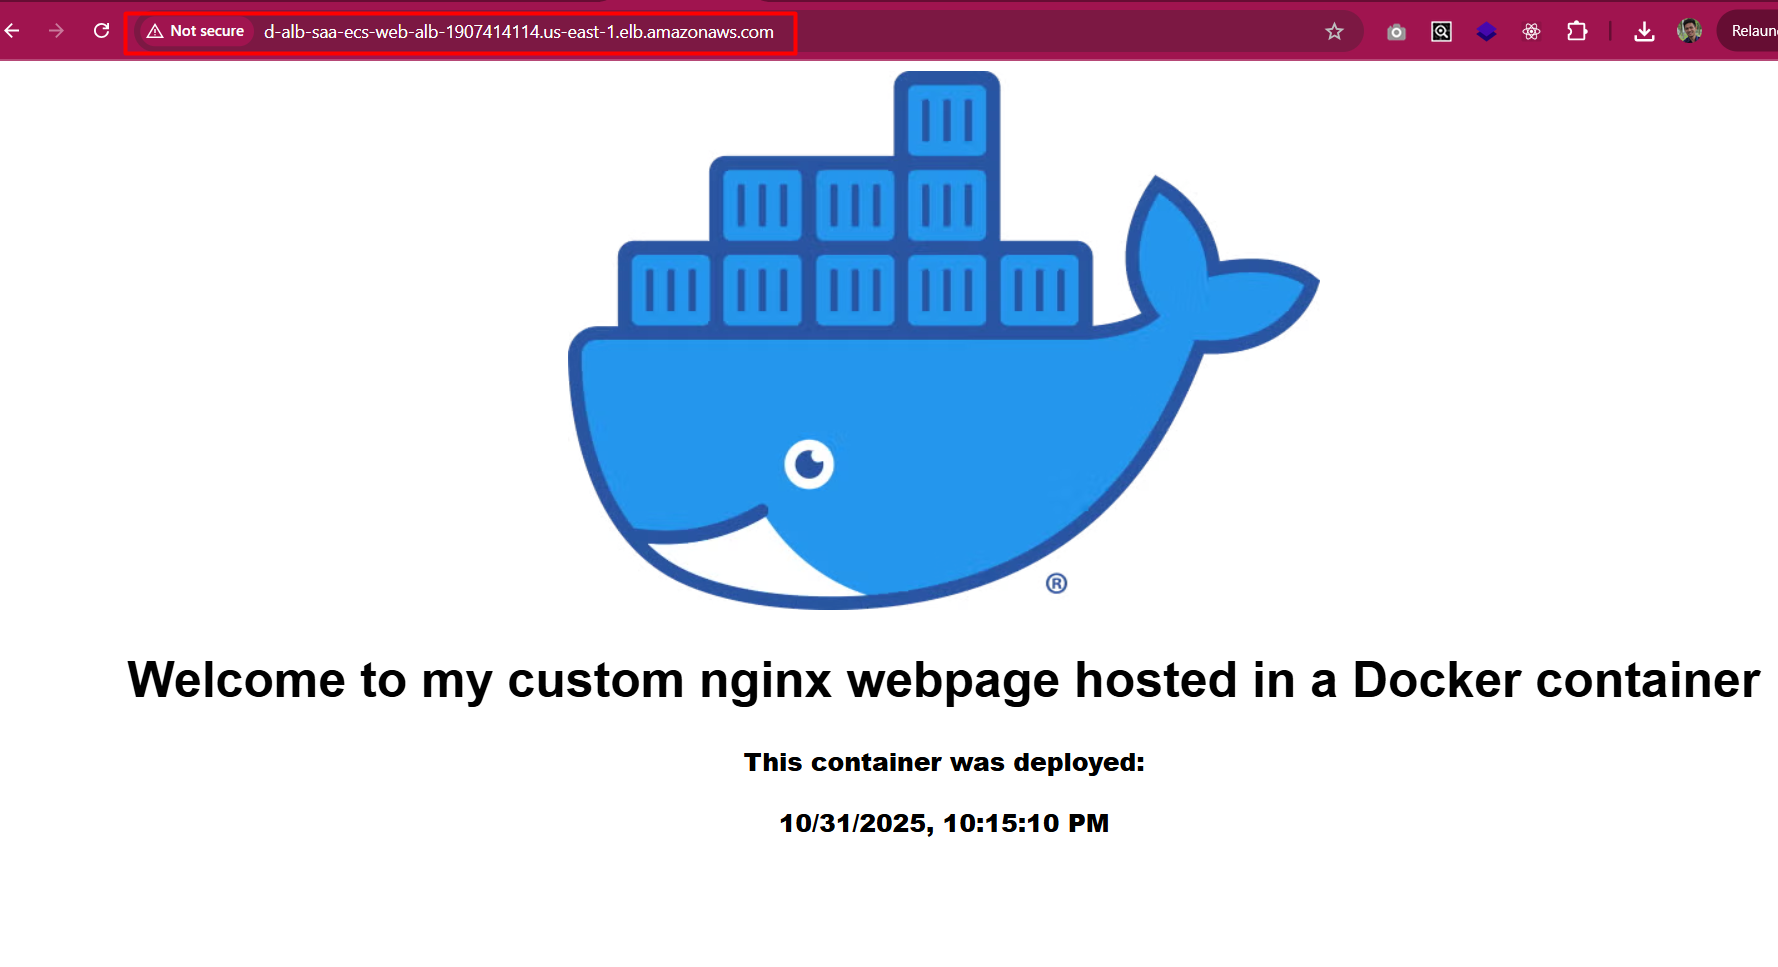
9. Test hoạt động
- Access đến DNS của Application LoadBalancer
- Update ECS Service
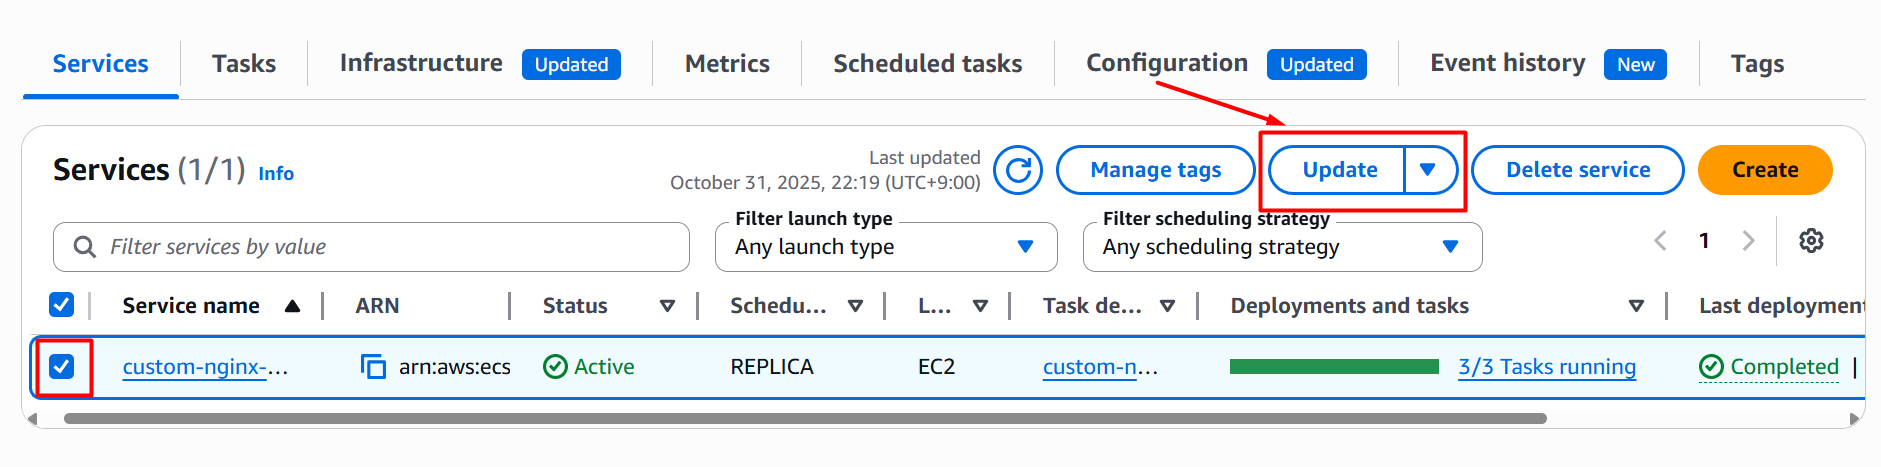
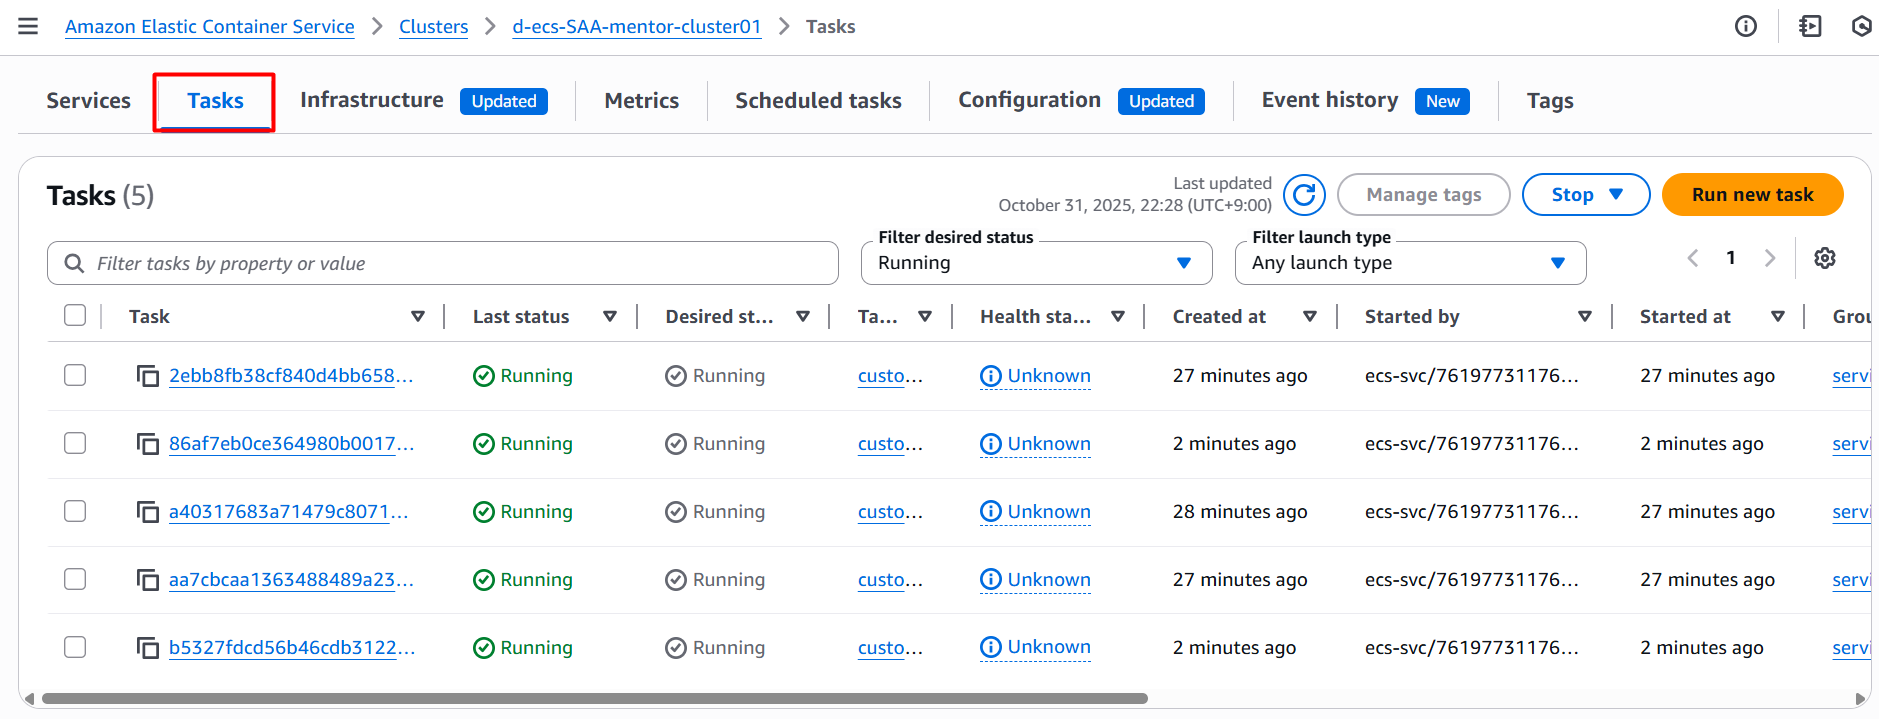
- Tăng số lượng Task lên 5
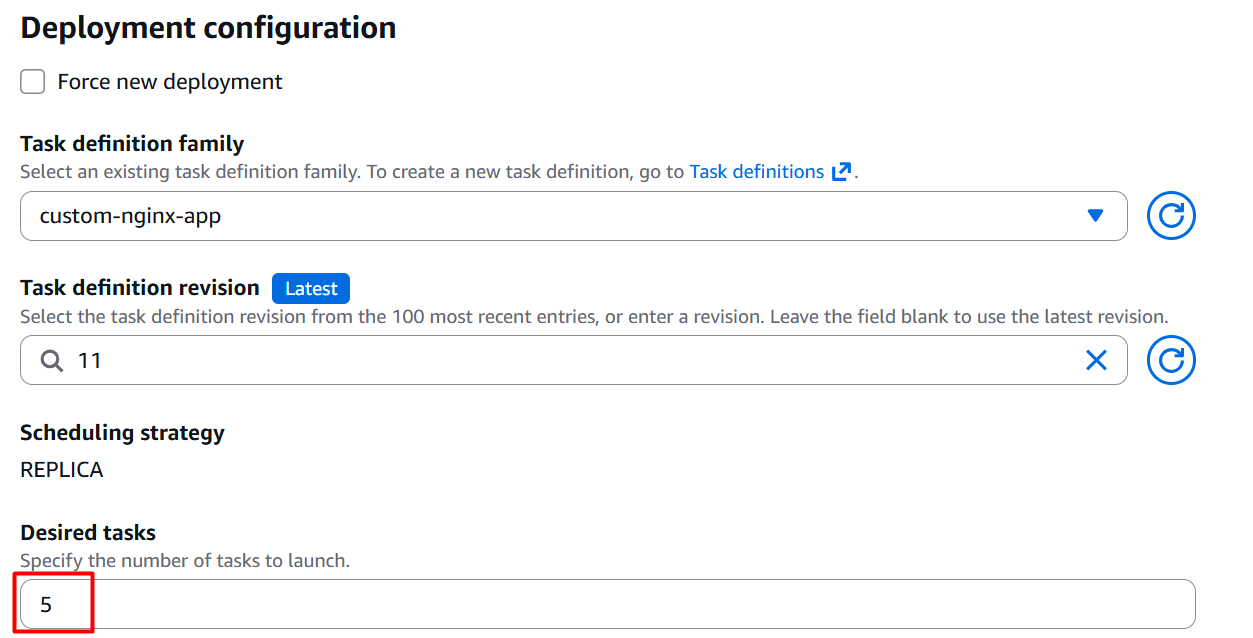
- Quá trình scale out sẽ diễn ra nhanh chóng
10. Setting Route53 and access website (optional)
Để Setting Route53 trỏ domain đến Application load balancer các bạn tham khảo bài viết Configuring ALIAS record on Route 53 of AWS
Challenge
Các bạn sẽ đặt câu hỏi "Vậy làm thế nào để triển khai 1 version mới của ứng dụng?". Mình sẽ hướng dẫn cách làm ngay bây giờ.
- Update file
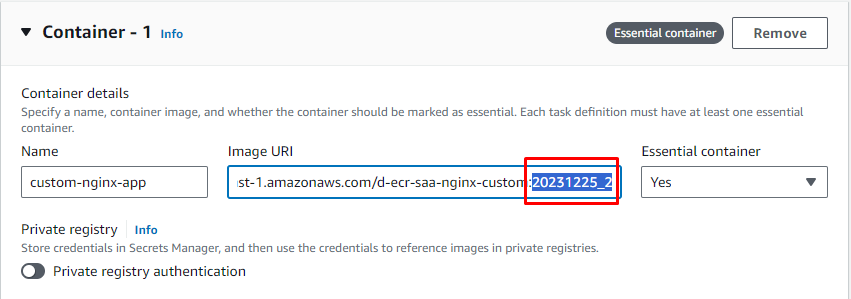
index.html - Sử dụng các command dc cung cấp ở ECR repository -> View push commands để build và push docker image> Note: sử dụng tag mới cho docker image (tag lúc đầu là 20231225_1, thì lần build này mình sẽ change thành 20231225_2)
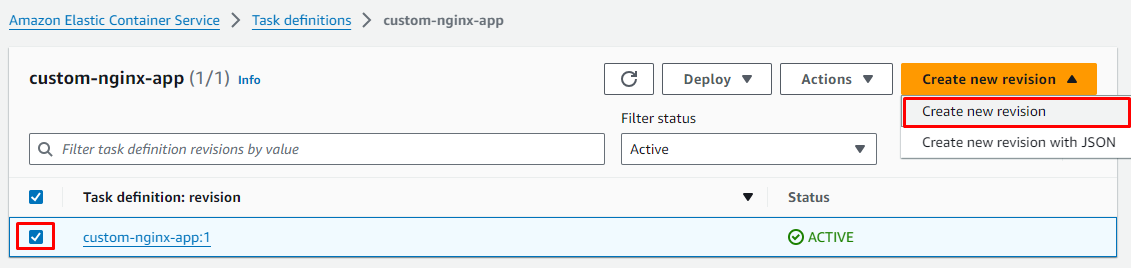
- Create new Revision của Task definition, Update Image URI
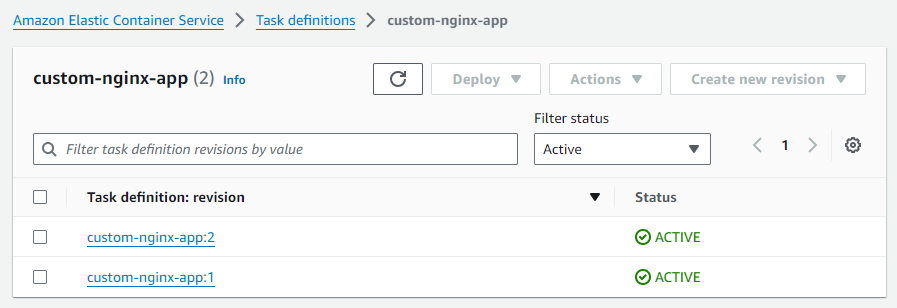
- Update ECS Service
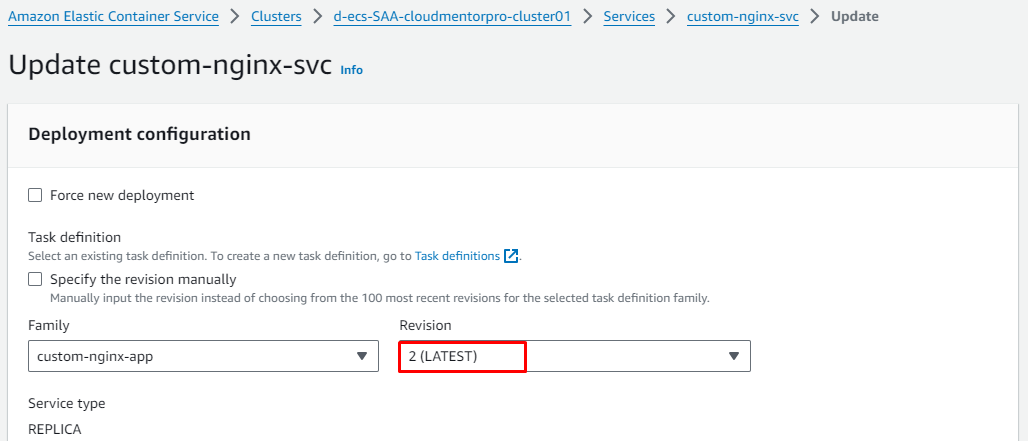
- Quá trình Deployment rolling update sẽ diễn ra bằng cách tạo ra task mới và stop task cũ.
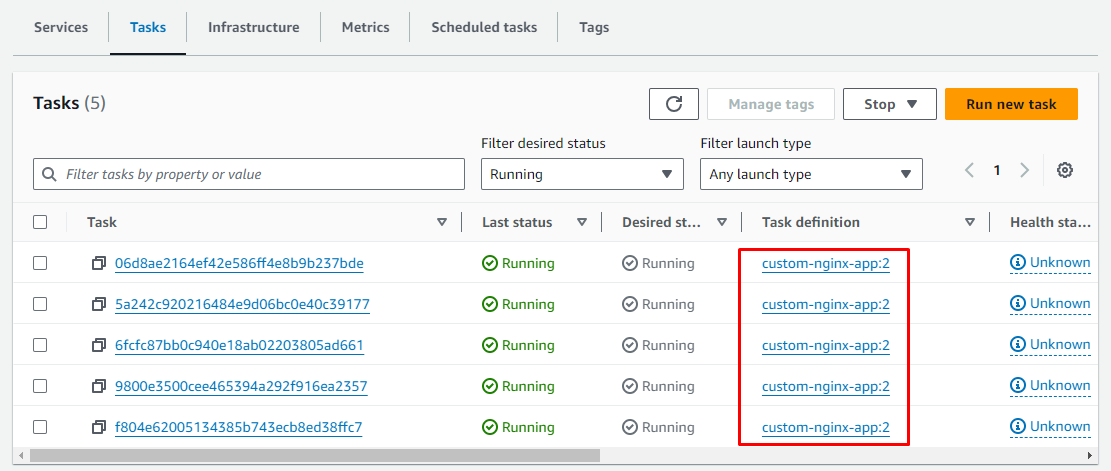
Nhật xét
Vậy là chúng ta đã hoàn thành bài lab tạo ECS cluster, build và deploy ứng dụng trên ECS. Mặc dù mọi thứ là thủ công tuy nhiên để cho các bạn dễ hình dung và tiếp cận dễ dàng.
Trong thực tế việc Xây dựng Cluster hay Deploy sẽ triển khai tự động
- Sử dụng IaC để xây dựng và quản lý hạ tầng
- Sử dụng CI/CD cho việc Build và Deploy
Mình sẽ còn viết về chủ đề ECS ở những bài blog sau này!
Clean up
- Delete NAT Gateway
- Terminated Bastion host
- Delete ECS service
- Delete ECS Cluster
- Delete Load balancers
- Delete Target groups
- Delete ECR repo:
d-ecr-saa-nginx-custom - Release Elastic IP addresses
- Delete Role:
SAA-PushImagesToECR-EC2Role - Delete VPC:
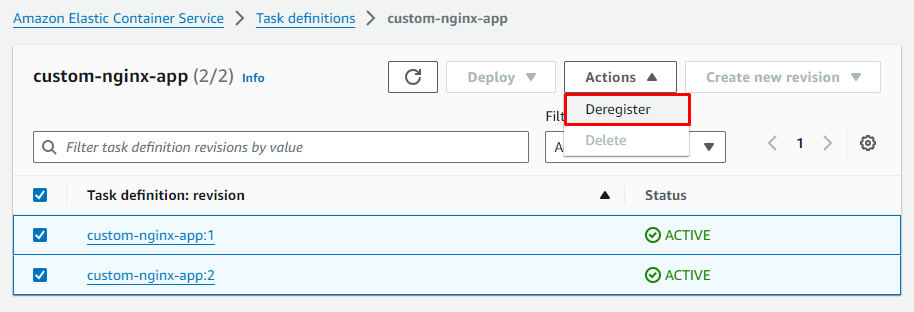
d-vpc-002-vpc - Delete Task definition
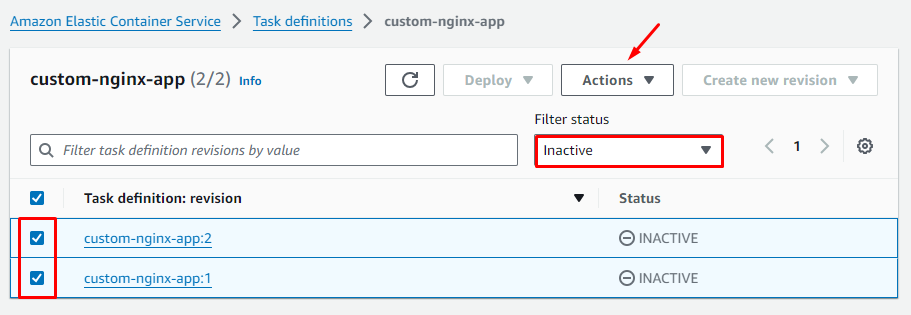
- Trước tiên cần Deregister tất cả các revision
- Tiếp tục chọn các revision đã bị Inactive và delete
Bài thực hành khá dài và chắc mọi người cũng mệt rồi, pha cốc cafe + mở một bài nhạc và Relax thôi !!!
