Extract information from unstructured documents with Amazon Bedrock and Amazon Textract
Lab Introduction
- AWS experience: Intermediate
- Time to complete: 35 minutes
- AWS Region: US East (N. Virginia) us-east-1
- Cost to complete: Less than $0.15 if completed within one hours and the notebook is deleted at the end of the lab.
- Services used: Amazon Textract, Amazozn Bedrock, LLM...
Architecture Diagram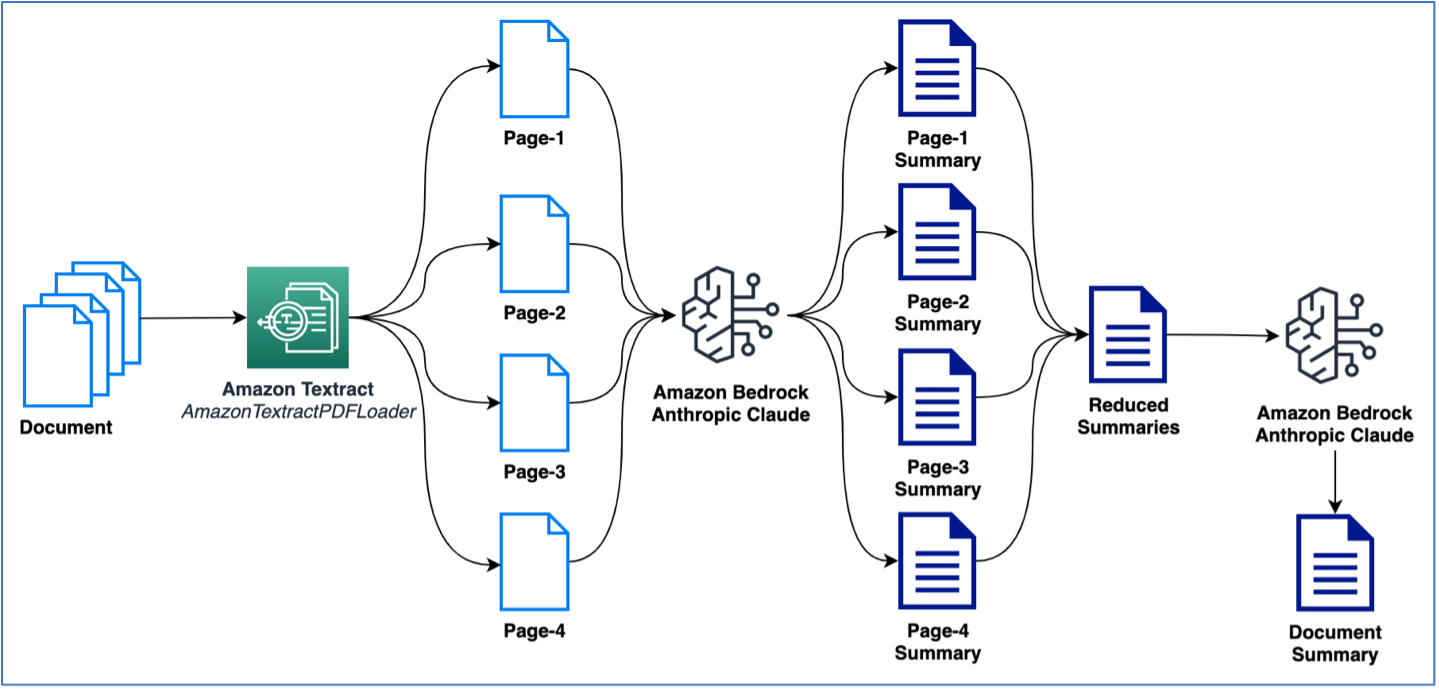
1. Bối cảnh hiện tại
Một công ty Fso** làm về bảo hiểm đa quốc gia có trụ sở chính tại Singapore và chi nhánh hoạt động tại hơn 12 quốc gia khu vực Châu Á – Thái Bình Dương, bao gồm Việt Nam, Thái Lan, Indonesia, Nhật Bản và Úc. Mỗi tháng, công ty tiếp nhận hơn 50.000 bộ hồ sơ yêu cầu bồi thường bảo hiểm từ khách hàng cá nhân và doanh nghiệp.
Điểm đặc biệt là tài liệu được gửi đến từ nhiều kênh và ở các định dạng phi cấu trúc khác nhau, ví dụ:
- Giấy tờ y tế (PDF scan).
- Bản scan hóa đơn khám chữa bệnh từ bệnh viện tư và nhà nước.
- Đơn yêu cầu bồi thường được viết tay hoặc điền trên mẫu tự do.
- Hợp đồng bảo hiểm dạng PDF (nhiều trang, có chữ ký tay, scan mờ).

- Nội dung email trao đổi giữa khách hàng và nhân viên chăm sóc...
2. Vấn đề gặp phải khi xử lý thủ công
Thách thức lớn nhất là các tài liệu này sử dụng đa dạng ngôn ngữ như tiếng Anh, tiếng Việt, tiếng Thái, Bahasa Indonesia và cả tiếng Nhật. Một số tài liệu chứa đồng thời nhiều ngôn ngữ (ví dụ: tiếng Anh + tiếng địa phương), hoặc văn phong không chuẩn, dễ gây nhầm lẫn khi đọc bằng máy.
- 📦 Khối lượng tài liệu khổng lồ: Hầu hết tài liệu là bản scan hoặc ảnh chụp, không thể xử lý tự động bằng công cụ truyền thống.
- 🧍♀️ Phụ thuộc vào nhân viên nhập liệu: Hàng trăm người làm công việc nhập tay thông tin từ biểu mẫu vào hệ thống core insurance.
- 🐢 Tốc độ chậm, dễ sai sót: Mỗi bộ hồ sơ mất trung bình 15–20 phút để trích xuất thông tin quan trọng → chậm trễ giải quyết yêu cầu bồi thường.
- 📄 Tài liệu không chuẩn hóa: Có rất nhiều mẫu biểu khác nhau, thậm chí đơn tự do, viết tay không theo mẫu nào.
- 🔒 Rủi ro bảo mật thông tin cá nhân (PII) nếu xử lý không cẩn thận...
3. Giải pháp
- Amazon Textract: Tự động trích xuất văn bản, bảng biểu và dữ liệu từ các tài liệu scan (PDF, hình ảnh)...
- Amazon Bedrock: Cung cấp nền tảng mô hình ngôn ngữ lớn (LLM) như Claude, Titan, Llama… giúp hiểu ngữ cảnh, phân loại thông tin, tổng hợp và chuẩn hóa dữ liệu phi cấu trúc.
- (Business Optional) Lưu kết quả trích xuất vào hệ thống hoặc truyền sang hệ thống phê duyệt...
- (Optional) Tích hợp với Amazon A2I + human review nếu tài liệu có score confidence kém (<30~40% ) -> nâng cao độ chính xác tối đa.
4. Lợi ích
- ⏱️ Tốc độ xử lý <1 phút/hồ sơ.
- 👩💼 Nhân lực nhập liệu Giảm 70–90%.
- 📈 Tự động hóa quy trình, dễ mở rộng.
- 🔍 Giảm sai sót nhập liệu.
Suggest implementation
Step 1. Enable Anthropic FM
In this step, you will enable the use of Anthropic models on your AWS account.
Already requested and obtained access to Anthropic models on Amazon Bedrock? Skip to Create a Jupyter Notebook.
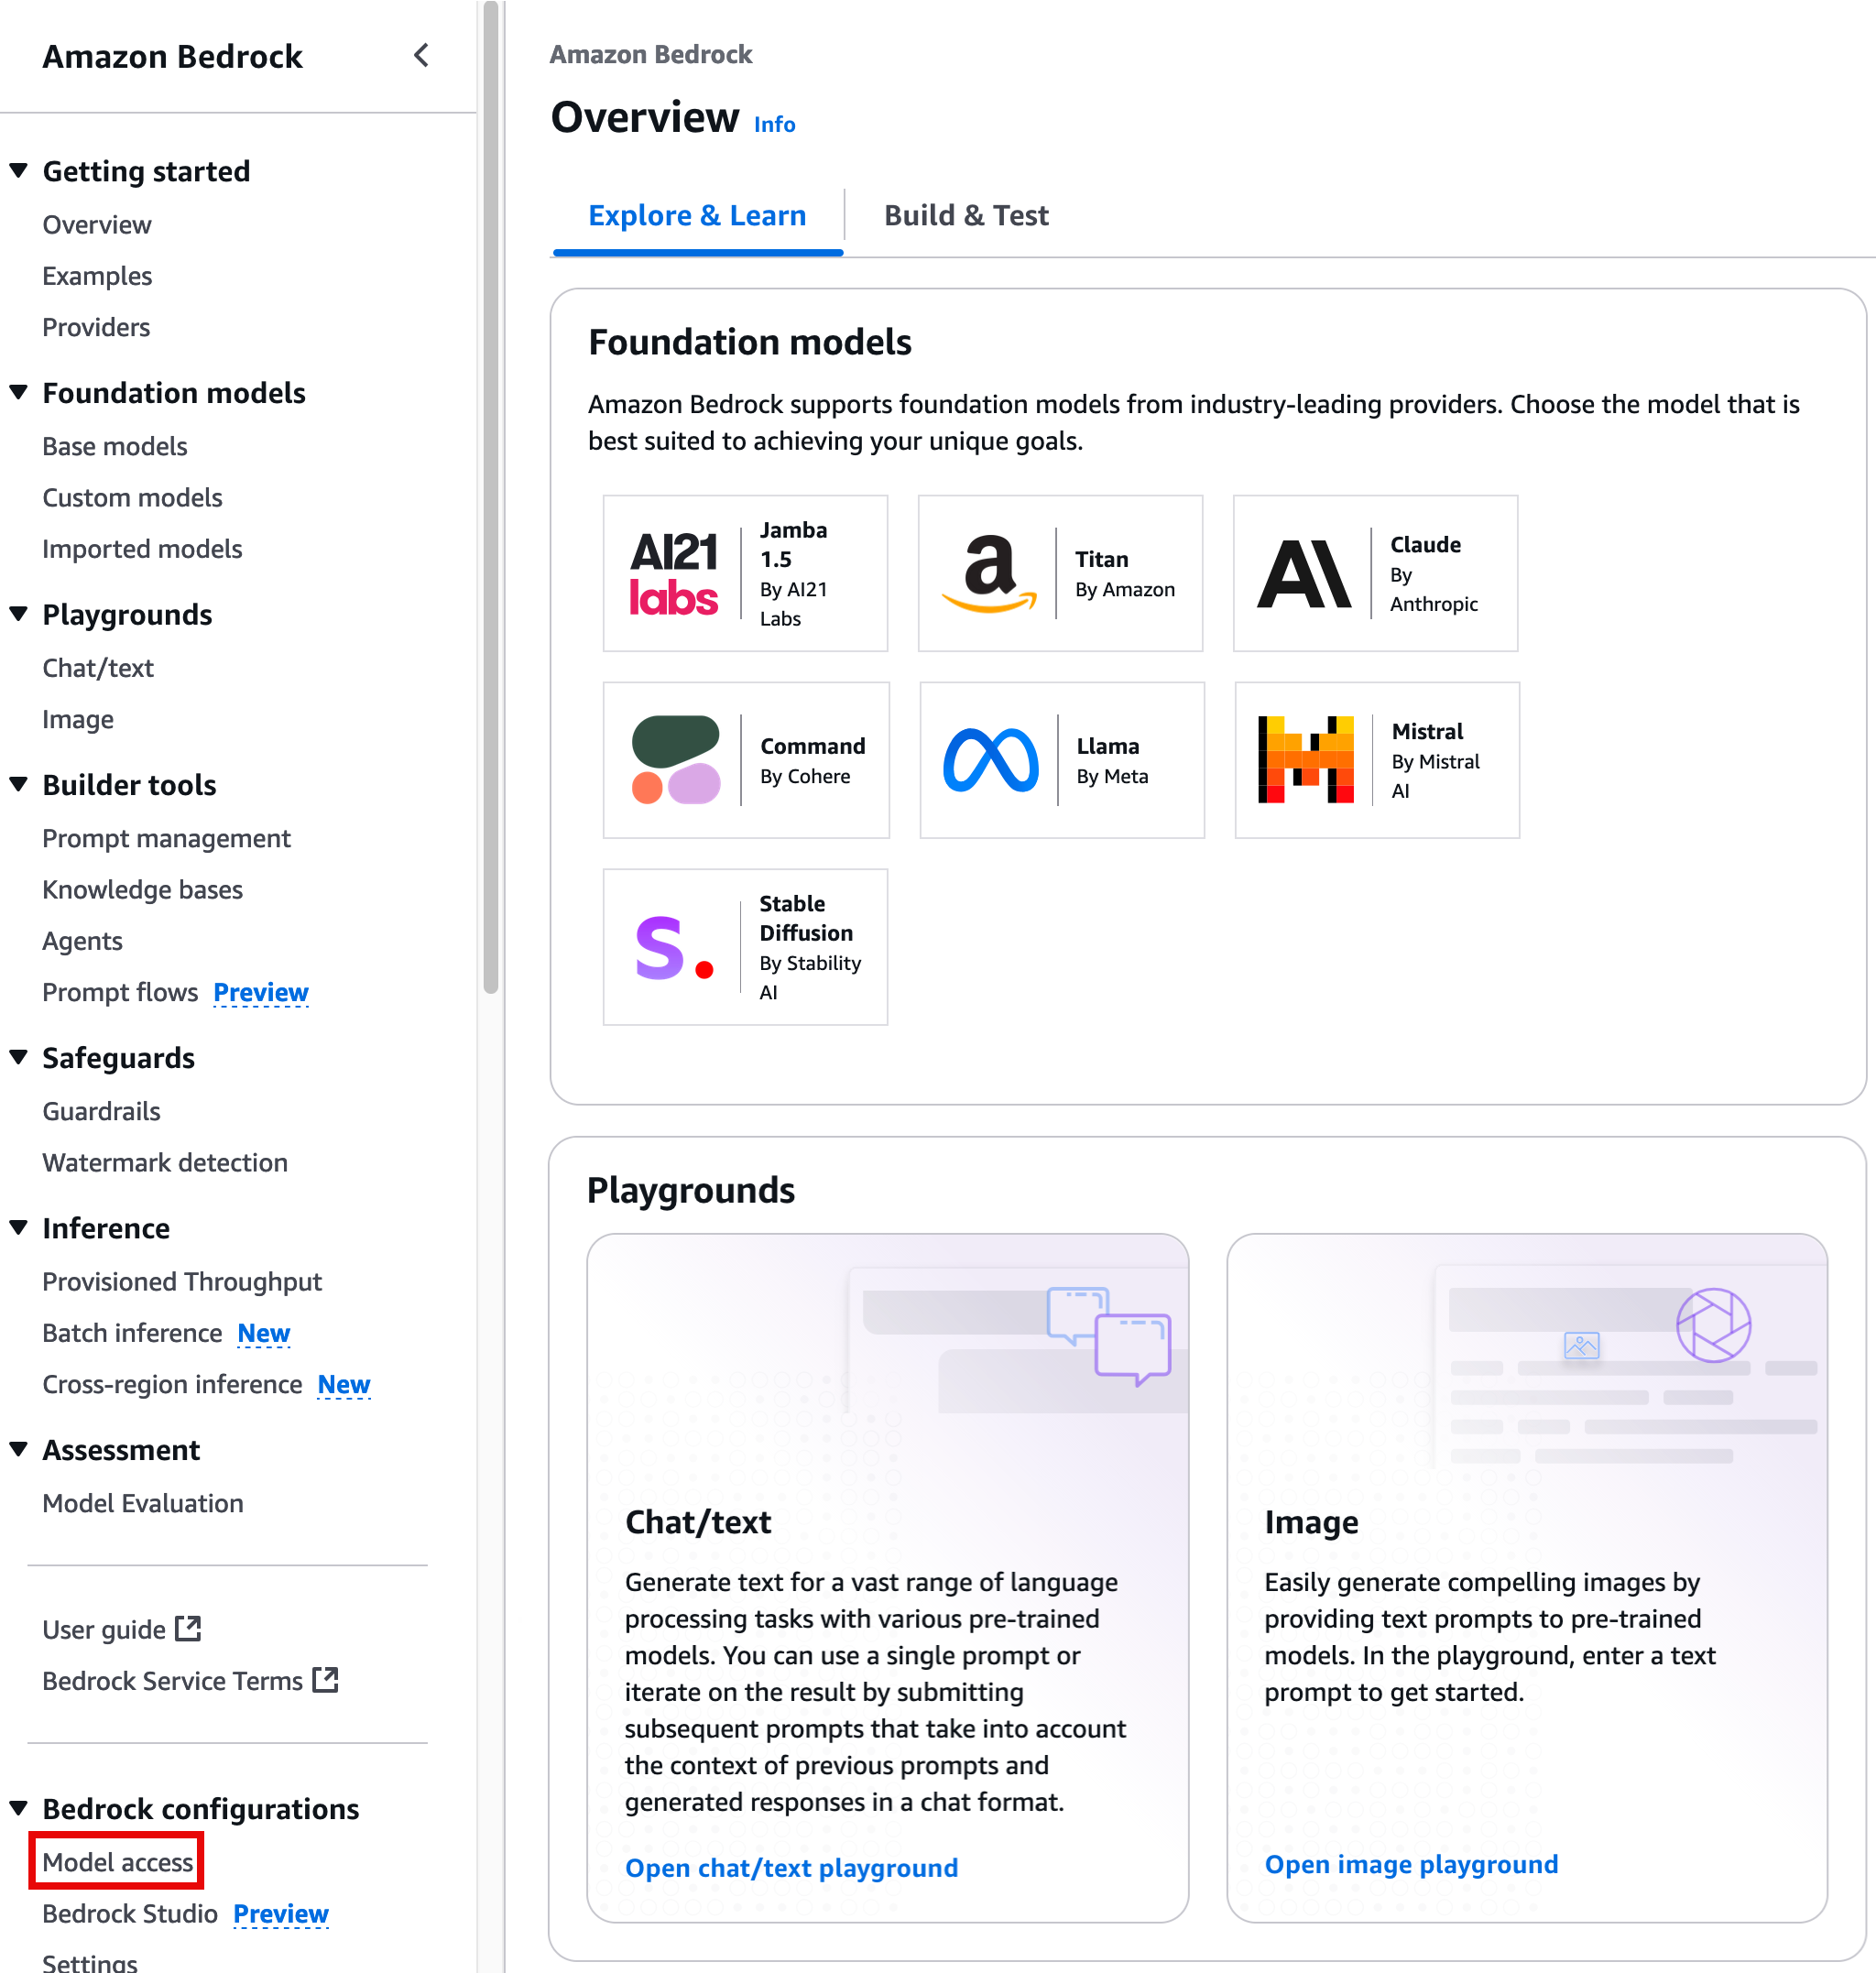
- Sign in to the AWS Management console, and open the Amazon Bedrock console at https://console.aws.amazon.com/bedrock/home.
- In the left navigation pane, under Bedrock configurations, choose Model Access.
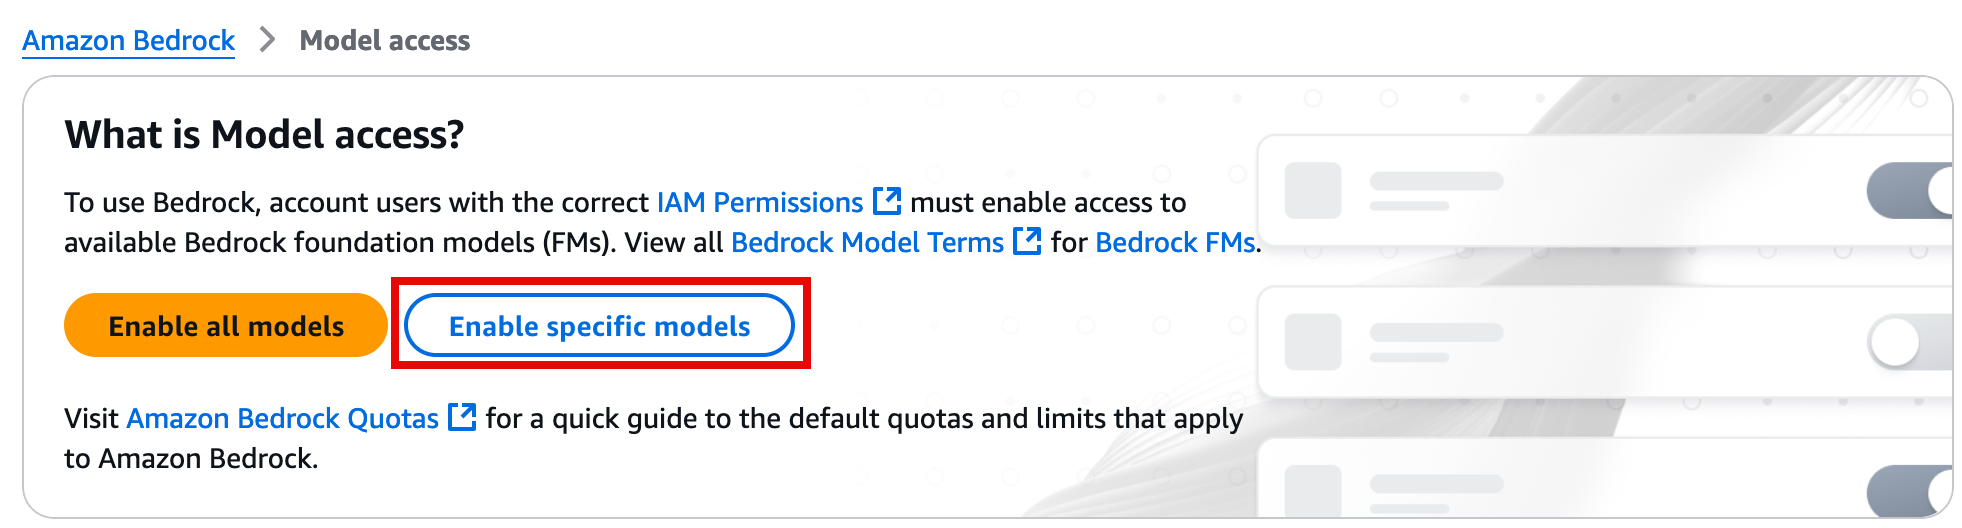
- On the What is Model access? page, choose Enable specific models.
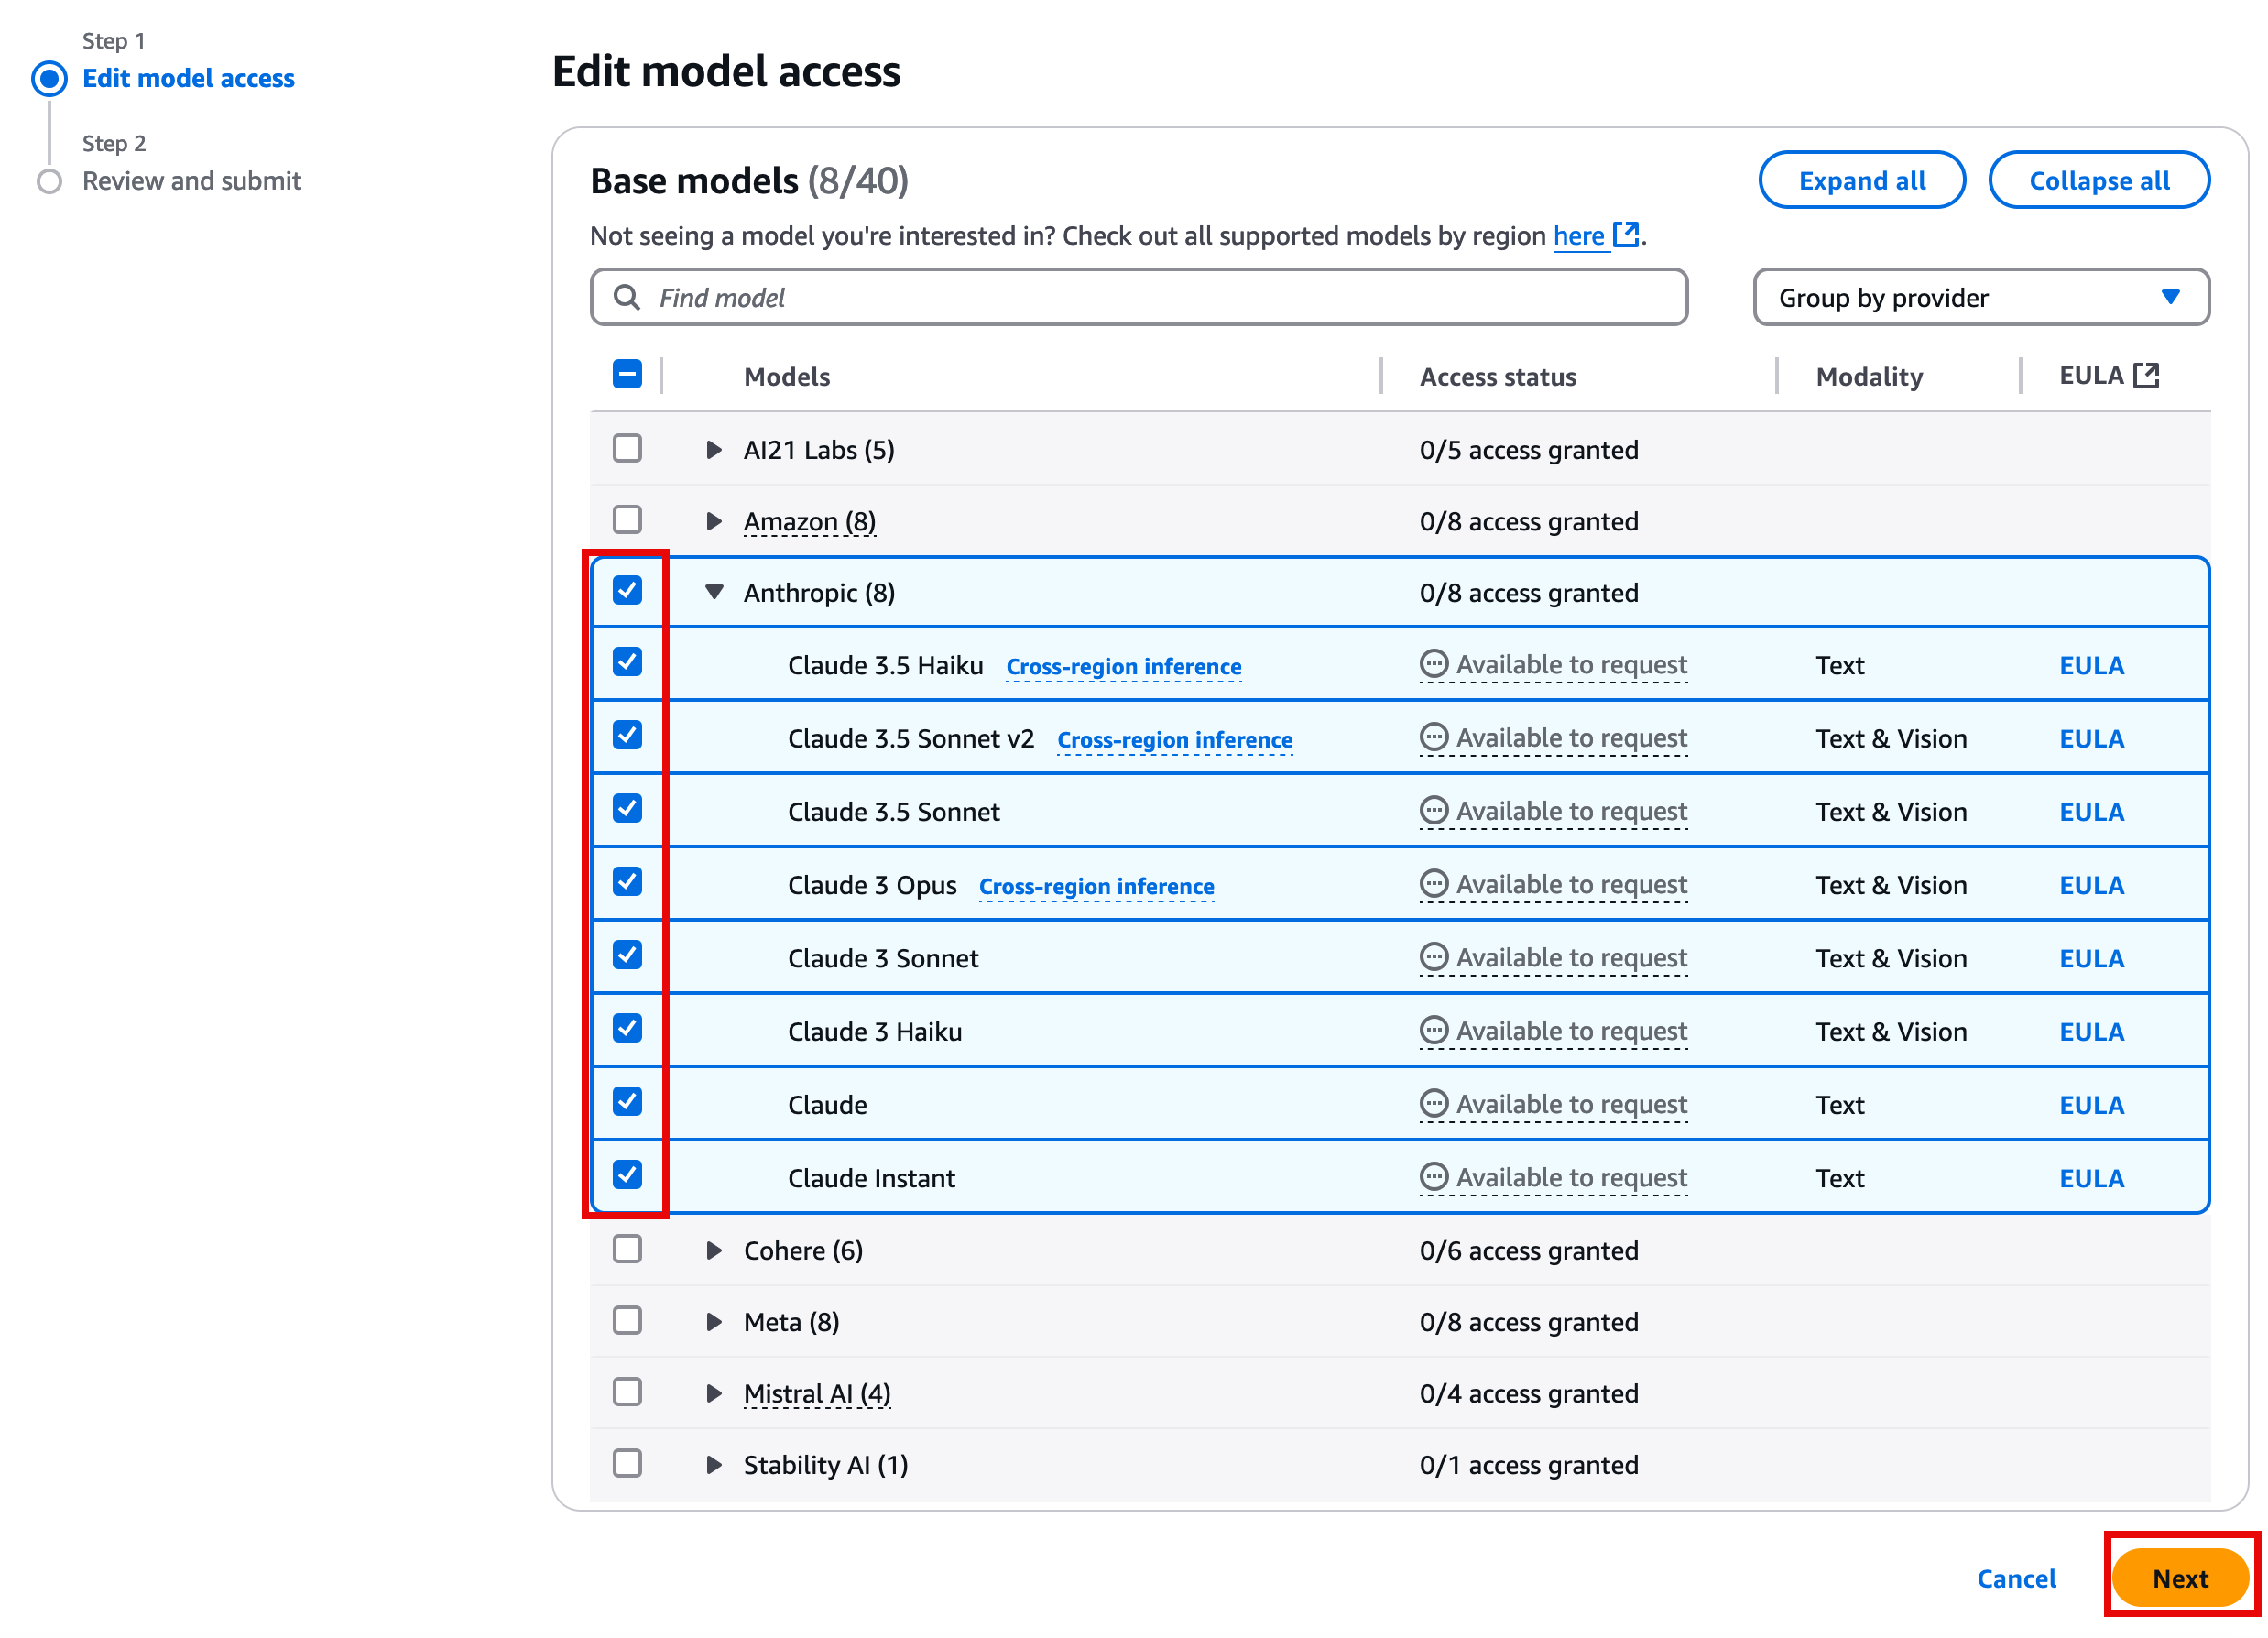
- On the Edit model access page, select the Anthropic models, and choose Next.
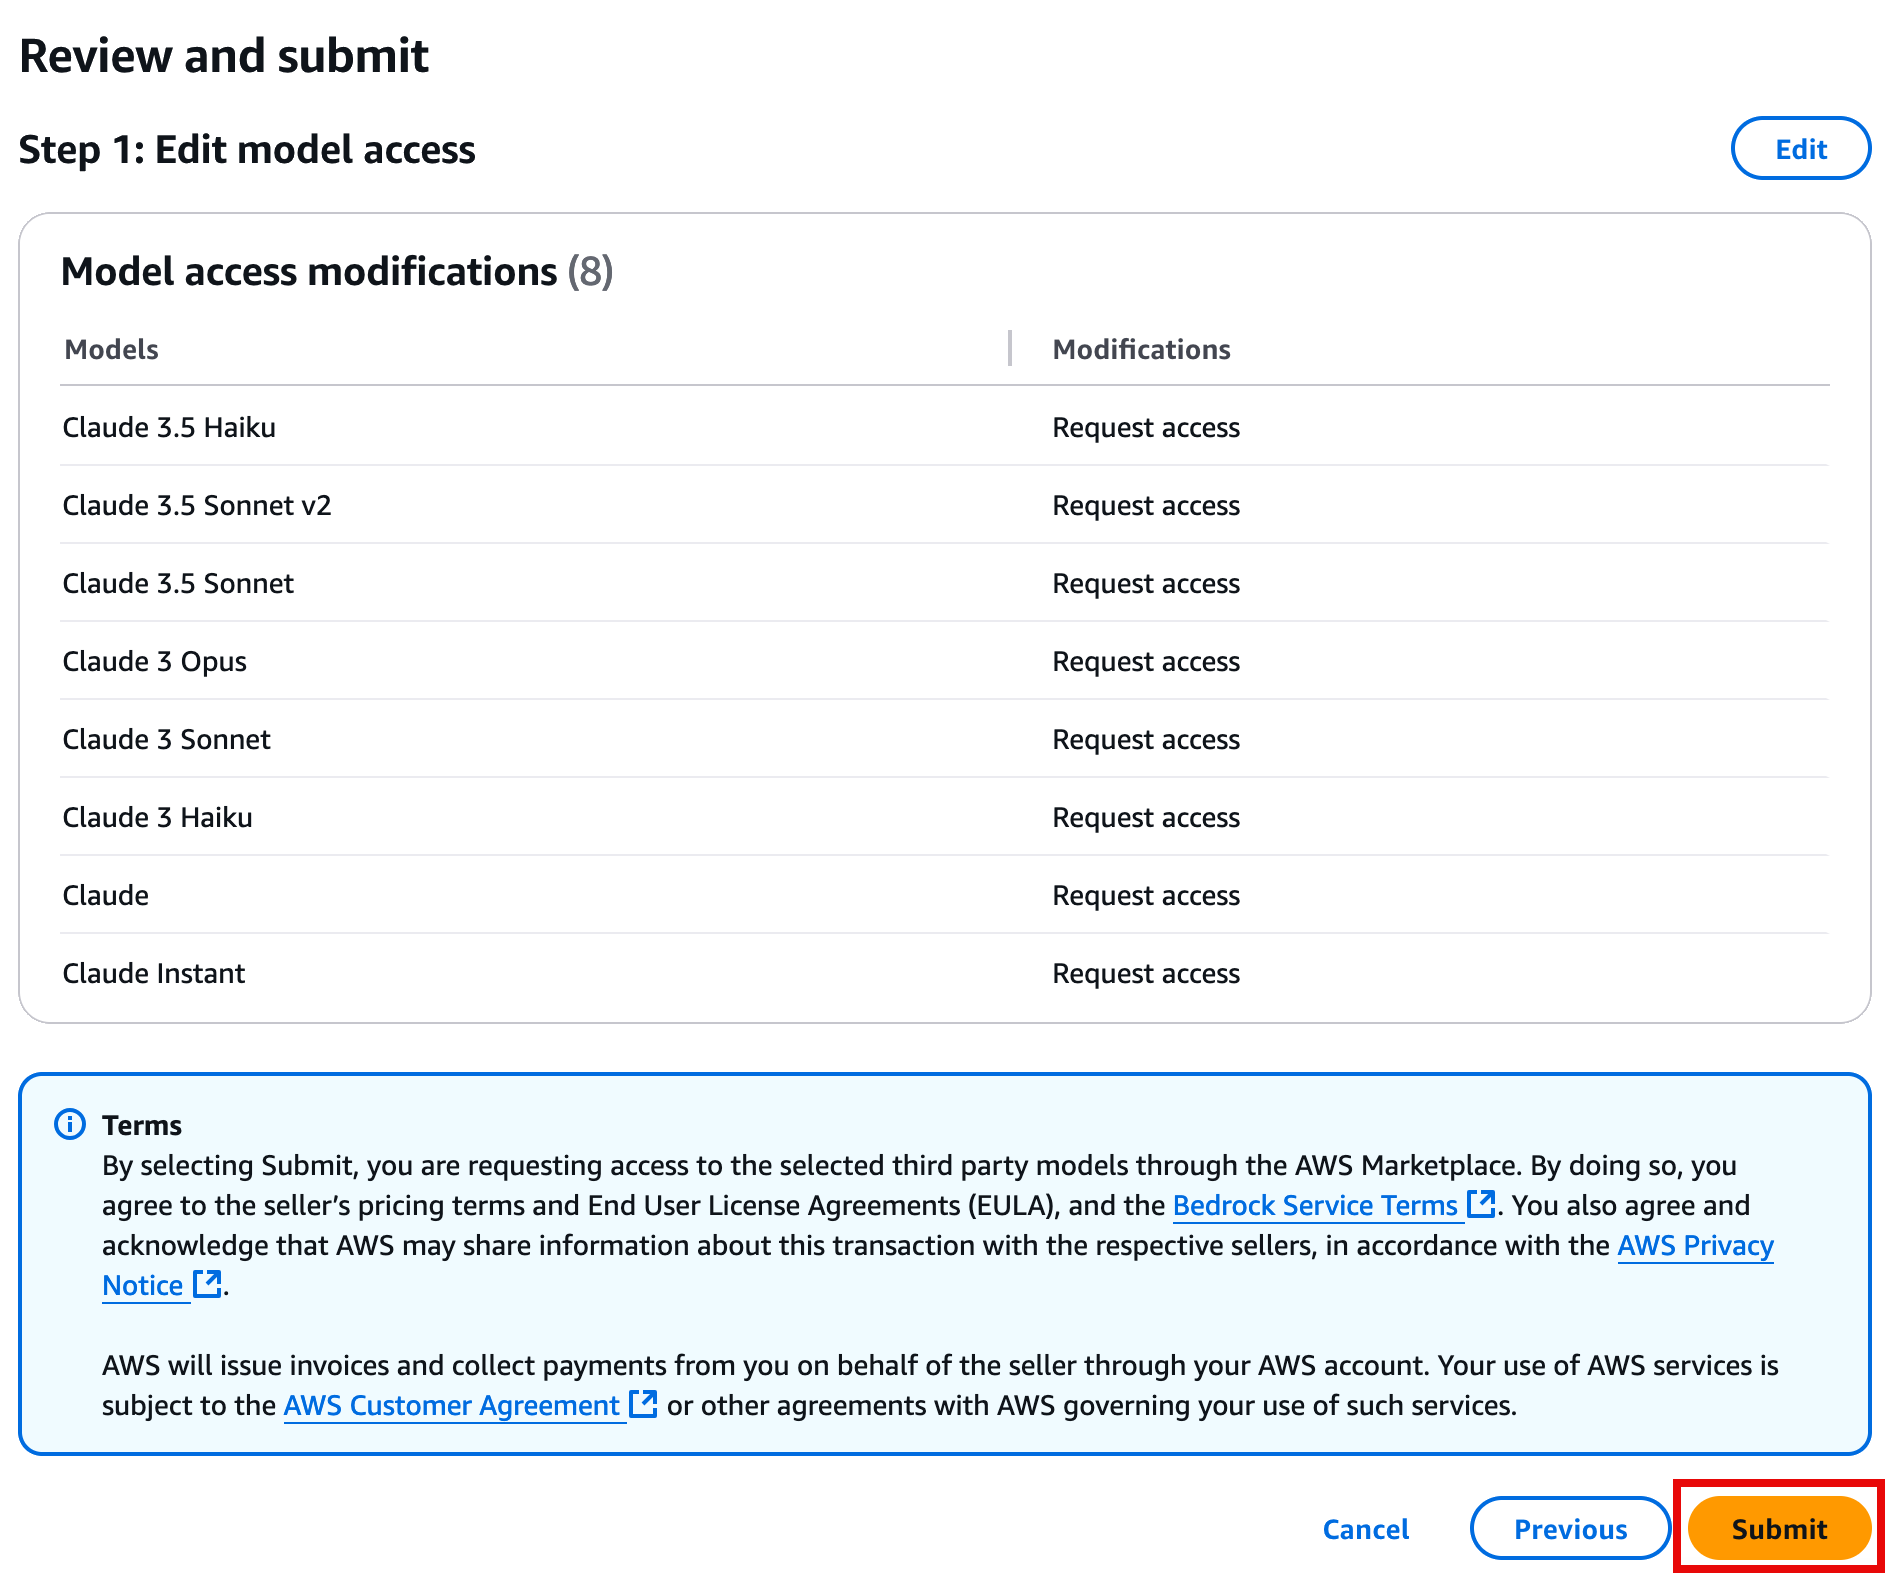
- On the Review and submit page, review your selections, and choose Submit.
Step 2. Create a Jupyter Notebook
In this step, you will create a Jupyter notebook to write your Proof-of-Concept code and test it out with real documents.
1. Open the Amazon Sagemaker console at https://console.aws.amazon.com/sagemaker/home.
2. In the left navigation pane, under Applications and IDEs, choose Notebooks.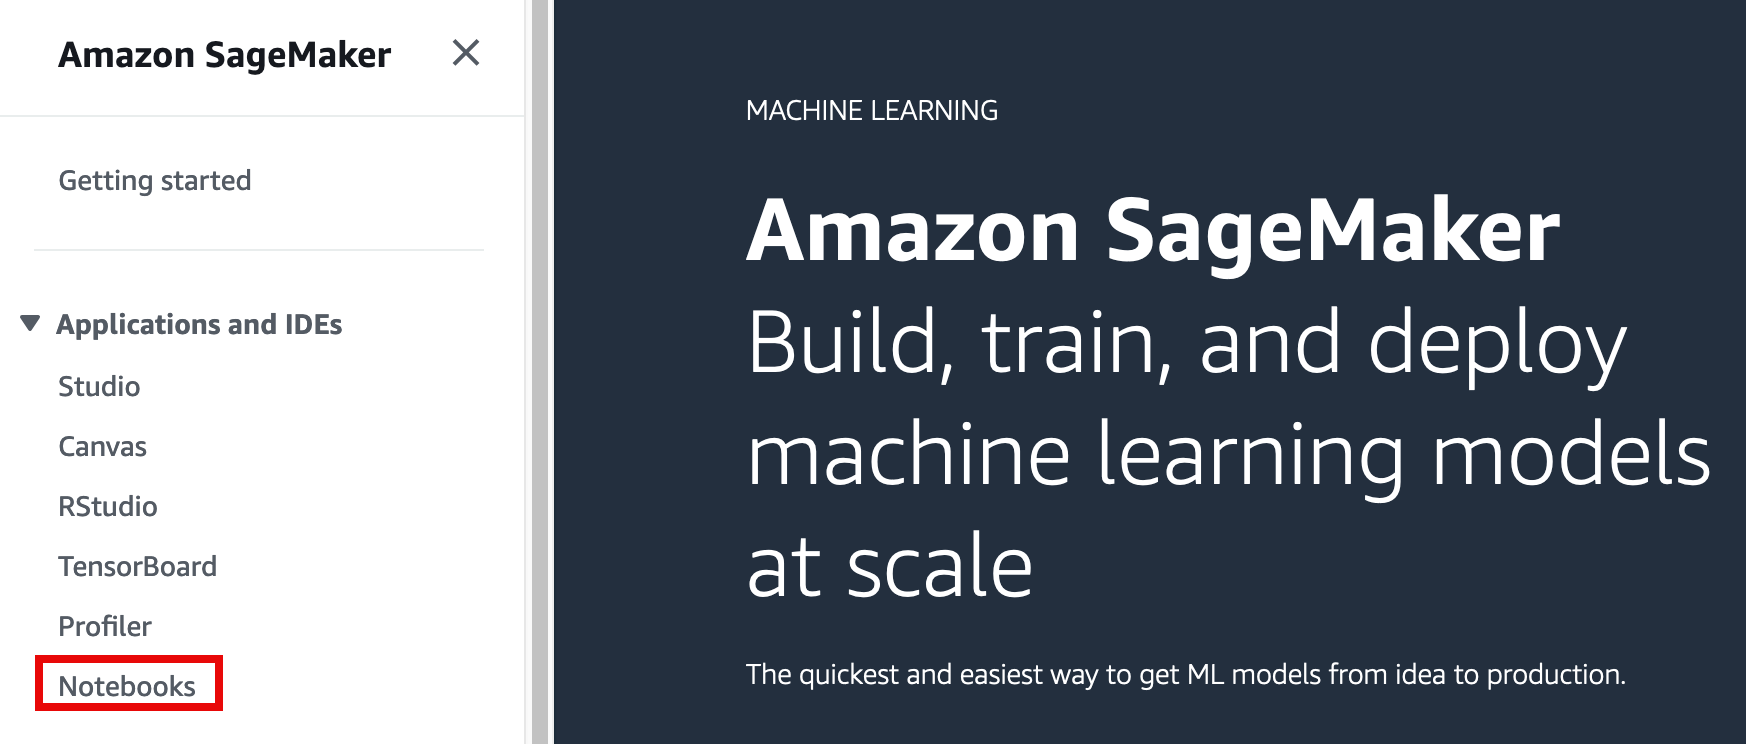
3. On the Notebooks and Git repos page, choose Create notebook instance.
4. On the Create notebook instance page:
- In the Notebook instance settings section:
- For Notebook instance name, enter a name for your Jupyter instance.
- For Notebook instance type, verify ml.t3.medium is selected.
- Keep all other default settings.
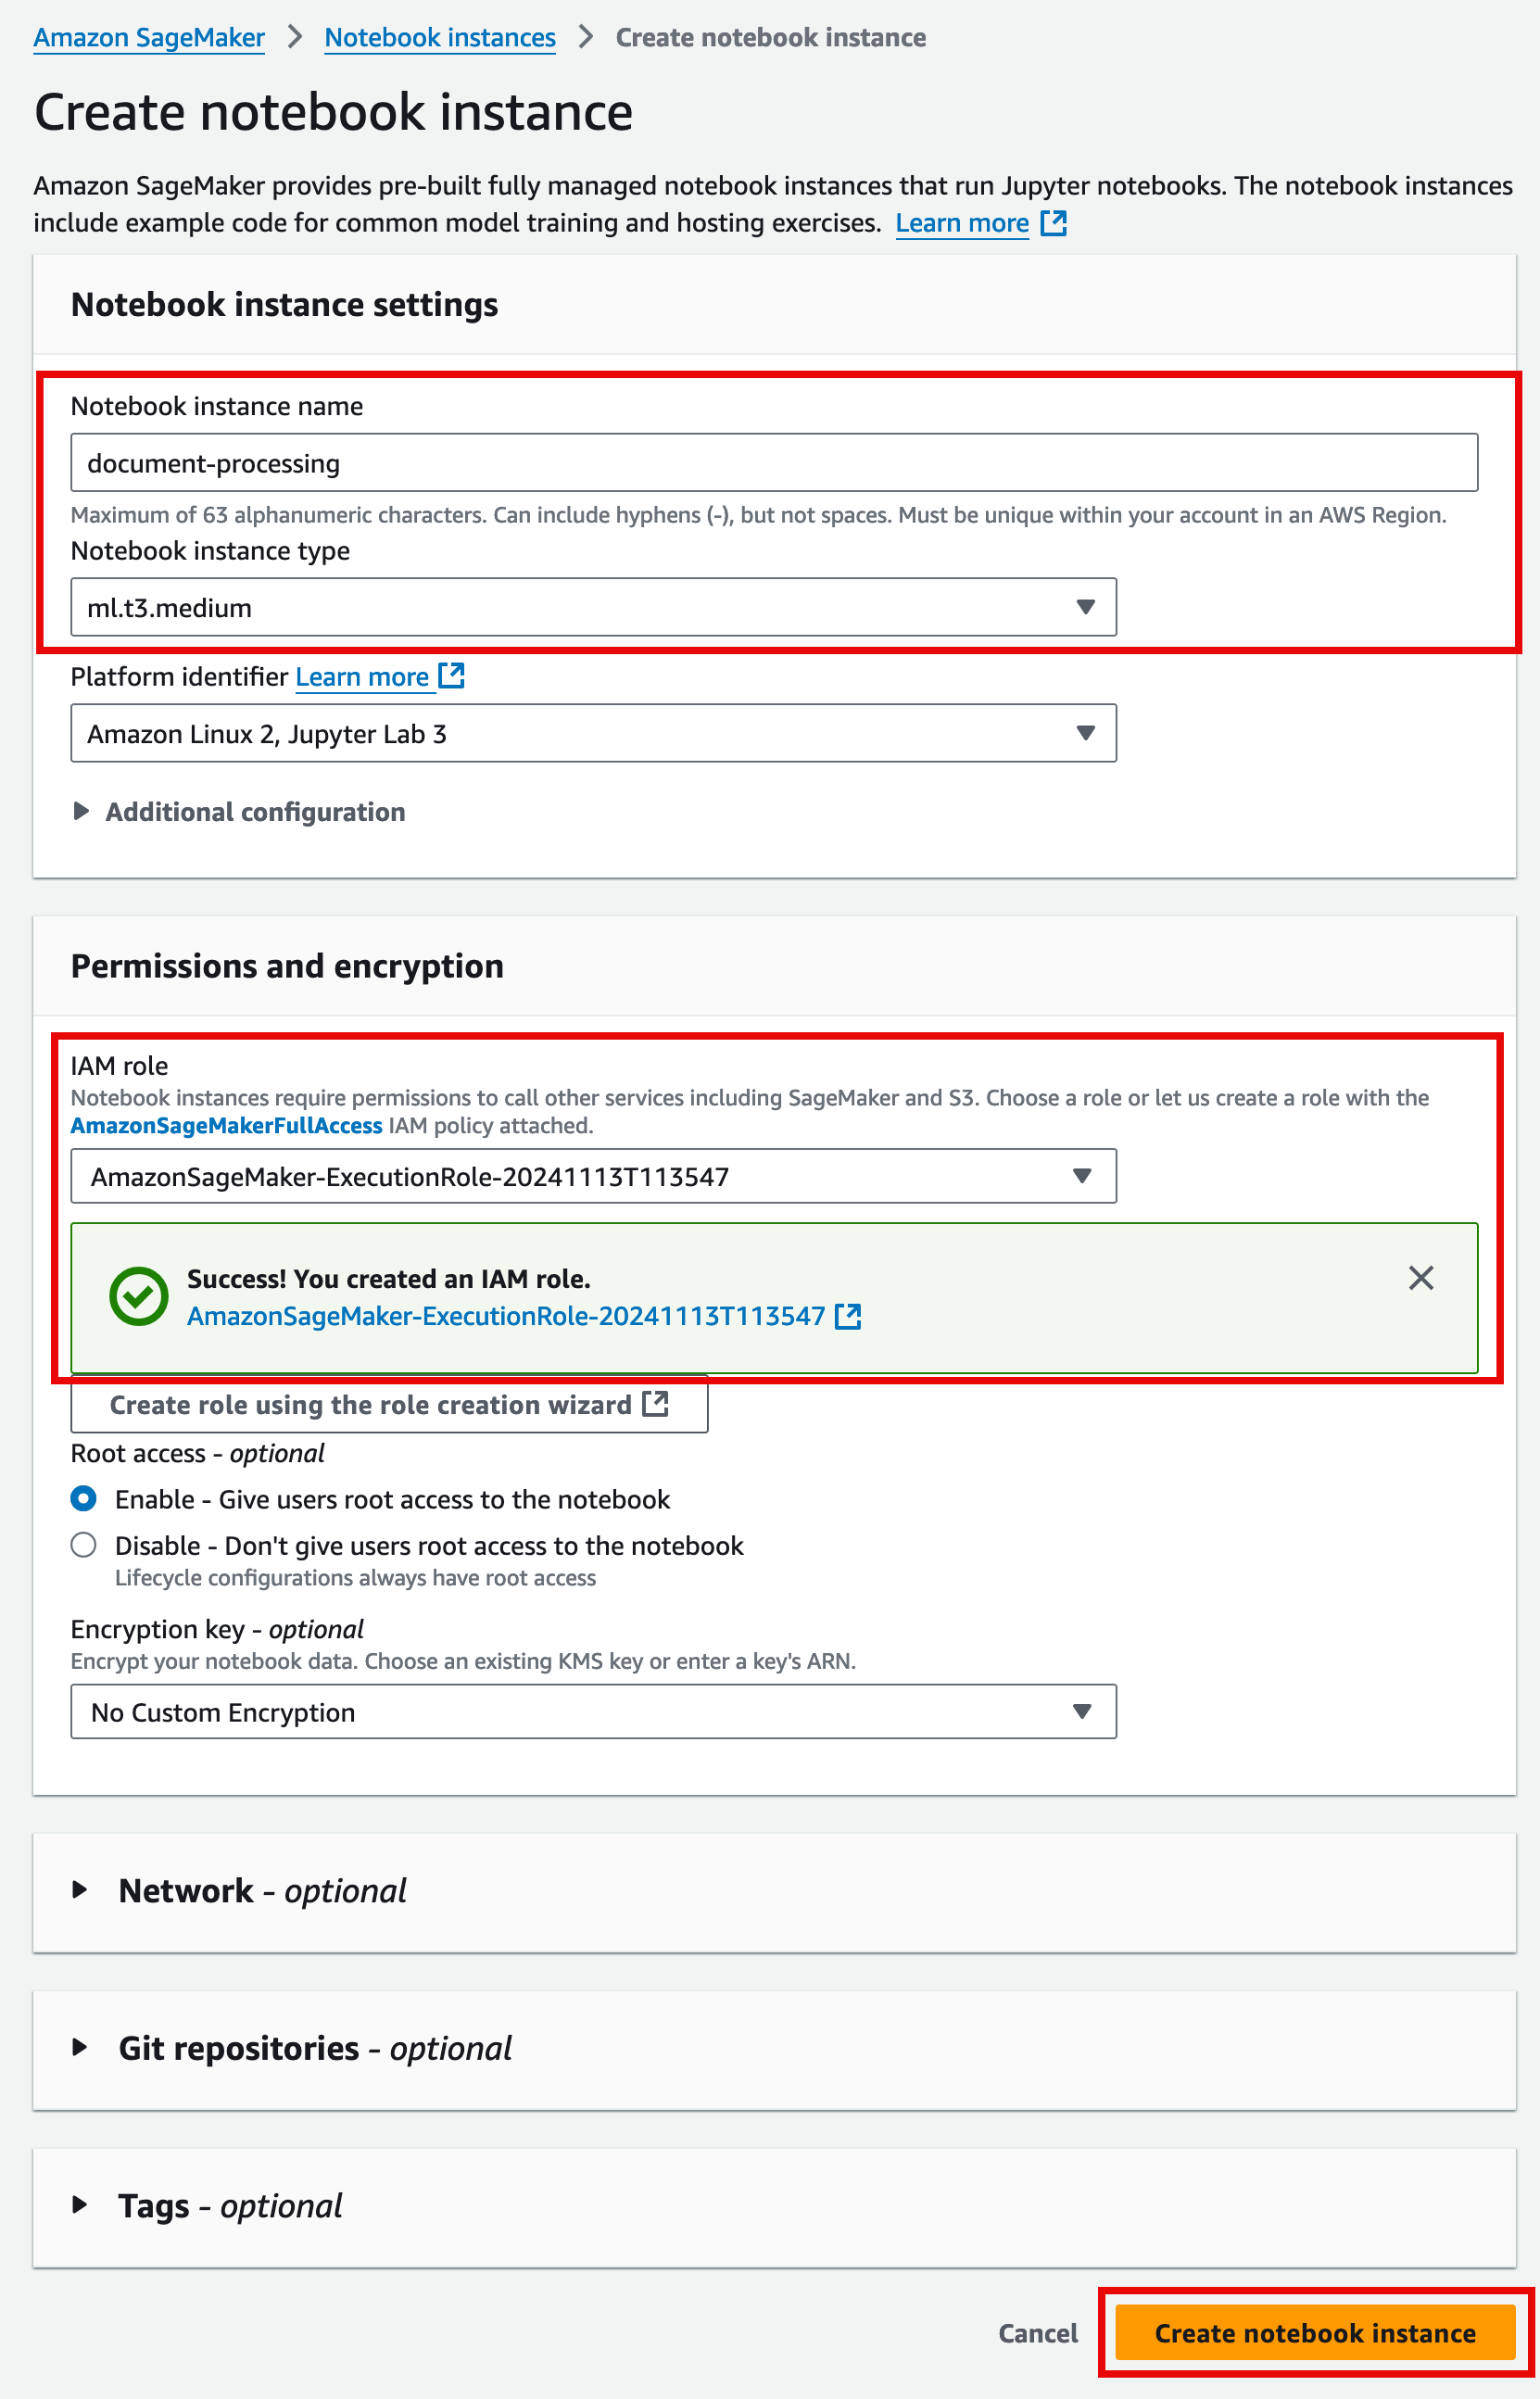
- In the Permissions and encryption section:
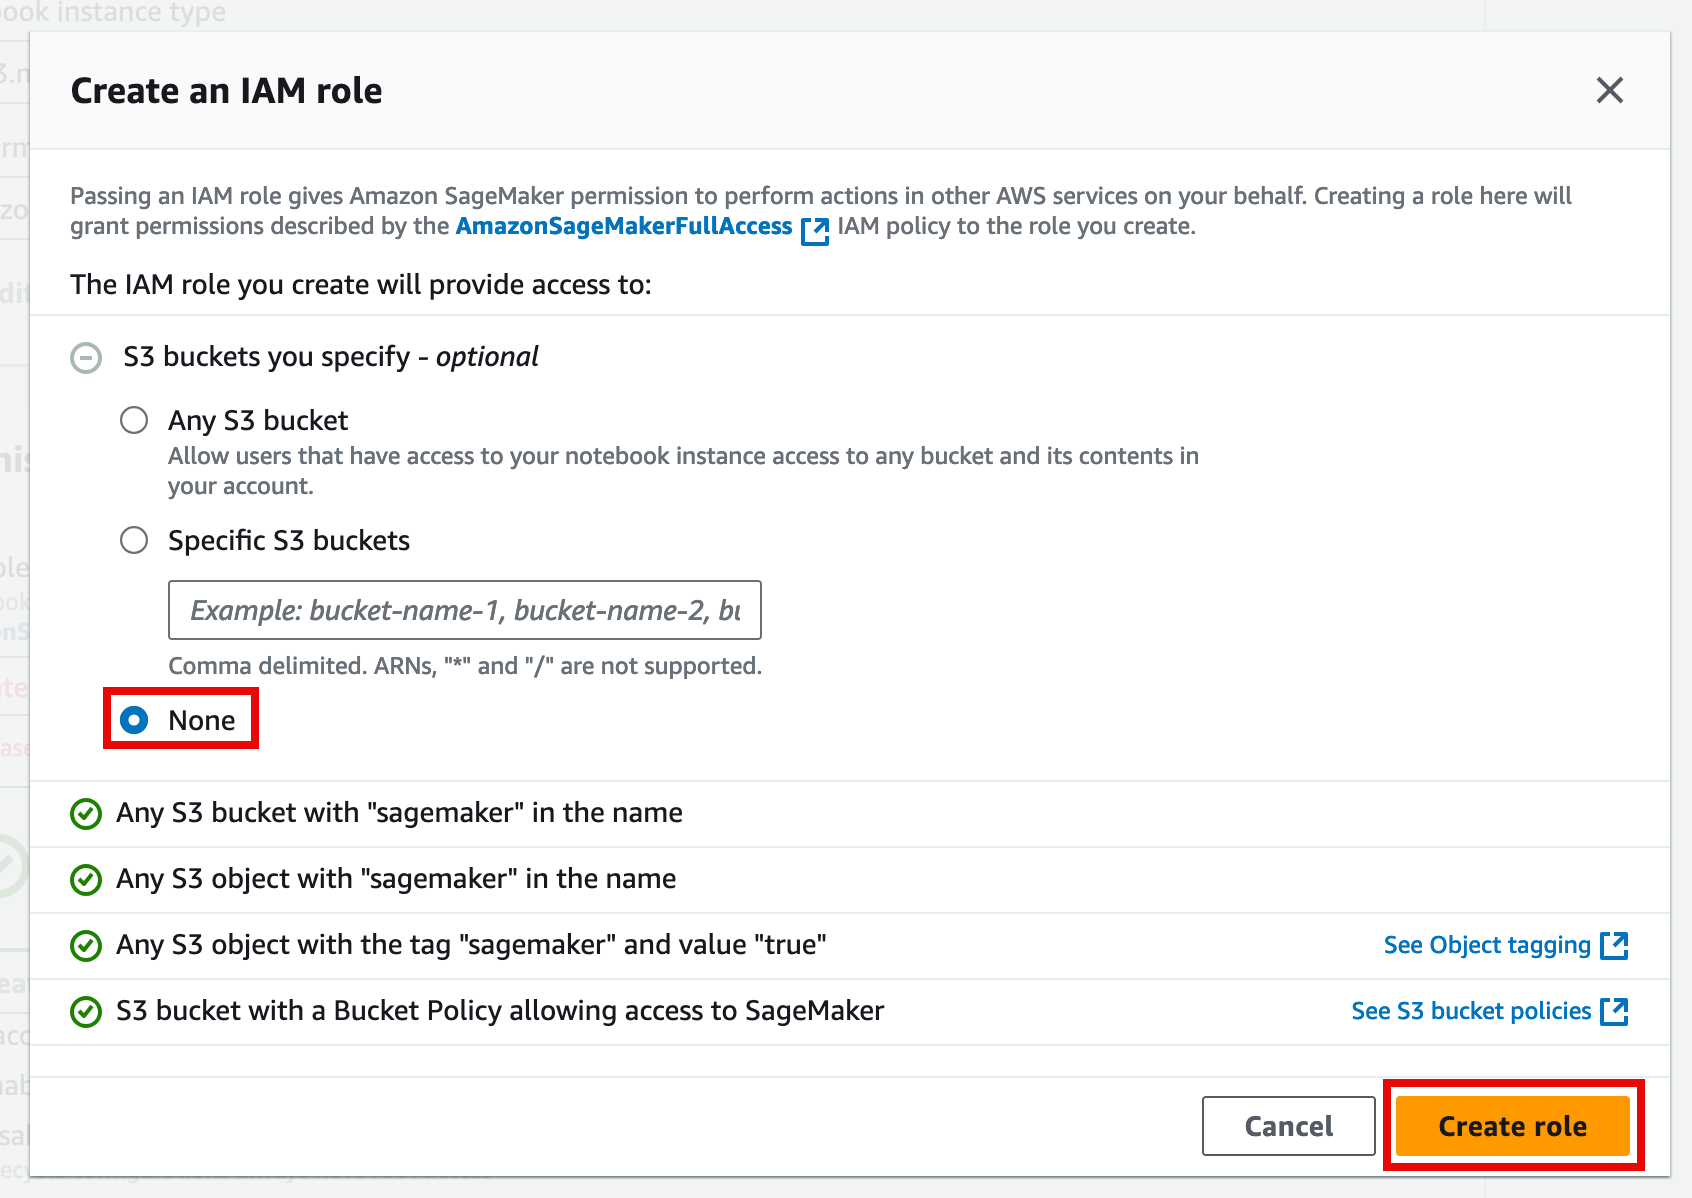
- For IAM role, choose Create a new role.
- On the Create an IAM role pop up window, for S3 buckets you specify – optional, choose None, and then choose Create role.
5. Then, choose Create notebook instance.
Note: The notebook instance may take up to 5 minutes to create.
Step 3. Generate code to process your documents
In this step, you will use Bedrock playground to generate code for your Jupyter notebook.
- On the Notebook instance page, choose Open JupyterLab for the instance you created in the previous step.
Note: The notebook will open in a separate browser tab.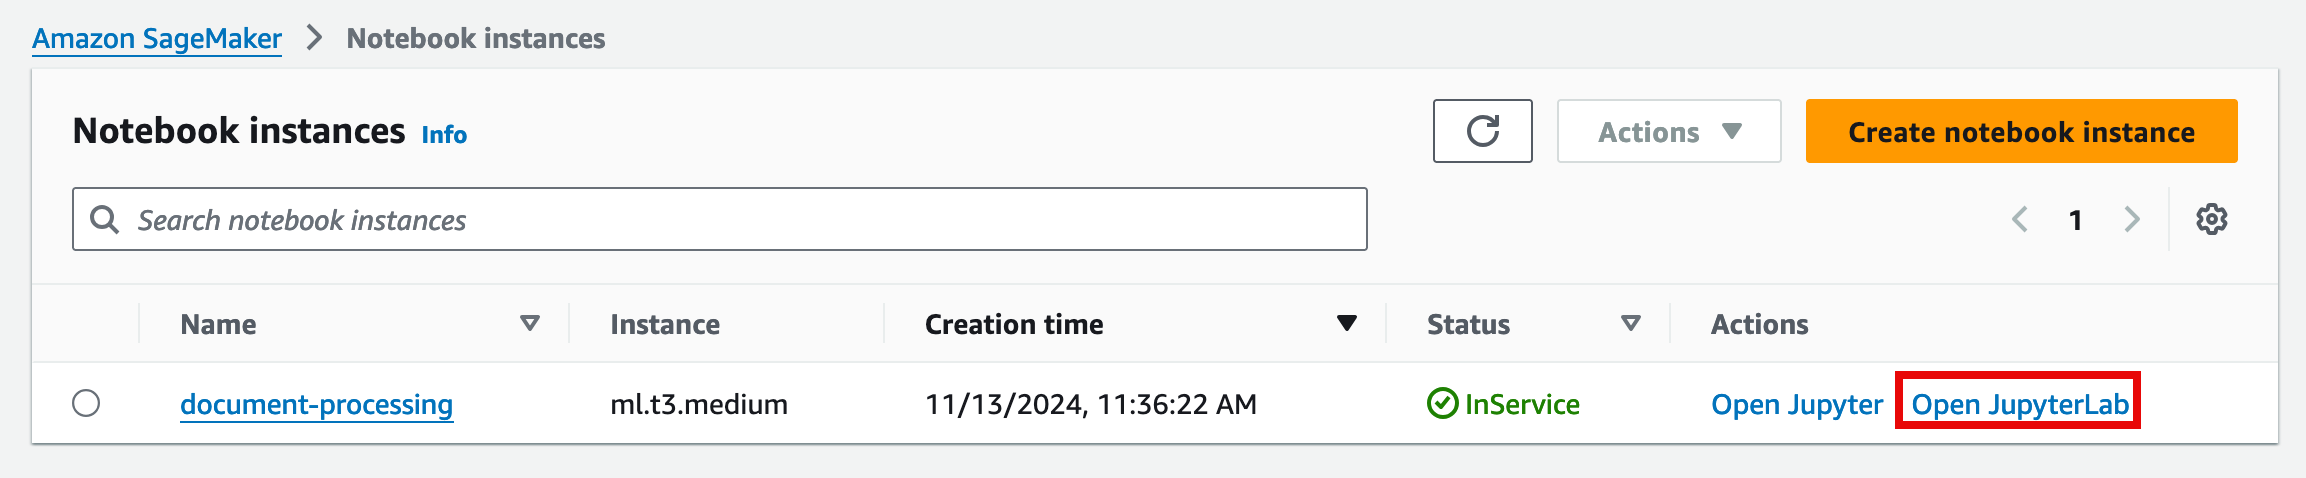
2. On the JupyterLab tab, right-click the file area, and then select New Notebook.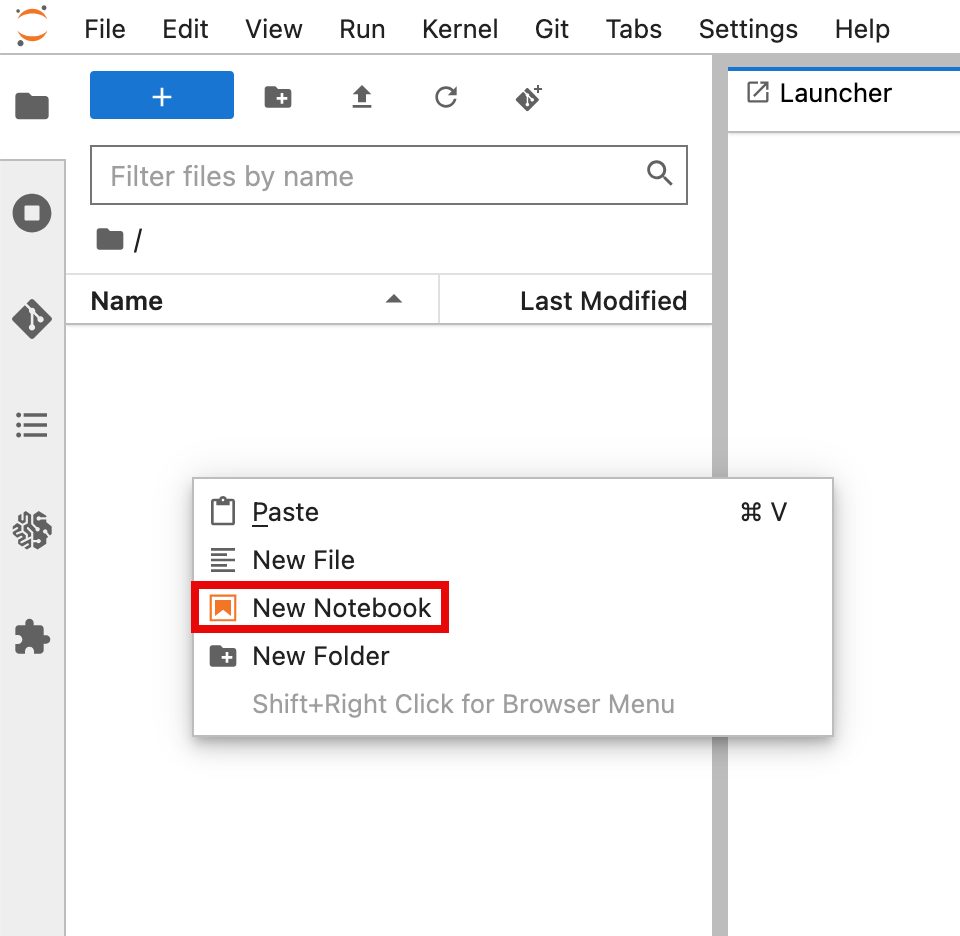
3. On the Select Kernel pop up window, choose conda_python3, and choose Select.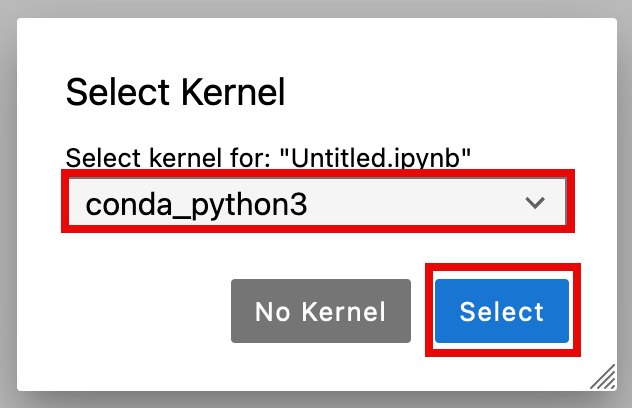
4. In a new tab, open the Amazon Bedrock console at https://console.aws.amazon.com/bedrock/home.
5. In the left navigation pane, under Playgrounds, choose Chat/text.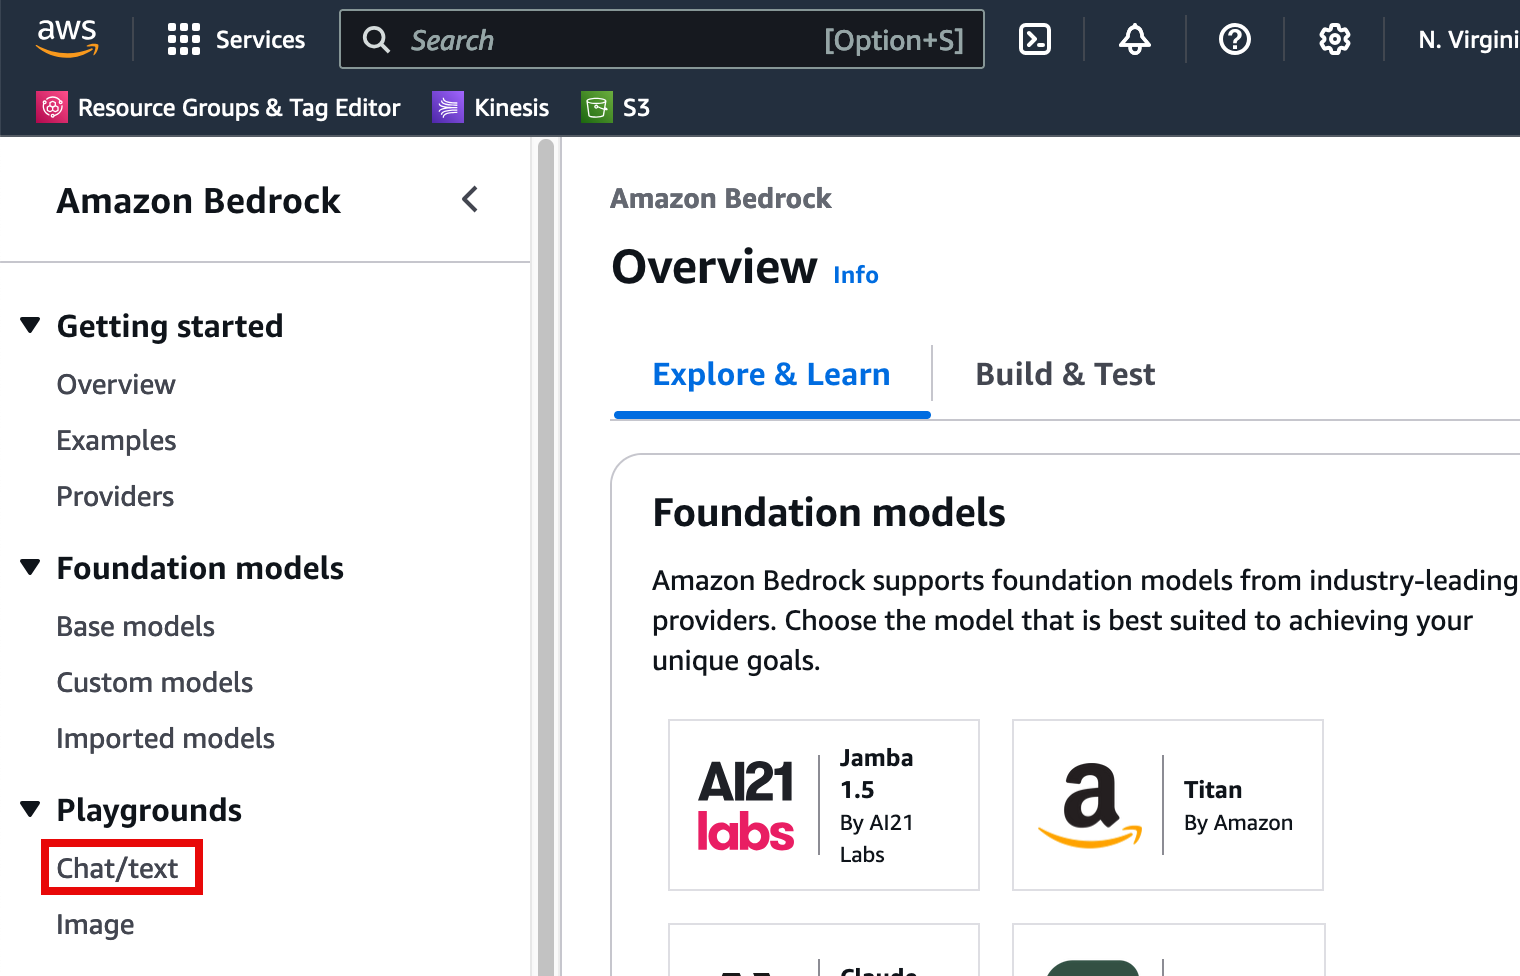
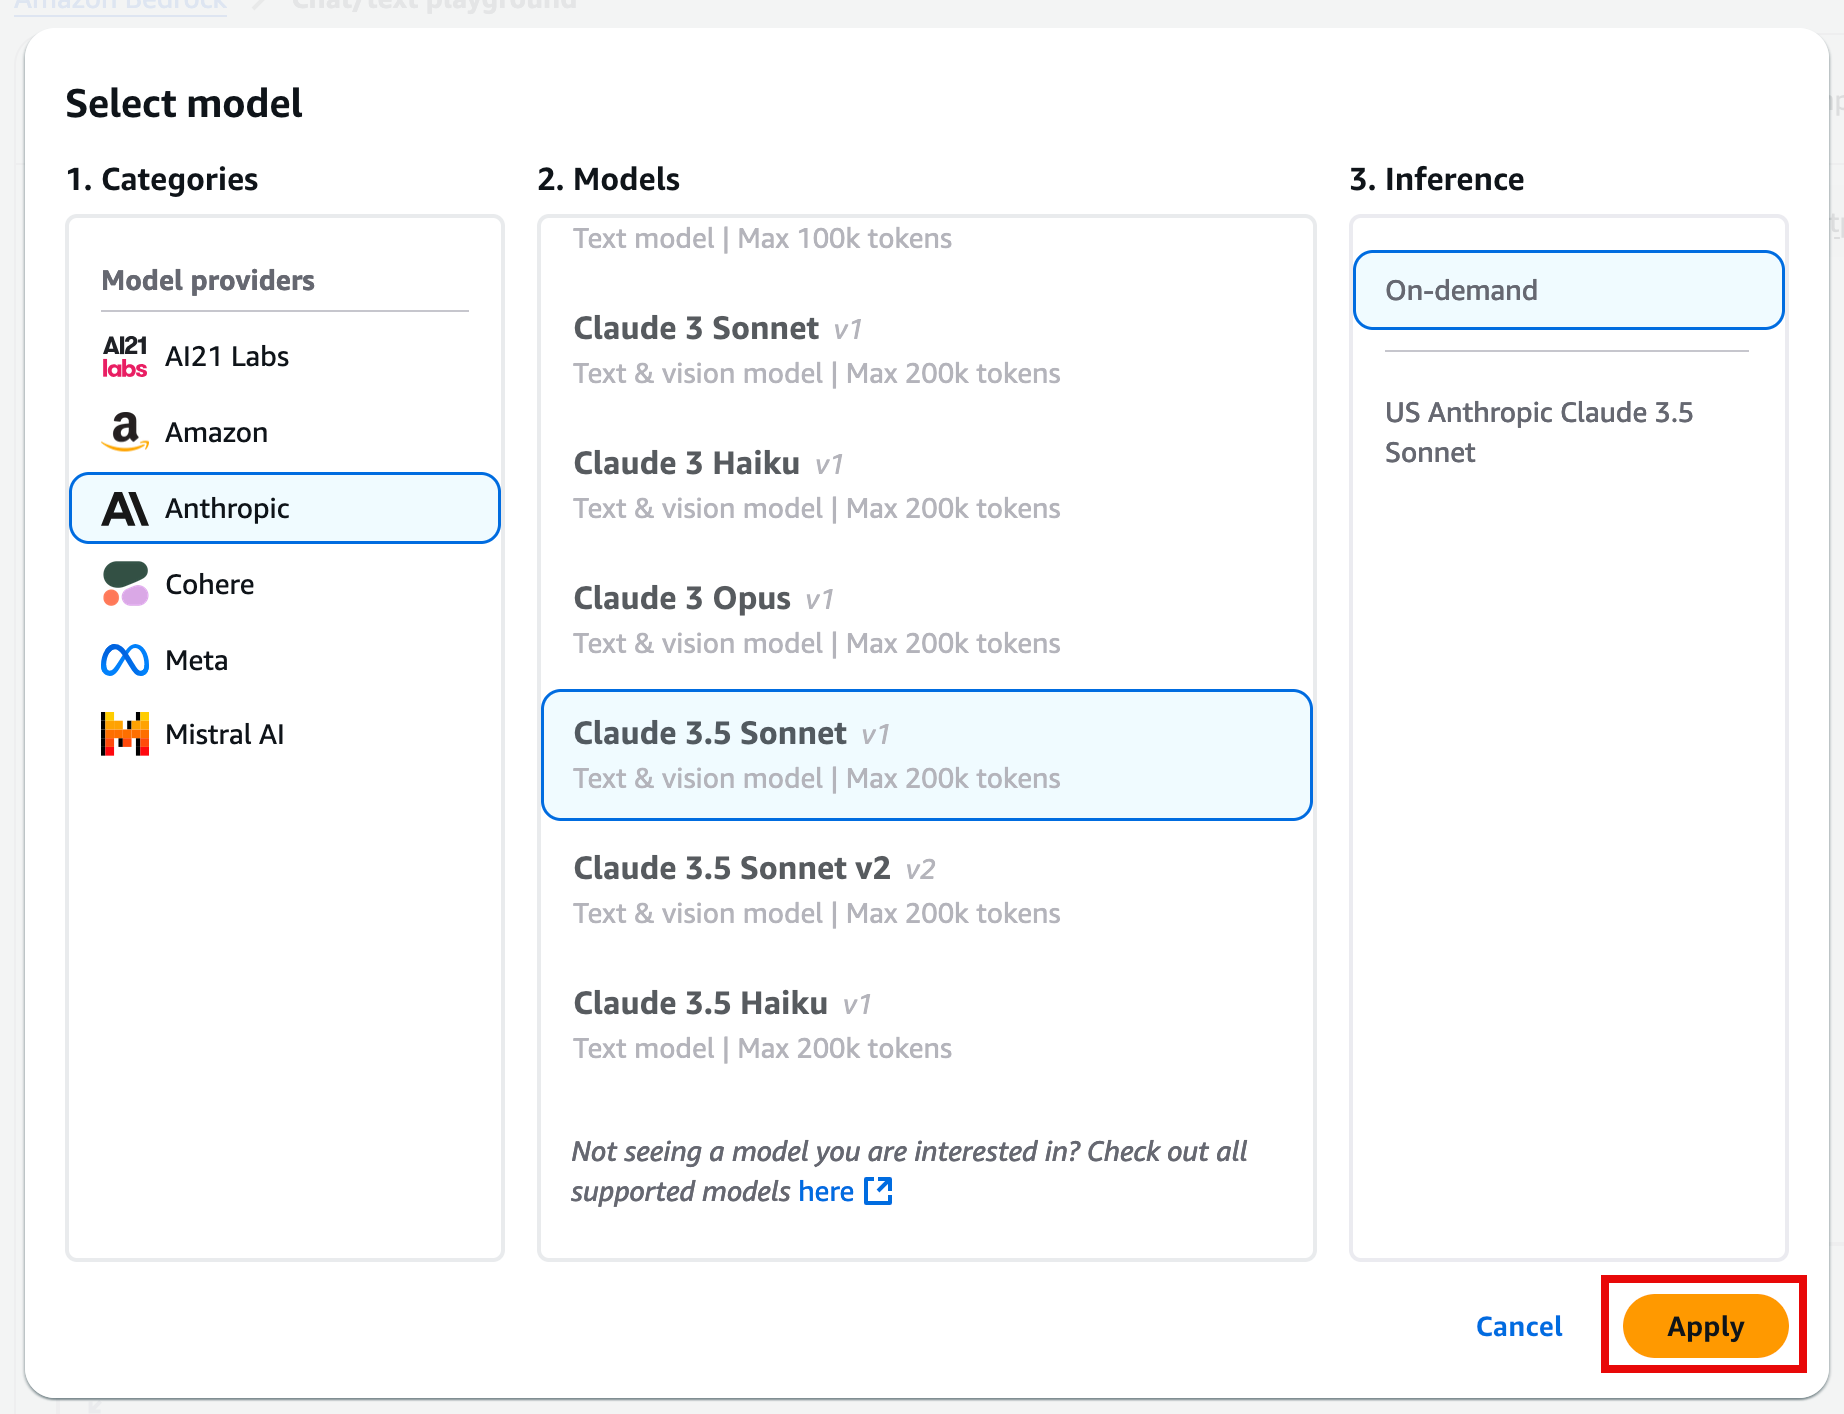
6. On the Mode page, choose Select model.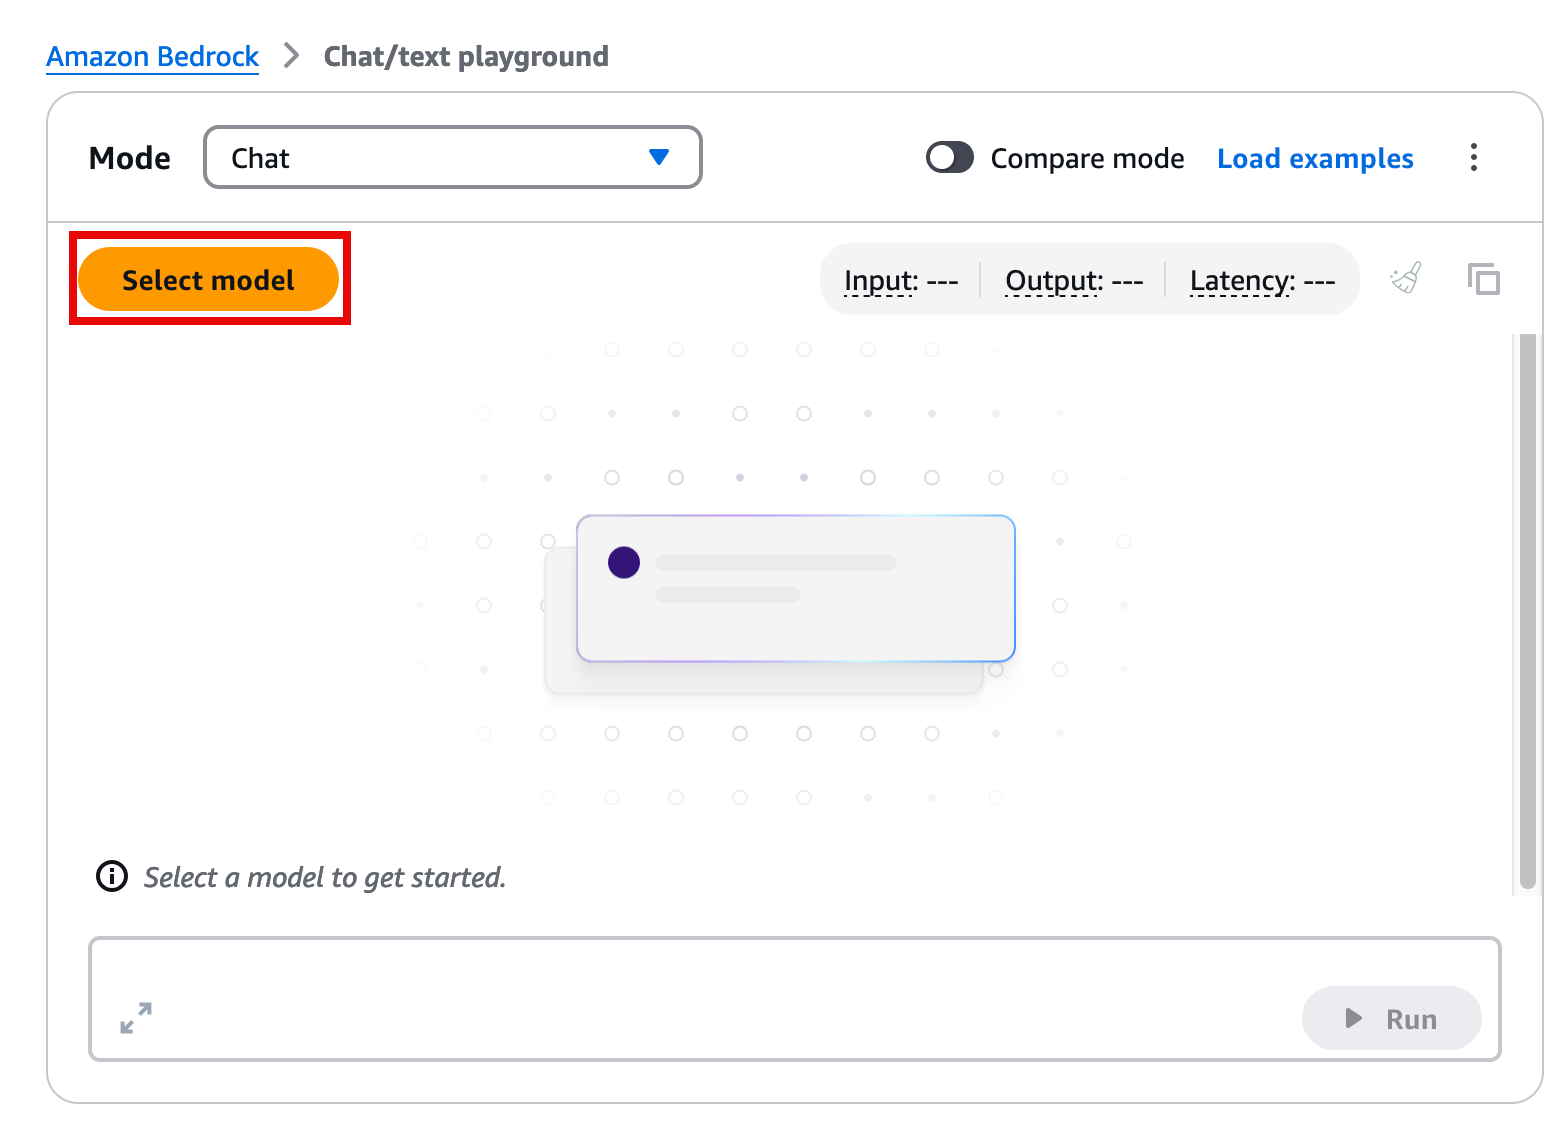
7. In the Select model dialog box:
- For Categories, choose Anthropic.
- For Models with access, choose the Claude 3.5 Sonnet model.
- Then, choose Apply.
8. In the Chat playground, you can now ask the LLM to write sample code. The following is an example prompt that you can use to extract information from an unstructured document.
I am writing a Jupyter notebook with a proof of concept python code snippets to perform a few tasks.
To start, write a snippet to iterate the current folder and read all the jpg/png files and for each file call textract DetectDocumentText API to extract all the text on the image.
Re-save the result with the same file name and txt extension.
Also make sure to:
- Not reprocess any files that already have the txt file existing in the directory
- Print a progress bar output using tdqm
- Keep everything readable and properly componentized in methods
- No need for __main__ implementations as it's a snippet to run on Jupyter notebook.
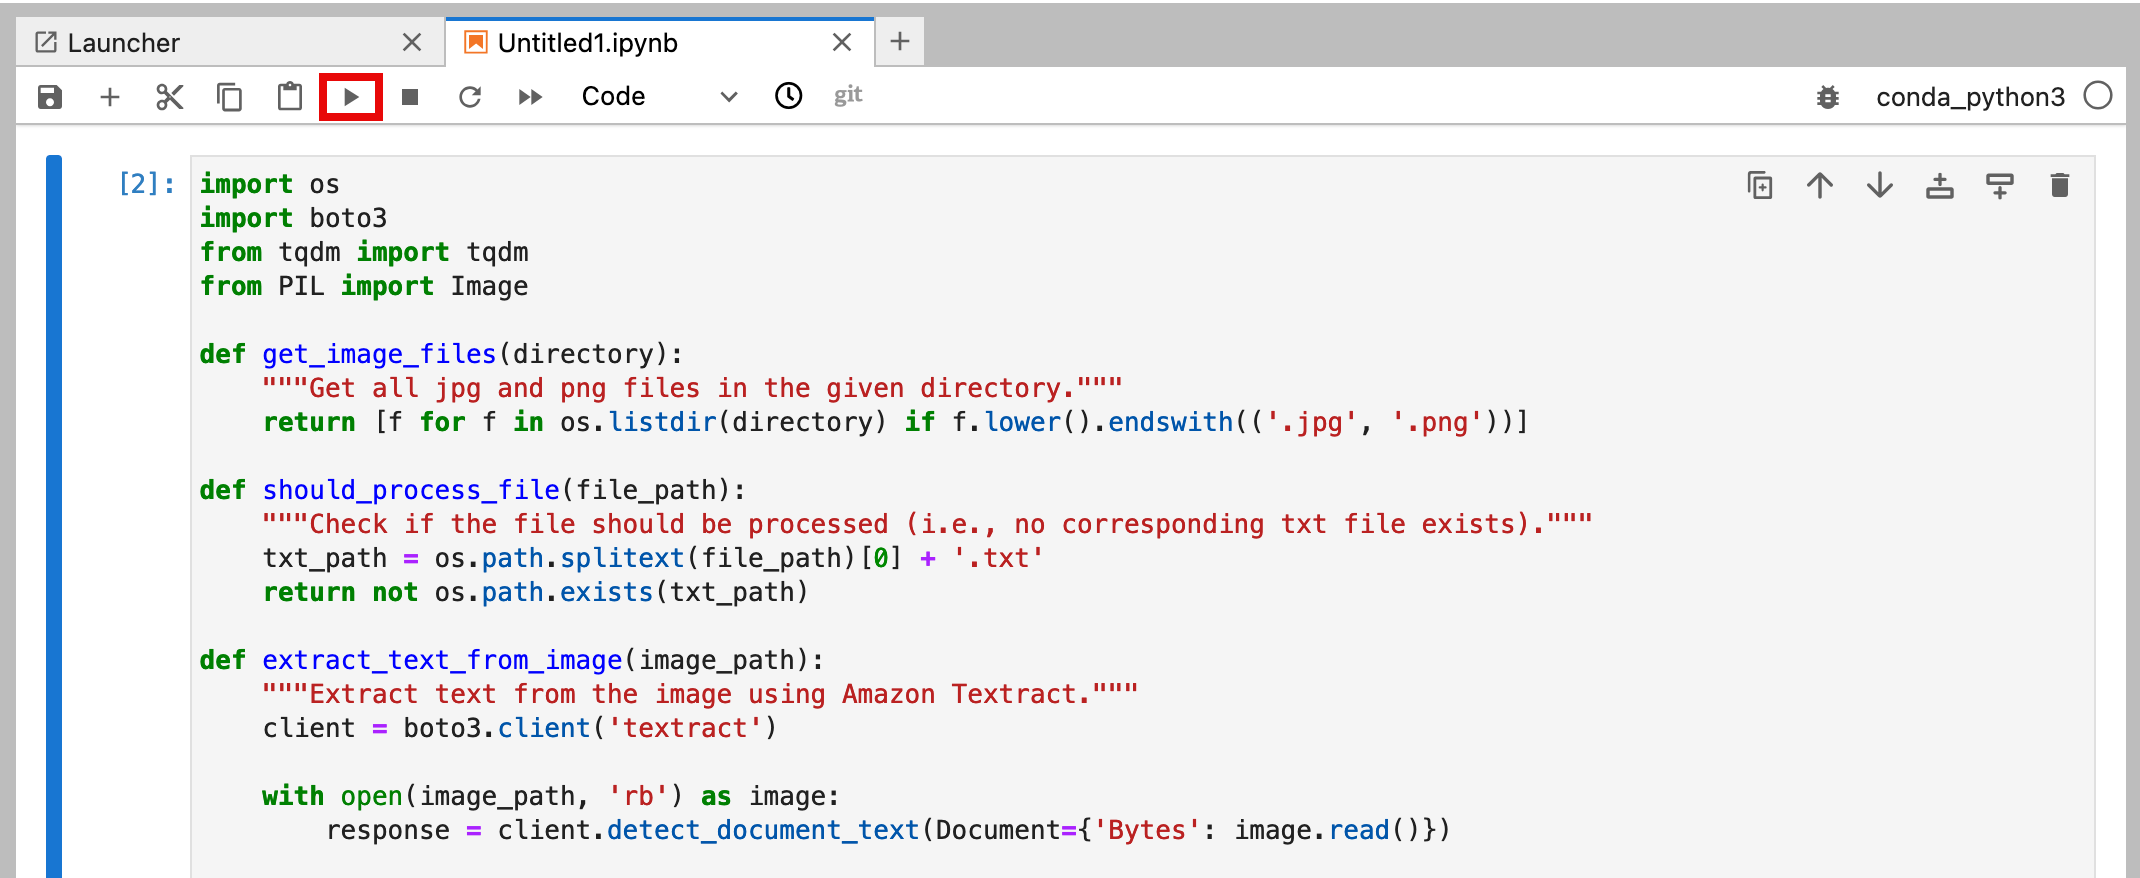
9. Once you enter your prompt, and choose Run, the prompt response will include code and also explanation of everything that the model generated. The code will typically be enclosed in quotation marks.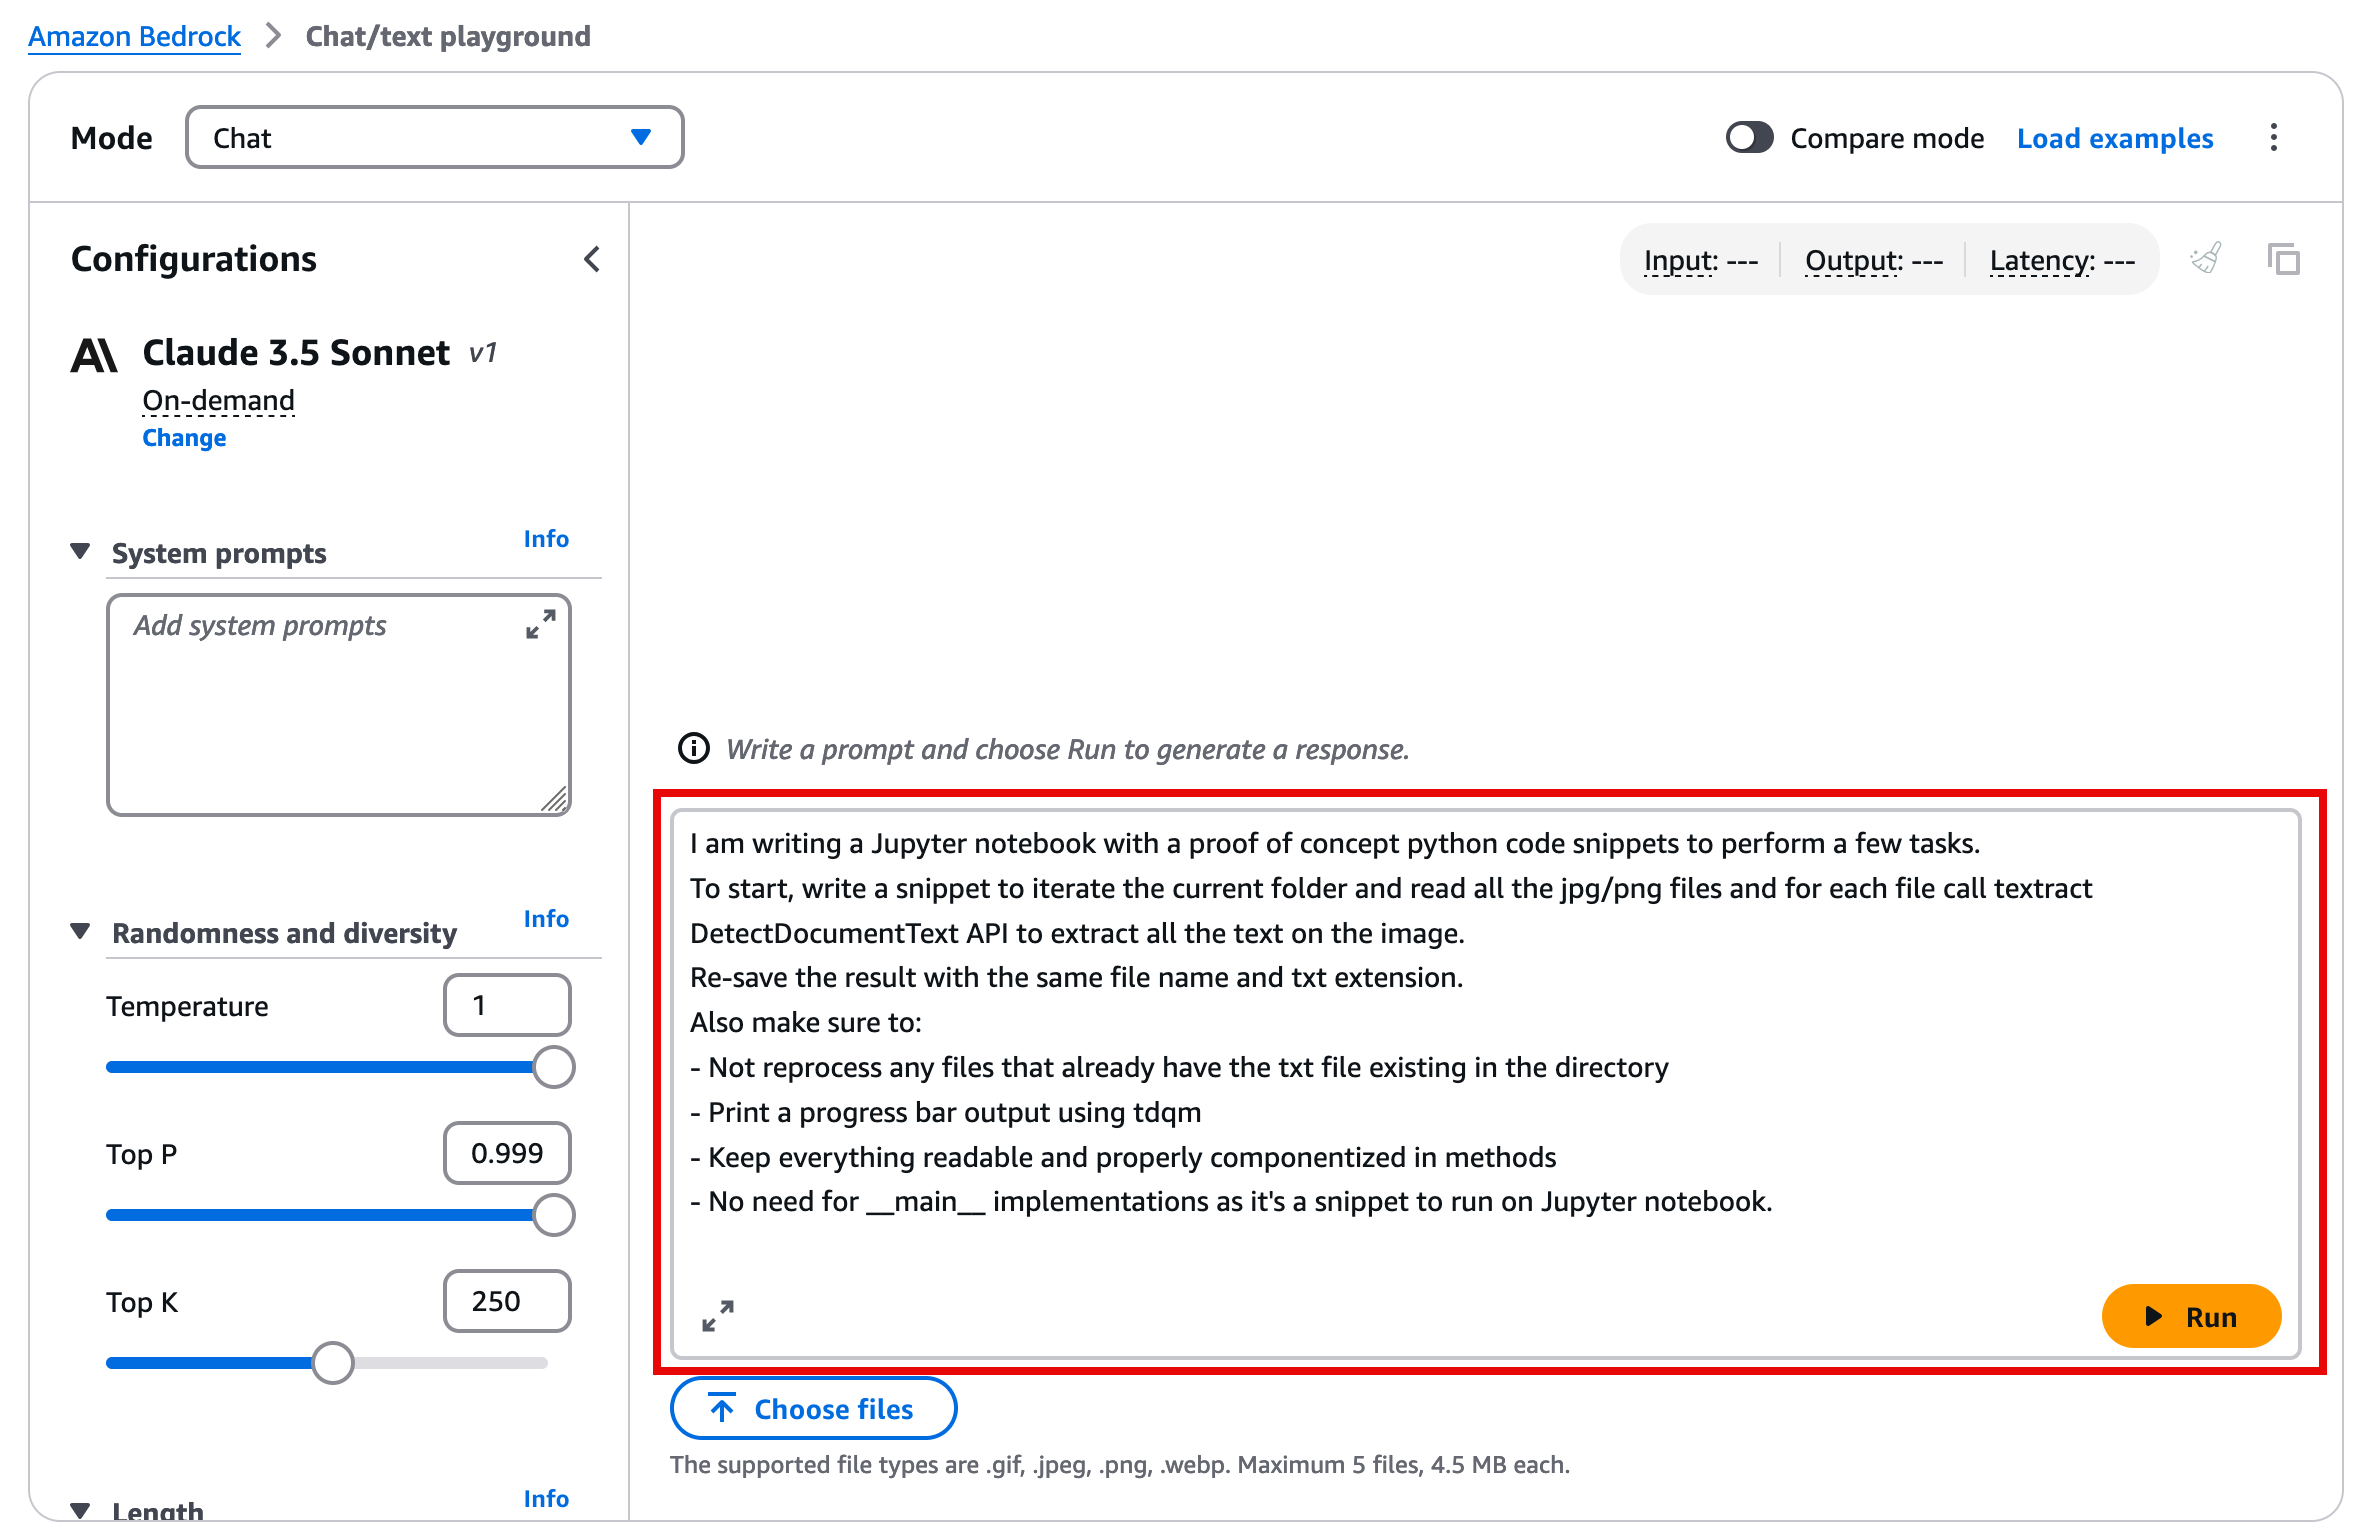
10. The generated code with the example prompt should look similar to the following example. You can also use the copy function to paste the code directly into the Jupyter notebook.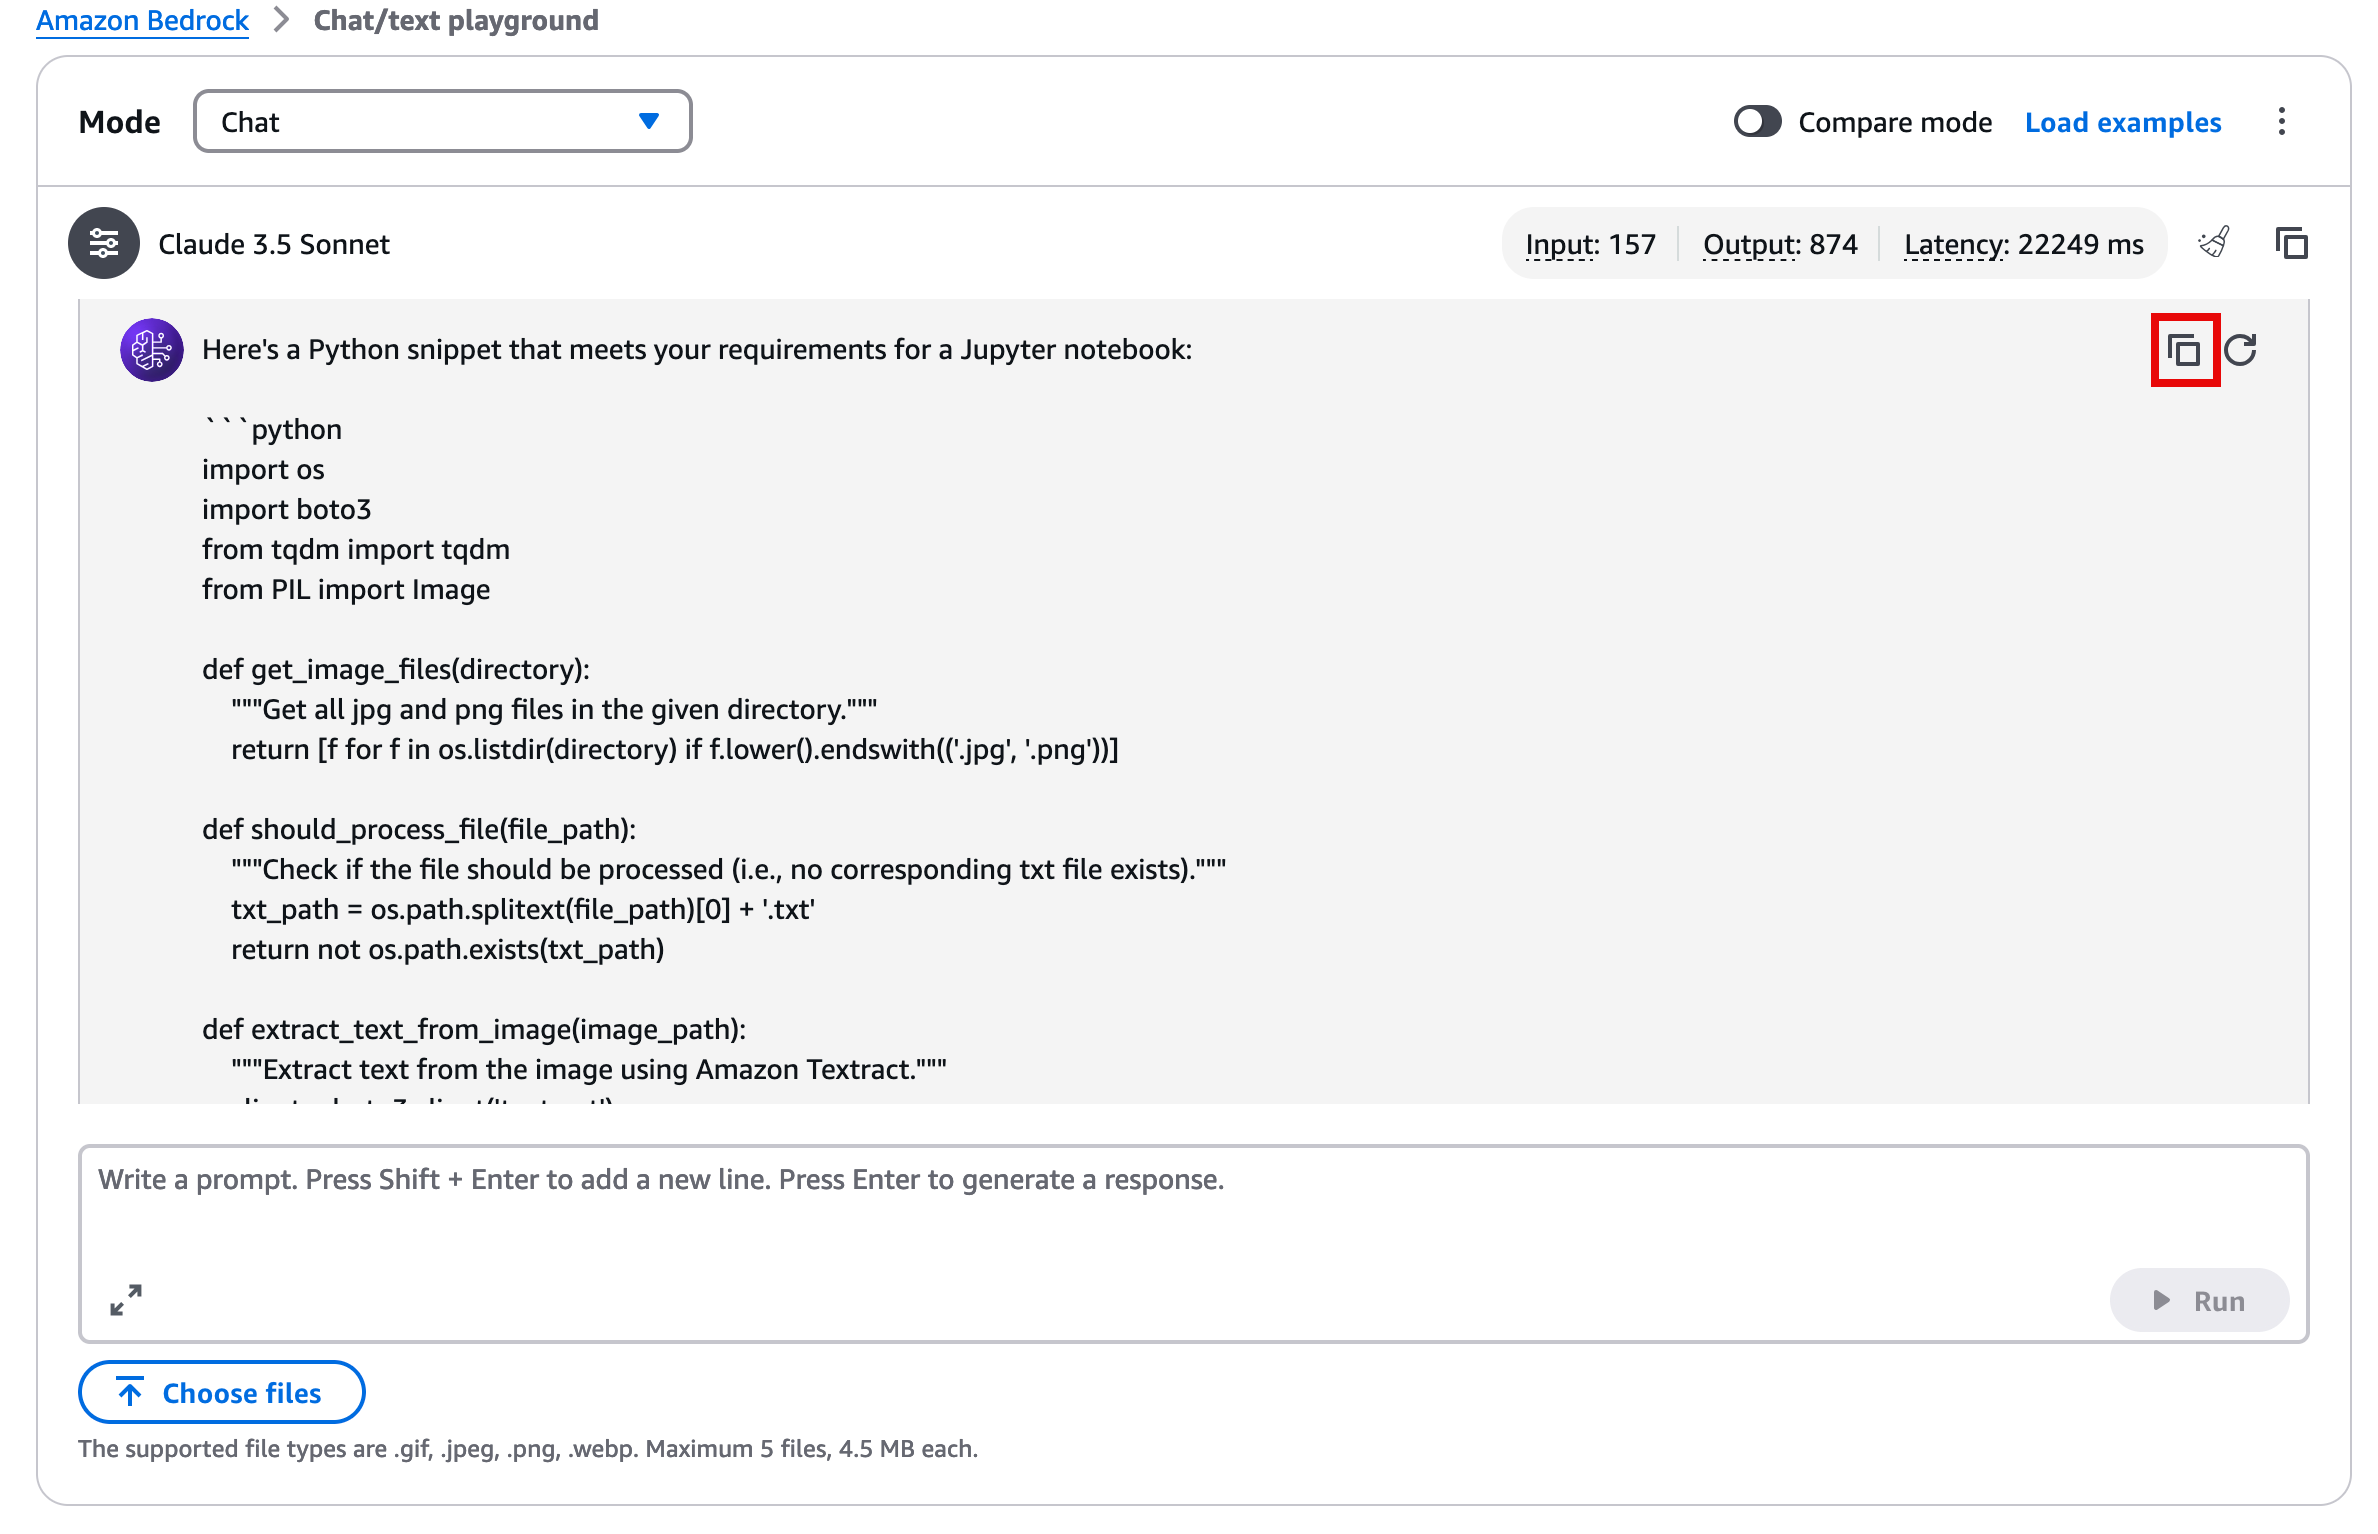
import os
import boto3
from tqdm import tqdm
from PIL import Image

def get_image_files(directory):
    """Get all jpg and png files in the given directory."""
    return [f for f in os.listdir(directory) if f.lower().endswith(('.jpg', '.png'))]

def should_process_file(file_path):
    """Check if the file should be processed (i.e., no corresponding txt file exists)."""
    txt_path = os.path.splitext(file_path)[0] + '.txt'
    return not os.path.exists(txt_path)

def extract_text_from_image(image_path):
    """Extract text from the image using Amazon Textract."""
    client = boto3.client('textract')

    with open(image_path, 'rb') as image:
        response = client.detect_document_text(Document={'Bytes': image.read()})

    extracted_text = []
    for item in response['Blocks']:
        if item['BlockType'] == 'LINE':
            extracted_text.append(item['Text'])

    return '\n'.join(extracted_text)

def save_text_to_file(text, file_path):
    """Save the extracted text to a file."""
    txt_path = os.path.splitext(file_path)[0] + '.txt'
    with open(txt_path, 'w', encoding='utf-8') as f:
        f.write(text)

def process_images_in_directory(directory):
    """Process all images in the given directory."""
    image_files = get_image_files(directory)

    for image_file in tqdm(image_files, desc="Processing images"):
        image_path = os.path.join(directory, image_file)

        if should_process_file(image_path):
            extracted_text = extract_text_from_image(image_path)
            save_text_to_file(extracted_text, image_path)

# Usage in Jupyter notebook
directory = '.'  # Current directory
process_images_in_directory(directory)
Note: The previous example code is built to process all files on the current directory and needs an image in order to fully process the code.
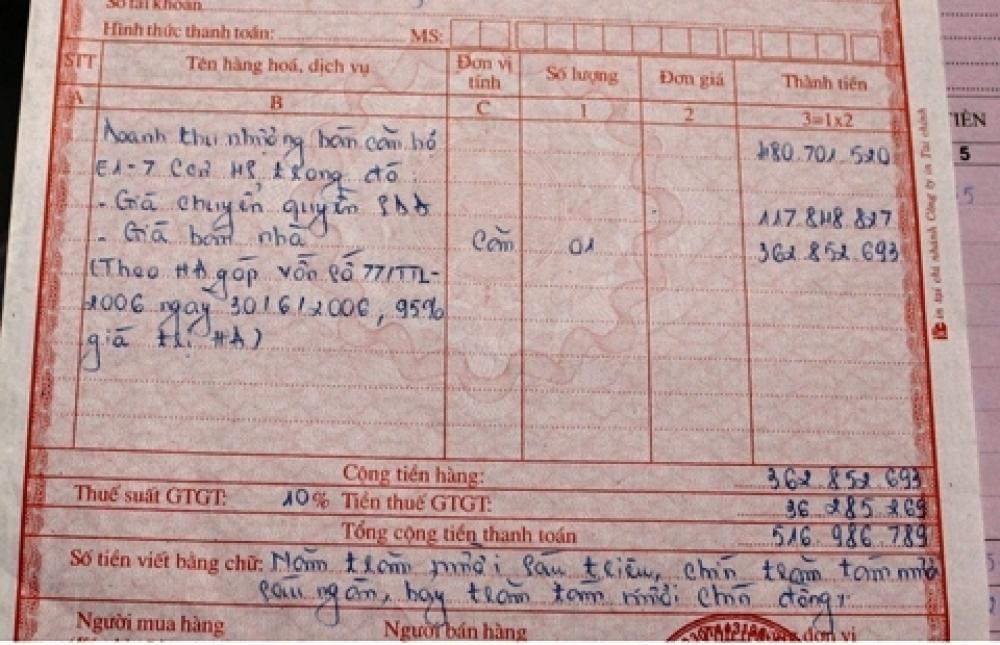
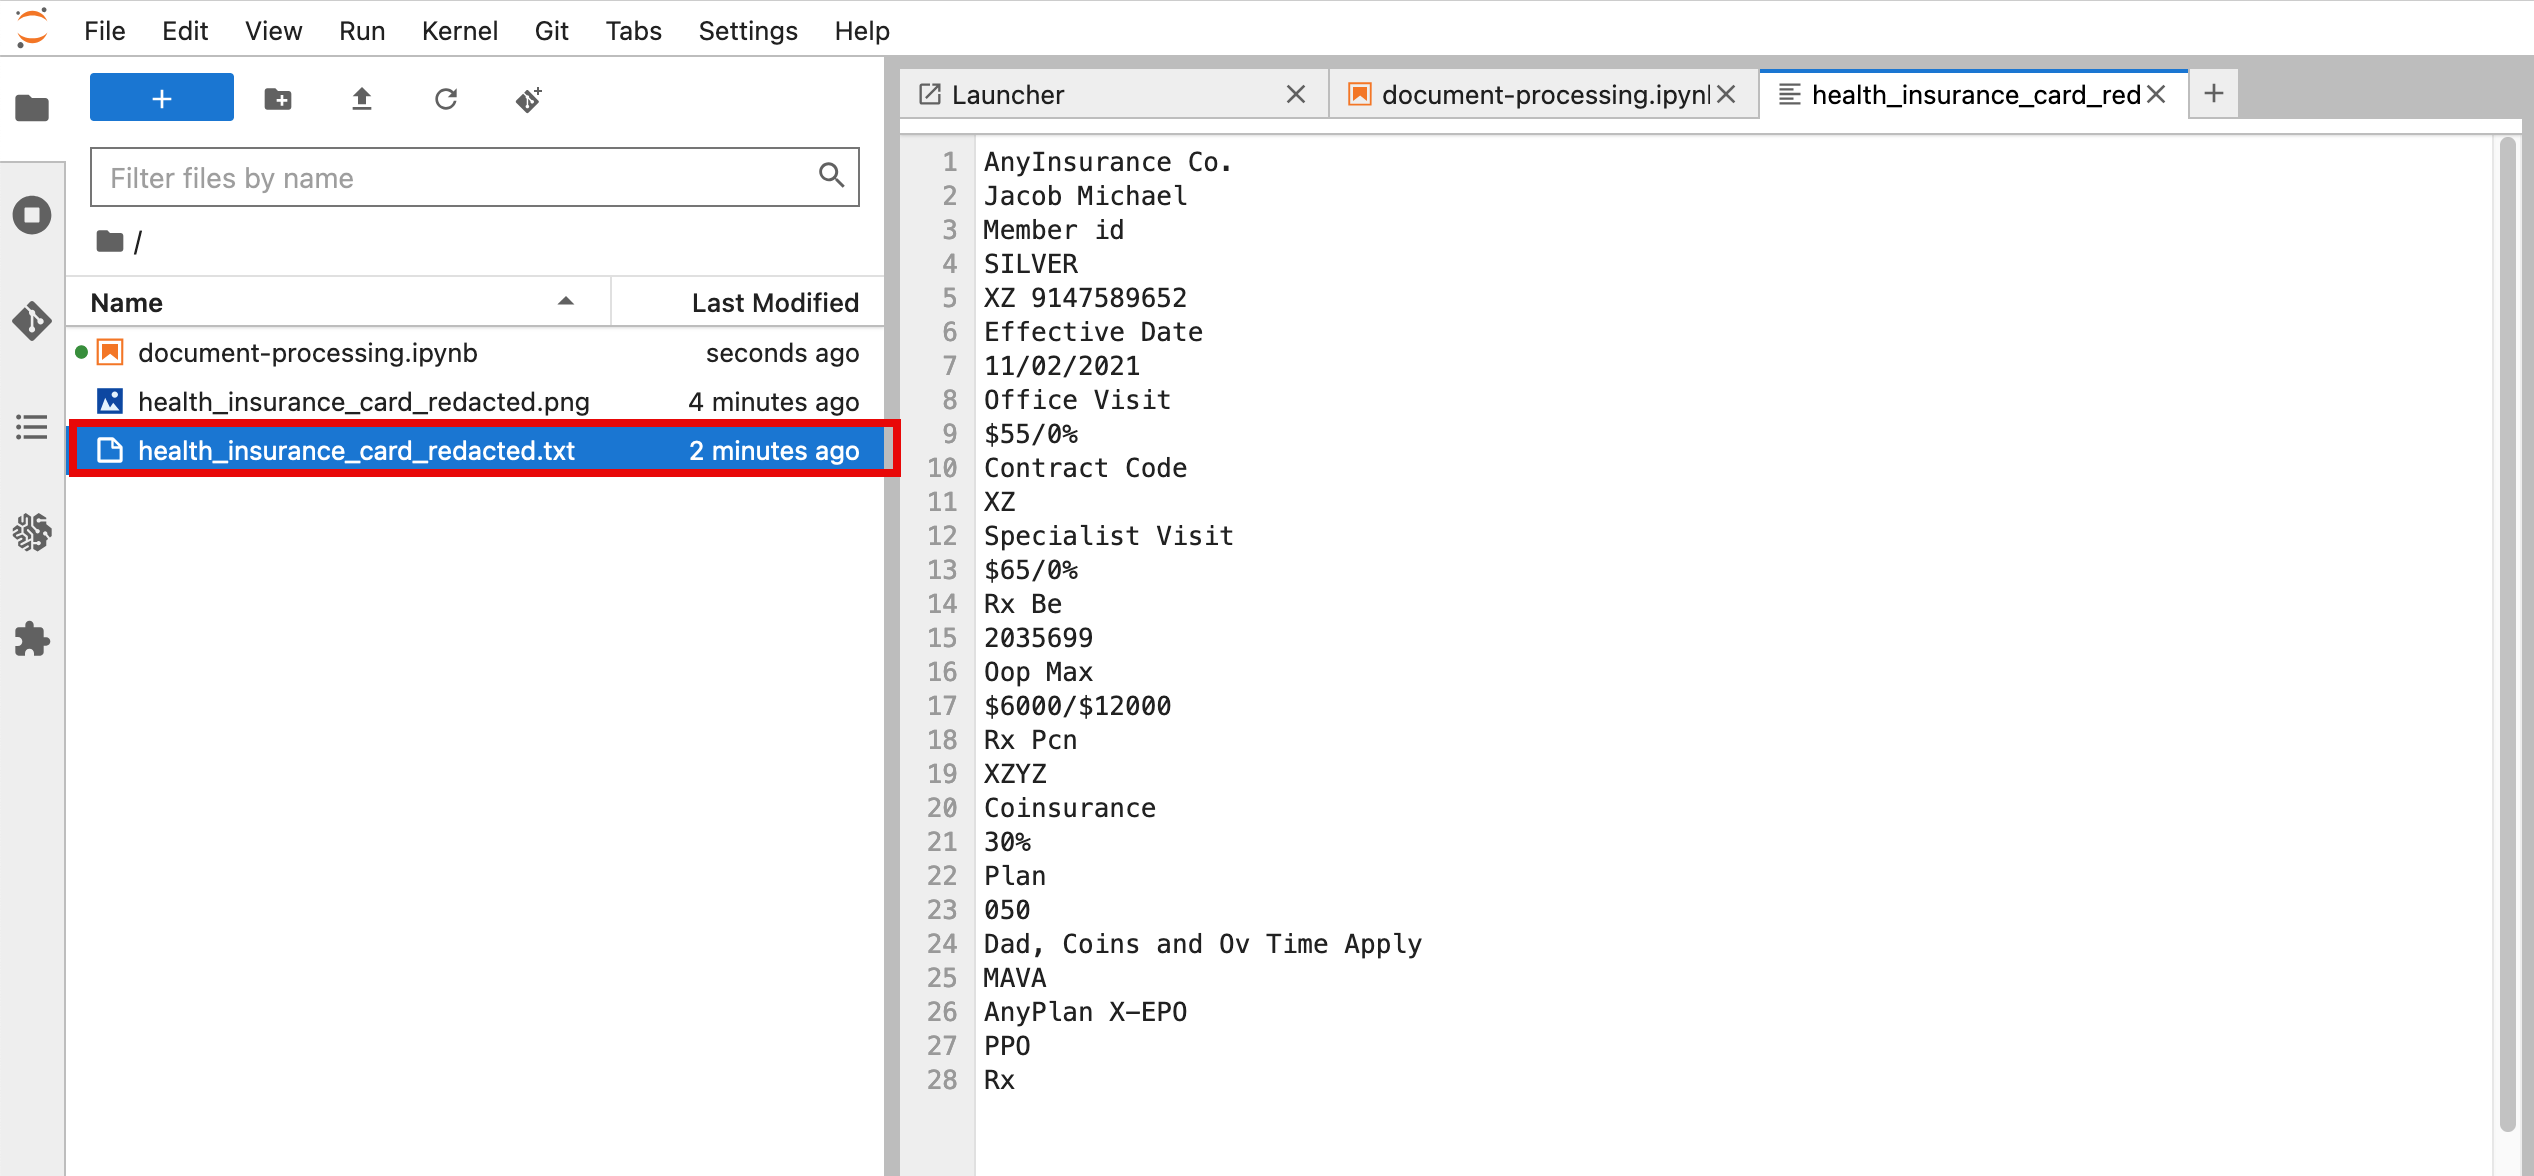
11. You can use your own image or download and save this image. Then, find the image you want to use on your local machine, and drag the file to the Jupyter Notebook file explorer in order to copy and paste it.

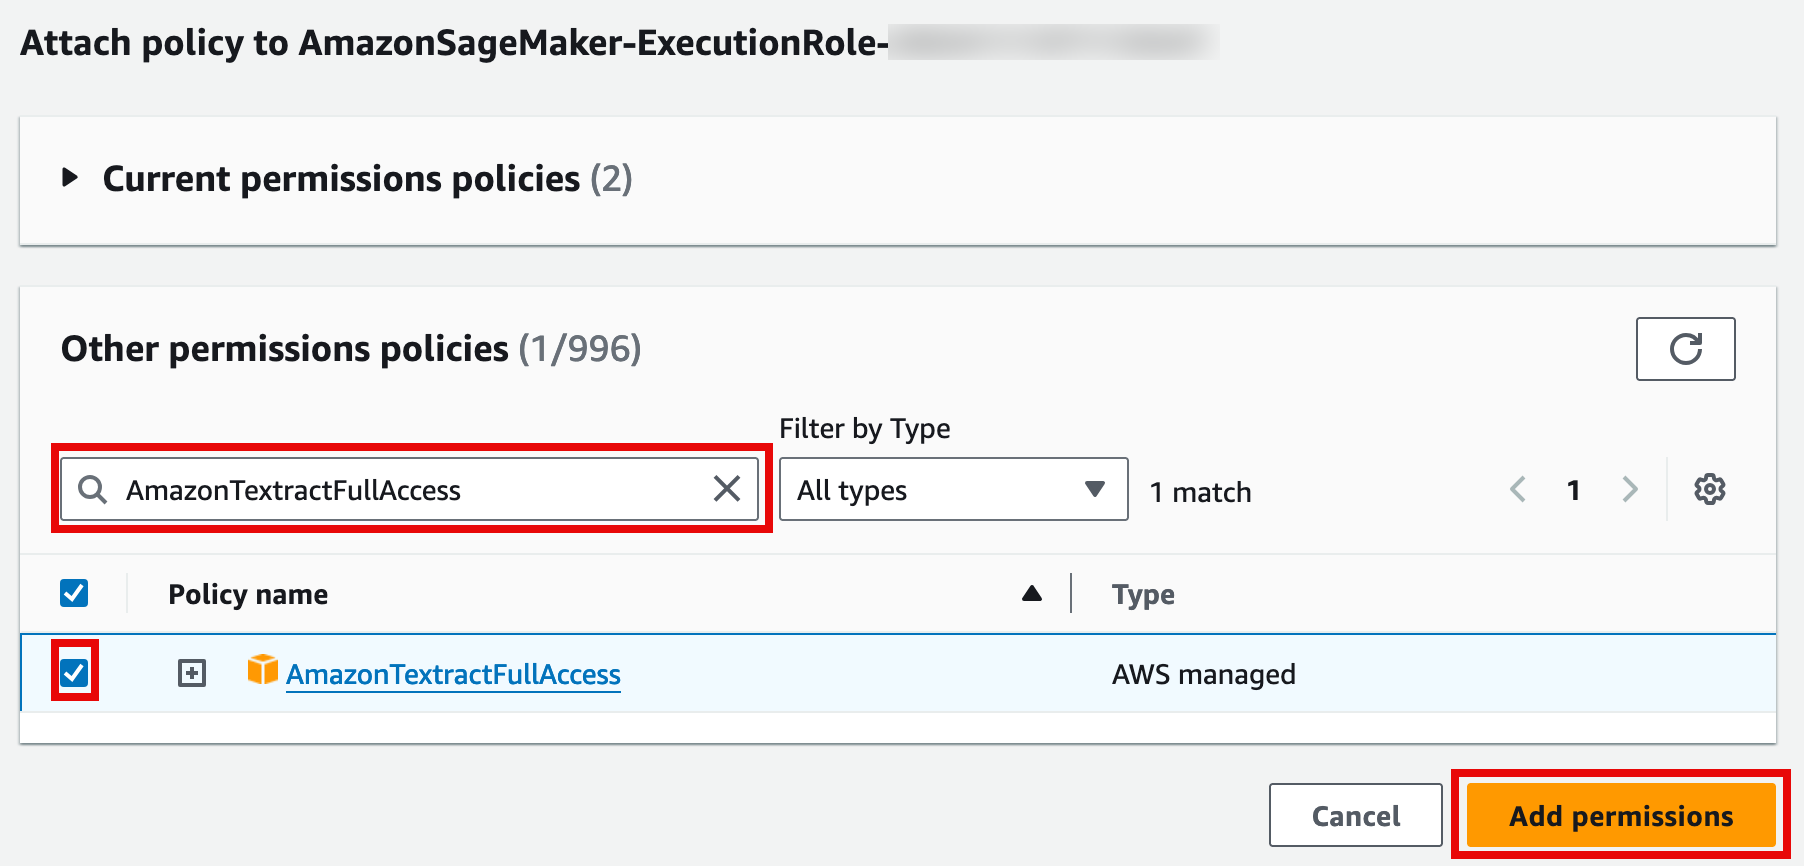
- Before run the code in your JupyterLab, need update permissions for notebook call to Amazon Textract.
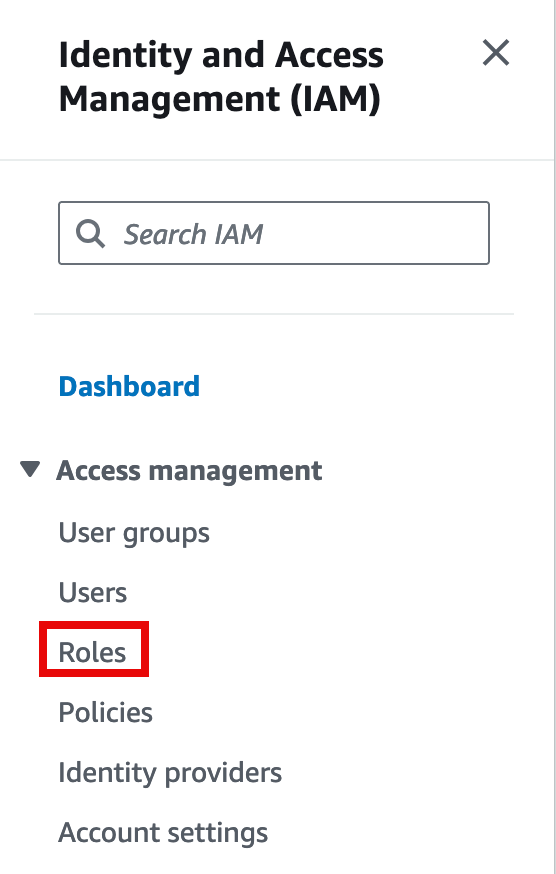
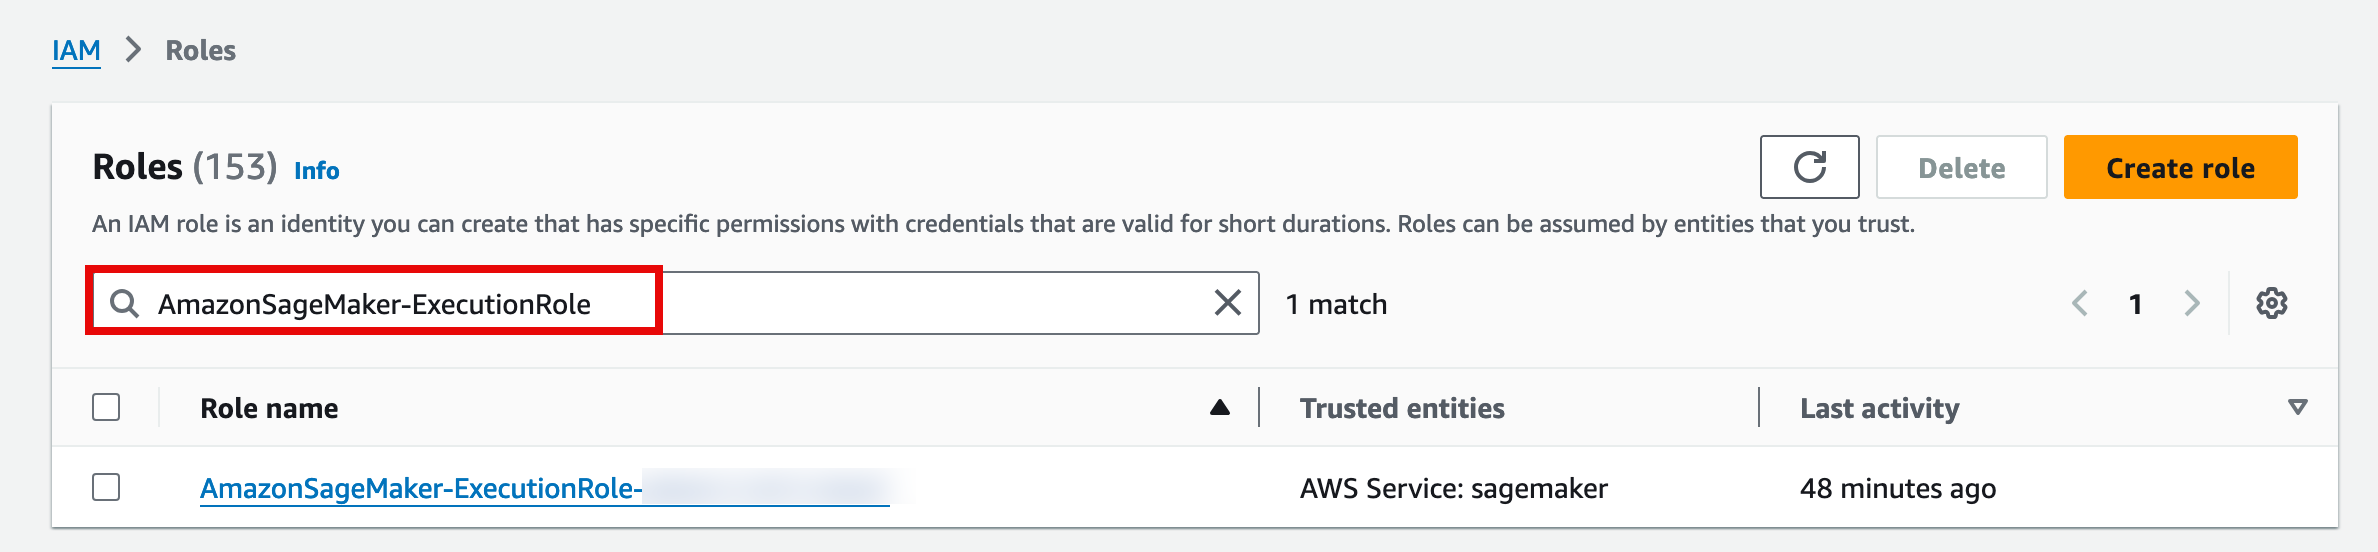
- In the search box, find the previously created AmazonSageMaker-ExecutionRole-<timestamp> role, and open the role.
- On the AmazonSageMaker-ExecutionRole-<timestamp> page, choose the Add permissions drop down, and select Attach policies.
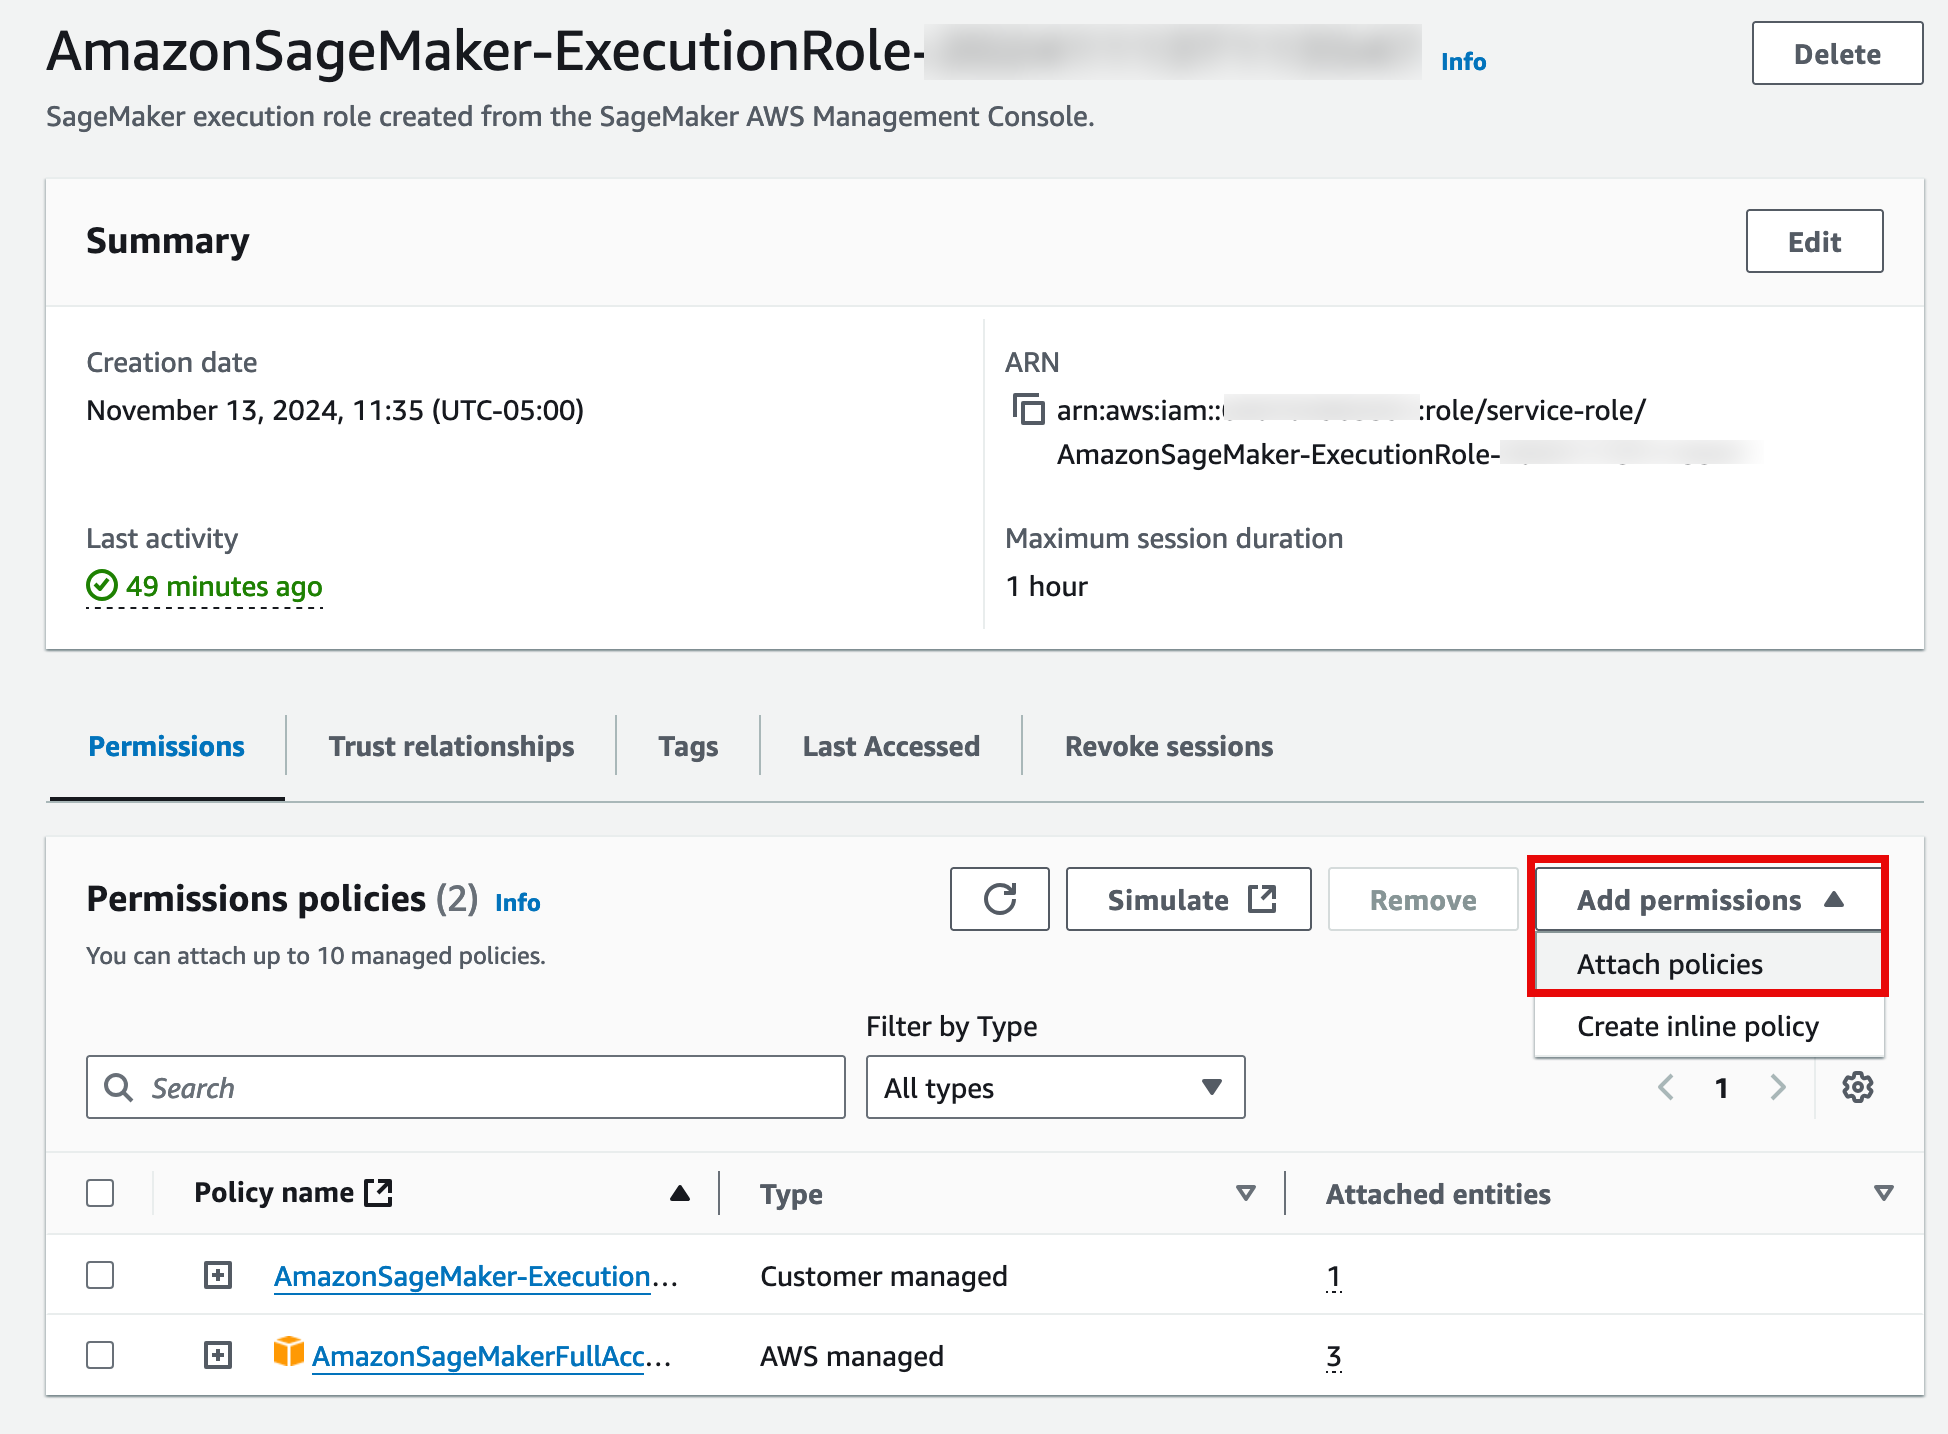
- On the Attach policy to AmazonSageMaker-ExecutionRole-<timestamp> page, in the Other permissions policies section search bar, enter AmazonTextractFullAccess. Then, select the policy, and choose Add permissions.
- Navigate back to your JupyterLab tab, and select Run.
- After your code runs you should now be able to see a .txt file with the extracted text in the left navigation pane of your JupyterLab.
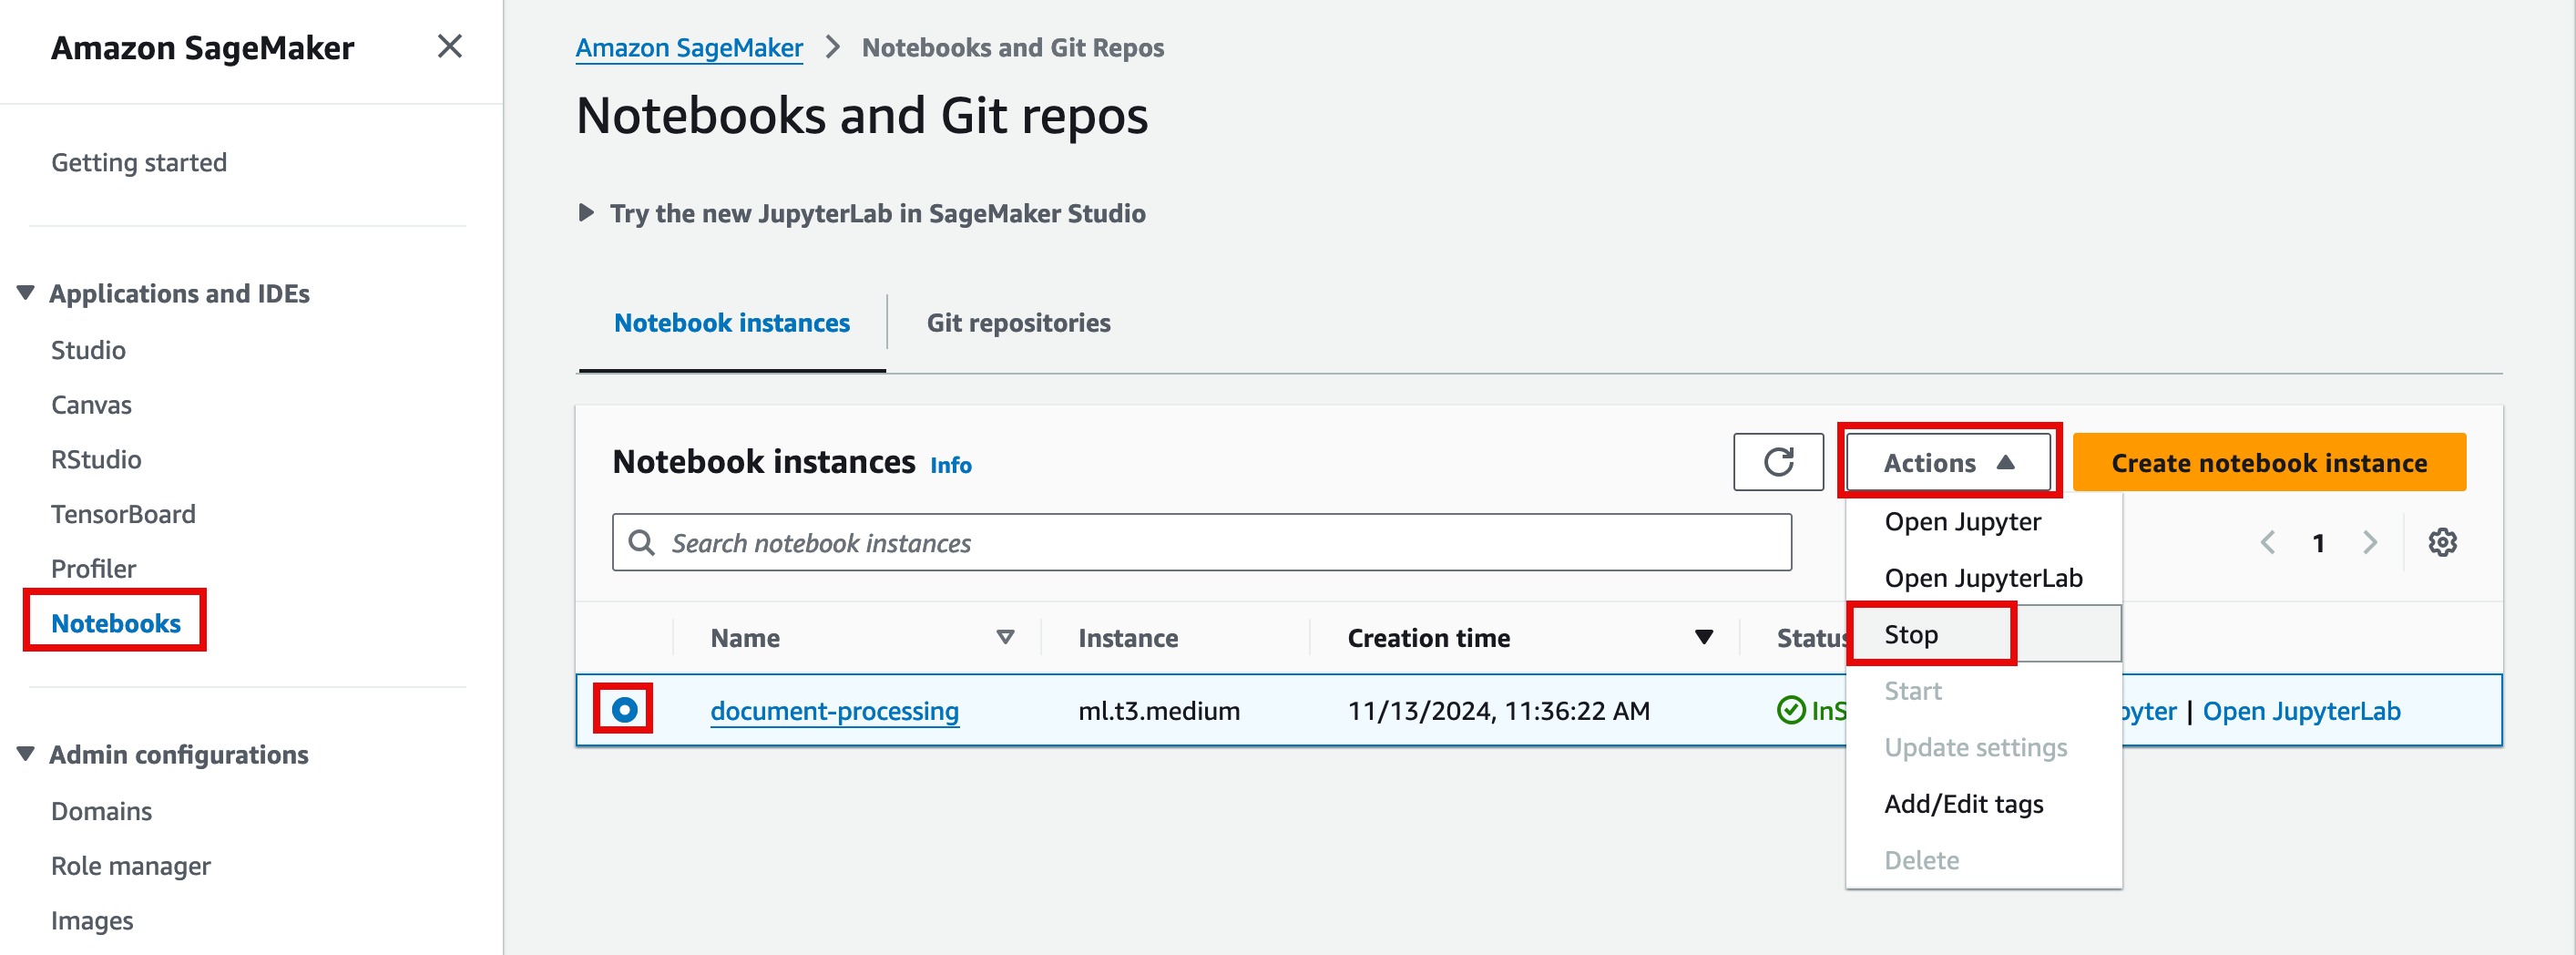
Step 4. Clean up Resource
In the SageMaker console, in the left navigation pane, choose Notebooks, and select the Notebook. Then, choose Actions, and select Stop.
Note: The stop operation might take around 5 minutes. Once the notebook is stopped you can also delete it by choosing Actions and selecting Delete.