Lab Introduction
- AWS experience: Advanced
- Time to complete: 160 minutes
- AWS Region: US East (N. Virginia) us-east-1
- Cost to complete: (Optional) Free Tier eligible
- Services used: Sagemaker AI, Canvas, MLOps...
A. Predicting Machine Failure Types (Manufacturing) (Sử dụng Amazon Canvas xây dựng và triển khai mô hình ML dự đoán khả năng xảy ra lỗi của máy móc)
1. Overview
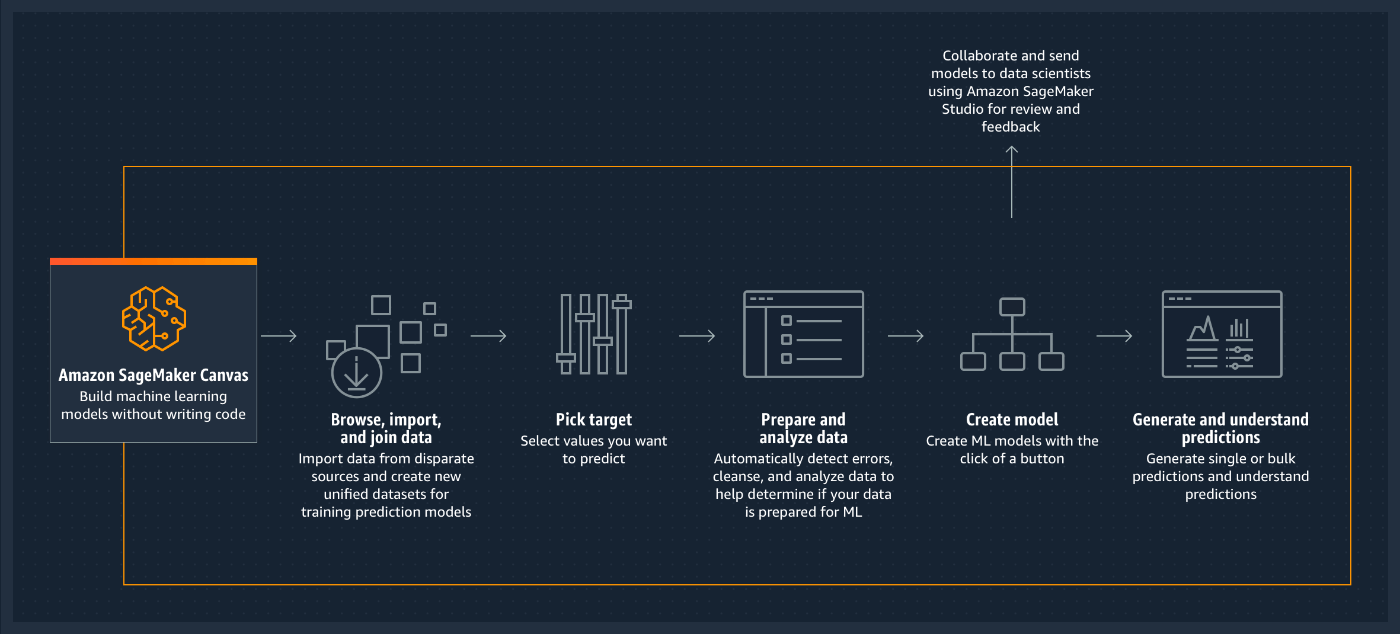
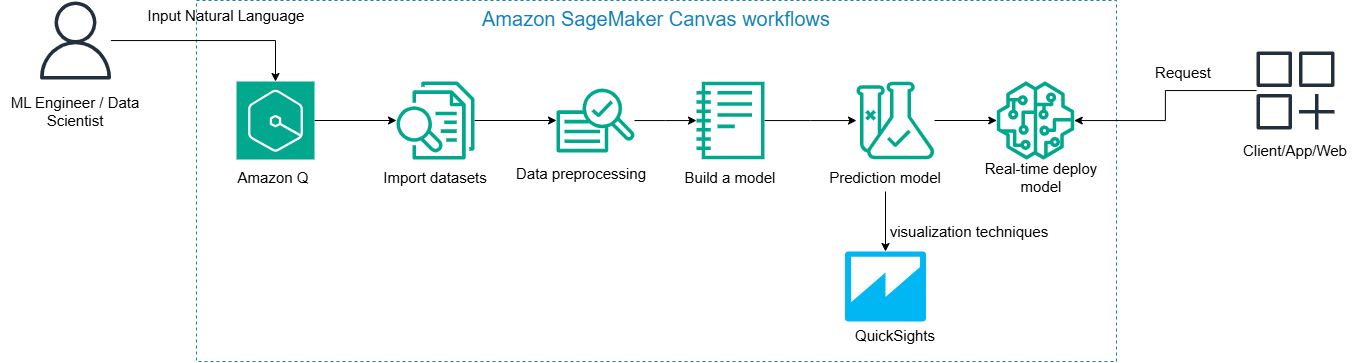
Amazon SageMaker Canvas is a no-code data science platform focused on making data science accessible to all.
In this lab, you will assume the role of a business analyst assigned to a maintenance team of a large manufacturing organization. Your maintenance team has asked you, as a business analyst, to assist in predicting common failures. They have provided you with a historical dataset that contains characteristics tied to a given failure type and would like you to predict which failure will occur in the future. The failure types include No Failure, Overstrain Failures and Power Failures.
The dataset we will use in this lab comes from the "AI4I 2020 Predictive Maintenance Dataset Data Set" (available on the UCI Machine Learning Repository - Dua, D. and Graff, C. (2019). UCI Machine Learning Repository [http://archive.ics.uci.edu/ml ]. Irvine, CA: University of California, School of Information and Computer Science.) The data schema is listed below:
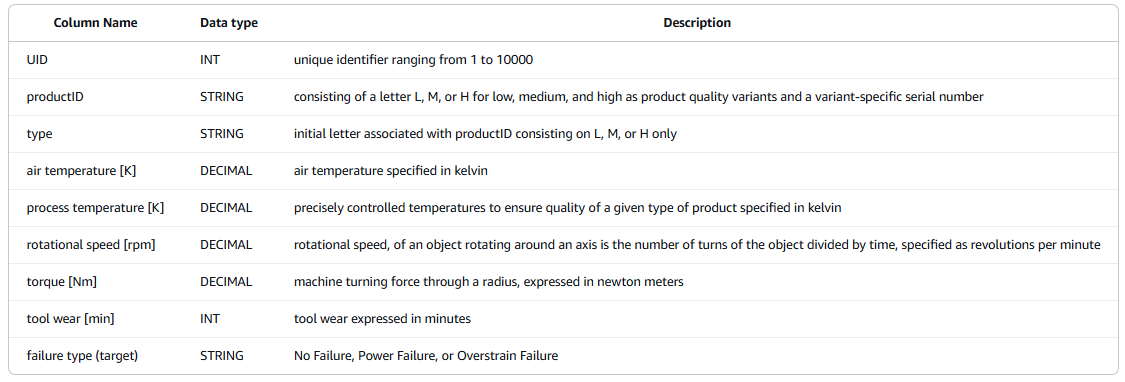
- UID (INT)
- Ý nghĩa: Mã định danh duy nhất cho mỗi bản ghi, giá trị từ 1 đến 10.000.
- Tác dụng: Giúp phân biệt từng sản phẩm hoặc lần kiểm tra riêng biệt.
- productID (STRING)
- Ý nghĩa: Mã sản phẩm bao gồm một chữ cái (L, M, H) đại diện cho chất lượng (Low, Medium, High) và một số serial cụ thể.
- Ví dụ: L123, M456, H789
- Tác dụng: Phân loại sản phẩm theo chất lượng và phiên bản.
- type (STRING)
- Ý nghĩa: Ký tự đầu tiên của
productID, dùng để nhóm theo loại sản phẩm: L (thấp), M (trung bình), H (cao). - Tác dụng: Hỗ trợ phân tích thống kê hoặc huấn luyện mô hình dựa trên loại sản phẩm.
- air temperature [K] (DECIMAL)
- Ý nghĩa: Nhiệt độ không khí được đo trong quá trình sản xuất, đơn vị là Kelvin.
- Tác dụng: Có thể ảnh hưởng đến quá trình sản xuất hoặc độ chính xác của thiết bị.
- process temperature [K] (DECIMAL)
- Ý nghĩa: Nhiệt độ trong quy trình sản xuất được kiểm soát chính xác, đơn vị Kelvin.
- Tác dụng: Một chỉ số quan trọng ảnh hưởng trực tiếp đến chất lượng sản phẩm.
- rotational speed [rpm] (DECIMAL)
- Ý nghĩa: Tốc độ quay của vật thể quanh trục, đơn vị là vòng/phút (revolutions per minute).
- Tác dụng: Có thể ảnh hưởng đến hiệu suất và độ mài mòn thiết bị.
- torque [Nm] (DECIMAL)
- Ý nghĩa: Mô-men xoắn – lực quay được tạo ra quanh một trục, đơn vị là Newton-mét.
- Tác dụng: Phản ánh lực cần thiết để quay, liên quan đến hoạt động máy móc và tình trạng thiết bị.
- tool wear [min] (INT)
- Ý nghĩa: Mức độ mài mòn của dụng cụ theo thời gian sử dụng, tính bằng phút.
- Tác dụng: Dùng để theo dõi tuổi thọ của công cụ và dự báo khi nào cần thay thế.
- failure type (target) (STRING)
- Ý nghĩa: Phân loại lỗi xảy ra trong sản xuất, có thể là:
- No Failure: Không có lỗi
- Power Failure: Lỗi nguồn
- Overstrain Failure: Lỗi quá tải (quá sức chịu đựng của thiết bị)
- Tác dụng: Là nhãn mục tiêu (target) trong các mô hình học máy để dự đoán lỗi thiết bị.
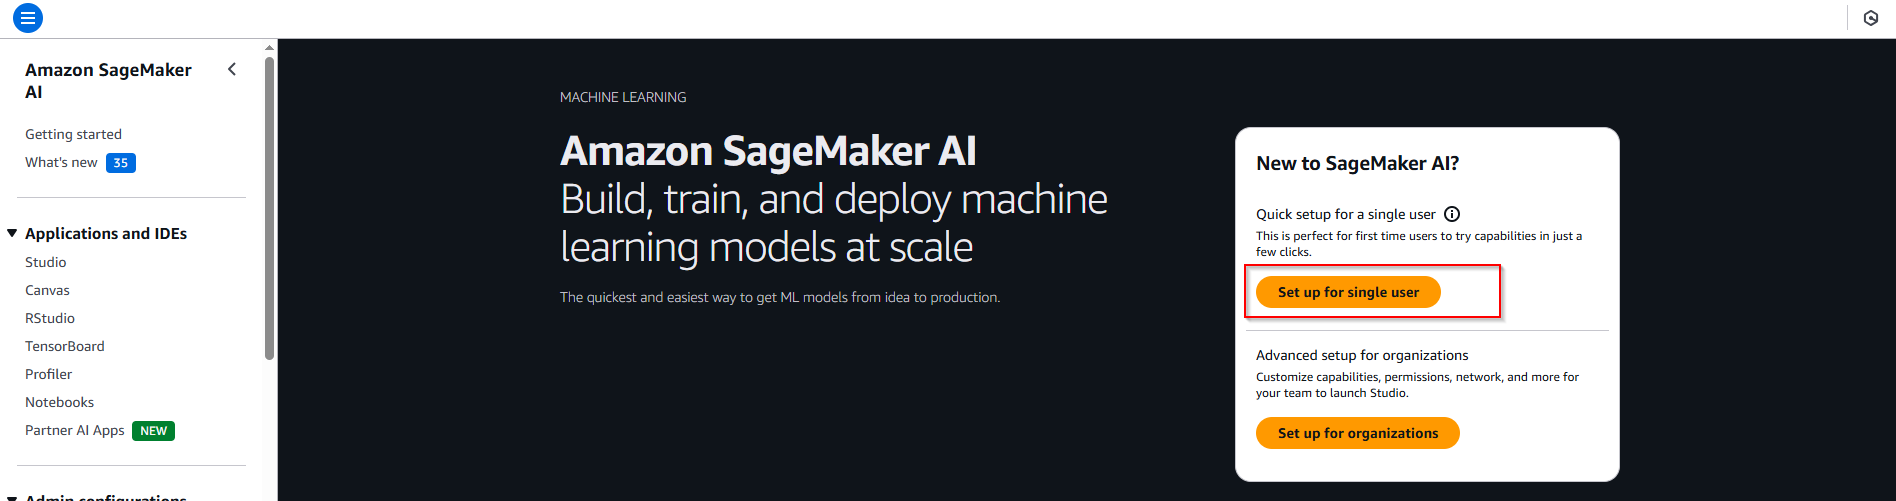
2. Create Amazon SageMaker AI Canvas
- Choose Sagemaker AI service -> Click button Set up for single user -> Waiting 3-5p complete.
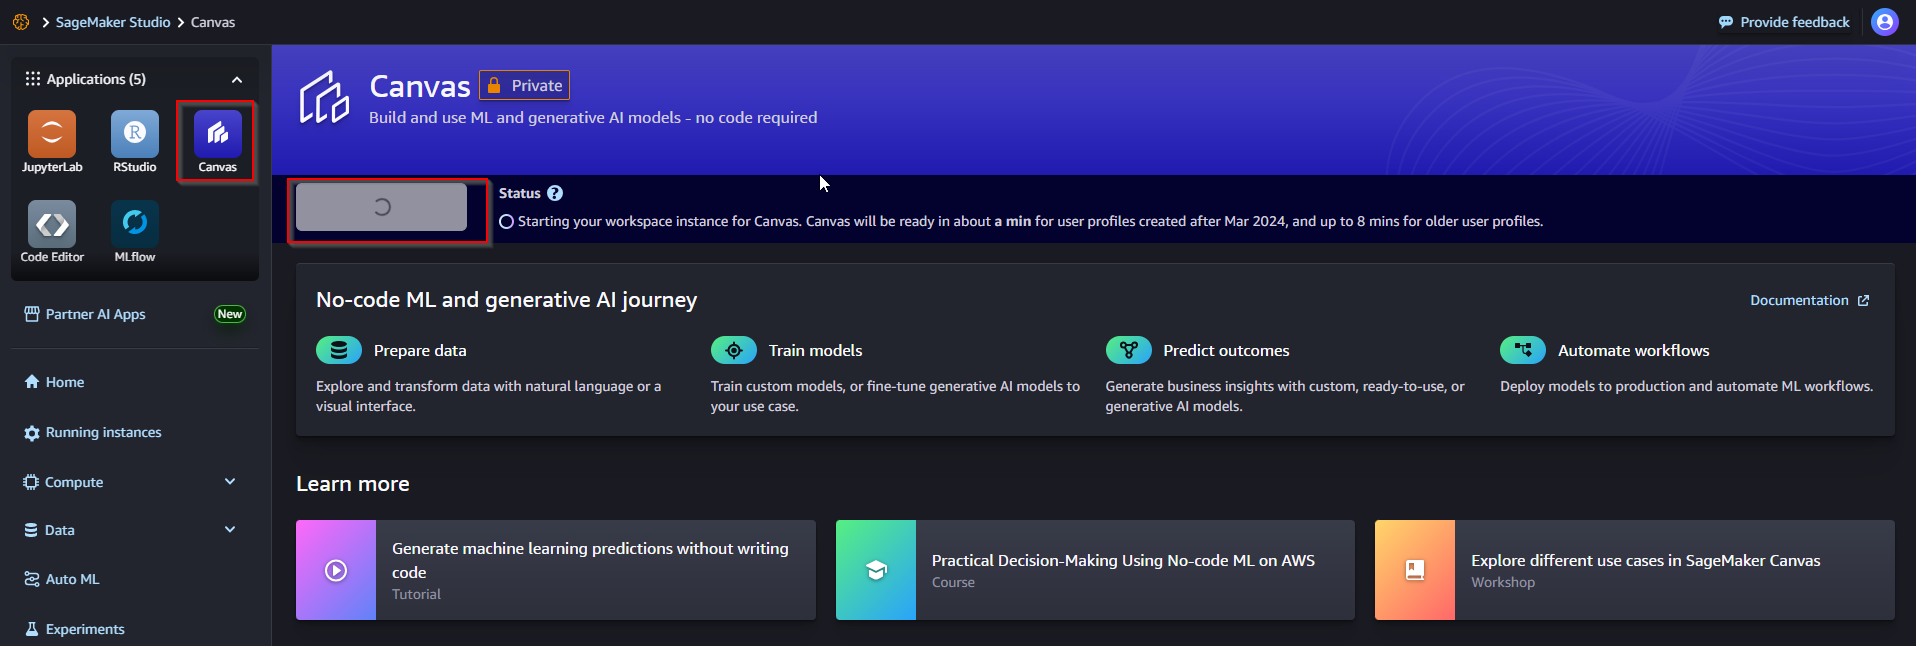
- Open SageMaker Studio
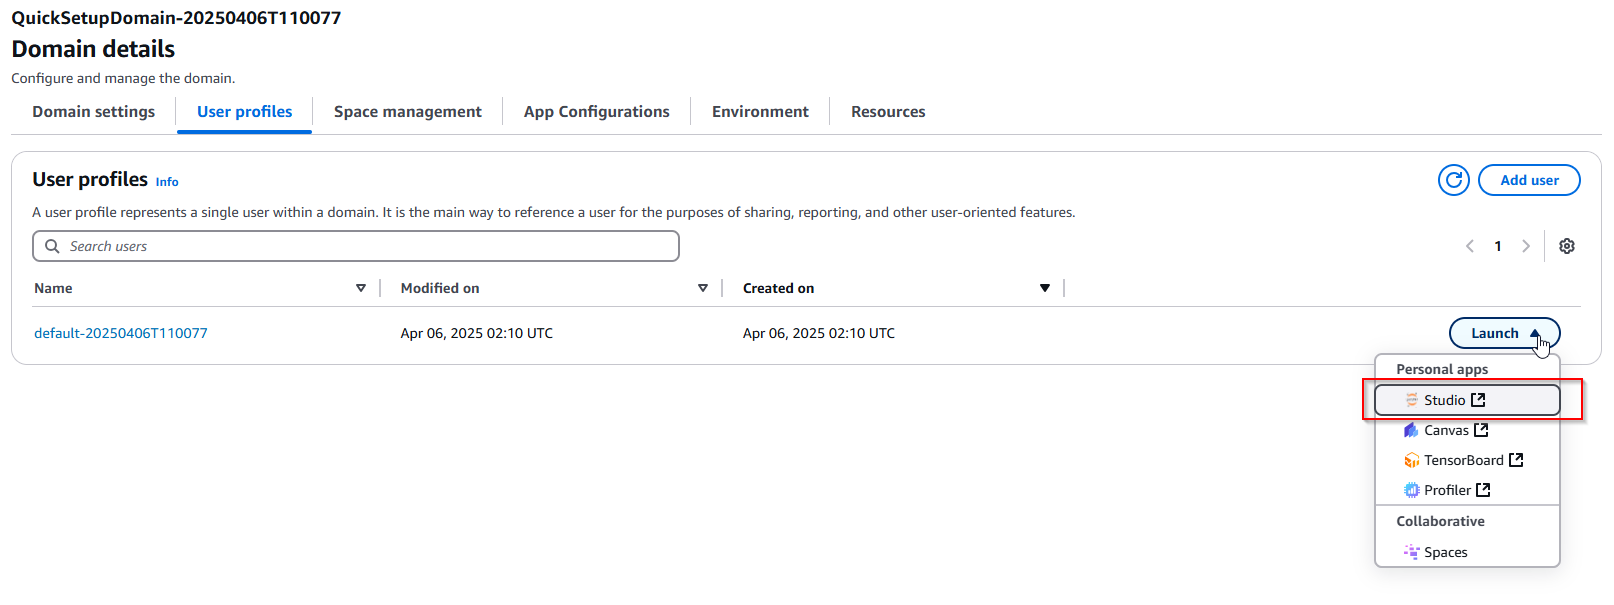
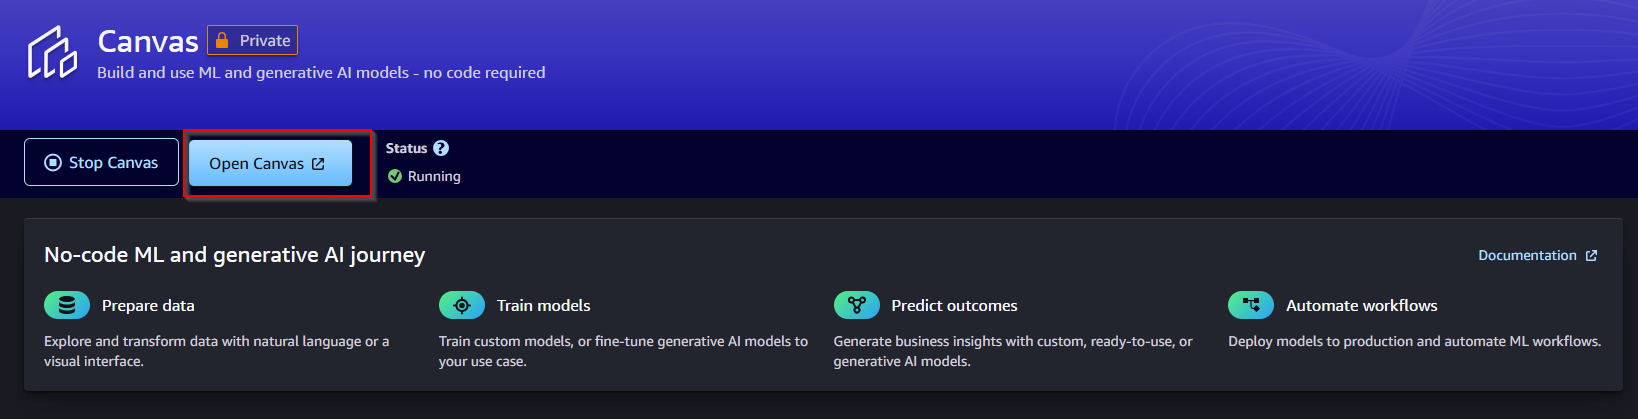
- Click icon Canvas -> Click button Run Canvas -> Open Canvas.
3. Upload the dataset to S3 Bucket
The first step is to download the dataset that we will use. You can download it here .
In the S3 console, click on the sagemaker-studio-* bucket. (Note: The sagemaker-studio-* bucket was created automatically when you created the SageMaker Studio domain)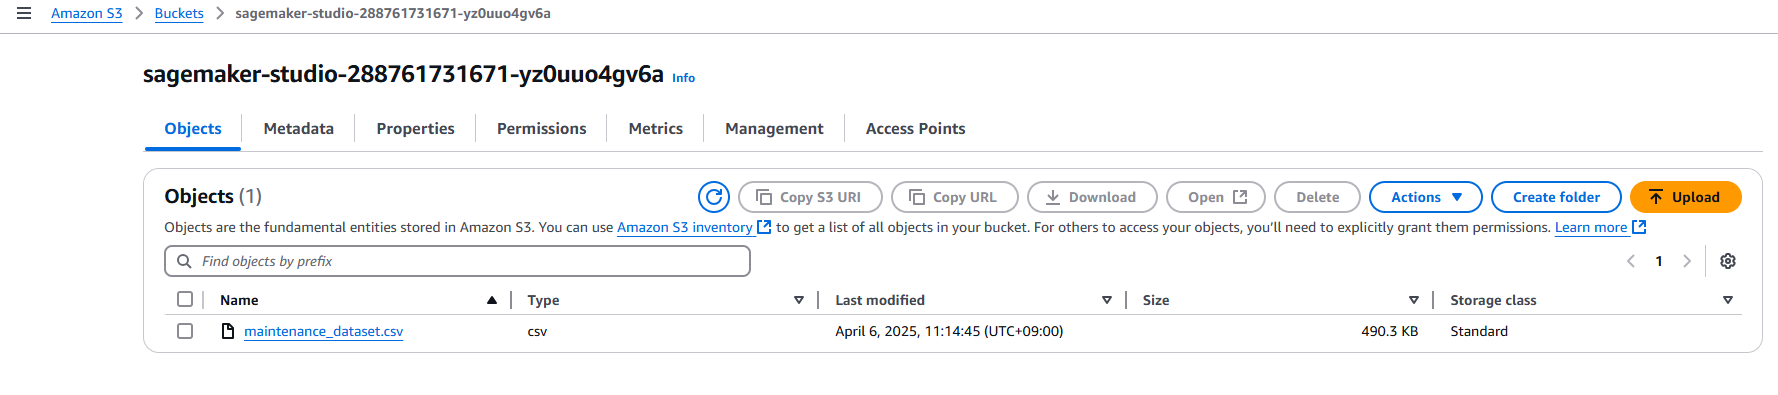
4. Import the dataset in Canvas
On the left menu, you can click the second icon to head to the Datasets section, then click the Import data button -> Dataset name: maintenance-dataset -> Click button Create.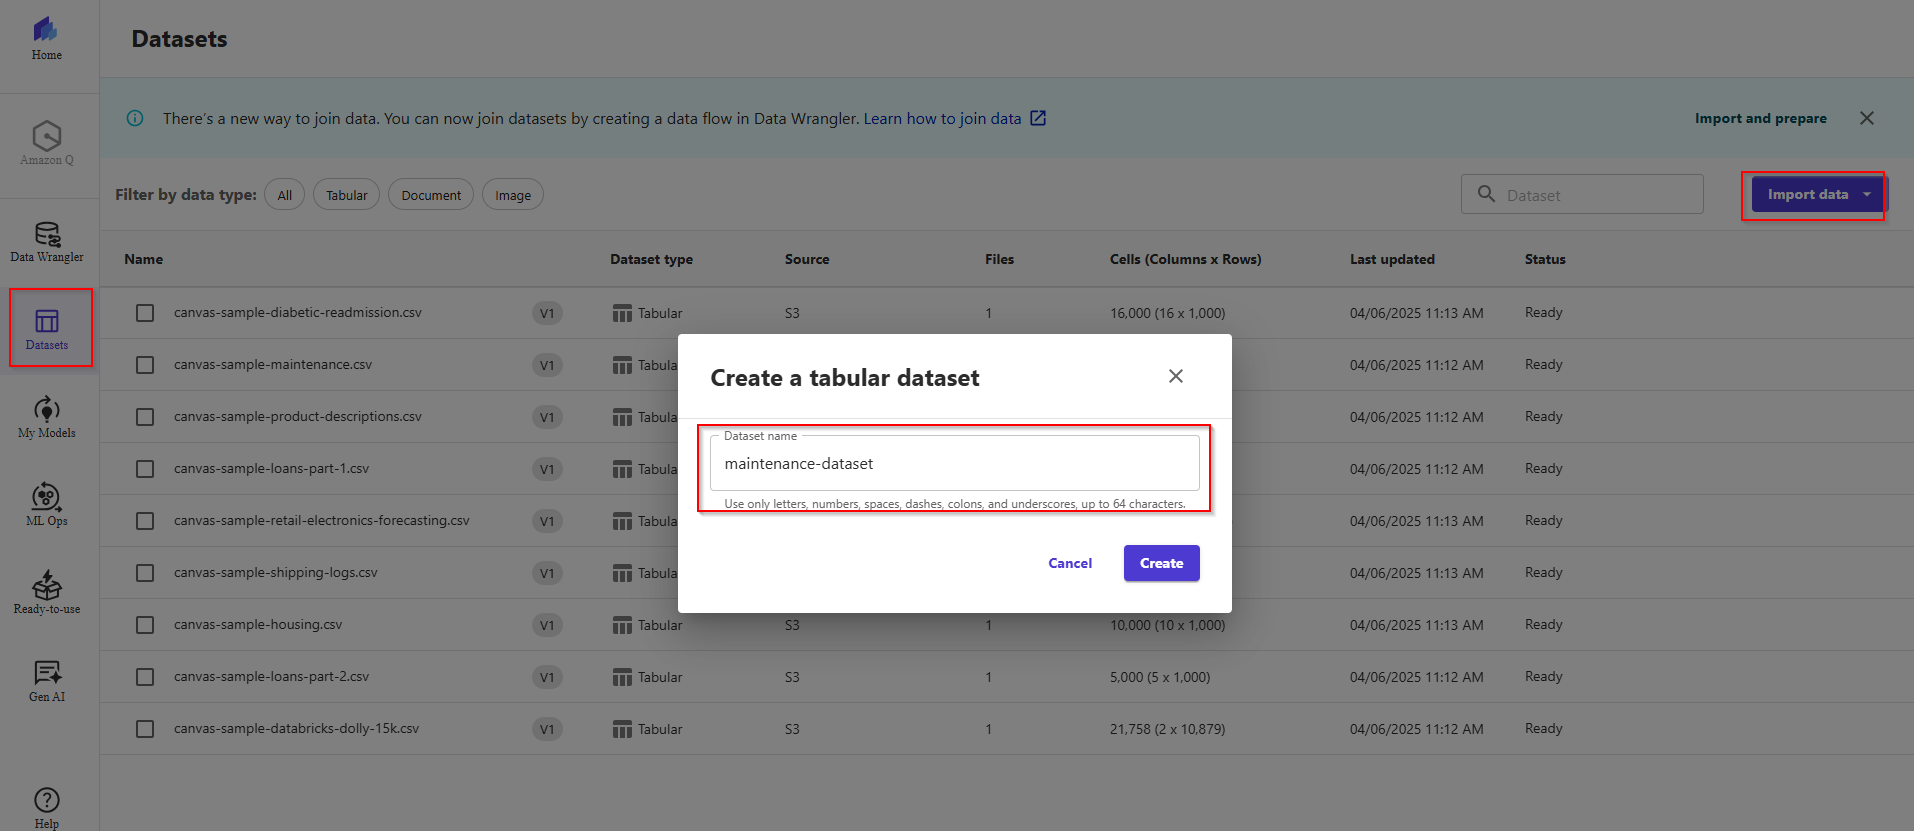
In UI Create Tabular dataset, click Select a data source -> Choose S3 the sagemaker-studio-* bucket.
You can now select the maintenance_dataset.csv file uploaded previously by selecting the checkbox at its left. Click button Preview dataset -> Create dataset.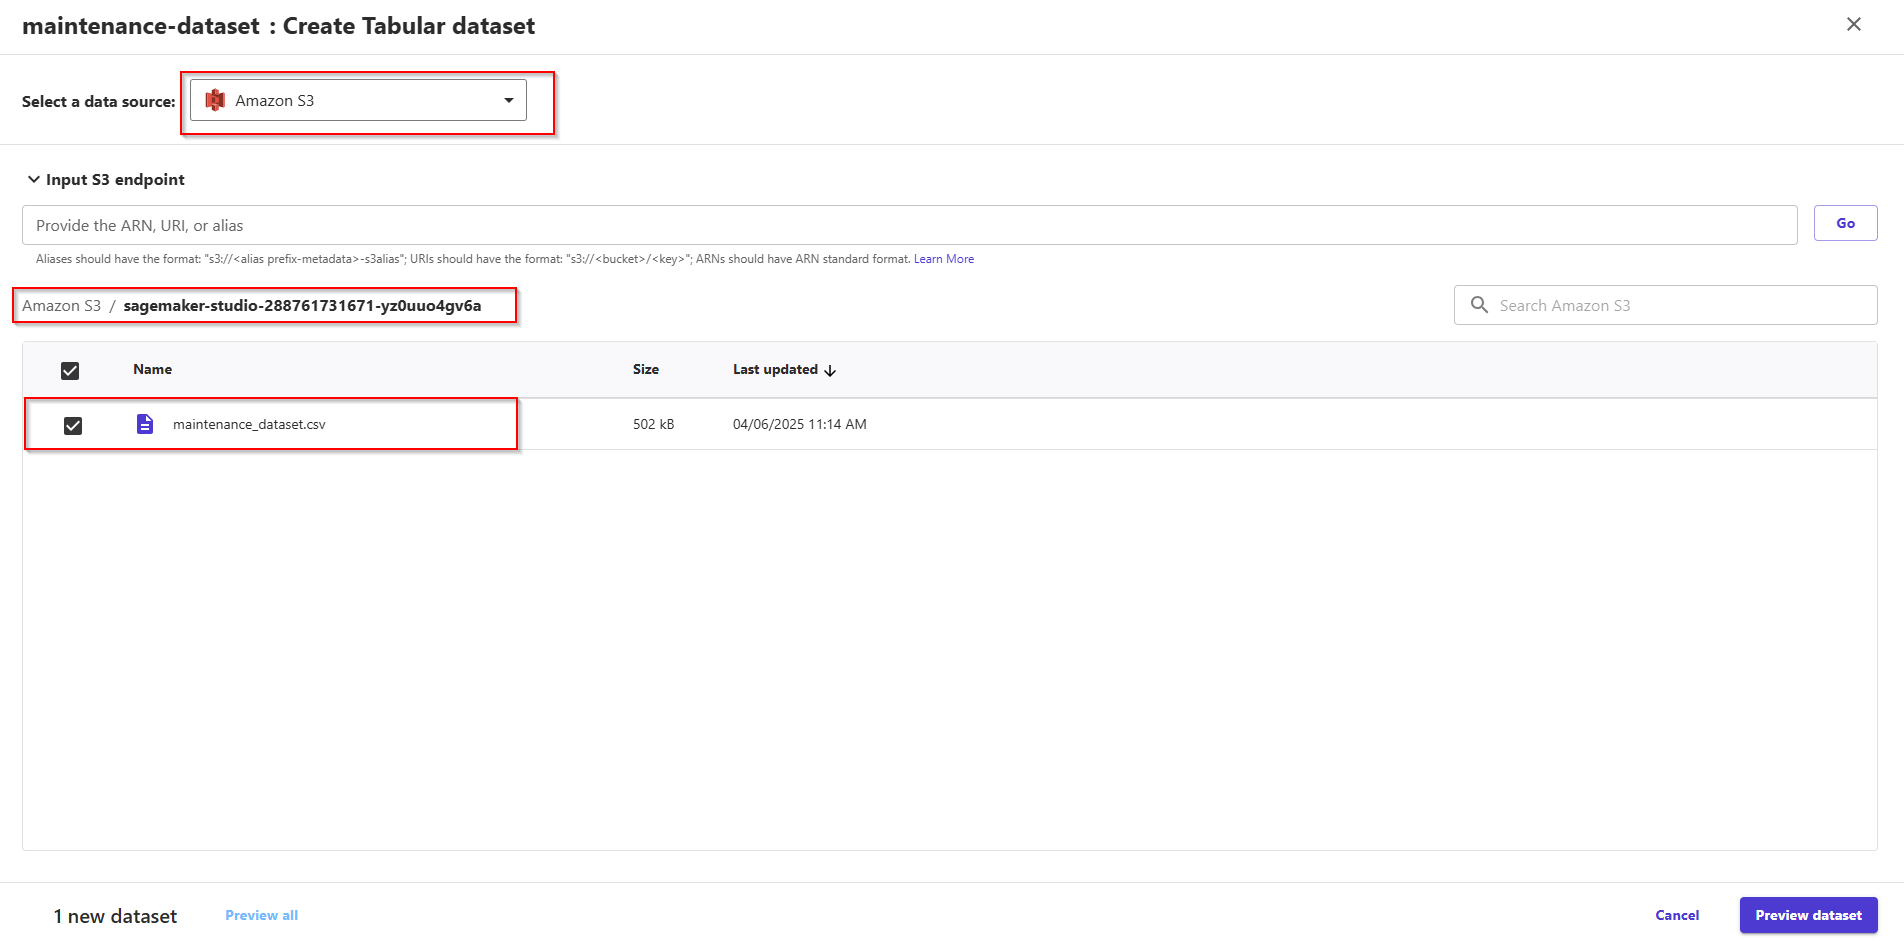
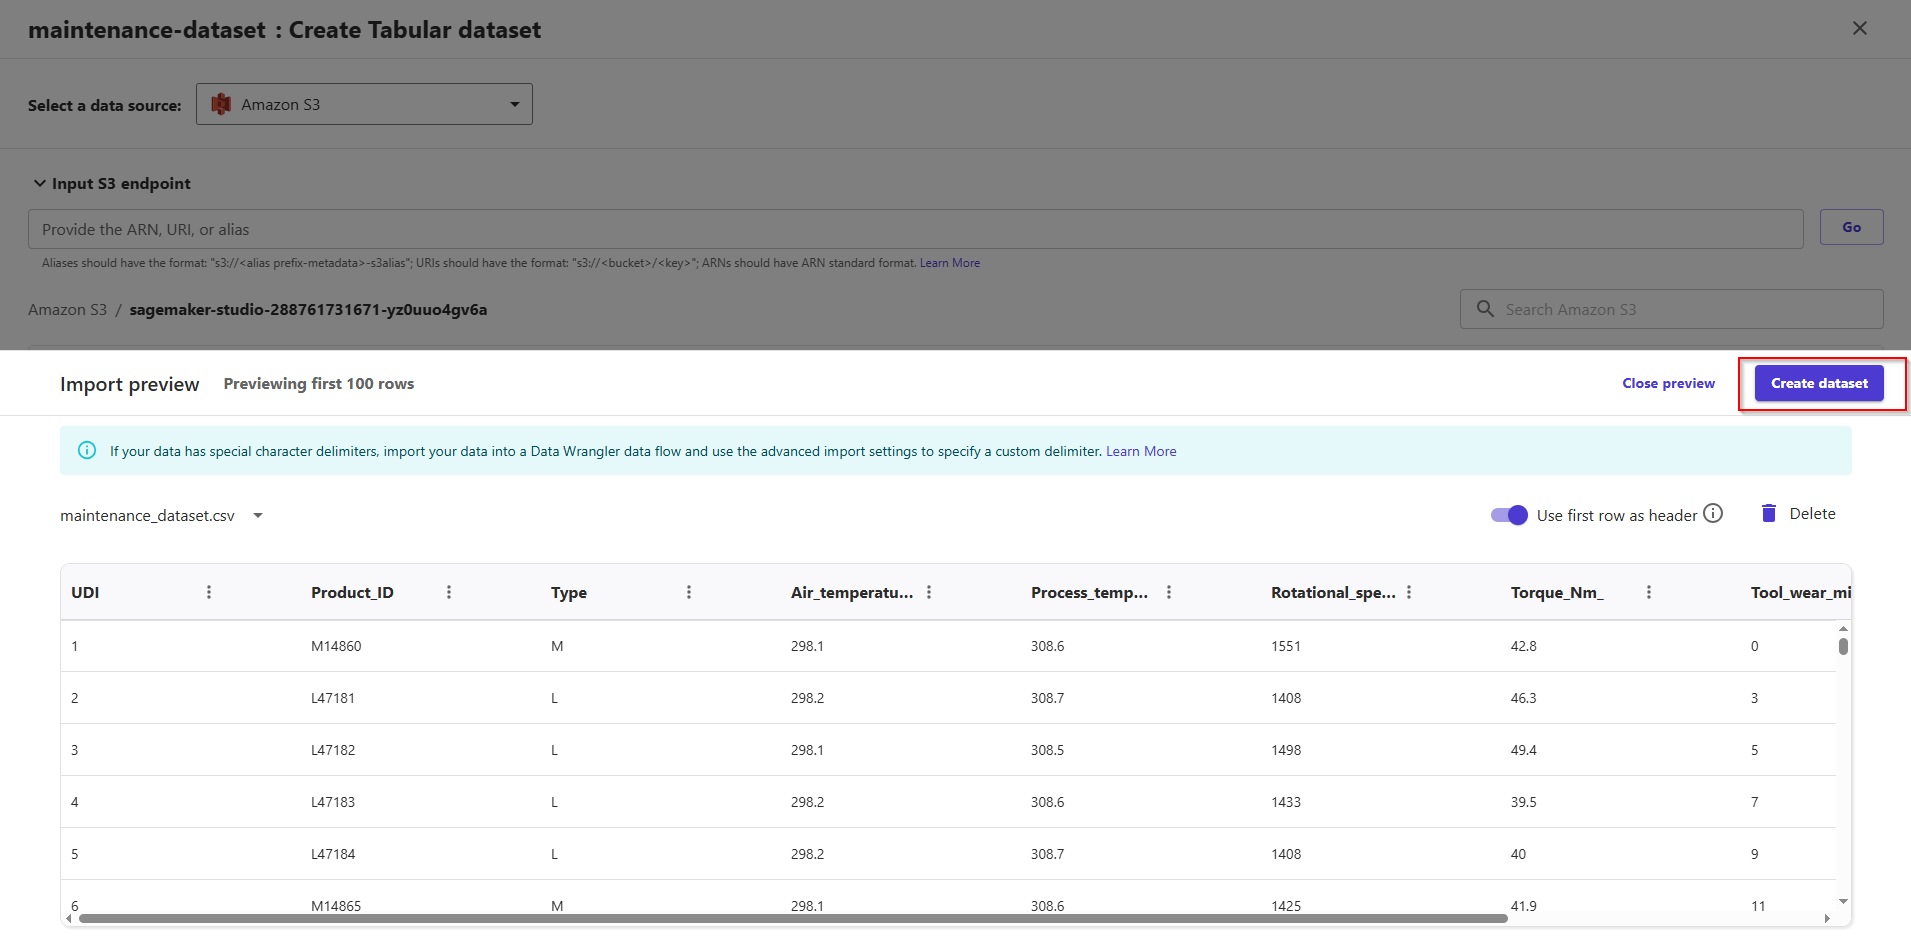
Now, dataset is status ready.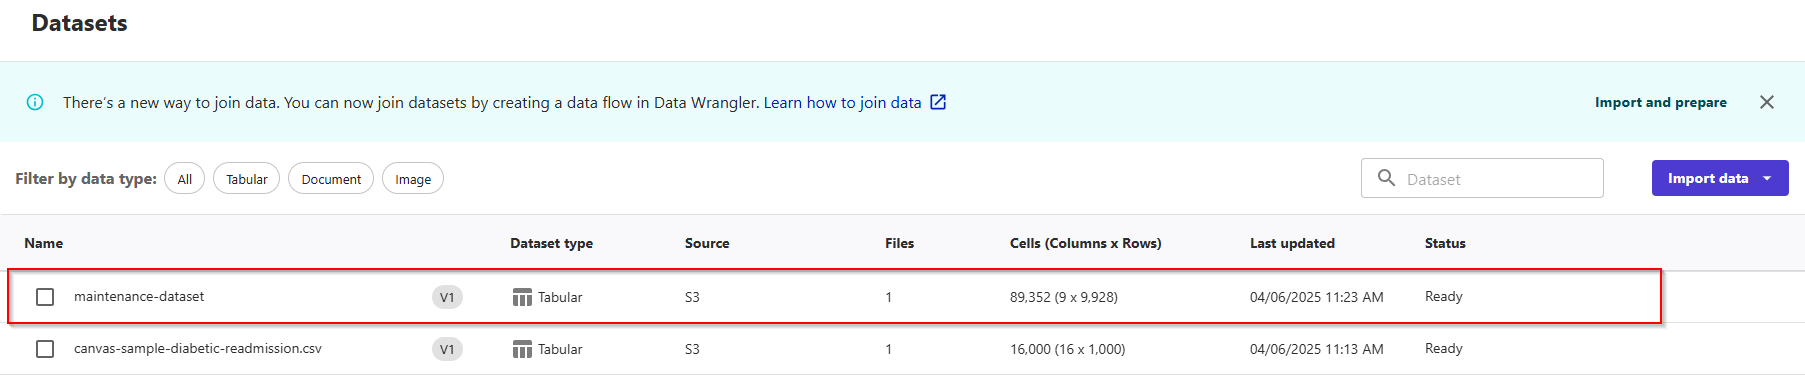
5. Building and Training a ML model
- Now, let's head back to the My Models section of the web page, by clicking the second button on the left menu.
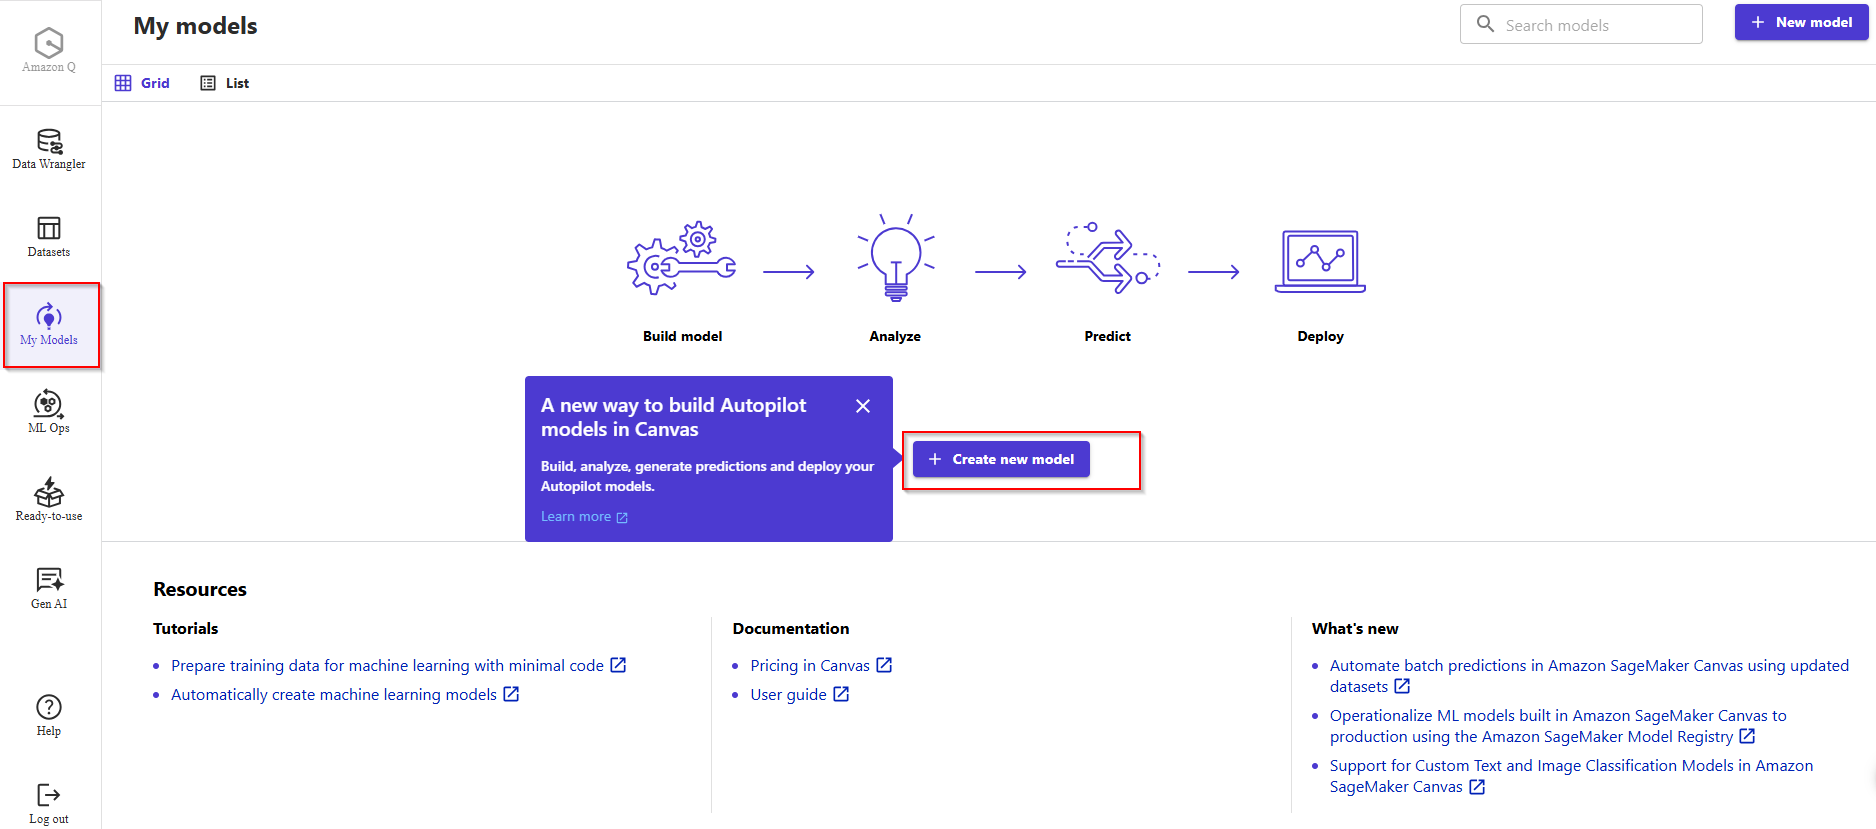
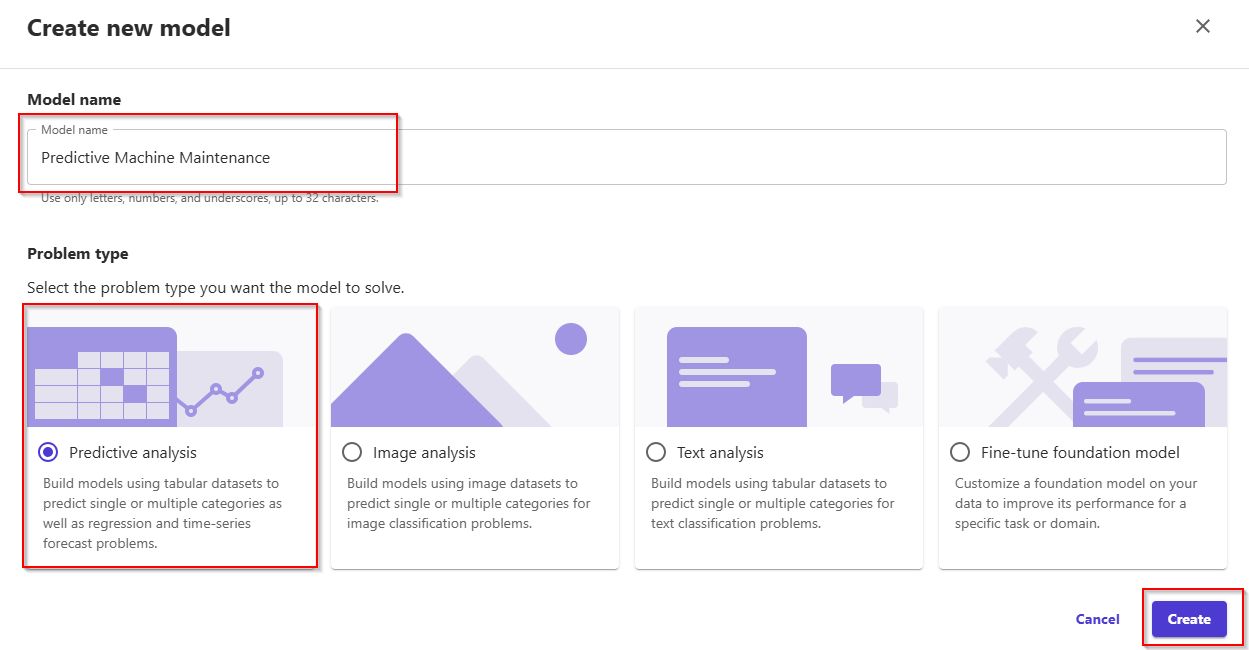
- Click on + New model, and provide a name to your model. Enter Model name: Predictive Machine Maintenance and Problem type: Predictive analysis. Click button Create.
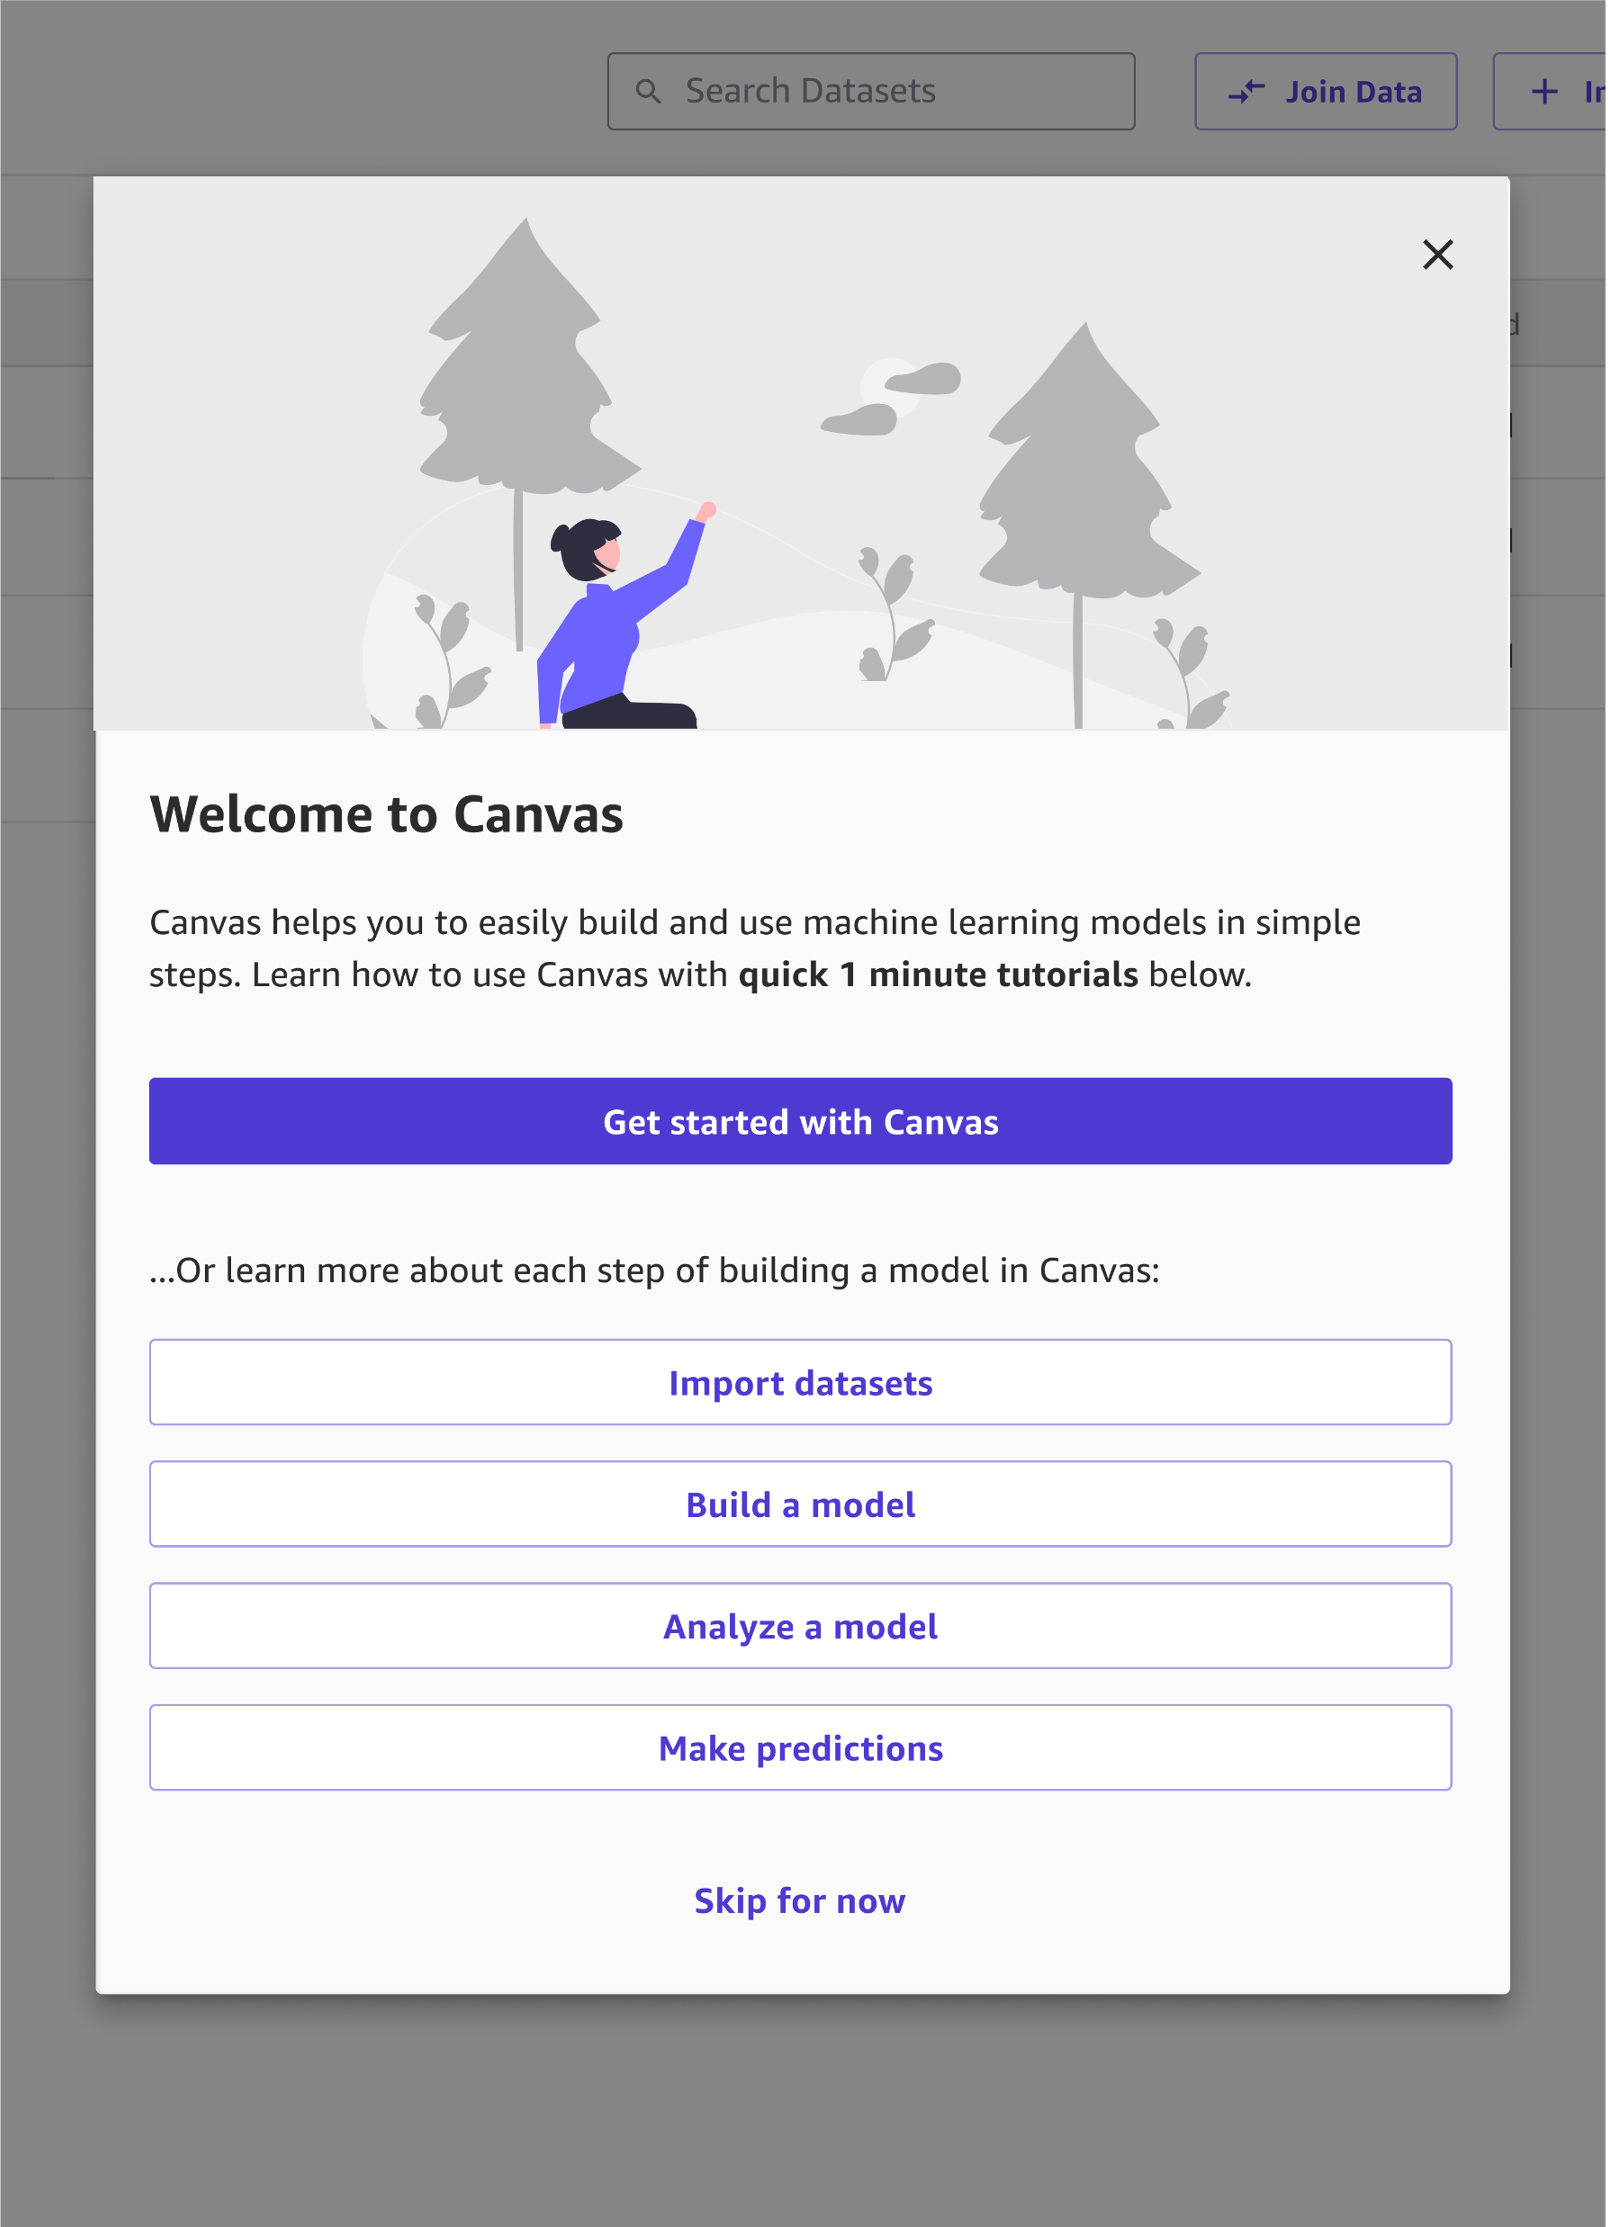
- If this is the first time creating a Canvas model, you will be welcomed by an informative pop-up about how to build your first model in 5 simple steps. You can read this through, then come back to this guide.
- In the Model view, you will see 5 tabs, which correspond to the 5 steps to create a model and use it to generate predictions: Select, Build, Analyze, Predict, Deploy.
- In the first tab, Select, click the radio button to select the
maintenance_dataset.csv dataset we've uploaded previously. This dataset includes 9 columns and 10K rows. Click the bottom button Select dataset.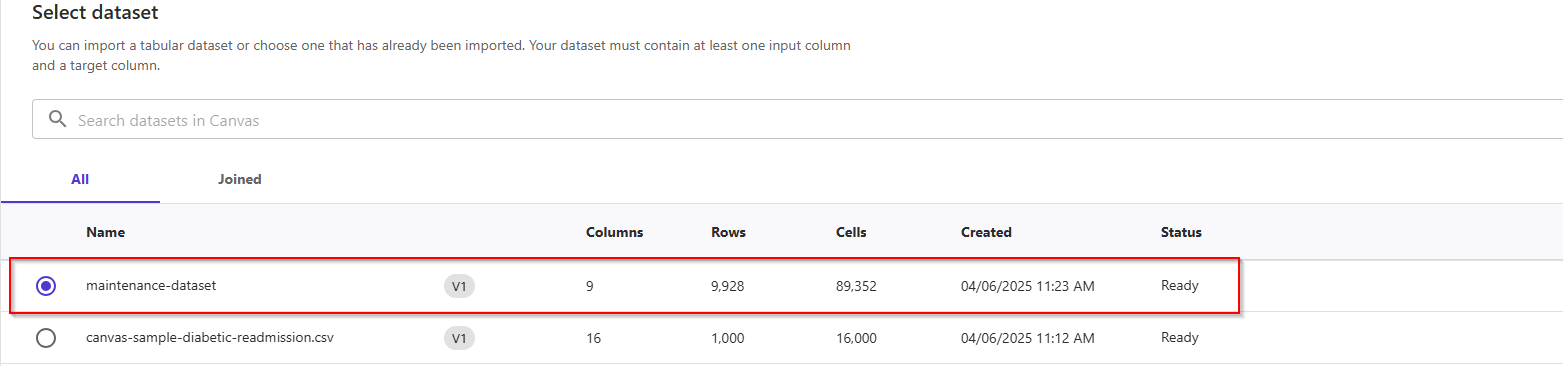
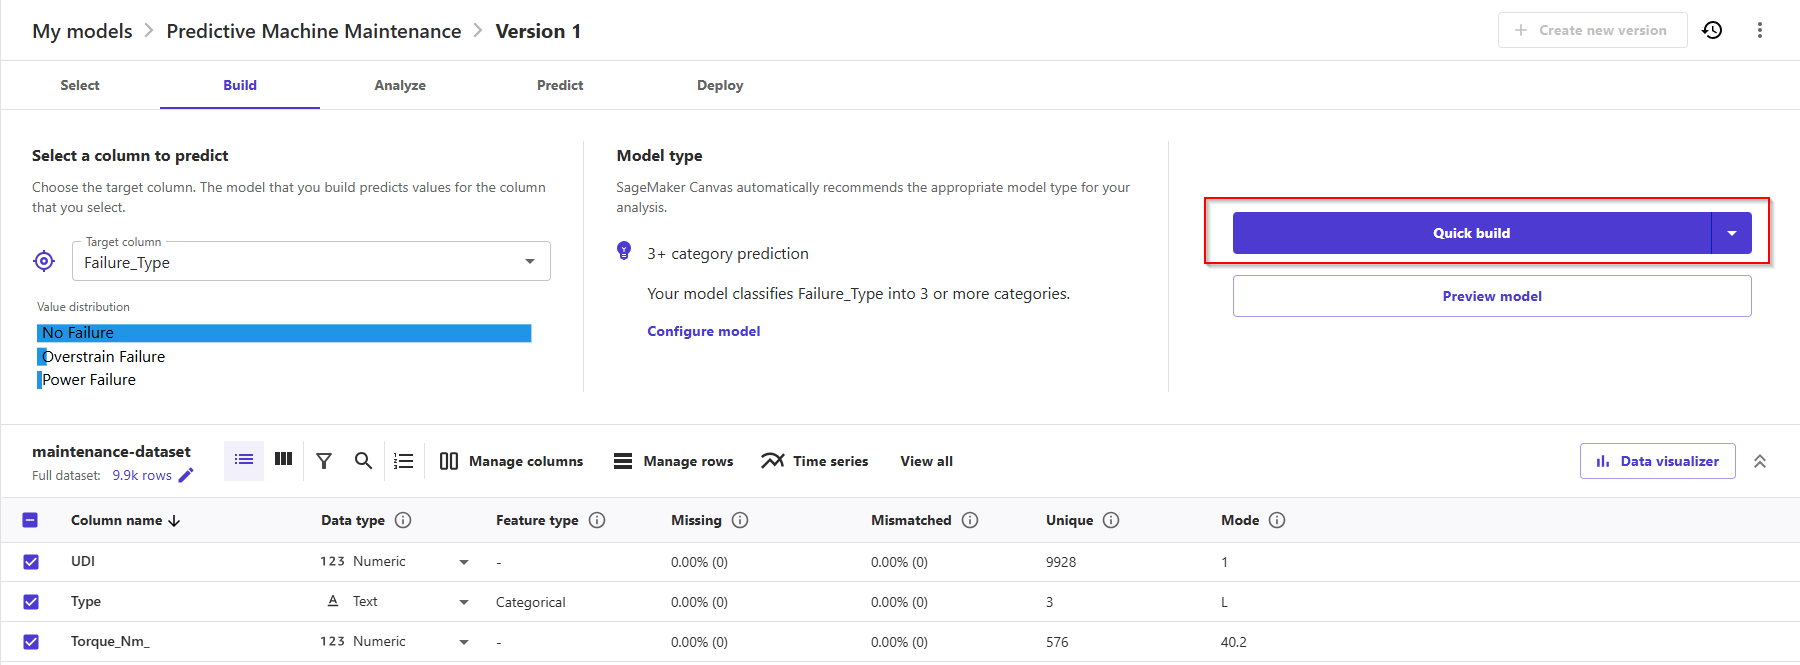
- Canvas will automatically move to the Build phase. In this tab, choose the target column, in our case
Failure Type. The maintenance team has informed you that this column indicates if the type of failures typically seen based off of historical data from their existing machines. - This is what you want to train your model to predict. Canvas will automatically detect that this is a 3 Category problem (also known as multi-class classification). If the wrong model type is detected, you can change it manually with the Change type link at the center of the screen.
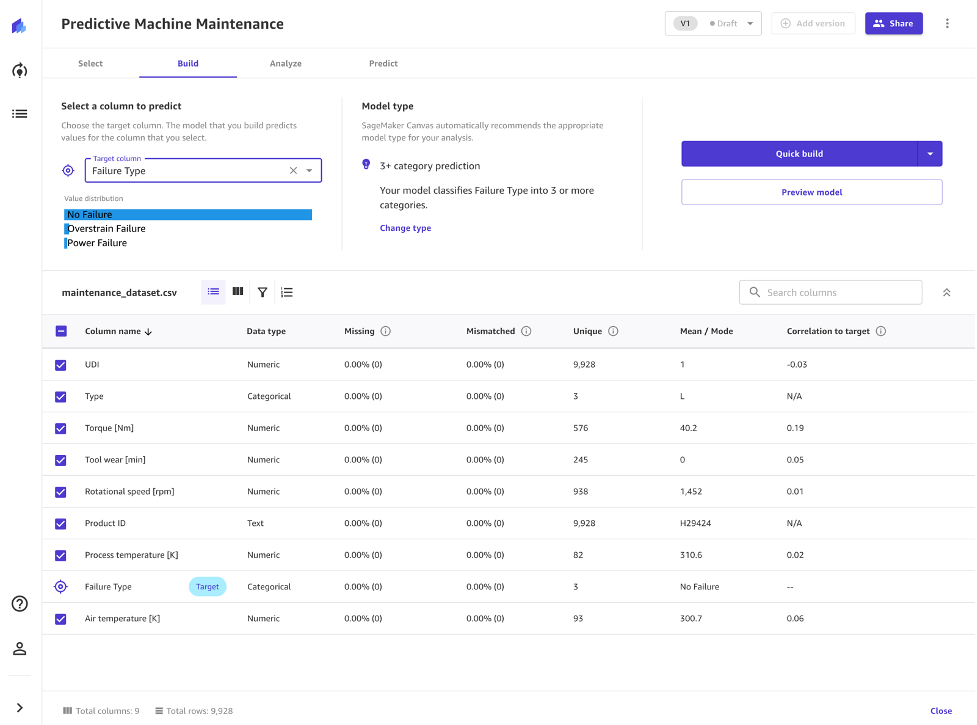
Note: It should be noted that this dataset is highly unbalanced towards the "No Failure" class which can be seen by viewing the column named "Failure Type". Although Canvas and the underlying AutoML capabilities can partly handle dataset imbalance, this may result in some skewed performances. As an additional next step after this lab, you can check additional resources on how to balance your dataset via services like Amazon SageMaker Data Wrangler.
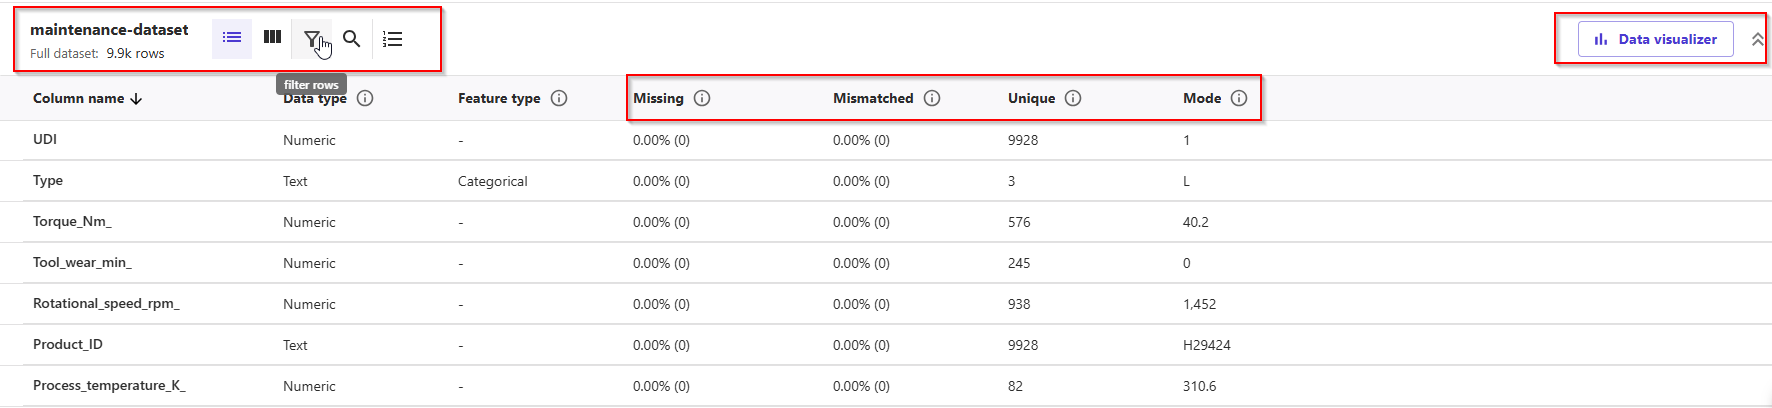
- In the bottom half of the screen, you can take a look at some of the statistics of the dataset, including missing and mismatched values, unique vales, mean and median values. This can also be used to drop some of the columns, if we don't want to use them for the prediction, by simply un-checking them with the left checkbox.
- A quick model trains fewer combinations of models and hyper-parameters in order to prioritize speed over accuracy, especially in cases like ours where we want to prove the value of training an ML model for our use case.
- Note that quick build is not available for models bigger than 50k rows. Let's go ahead and click Quick build.
- Now, we wait anywhere from 2 to 15 minutes. Since the dataset is small, this will take probably even less than 2 minutes.

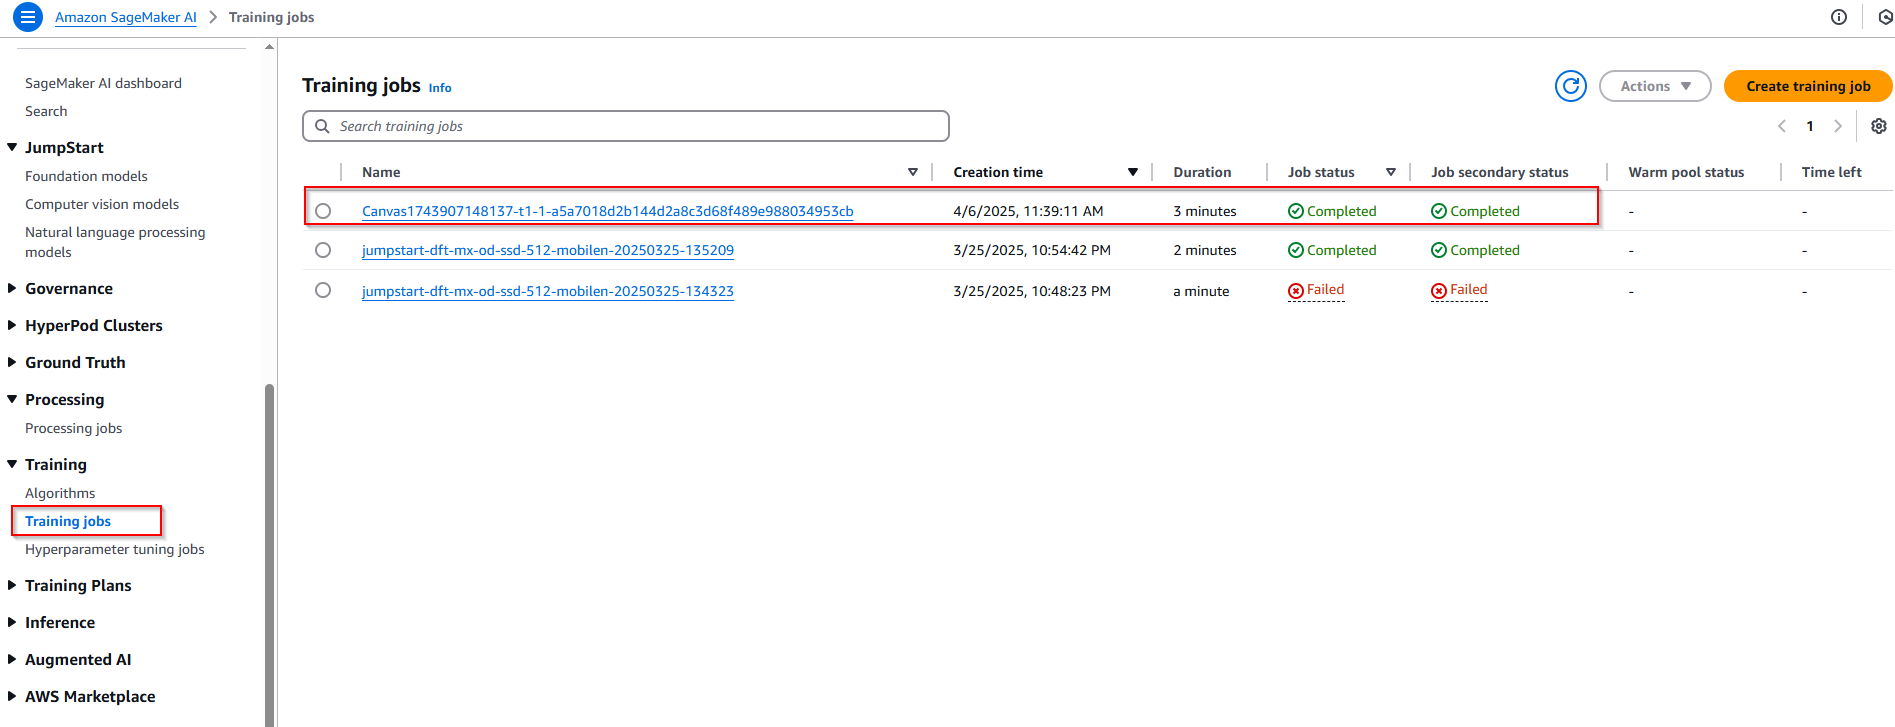
- Training progress can be monitoring in the Sagemaker AI console.
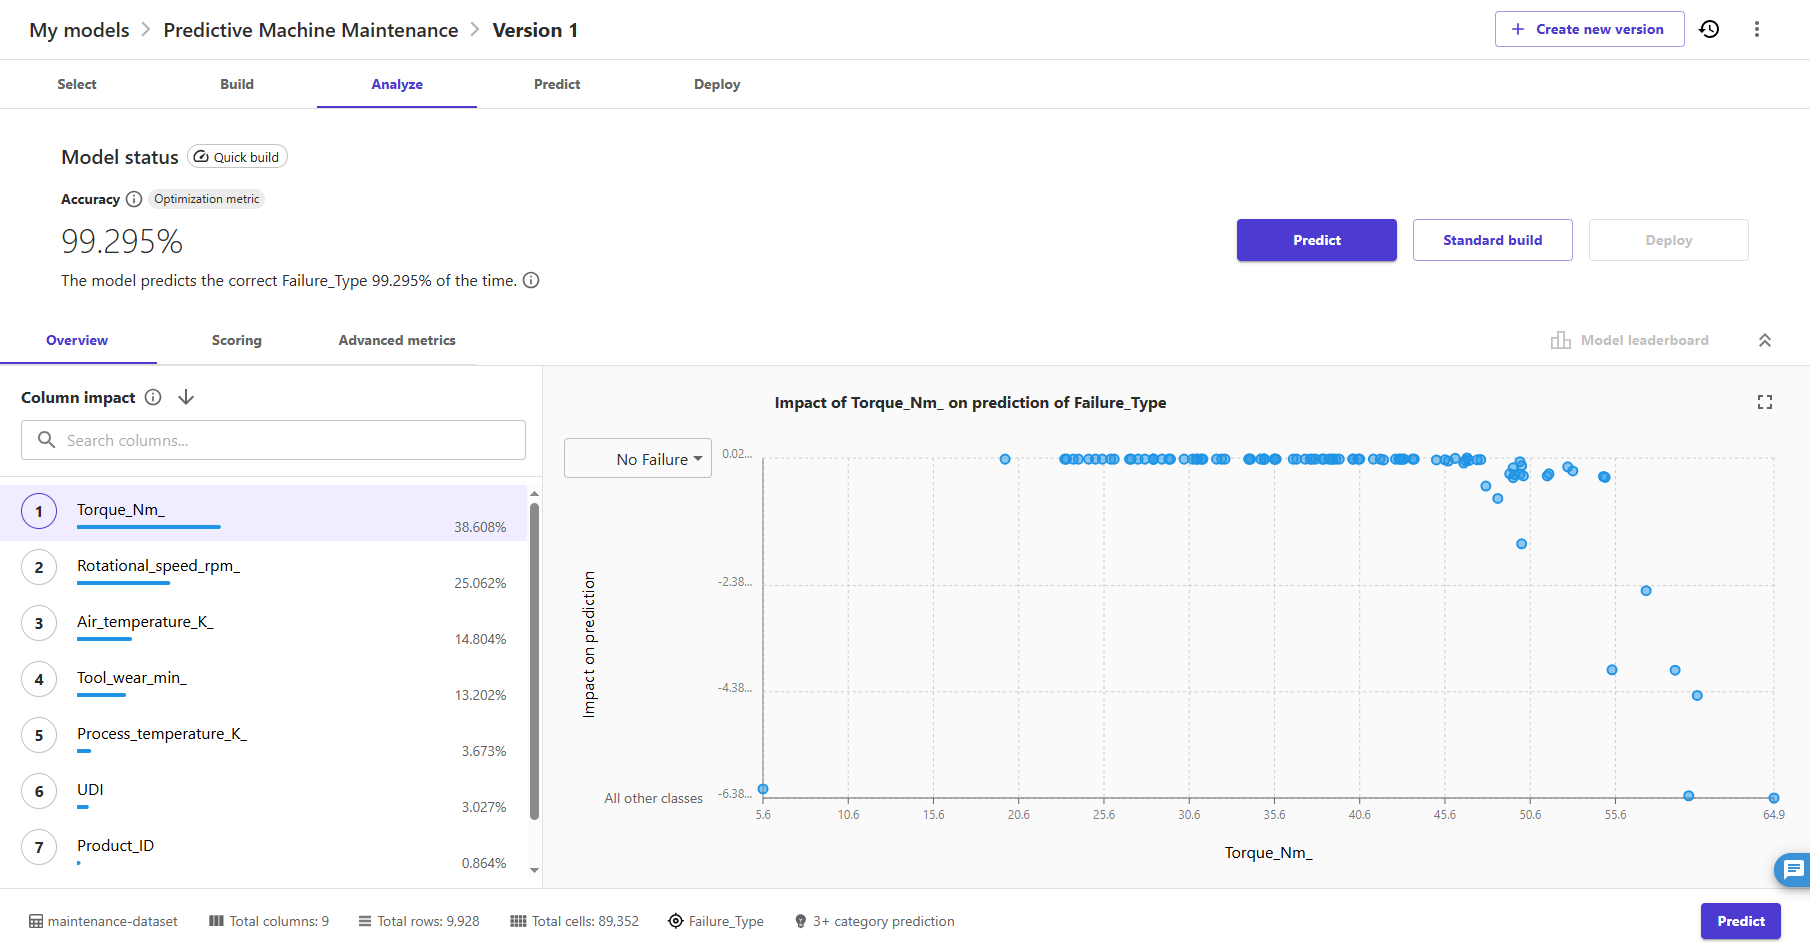
- Once done, Canvas will automatically move to the Analyze tab, to show us the results of our quick training. The analysis performed using quick build estimates that our model is able to predict the right outcome 99.295% of the time.
- Let's focus on the first tab, Overview. This is the tab that shows us the Column impact, or the estimated importance of each column in predicting the target column. In this example, the duration column has the most significant impact in predicting what type of failure will occur.
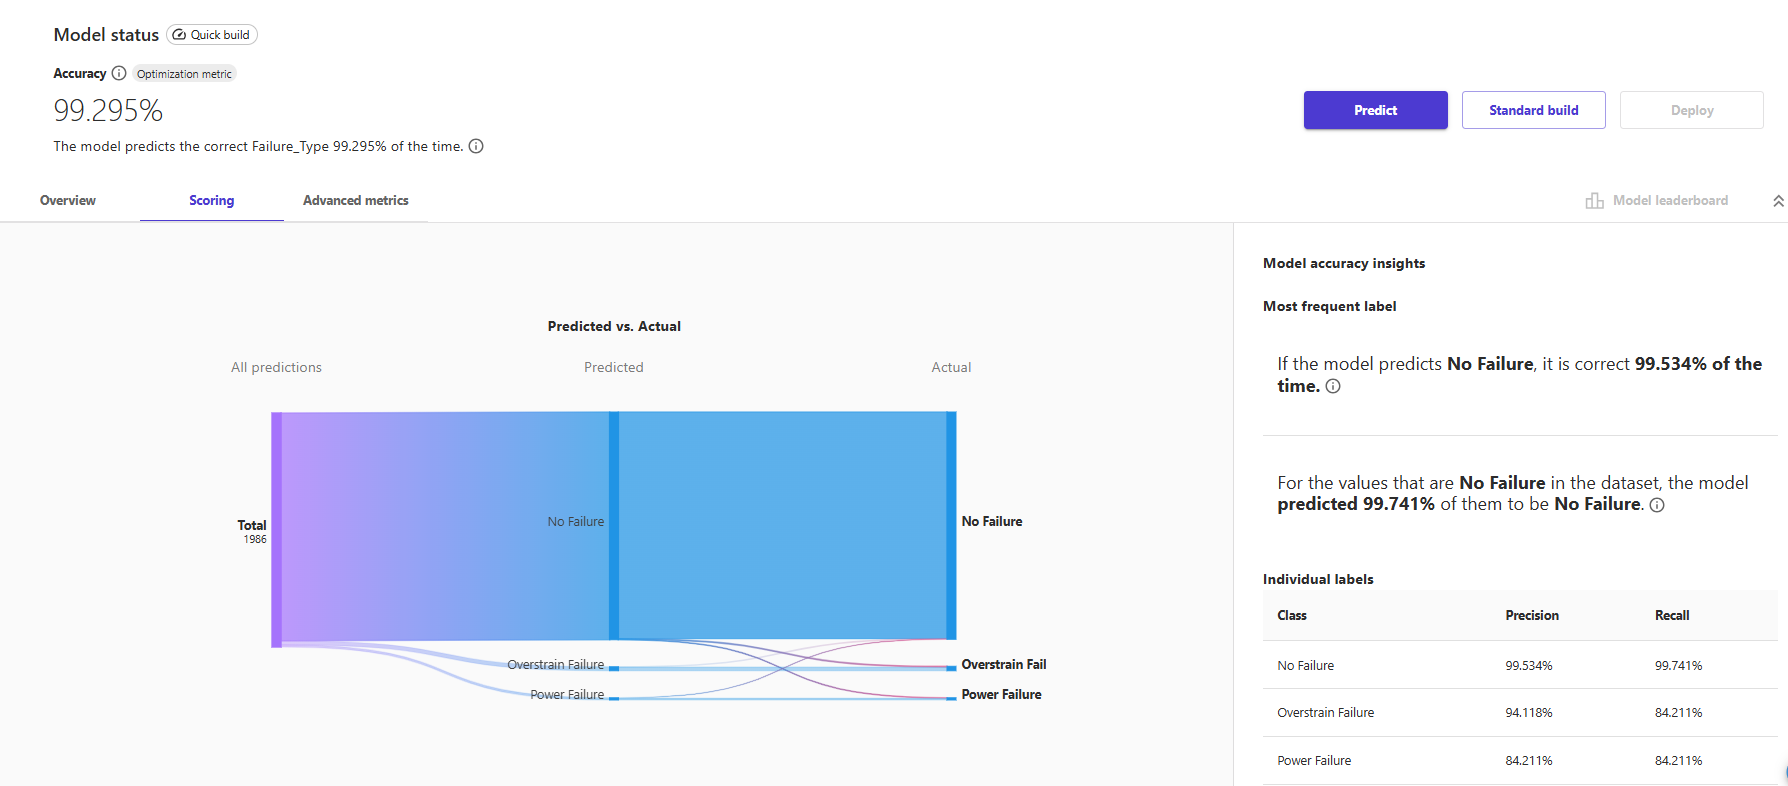
- When we move to the Scoring portion of our analysis, we can see a plot representing the distribution of our predicted values with respect to the actual values. Notice that most failures will be within the "No Failure Category".
- If you want to learn more about how Canvas uses SHAP baselines to bring explainability to Machine Learning, you can check the "Evaluating Your Model's Performance in Amazon SageMaker Canvas" section of the Canvas documentation, as well as the page for SHAP Baselines for Explainability .
- You are most interested in failure types and how well the model predicts failure types based on a series of inputs. To take a closer look at the results, you can click on the Advanced metrics link on the right.
- This will display a matrix that allows you to more closely examine the results. In machine learning, this is referred to as a confusion matrix.
In the default case, "No Failure", there were 1924 correct predictions out of 1986 overall records, which resulted in 99.295% accuracy. 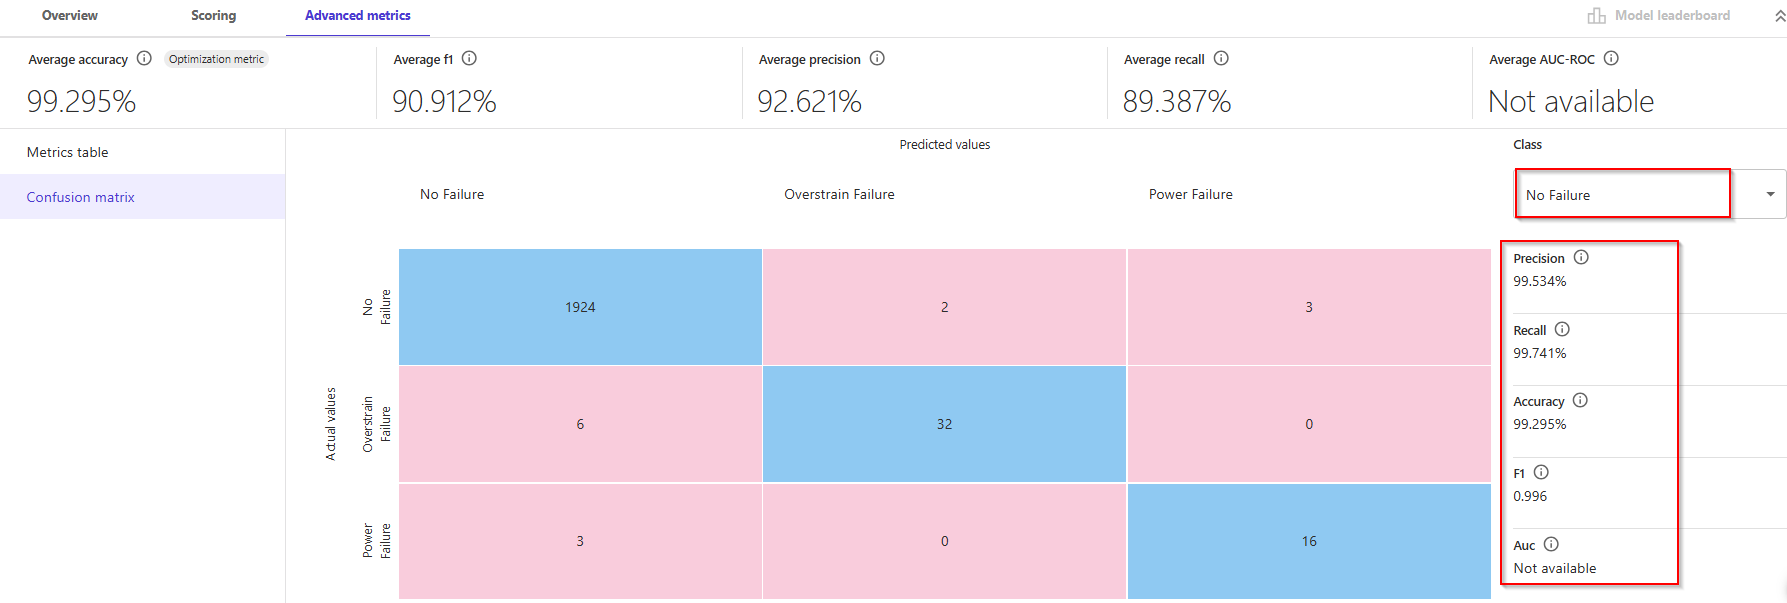
🧠 Tổng quan các chỉ số ở trên cùng:
- Average accuracy: Tỷ lệ tổng thể các dự đoán đúng trên toàn bộ tập test (99.295%)
- Average f1: Trung bình F1-score giữa các lớp (90.912%) – cân bằng Precision & Recall
- Average precision: Trung bình precision giữa các lớp (92.621%)
- Average recall: Trung bình recall giữa các lớp (89.387%)
- Average AUC-ROC: Không khả dụng trong mô hình này (Not available)
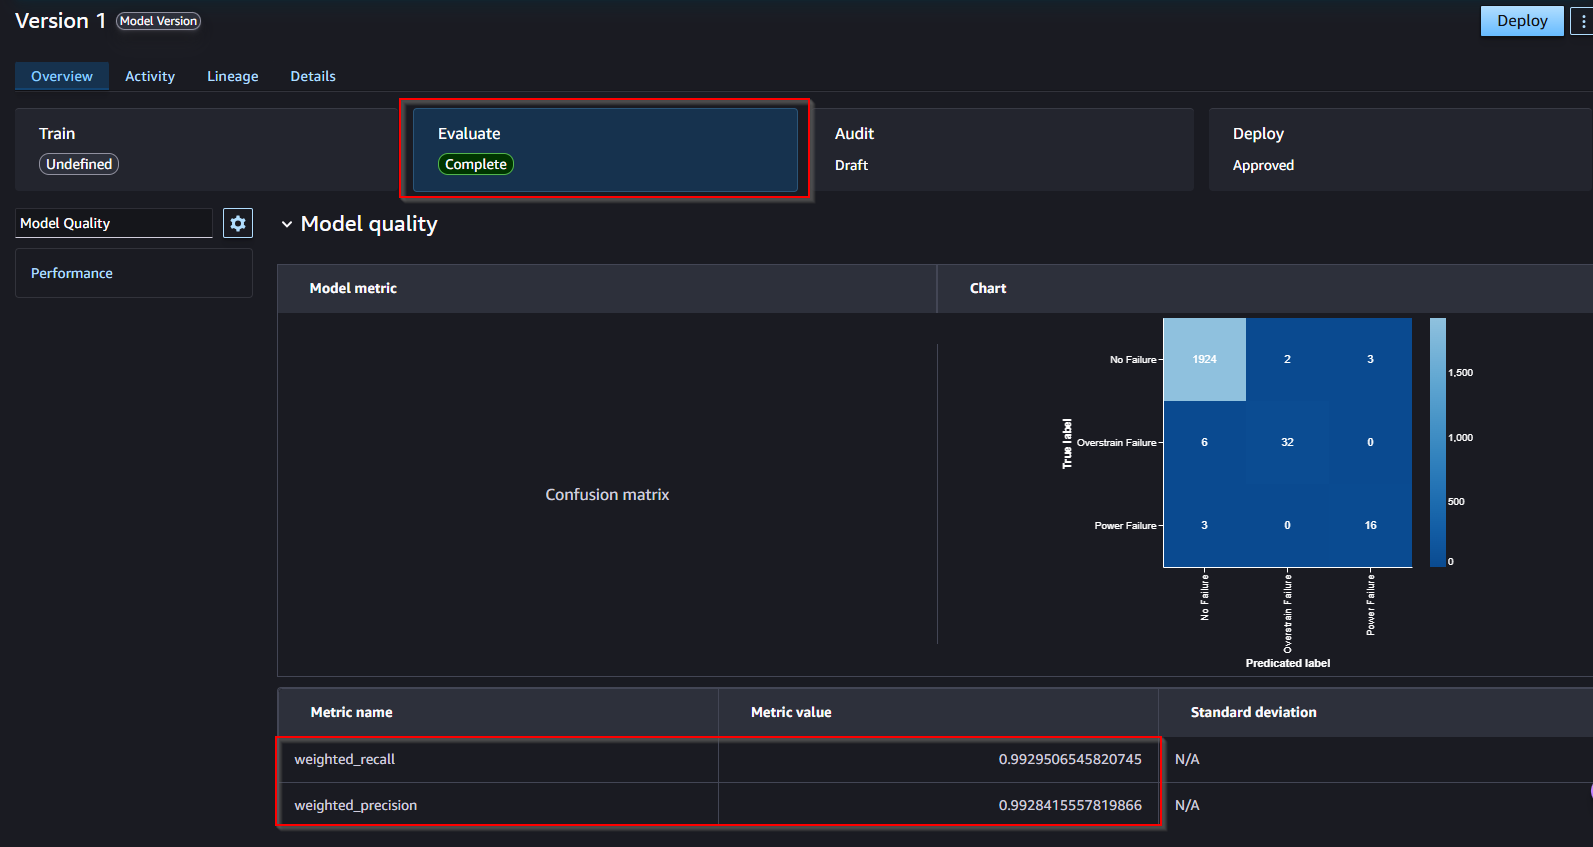
📊 Confusion Matrix:
- 1924 mẫu No Failure được dự đoán đúng.
- 6 mẫu Overstrain Failure bị dự đoán nhầm thành No Failure.
- 3 mẫu Power Failure bị dự đoán nhầm thành No Failure.
- ...v.v.
✅ Nhận xét tổng quát:
- Mô hình này cực kỳ mạnh trong việc phát hiện No Failure với precision và recall ~99.5%.
- Tuy nhiên, số lượng sample cho lỗi (32, 16, v.v.) ít hơn nhiều so với không lỗi (1924), dẫn đến imbalance dataset → nên chú ý khi đánh giá toàn diện.
- Đối với Overstrain Failure và Power Failure, có thể xem thêm hiệu suất bằng cách đổi
Class ở dropdown menu (bạn đang chọn "No Failure").
Alternatively, the class of "Overstrain Failure, there were 32 out of 38, which results in 84% accuracy. 
Lastly, the class of "Power Failure", there were 16 out of 19, which results in 84% accuracy. In machine learning, a ratio used to measure this is TP / (TP + FN). This is referred to Recall.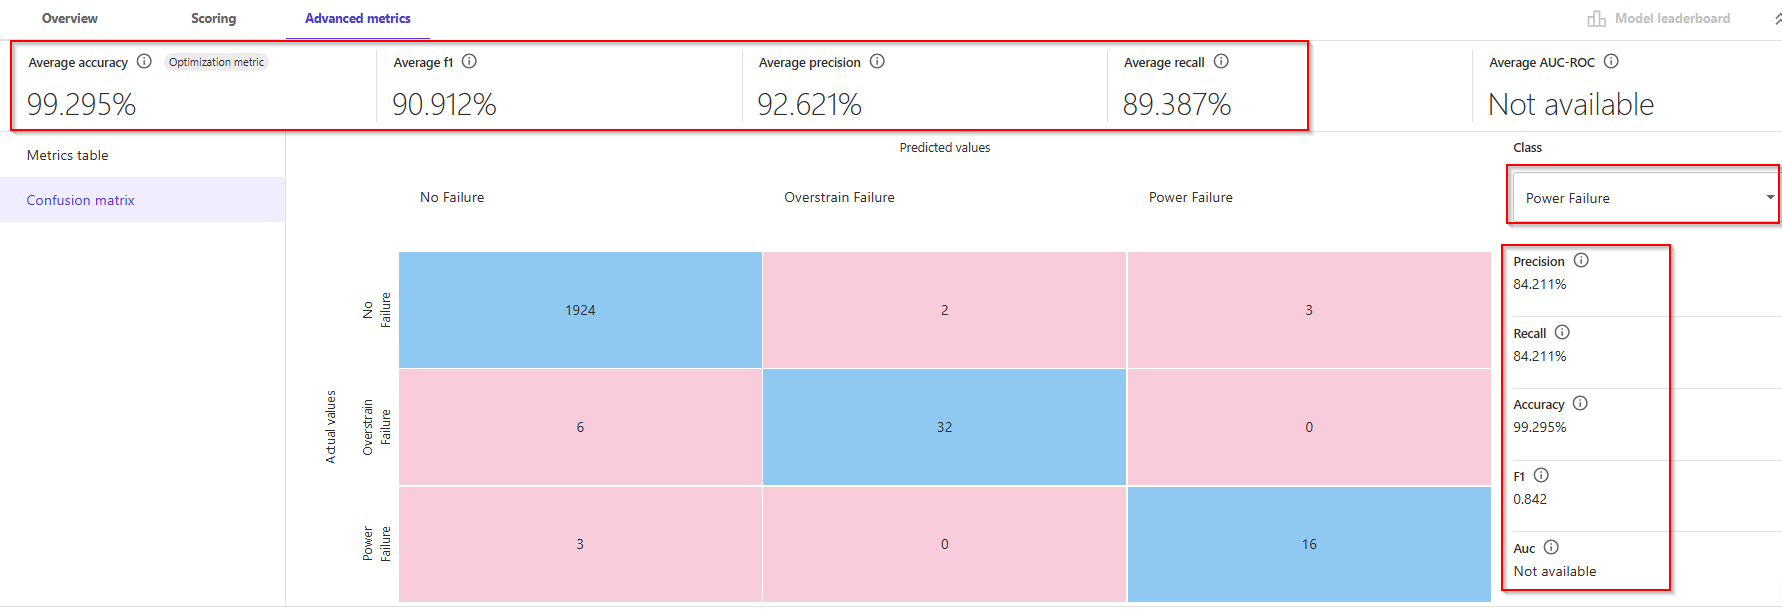
6. Using the model to generate predictions
- Now that the model is trained, let's use for some predictions. Select Predict at the bottom of the Analyze page, or choose the Predict tab.
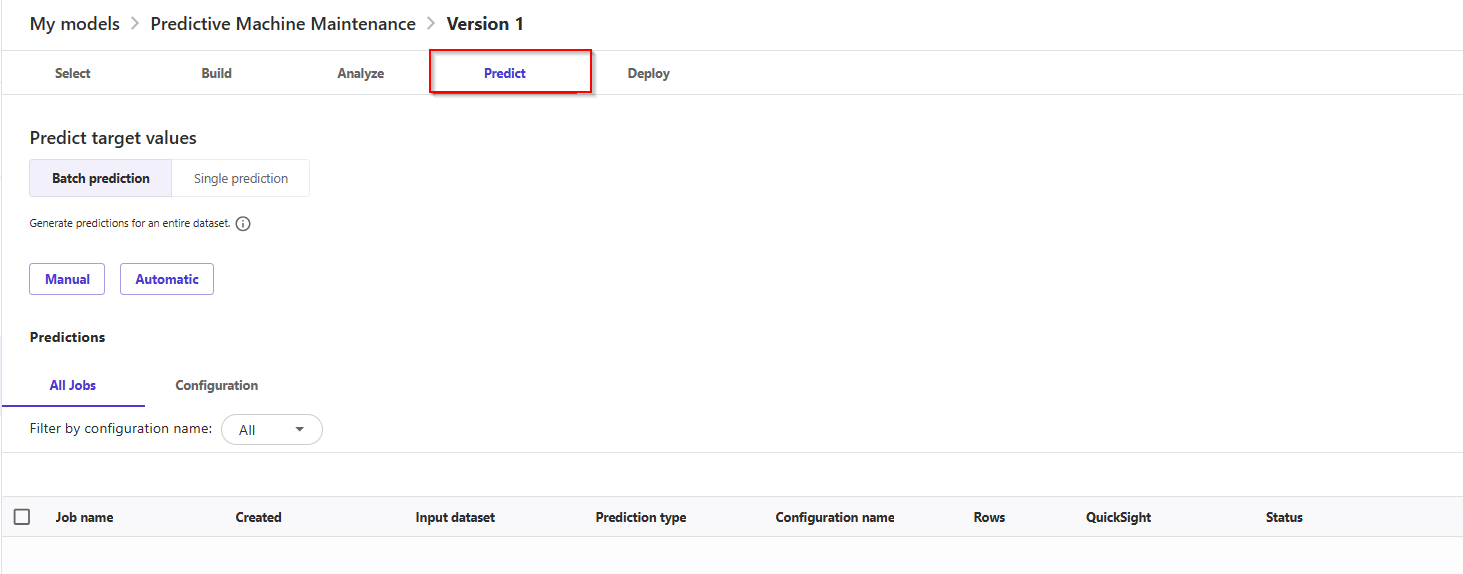
- Now, choose button Manual -> Select dataset, and choose the
maintenance_dataset.csv. Next, choose Generate predictions at bottom of the page. Canvas will use this dataset to generate our predictions.
Note: Although it is generally a good idea not to use the same dataset for both training and testing, using the same dataset for the sake of simplicity.
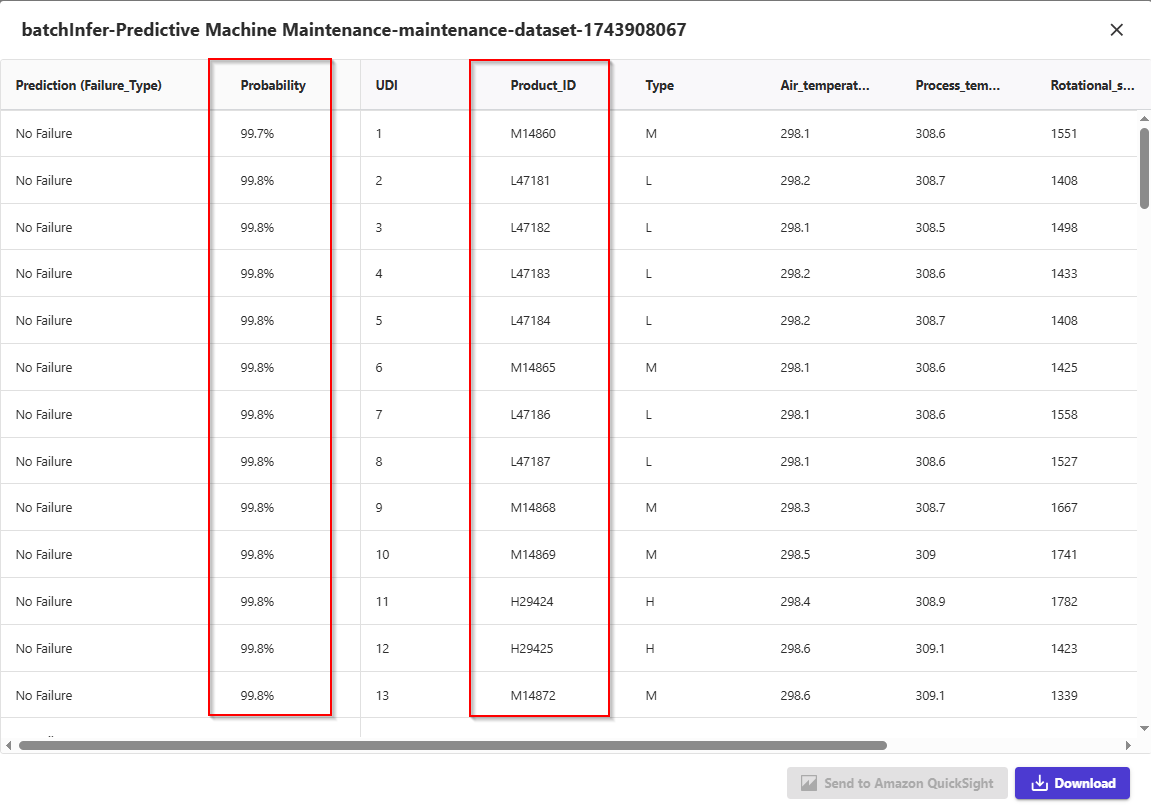
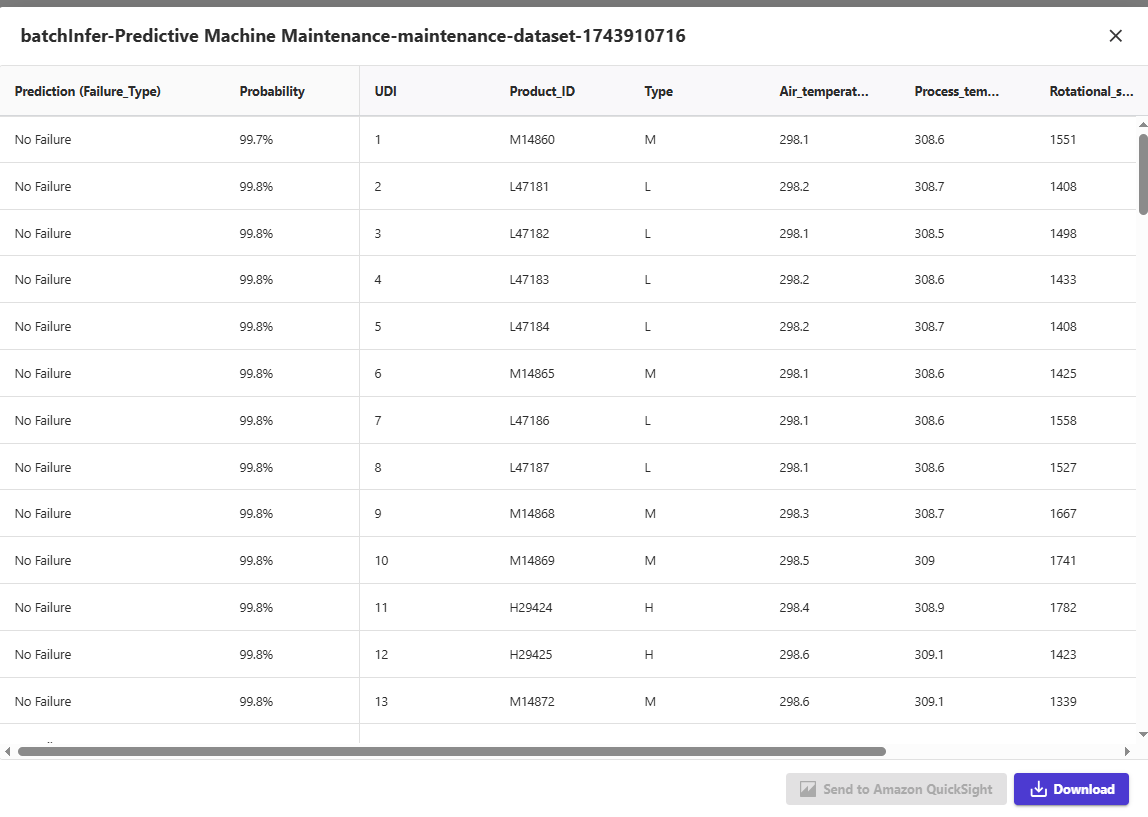
- After a few seconds, the prediction is done. You can click on the eye icon to see a preview of the predictions by hovering over the, or click the download button to download a CSV file containing the full output.
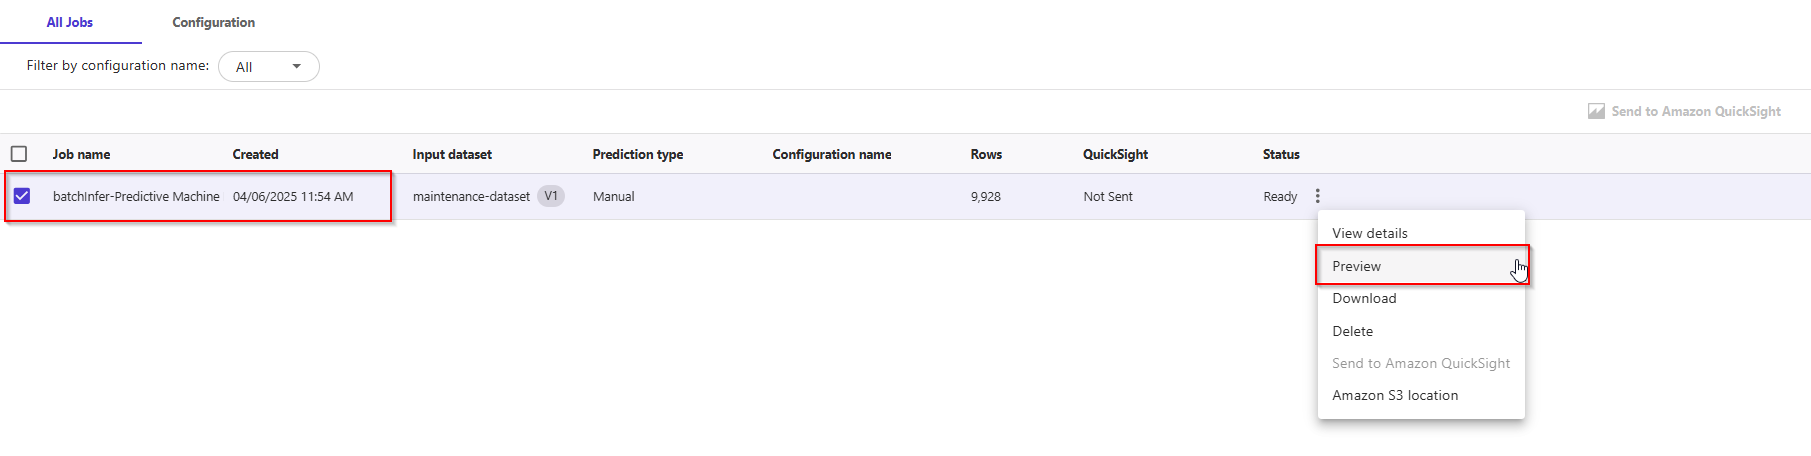
- SageMaker Canvas will return a prediction for each row of data and the probability of the prediction being correct.
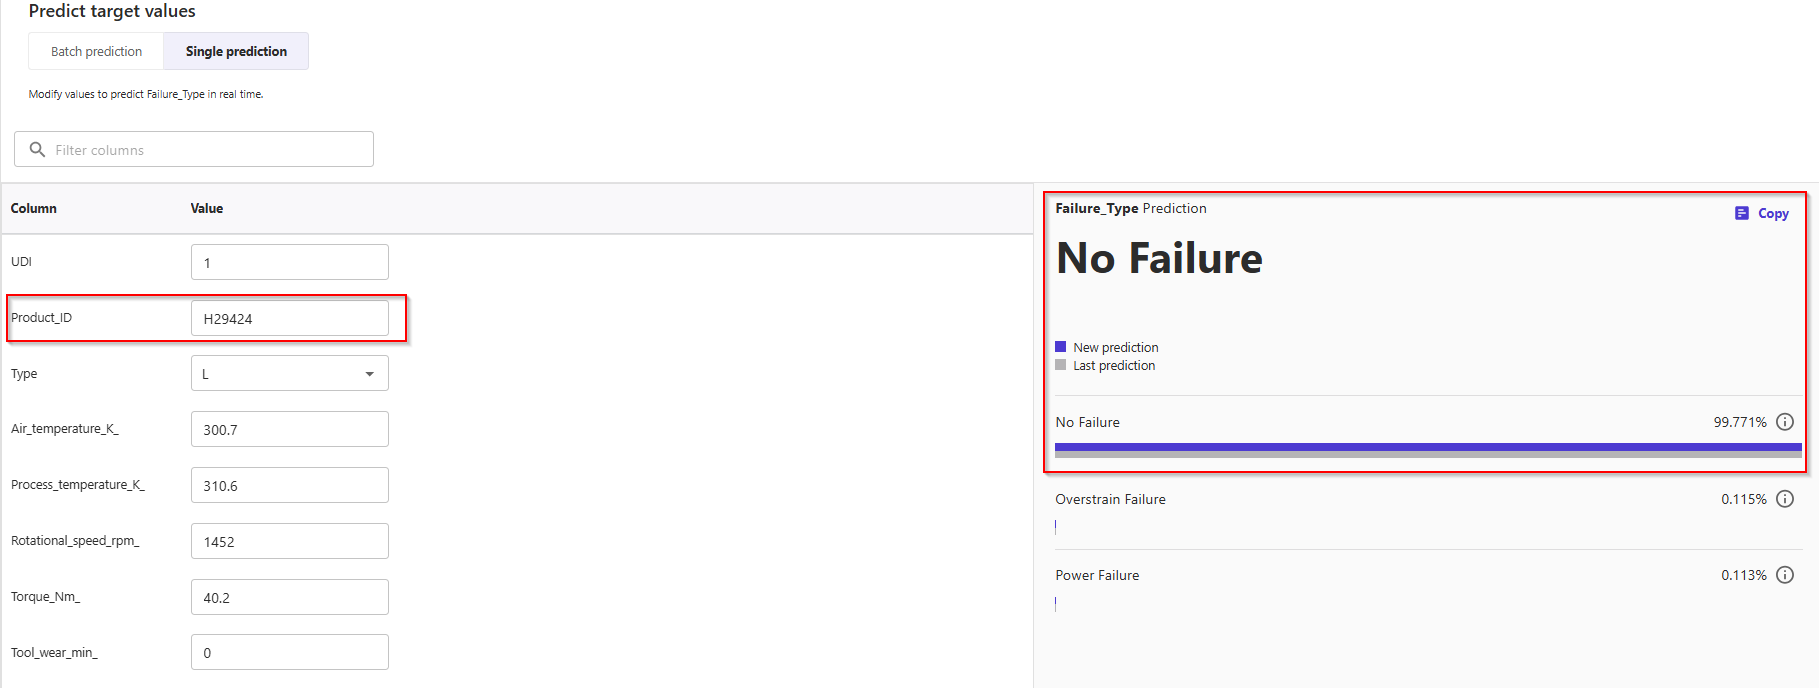
- You can also choose to predict one by one values, by selecting Single prediction instead of batch prediction. Canvas will show you a view where you can provide manually the values for each feature, and generate a prediction.
- This is ideal for situations like what-if scenarios: e.g. how does the tool wear impact the failure type? What if process increase or decrease? How about rotation speed, what if it changes?
Congratulations! You've now completed.
B. Advanced: Operationalize your models - Automations, Model deployments, MLOps. (Tích hợp Automation trong workflows ML)
MLOps includes common tasks such as deploying a model for use in production or setting up continuous integration and continuous deployment (CI/CD) pipelines.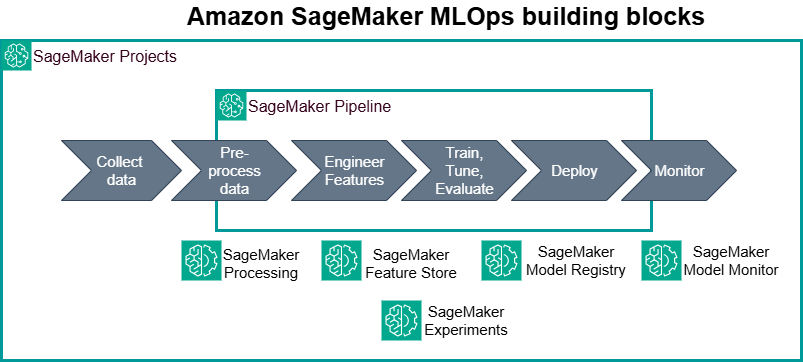
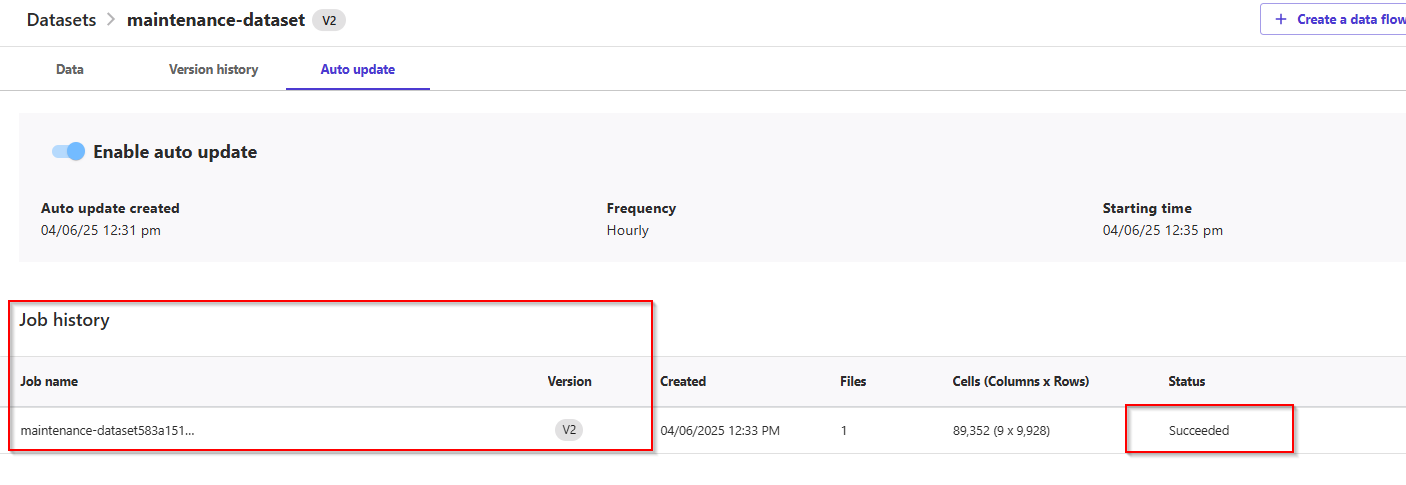
In SageMaker Canvas, you can create automations to update your dataset or generate predictions from your model on a schedule. You can set up automatic updates for your dataset and automatic batch predictions that run whenever the dataset is updated.
- On the left menu, click the second icon to go to the Datasets section. Choose the
maintenance_dataset from the list of datasets, and then click on the Update dataset dropdown menu item. Click Automatic Update.
- On the update page, select Enable Auto Update, choose the S3 bucket location, set the frequency, and specify the starting time.
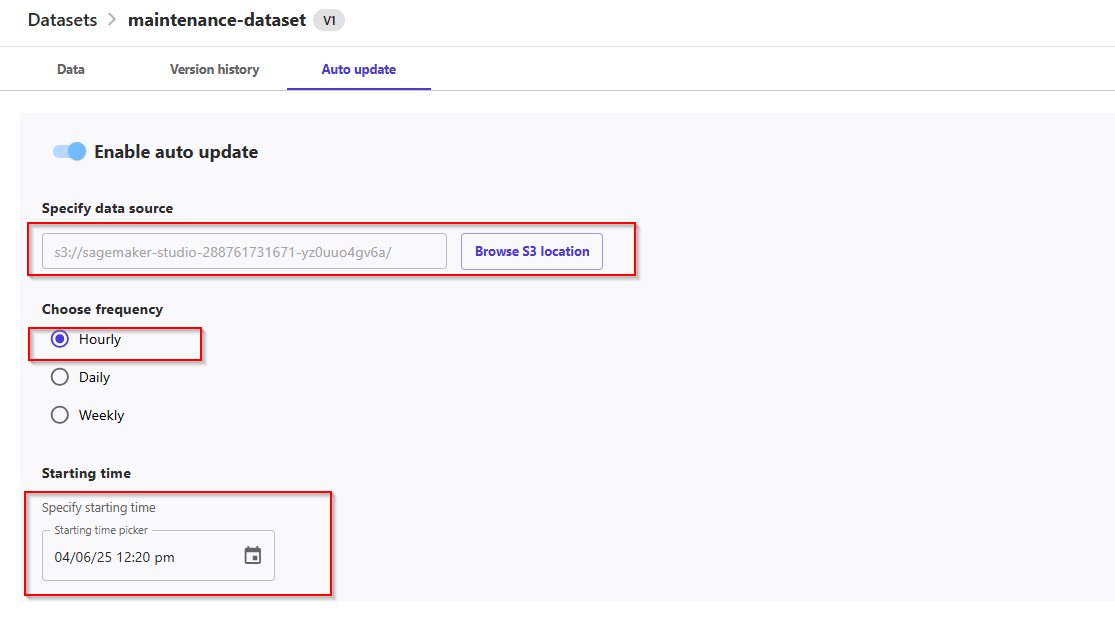
- For example, 10-15 minutes from now. If you set "now" as the starting time, you will have to wait at least one hour before the automation takes place.
- Click Save to save the configuration and schedule the update job.

- In SageMaker Canvas, from the left menu, click the third icon from the top, "My Models". Select the predictive maintenance model built previously, then select the model version in Ready state, then head over to the Prediction tab.
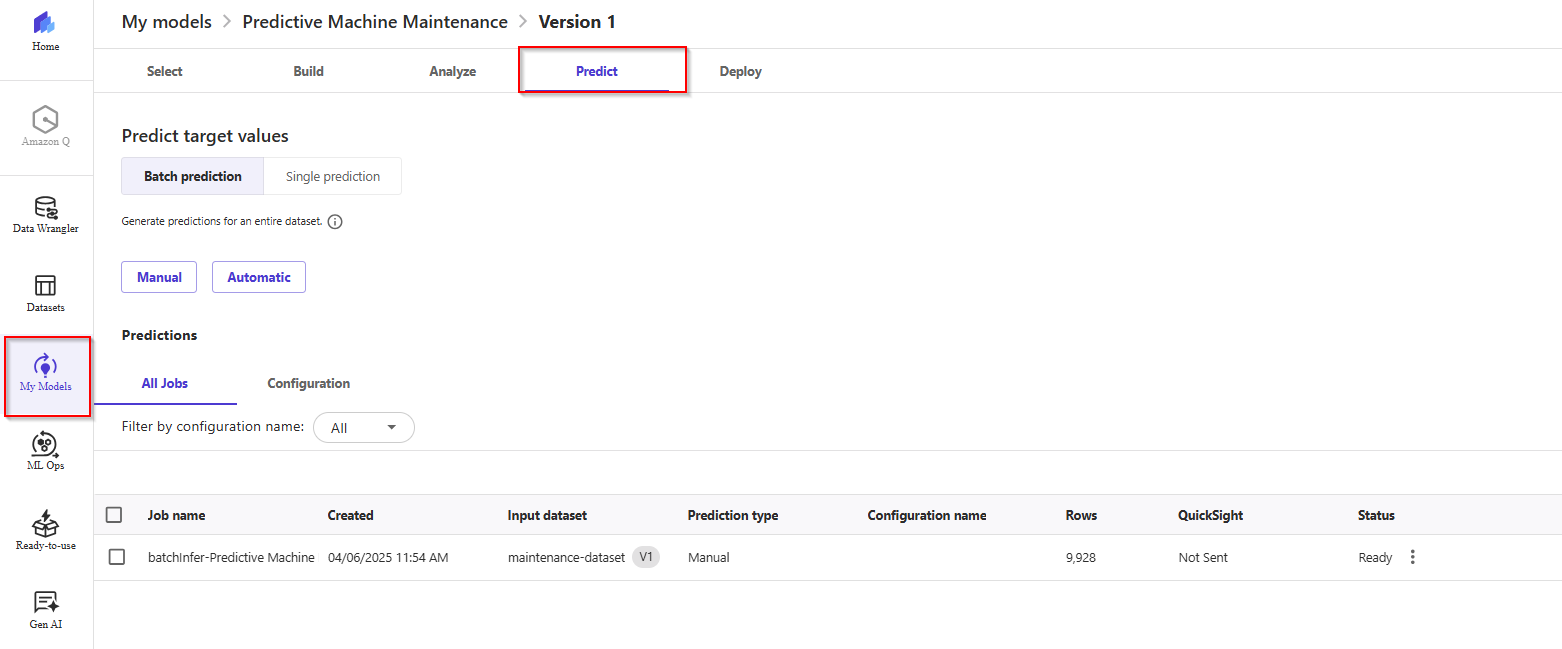
- In this screen, we have two options for Batch Prediction: manual predictions, and automatic predictions. Choose Automatic.
- Now, click on the Select Dataset in the pop-up and choose your dataset from the list by selecting the checkbox next to it.
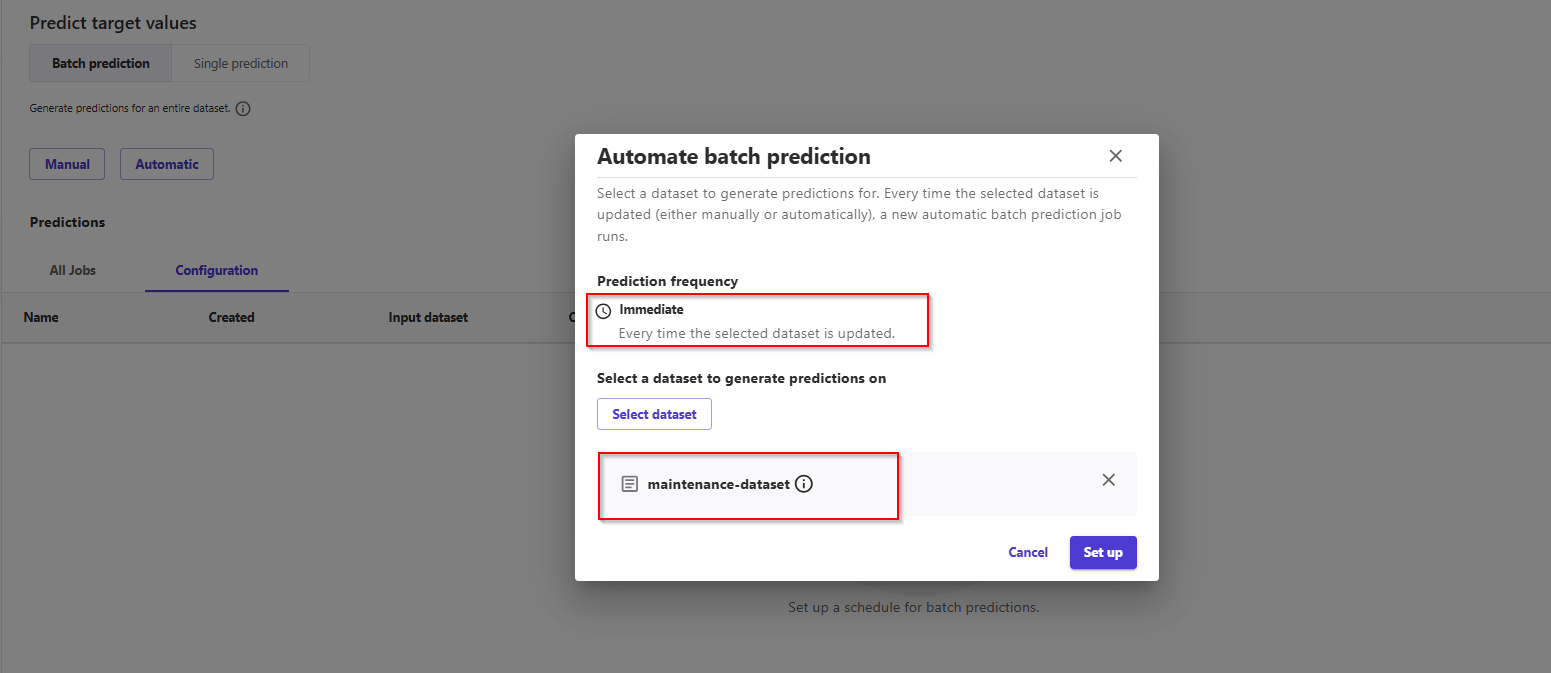
- Now the job for automated batch prediction is configured. The job will be triggered when the selected dataset is updated manually or automatically.
3. Automate Is Triggered
In the previous steps, we have:
- uploaded the updated dataset to the S3 bucket to simulate some upstream process generating a new dataset;
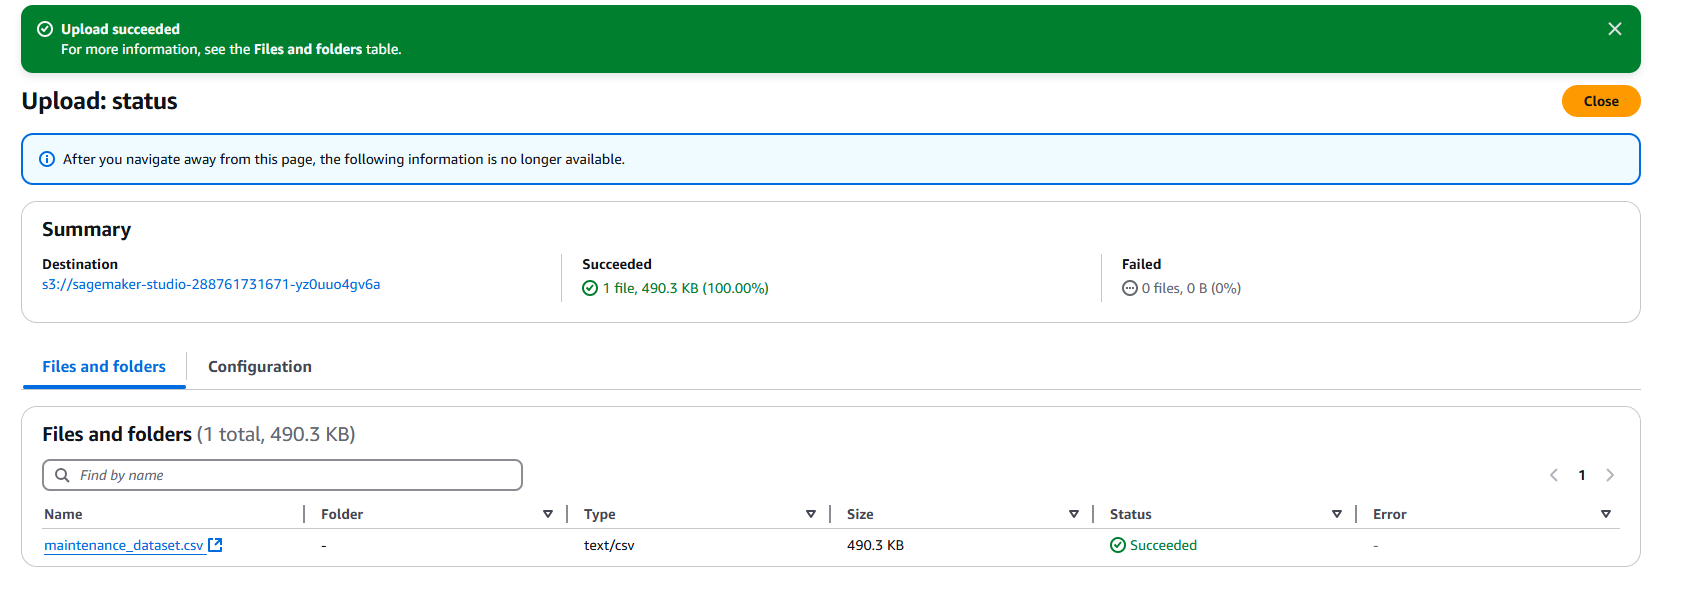
- configured the dataset for automated updates with the S3 bucket used in the earlier step as the destination for the updated dataset;
- configured the model for automated batch prediction whenever the dataset is updated.
All that is left to do, is to verify that the automation has been triggered.
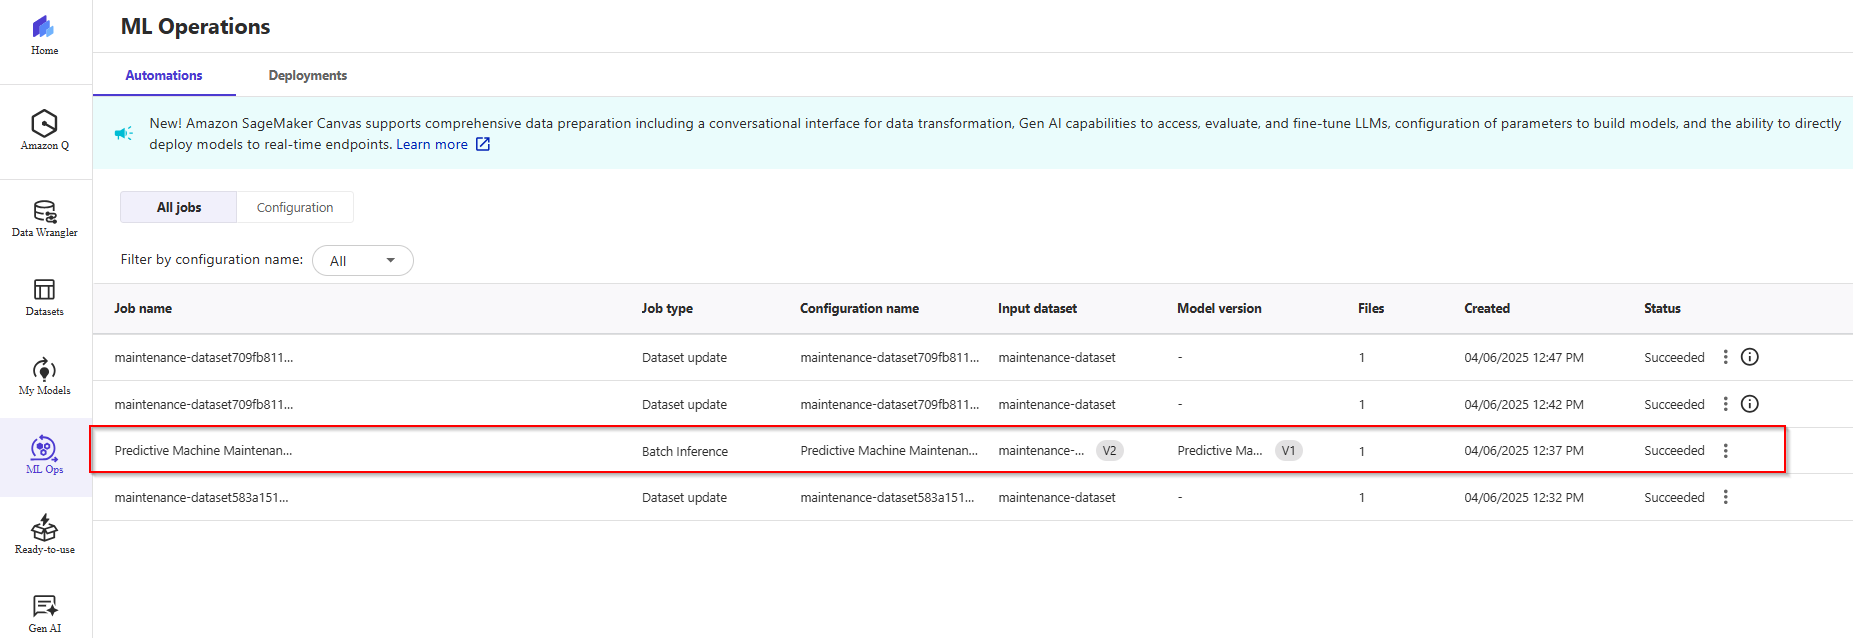
- On the left menu, click the My model icon -> All jobs. You will see two successful jobs for dataset updates and batch inference.
- Click on Datasets in the left-side menu, and you will see that the version of
maintenance_dataset has changed from V1 to V2.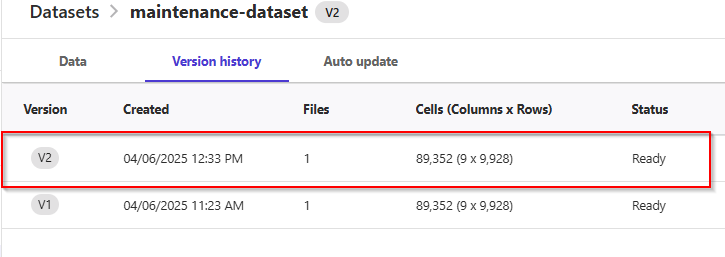
![]()
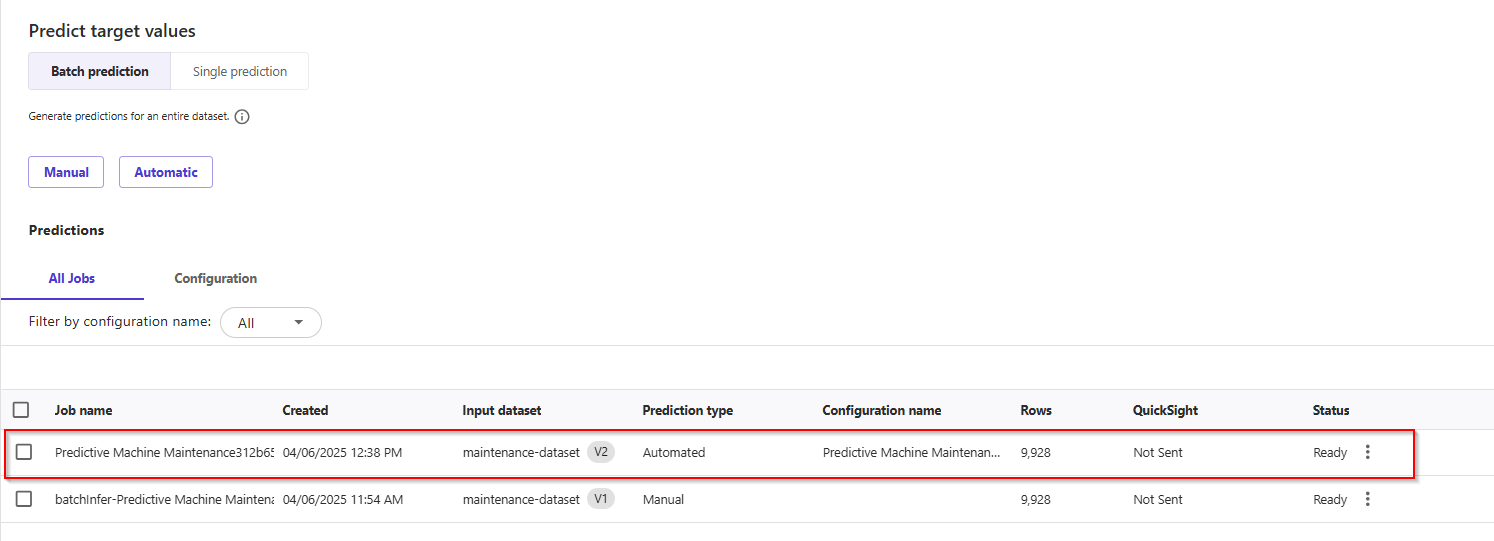
- Now, go back to the Predict tab of the model by clicking on My Models in the left-side menu, selecting the model, and then choosing the Predict tab. Select Batch Prediction. You will find a job with the status "Ready." Click on the 'Ready' status.
- Select Preview to view the predicted dataset.
Congratulations! You have now completed the Advanced Lab for Automation.
4. MLOps with SageMaker Model Registry
In the SageMaker model registry interface in Studio, the data scientist or MLOps team can evaluate your model and update its approval status:
- If the model doesn’t perform to their requirements, the data scientist or MLOps team can update the status to Rejected.
- If the model does perform to their requirements, then the data scientist or MLOps team can update the status to Approved.
From there, they can deploy your model to an endpoint or automate model deployment with CI/CD pipelines.
- Update role MLOps permissions configuration option in the SageMaker Domain configuration page. Choose default user in domain -> Click App Configurations tab -> Edit Canvas.

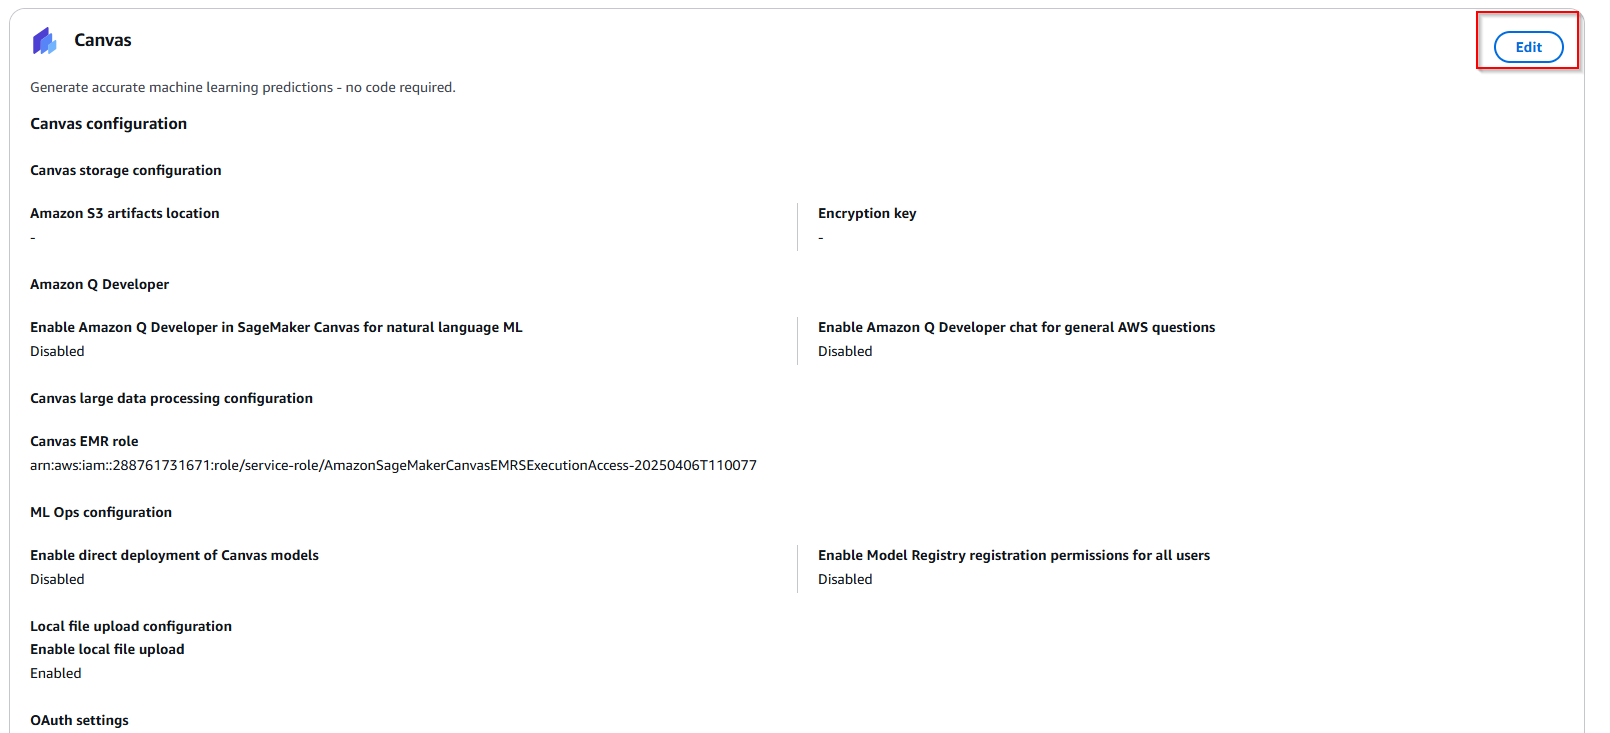
- Enabled two option ML Ops configuration -> Scroll down to the end of the screen, and click Submit.

- Back to Canvas dashboard. Continue, register a model version to the SageMaker model registry from the Canvas application, use the following procedure:
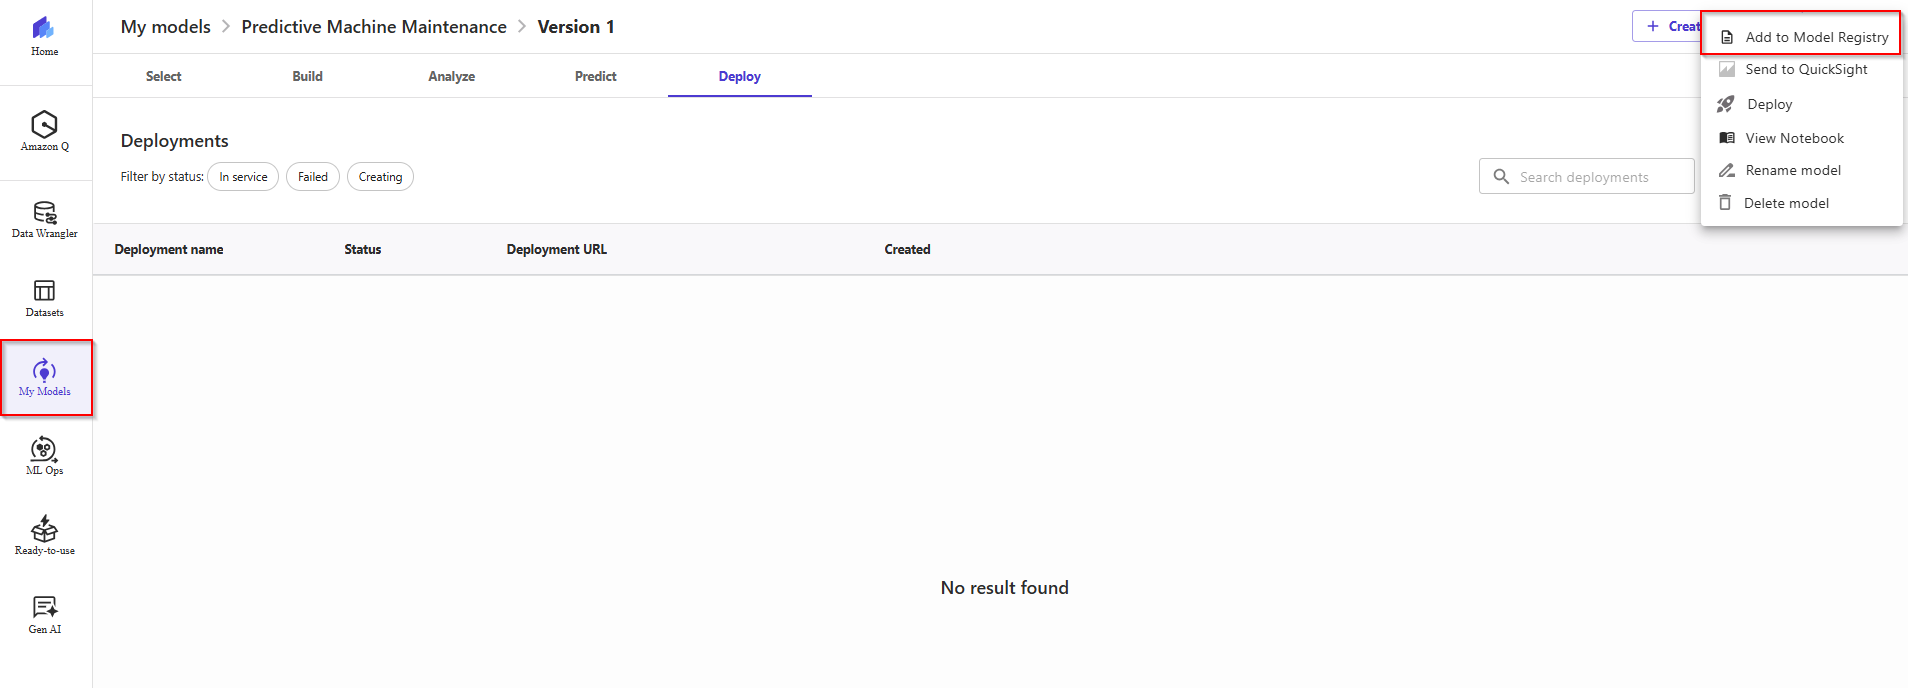
- On the My models page, choose your model. choose the More options (three dots) icon.
- In the dropdown list, choose Add to Model Registry.
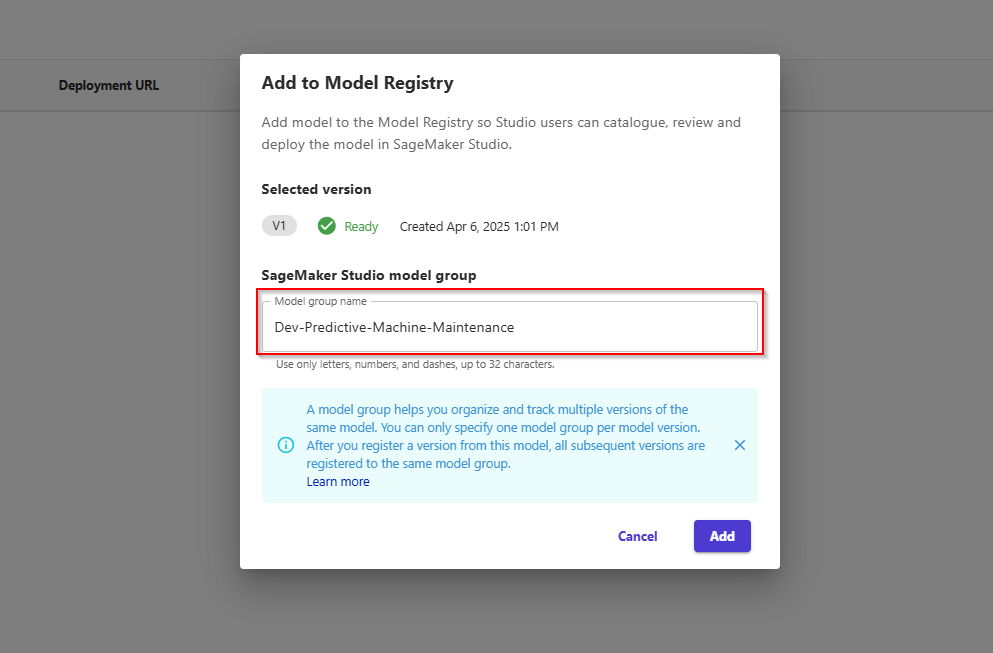
- In the dialog box, do the following: a. In the SageMaker Studio model group section, for the Model group name field, enter the name of the model group to which you want to register your version.
- If you don’t specify this field, Canvas registers your version to a default model group with the same name as your model.
- If you specify this field, Canvas register your version to the model group specified, creating a new model group if it doesn't exist b. Choose Add.
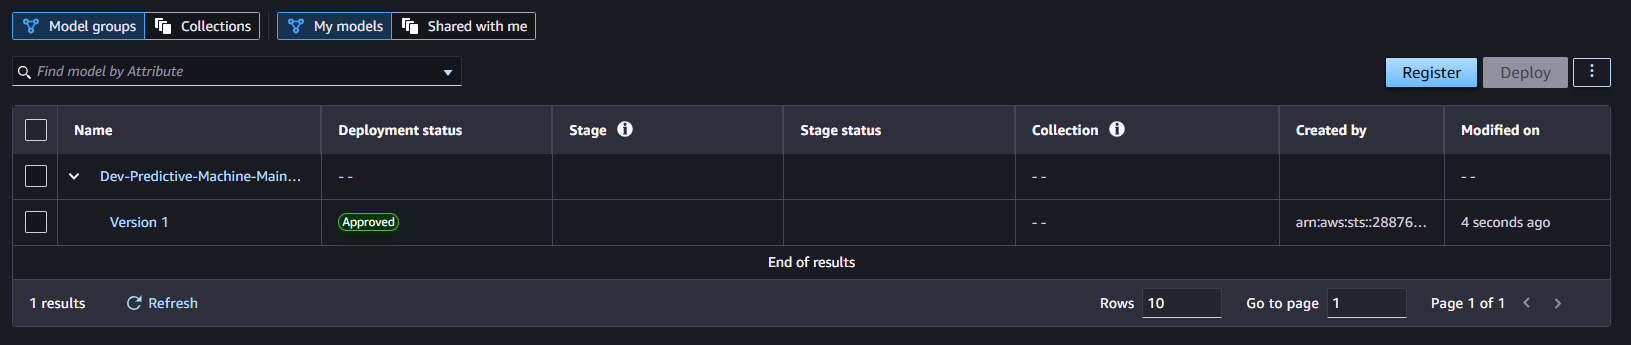
- Review the registered model in SageMaker Studio. We can see the model group
Dev-Churn-Prediction-Model that Canvas automatically created for us.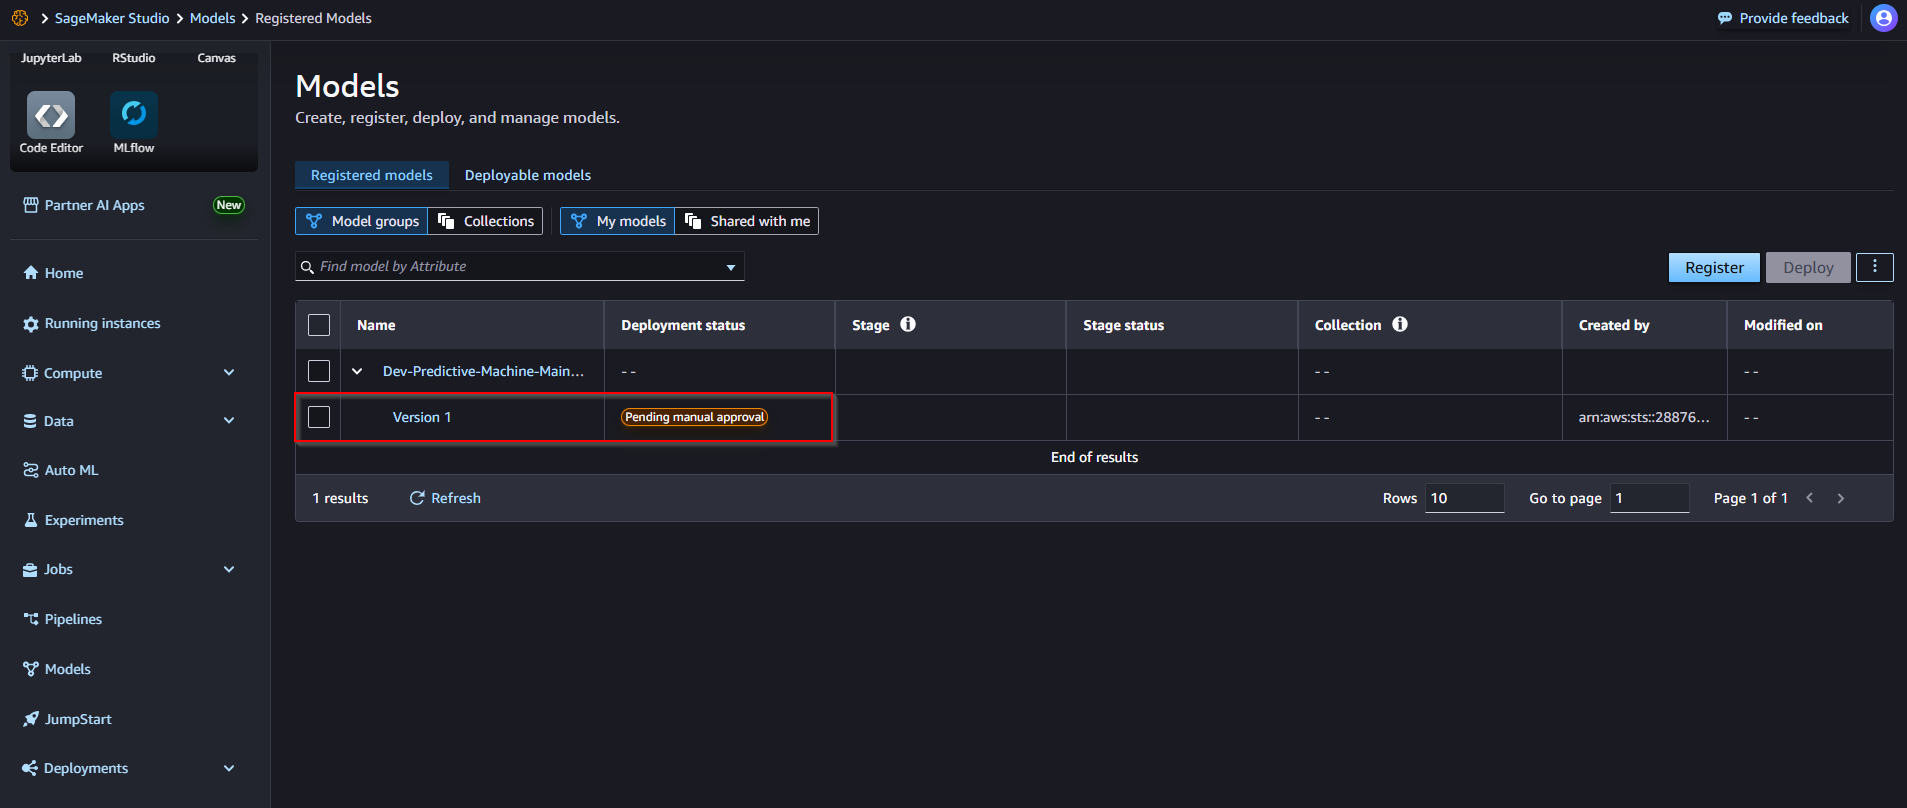
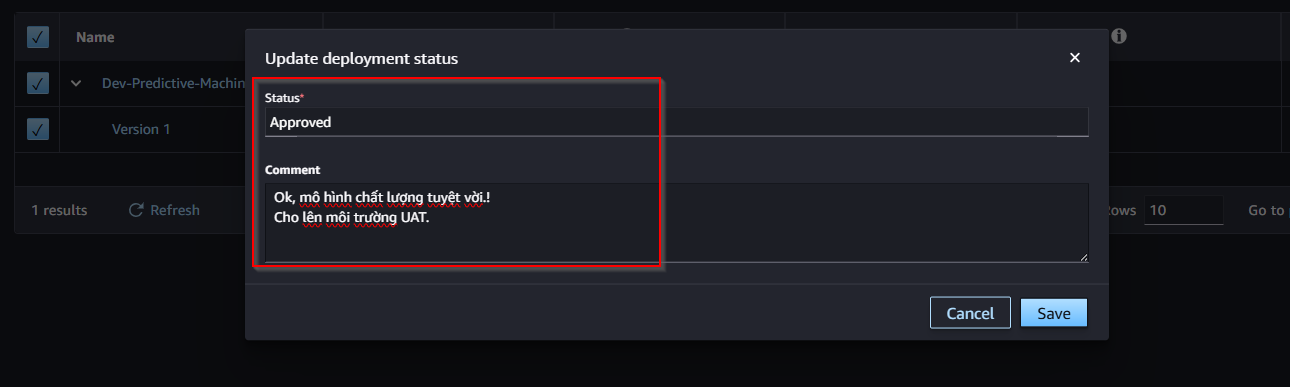
- After registering the model registry in Canvas, the model is currently in Pending status, waiting for review and needs Manual Approve. Next, perform model approval.
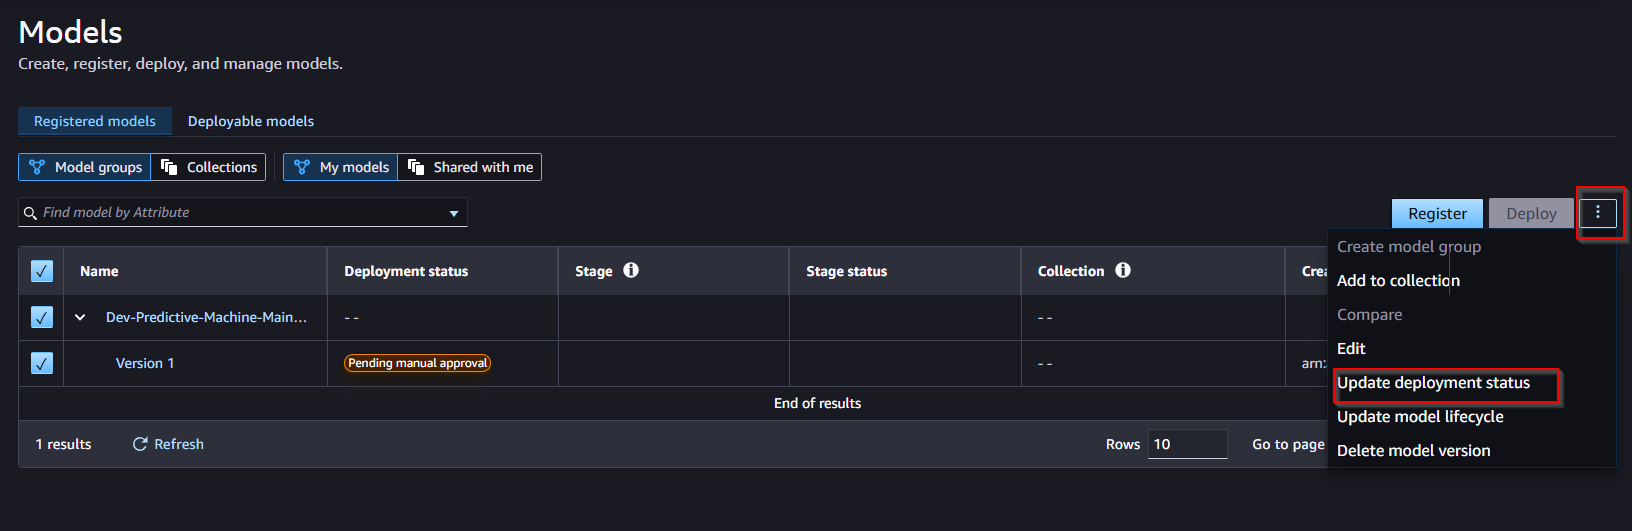

- You can add additional comments to the model. Wait about 5s for the model to change to Approved status.
- On the Evaluate tab, we can review the model metrics, precision/recall curves, and confusion matrix plots to understand the model performance.
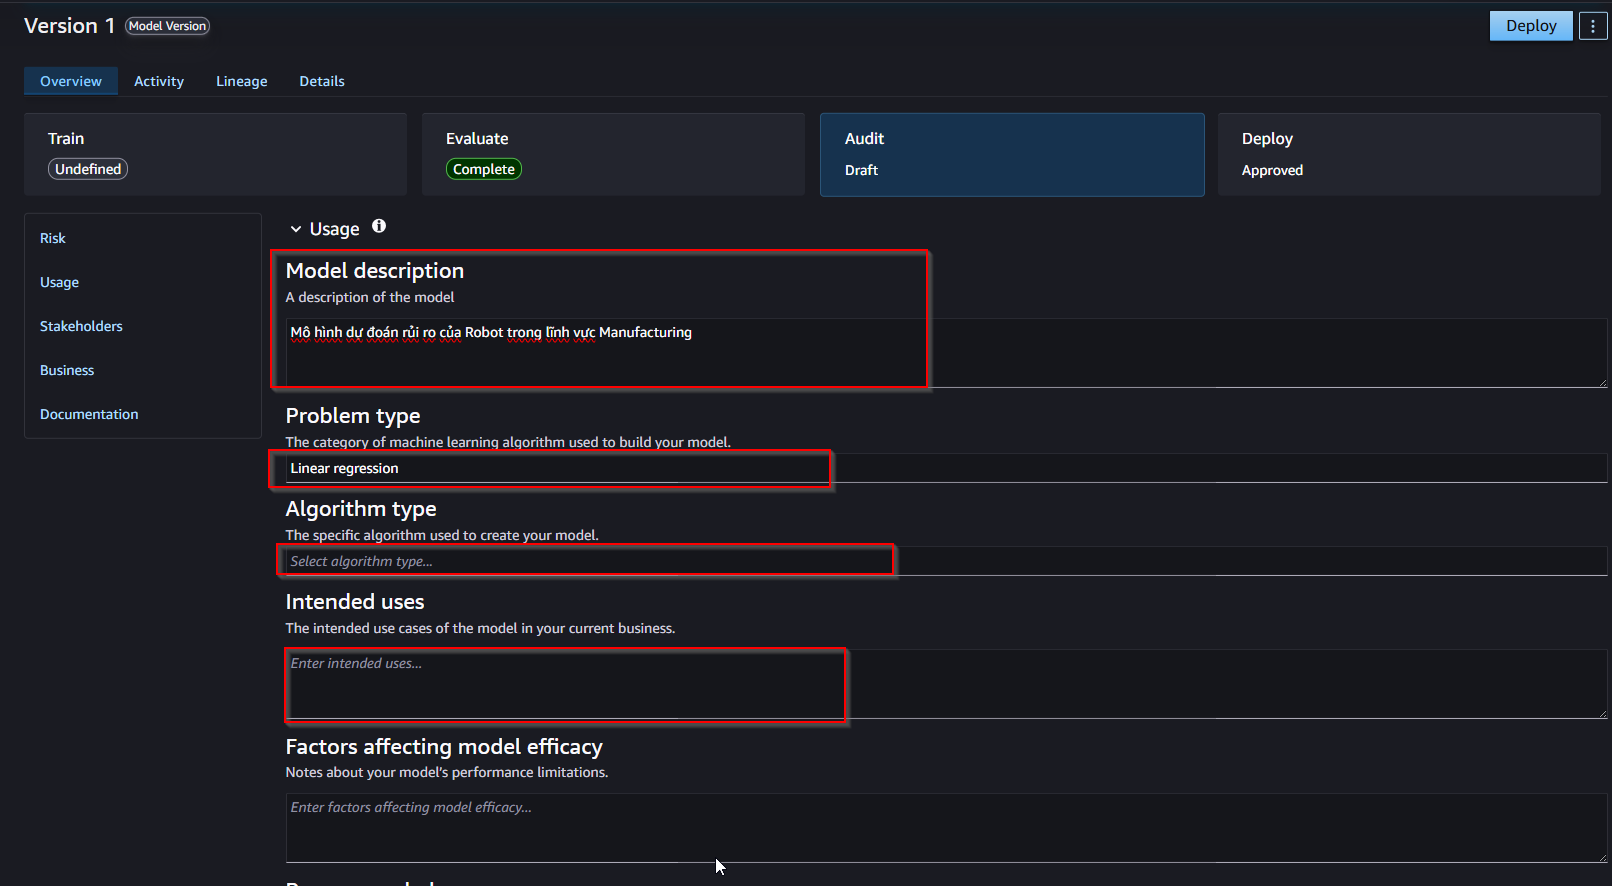
- On the Audit tab, we can create/edit/update the features the model’s. Write an explanation of the model.
- That's it! Your model version is now registered in SageMaker Model Registry. Congratulations! 🎉
5. Deploy a model from Amazon SageMaker Canvas
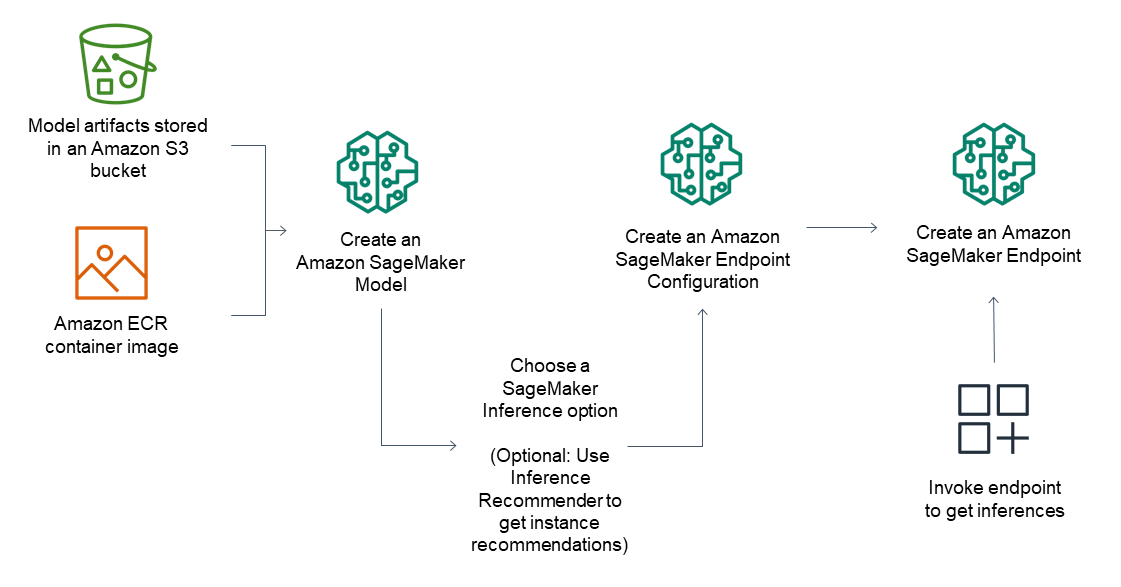
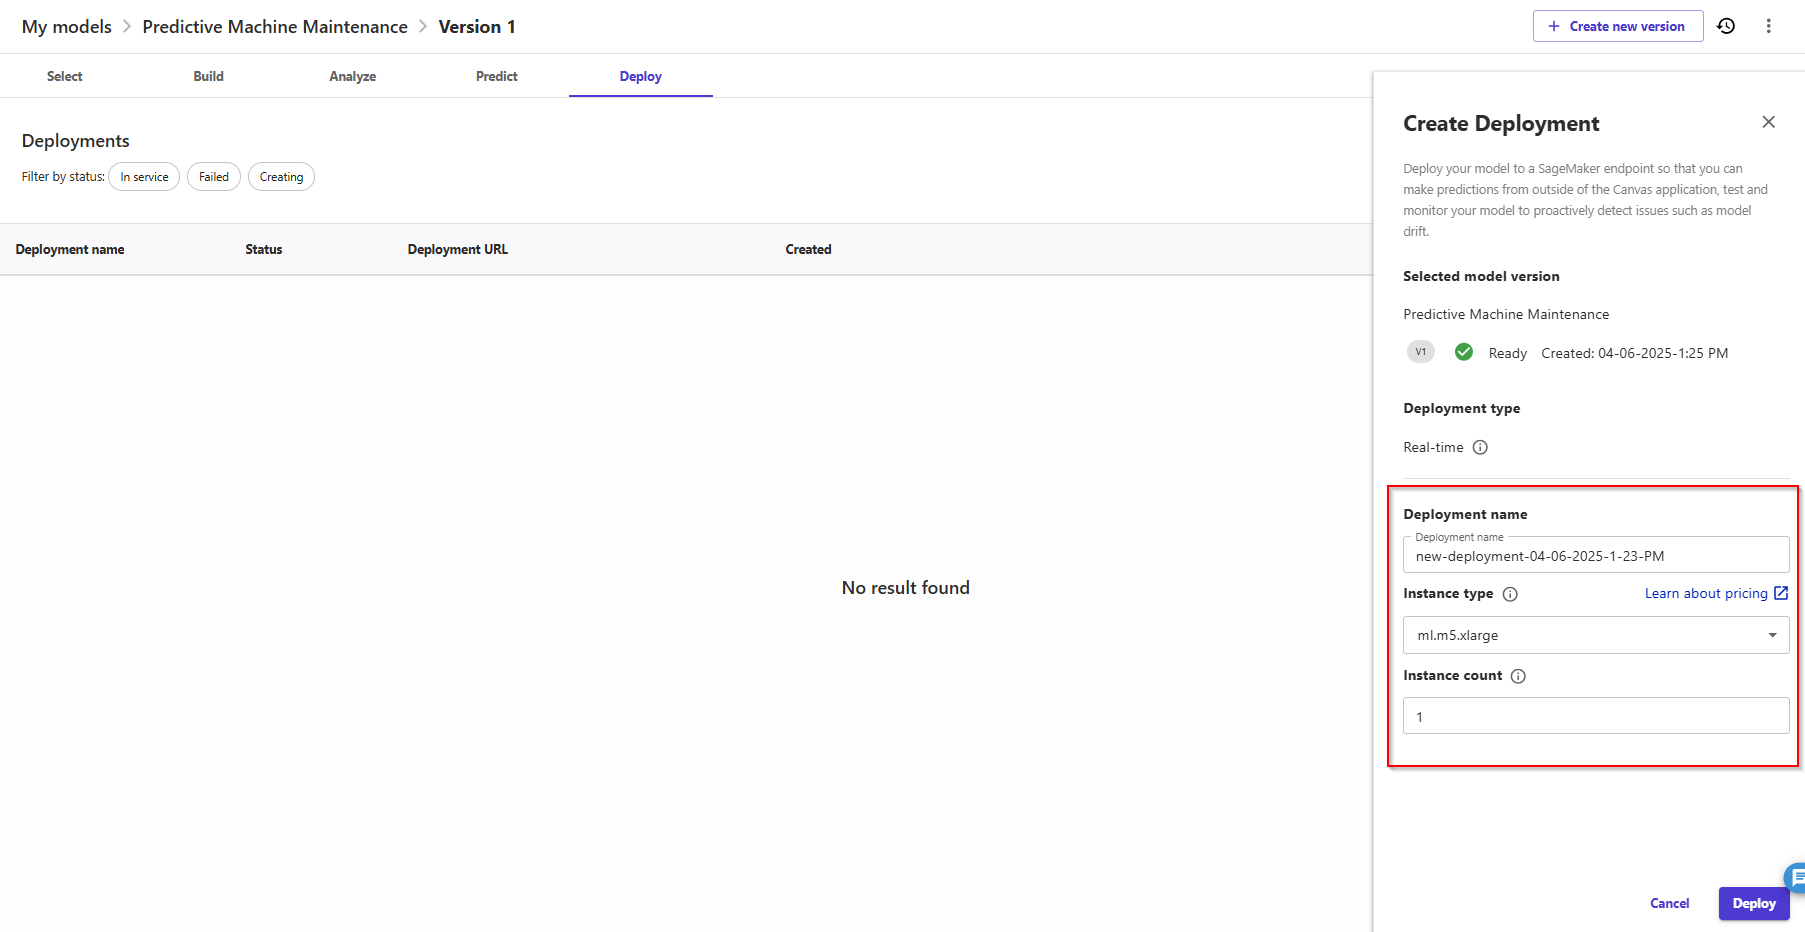
With a single click, SageMaker Canvas combines the transformation selected during the data preparation phase with the model trained with the AutoML process, and deploys then on a real-time endpoint within a SageMaker Inference Pipeline . Select Deploy tab:
- Deployment name: using default
- Instance type: ml.m5.xlarge
- Instance count: 1
- Click button Deploy.
6. Testing the endpoint
You can copy the deployment name and use it with the SageMaker Python SDK or with Boto3, or copy the deployment URL and use it with HTTPS requests, for example with Postman. ( Remember that, in both cases, you will have to provide valid AWS credentials to be able to query the endpoint.)
- Back to SageMaker Studio, create JupyterLab -> click on Open Launcher, then Create Notebook.

- Choose environment is Python 3 as kernel as instance. Leave the rest as default.
- Once the kernel is running, in the first empty cell of the notebook, paste the following code. Test data order: UID,Product_ID,Type,Air_temperature_K_,Process_temperature_K_,Rotational_speed_rpm_,Torque_Nm_,Tool_wear_min_
import sagemaker

# Configuration
endpoint_name = "canvas-new-deployment-04-06-2025-1-23-PM"
my_input = '176,MO,L,400.1,6.039329925774005,3.67888858431078,3.0296212421701054,150'

# SageMaker configuration setup
session = sagemaker.session.Session()
serializer = sagemaker.serializers.CSVSerializer()
deserializer = sagemaker.deserializers.CSVDeserializer()

# Connect to the endpoint and query
predictor = sagemaker.predictor.Predictor(
    endpoint_name=endpoint_name,
    sagemaker_session=session,
    serializer=serializer,
    deserializer=deserializer
)
predictor.predict(my_input)
- Change values for
endpoint_name with your endpoint name. - Execute the code by clicking on the play button, or by pressing Shift+Enter on your keyboard. You should get a result similar to this:
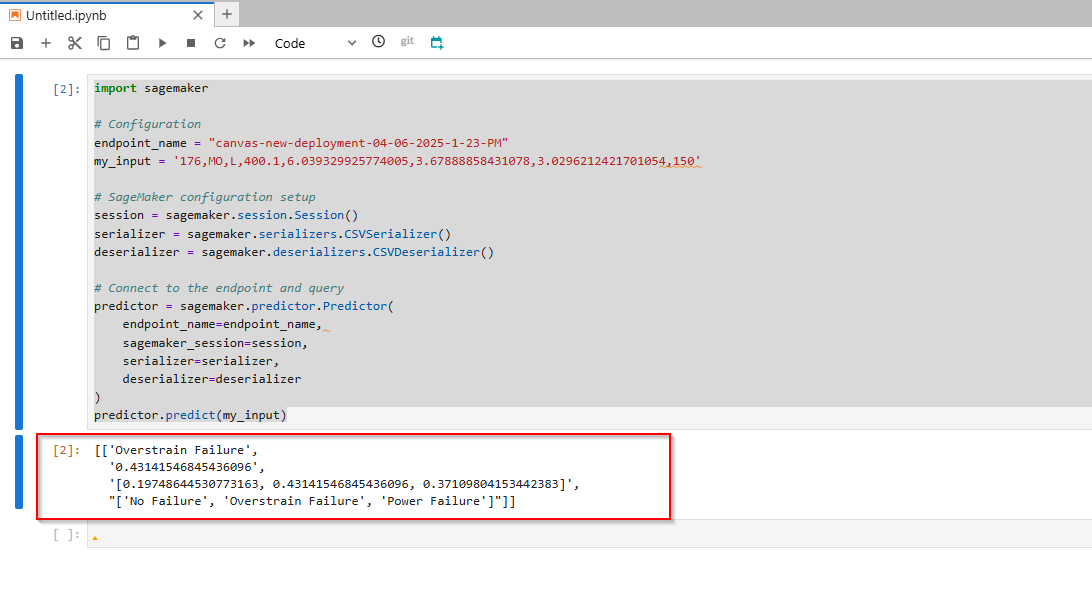
- The content of the response has three main components:
- its probability (43*,14%*) -> Overstrain Failure.
- the complete set of probabilities (19.74*% for No Failure class,* 43*,14% for the Overstrain Failure class, 37.1% for the Power Failure class*)
C. Data Science Assistant powered by Amazon Q Developer ( Tích hợp Amazon Q cho workflows MLOps, triển khai nhanh chóng mô hình ML sử dụng Ngôn ngữ tự nhiên)
- In this lab, you will learn how to use Amazon SageMaker Canvas to import and analyze a dataset for housing prices, and build a ML model to predict pricing without having to write a single line of code. Since the prices can be in any range of real values, this ML problem is called "Regression".
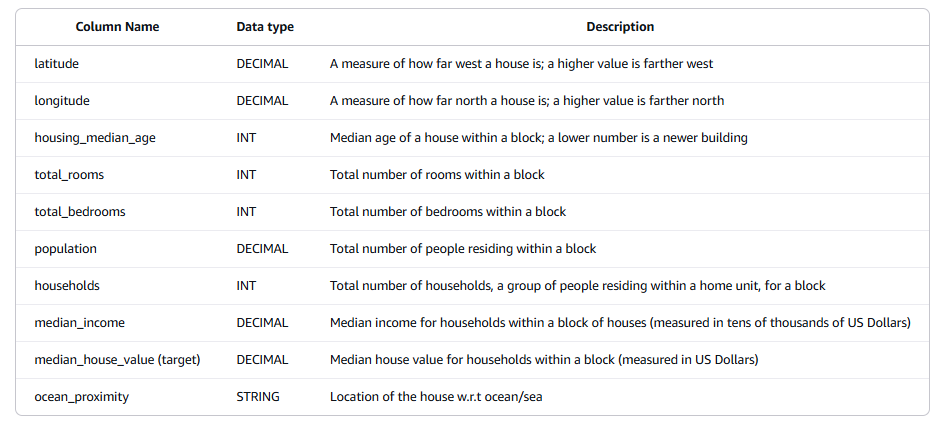
- The dataset we will use is the "California Housing Dataset" (Pace, R. Kelley and Ronald Barry, Sparse Spatial Autoregressions, Statistics and Probability Letters, 33 (1997) 291-297.). The data schema is as follows:
🏘️ Mục tiêu của bộ dữ liệu
- Dự đoán giá trị trung vị của một căn nhà (
median_house_value) dựa trên các đặc trưng khác của khu vực.
🔢 Chi tiết các cột dữ liệu
- latitude: Vĩ độ của khu vực — giá trị cao hơn thì càng về phía Bắc
- longitude: Kinh độ của khu vực — giá trị cao hơn thì càng về phía Tây
- housing_median_age: Tuổi trung bình của các ngôi nhà trong block (nhà càng mới → giá trị càng nhỏ)
- total_rooms: Tổng số phòng (tất cả các loại) trong khu vực (block)
- total_bedrooms: Tổng số phòng ngủ trong block
- population: Dân số sinh sống trong block đó
- households: Tổng số hộ gia đình (nhóm người sống trong một đơn vị nhà)
- median_income: Thu nhập trung bình (tính theo đơn vị 10,000 USD) của các hộ gia đình trong block
- median_house_value (target): Biến mục tiêu – Giá trị trung bình của nhà trong block (tính bằng USD)
- ocean_proximity: Khoảng cách đến biển. Ví dụ:
"NEAR BAY", "INLAND", "NEAR OCEAN" v.v.
You can download the dataset here. Note that the dataset is also available as one of the SageMaker Canvas sample datasets, canvas-sample-housing.
1. Prerequistes
To access Q Developer while using Canvas, you must attach the necessary permissions to the AWS IAM role used for your SageMaker AI domain or user profile.
- Open the Amazon SageMaker AI console.
- On the Domain details page, select User profiles, then click on
default-20250406T110077.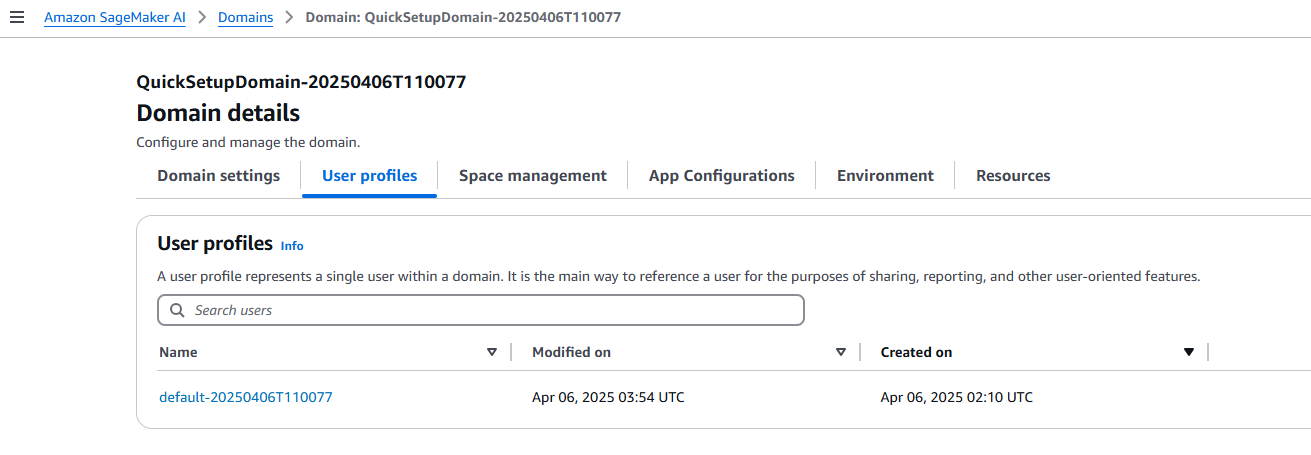
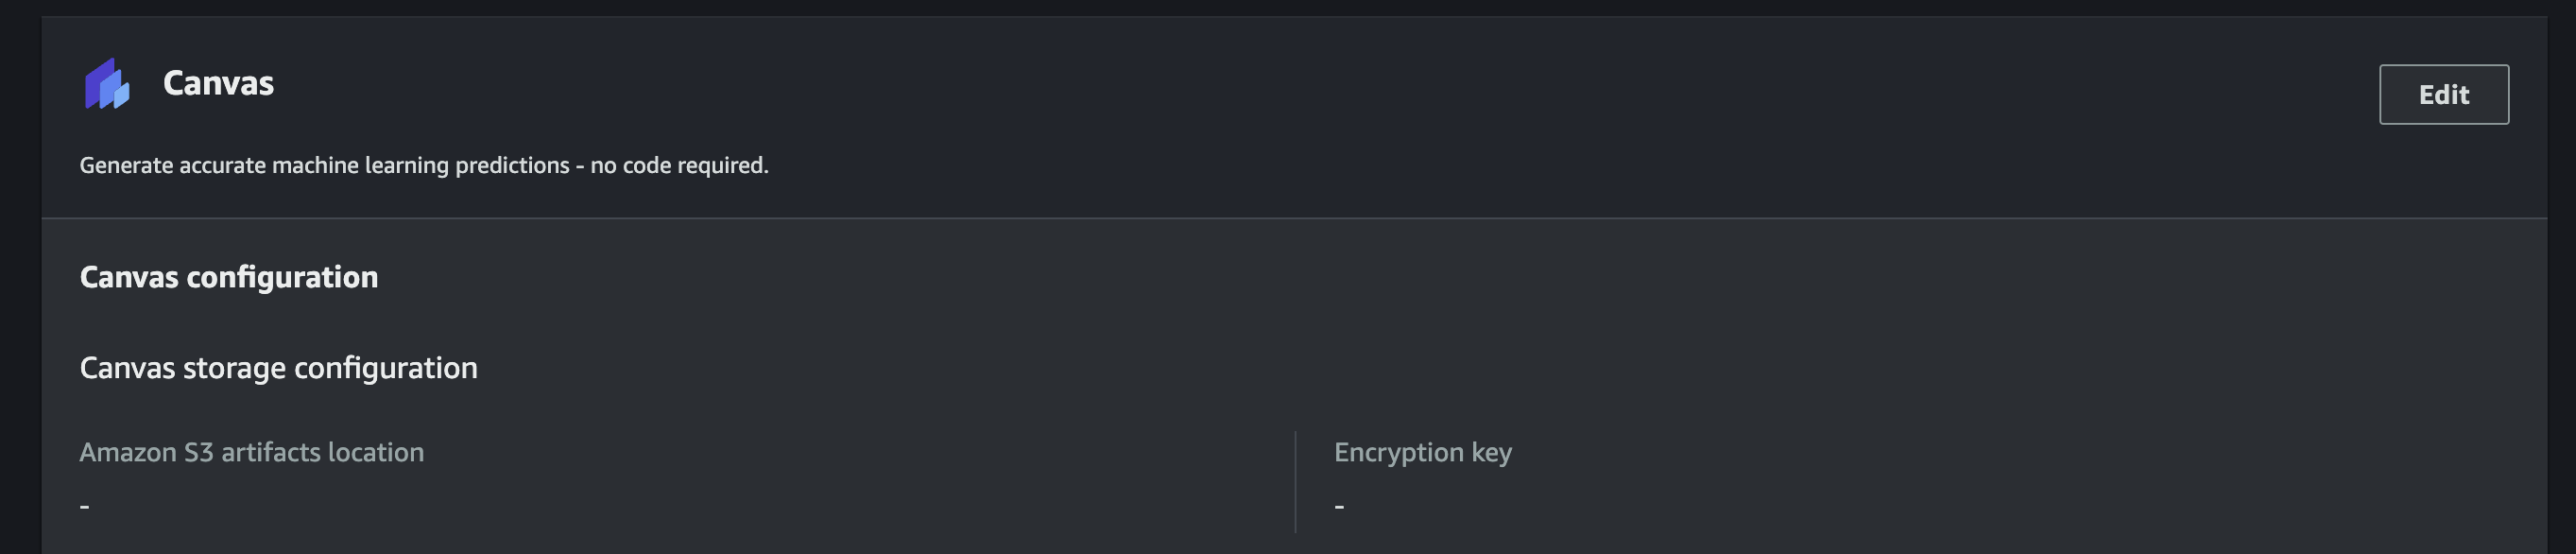
- Click on the App configurations tab, identify the Canvas section, choose Edit.
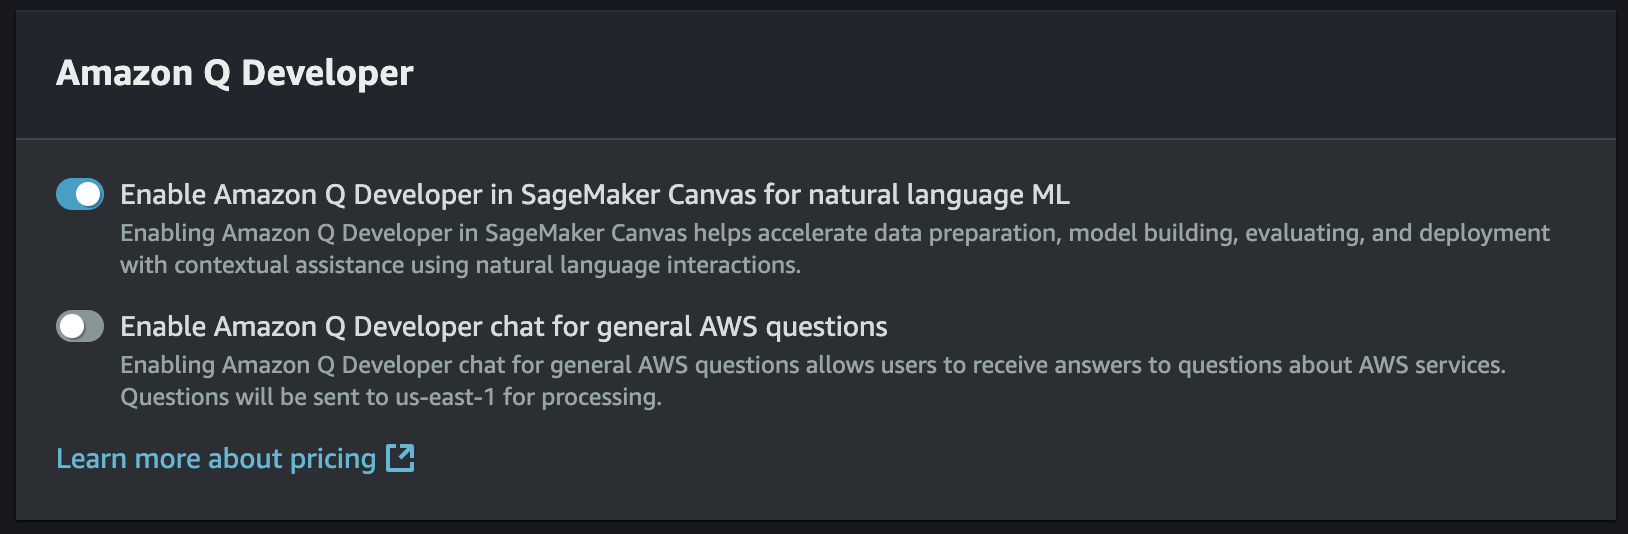
- On the Edit Canvas settings page, go to the Amazon Q Developer section and do the following:
- Turn on Enable Amazon Q Developer in SageMaker Canvas for natural language ML to add the permissions to chat with Q Developer in Canvas to your domain's execution role.
- (Optional) Turn on Enable Amazon Q Developer chat for general AWS questions if you want to ask Q Developer questions about various AWS services (for example: Describe how Athena works).
- Scroll down to the end of the screen, and click Submit.
2. From business problem to ML problem
- In SageMaker Canvas, locate and click on the Q icon to open Amazon Q Developer.
- This is the chat interface that we will be using to interact with the Amazon Q data science assistant.

- To get started, we want the chatbot to help us figure out how to solve a business problem we have in mind. Our goal here is to predict house prices. In the chat interface, type the following:
I am an analyst and need to predict house prices for my marketing and finance teams.
- Amazon Q will respond with an explanation of the task and ask for more information. It explains that the problem can be considered a regression problem, aiming to predict a continuous numerical value. To solve this task, we will need relevant data about houses - which we can provide by clicking on I want to upload my dataset, then sending the message in the chatbox.

- We will now perform the operations that will allow us to upload the dataset.
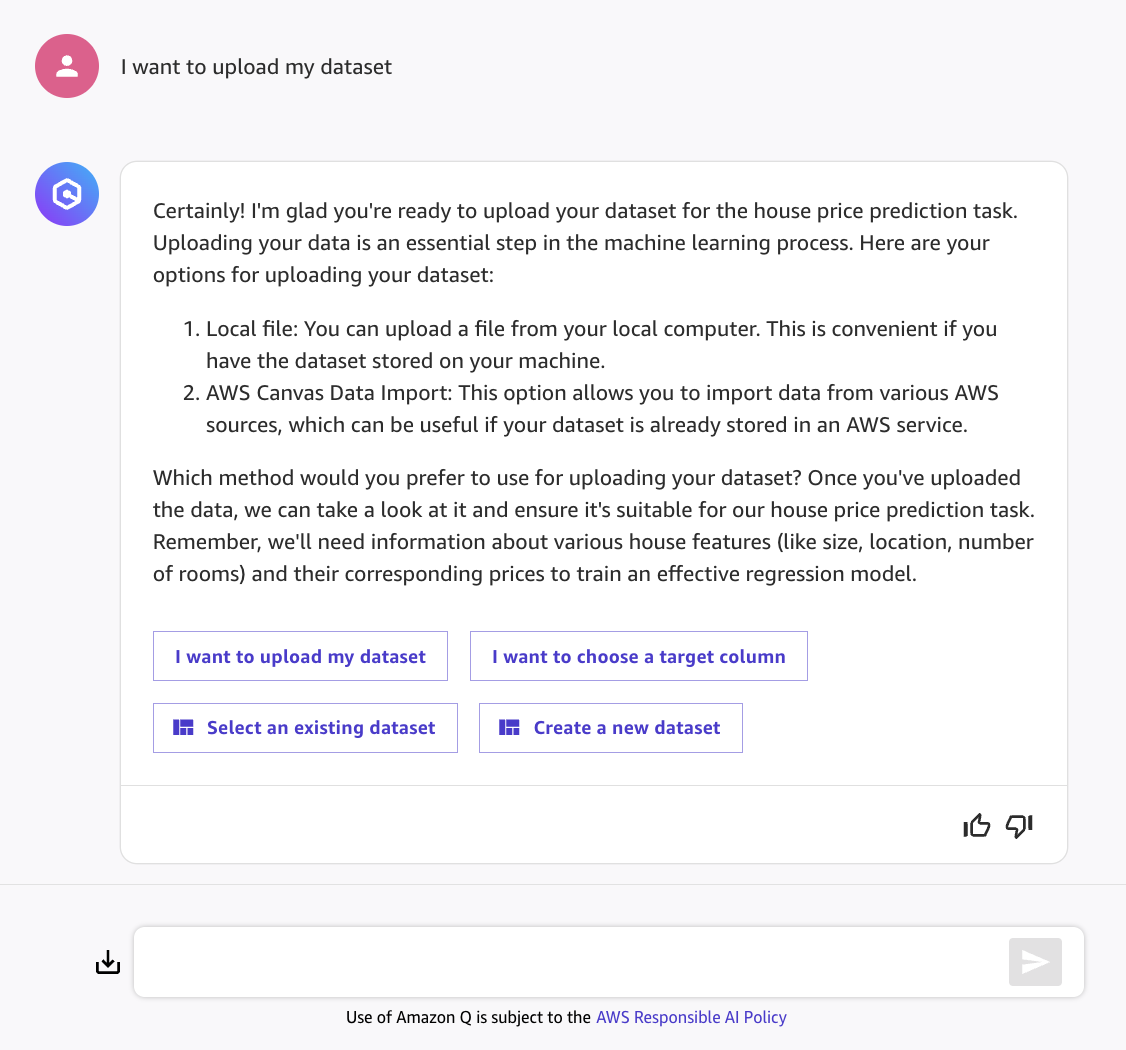
- Select Create a new dataset, then provide a dataset name, e.g.
HousingPrices. 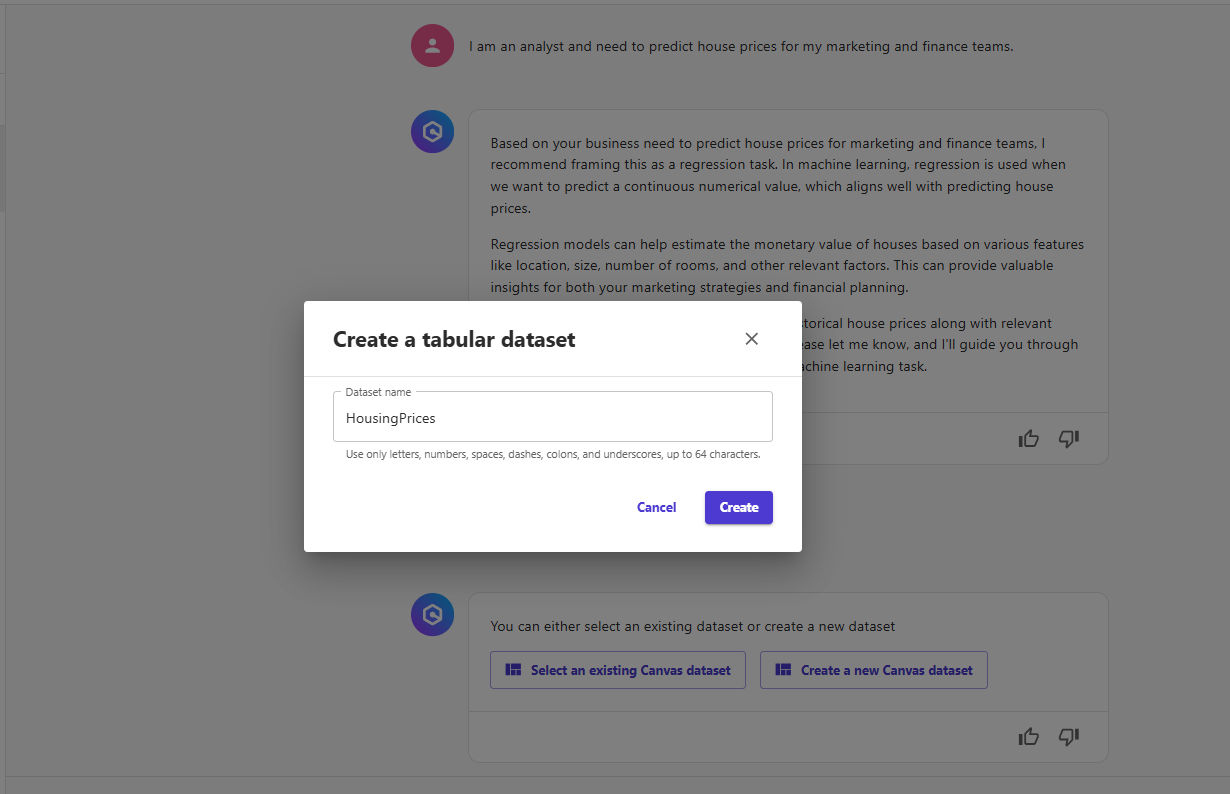
- Drag and drop the CSV file you downloaded in the previous step,
housing.csv, into the UI.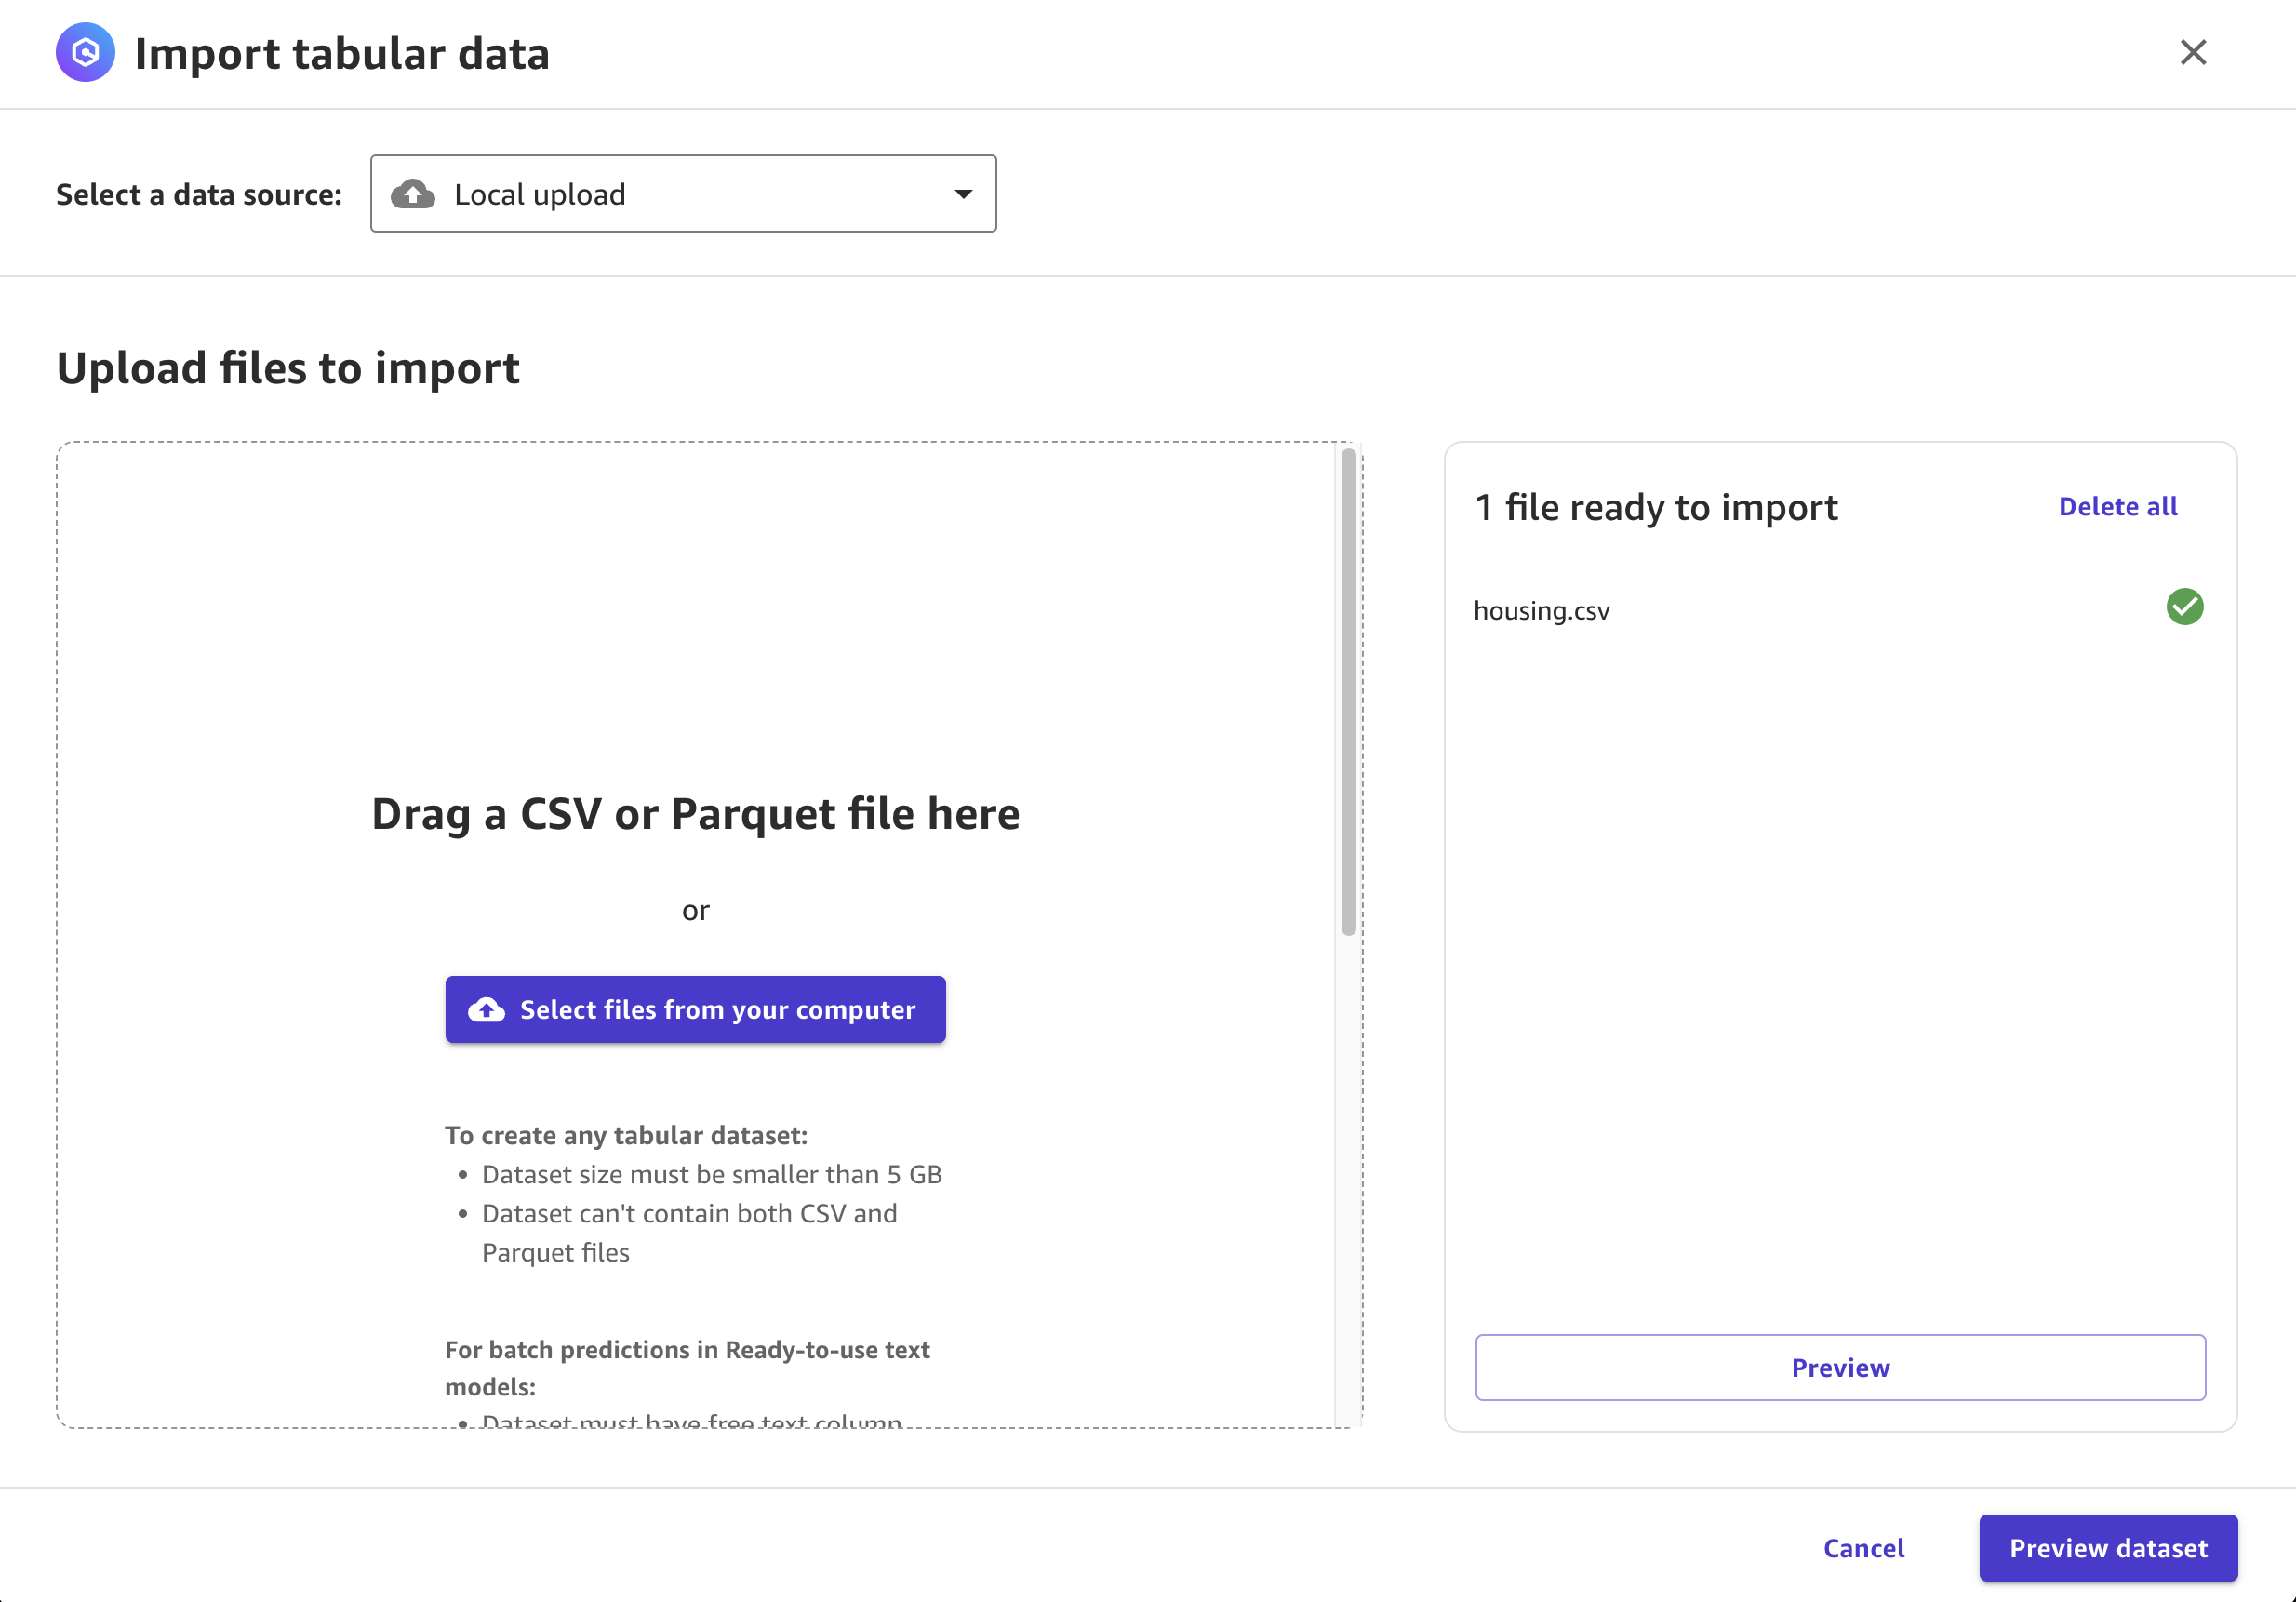
- Click on Preview dataset, then Create dataset.
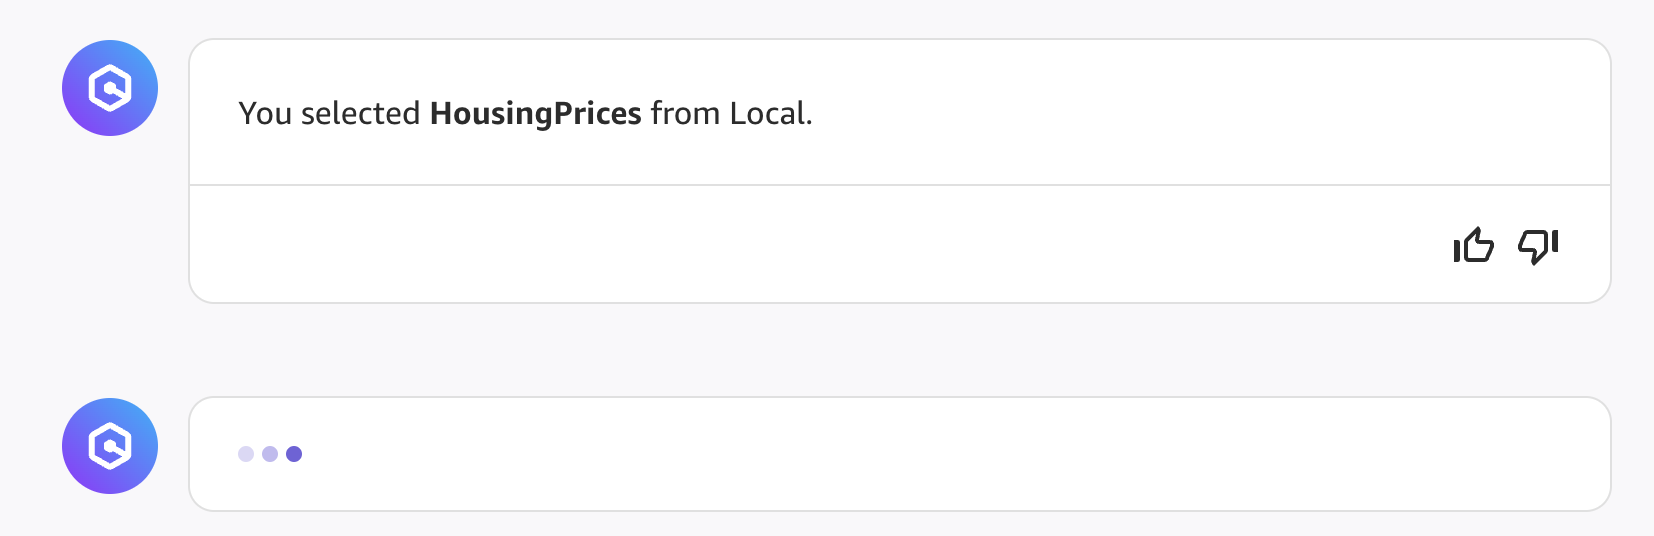
- Wait a couple of seconds for Amazon Q to analyze the dataset.
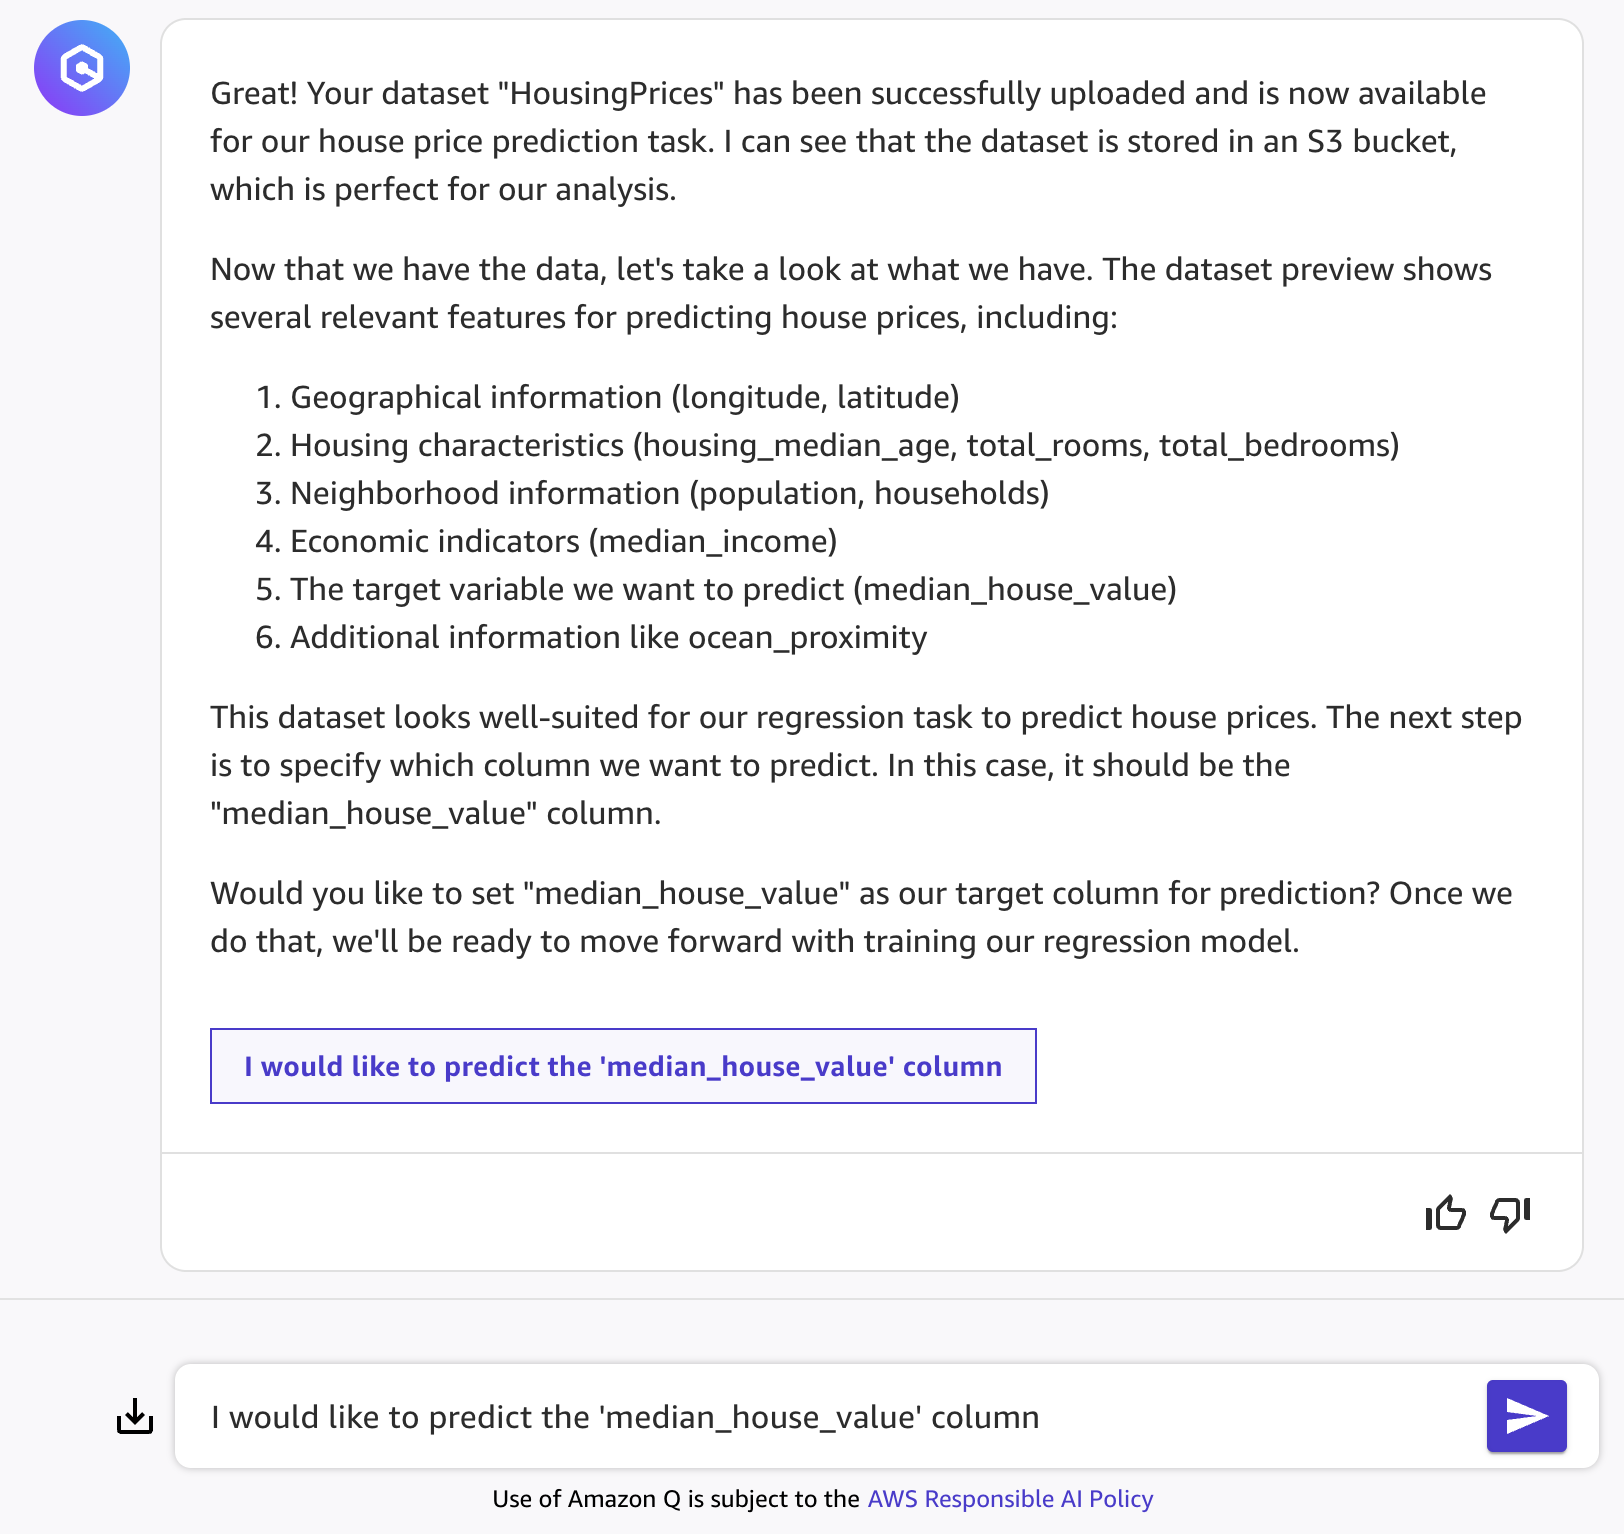
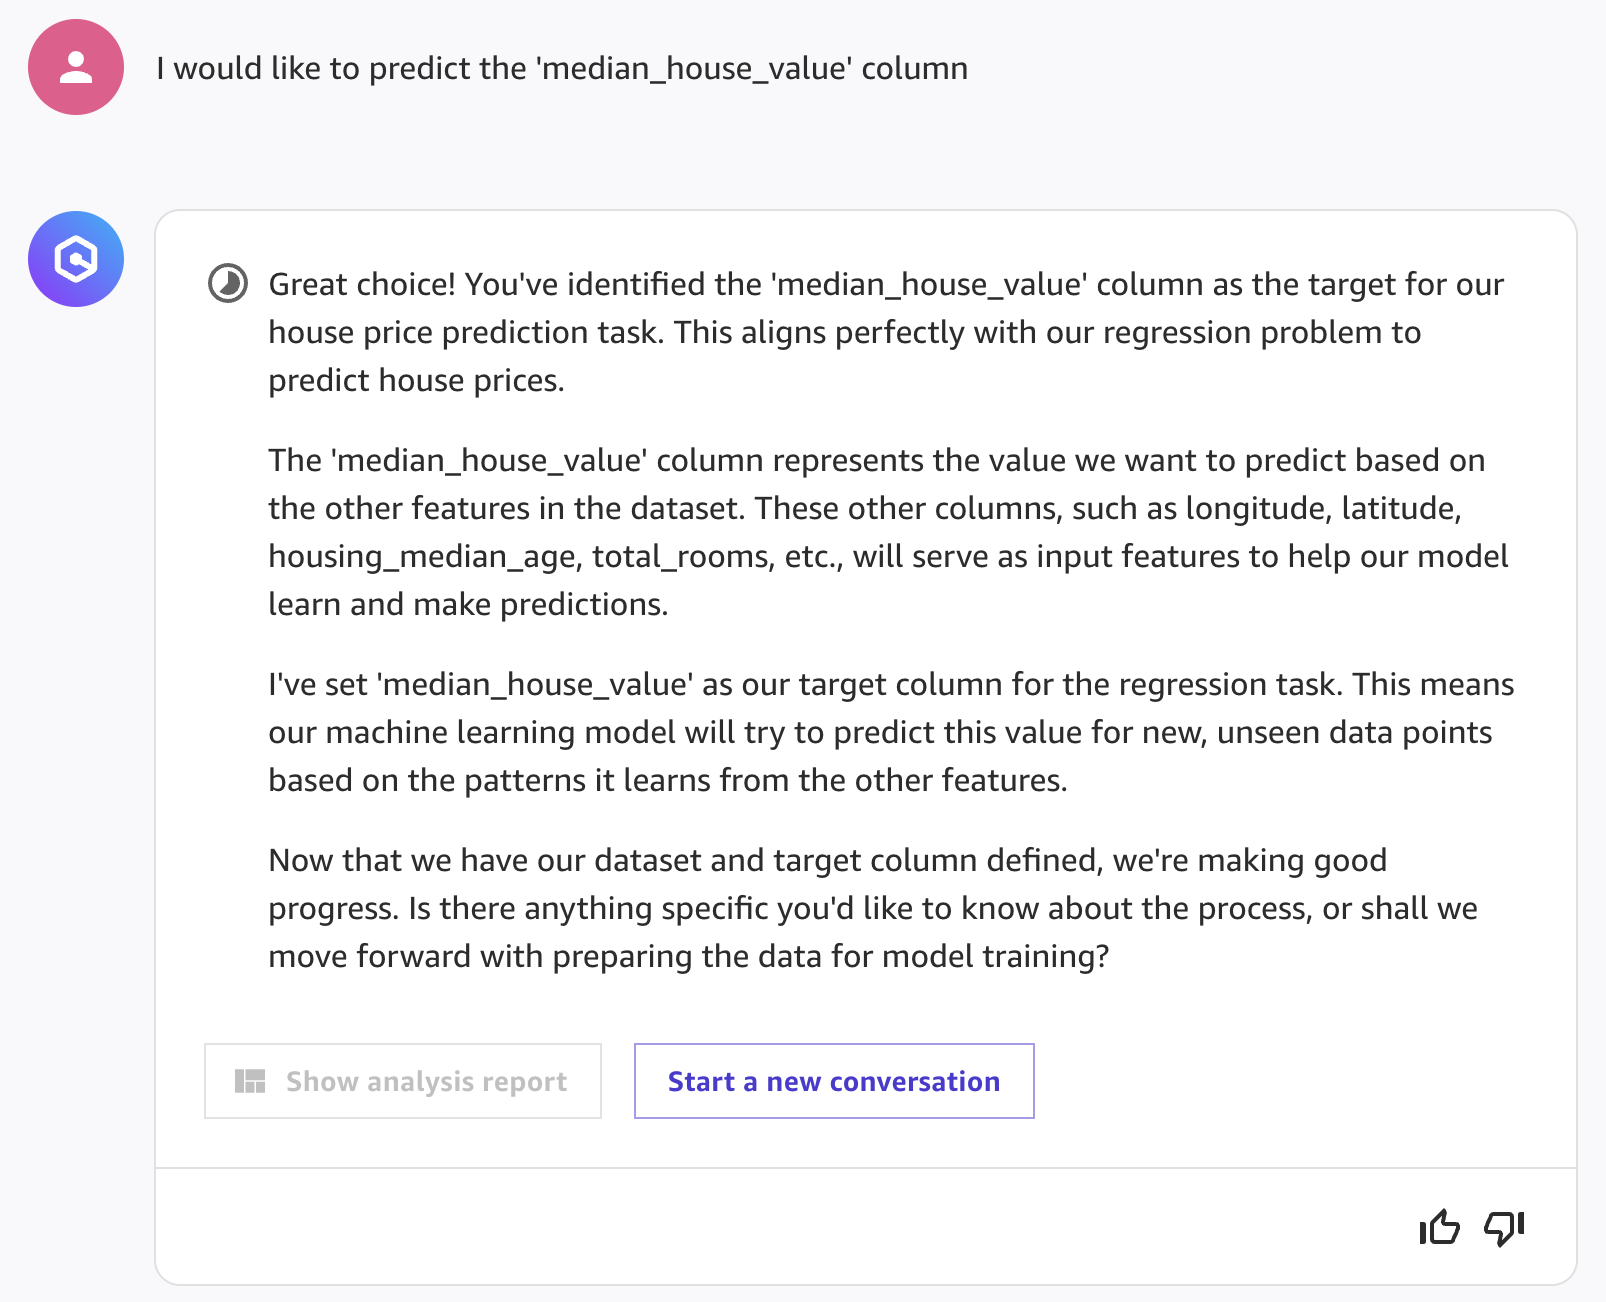
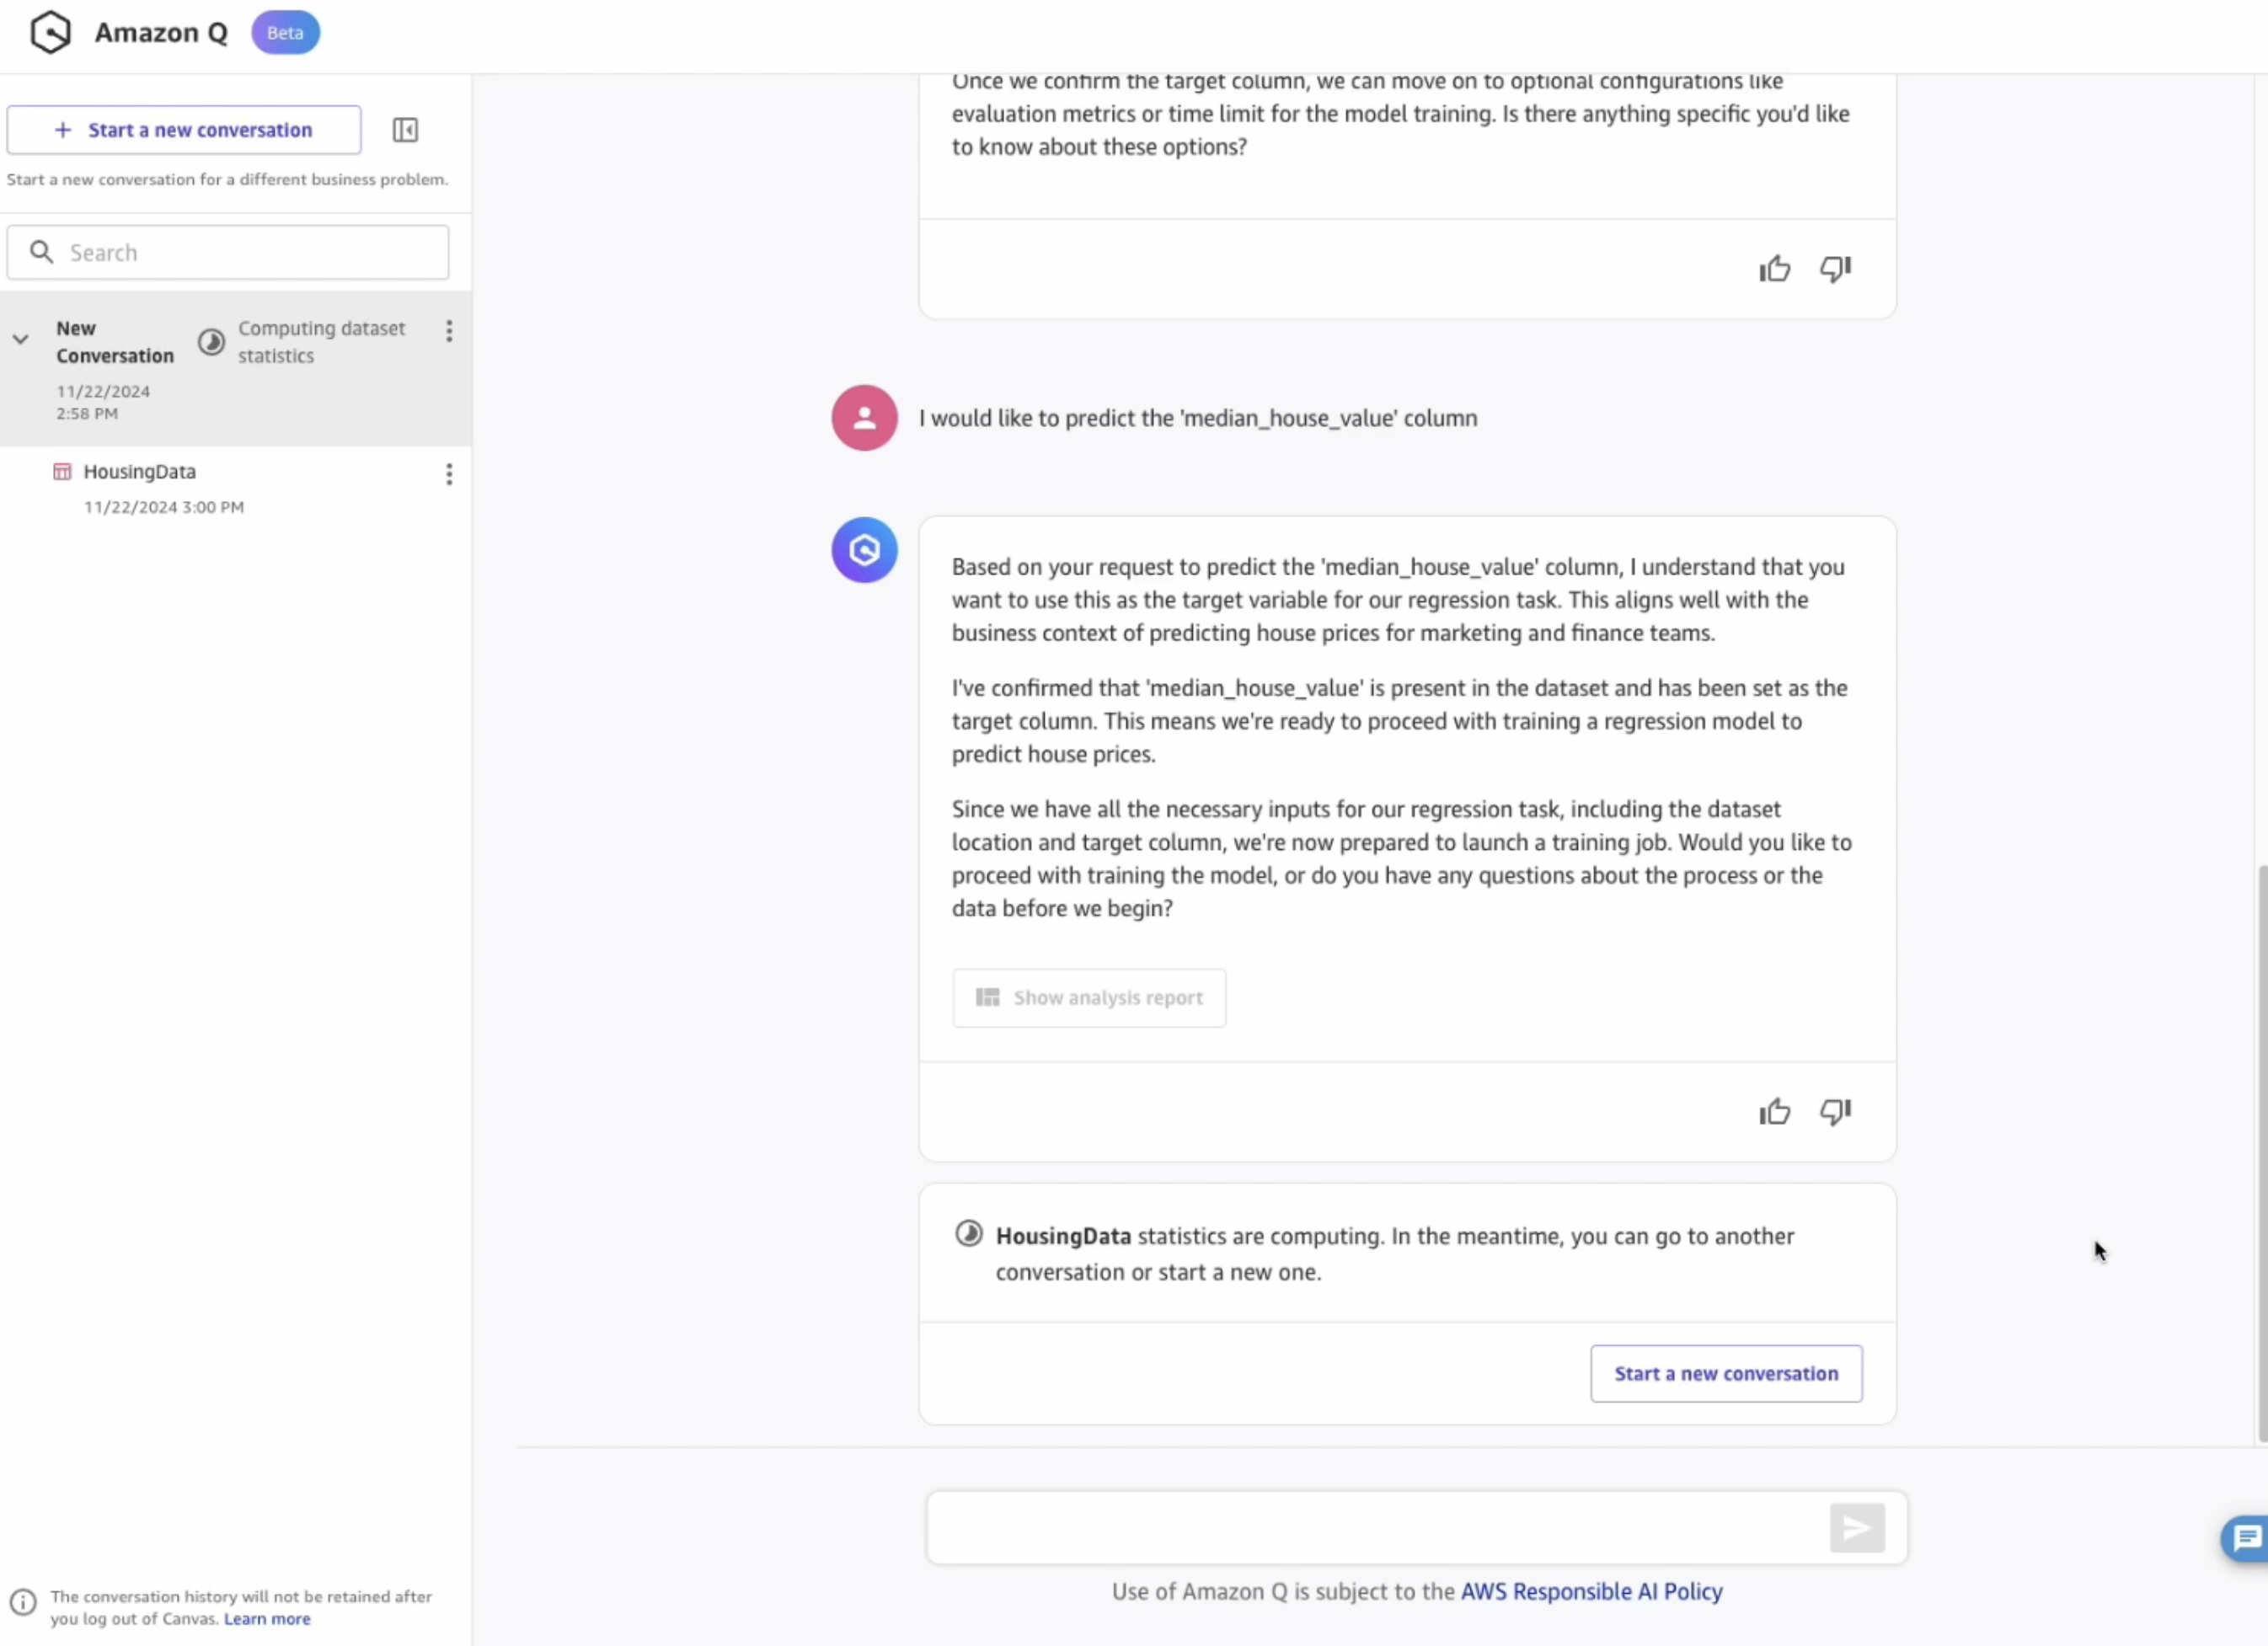
- Once done, Amazon Q will provide some details about the dataset, as well as suggest a target column. Confirm the target column by clicking the button, or by answering:
Yes, median_house_value is what I want to predict.
- Amazon Q will launch a data quality report job behind the scenes for you. This will provide a detailed analysis of the dataset features, including warnings about data quality issues that should be fixed as part of the data preparation. You can also directly ask Amazon Q about the quality of your data:
What is the quality of my data?
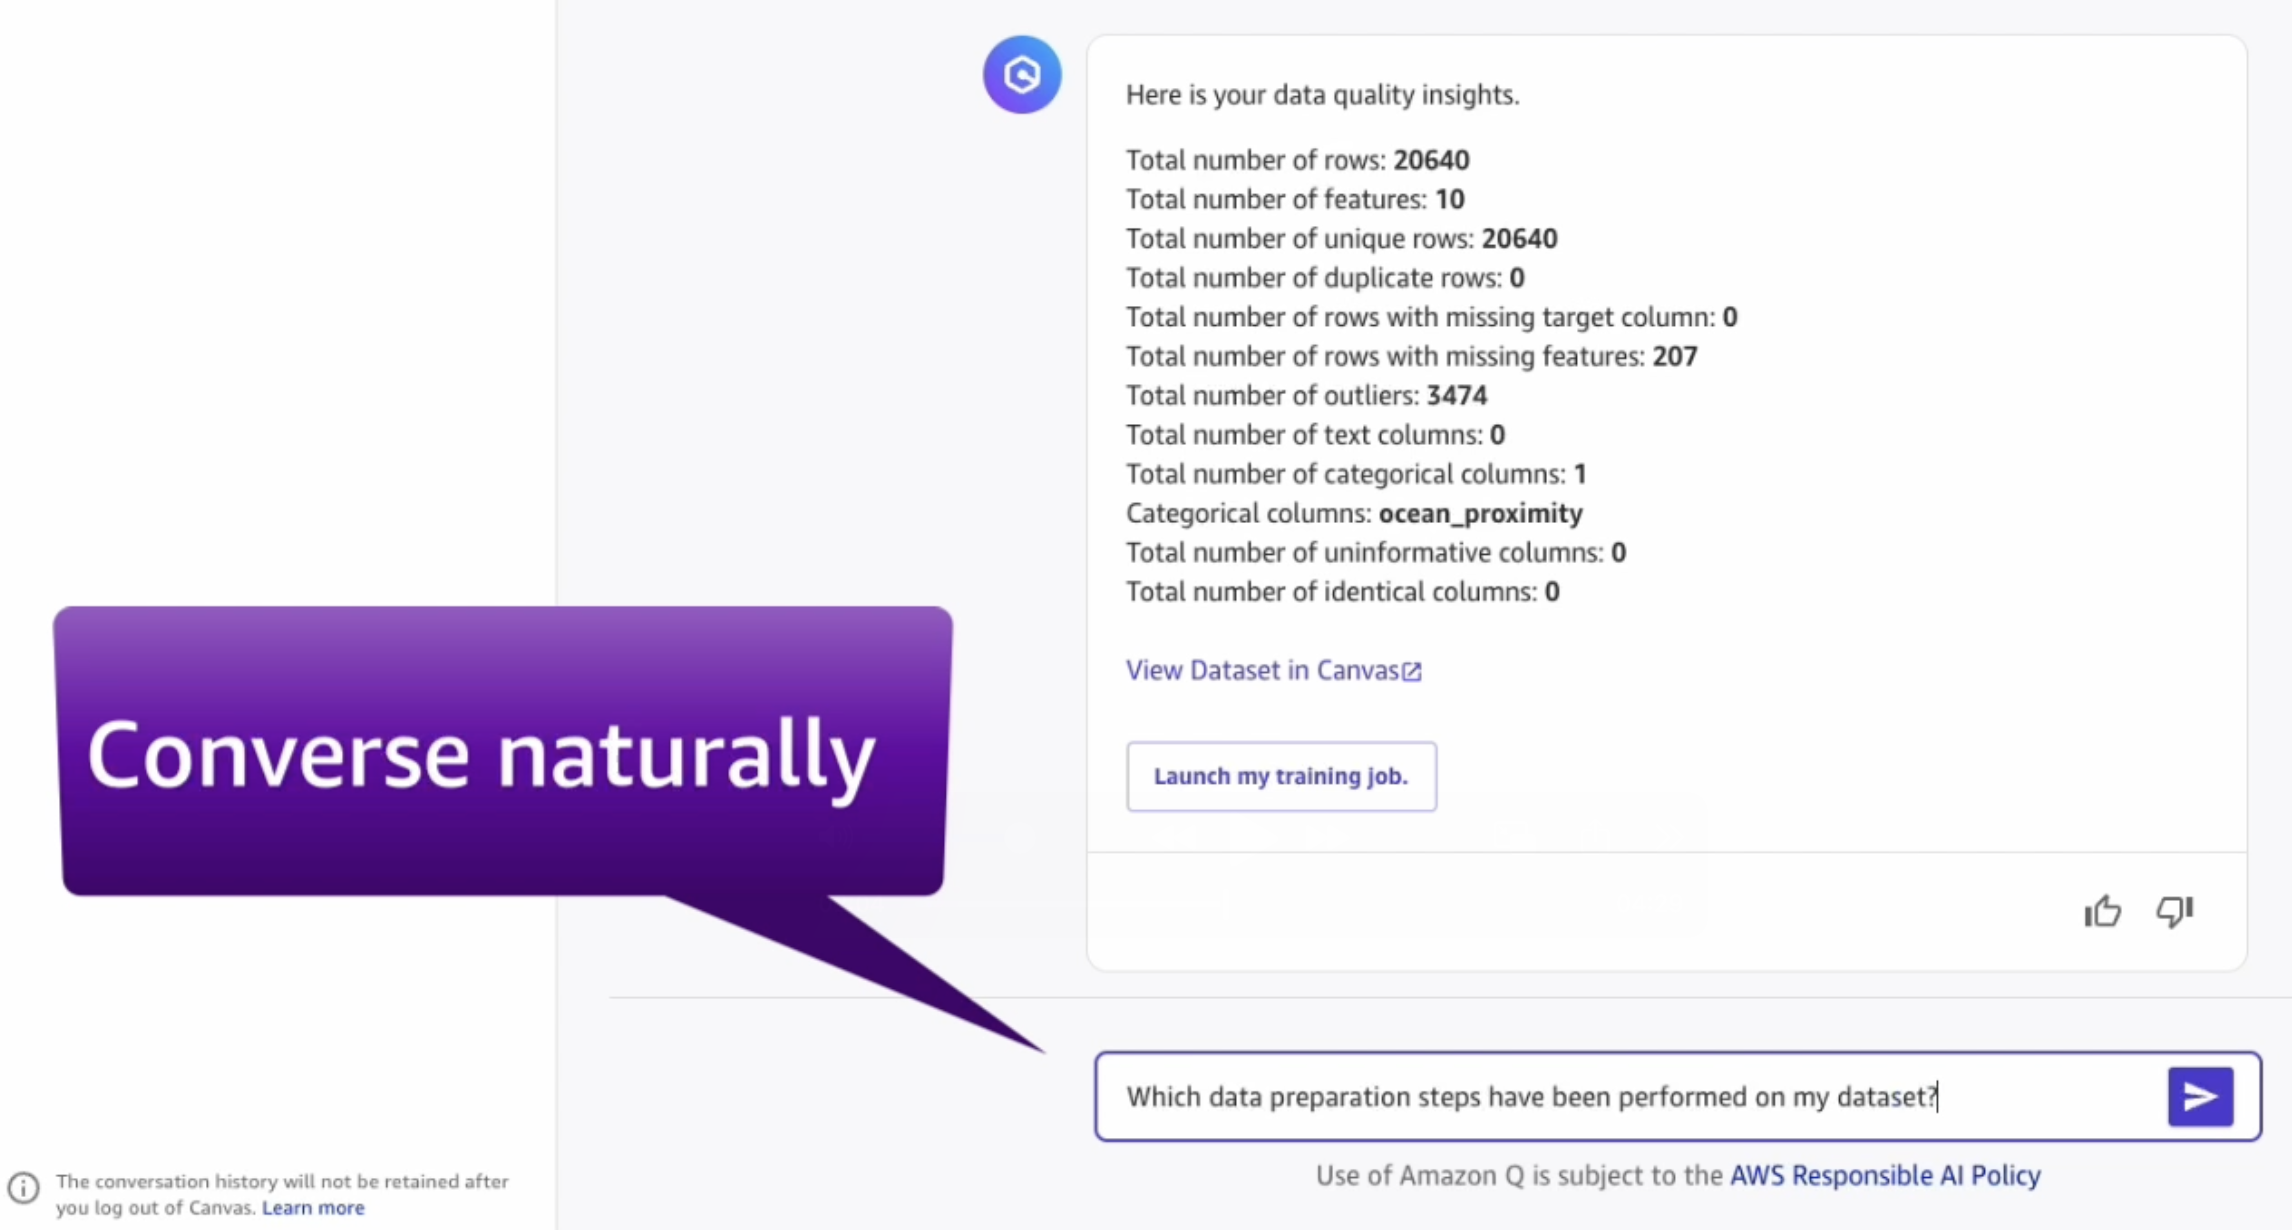
- Once the data analysis report is complete, click on Show analysis report.

- Q will provide statistical insights into the dataset:

- At this point, we can converse naturally with Amazon Q to understand more about our dataset:
What are the columns in my dataset?
What is the average number of households in the dataset?
3. Data Preparation and Model Training
- Amazon Q already performs some automated data preparation steps behind the scenes. Let's figure out which ones:
Which data preparation steps have you already performed on the dataset?
- We can request Amazon Q to fix any additional issues in the dataset or apply any further transforms. Once we're happy, we can initiate the model building process:
or
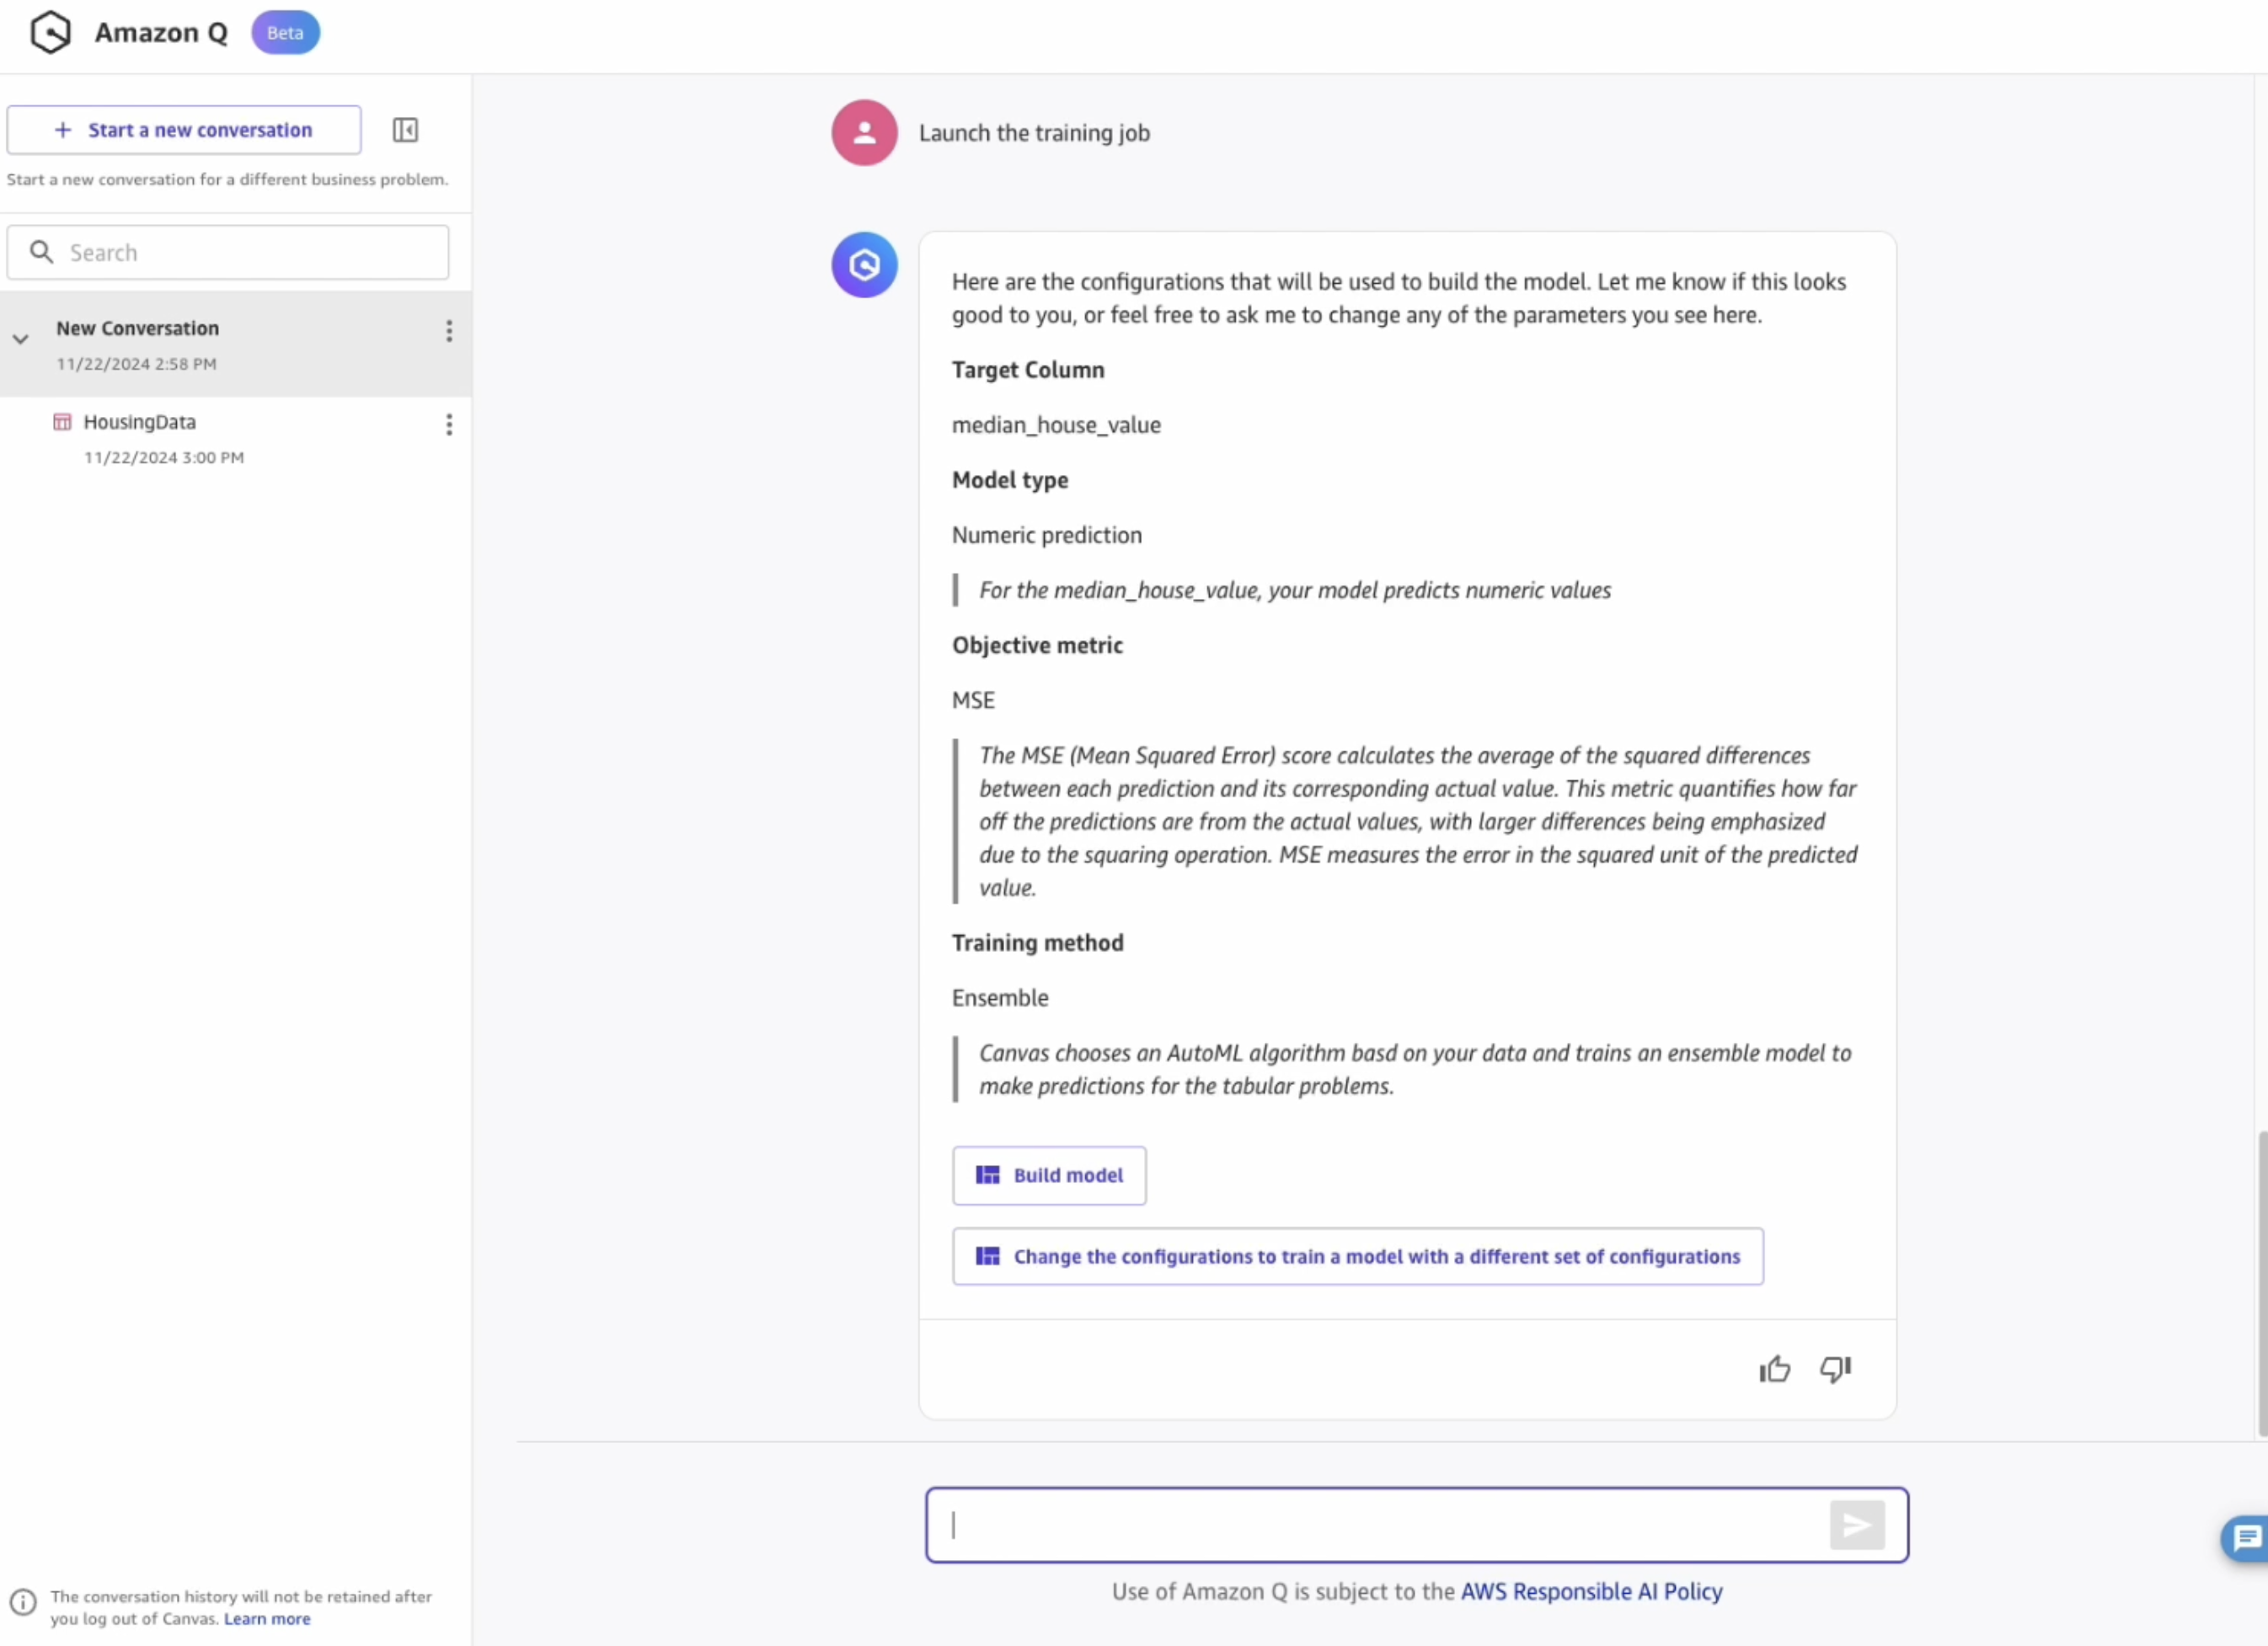
- Notice that Amazon Q has configured the model training with default parameters. These can be configured manually, by conversing with Q and asking to change something.
Which other objective metrics are available for this problem type?
- Once ready, start the model training by clicking on "Build the model" or typing it in the chat interface!
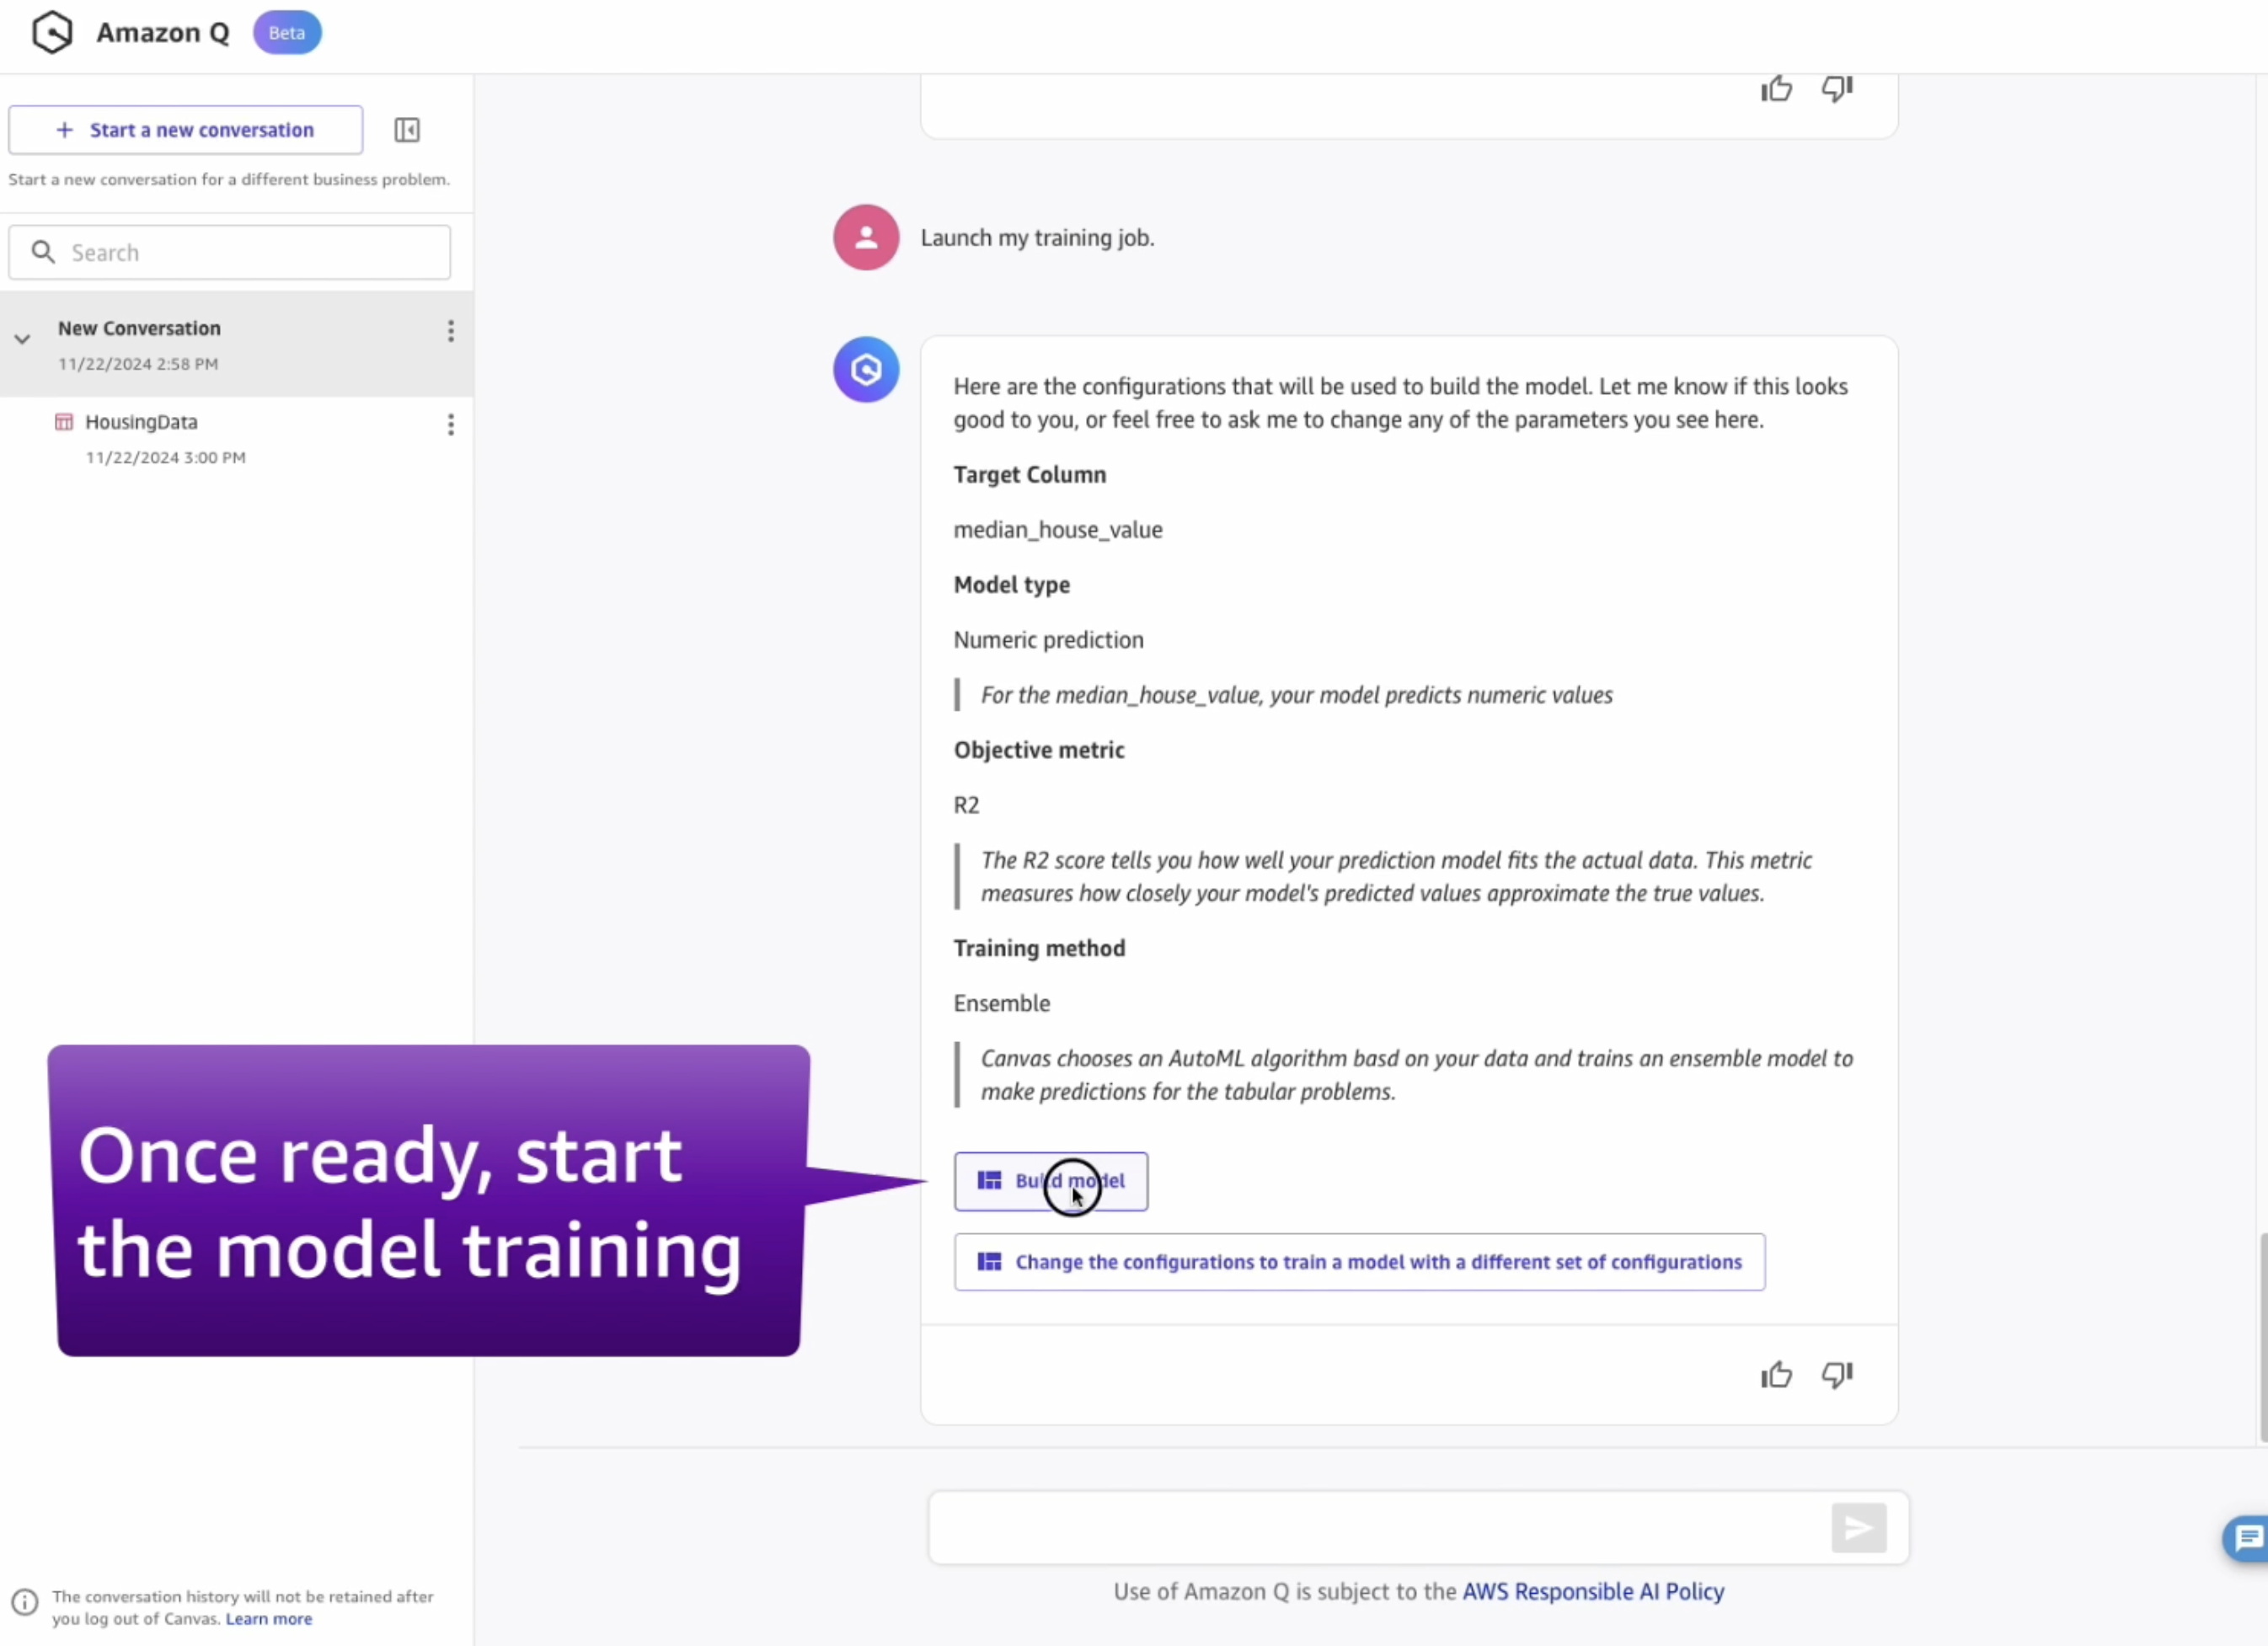
- Wait for the model training to complete. This should take around 15~30 minutes.
- Once the model is built, ask Amazon Q about the model's performance:
How accurate is my model?
- Ask for clarification on any metrics you don't understand:
What does the balanced accuracy mean? Is that a good quality model?
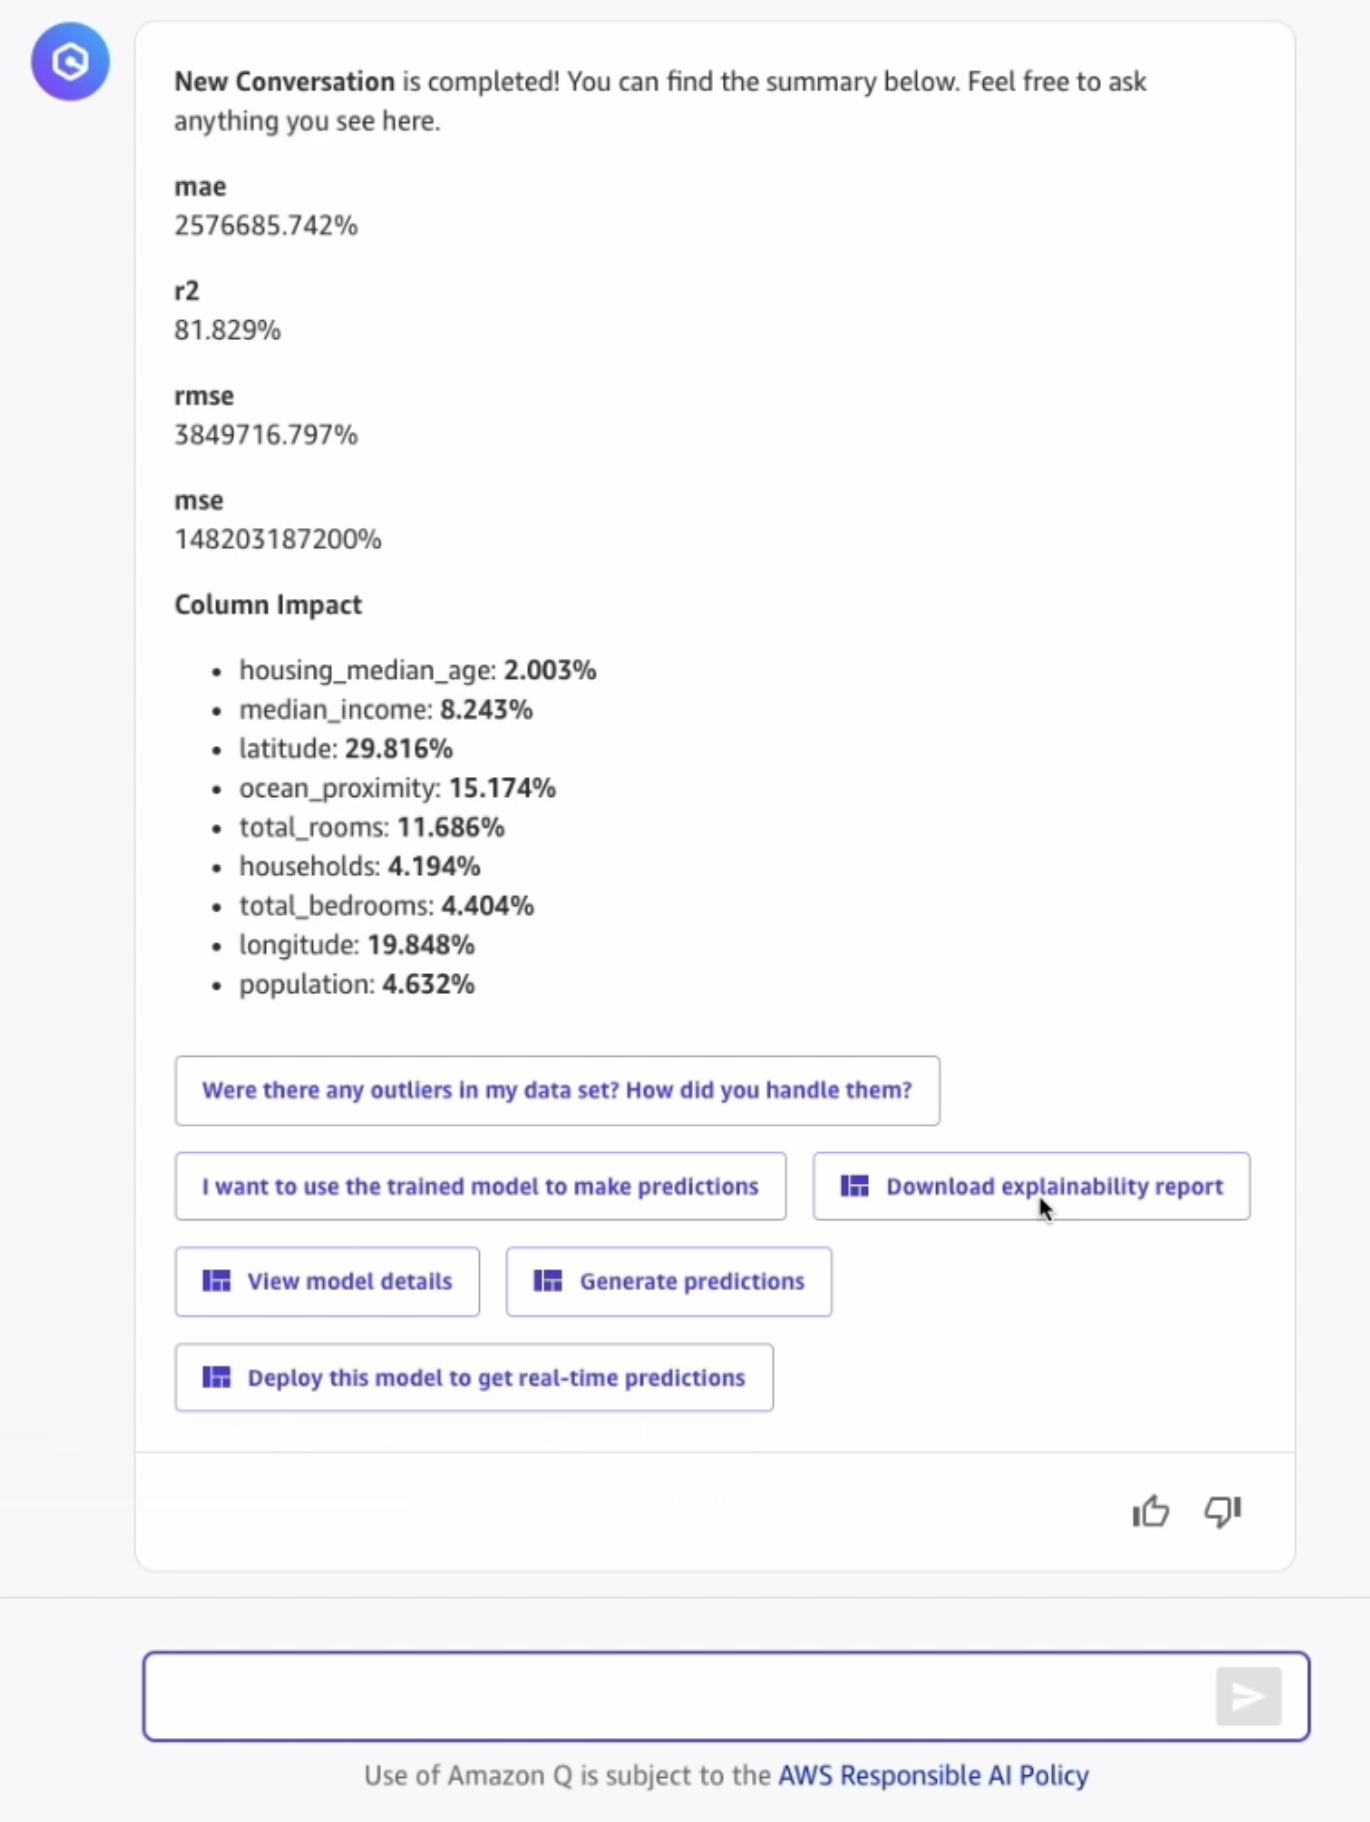
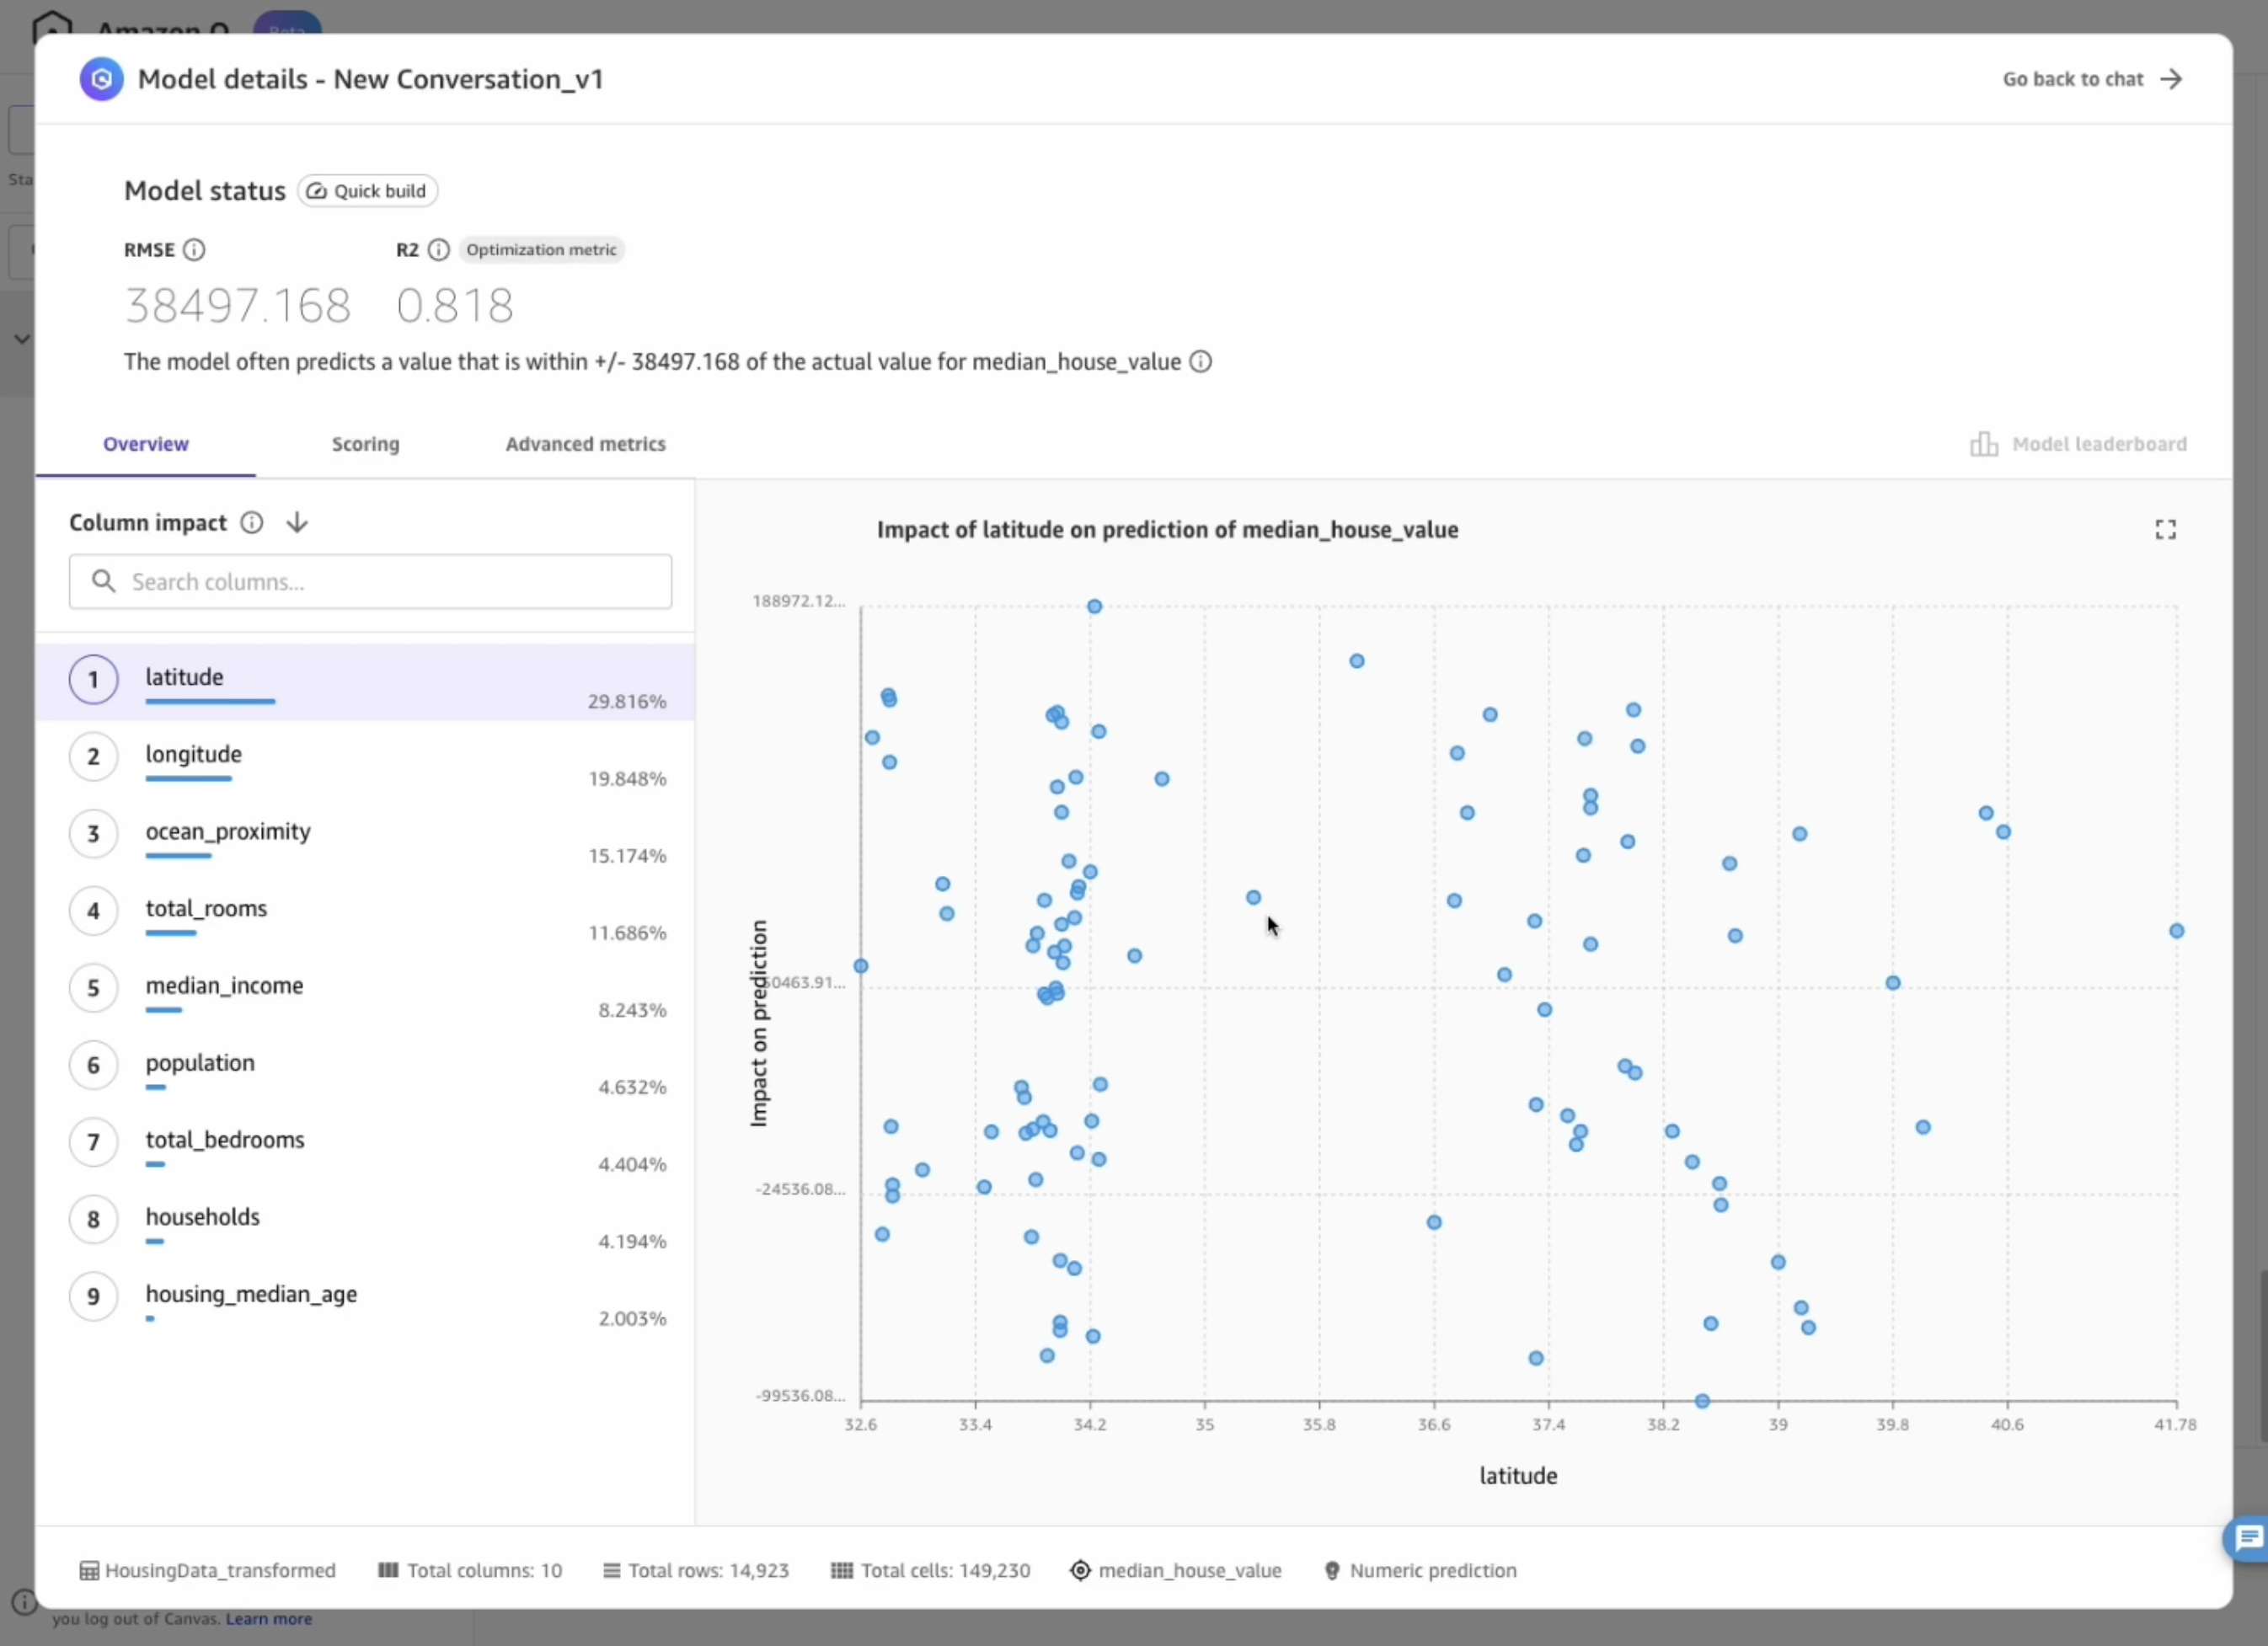
- Select View model details to learn more about the model performances:
4. Generate predictions
Amazon SageMaker Canvas can load the model in order to use it to generate inferences. You can do so by clicking the Generate predictions button after a model has successfully trained: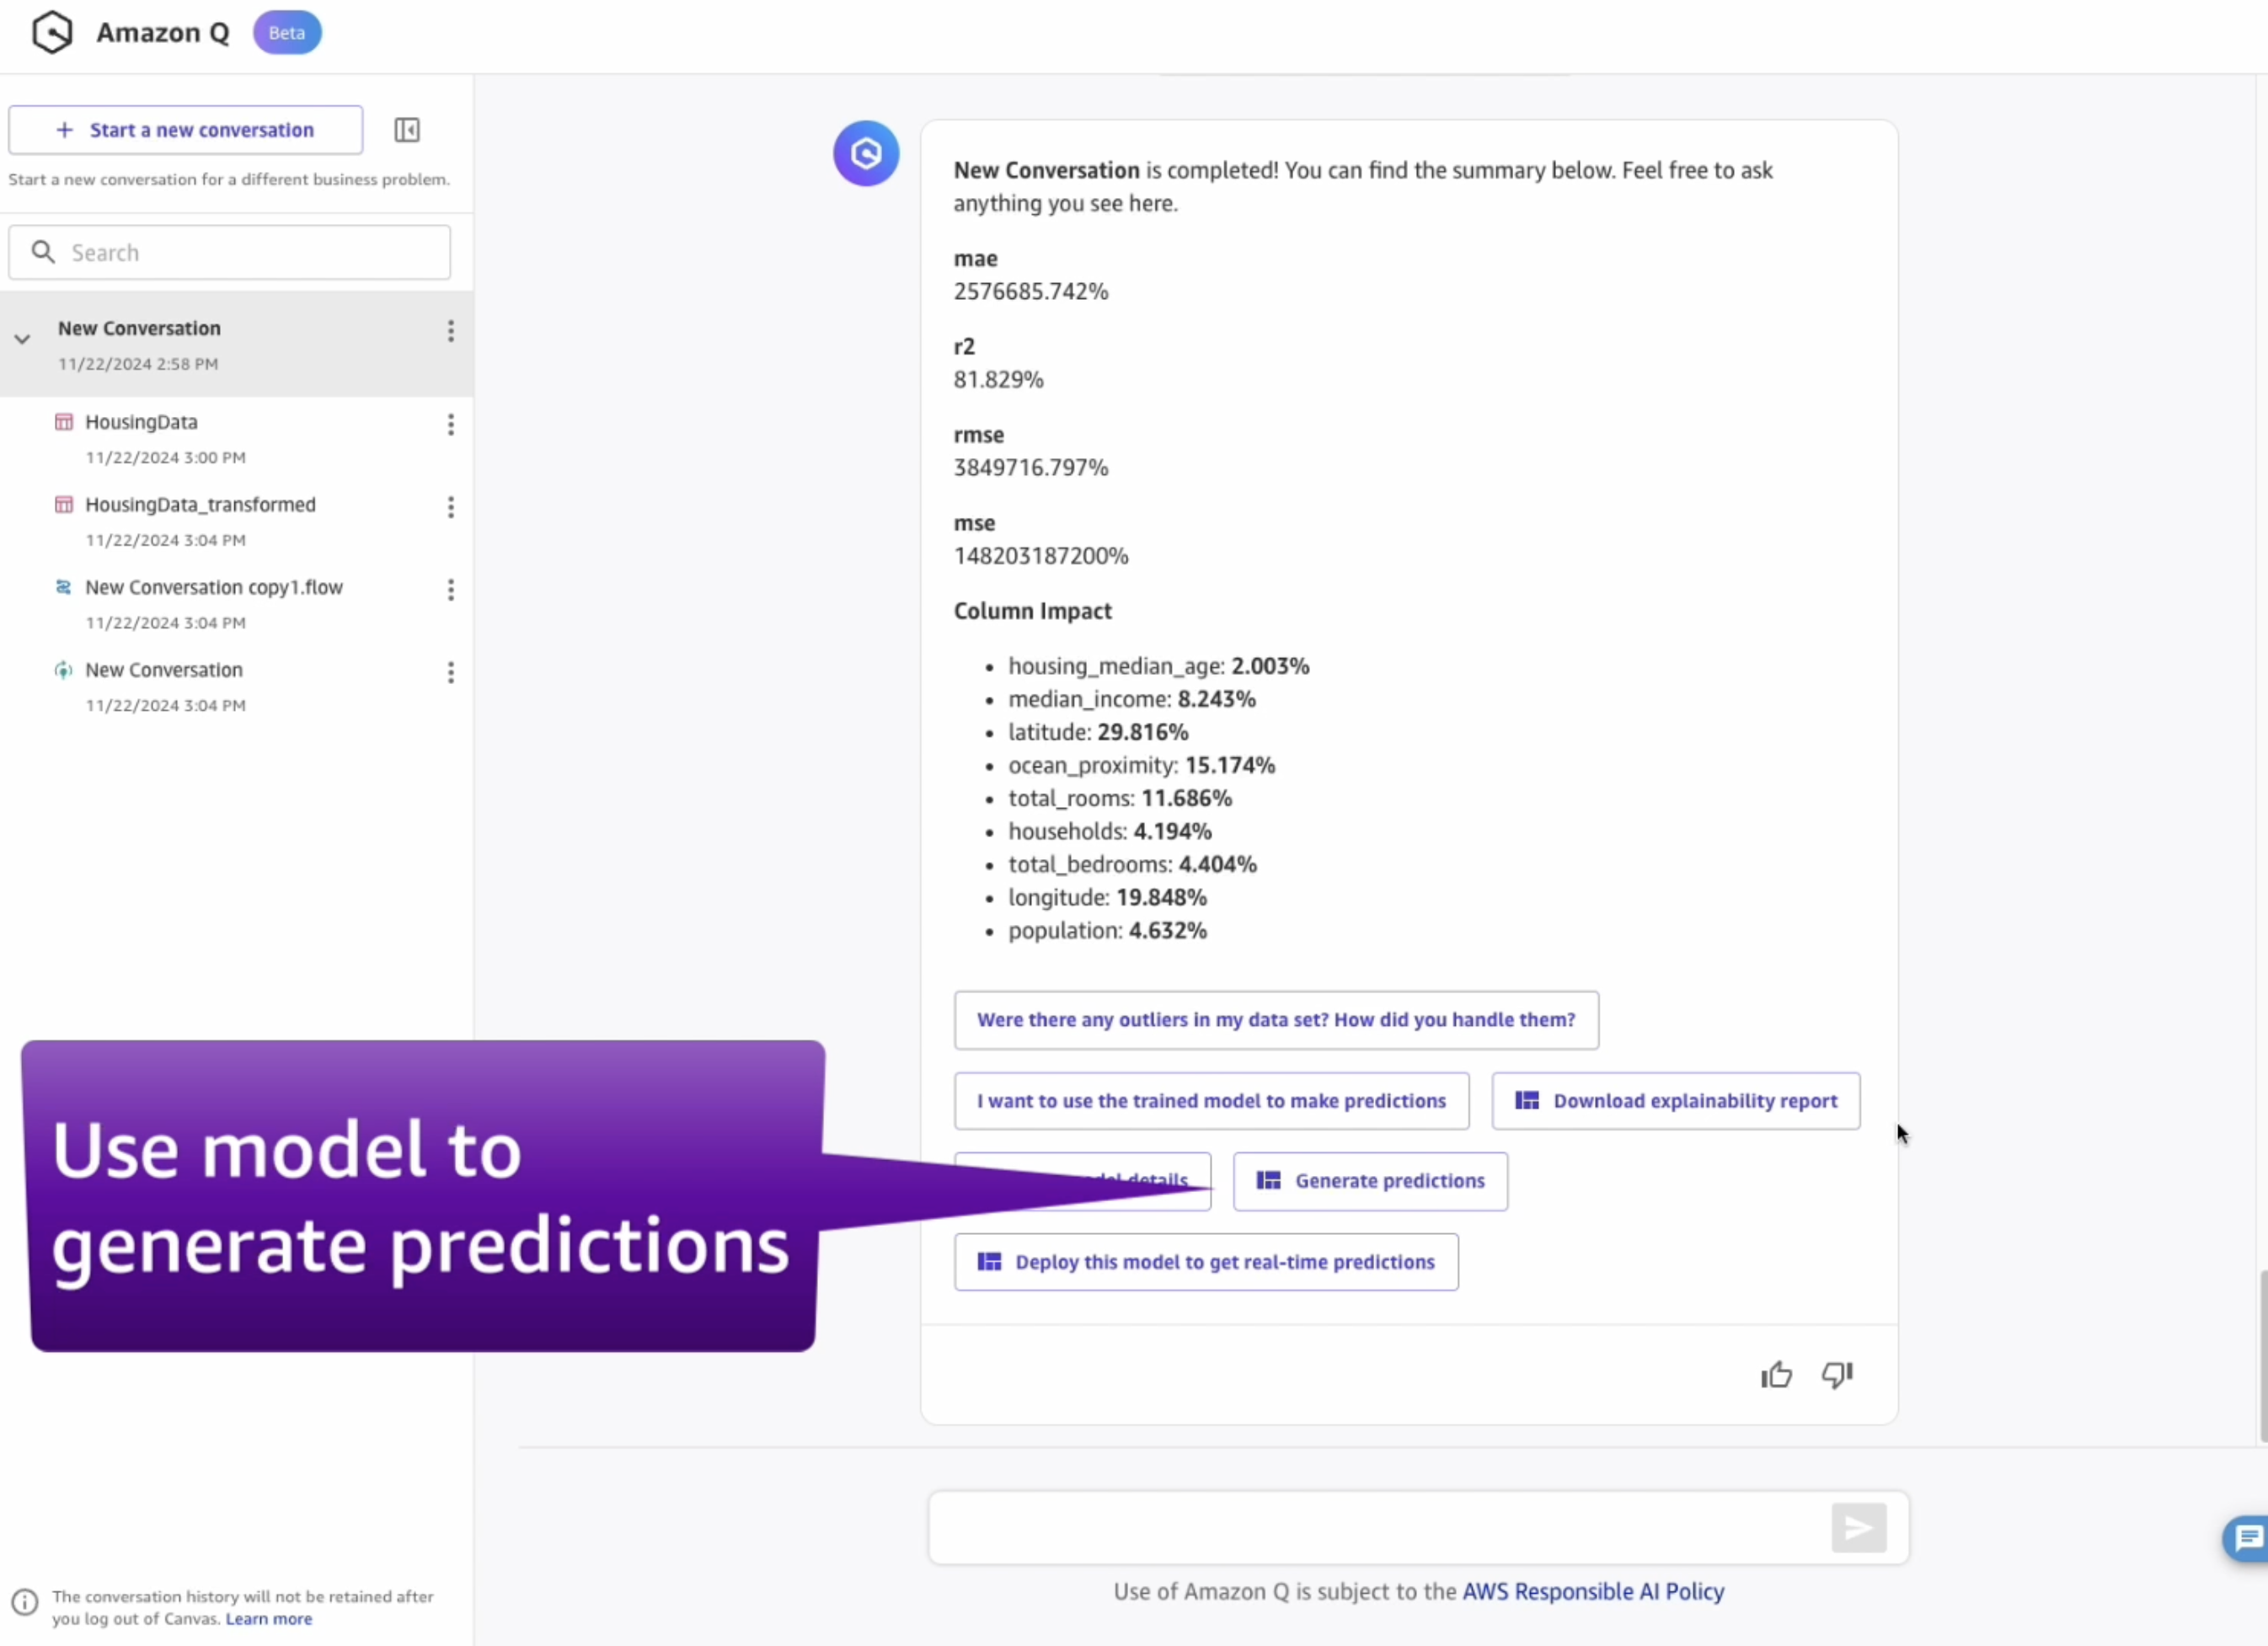
Predictions can be generated either in batch or in single prediction mode. Select Single prediction in the top menu, then change values like shown in the image below: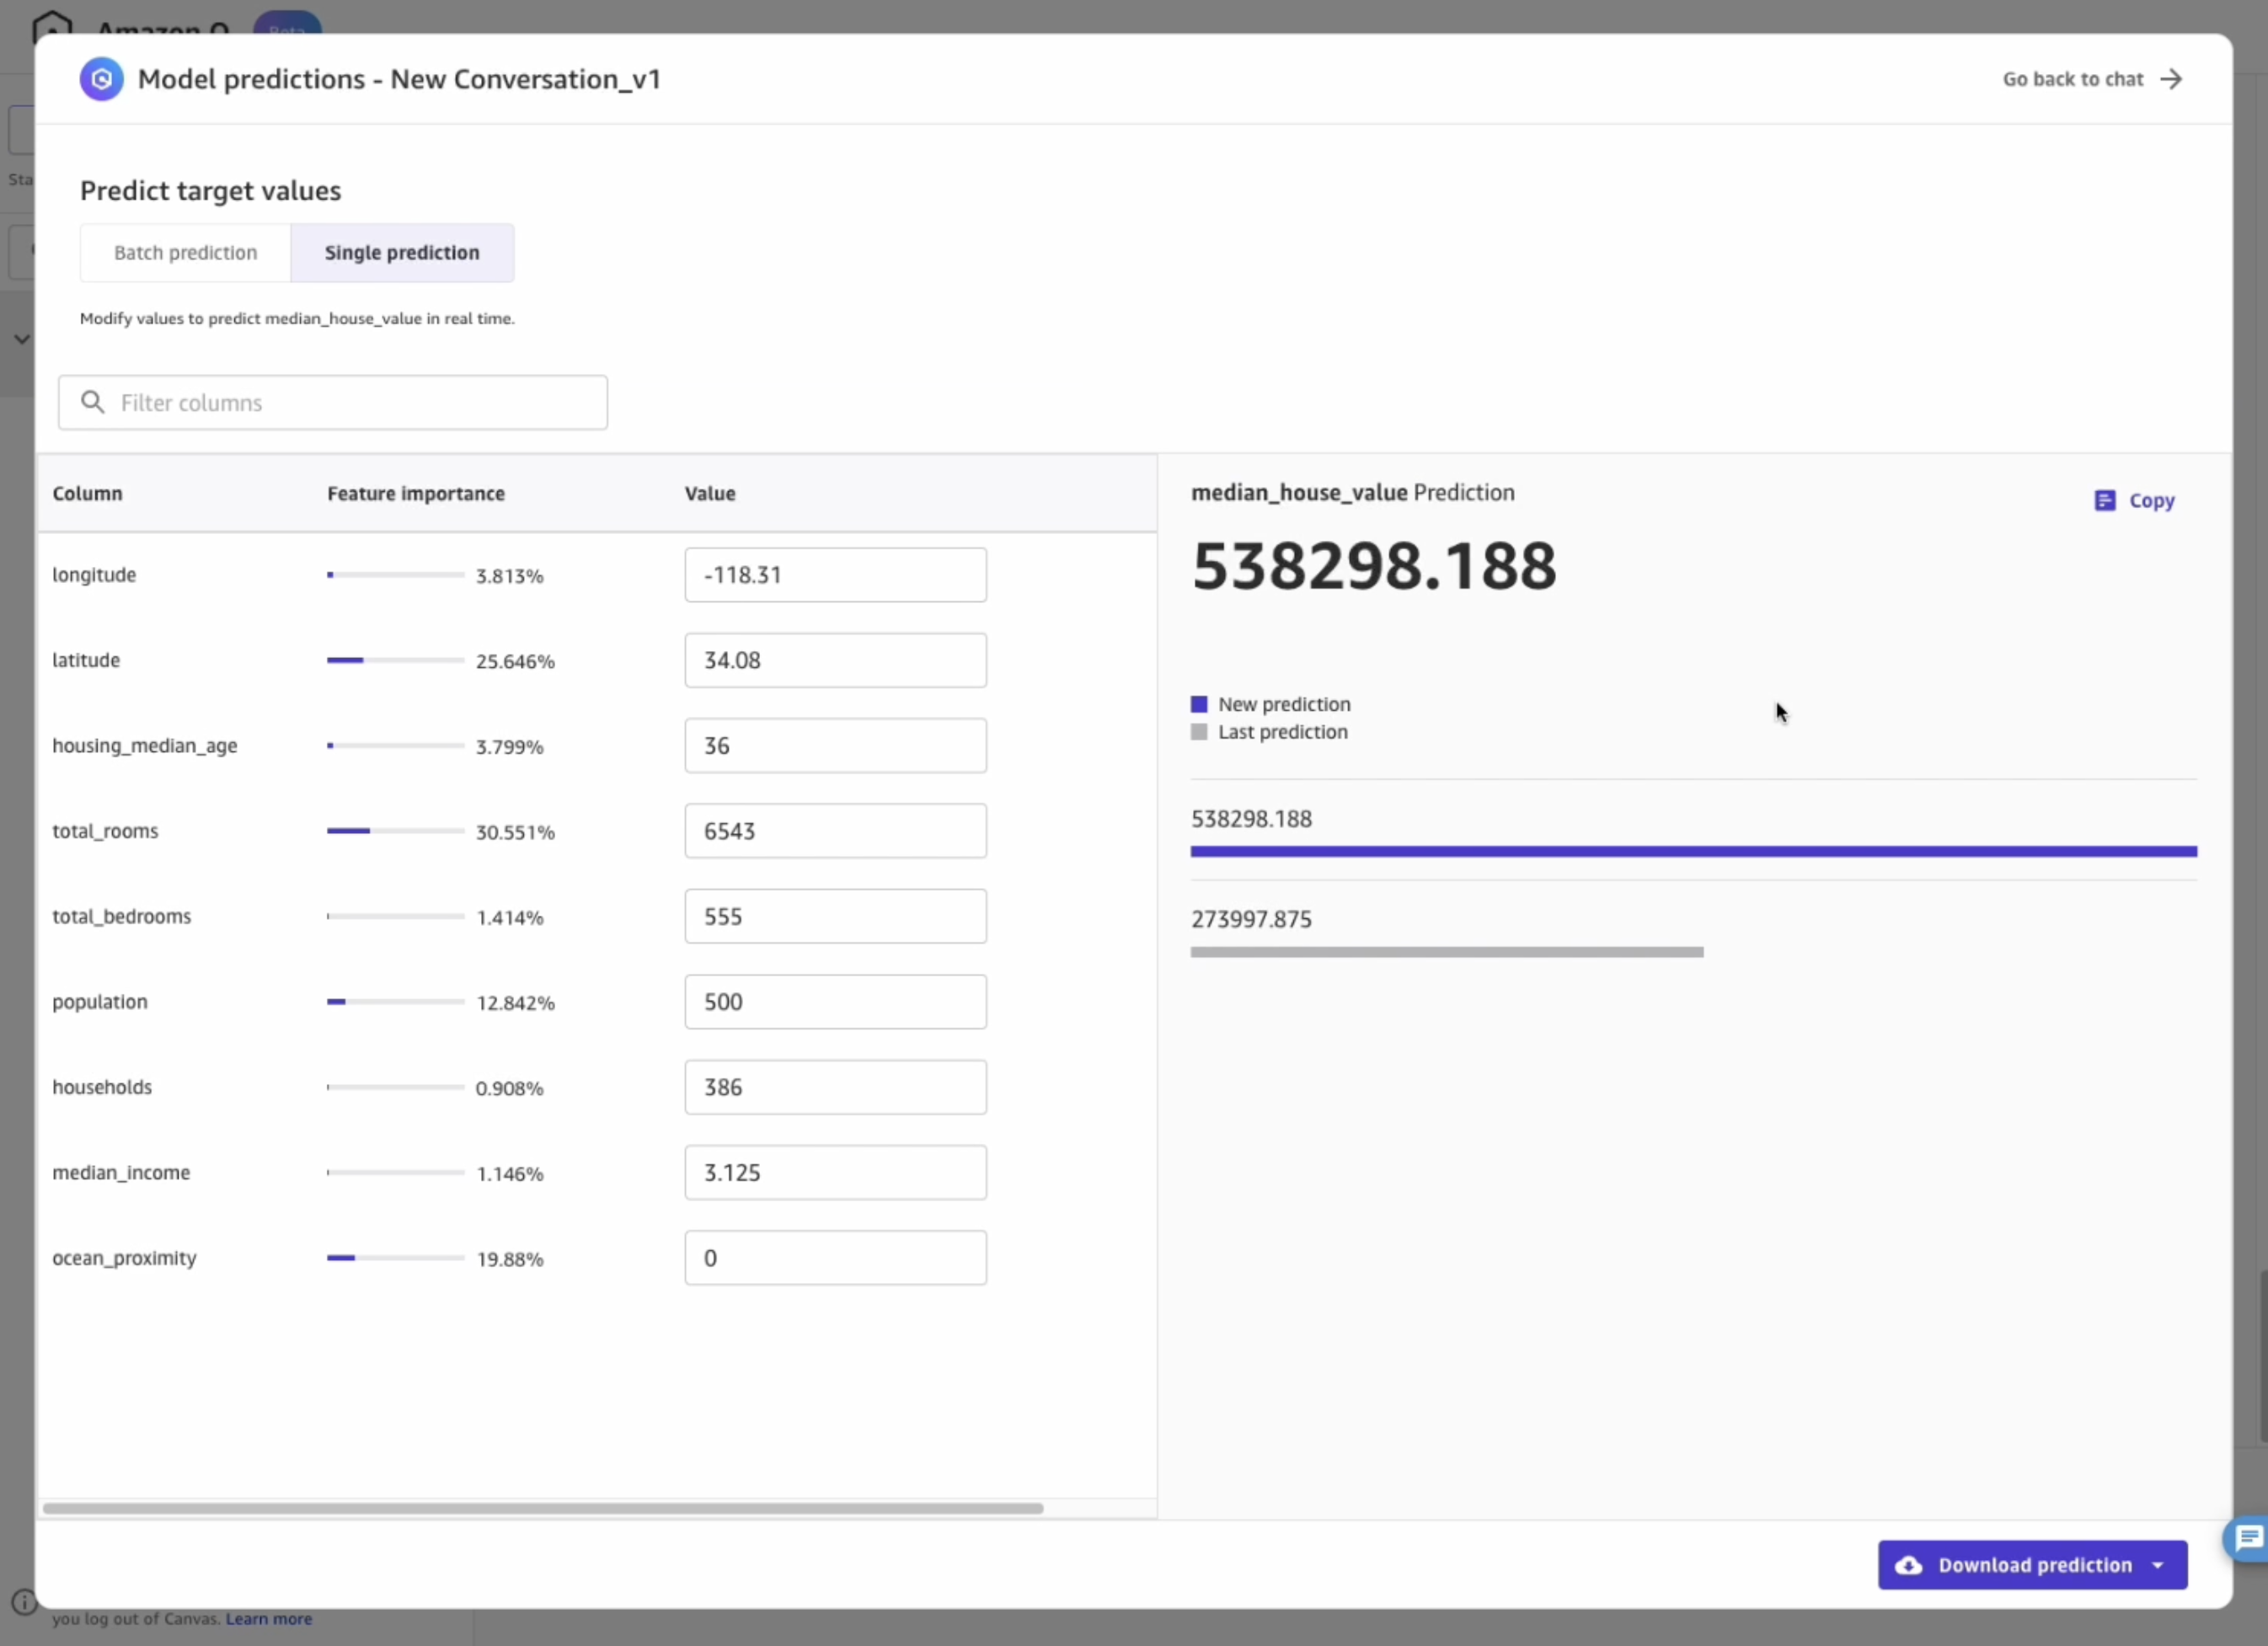
5. Deploy Model
If you want to deploy the model, ask:
What does it mean to deploy a model?
After understanding the concept, request to deploy the model:
Can you deploy the model for me?
If you've just trained your model, you can also click the button Deploy this model to get real-time predictions: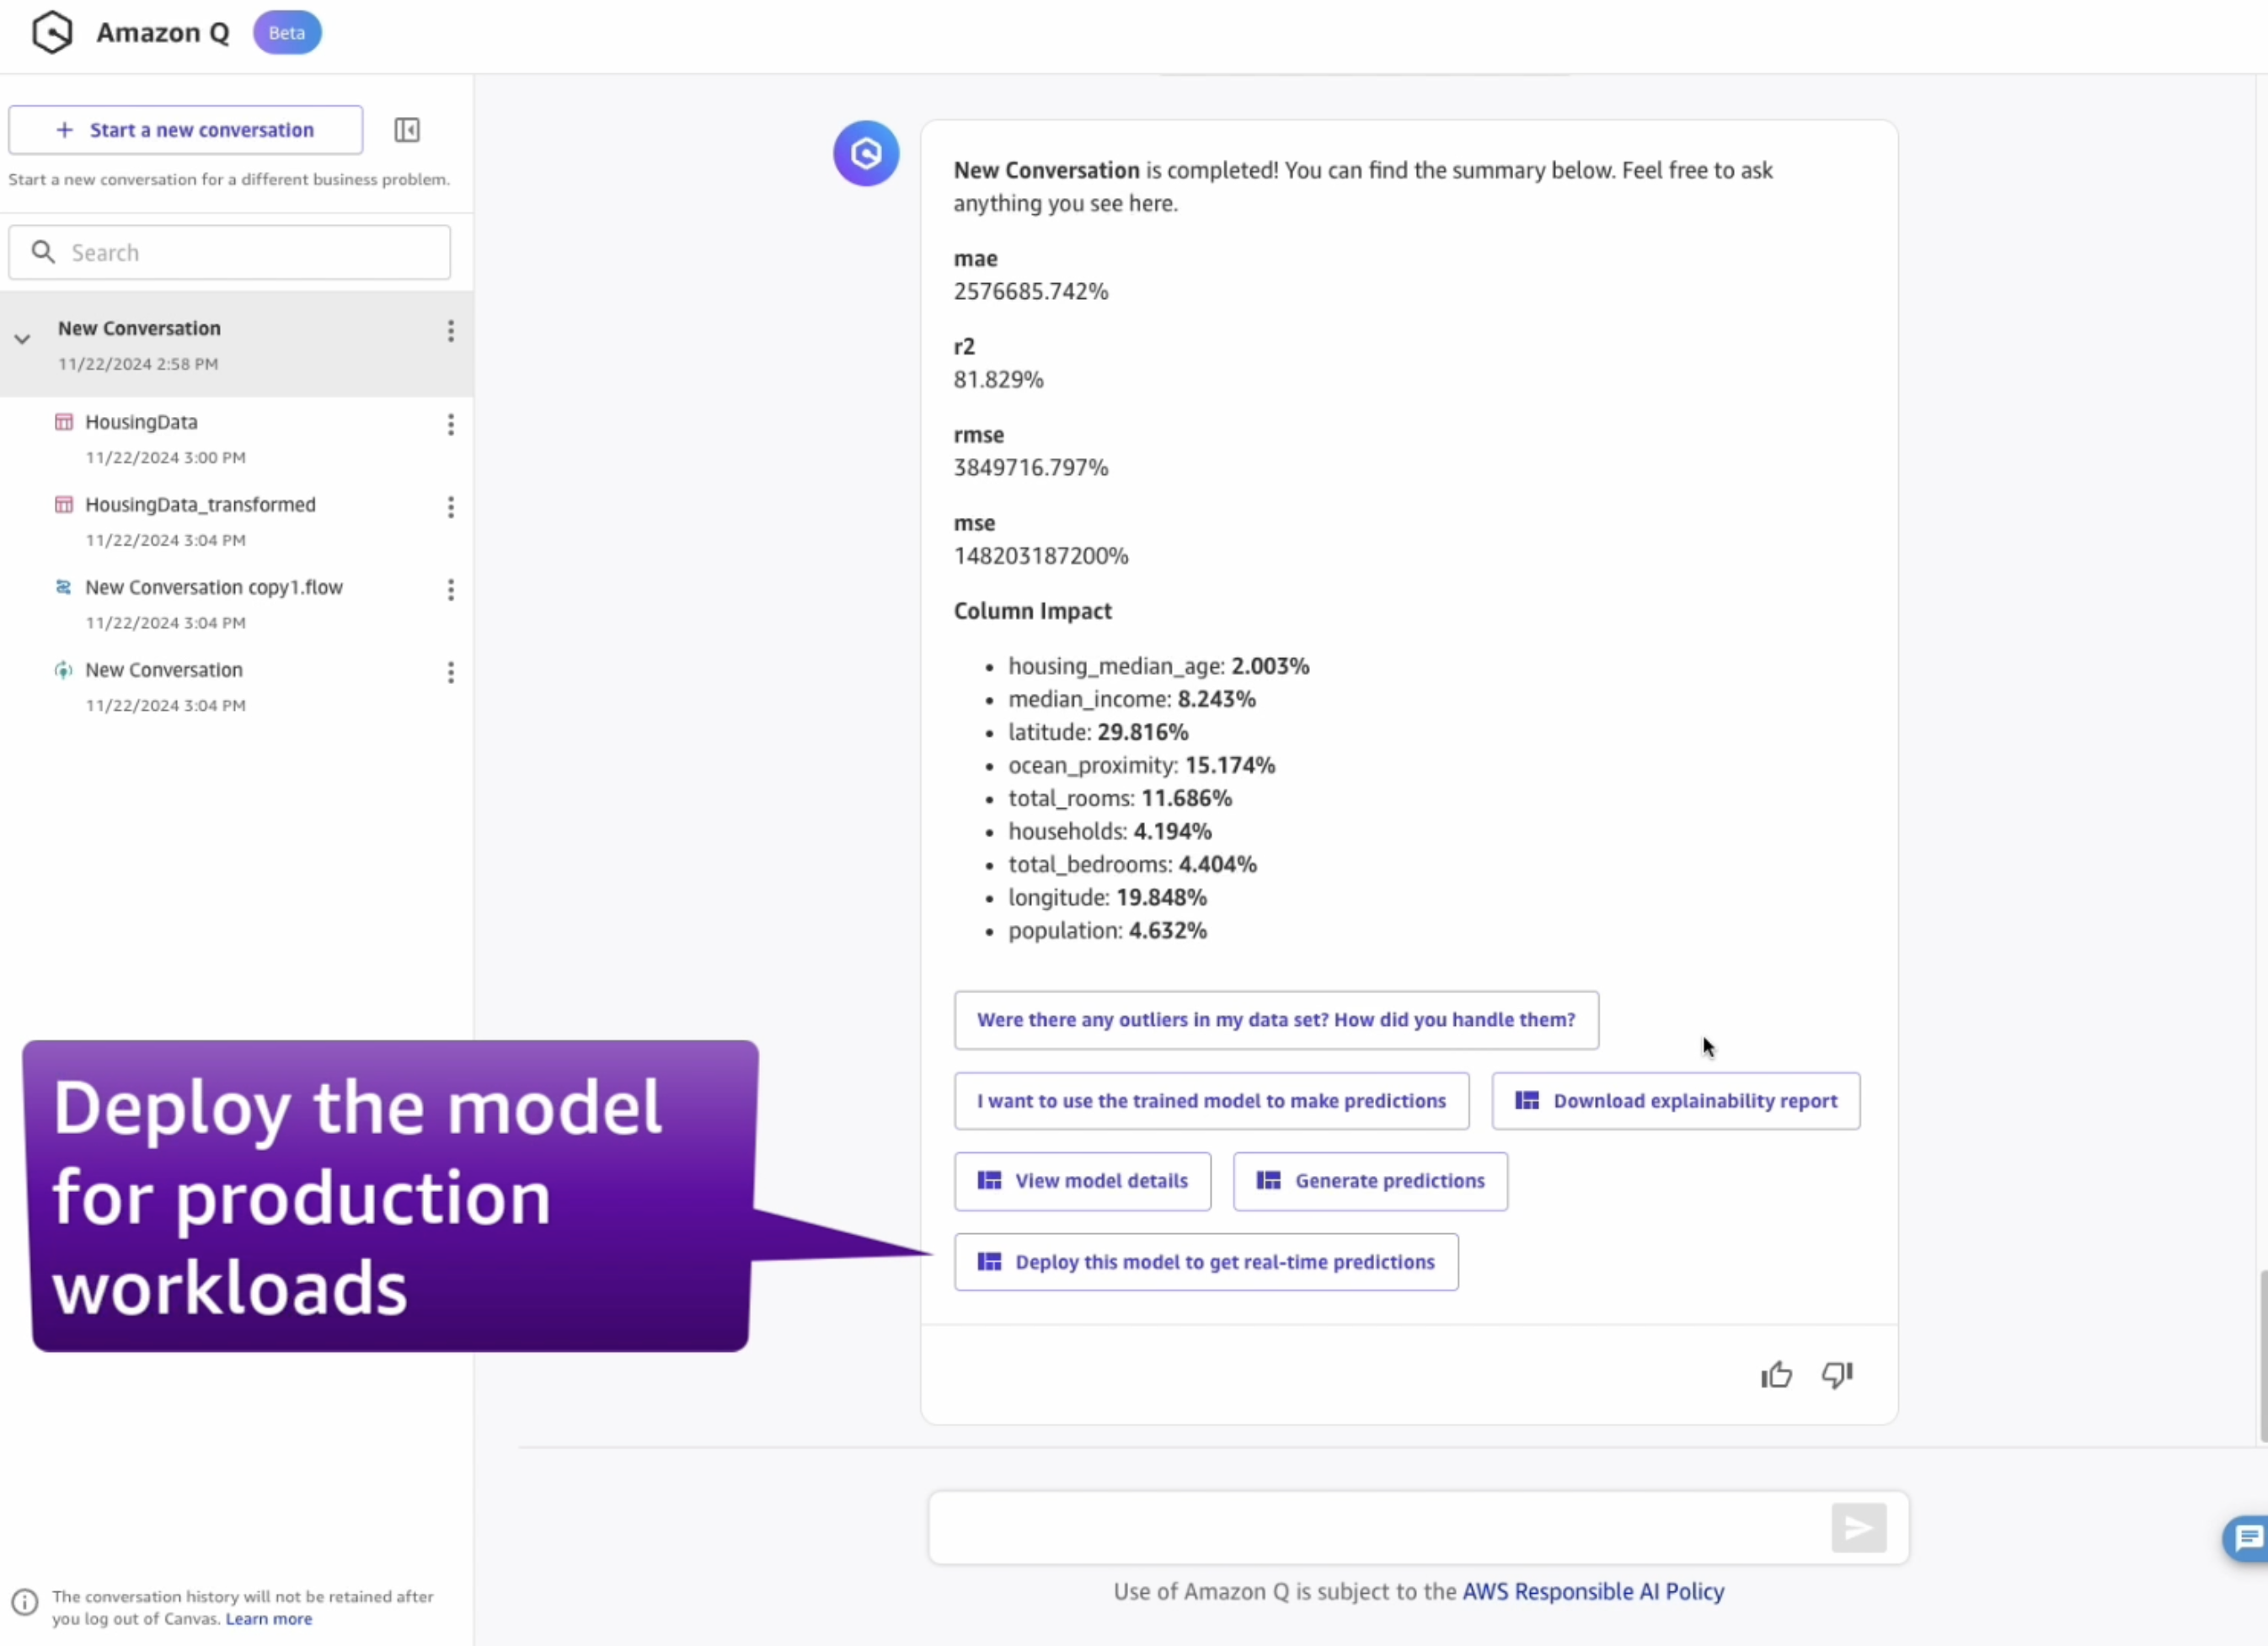
Configure the model deployment endpoint, selecting values like in the image below, then click Deploy:
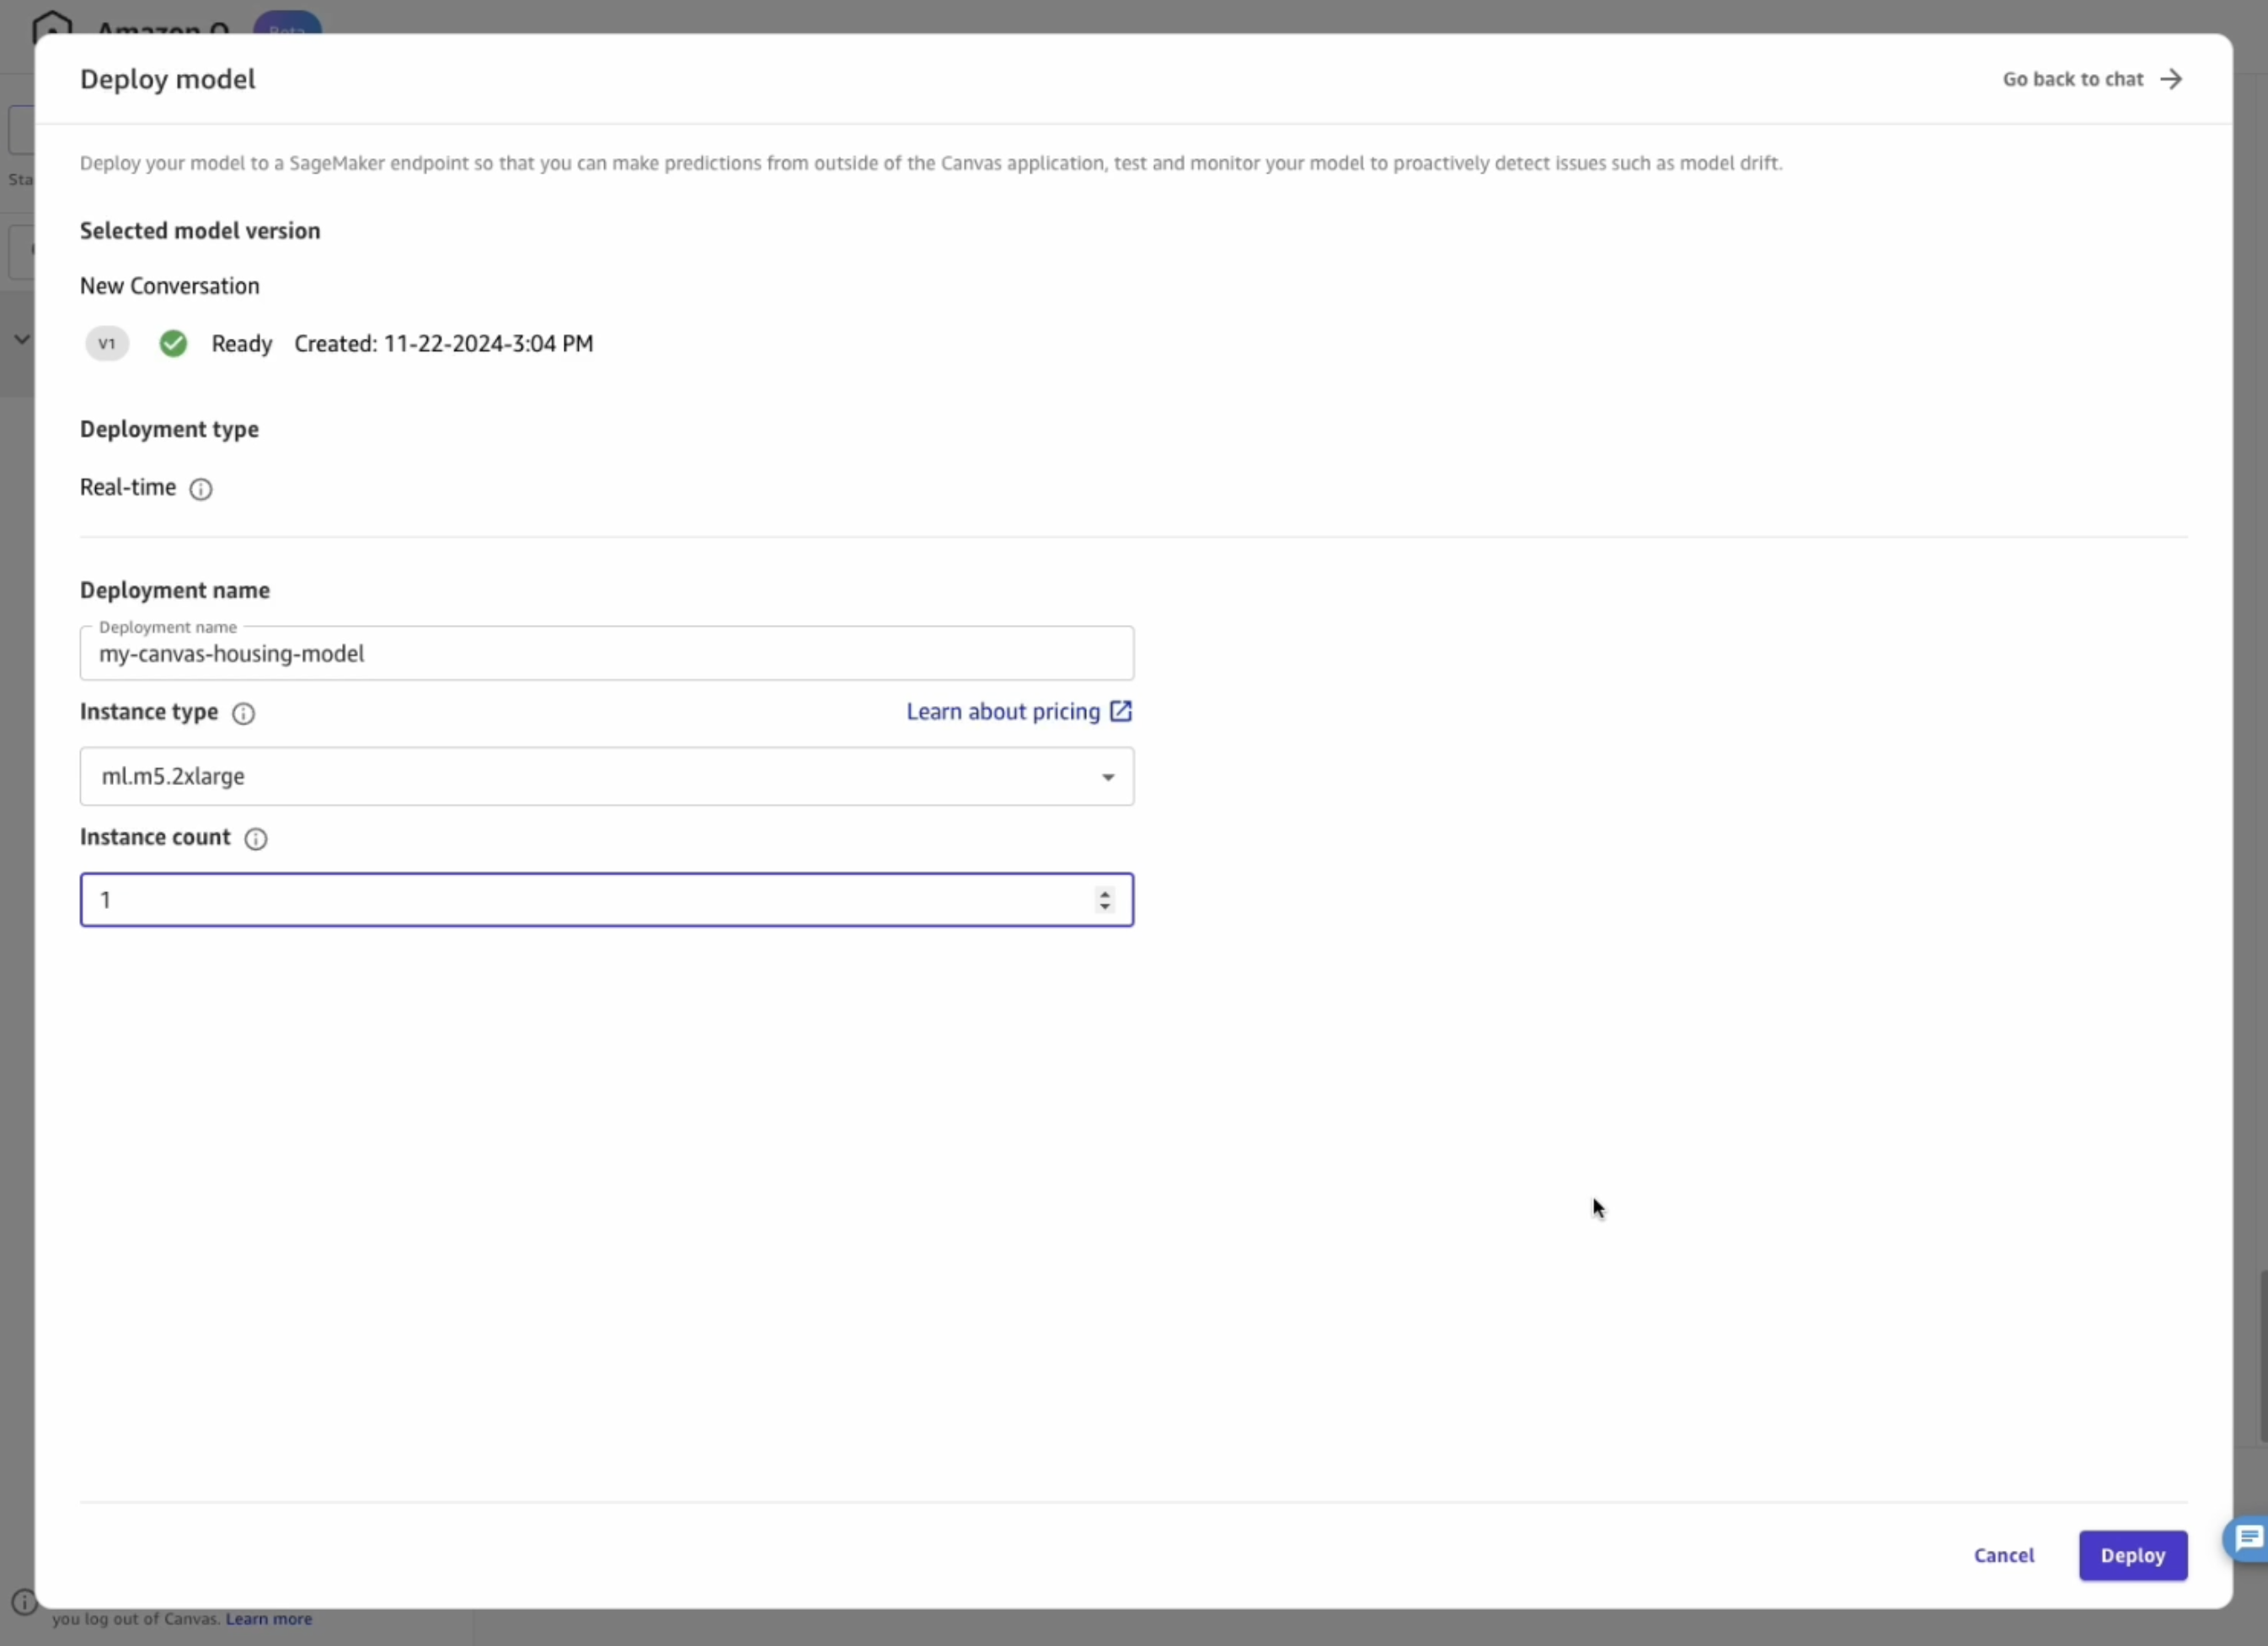
The model has now been deployed on a real-time inference endpoint. This is a dedicated instance that runs 24/7 and makes the model highly available and resilient.
Developers can use this model outside of SageMaker Canvas, by invoking the SageMaker Python SDK or with HTTPS requests. (Follow the notebook creation step to test the model).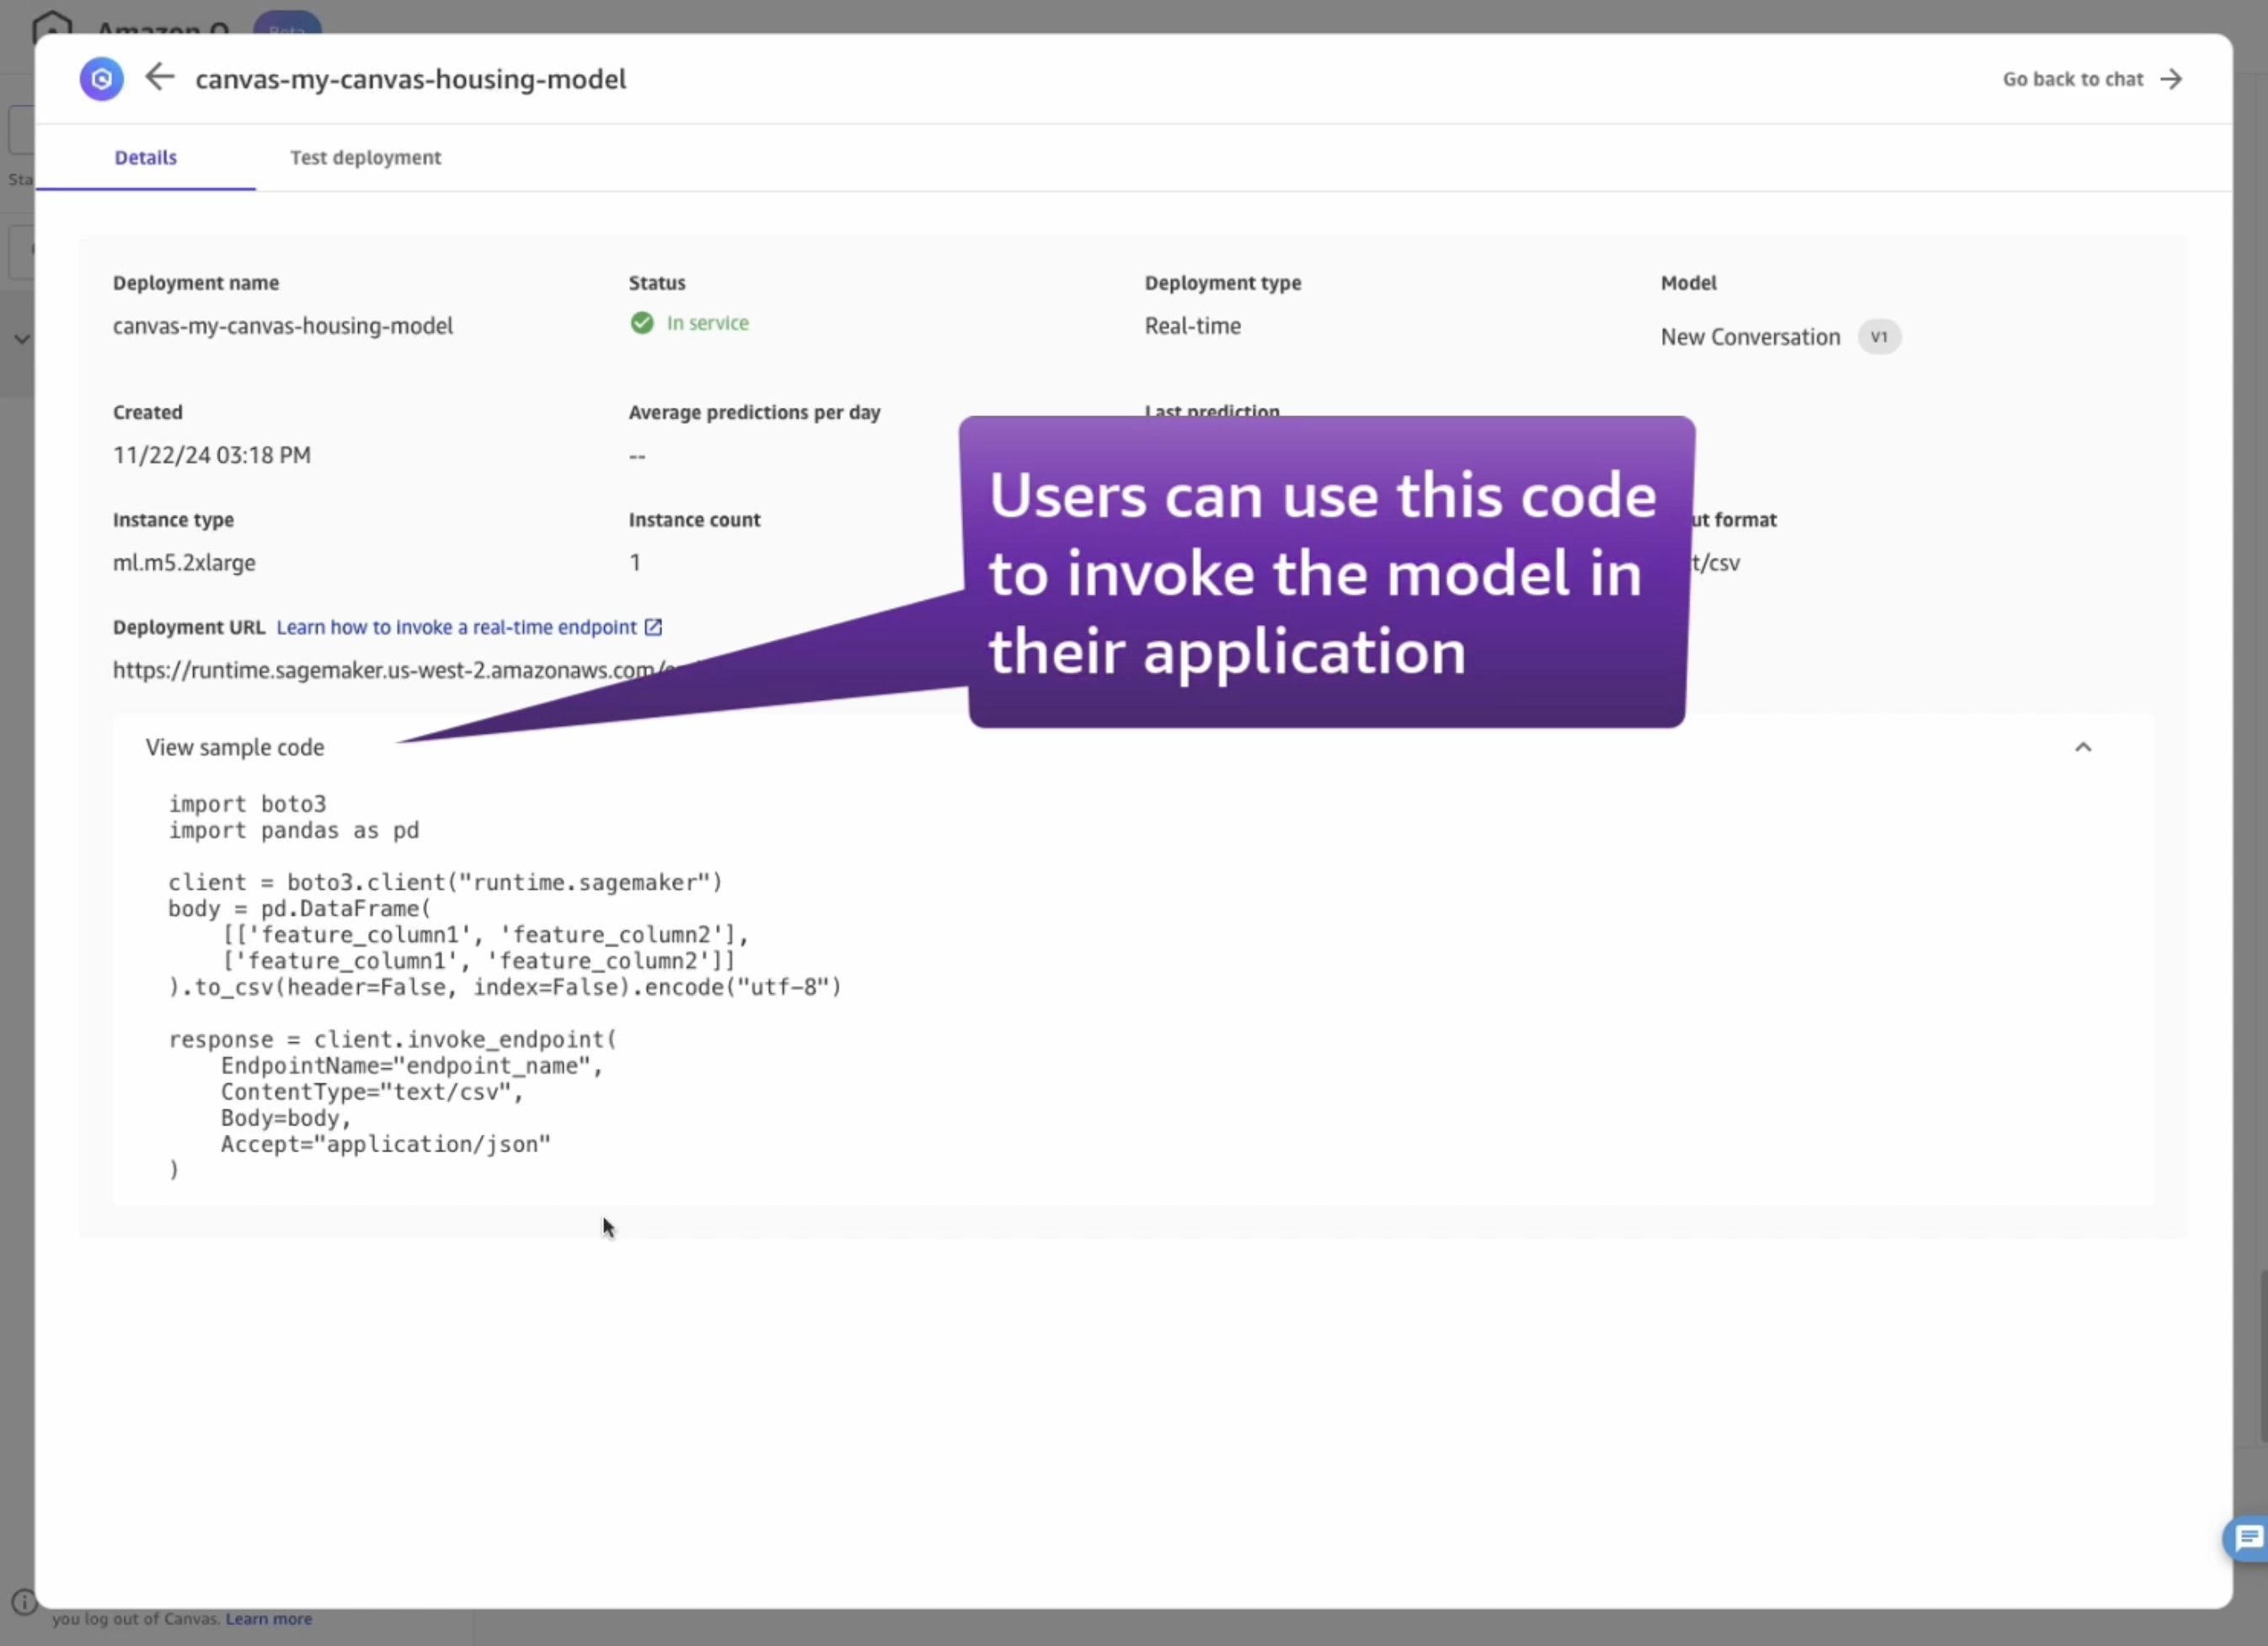
6. Clean up resources
- Clean Amazon Canvas
- Clean Amazon SageMaker Domain
- Clean Amazon S3
7. Conclusions
You have now successfully used Amazon Q Developer to build, evaluate, and optionally deploy a machine learning model for predicting house prices with Amazon SageMaker Canvas and AutoML. This natural language interface simplifies the process of creating ML models, making it accessible to analysts and business users without extensive data science expertise.


