
Cải thiện hiệu quả tìm kiếm tài liệu cho dự án lớn lưu trữ trên SharePoint
Lab Introduction
- AWS experience: Intermediate
- Time to complete: 35 minutes
- AWS Region: US East (N. Virginia) us-east-1
- Cost to complete: ~1-2$
- Services used: Amazon Kendra, Secrets Manager, Microsoft SharePoint
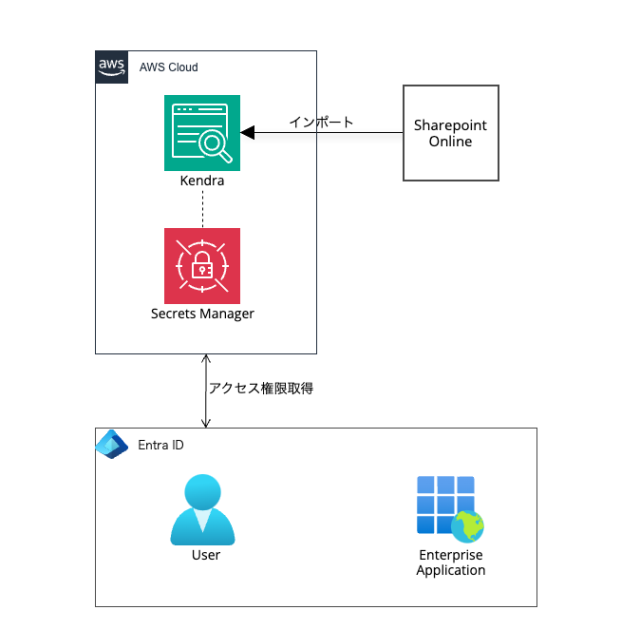
Architecture Diagram
1. Bối cảnh hiện tại
Các công ty tư vấn kỹ thuật/outsourcing nói chung và trong ngành IT nói riêng đang quản lý hàng trăm dự án trên toàn cầu. Mỗi dự án bao gồm hàng ngàn tài liệu được lưu trữ trên SharePoint, từ bản thiết kế Basic design, detail design, user requirement, testcase... đến hợp đồng và email trao đổi với khách hàng. Các tài liệu này được phân tán theo thư mục, site khác nhau và có cấu trúc tên file không thống nhất giữa các đội dự án.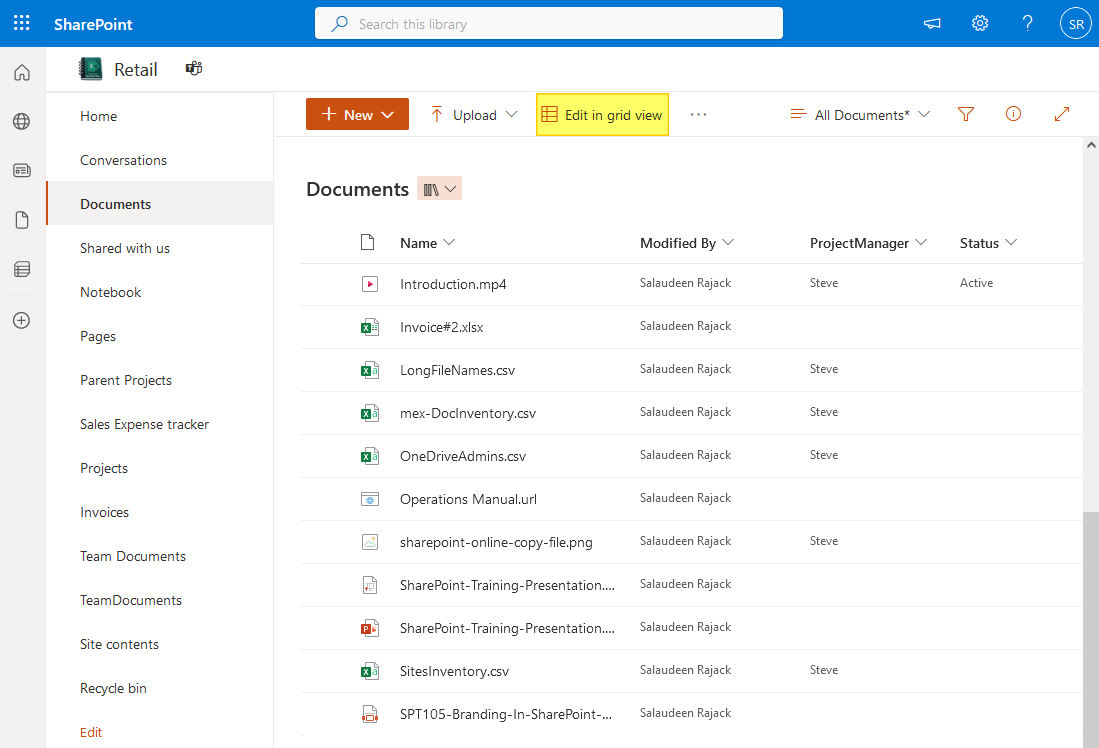
2. Vấn đề
- 🔍 Tìm kiếm khó khăn: Nhân viên phải nhớ đúng từ khóa, thư mục hoặc site để tìm tài liệu. Công cụ tìm kiếm của SharePoint cơ bản, không hiểu ngữ nghĩa hoặc ngữ cảnh câu hỏi.
- 🧱 Tài liệu không đồng nhất: Tài liệu được lưu ở nhiều định dạng khác nhau (PDF, DOCX, email, bản vẽ system design…) khiến việc tìm kiếm bị hạn chế.
- 🕐 Tốn thời gian: Kỹ sư dự án mất trung bình 30–60 phút mỗi lần tìm kiếm các hồ sơ cần thiết, gây lãng phí thời gian và ảnh hưởng tiến độ dự án.
- 🔒 Phân quyền phức tạp: Các quyền truy cập khác nhau giữa các site gây lỗi “access denied” thường xuyên, ngay cả khi tài liệu tồn tại.
3. Giải pháp: Tích hợp Amazon Kendra
✅ Tổng quan
- Amazon Kendra là dịch vụ tìm kiếm thông minh sử dụng AI/ML để hiểu ngữ nghĩa, có thể tích hợp với SharePoint nhằm nâng cao khả năng tìm kiếm tài liệu chuyên sâu.
🔧 Các bước triển khai
- Kết nối dữ liệu SharePoint Online: Sử dụng Amazon Kendra SharePoint connector để lập chỉ mục tài liệu từ các site và thư viện được cấp quyền.
- Huấn luyện Kendra theo ngữ cảnh doanh nghiệp: Tinh chỉnh để hiểu các thuật ngữ chuyên ngành xây dựng, kỹ thuật, hợp đồng…
- Tạo giao diện truy vấn tự nhiên: Cho phép người dùng đặt câu hỏi như:
“Tài liệu testcase phiên bản mới nhất cho chức năng quên mật khẩu.”
“Bản vẽ Basic design được khách hàng review nằm ở đâu?”
- Tích hợp phân quyền người dùng: Kendra tôn trọng các quyền truy cập SharePoint, đảm bảo bảo mật thông tin.
4. Lợi ích
- ⏱️ Tiết kiệm thời gian tìm kiếm lên đến 70%.
- 🧠 Hiểu ngữ nghĩa và truy vấn bằng ngôn ngữ tự nhiên, không cần nhớ từ khóa chính xác.
- 📂 Tìm được cả các tài liệu không có trong metadata (ví dụ: nội dung nằm sâu trong file PDF).
- 📊 Cải thiện hiệu suất công việc cho đội kỹ thuật, pháp lý, quản lý dự án...
Prerequisites
Để bắt đầu, bạn cần những điều sau:
- A SharePoint Online site
- A SharePoint Online user with owner rights

1. Creating a SharePoint Online User for the connector
For this section you will need access to a SharePoint Online site.
- Login to your SharePoint Online site.
- Press the top left icon and Click on Admin.
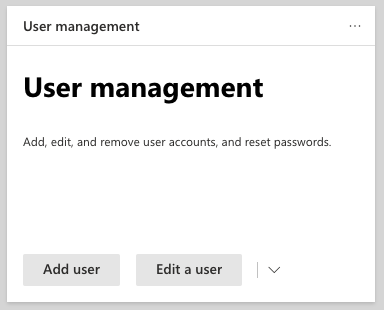
- Under the User management section click on Add User.
- Create a new user and assign a password, make sure you don’t click on Require this user to change their password when they first sign in.
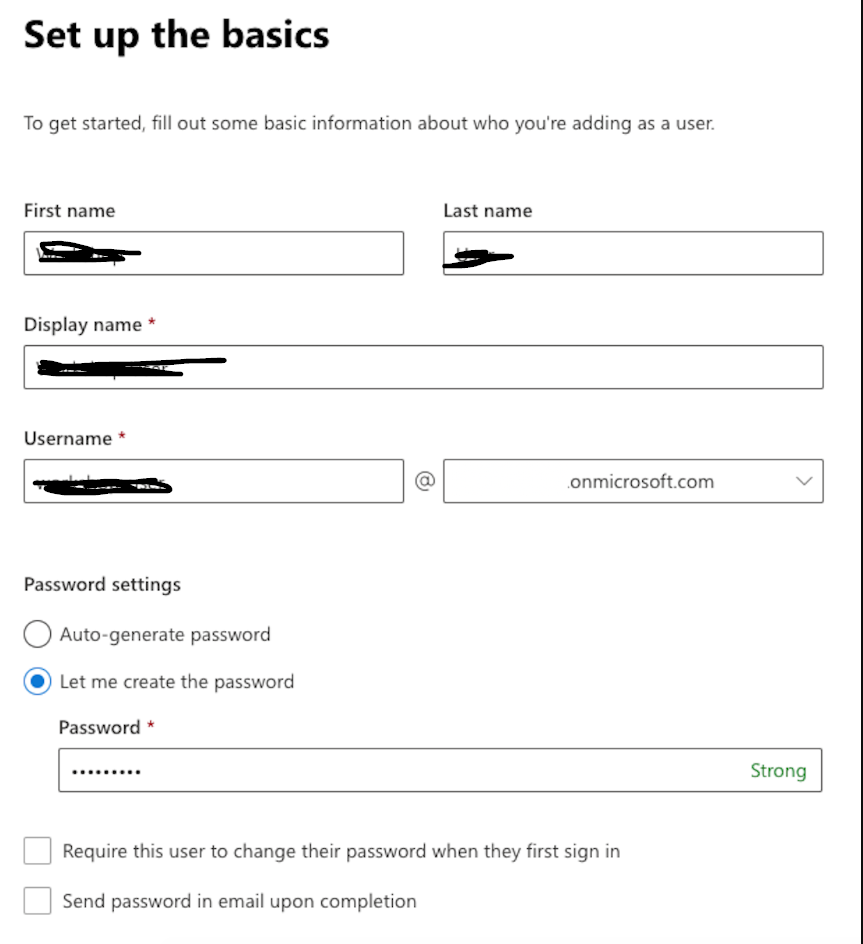
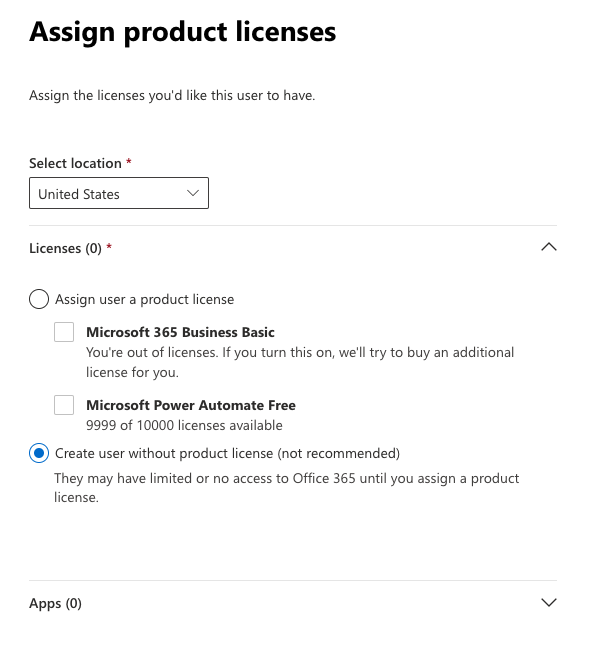
- The user that will be associated with the by our SharePoint Online connector doesn’t need a license, so we will click on *Create user without product License.
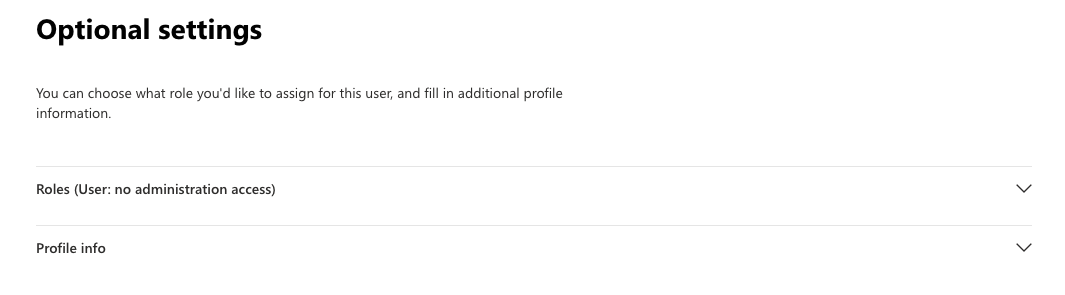
- We won’t modify anything on the Optional settings, click Next.
- Select Finish Adding.

- Login with your username and password to make sure everything works as expected, in order to do this you can open a new incognito tab and try to open your SharePoint Site.
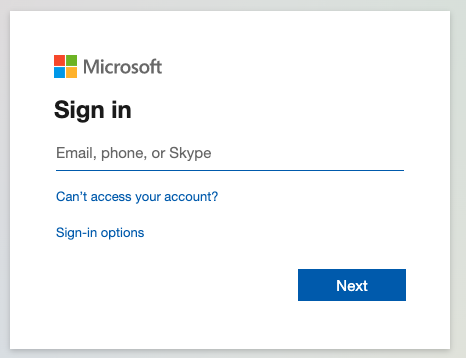
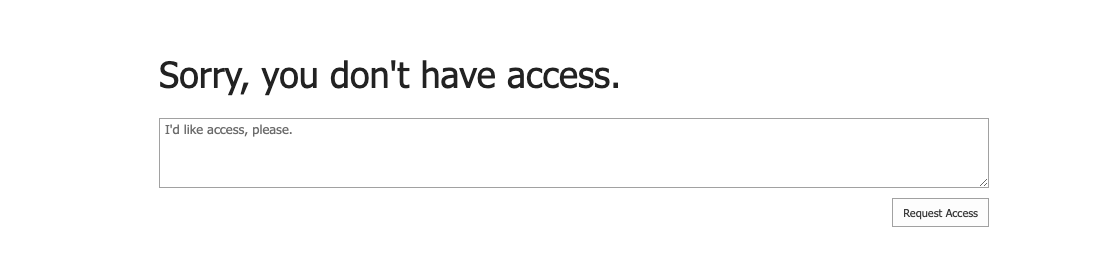
- Login using your username and password, you will notice that you don’t have access… yet.
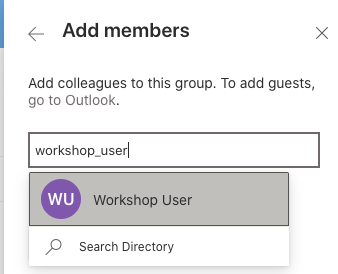
- Go back to your SharePoint Online site, and click on the members icon.

- Click on Add members.
- Add the user you just created, in some cases the name may not pop up immediately after creating it, in that case, you can just paste the email address.
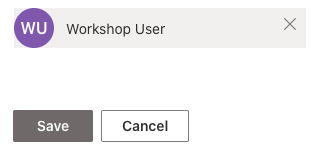
- Click on Save.
- Example data dummy used for search purposes.

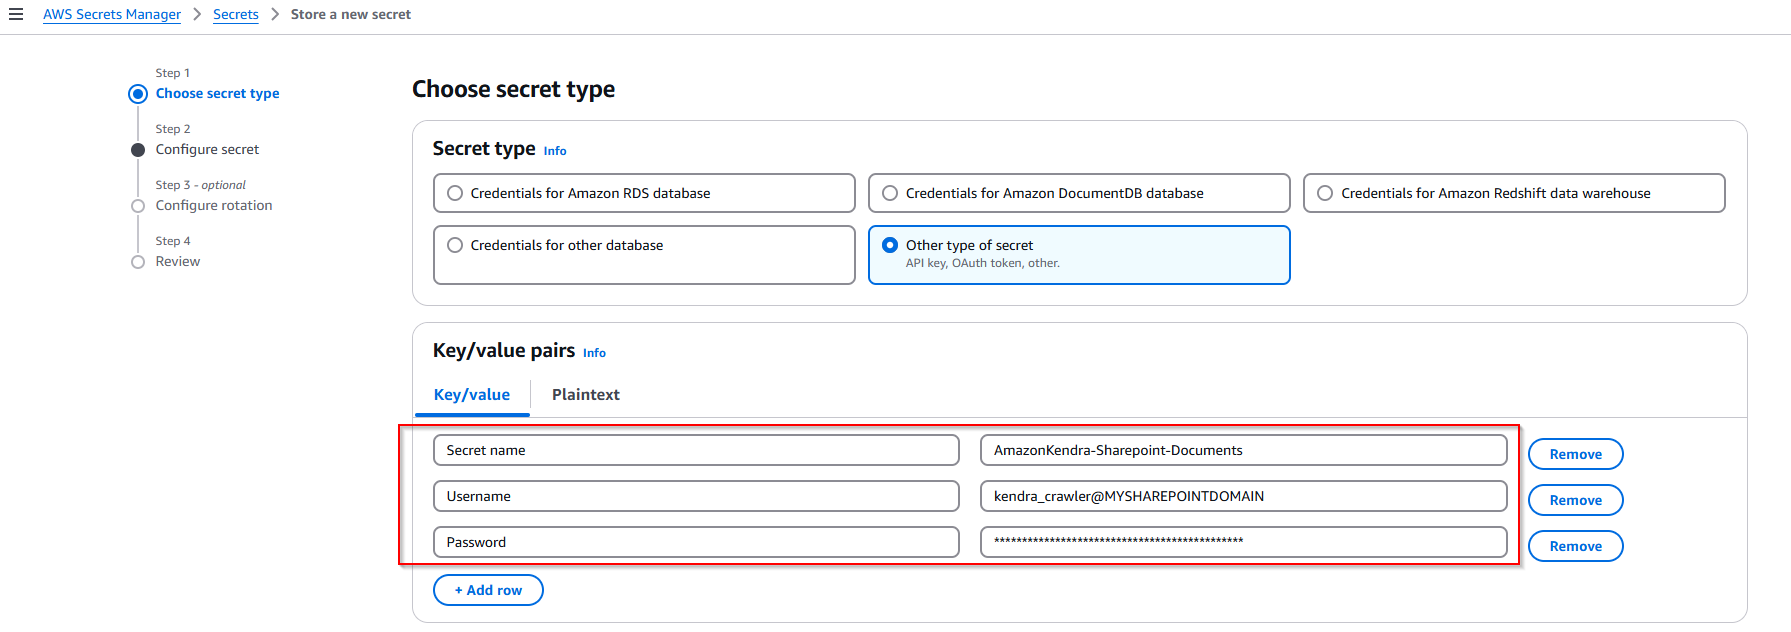
2. Configuration AWS Secrets Manager
Enter the user information credentials created in step 1.
3. Config Kendra connection on AWS
- Creating an Amazon Kendra Index
In an Amazon Kendra setup workflow, the first step is to create an index.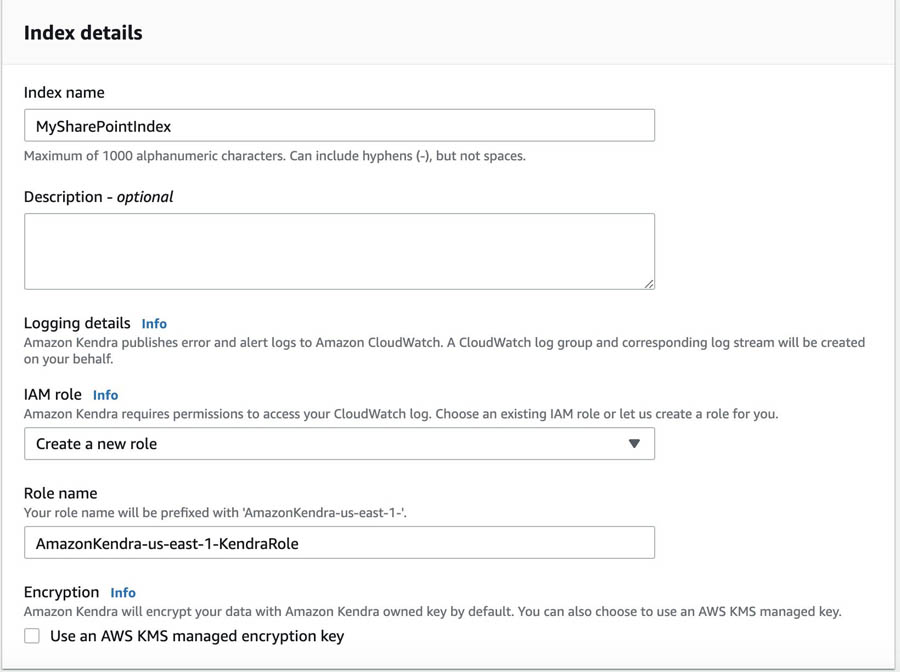
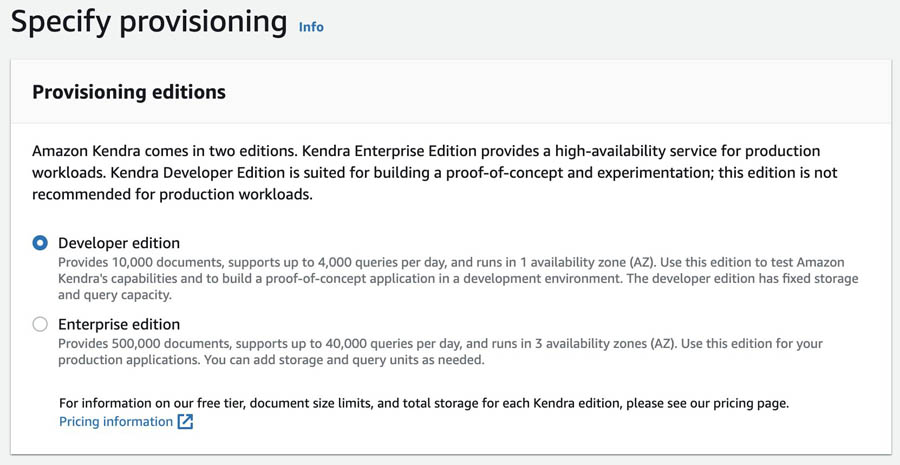
- Next, you select which provisioning edition to use.
- For this post, I select the Developer edition. If you’re new to Amazon Kendra, we recommend creating an Amazon Kendra Developer Edition index because it’s a more cost-efficient way to explore Amazon Kendra.
- For production environments, we highly recommended using the Enterprise Edition because it allows for more storage capacity and queries per day, and is designed for high availability.
- Configuring the SharePoint Online connector
After you create your index, you set up the data sources. For this use case, we choose SharePoint Online.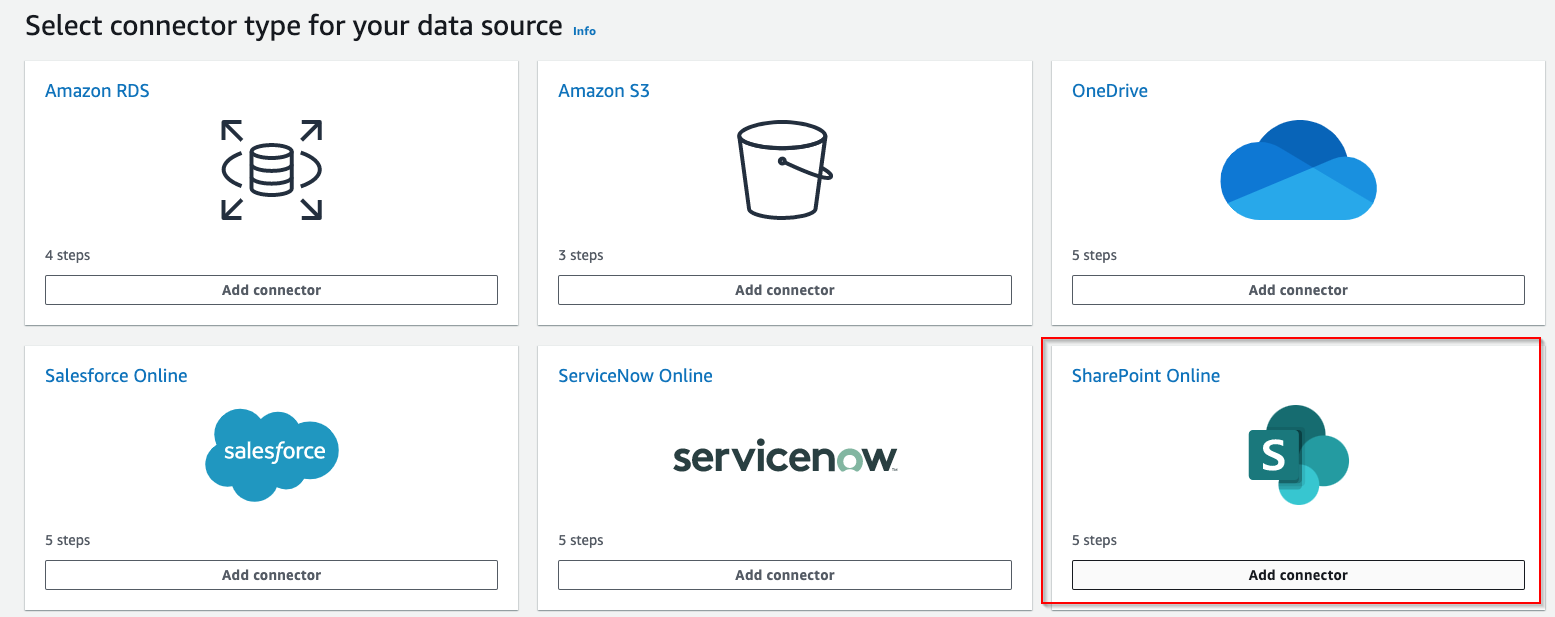
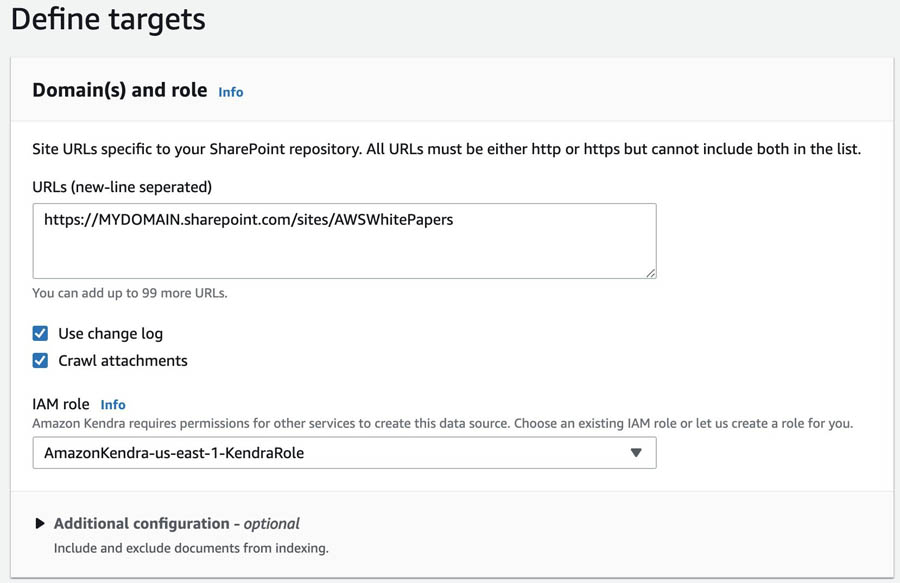
- Assigning a name to the data source
In the Define attributes section, you enter a name for the data source, an optional description, and assign optional tags.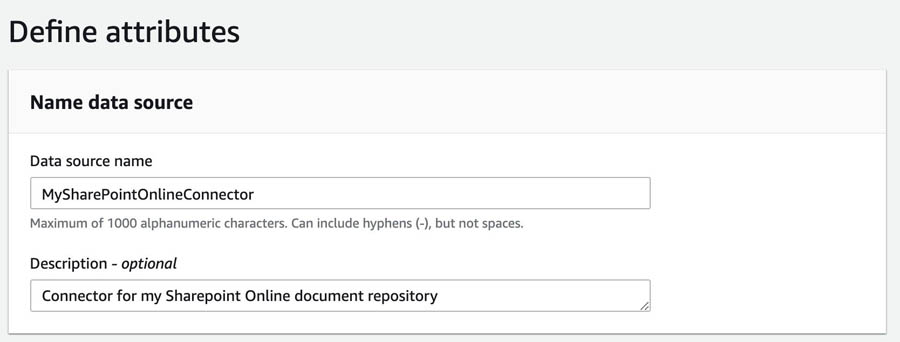
- Under URLs enter your SharePoint Online site URL, it should follow the format https://yourcompany.sharepoint.com/sites/mysite , select Create a new role and enter a name for it.
- Use change log, which enables the connector to use the SharePoint change log to determine the documents that need to be updated in the index. If your SharePoint change log is too large, your sync process may take longer.
- Crawl attachments, which allows the crawler to include the attachments associated with items stored in your site.
- Providing SharePoint Online credentials
In the Configure settings section, you set up your SharePoint Online user. The credentials you enter are stored in the Secrets Manager.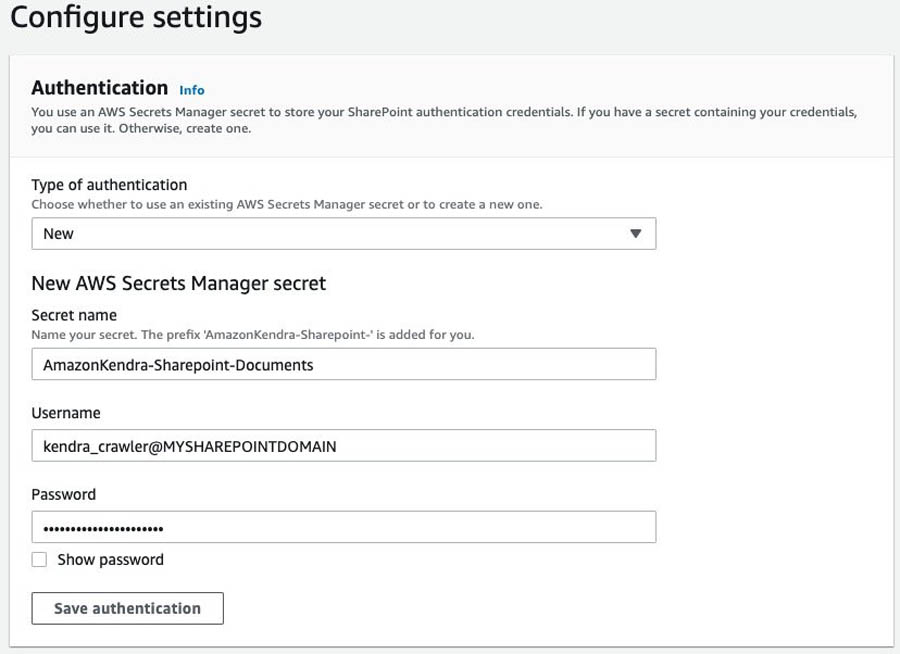
Save the authentication information and set up the sync run schedule, which determines how often Kendra checks your SharePoint Online site URLs for changes. For this use case, I choose to Run on demand.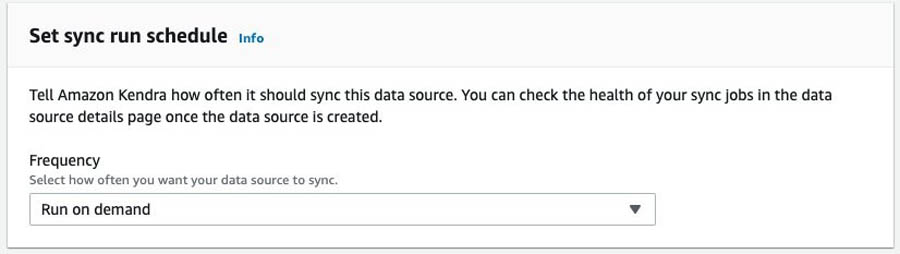
- Attributes and field mappings
- Metadata enables you to improve accuracy through manual tuning, filtering, and faceting.
- You can’t add metadata to already ingested documents, so if you want to add metadata later, you need to delete this data source and recreate this data source with metadata and re-ingest your documents.
The default SharePoint Online metadata fields are Title, Created, and Modified.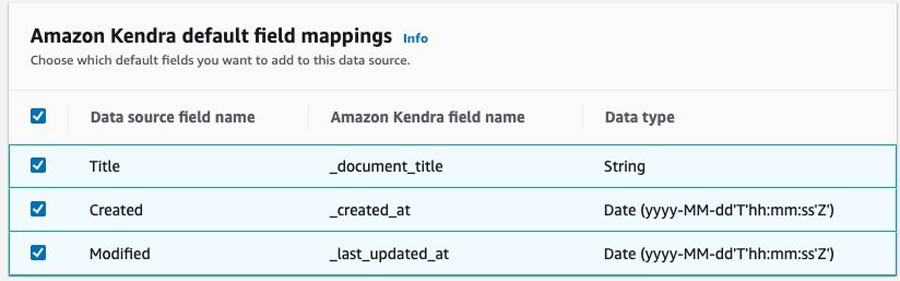
For example, on my SharePoint Online site, I created a column named Category. By importing this extra piece of information, we can create filters based on category names.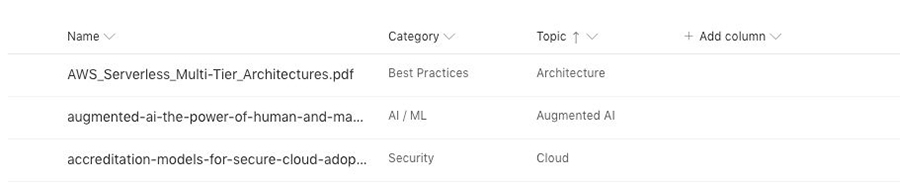
To import that extra information, you create a custom field mapping by choosing Add a new field mapping button.
For this use case, I have other documents that have the attribute Category, so I choose Option A to map fields to an existing document attributes field in my Amazon Kendra index.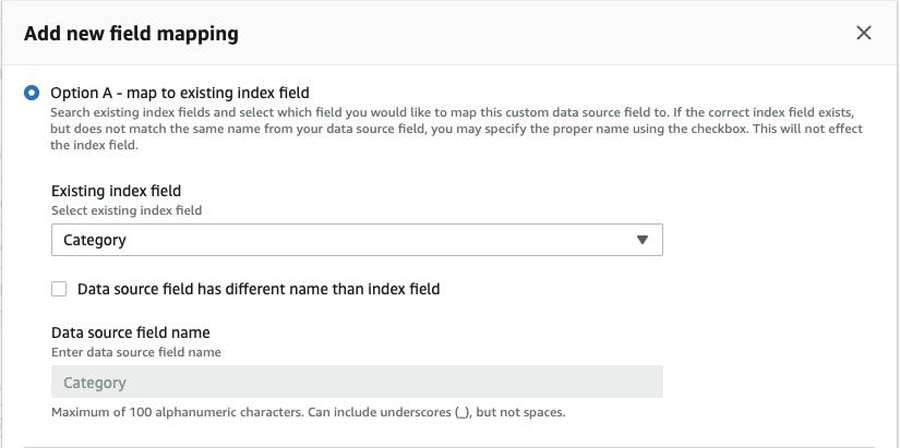
Also, on my SharePoint Site, I have an additional field called Topic. Because I don’t have that field on my index yet, I select Option B and enter the data source field name and select the data type (for this use case, String).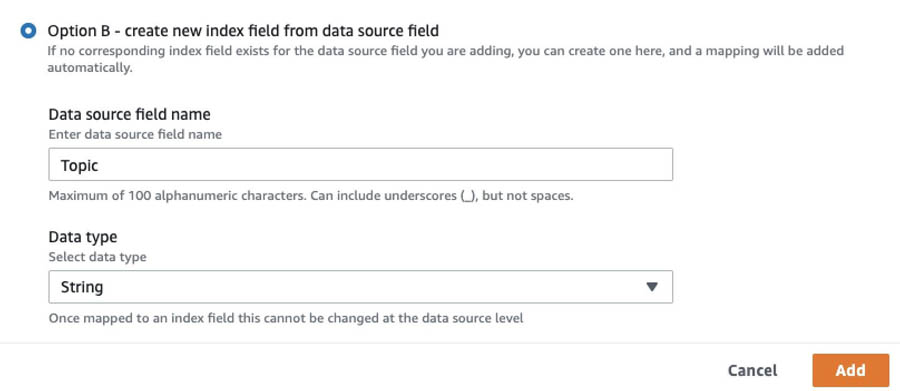
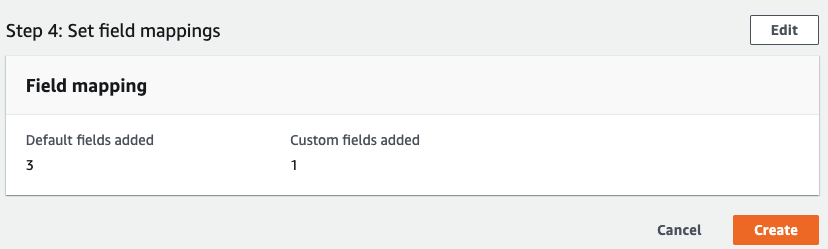
- Click on Next. Review your settings and click on Create.
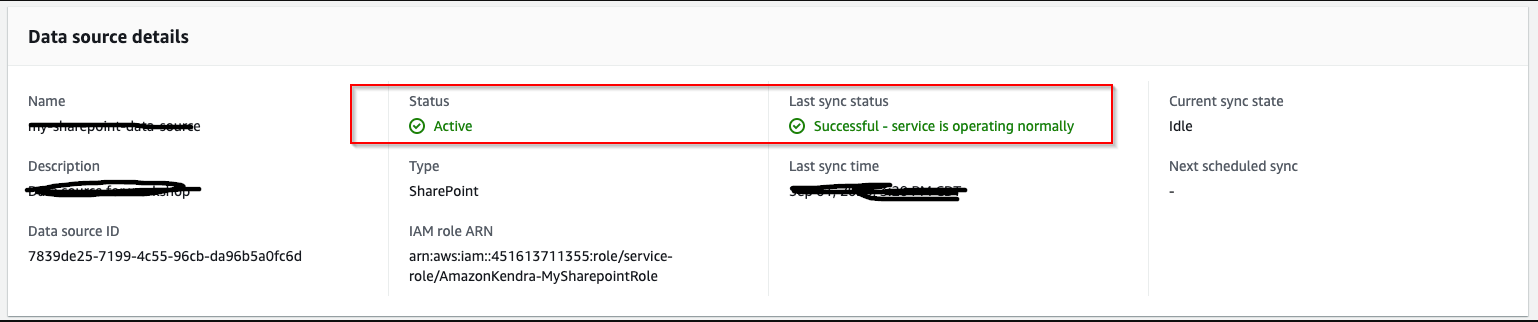
- After the Data source is created, click on Sync now.

- Wait until the sync process finishes.
3. Testing
You can test your new index on the Amazon Kendra search console. See the following screenshot.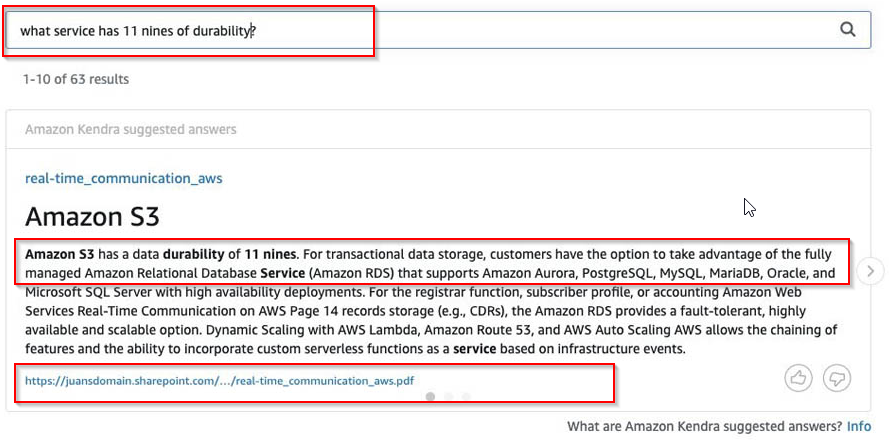
Also, you can filter your documents by those facets. See the following screenshot.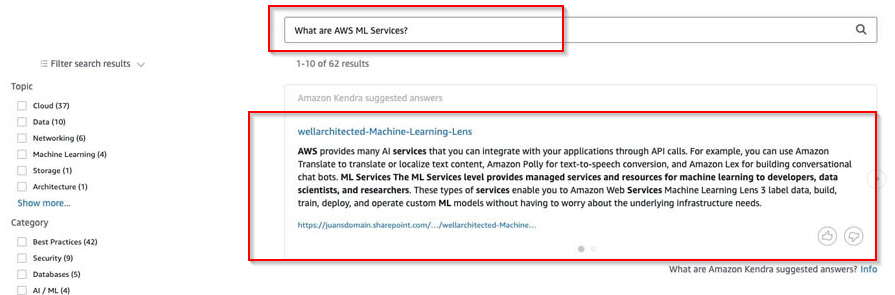
Clean up resources
- Delete Kendra Index
- Delete Kendra data source connection
- Delete user SharePoint