
Building a CI/CD pipeline for ECS Fargate Blue-Green Deployment
Introduction
What is ECS Blue/Green Deployment?
Blue/Green Deployment là tạo ra hai môi trường. Một môi trường (Blue) chạy phiên bản hiện tại và môi trường còn lại (Green) chạy phiên bản mới. Sau khi quá trình thử nghiệm trong môi trường Green hoàn tất, traffic sẽ được chuyển hướng đến môi trường Green và môi trường Blue sẽ không được dùng nữa.
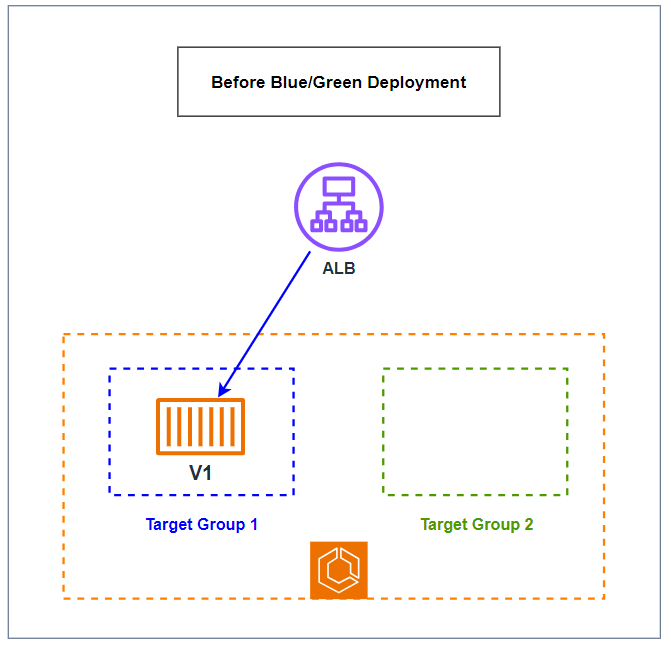
Trong quy trình triển khai ECS Blue/Green bằng CodeDeploy, Load Balancer và hai Target Group là những thành phần quan trọng không thể thiếu.
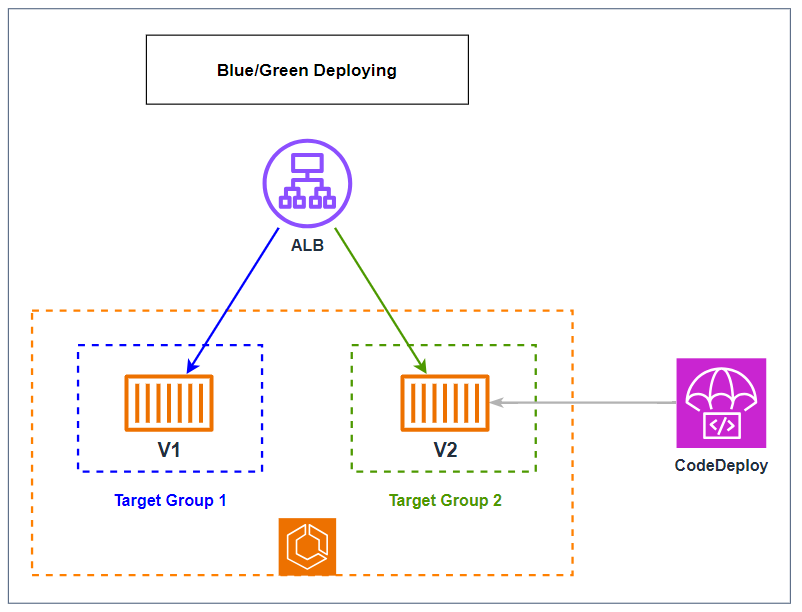
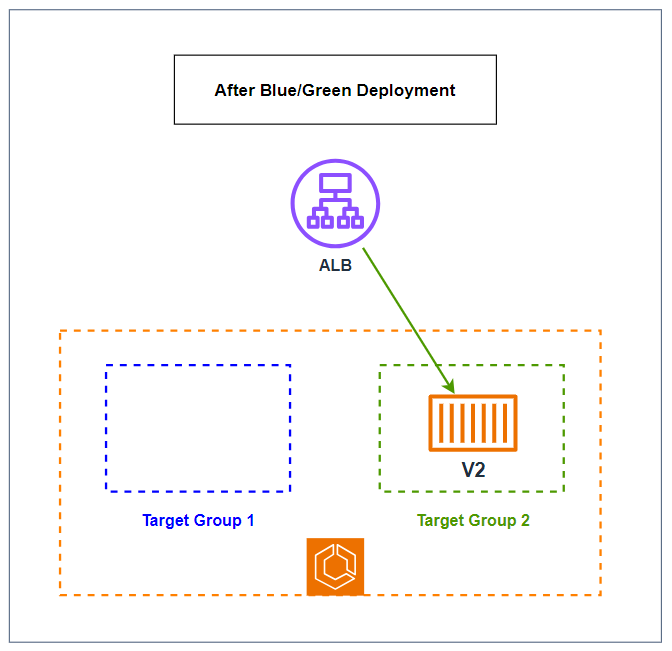
Hai Target Group được sử dụng để định nghĩa hai nhóm tasks khác nhau. Một Target Group sẽ đại diện cho môi trường hiện tại (Blue) và cái còn lại đại diện cho môi trường mới (Green). Khi quá trình triển khai diễn ra, CodeDeploy sẽ gán các tasks mới (Green) vào Target Group 2 (Green), đồng thời giám sát healthcheck của chúng. Khi tất cả các tasks trong Target Group 2 (Green) hoạt động ổn định, CodeDeploy sẽ chuyển toàn bộ traffic từ Target Group 1 (Blue) sang Target Group 2 (Green) thông qua Load Balancer.
CodeDeploy hỗ trợ ba cách Shifting traffic trong ECS Blue/Green Deployment:
- All-at-once: Toàn bộ traffic được chuyển một lần duy nhất từ phiên bản cũ sang phiên bản mới, thích hợp cho các triển khai có quy mô nhỏ hoặc cần thời gian cập nhật nhanh.
- Linear: traffic được chuyển đổi dần dần theo các phần bằng nhau, với khoảng thời gian cố định giữa mỗi lần chuyển. Phương pháp này giúp kiểm soát tốt hơn việc chuyển đổi và giảm thiểu rủi ro.
- Canary: traffic được chuyển đổi trong hai giai đoạn. Một phần nhỏ traffic được chuyển trước, phần còn lại sẽ chuyển sau một khoảng thời gian định sẵn. Điều này giúp bạn dễ dàng giám sát và kiểm tra trước khi áp dụng toàn bộ.
Từ các chiến lược Shifting traffic trên, CodeDeploy có các deployment configuration default như sau:
- CodeDeployDefault.ECSAllAtOnce: Chuyển toàn bộ traffic truy cập sang Amazon ECS container đã được cập nhật một lần duy nhất.
- CodeDeployDefault.ECSLinear10PercentEvery1Minutes: Chuyển 10% traffic truy cập mỗi phút cho đến khi toàn bộ traffic được chuyển.
- CodeDeployDefault.ECSLinear10PercentEvery3Minutes: Chuyển 10% traffic truy cập mỗi 3 phút cho đến khi toàn bộ traffic được chuyển.
- CodeDeployDefault.ECSCanary10Percent5Minutes: Chuyển 10% traffic truy cập trong lần chuyển đầu tiên, 90% còn lại được chuyển sau 5 phút.
- CodeDeployDefault.ECSCanary10Percent15Minutes: Chuyển 10% traffic truy cập trong lần chuyển đầu tiên, 90% còn lại được chuyển sau 15 phút.
Thông qua việc sử dụng chiến lược Blue/Green, hệ thống của bạn có thể dễ dàng kiểm tra các thay đổi trong môi trường Green trước khi chuyển lưu lượng truy cập thực sự, giúp đảm bảo tính liên tục và an toàn cho dịch vụ.
Ngoài ra khi kết hợp với CodePipeline trong triển khai ECS Blue/Green đảm bảo rằng mọi thay đổi, cập nhật đều được triển khai một cách tự động, an toàn, nhanh chóng và dễ dàng rollback mà không gây gián đoạn dịch vụ, mang lại sự an tâm, tin cậy và hiệu quả trong quản lý hệ thống.
Quá trình ECS Blue/Green Deployment
- Before Blue/Green Deploy
- Blue/Green Deploying
- After Blue/Green Deployment
Lab Introduction
- AWS experience: Intermediate
- Time to complete: 90+ minutes
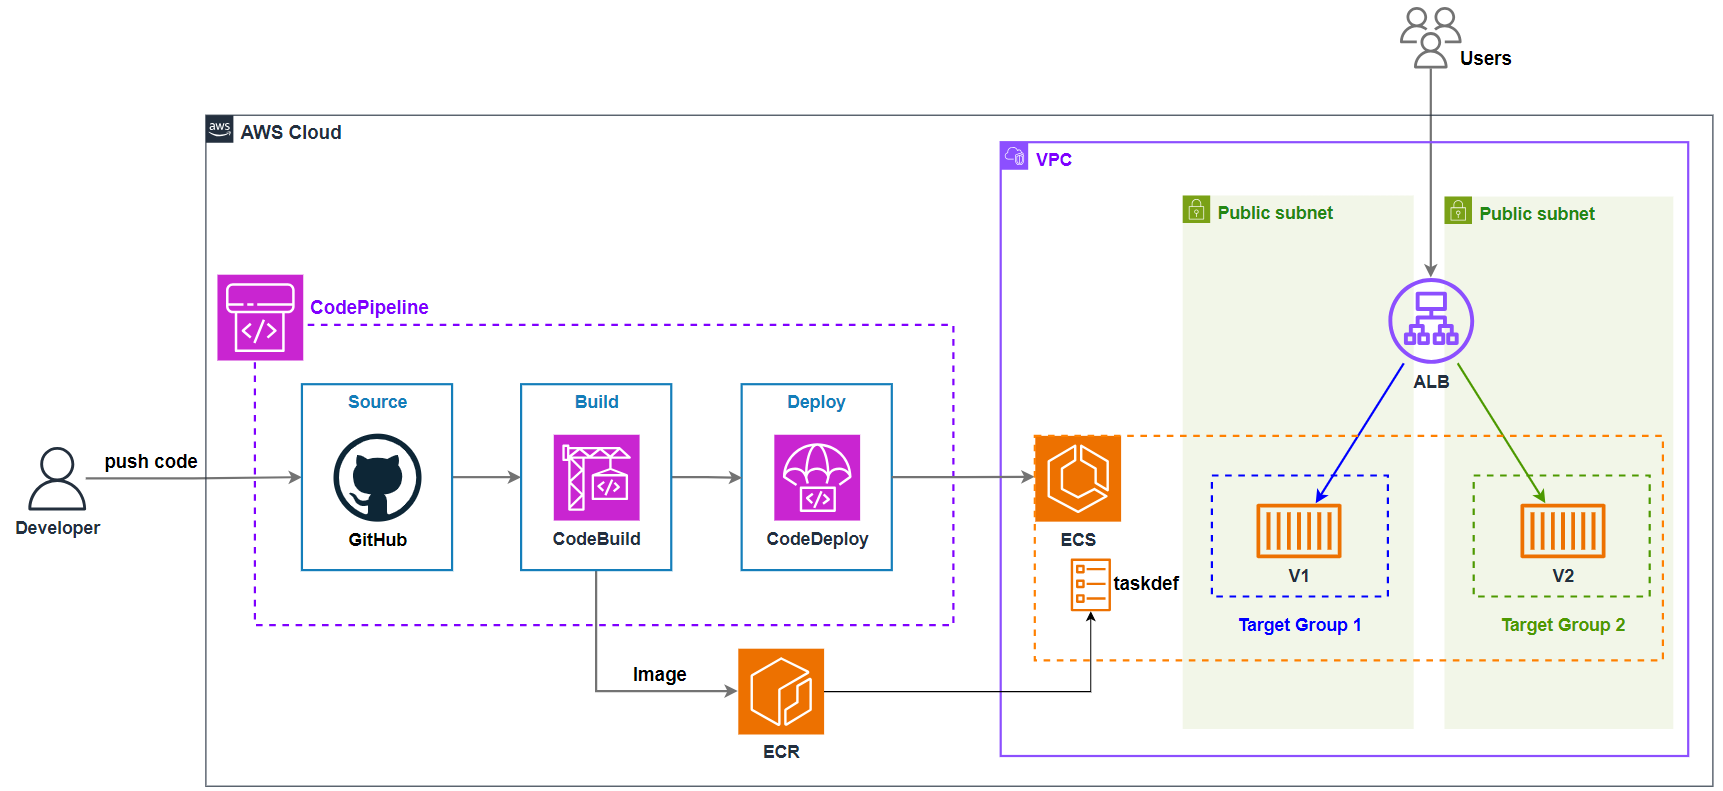
- AWS Region: US East (N. Virginia) us-east-1
- VPC: default VPC
- Services used: ALB, ECR, ECS, CodeBuild, CodeDeploy, CodePipeline
Architecture Diagram
Task Details
- Create Application Load Balancer
- Building and Pushing the Docker Image to ECR With CodeBuild
- Create ECS-Fargate with Blue/green deployment type
- ECS Fargate Blue-Green Deployment with CodeDeploy
- Building a CI/CD pipeline with CodePipeline
- Verify kết quả
- Clean up
1. Create Application Load Balancer
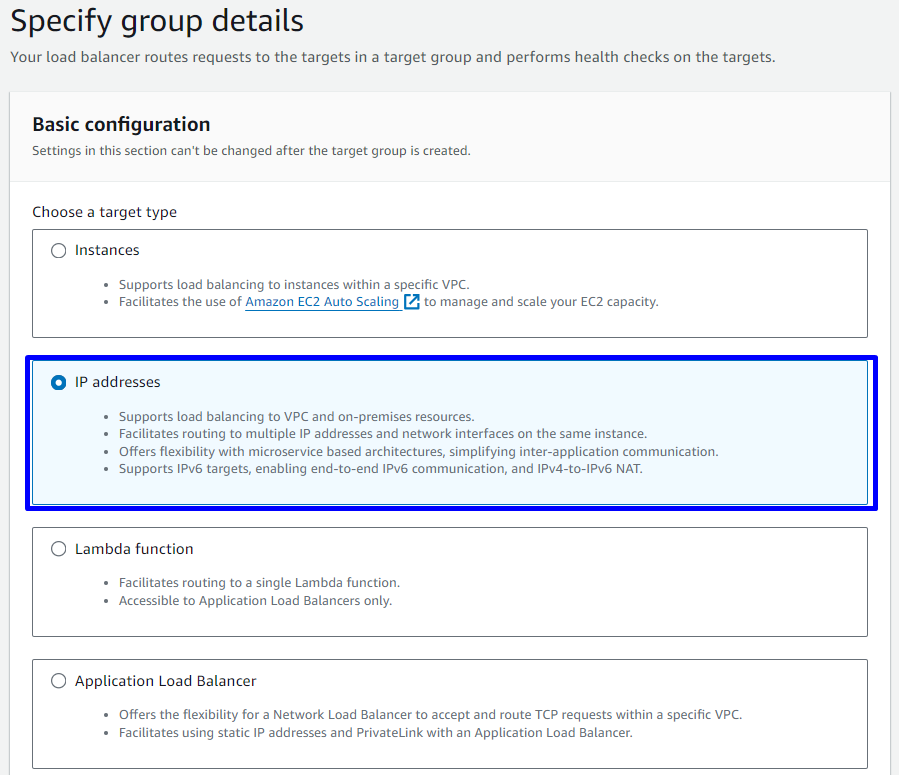
1.1. Create Target Group 1 ( Blue )
Vào EC2 Console -> Target Group -> Nhấn Create target group
- Choose a target type:
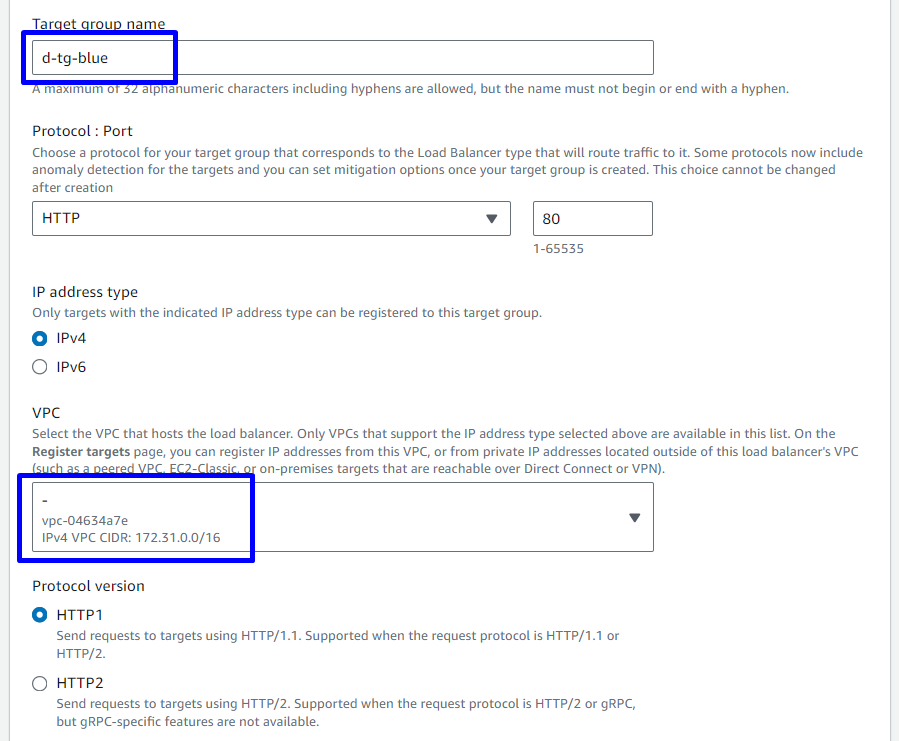
IP addresses - Target group name:
d-tg-blue - Protocol:
HTTP - Port:
80 - VPC: Chọn default VPC
- Tag: Key:
NameValue:d-tg-blue - Các setting khác để như default
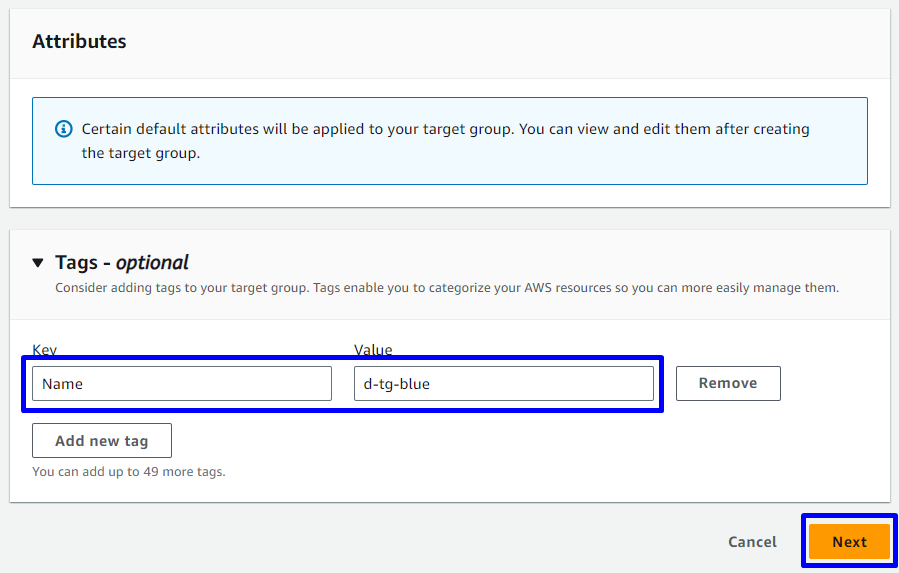
- Nhấn Next
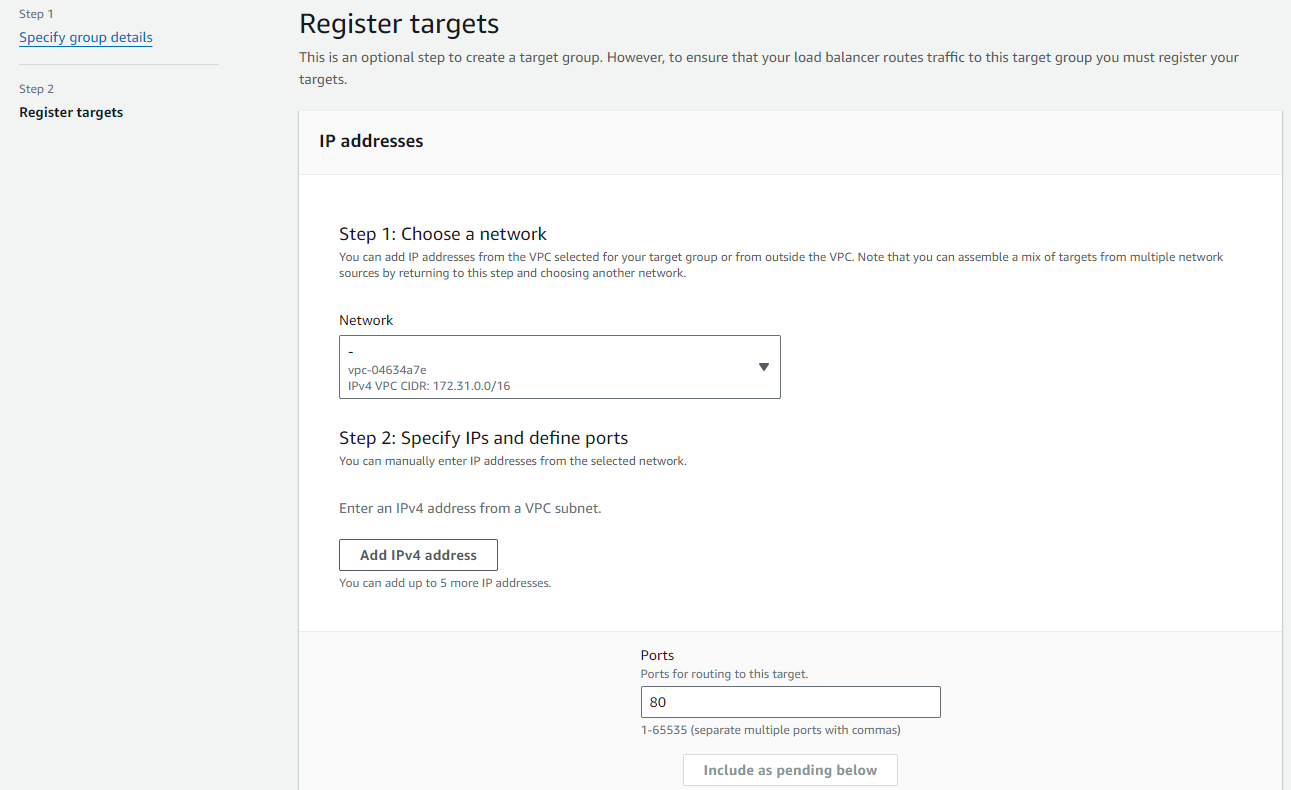
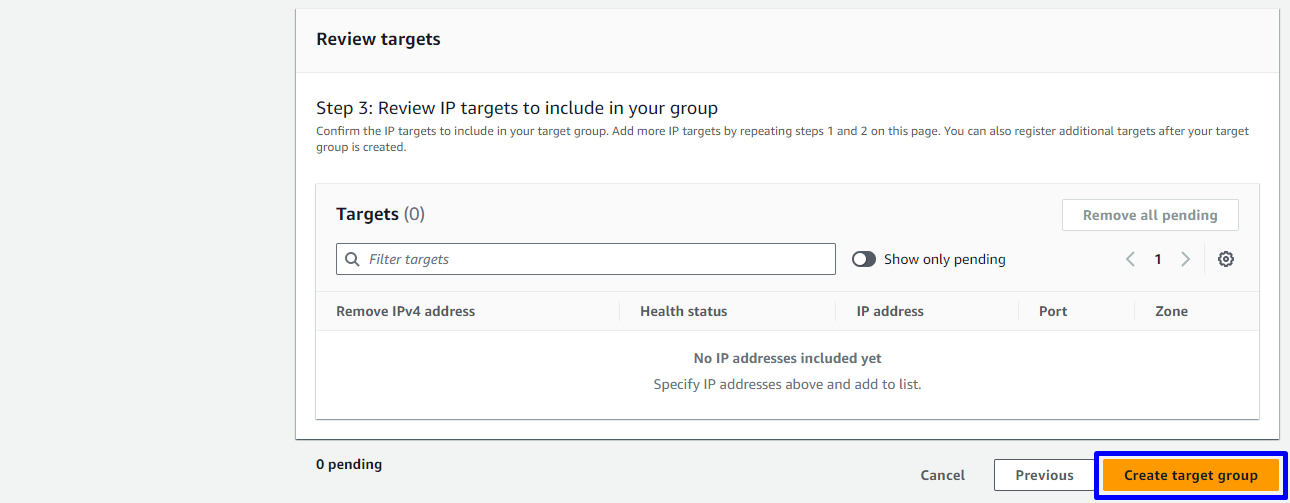
- Không cần đăng ký IP vào Target group

1.2. Create Target Group 2 ( Green )
- Choose a target type:
IP addresses - Target group name:
d-tg-green - Protocol:
HTTP - Port:
80 - VPC: Chọn default VPC
- Tag: Key:
NameValue:d-tg-green - Các setting khác để như default
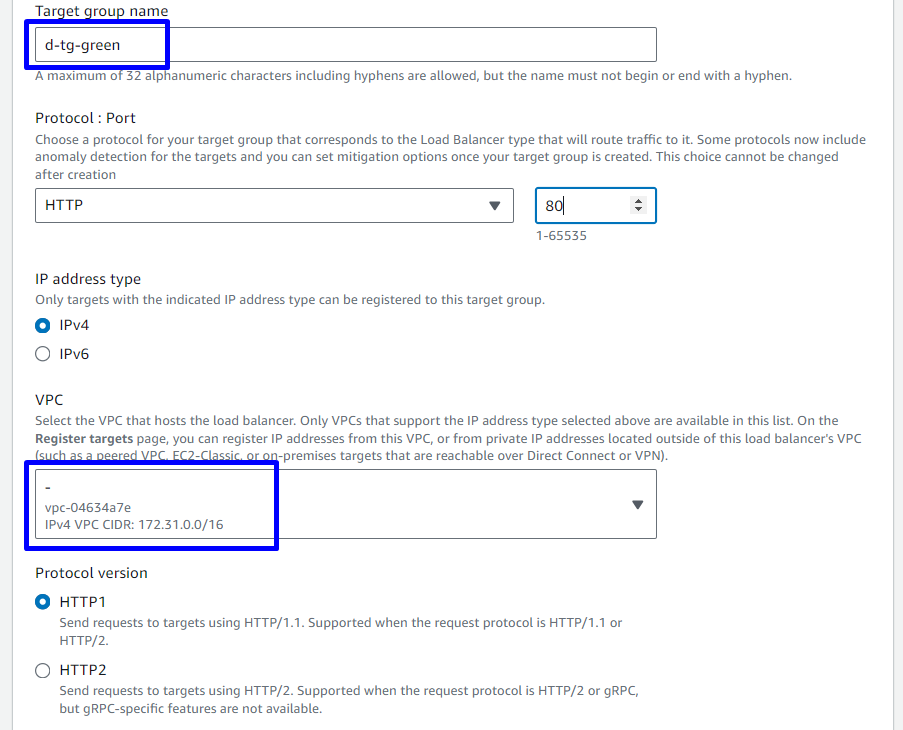
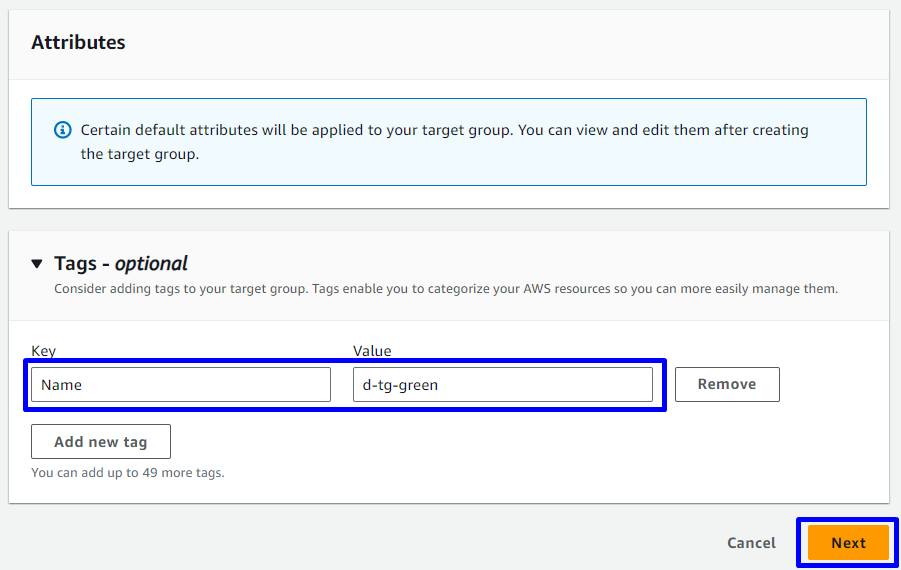
- Nhấn Next
- Không cần đăng ký IP vào Target group
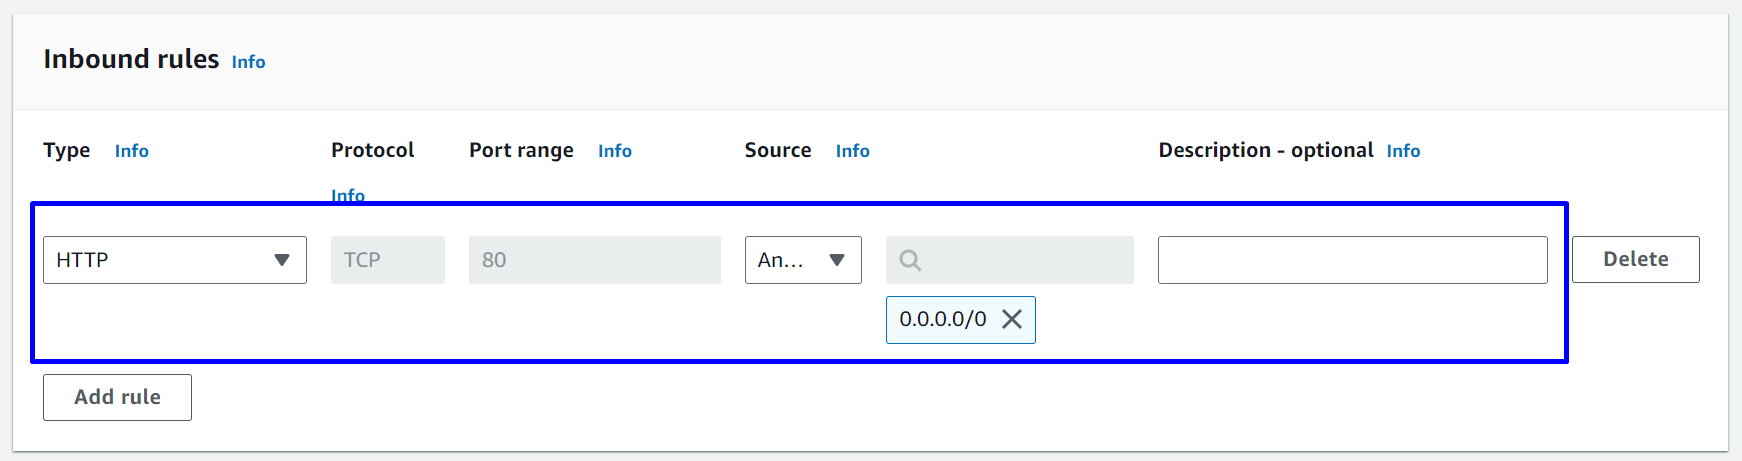
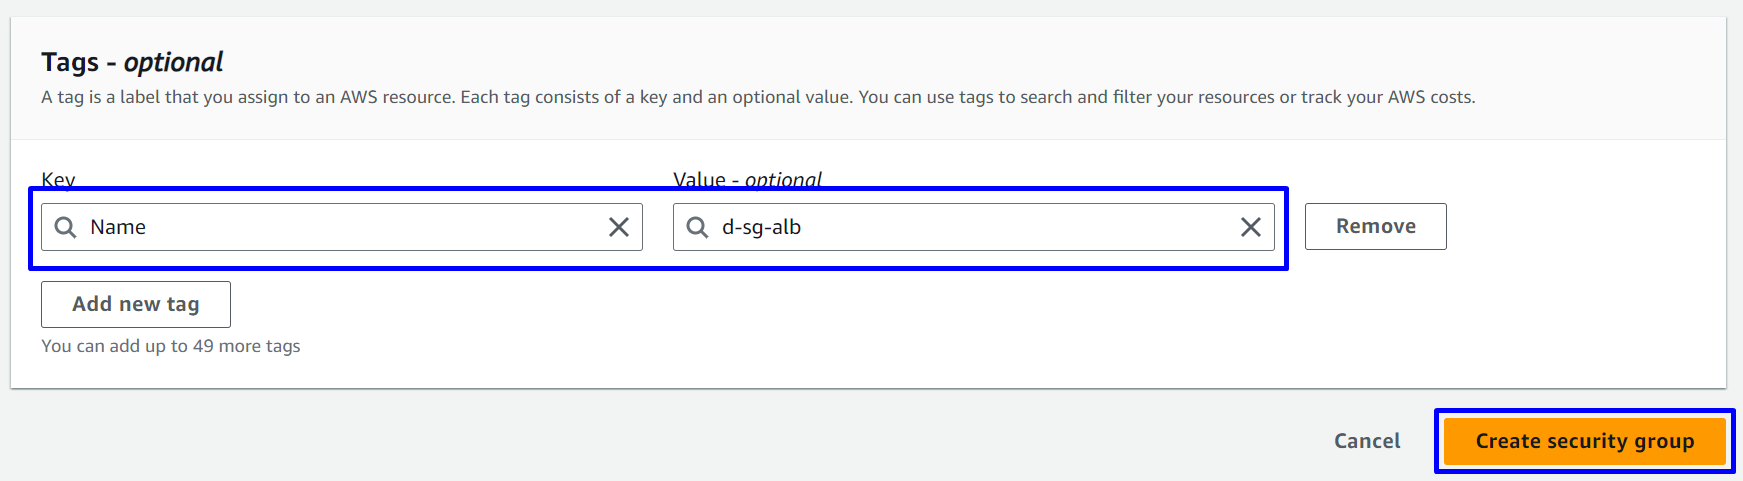
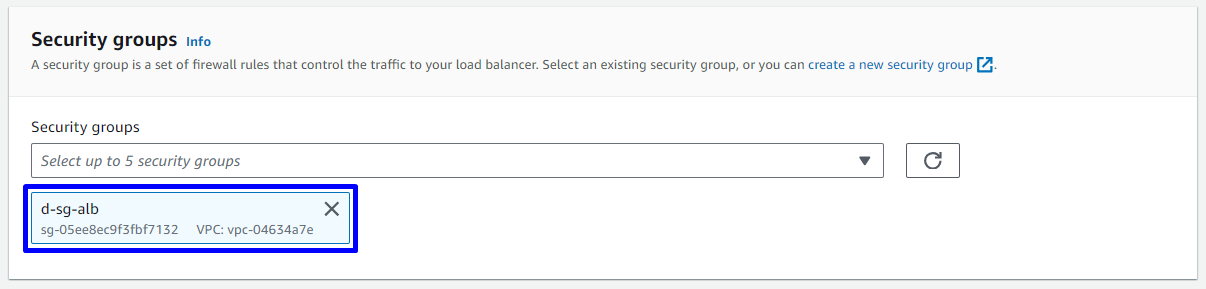
1.3. Create Security group for Application Load Balancer
Nhập các thông tin như trong hình
- Security group name:
d-sg-alb - Description:
Allow http from internet - VPC: chọn Default VPC (nếu như account các bạn có nhiều VPC)
- Inbound rules: Như hình bên dưới
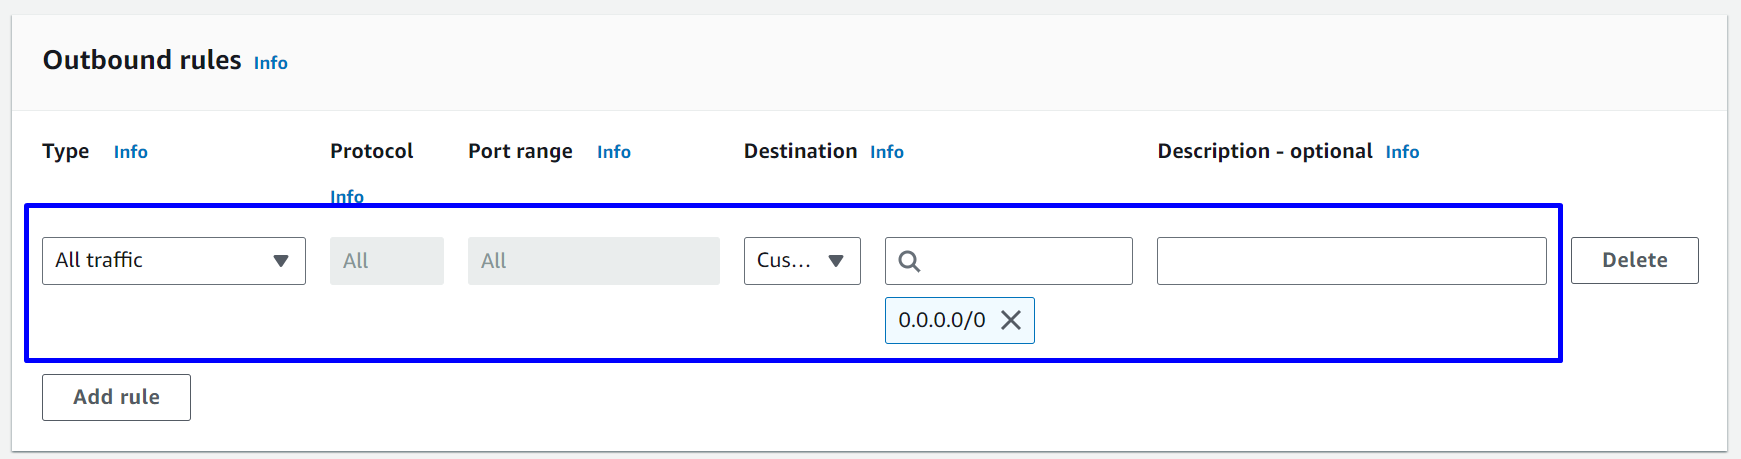
- Outbound rules: Như hình bên dưới
- Tags - optional:
- Key:
Name - value:
d-sg-alb
- Key:

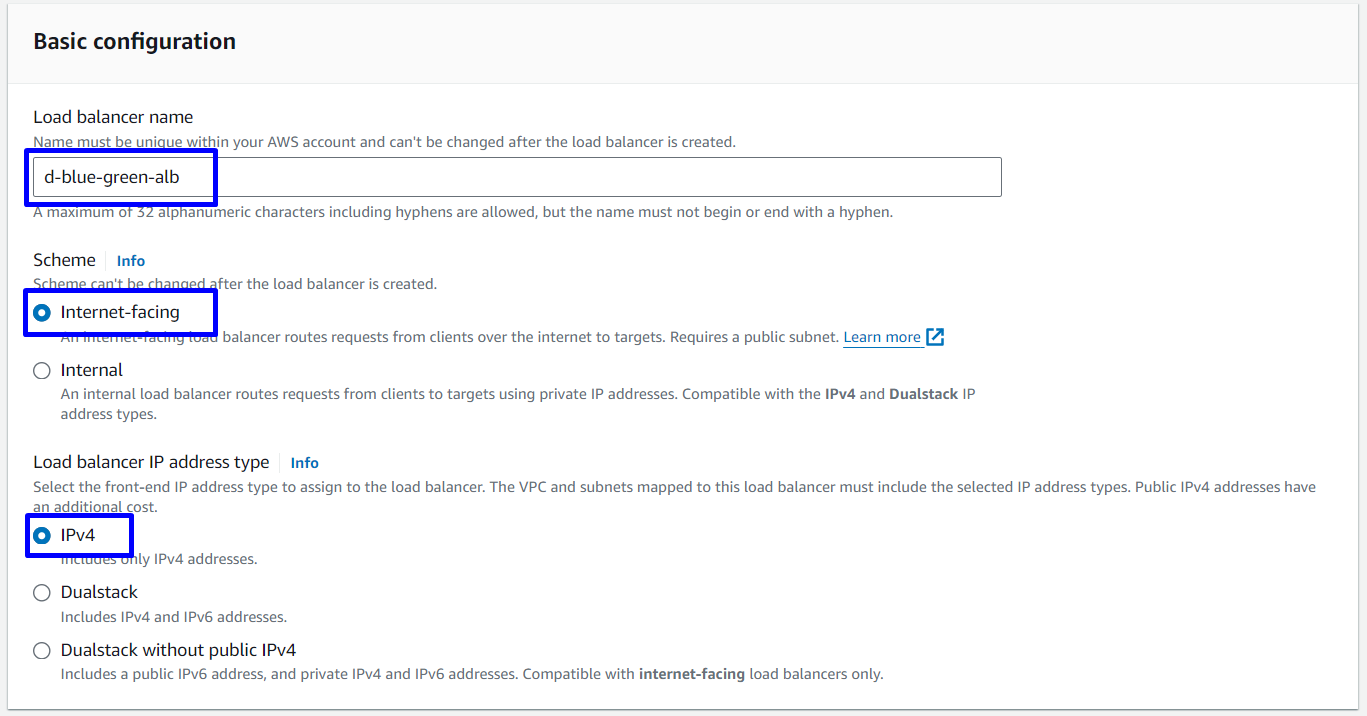
1.4. Create Application Load Balancer
Vào EC2 Console -> Load Balancers -> Nhấn Create load balancer
- Chọn create Application Load Balancer
- Load balancer name:
d-blue-green-alb - Scheme:
Internet-facing - IP address type:
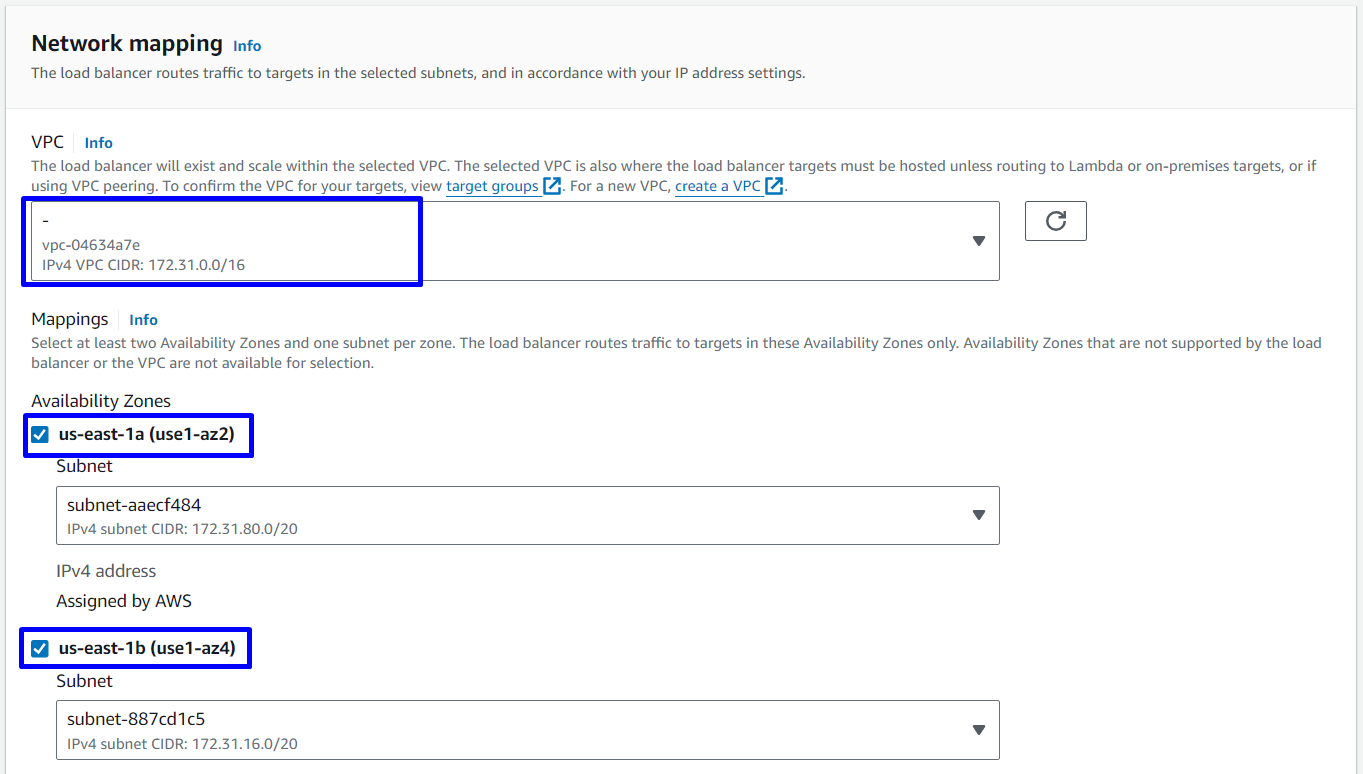
IPv4 - Network mapping
- VPC: Chọn default VPC
- Mappings: Chọn
us-east-1avàus-east-1b - Security groups: Chọn
d-sg-alb
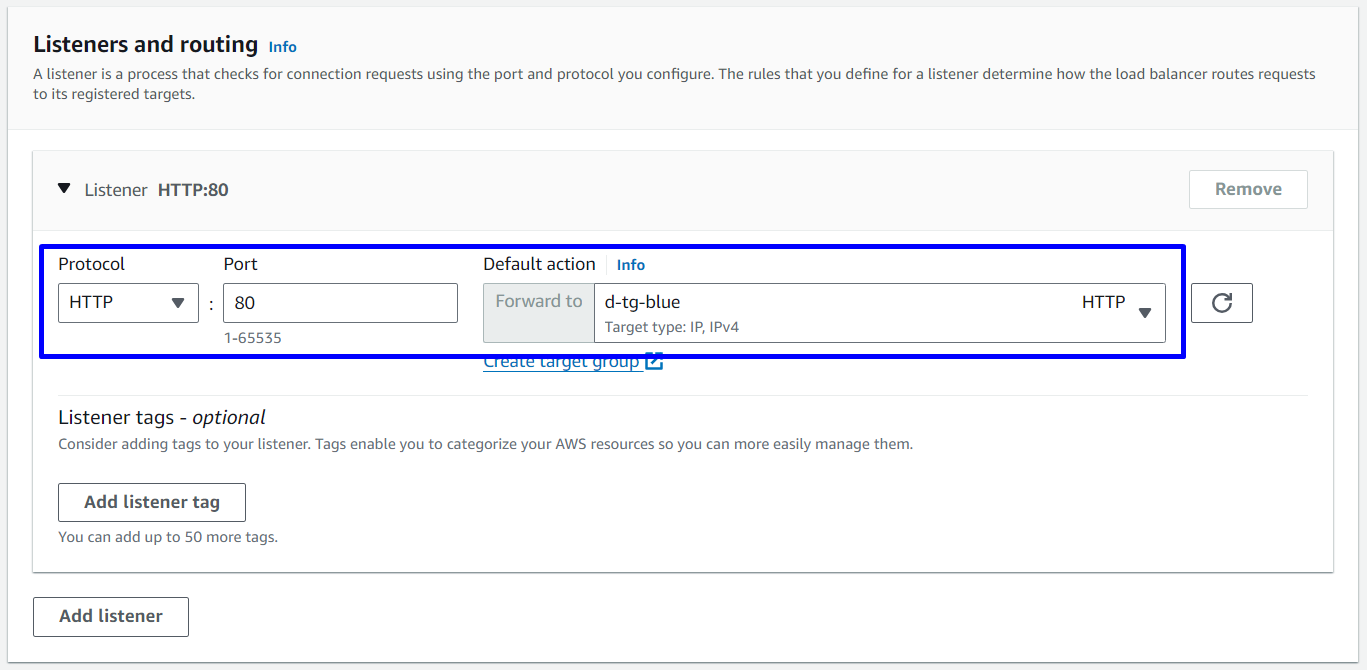
- Listeners and routing
- Protocol:
HTTP - Port:
80 - Default action: Chọn Target group
d-tg-blue
- Protocol:

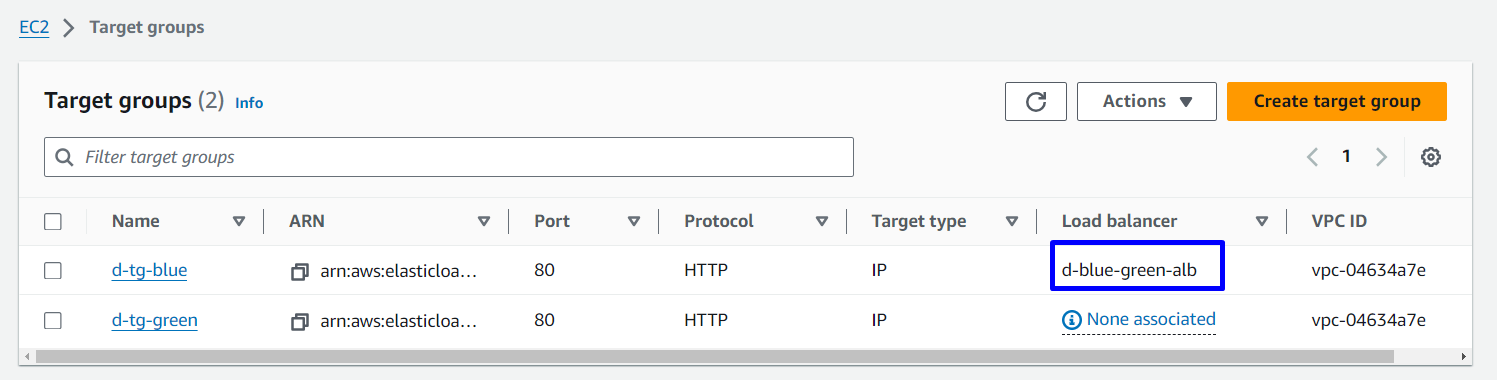
1.5. Confirm Target Group and ALB
ALB đang trỏ đến Target Group d-tg-blue
2. Building and Pushing the Docker Image to ECR With CodeBuild
2.1. Set Up GitHub Repo
Code sample mình để ở Github, mọi người lấy về rồi đẩy lên Github Repo của các bạn nha
- Tải Code sample Tại đây
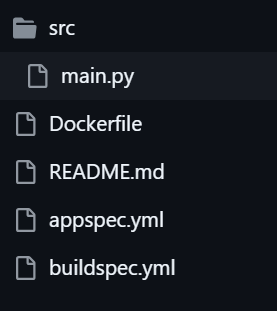
- ① src/main.py: sample code của web app
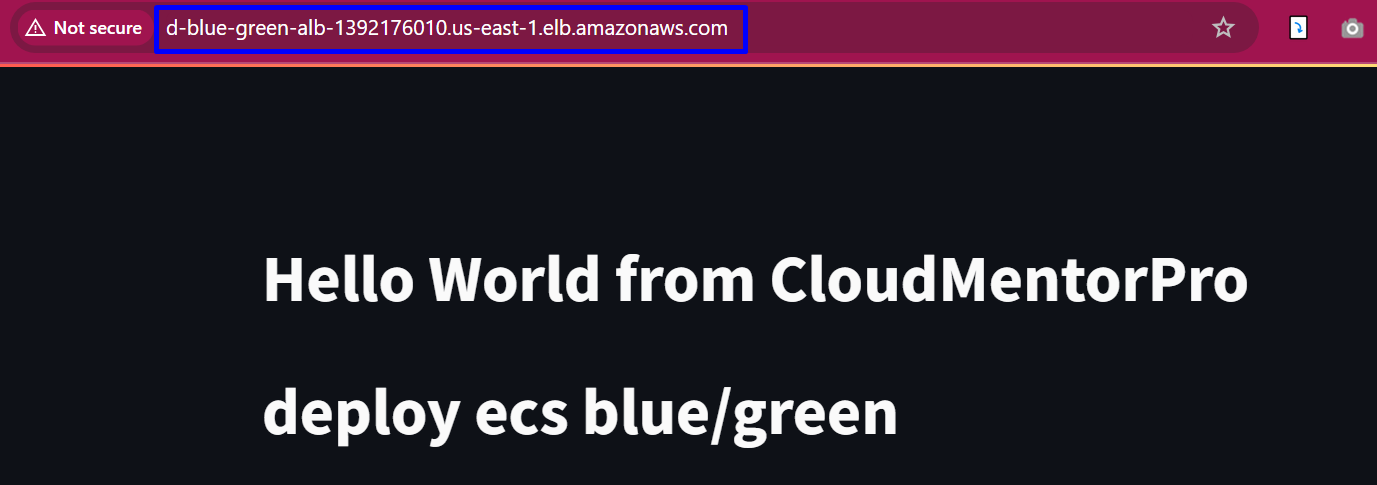
import streamlit as st st.title("Hello World from CloudMentorPro") st.title(" deloy ecs blue/green ") - ② Dockerfile: định nghĩa khi build Docker image
- ③ buildspec.yml: định nghĩa quá trình build với CodeBuild
- ④ taskdef.json: định nghĩa task trong ECS
- ⑤ appspec.yml: định nghĩa quá trình deploy với CodeDeploy
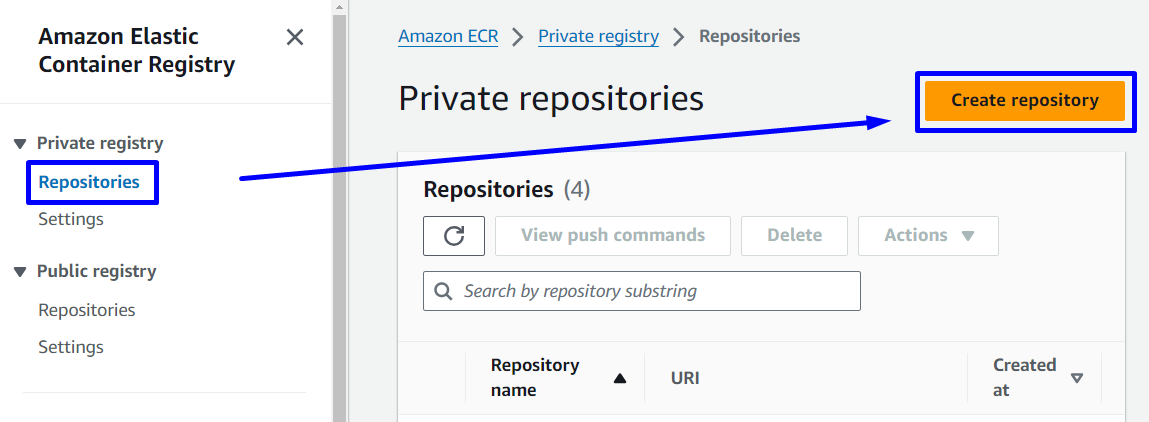
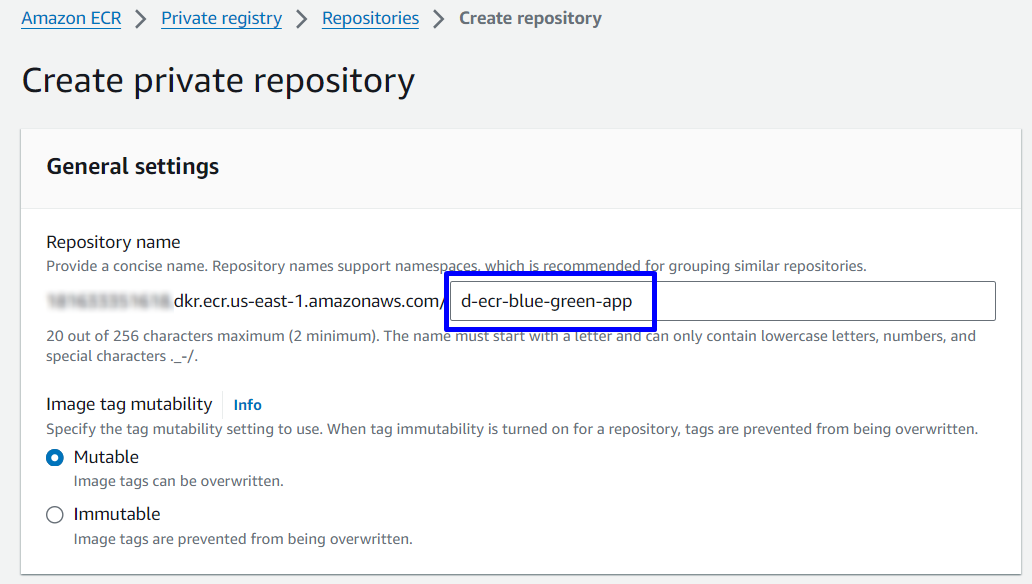
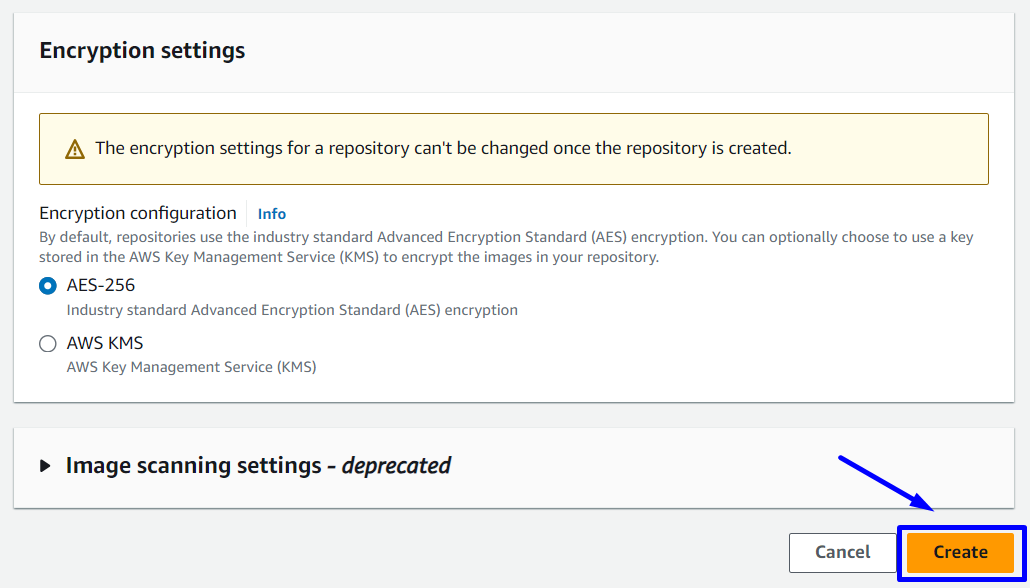
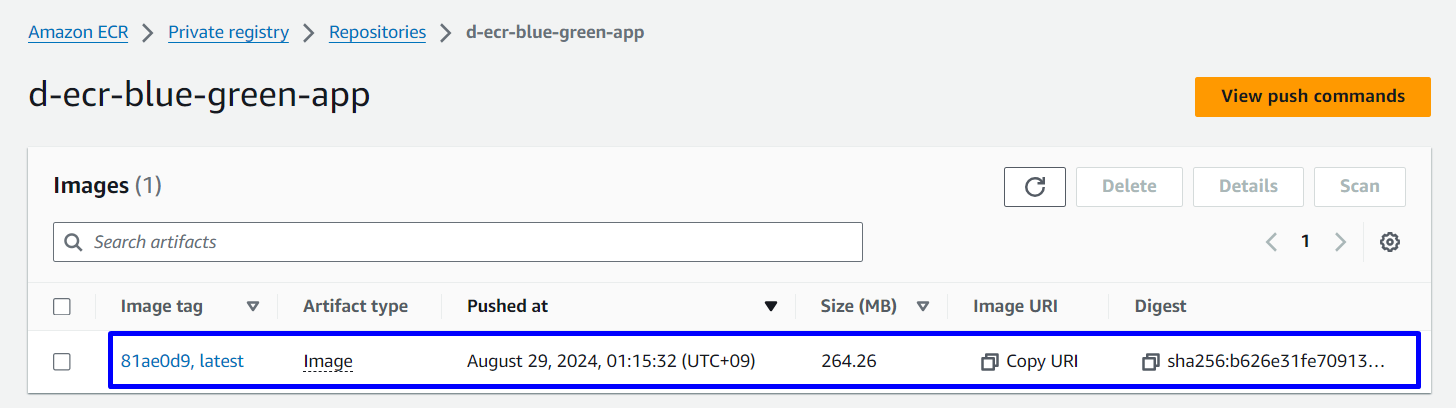
2.2. Create ECR
Tại Amazon Elastic Container Registry Console -> Repositories -> Create repository
- Repository name:
d-ecr-blue-green-app
2.3 Review buildspec.yml
Chú ý: confirm ECR_REPOSITORY_URI phải matching với ECR Repository vừa tạo
buildspec.yml
version: 0.2
phases:
  pre_build:
    commands:
      - export AWS_DEFAULT_REGION=us-east-1
      - AWS_ACCOUNT_ID=$(aws sts get-caller-identity --query Account --output text)
      - aws ecr get-login-password --region "${AWS_DEFAULT_REGION}" | docker login --username AWS --password-stdin "${AWS_ACCOUNT_ID}.dkr.ecr.${AWS_DEFAULT_REGION}.amazonaws.com"
      - ECR_REPOSITORY_URI=$AWS_ACCOUNT_ID.dkr.ecr.us-east-1.amazonaws.com/d-ecr-blue-green-app
      - IMAGE_TAG=$(echo $CODEBUILD_RESOLVED_SOURCE_VERSION | cut -c 1-7)
      - echo "ECR_REPOSITORY_URI is ${ECR_REPOSITORY_URI}"
      - echo "AWS_ACCOUNT_ID is ${AWS_ACCOUNT_ID}"
      - echo "IMAGE_TAG is ${IMAGE_TAG}"

  build:
    commands:
    - echo "Building Docker image"
    - docker build -t $ECR_REPOSITORY_URI:latest .
    - echo "Tagging Docker image with commit ID"
    - docker tag $ECR_REPOSITORY_URI:latest $ECR_REPOSITORY_URI:$IMAGE_TAG

  post_build:
    commands:
      - echo "Pushing Docker images"
      - docker push ${ECR_REPOSITORY_URI}:latest
      - docker push ${ECR_REPOSITORY_URI}:$IMAGE_TAG
      - printf '{"Version":"1.0","ImageURI":"%s"}' "${ECR_REPOSITORY_URI}:${IMAGE_TAG}" > imageDetail.json

artifacts:
    files:
      - imageDetail.json
      - appspec.yml
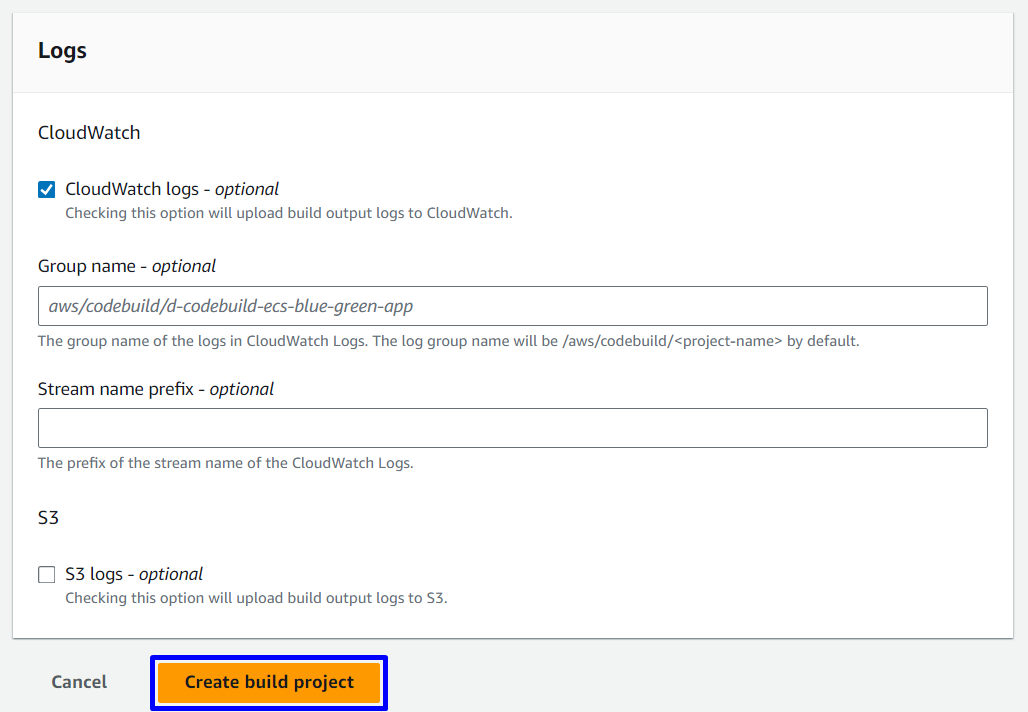
2.4. Create CodeBuild project
Tại CodeBuild Console -> Build projects -> Create project
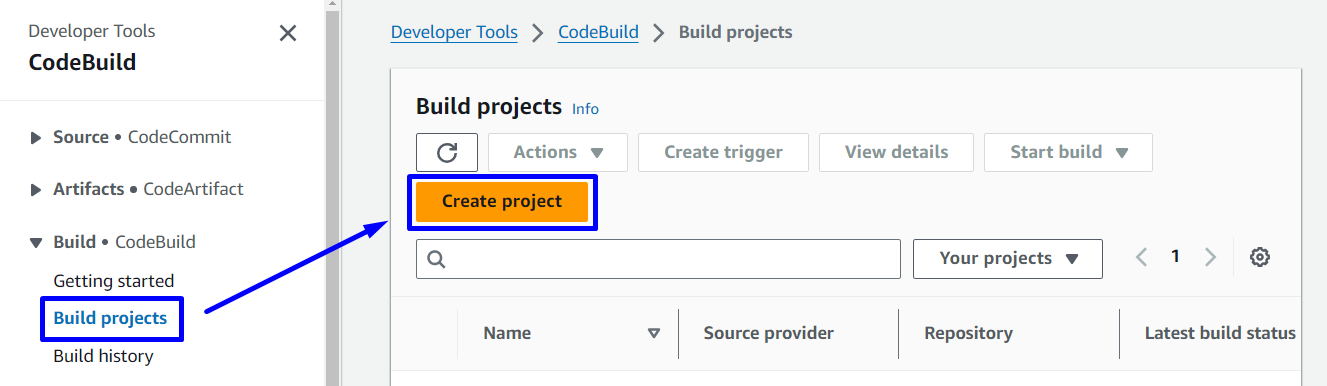
- Project name:
d-codebuild-ecs-blue-green-app

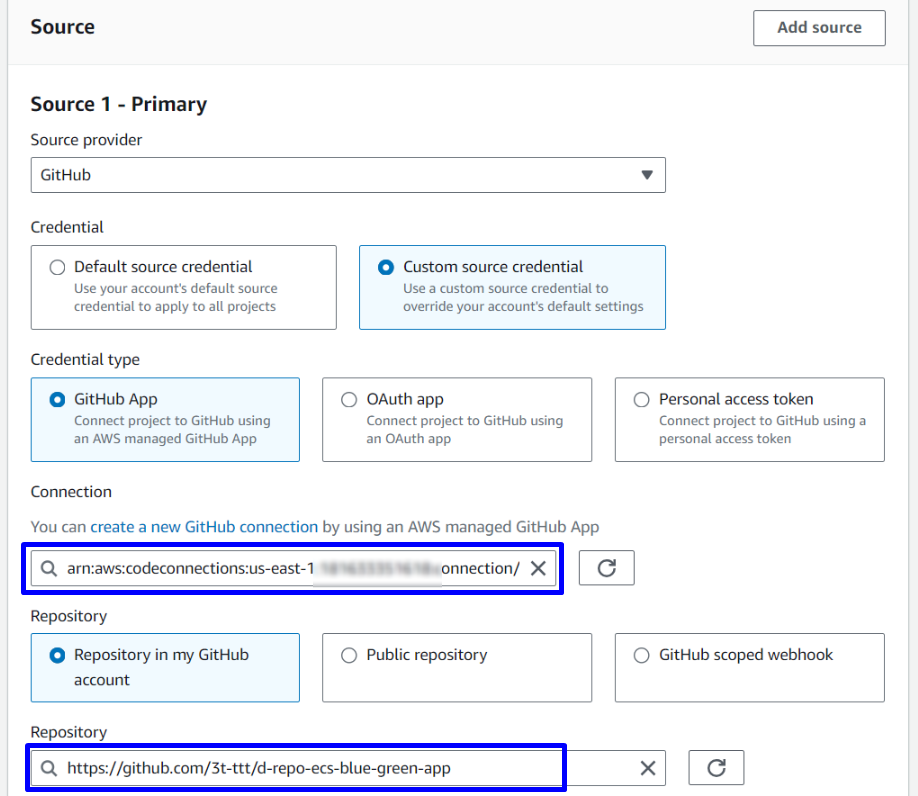
- Source 1 - Primary
- Source provider:
GitHub - Credential:
Custom source credential - Credential type:
GitHub App - Connection:
create a new GitHub connection
- Source provider:

Create GitHub App connection
- Connection name:
ecs-blue-green-connection
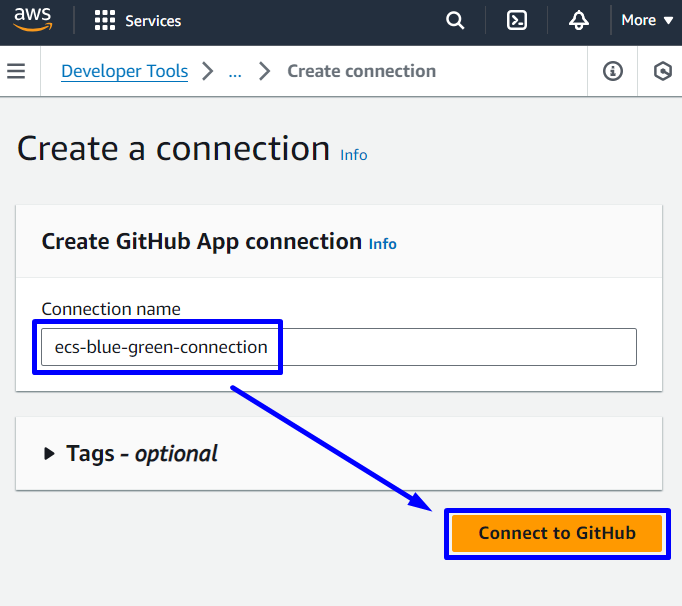
Connect to GitHub
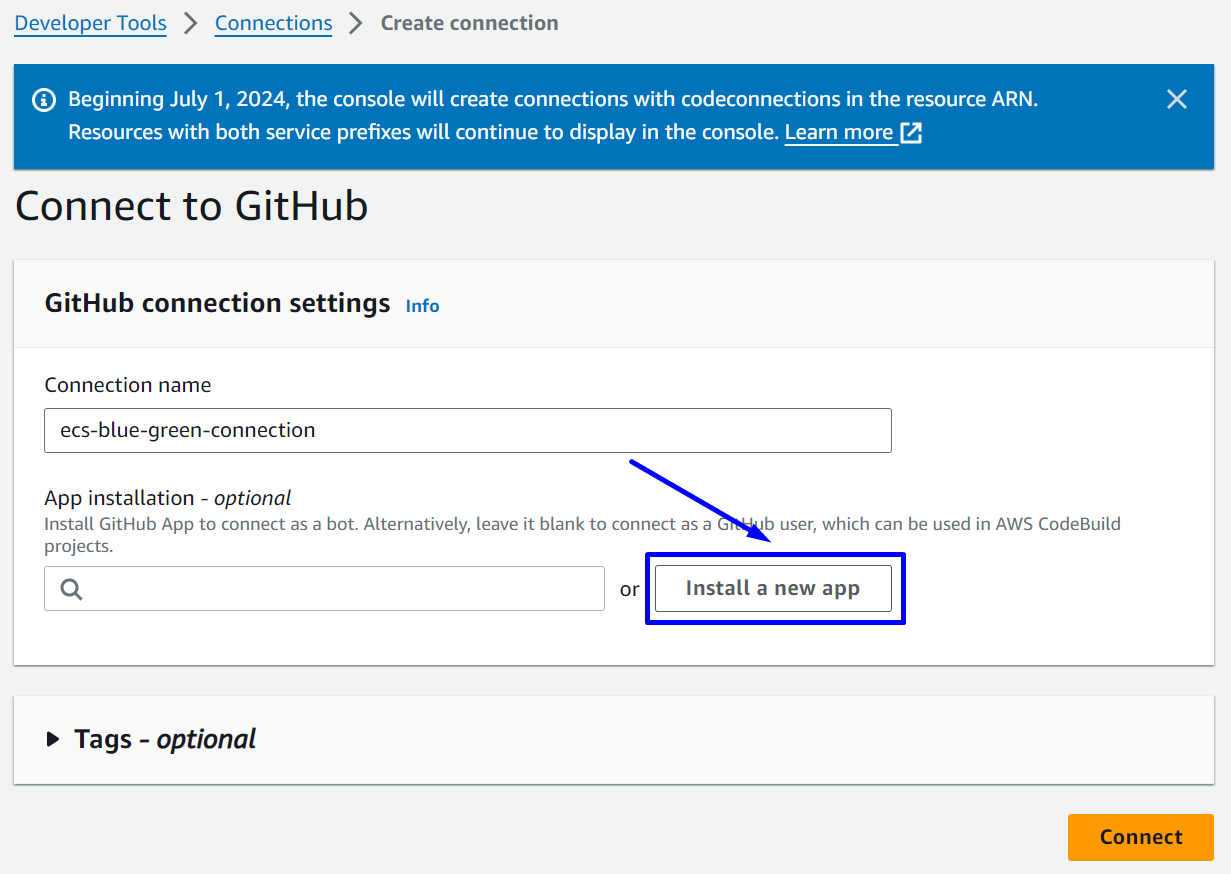
- App installation :
Install a new app
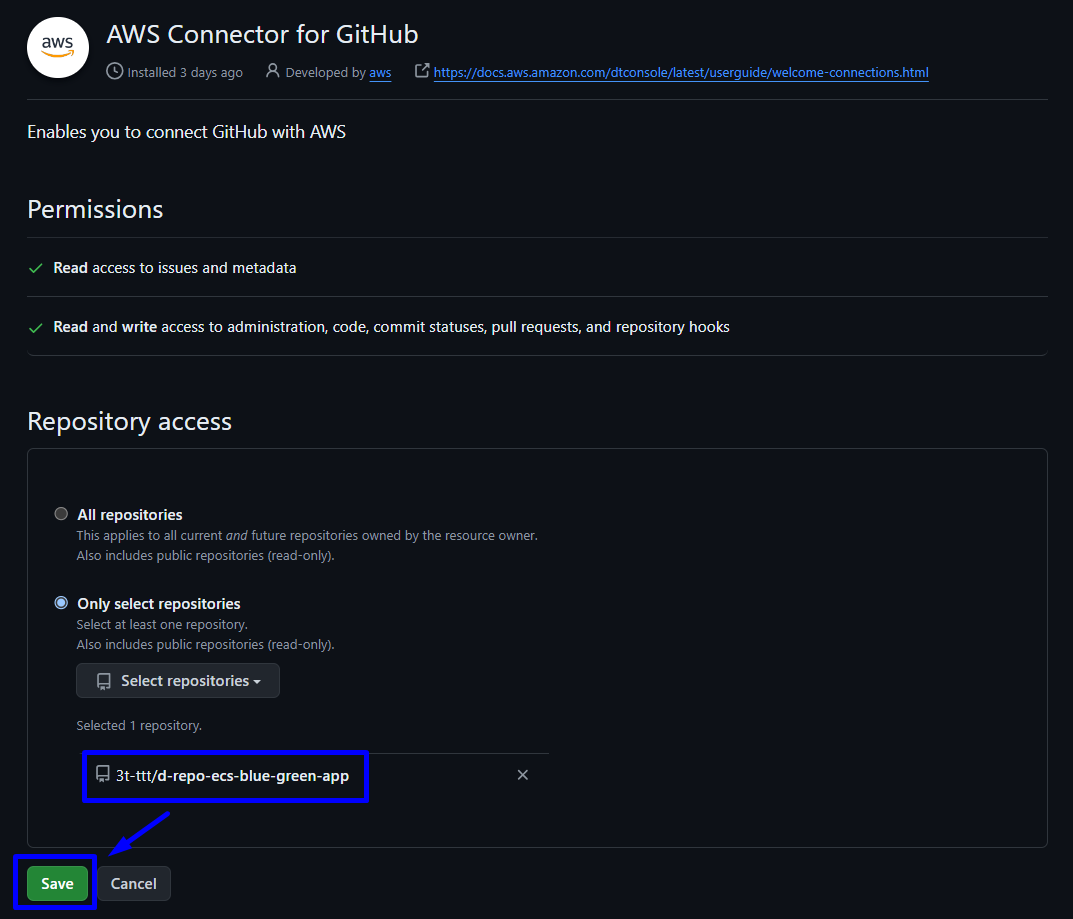
AWS Connector for GitHub
- Repository access : chọn repositoy đã set up ở bước 2.1. Set Up GitHub Repo rồi
Save- Repository của demo này là:
d-repo-ecs-blue-green-app
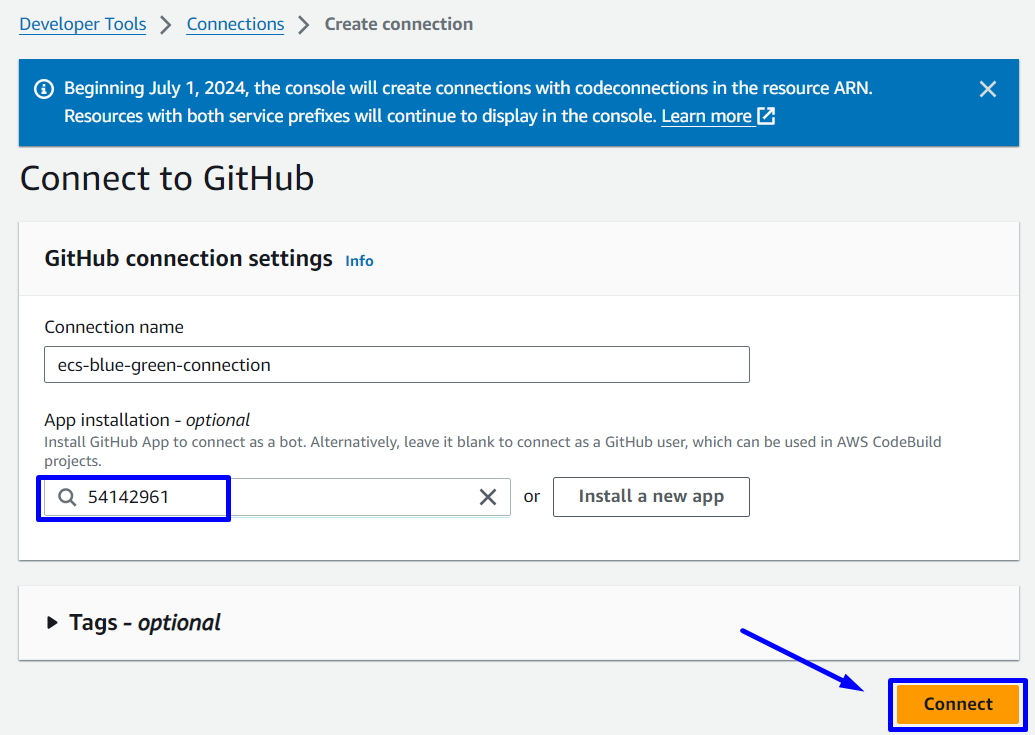
- Repository của demo này là:
Connect to GitHub
Sau khi tạo connection với GitHub thành công, App installation sẽ tự động điền mã số connection, tiếp theo chọn connect
 Tiếp tục với
Source 1 - Primary
- Connection
ecs-blue-green-connection - Repository: Chọn Repository ( demo này là
d-repo-ecs-blue-green-app)
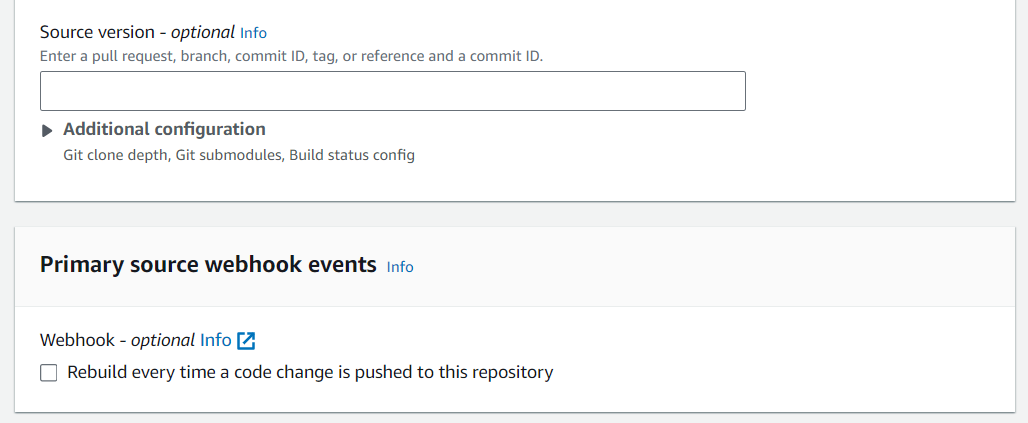
Primary source webhook events
- để default
Environment
- Service role:
New service role - Role name:
d-codebuild-ecs-blue-green-app-Role
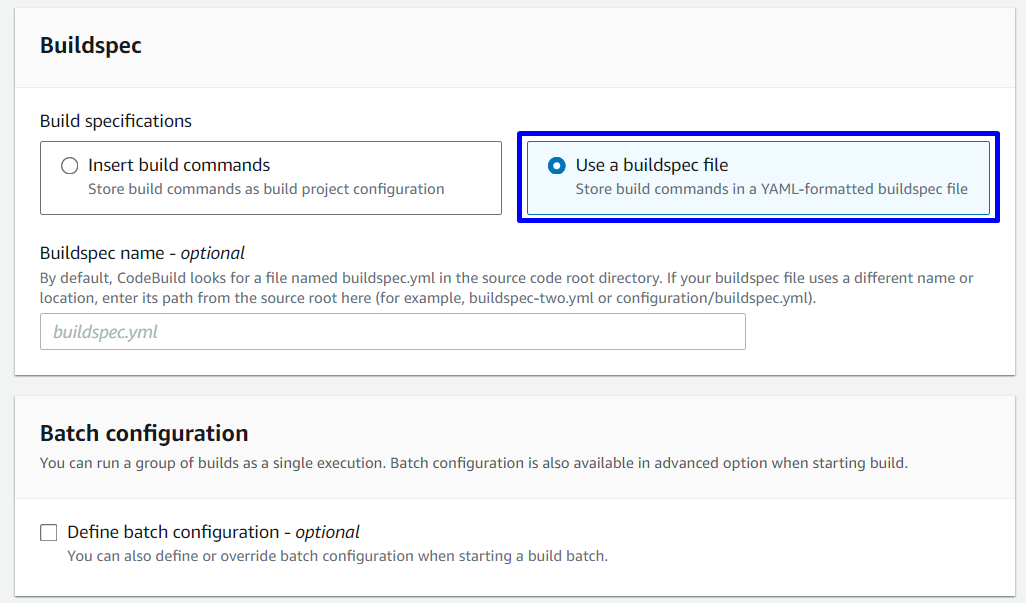
Buildspec
- Buildspec:
Use a buildspec file - Các setting khác để default


Vì trong source code của chúng ta đã có file tên buildspec.yml nên không cần phải ghi rõ tên
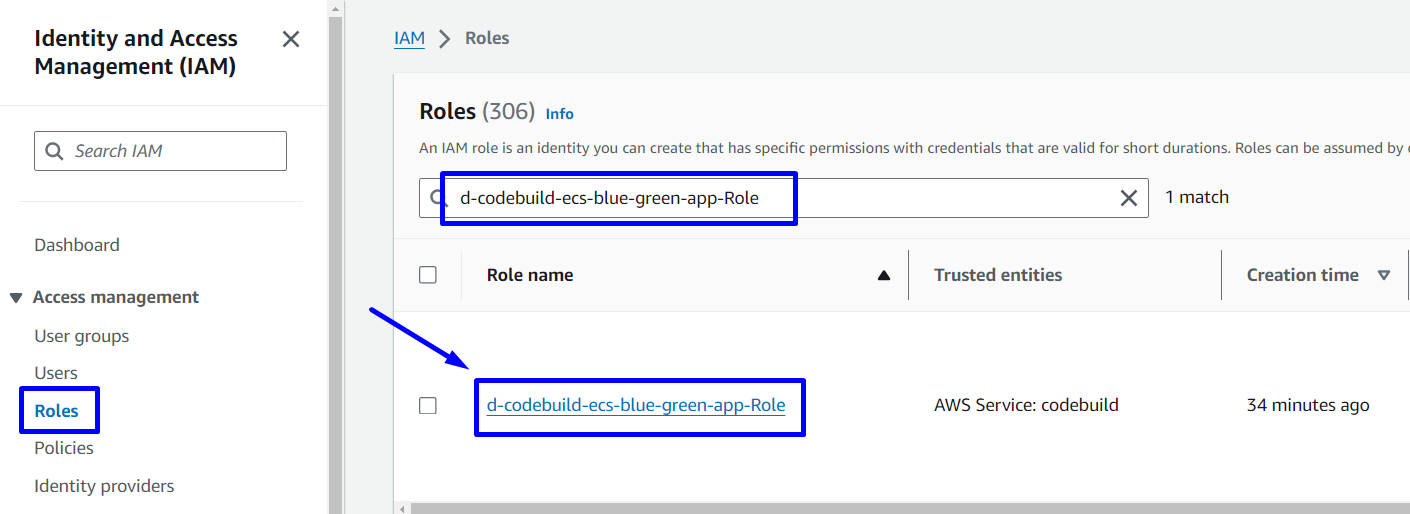
2.5. Add policy AmazonEC2ContainerRegistryPowerUser
Trước khi Start Build, chúng ta cần cấp cho CodeBuild quyền push Docker images đến ECR repositories.
Tại Console IAM, thực hiện attach thêm AmazonEC2ContainerRegistryPowerUser policy vào d-codebuild-ecs-blue-green-app-Rolenhư sau:

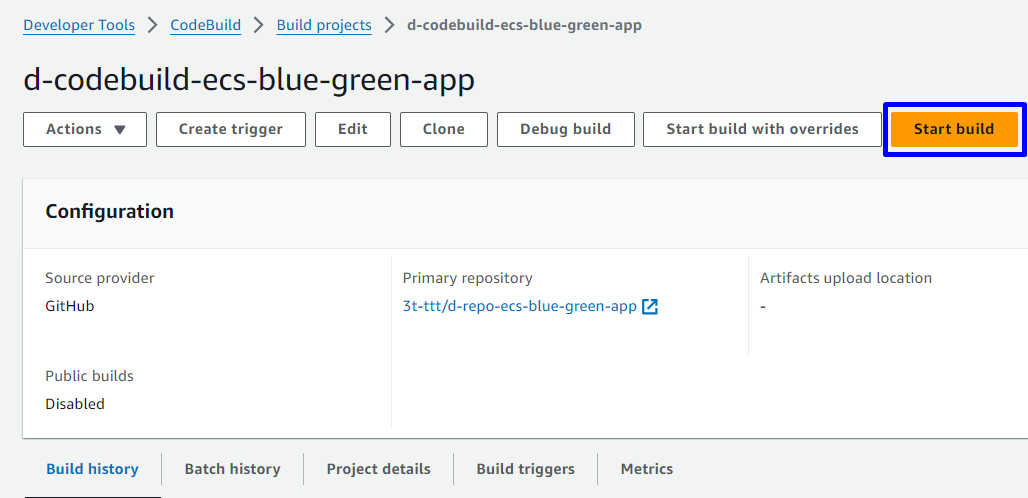
2.6. Test Building and Pushing the Docker Image to ECR
Click Start build
Quá trình build hoàn tất thành công và chúng ta có thể xem log cụ thể nhưng gì được chạy (Nội dung trong file buildspec.yml)
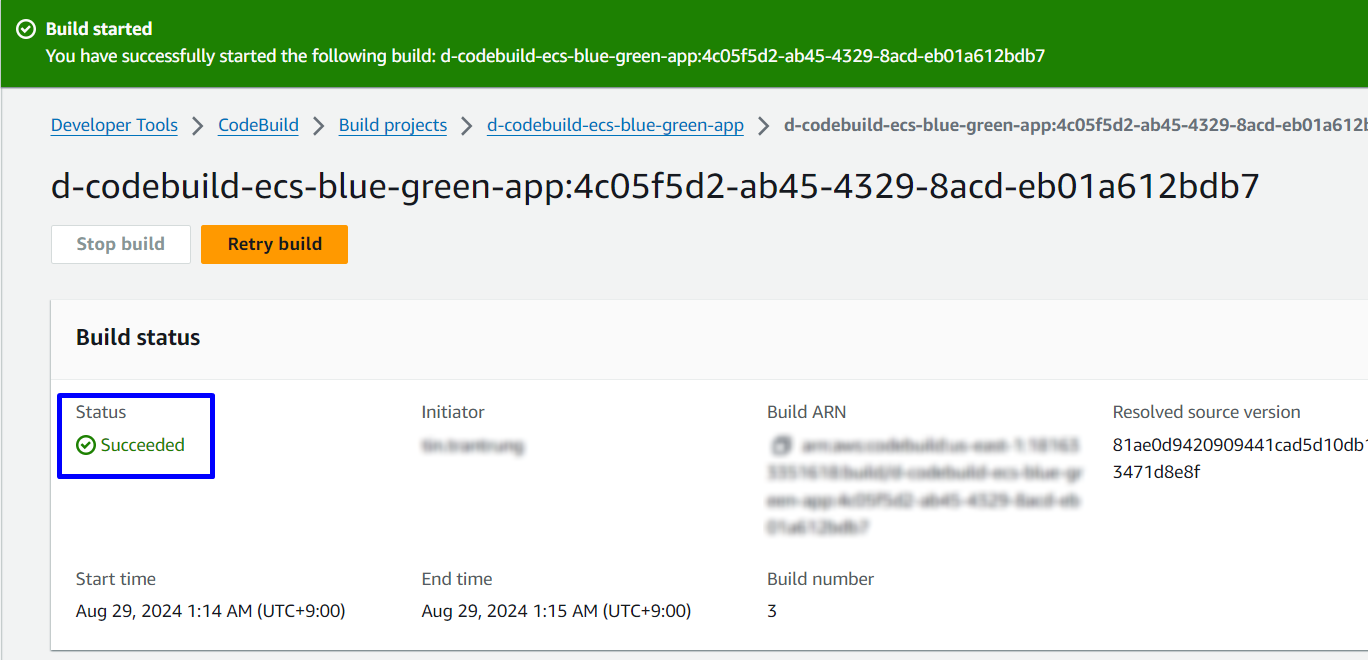
Docker Image đã được build và push lên ECR Repository thành công
3. Create ECS-Fargate with Blue/green deployment type
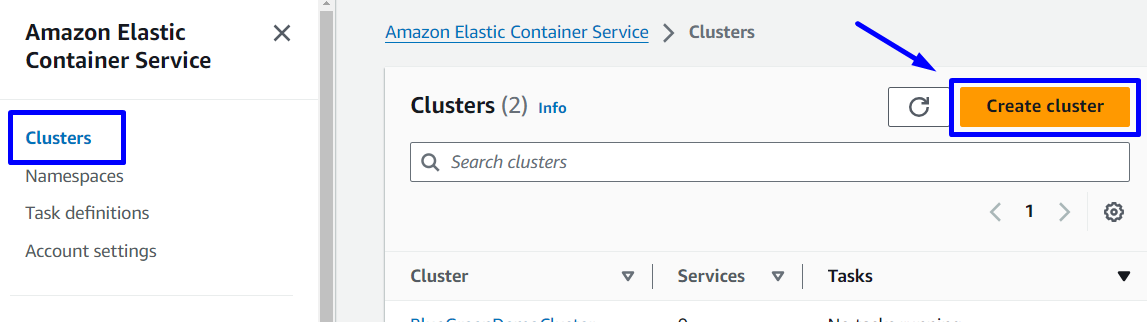
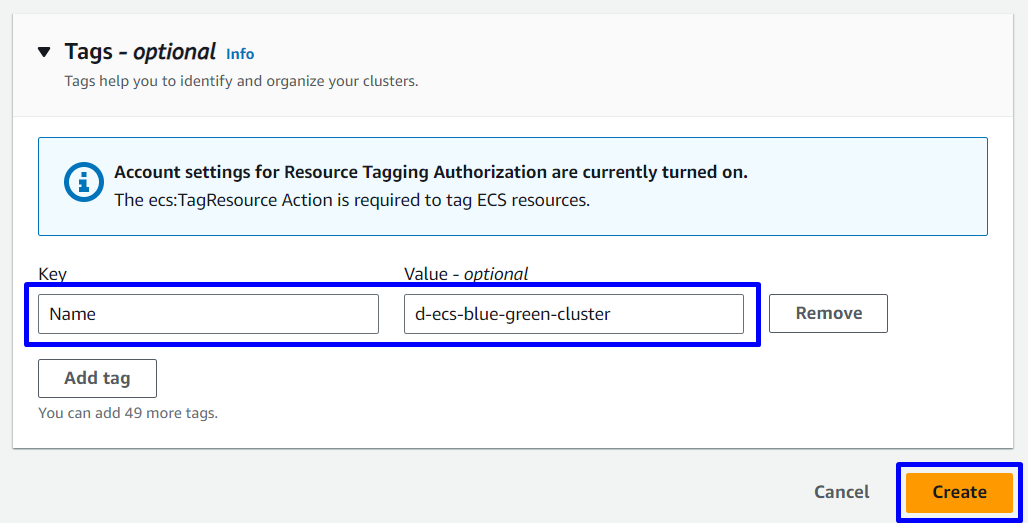
3.1. Create ECS Cluster
Vào Console Elastic Container Service -> Chọn Cluster -> Create cluster
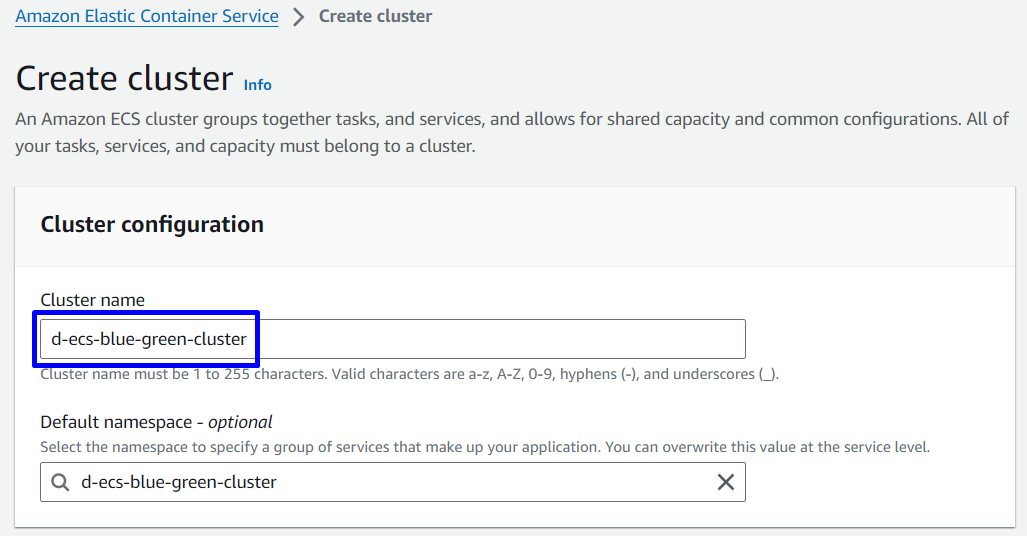
- Cluster configuration
- Cluster name:
d-ecs-blue-green-cluster
- Cluster name:
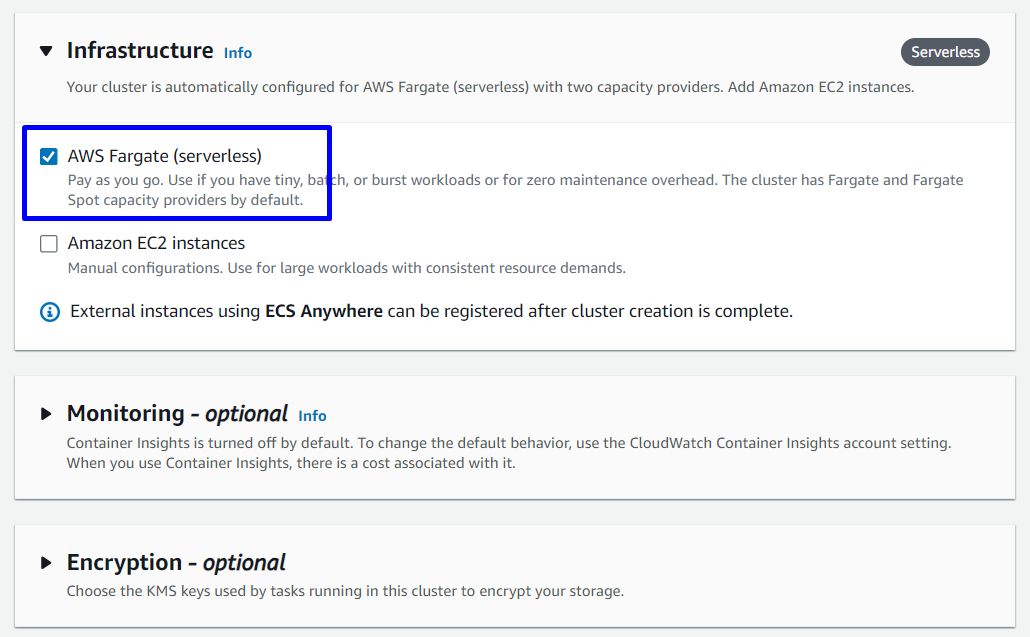
- Infrastructure:
AWS Fargate (serverless) - Tags: Key:
Name, Value:d-ecs-blue-green-cluster
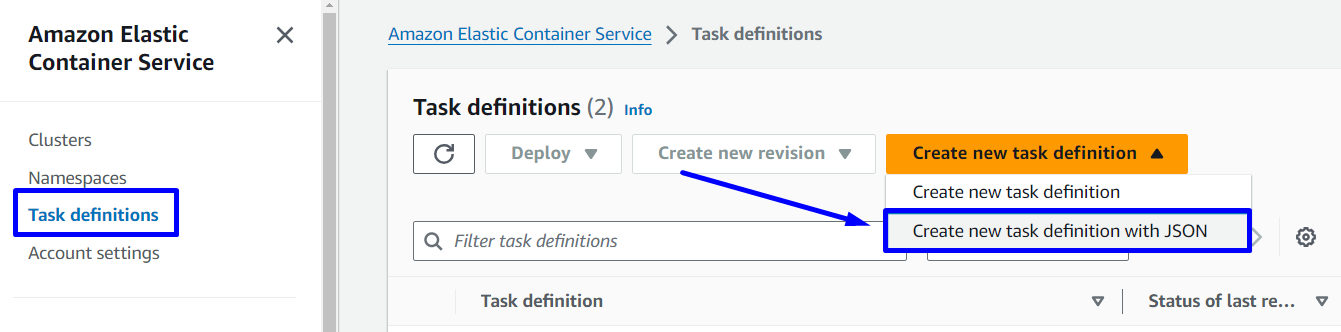
3.2. Create Task definition
Vào Console Elastic Container Service -> Task definitions -> Create new task definition -> Create new task definition with JSON
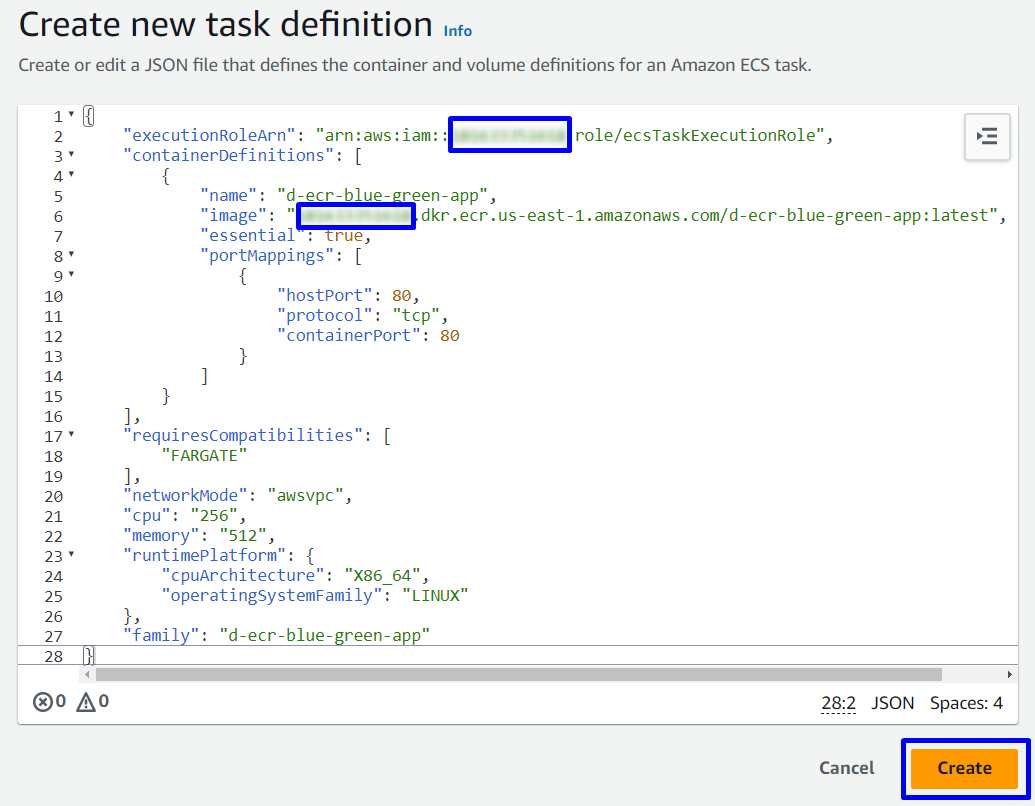
task-definiton.json
{
    "executionRoleArn": "arn:aws:iam::ACCOUNT-NUMBER:role/ecsTaskExecutionRole",
    "containerDefinitions": [
        {
            "name": "d-ecr-blue-green-app",
            "image": "ACCOUNT-NUMBER.dkr.ecr.us-east-1.amazonaws.com/d-ecr-blue-green-app:latest",
            "essential": true,
            "portMappings": [
                {
                    "hostPort": 80,
                    "protocol": "tcp",
                    "containerPort": 80
                }
            ]
        }
    ],
    "requiresCompatibilities": [
        "FARGATE"
    ],
    "networkMode": "awsvpc",
    "cpu": "256",
    "memory": "512",
    "runtimePlatform": {
        "cpuArchitecture": "X86_64",
        "operatingSystemFamily": "LINUX"
    },
    "family": "d-ecr-blue-green-app"
}
Chú ý review lại task-definiton.json:
- executionRoleArn: update ACCOUNT-NUMBER
- image: chọn 1 trong 2 cách sau
- Cách 1: Update ACCOUNT-NUMBER
- Cách 2: Copy URI từ ECR repository và thêm
:latestvào phía sau URI
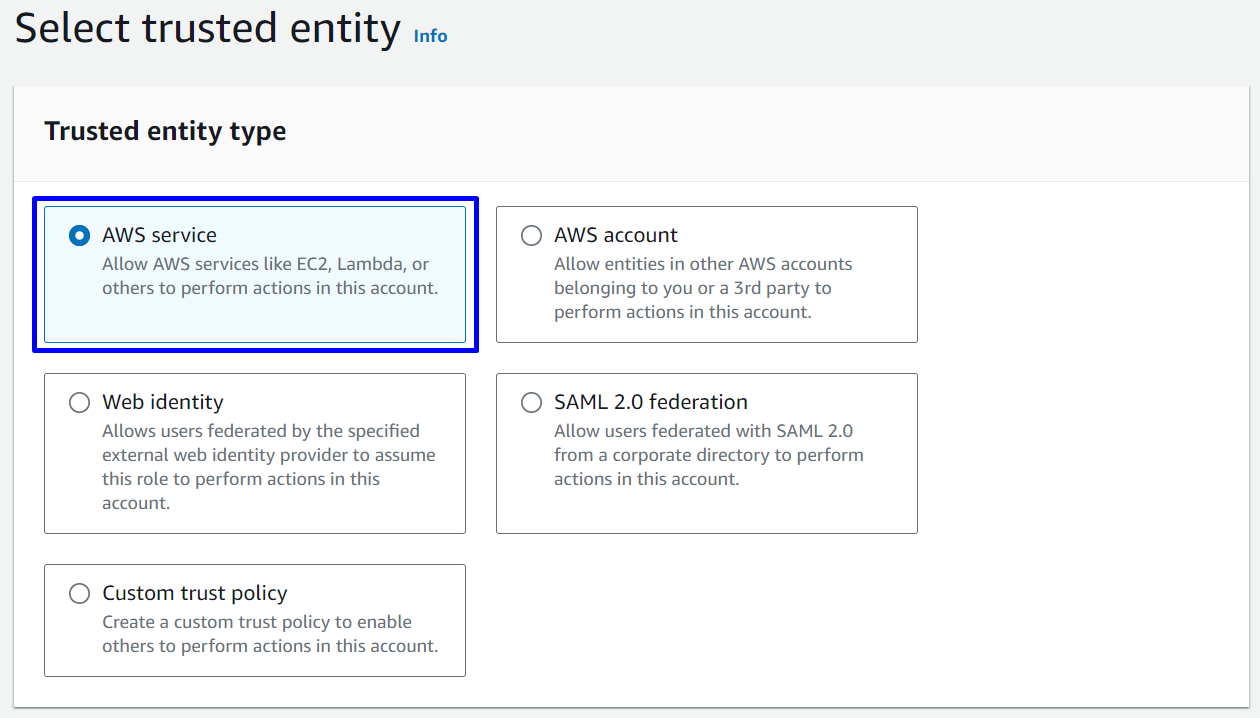
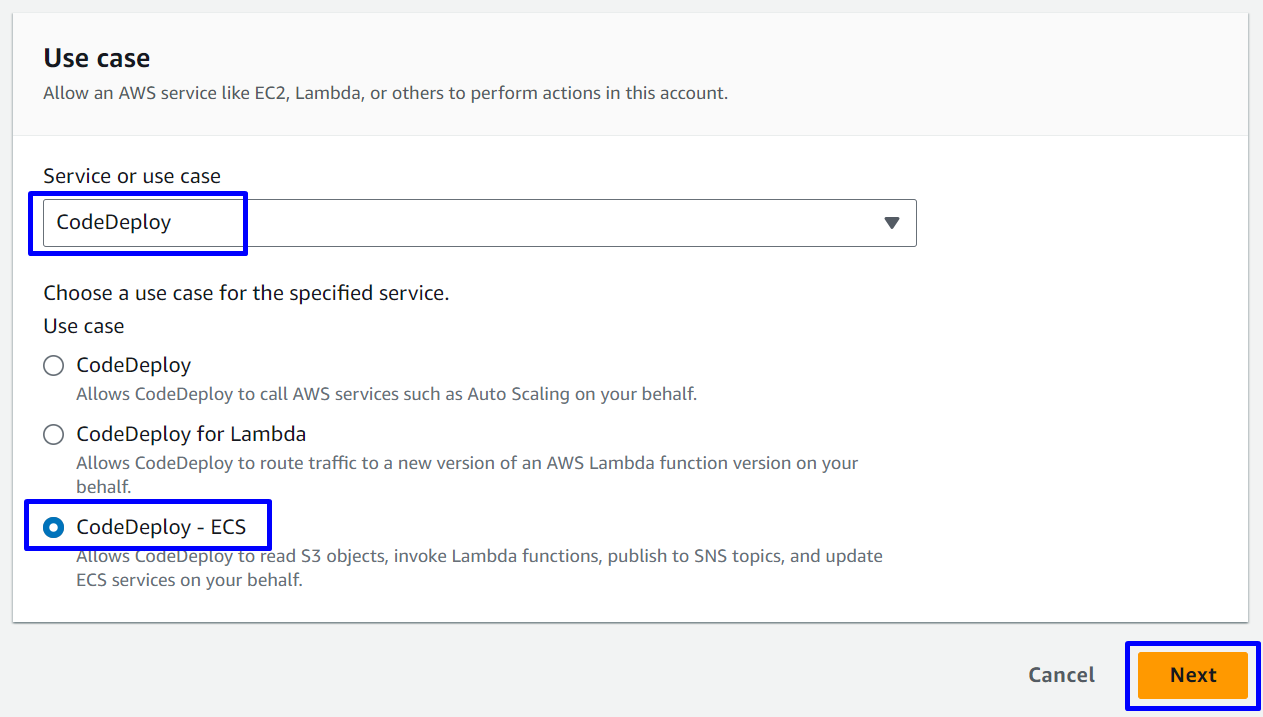
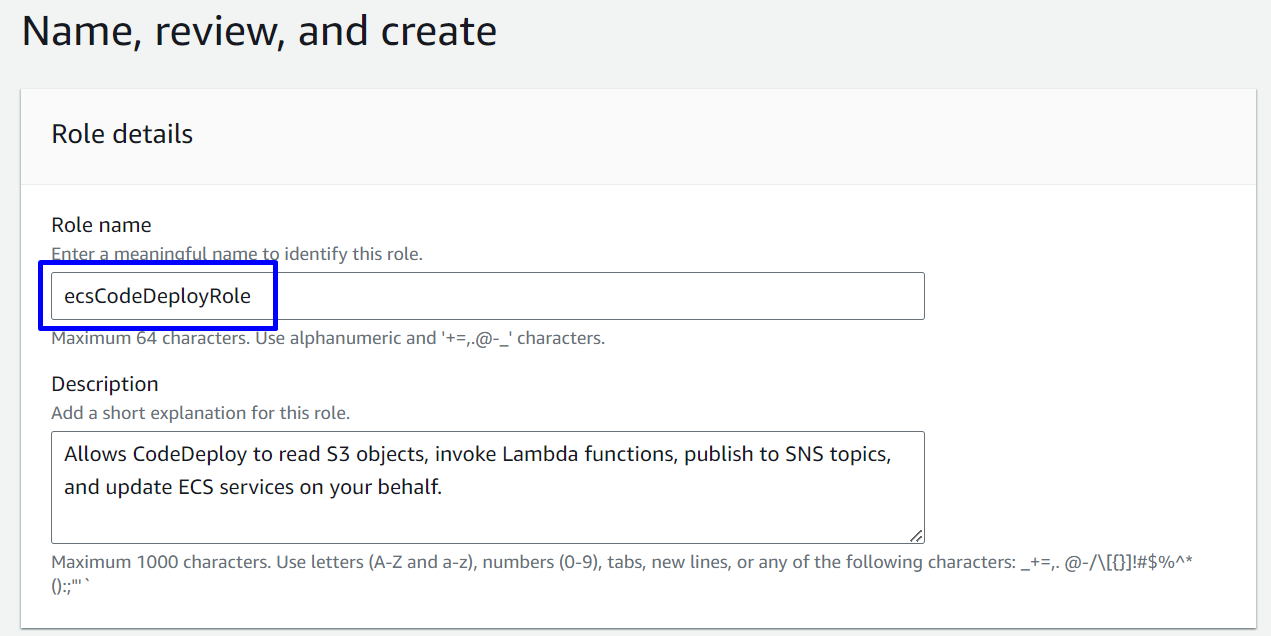
3.3. Create IAM Role for CodeDeploy
Để CodeDeploy làm việc với ECS, cần cấp cho CodeDeploy quyền quản lý và triển khai ứng dụng trên ECS. (AWSCodeDeployRoleForECS policy )
- Trusted entity type :
AWS service - Use case :
- Service or use case:
CodeDeploy - Use case:
CodeDeploy - ECS
- Service or use case:
- Permissions policies :
AWSCodeDeployRoleForECS - Role name :
ecsCodeDeployRole

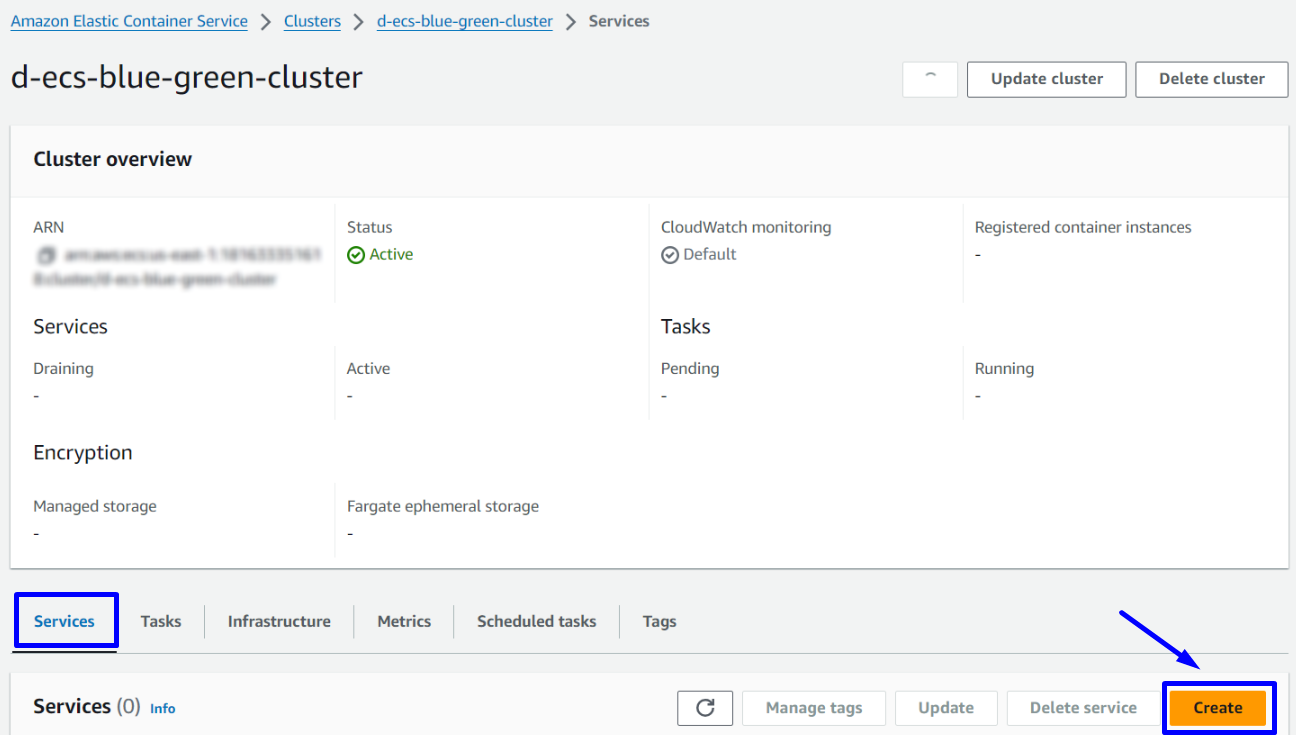
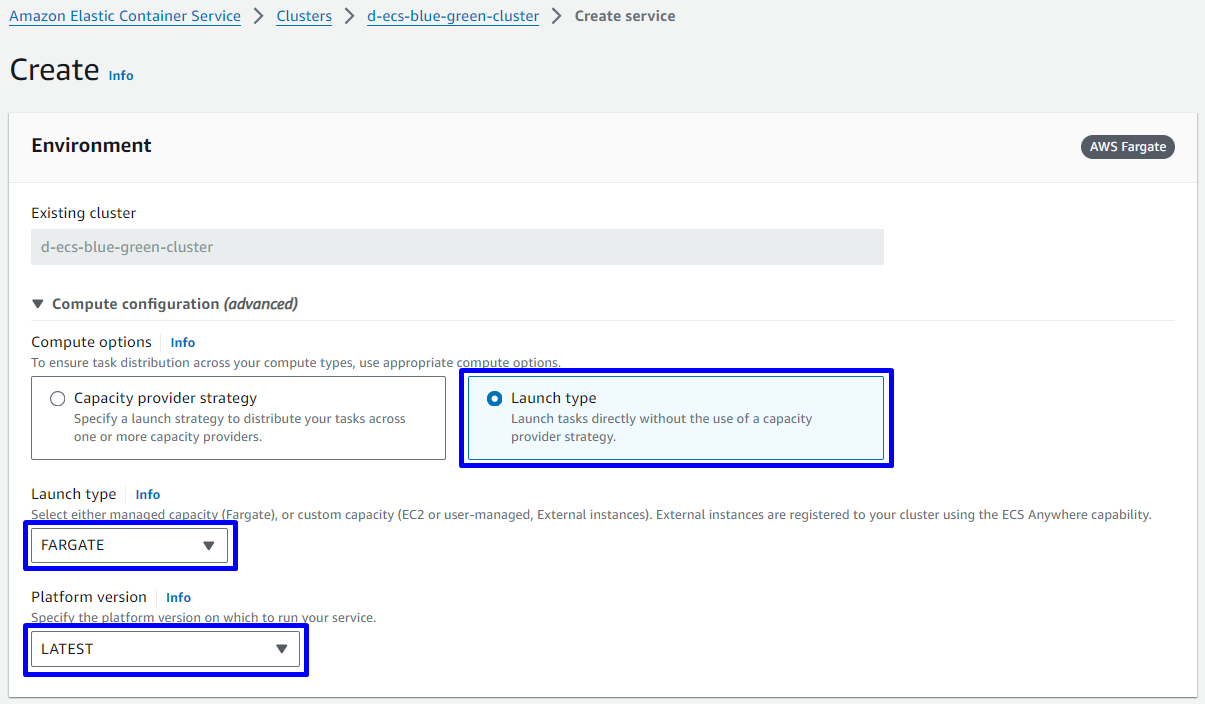
3.4. Create ECS Service
- Vào Console Elastic Container Service -> Clusters -> Chọn
d-ecs-blue-green-cluster - Tại tab Services -> Create
- Environment
- Compute options:
Launch type - Launch type:
FARGATE - Platform version:
LATEST
- Compute options:
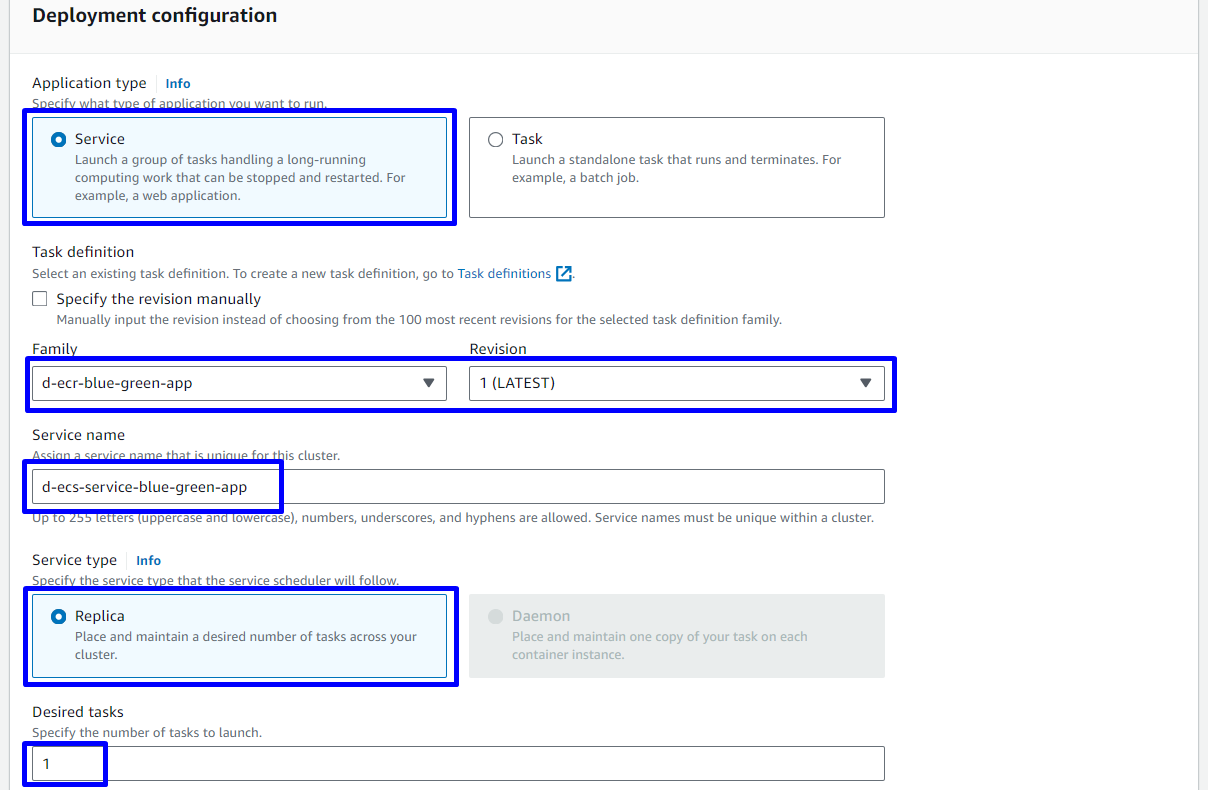
- Deployment configuration
- Application type:
Service - Task definition
- Family:
d-ecr-blue-green-app - Revision:
{No}(LATEST)(Chọn version LATEST)
- Family:
- Service name:
d-ecs-service-blue-green-app - Service type:
Replica - Desired tasks:
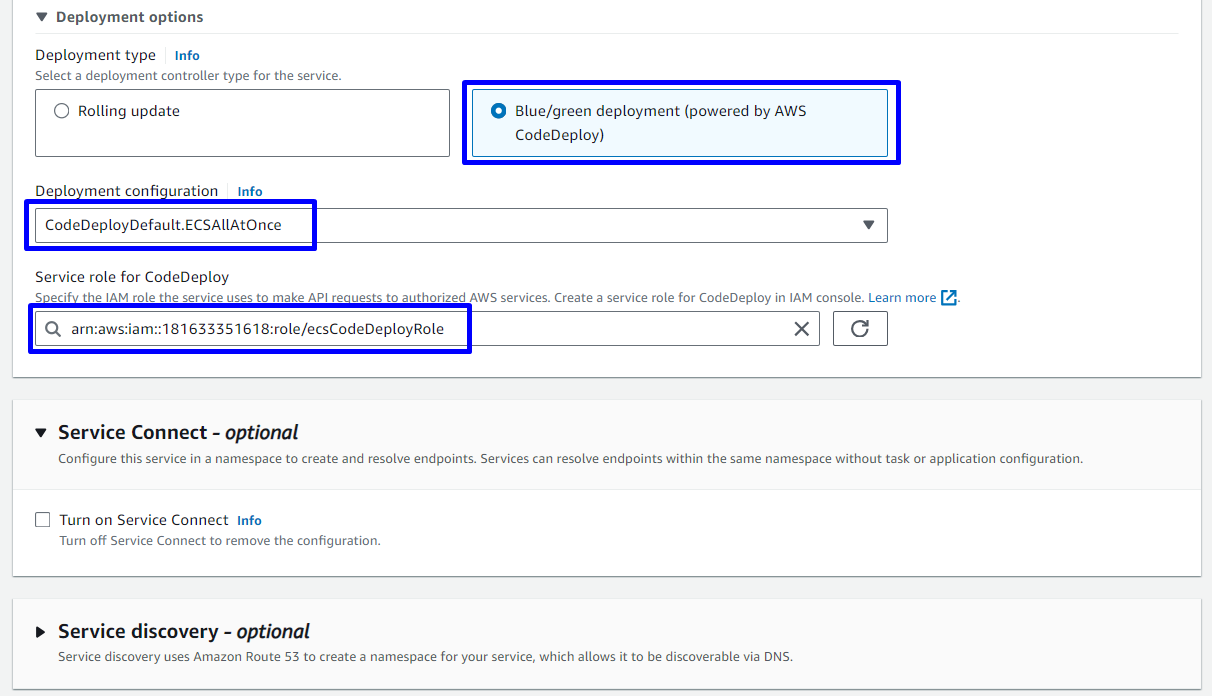
1 - Deployment options:
- Deployment type:
Blue/green deployment (powered by AWS CodeDeploy) - Deployment configuration:
CodeDeployDefault.ECSAllAtOnce - Service role for CodeDeploy:
ecsCodeDeployRole
- Deployment type:
- Application type:
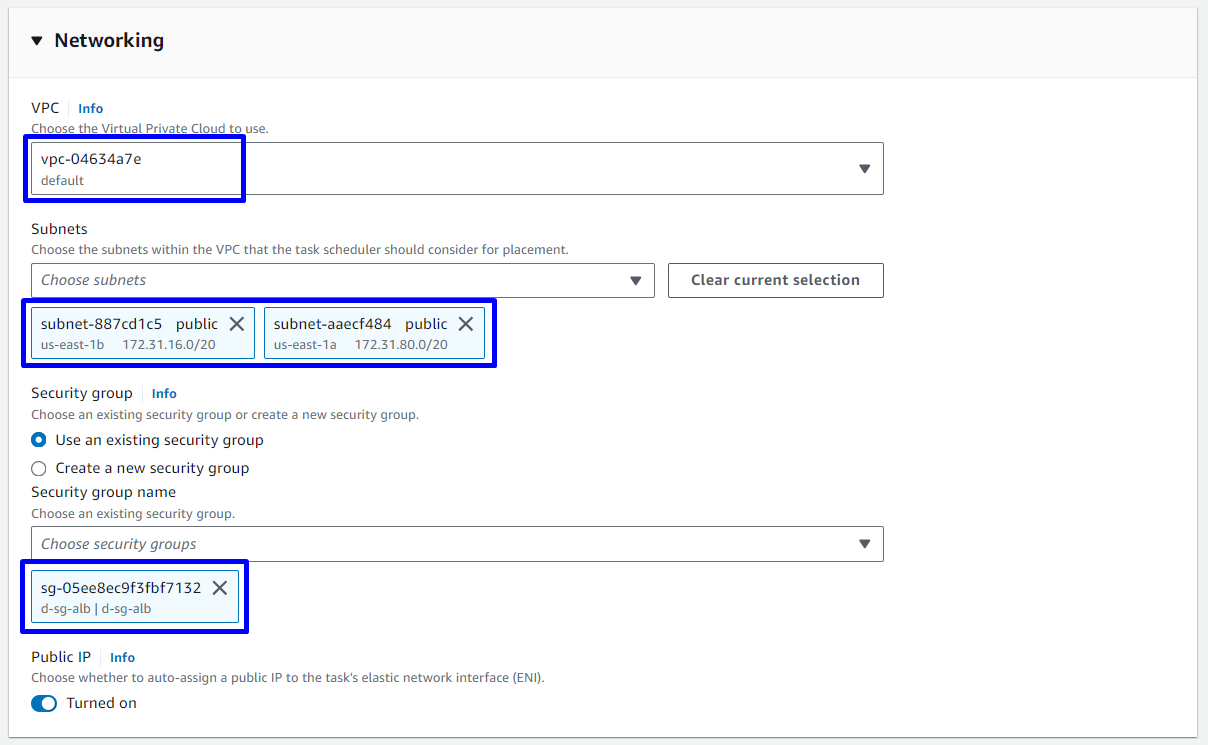
- Networking
- VPC: Chọn default VPC
- Subnets: Chọn
us-east-1avàus-east-1b - Security group: Chọn
d-sg-alb
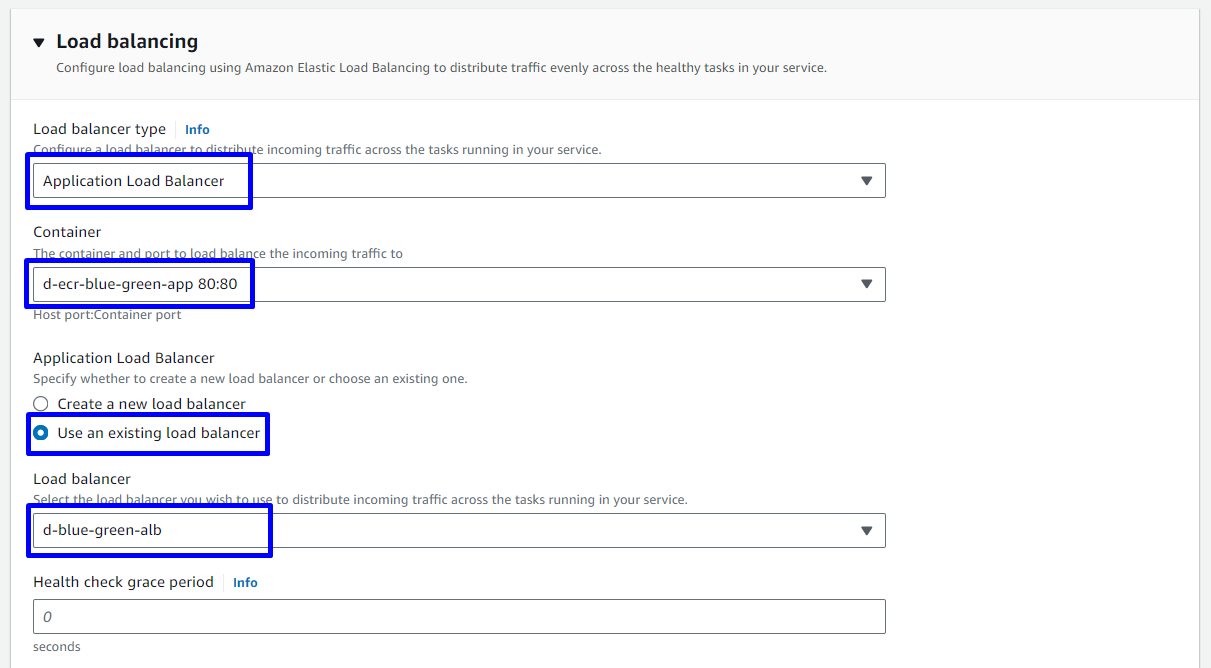
- Load balancing
- Load balancer type:
Application Load Balancer - Container:
d-ecr-blue-green-app 80:80 - Application Load Balancer:
Use an existing load balancer - Load balancer:
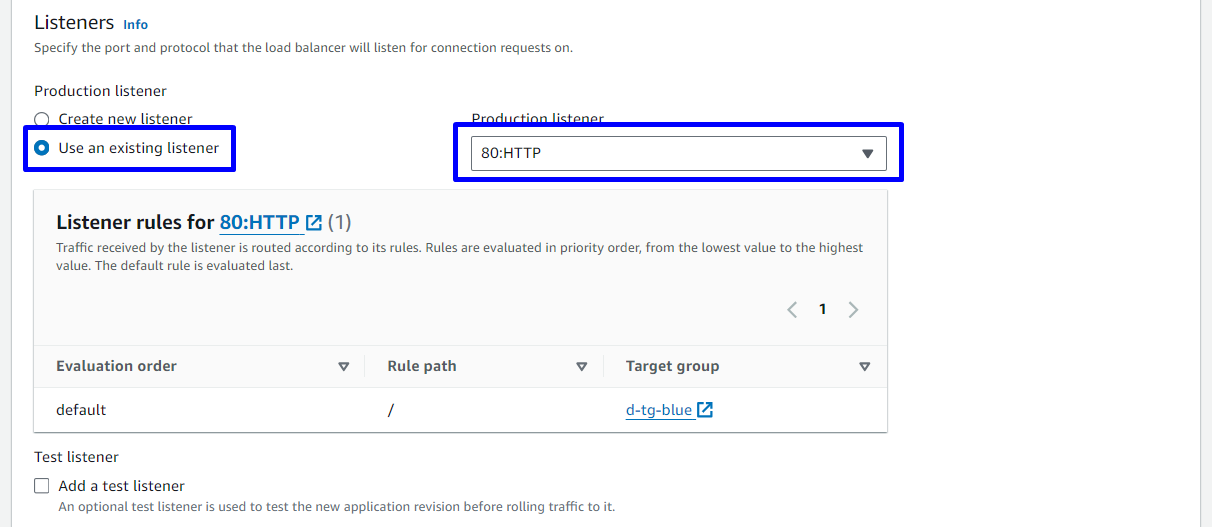
d-blue-green-alb - Listener:
Use an existing listener- Production listener:
80:HTTP
- Production listener:
- Target groups:
- Target group 1:
Use an existing target group- Target group name:
d-tg-blue
- Target group name:
- Target group 2:
Use an existing target group- Target group name:
d-tg-green
- Target group name:
- Target group 1:
- Load balancer type:
- Các setting khác để default

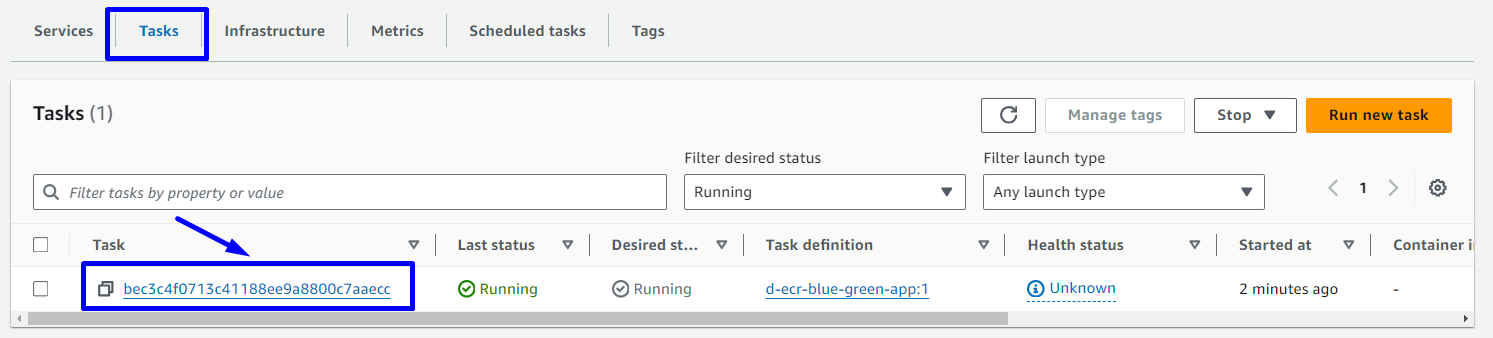
d-ecs-service-blue-green-app Service đã được tạo thành công

task cũng đã được tạo thành công
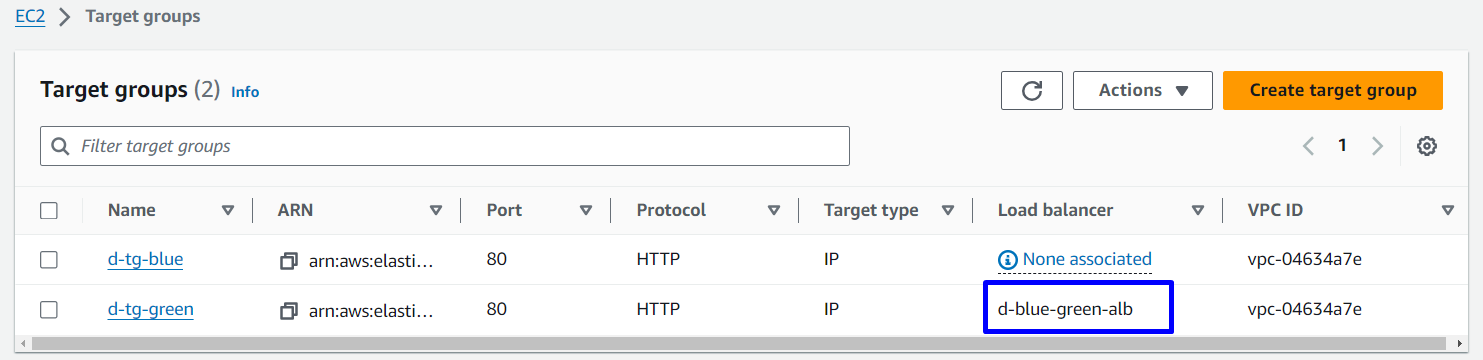
ALB hiện tại vẫn đang trỏ đến Target group d-tg-blue
Truy cập vào DNS của ALB kiểm tra
4. ECS Fargate Blue-Green Deployment with CodeDeploy
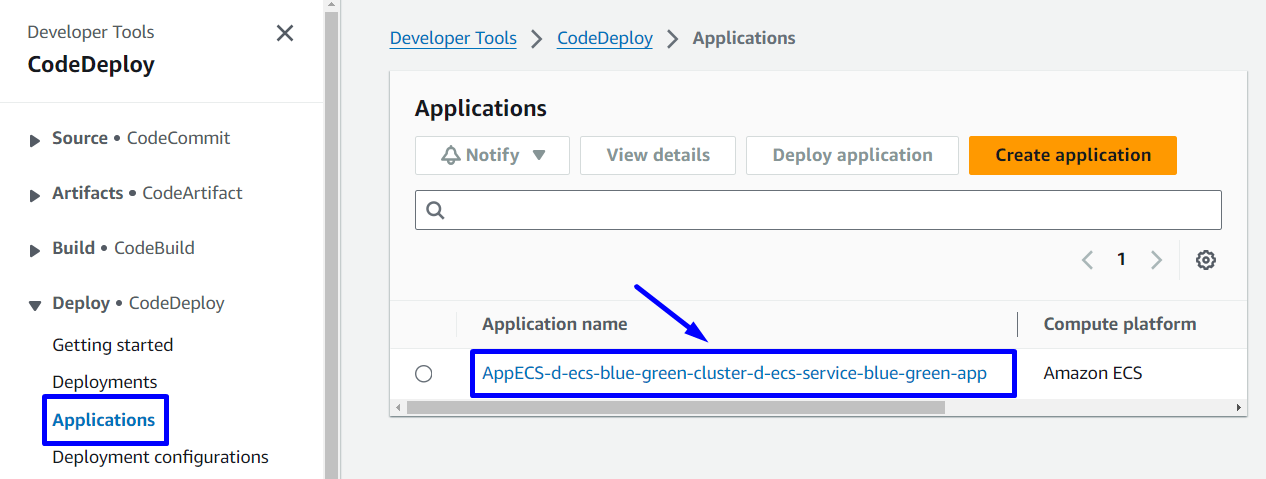
Ở bước tạo ECS-FARGATE mình chọn Deployment type: Blue/green deployment (powered by AWS CodeDeploy)nên CodeDeploy đã auto tạo Application cho mình
Tại CodeDeploy Console -> Applications -> Chọn AppECS-d-ecs-blue-green-cluster-d-ecs-service-blue-green-app
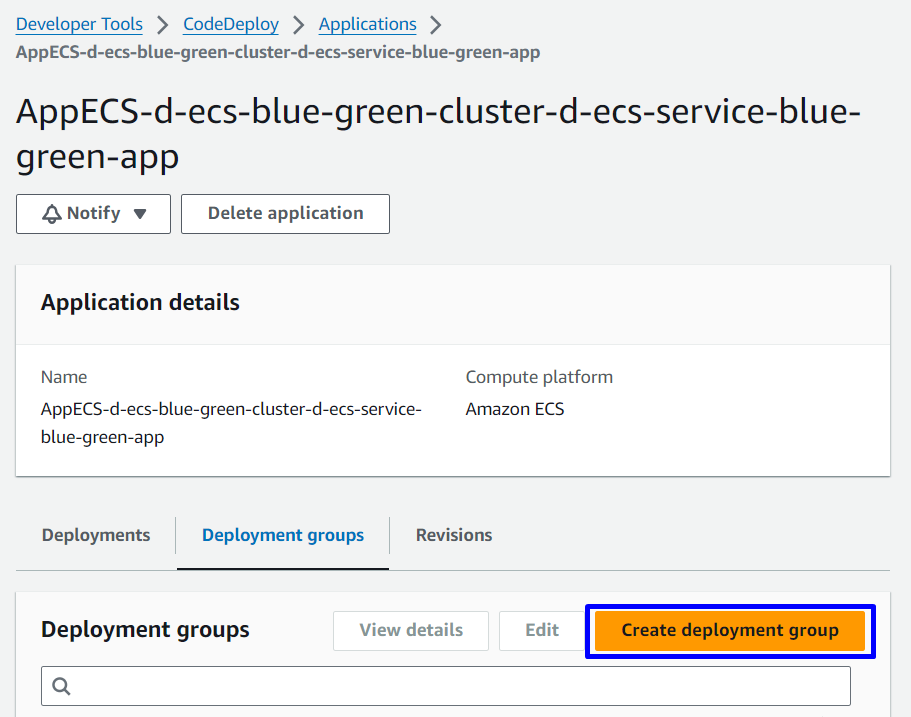
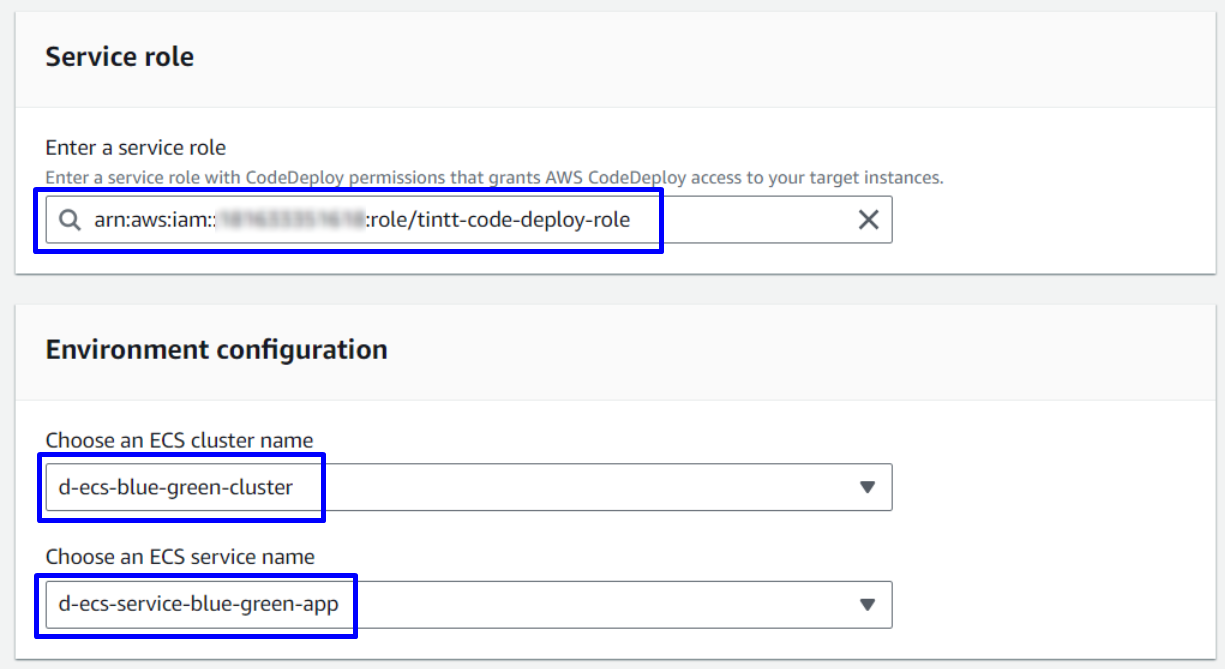
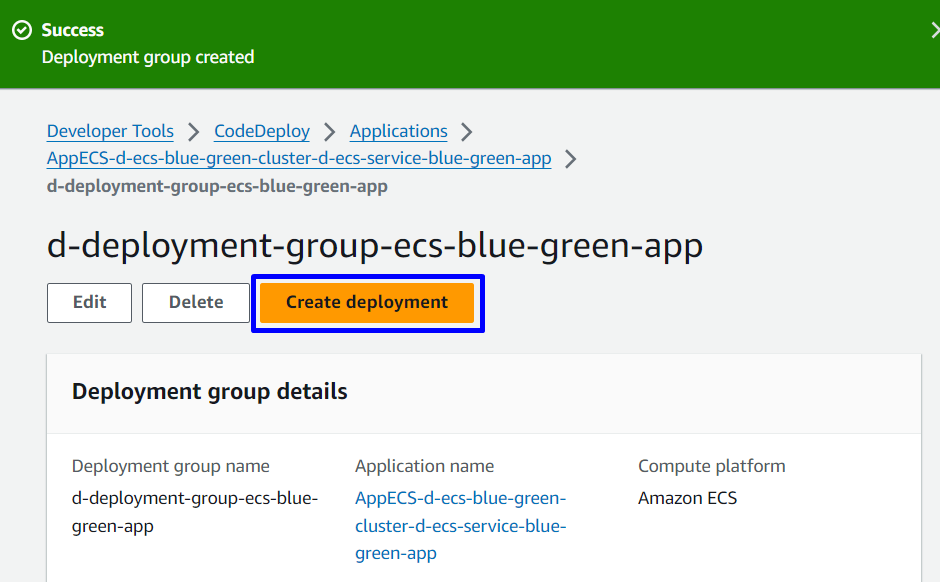
4.1. Create deployment group
Chọn Create deployment group
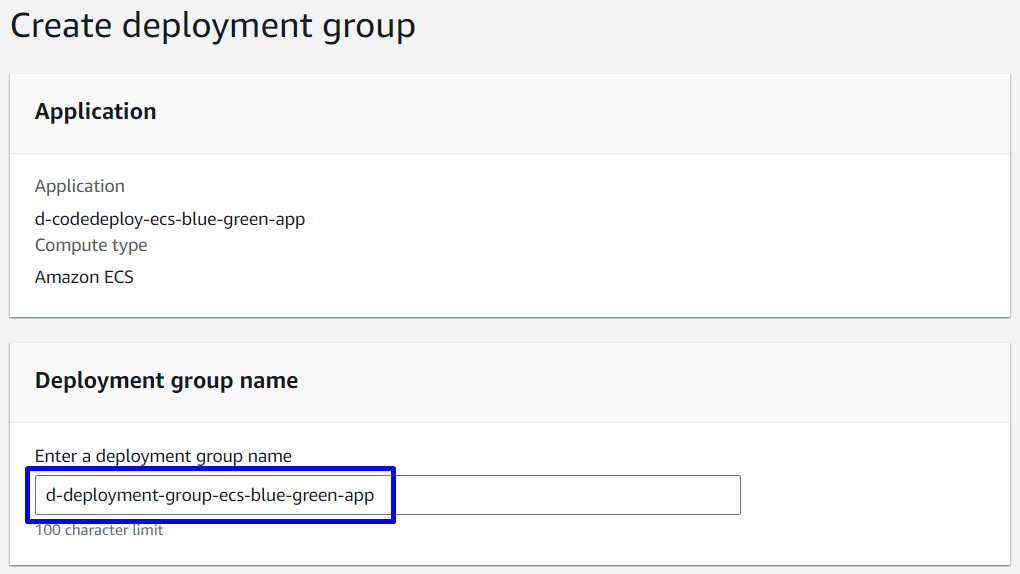
- Deployment group name:
d-deployment-group-ecs-blue-green-app - Service role:
ecsCodeDeployRole
Environment configuration
- Choose an ECS cluster name:
d-ecs-blue-green-cluster - Choose an ECS service name:
d-ecs-service-blue-green-app
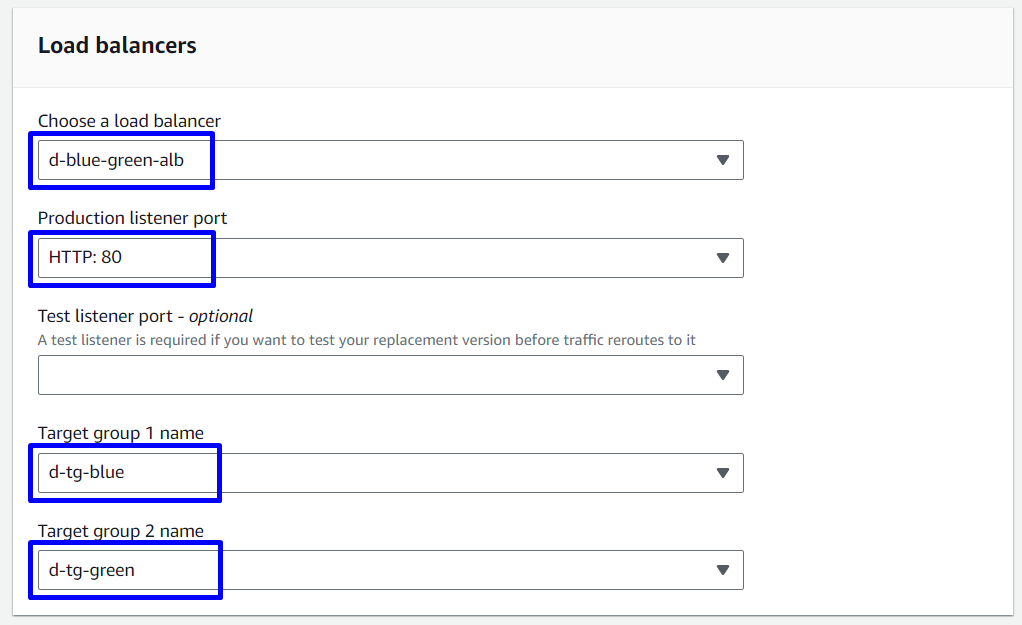
Load balancers
- Choose a load balancer:
d-blue-green-alb - Production listener port:
HTTP: 80 - Target group 1 name:
d-tg-blue - Target group 2 name:
d-tg-green
Deployment settings
- Traffic rerouting:
Reroute traffic immediately - Deployment configuration:
CodeDeployDefault.ECSAllAtOnce - Original revision termination :
5 Minutes
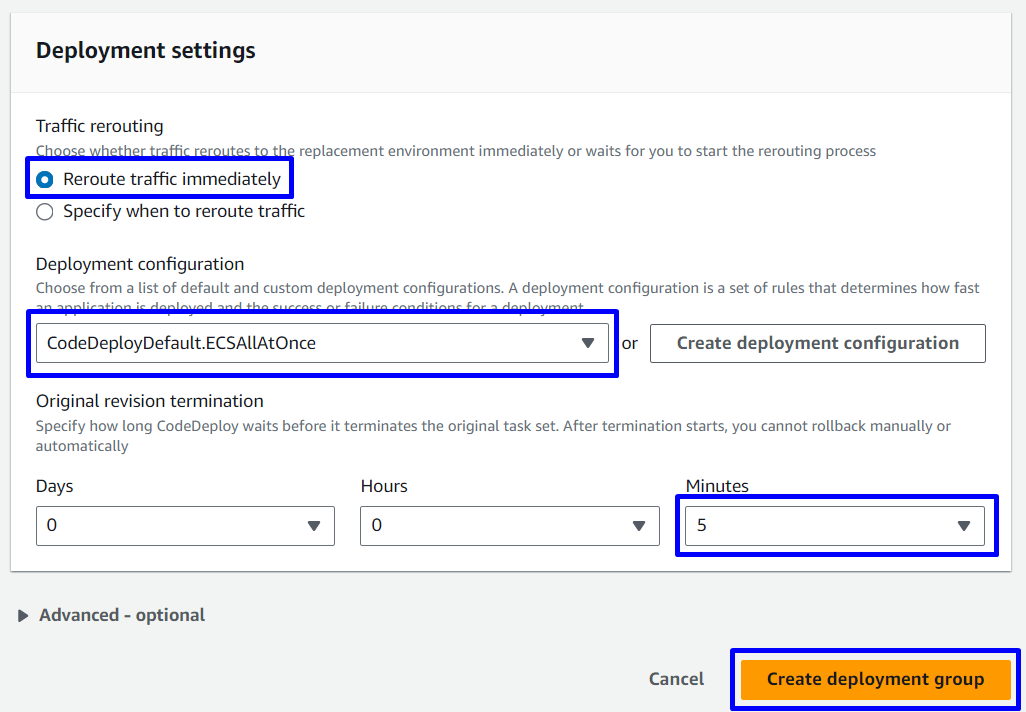
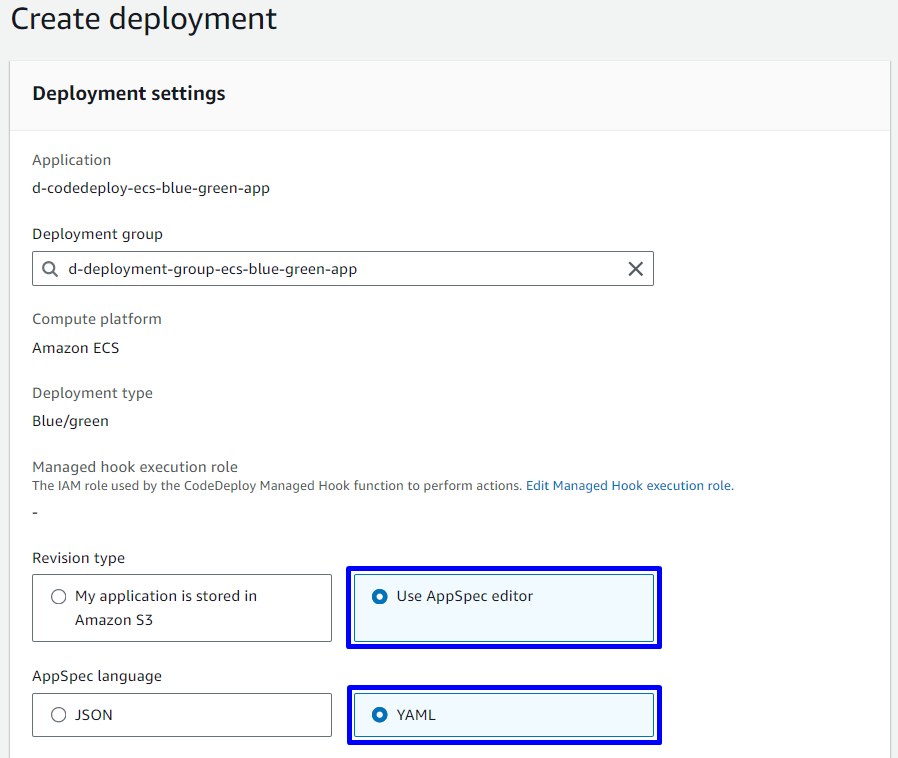
4.2. Create deployment
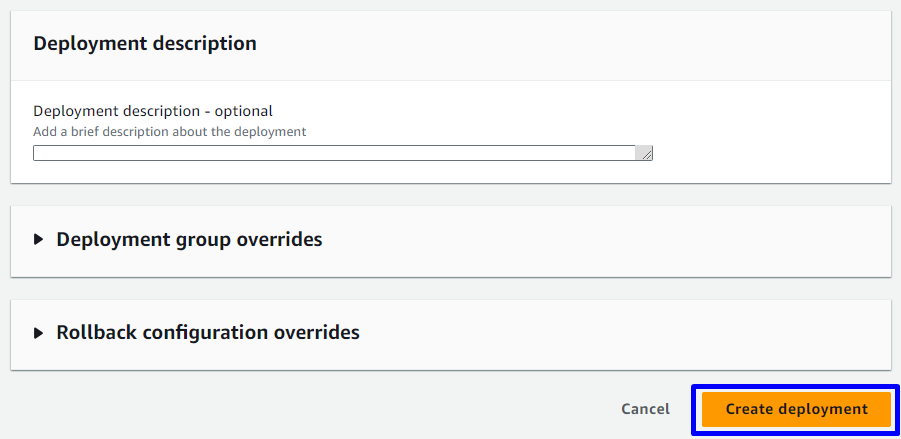
Chọn Create deployment
Deployment settings
- Revision type:
Use AppSpec editor - AppSpec language:
YAML
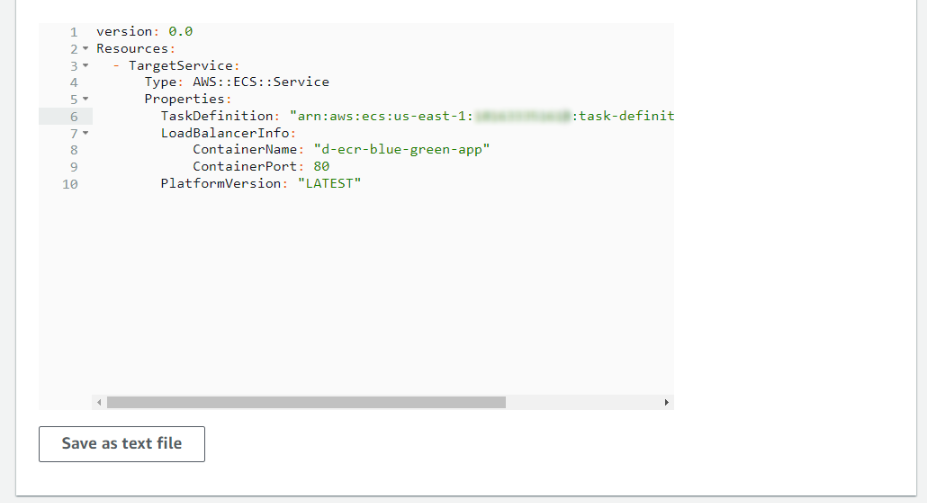
appspec.yml
version: 0.0
Resources:
  - TargetService:
      Type: AWS::ECS::Service
      Properties:
        TaskDefinition: "arn:aws:ecs:us-east-1:ACCOUNT-NUMBER:task-definition/d-ecr-blue-green-app:1"
        LoadBalancerInfo:
            ContainerName: "d-ecr-blue-green-app"
            ContainerPort: 80
        PlatformVersion: "LATEST"
Chú ý: confirm URI của TaskDefinition trong appspec.yml
CodeDeploy đang bắt đầu thực hiện quá trình Deploy
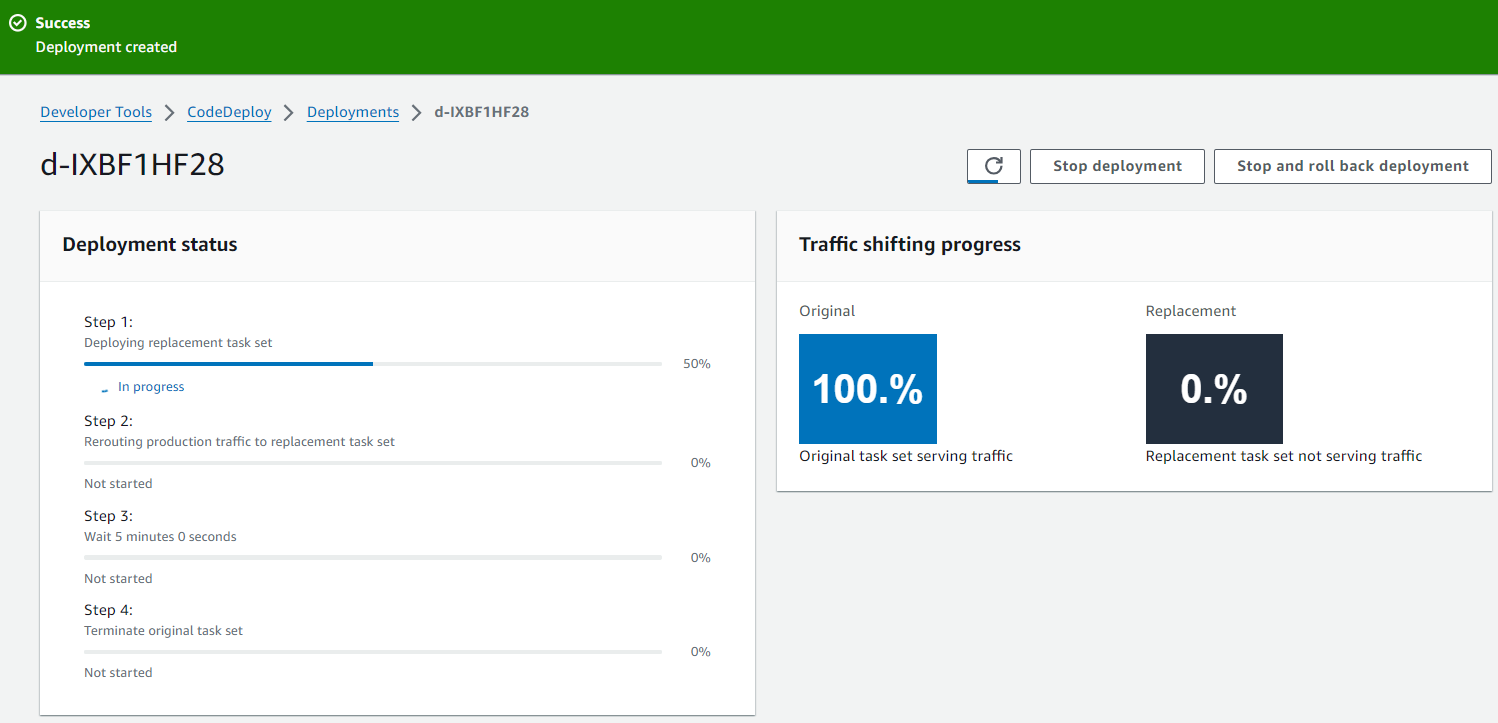
Đợi tầm 10mins thì sẽ deploy xong, Traffic shifting progress đã hoàn thành 100%
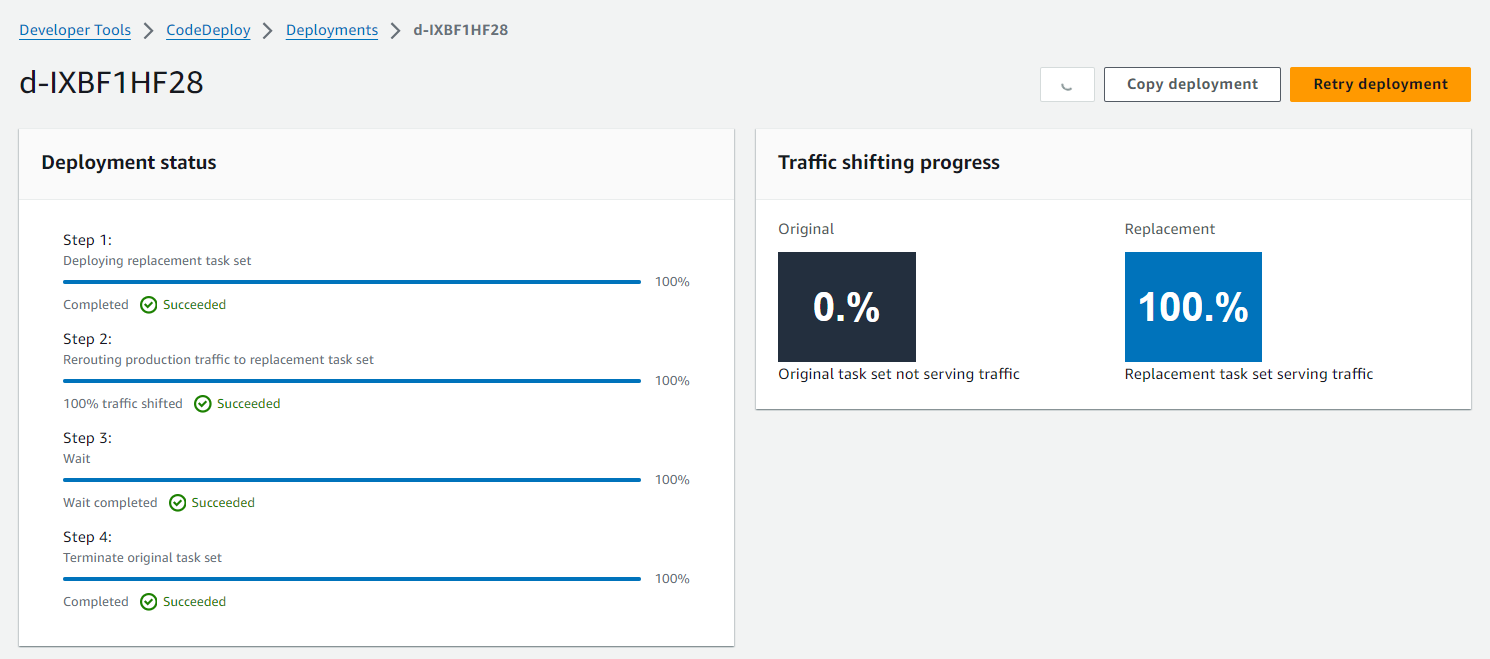
ALB đã trỏ sang Target Group t-tg-green
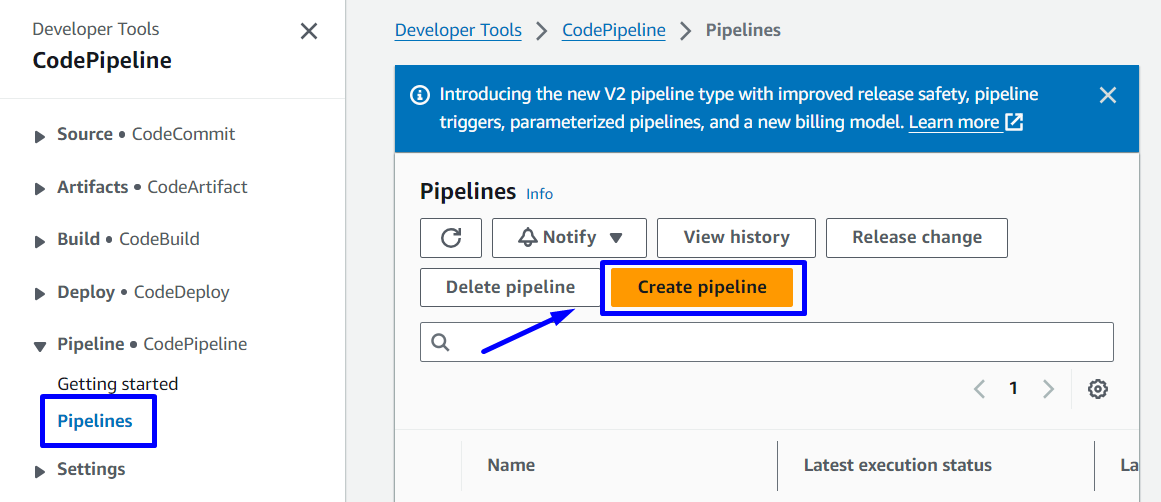
5. Building a CI/CD pipeline with CodePipeline
Tại Console CodePipeline -> Pipelines -> Create pipeline
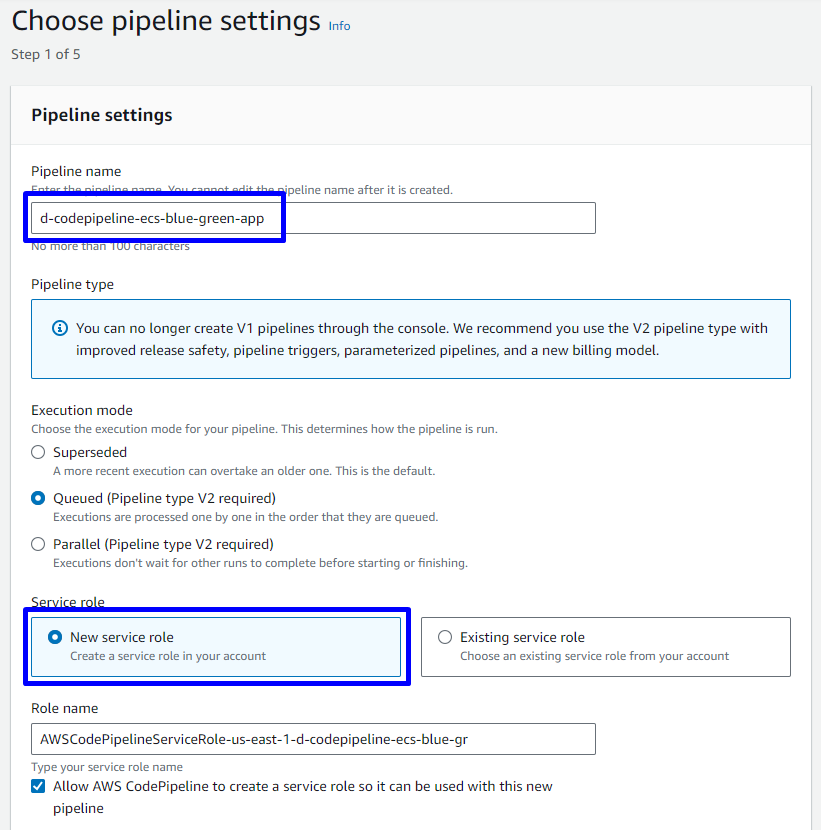
Step 1: Choose pipeline settings
- Pipeline name:
d-codepipeline-ecs-blue-green-app - Service role:
New service role
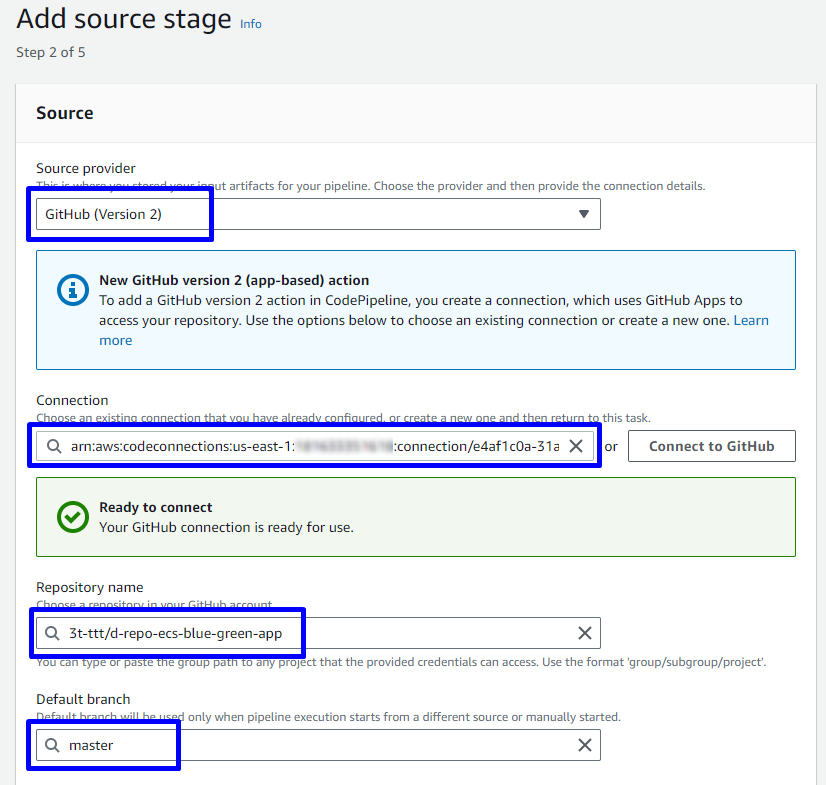
Step 2: Add source stage
Source
- Action provider:
GitHub (Version 2) - Repository name: Chọn Repository name ( demo này là
d-repo-ecs-blue-green-app) - Branch name: Chọn branch name ( demo này là
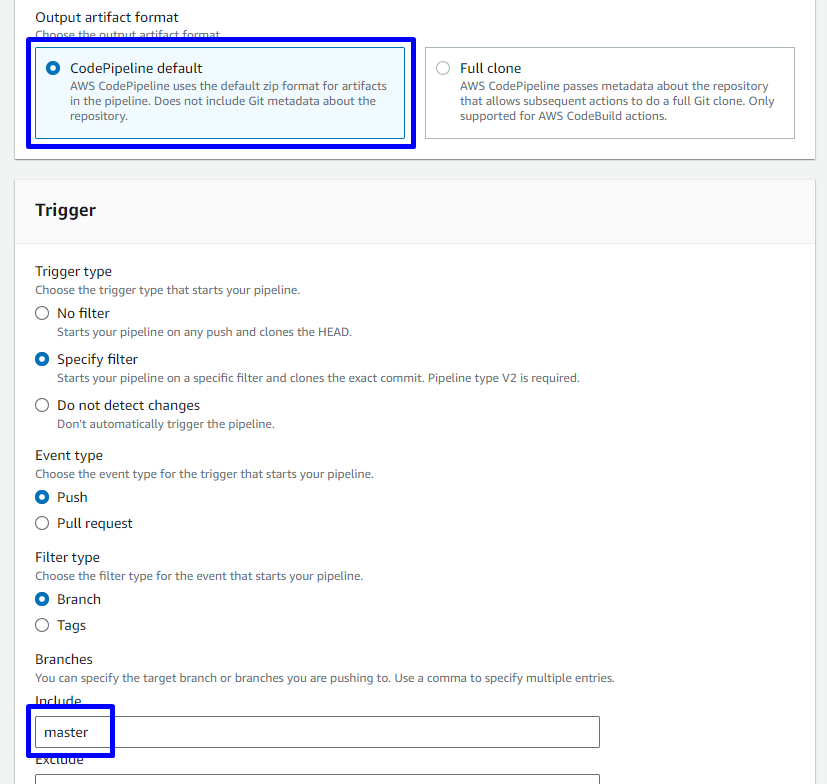
master) - Output artifact format:
CodePipeline default
Trigger
- Branches
- Include: Chọn branch name ( demo này là
master)
- Include: Chọn branch name ( demo này là
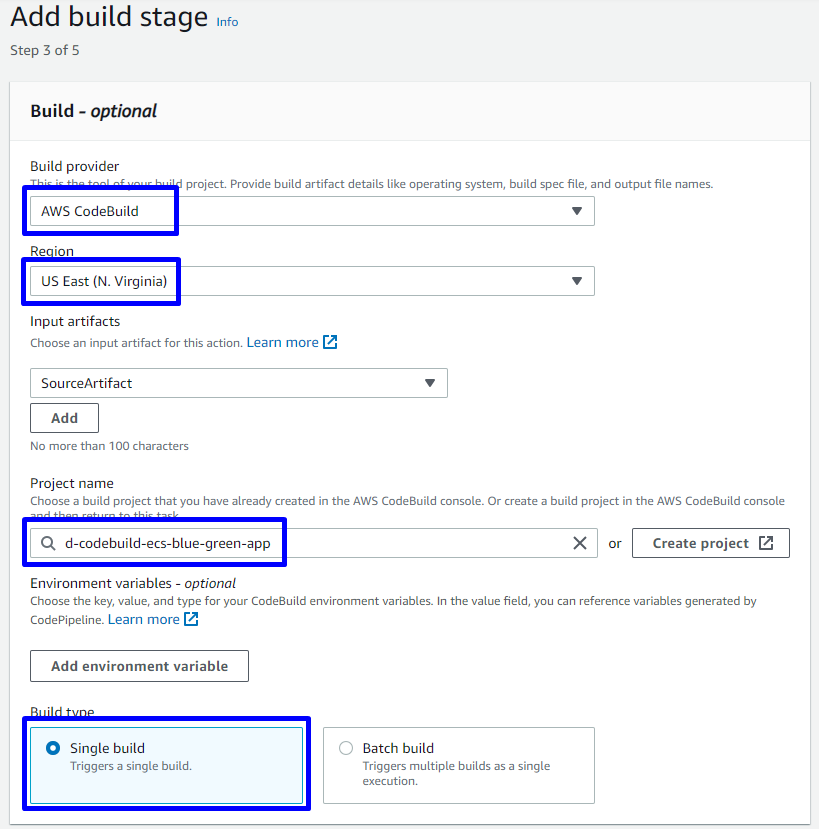
Step 3: Add build stage
- Build provider:
AWS CodeBuild - Region:
US East (N. Virginia) - Project name: Chọn Project name ( demo này là
d-codebuild-ecs-blue-green-app) - Build type:
Single build
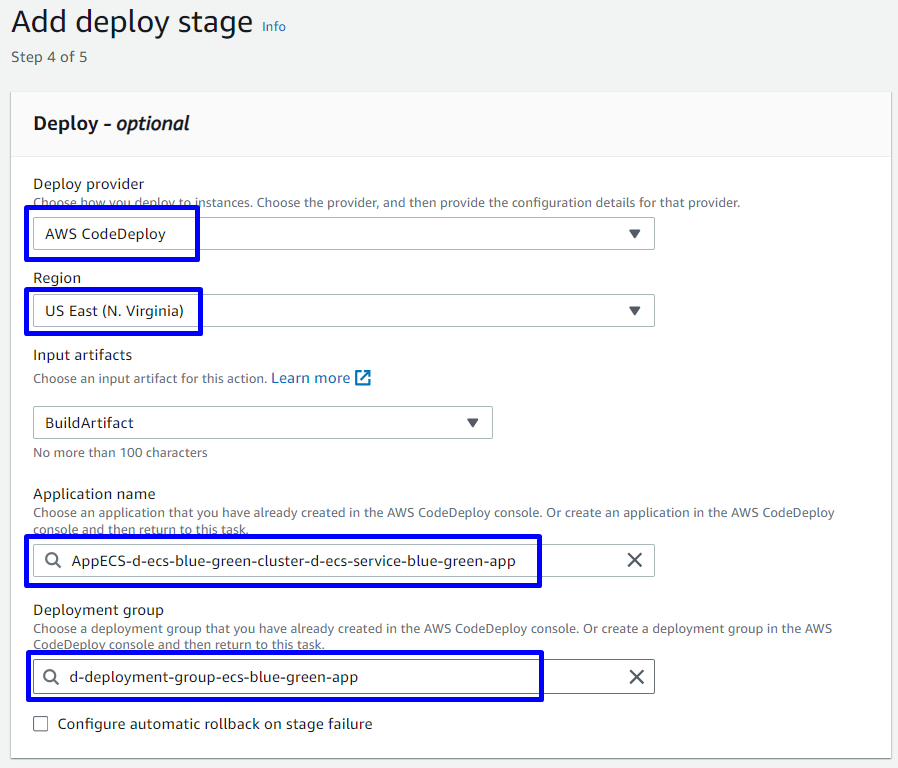
Step 4: Add deploy stage
- Deploy provider:
AWS CodeDeploy - Region:
US East (N. Virginia) - Application name: Chọn Application name ( demo này là
AppECS-d-ecs-blue-green-cluster-d-ecs-service-blue-green-app) - Deployment group: Chọn Deployment group ( demo này là
d-deployment-group-ecs-blue-green-app)
Step 5: Review
- Create pipeline
Test pipeline execution
Sau khi create pipeline thì quá trình Build và Deploy bắt đầu chạy trong pipeline
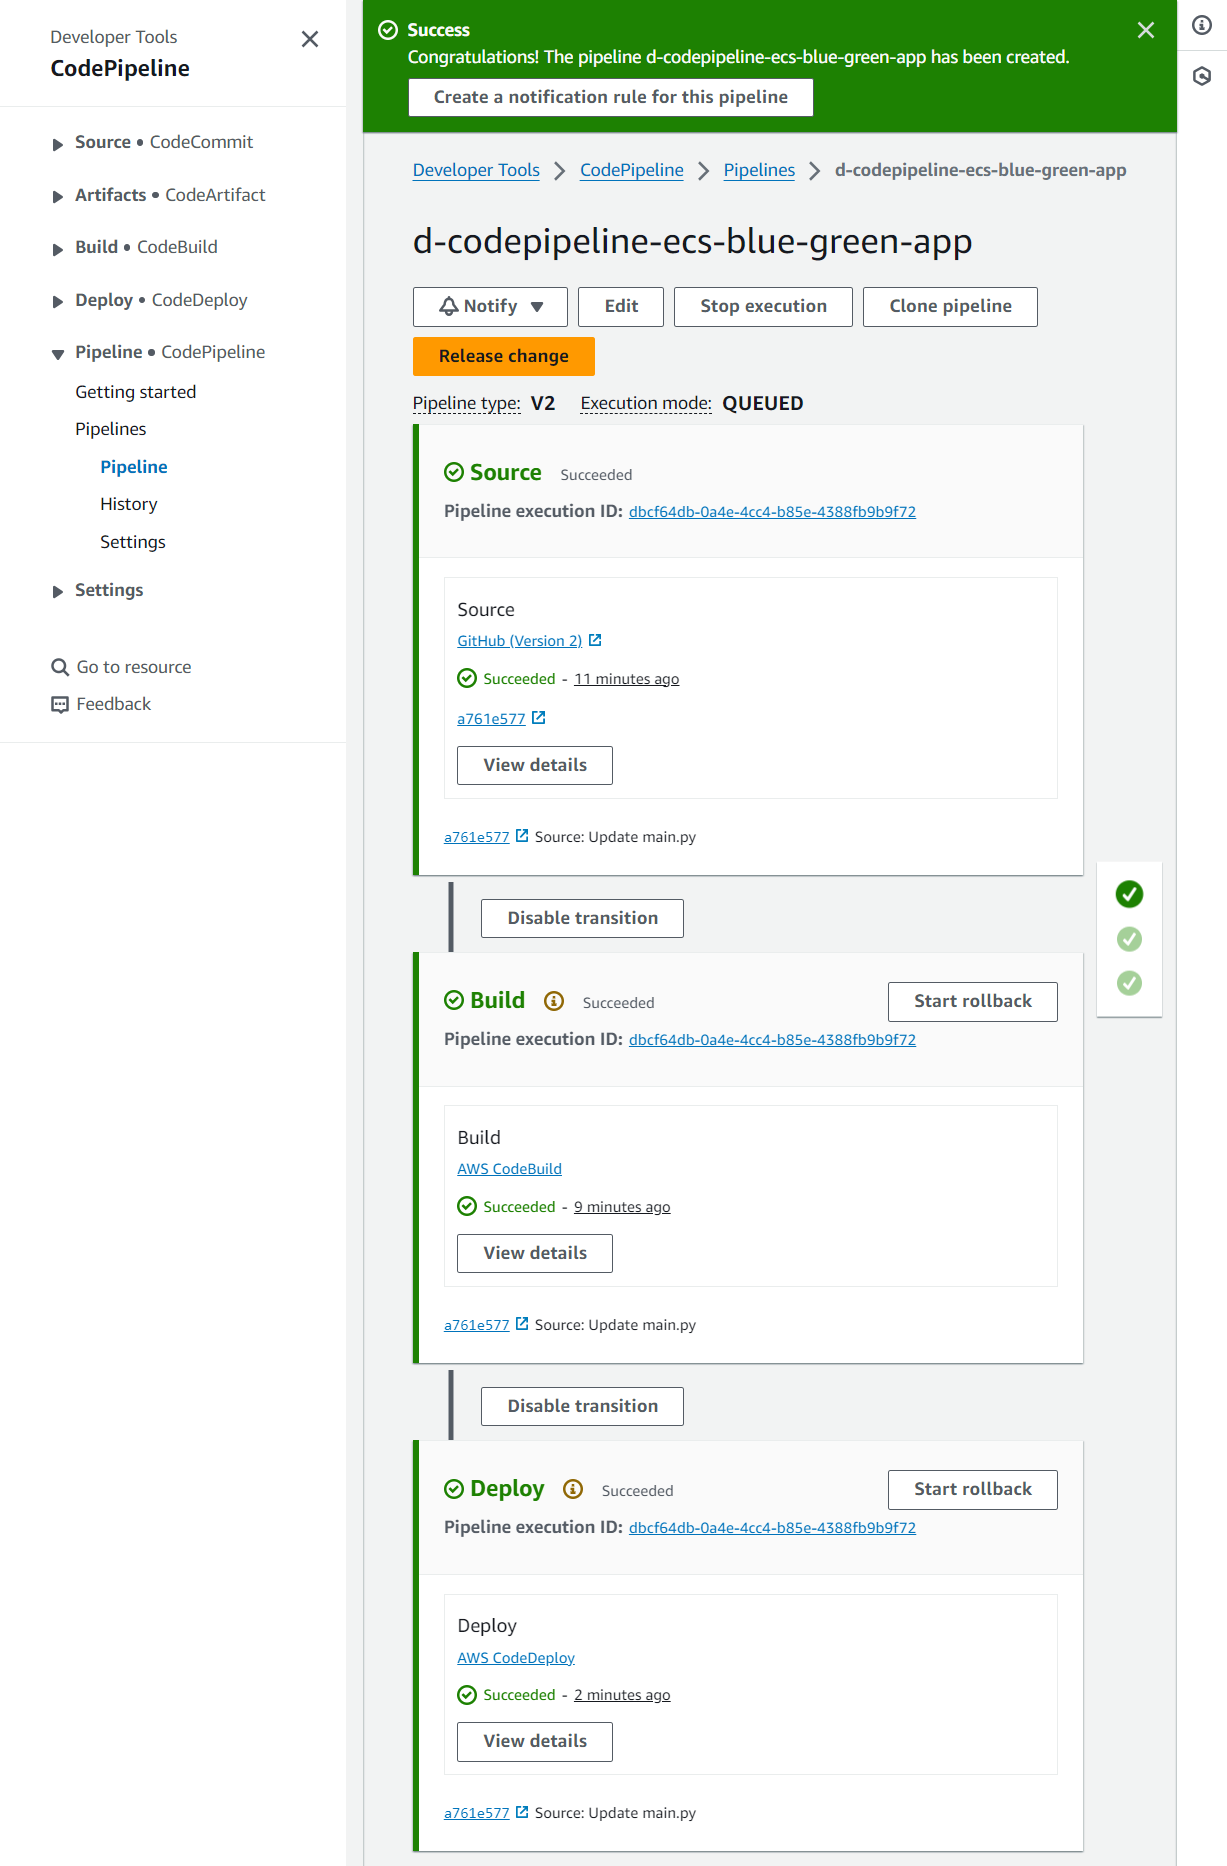
ALB đã chuyển sang trỏ đến Target Group d-tg-blue
6. Verify kết quả
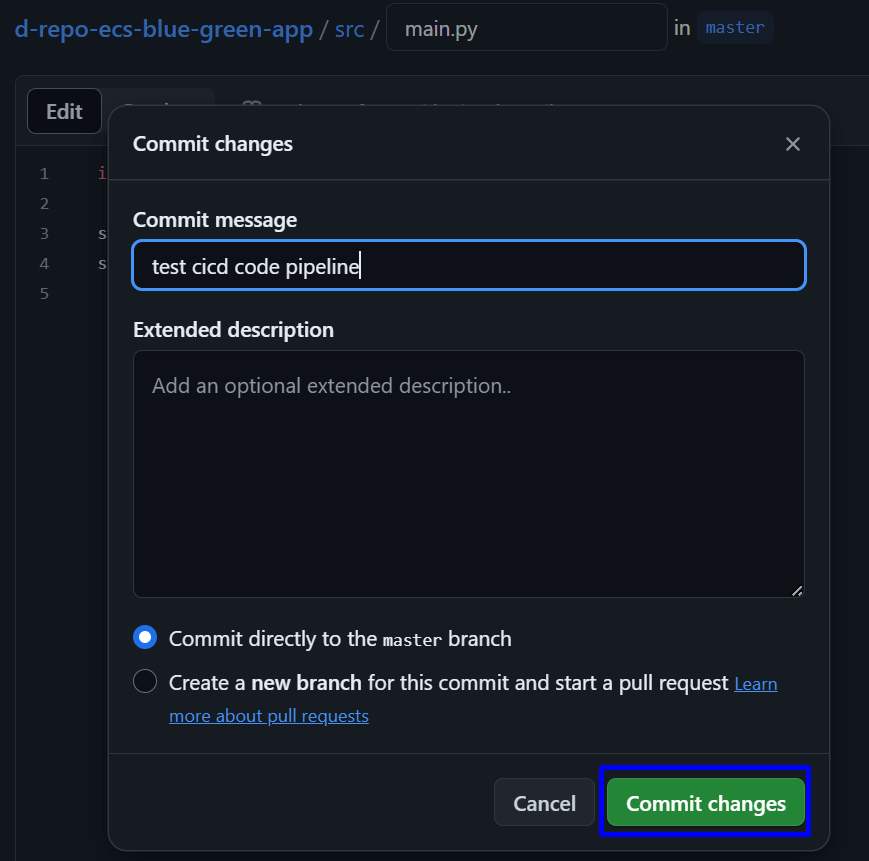
Thay đổi nội dung source code và push code để verify hoạt động của CICD pipeline
main.py
import streamlit as st

st.title("Hello World from CloudMentorPro")
st.title(" test cicd code pipeline ")
Đợi tầm 10mins, Pipeline đã Build Docker Image mới và Deploy thành công
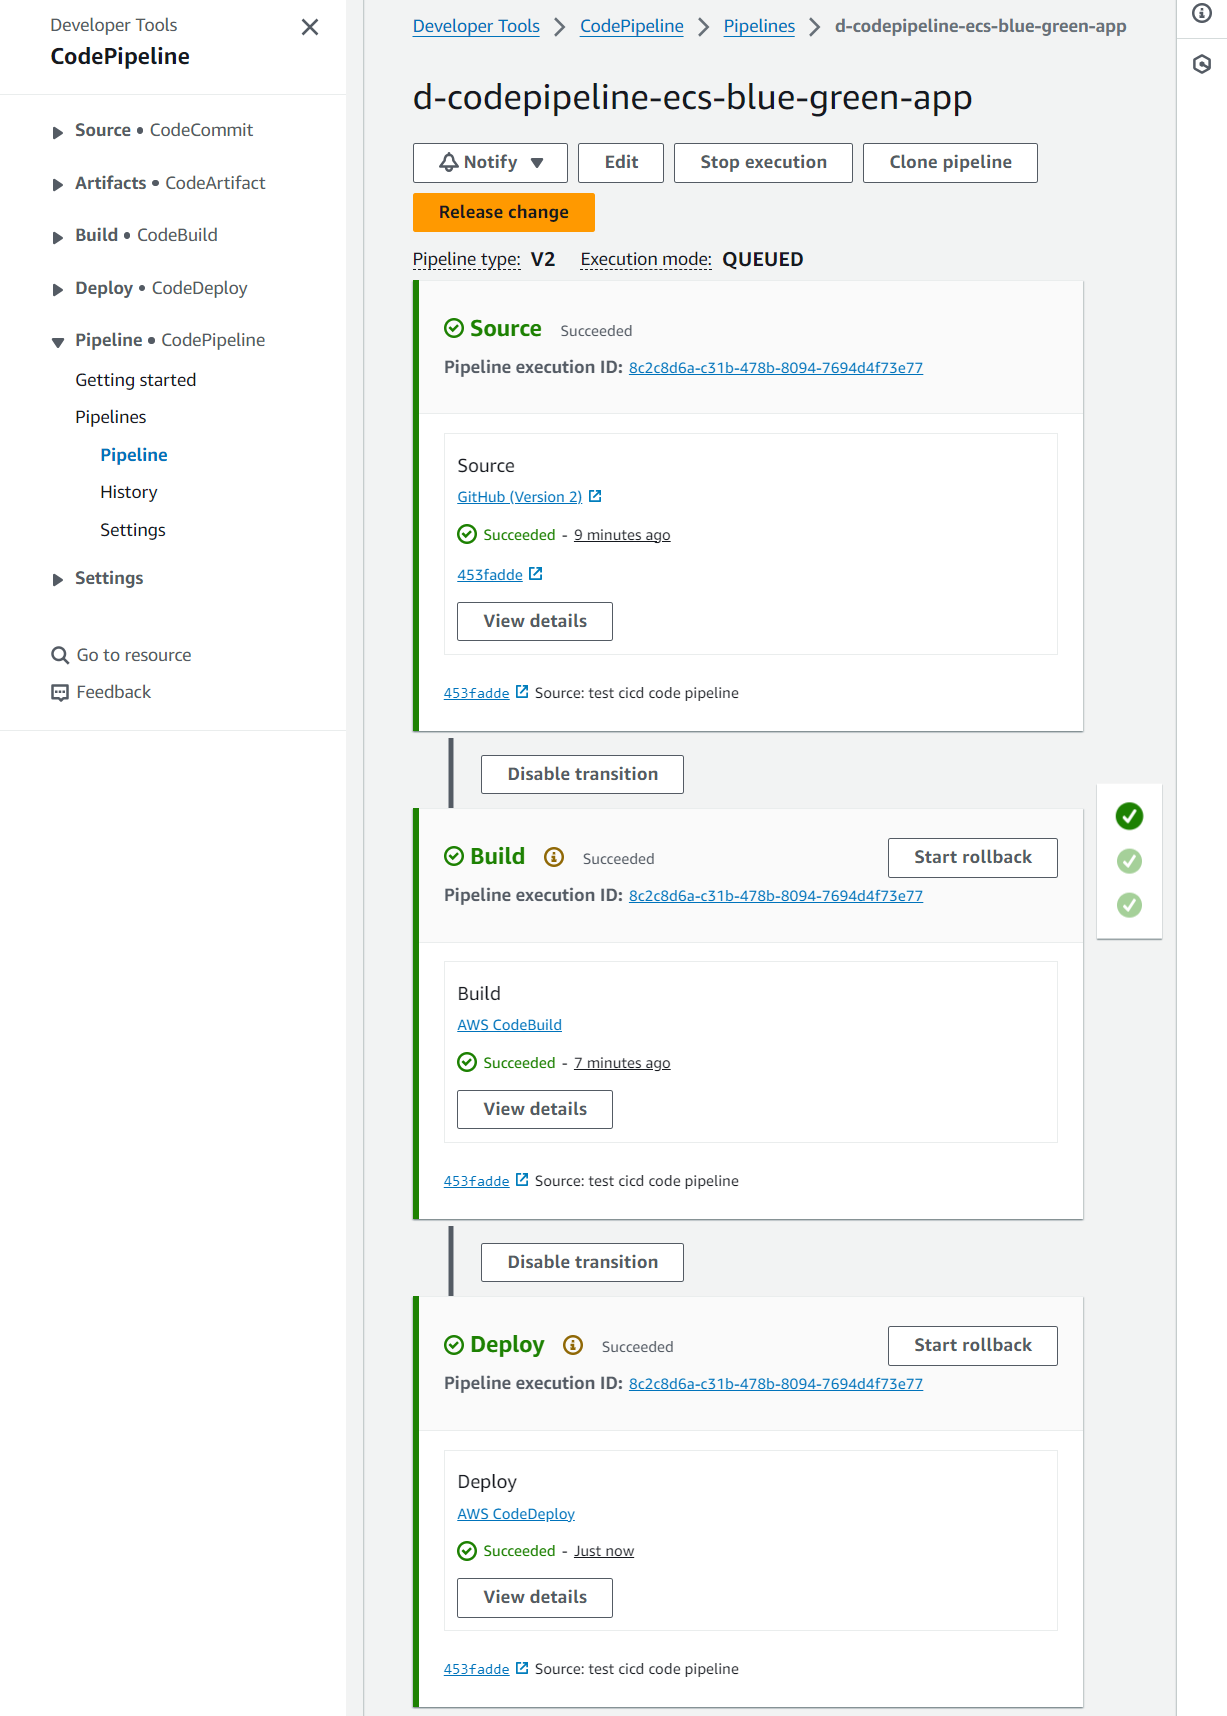
Truy cập vào DNS của ALB kiểm tra, test cicd code pipelineđã được update thành công!!

ALB đã chuyển sang trỏ đến Target Group d-tg-green
7. Clean up
- Delete ECS service
- Delete ECS Cluster
- Delete Load balancers
- Delete Target groups
- Delete ECR repo: Trước tiên cần delete tất cả các images
- Delete IAM Role:
ecsCodeDeployRoled-codebuild-ecs-blue-green-app-RoleAWSCodePipelineServiceRole-us-east-1-d-codepipeline-ecs-blue-gr
- Delete Secutiry group:
d-sg-alb - Delete Task definition: Trước tiên cần Deregister tất cả các revision
- Delete pipeline from CodePipeline:
d-codepipeline-ecs-blue-green-app - Delete Application in CodeDeploy:
AppECS-d-ecs-blue-green-cluster-d-ecs-service-blue-green-app - Delete build project in CodeBuild:
d-codebuild-ecs-blue-green-app - Delete pipeline resource from S3 Bucket:
codepipeline-us-east-1***- Empty bucket
- Delete bucket
Challenge
- Triển khai ECS trong Private Subnet: Để tăng cường bảo mật, triển khai ECS trong Private Subnet giúp đảm bảo các task chỉ có thể giao tiếp với Internet qua NAT Gateway hoặc VPC Endpoints, giúp giảm thiểu rủi ro bảo mật và cải thiện hiệu suất Networking.
- Custom Shifting Traffic: Thay vì sử dụng các deployment configurations default, bạn có thể tùy chỉnh hoàn toàn cách chuyển đổi traffic để phù hợp với nhu cầu cụ thể của hệ thống:
- Tùy chỉnh thời gian chuyển đổi và tỷ lệ traffic: bạn có thể thiết lập các quy tắc Shifting Traffic riêng, như chuyển 20% lưu lượng mỗi 2 phút hoặc 30% trong giai đoạn đầu và phần còn lại sau 10 phút. Điều này mang lại khả năng kiểm soát linh hoạt hơn và giúp tối ưu hóa hiệu suất triển khai.
- Kết hợp nhiều chiến lược: Ví dụ, bắt đầu với một lượng nhỏ Canary để kiểm tra tính ổn định, sau đó chuyển sang Linear để tăng tốc quá trình nếu môi trường Green hoạt động ổn định.
- Blue/Green Deployment ở level Cluster: Bài blog này viết về Blue/Green Deployment ở level Service, bạn có thể mở rộng chiến lược Blue/Green sang toàn bộ Cluster. Điều này bao gồm việc tạo ra một Cluster Blue và một Cluster Green hoàn toàn riêng biệt, sau đó chuyển đổi lưu lượng truy cập giữa chúng.
Tổng kết
Như vậy vừa rồi mọi người đã cùng CloudMentorPro đi từng bước từ việc tạo Application Load Balancer, build và push Docker image lên ECR bằng CodeBuild, đến việc deploy Blue/Green ứng dụng với ECS-Fargate sử dụng CodeDeploy. Bạn đã biết cách tạo ra một pipeline CI/CD hoàn chỉnh với CodePipeline, tự động hóa quá trình deploy và kiểm tra kết quả để đảm bảo rằng quá trình cập nhật ứng dụng diễn ra một cách an toàn và hiệu quả.
Hy vọng qua bài viết này, bạn đã có thêm kiến thức và công cụ để triển khai ứng dụng một cách an toàn, hiệu quả và tự tin hơn. Hãy thử thách bản thân với các cấu hình nâng cao và khám phá thêm nhiều chiến lược triển khai khác để tối ưu hóa quy trình CI/CD cho hệ thống của bạn!
Lời cuối cùng CloudMentorPro cám ơn mọi người đã theo dõi bài blog này. Nếu có chỗ nào chưa rõ cần trao đổi thêm hoặc các bạn muốn tụi mình viết thêm blog về chủ đề nào đó thì đừng ngần ngại hãy comment cho chúng mình biết nhé!
Hẹn gặp lại mọi người ở các bài blog tiếp theo nha !
Tài liệu Tham khảo
- AWSコンテナ設計・構築[本格]入門
- https://docs.aws.amazon.com/AmazonECS/latest/developerguide/create-blue-green.html
- https://docs.aws.amazon.com/AmazonECS/latest/developerguide/deployment-type-bluegreen.html
- https://blog.serverworks.co.jp/cicd-ecs-blue-green-deploy-detail
- https://dev.classmethod.jp/articles/blue-green-deployment-for-ecs-fargate-using-codedeploy/